TAISEI KOGYO ATL-A Series User manual

ATL‐ASERIESOILCOOLER
AIR‐COOLEDTYPE
INSTRUCTIONMANUAL
TAISEIKOGYOCO.,LTD.
No. B11001562
Issued Nov.25.2019
Pleasemakesuretoreadthismanual
completelybeforeusingthisproduct.

Thankyouforpurchasingourproduct.
Thismanualcontainsnecessaryinstructionstoensurethecorrectuseoftheproduct.
Beforeusingtheproduct,pleasereadingandunderstandthismanualthoroughly.
Afterreading,besuretokeepthismanualwhereitisaccessiblewhenneeded.
Safetyprecautionsaregivenintheboxesmarked[⚠Caution]inthismanual.
⚠Caution
Ignoringthisindicationmaycausemediumorminorinjurytotheuser,damagetotheequipment,
orevenmoreseriousaccident.Pleasemakesuretofollowallgiveninstructionstopreventany
injuryordamage.
Thegraphicsymbolsshowninthe⚠Cautionrepresentasfollows:
Prohibited Unplugpowercord Doasinstructed
withoutfail
Donottouch Connectprotective
groundingwire
Donot
disassemble
Donotuseinwet
place
Disclaimer
WeareNOTresponsibleforanyofthefollowingitems.
1.Anydamagebyignoring⚠Cautionindicationintheinstructionmanuals.(Productdamage,
Peripheralequipmentdamage,Injuryaccident,etc.)
2.Anydamagebynaturaldisasterssuchasearthquakes,lightning,andfire,ormistaken
bycustomersorthirdparties.
3.Anydamagebyimproperusewithunexpectedfluid,workingpressure,workingtemperature,
orflowrateetc.
4.Thedamagebyremodelingorrepairbycustomersorthirdparties.
For Safety Use

1.ProductName…………………………………….1
2.ModelIdentification……………………………1
3.Specifications……………………………………..1
4.ProductDescription…………….……………….2
5.Transportation…………………………………….2
6.MotorWiring……………………………………….3
7.Installation…………………………………………..8
8.Piping…………………………………………………..8
9.Operation…………………………………………….9
10.Maintenance……………………………………10
11.Storage…………………………………………….11
Contents

Radiatorsize MotorWiring Protectionlevel Voltage
1.ProductName Air‐CooledTypeOilCooler
2.ModelIdentification
ATL-**A-03-***
3.Specifications
⚠Caution
*Donotusenon‐specifiedfluids.(Itmaycauseabreakdown.)
*Donotuseatoverthemaximumworkingpressureandtemperature.
(Itmaycauseabreakdown.)
*Donotuseforotherpurposes,exceptforoilcooling.
*Donotusethefanmotorpartially.Itisbuilt‐intotheoilcooleranditcannot
beusedpartially.(Itmaycauseaninjuryifitisremovedandused.)
*Donotusethefanmotorintheothervoltageandfrequency,exceptforrated
valueinthespecifications.(Itmaycauseanelectricshockorafire.)
Specification
Maximumworkingpressure 1.0MPa
Maximumworkingtemperature
Oilside:100°C
Airside:70°C(Noprotection)
60°C(D
ustproofandwaterproof)
Applicablefluids ・Mineraloil
・Water‐glycolfluid
Note: The fluids that do not corrode
Cord
13A
14A
16A
Cord Detail
A DINconnector
B Leadwire
Cord Detail
M Noprotection
P
Dustproofand
waterproof
(Coil)
Cord Voltage
1
100VAC
15
115VAC
12
120VAC
2
200VAC
22
220VAC
23
230VAC

2
aluminumareapplicable.
Fanmotorspecification
Model Voltage Frequency Input
50Hz/60Hz
Ambientconditions
Temperature HumidityLocation
ATL‐A‐**A‐03‐*M1 100V
50Hz/60Hz 35W/33W ‐10°C~+70°C RH
35~85%
Indoor
ATL‐A‐**A‐03‐*M15 115V
ATL‐A‐**A‐03‐*M12 120V
ATL‐A‐**A‐03‐*M2 200V
ATL‐A‐**A‐03‐*M22 220V
ATL‐A‐**A‐03‐*M23 230V
ATL‐A‐**A‐03‐*P1 100V
50Hz/60Hz 36W/31W ‐40°C~+60°C
RH
Lessthan
95%
ATL‐A‐**A‐03‐*P15 115V
ATL‐A‐**A‐03‐*P12 120V
ATL‐A‐**A‐03‐*P2 200V
ATL‐A‐**A‐03‐*P22 220V
ATL‐A‐**A‐03‐*P23 230V
4.ProductDescription
ThisproductistheAir‐CooledTypeOilCooler.Oilflowinginsidetheradiatoriscooleddownby
blowingairtotheoutsideoftheradiator.
5.Transportation
⚠Caution
*Takeparticularcaretopreventfromfallingoffintransit.
(1) Covertheoilcoolerfullytoprotectfromrainintransit.
(2) Donotmakeastrongshocksuchasfalling.

3
6.MotorWiring
6‐1Wiringforleadwiretypefanmotor
⚠Caution
*Besuretoconnecttheprotectivegroundwiretothefanmotor.
(Itmaycauseabreakdown,anelectricleakage,oranelectricshock.)
*Donotsprinklewaterovertheoilcooler.
(Itmaycauseabreakdown,anelectricleakage,anelectricshock,oranearlyrust
formation.)
*Donottouchwithawethand.
*Beforecleaning,besuretounplugthepowercordorturnoffthecircuitbreaker
onthedistributionpanel. (Itmaycauseanelectricshockoraninjury.)
*Installation,operation,andmaintenancemustbedonebyapropertechnician.
(Itmaycauseanelectricleakageoraninjury.)
*Carryoutwiringworksafelyandsecurelyinaccordancewiththeelectrical
equipmentstandardsandinternalwiringrules.
(Alooseconnectionorawrongconnectionmaycauseanelectricshockorafire.)
Disassembly,wiring,andreassemblyshouldbecarriedoutbythefollowingprocedures.
(Theexplodedviewisshownonpage4)
(1) Disassembly
1) Loosenthescrew①andremovetheradiator②fromthecase③.
2) Loosenthenut④andremovethewasher⑤andthefanguard⑥.
3) Loosenthescrew⑦andremovethefanmotor⑧.
(2) Groundwiring
1) Loosenthescrew⑨atthegroundterminalontheremovedfanmotor⑧.
2) Attachthepreparedgroundwiretothegroundterminalonthefanmotorandretighten
thescrew⑨.
Note:Usearoundpressureterminalforthegroundwire.

4
(3) Reassembly
Thescrewtighteningtorqueforreassemblyshouldbewithintherangeof“3N∙m±10%”.
1) Installthefanmotor⑧intothecase③andghtenthescrew⑦.
Note:Makesurethattheinstalldirectionofthefanmotor⑧(winddirectiontotheradiator)
iscorrectasindicatedbythearrowonthesurface.
Note:Makesuretopulloutthefanmotorleadwireandgroundwirefromthehole⑩onthe
case③.
Note:Makesurethatthefanbladedoesnothitthewiresinsidethecase③.
2) Asshownintheexplodedview,placethefanguard⑥withthescrew⑦andthe
washer⑤inorder,andtightenthemwiththenut④.
3) Installtheradiator②andthecase③andtightenthemwiththescrew①.
(4) Connection
1) Checkthevoltageofthefanmotor⑧beforewiring.
2) Thewiringdiagramisshownonpage5.
ExplodedView
(Thepositionofthegroundterminal⑨ maybedifferentbyeachfanmotor.)

5
Wiringdiagram
6‐2WiringforDINconnectortype
⚠Caution
*Besuretoconnecttheprotectivegroundwiretothefanmotor.
(Itmaycauseabreakdown,anelectricleakage,oranelectricshock.)
*Donotsprinklewaterovertheoilcoolerhousing.
(Itmaycauseabreakdown,anelectricleakage,anelectricshock,oranearlyrust
formation.)
*Donottouchwithawethand.
*Beforecleaning,besuretounplugthepowercordorturnoffthecircuitbreaker
onthedistributionpanel. (Itmaycauseanelectricshockoraninjury.)
*Installation,operation,andmaintenancemustbedonebyapropertechnician.
(Itmaycauseanelectricleakageoraninjury.)
*Carryoutwiringworksafelyandsecurelyinaccordancewiththeelectrical
equipmentstandardsandinternalwiringrules.
(Alooseconnectionorawrongconnectionmaycauseanelectricshockorafire.)
DINconnectorstandards :IEC529(EN60529).
ProtectionGrade :IP65
AterminalblockisinstalledintheDINconnector.
Disassembly,wiring,andreassemblyshouldbecarriedoutbythefollowingprocedures.
(Theexplodedviewandtheconnectiondiagramareshownonpage7)
G
Shaded Pole Coil

6
(1) Disassembly
1) Loosenthescrew① andpulloutthecover④ upwardtoremovetheconnector.
2) Removethescrew① andremovethegasket2afromthecover④.
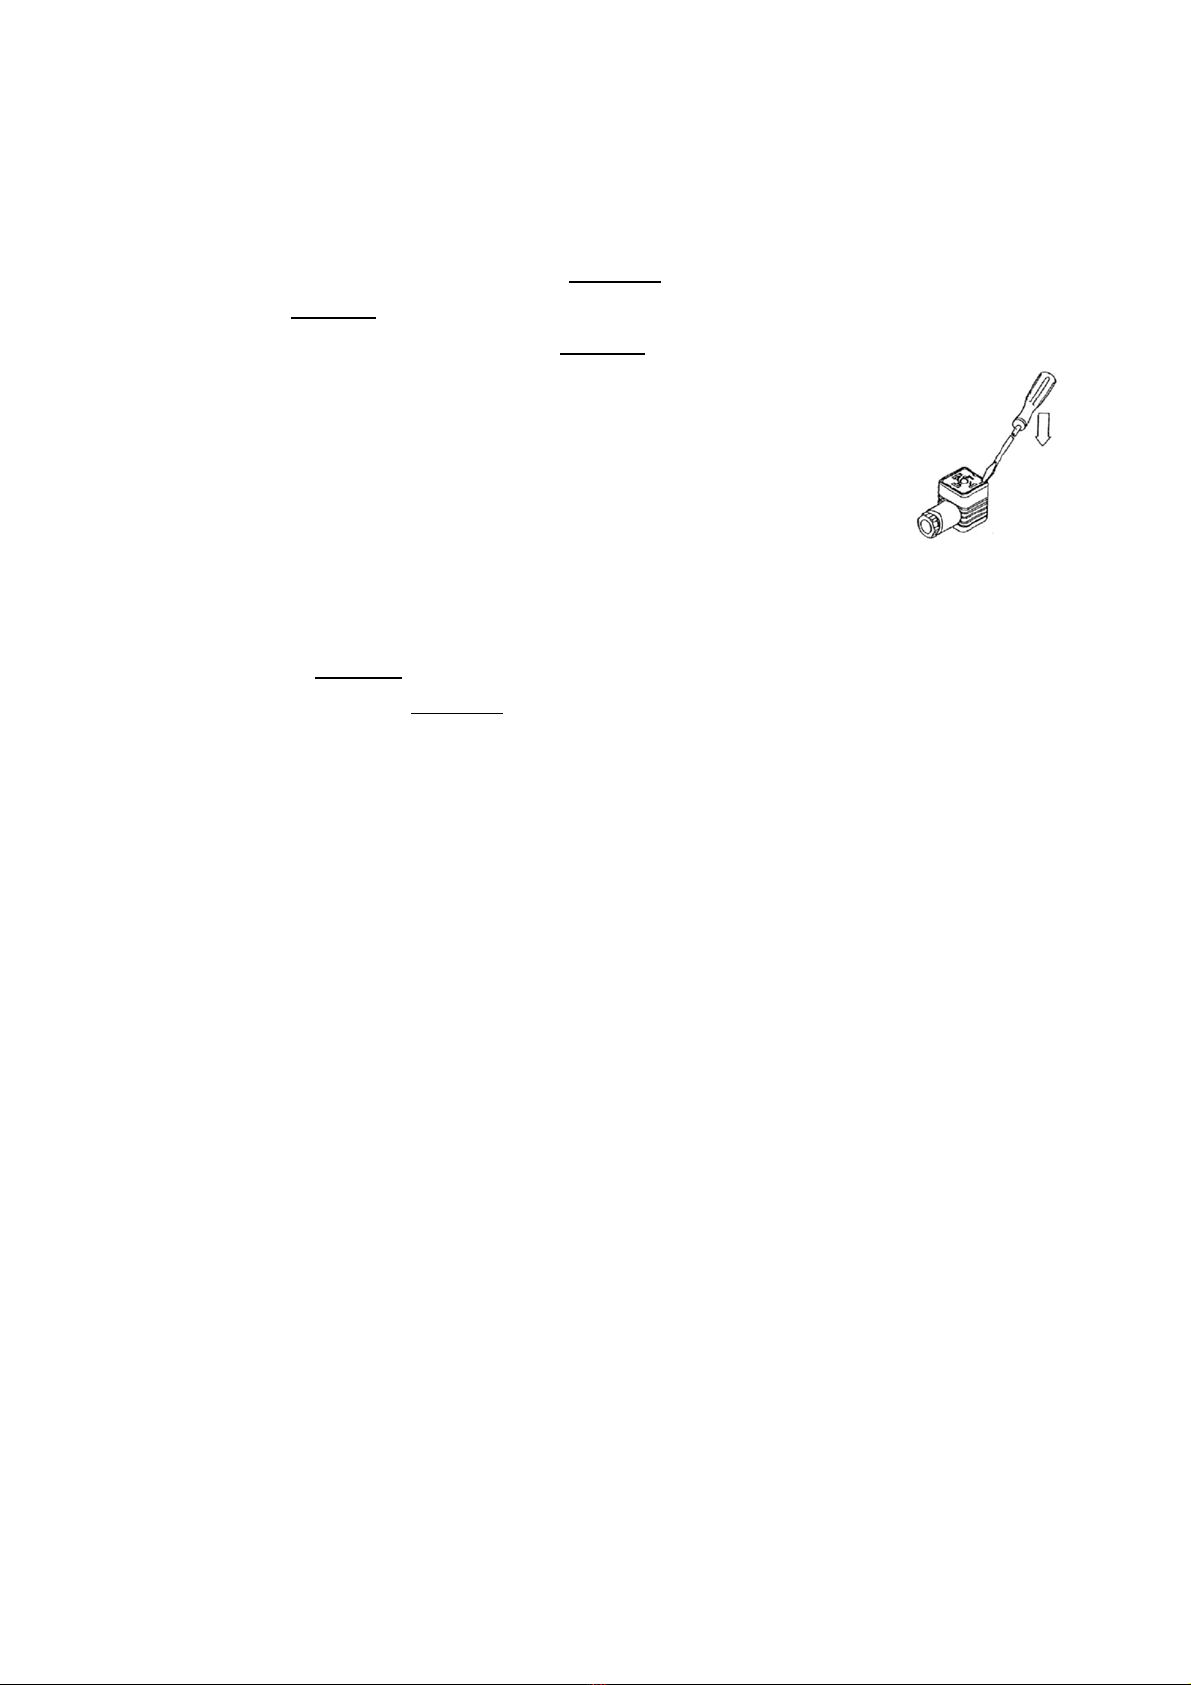
3) Thereisanotch3aatthebottomoftheterminalblock③.
Insertaflatheadscrewdriverintothenotch3aandlifttoremoveterminalblock③ from
thecover④.(Refertothefigureontheright.)
4) Removecablegland⑤ andtakeoutwashers⑥ andpacking ⑦.
(2) Wiring
1) Insertthecable⑧ throughthecablegland⑤,thewasher⑥,andthepacking⑦inthis
order,andinsertitintothecover④.
2) Crimptheroundpressureterminal⑨tothecable⑧.
Removethescrew3ewithawasherandattachwiththeroundpressureterminal⑨,and
tightenthemwiththescrew3easshownintheexplodedviewonpage7.
Note:Thescrewtighteningtorqueshouldbewithintherangeof“0.5N∙m±15%.”
※Remarks
a:Usearoundpressureterminal⑨.
b:Themaximumsizeofaroundpressureterminal⑨ is“1.25‐4M”.
c:Cablewithdiameterbetween"6‐12mmφ"canbeusedasthecable⑧.
(Whenusing"9‐12mmφ"outerdiametercable,removetheinnerpartofpackingbefore.)
(3) Reassemble
1) Installtheterminalblock③tothecover④.(Pressuntilhearingaclick.)
2) Insertthepacking⑦ andthewasher⑥ intothecableinletofthehousing④ inorder,and
tightenthecablegland⑤.
3) Insertthegasket2atothebottomoftheterminalblock③ andconnectittopinsofthe
fanmotor,andinsertthescrew① fromthetopofthecover④ totightenthem.
Note:Thescrewtighteningtorqueshouldbewithintherangeof“0.5N∙m±20%”.
※Remarks
a:Directionoftheconnectorcanbechangeddependingontheassemblyofthecover④
andtheterminalblock③.

7
DINconnectorexplodedview
ConnectiondiagramofDINconnectorDimensionaldiagramofDINconnector

8
7.Installation
⚠Caution
*Donotinstalltheoilcoolerwhereexplosivedustorgasmaybeproduced.
(Itmaycauseanexplosionorafire.)
*Donotstepontheoilcooler.
(Itmaycauseabreakdownoraninjury.)
*Donotinstalltheoilcoolerwhereitmaydirectlycontactwithflame.
(Itmaycauseafire.)
*Donotinstalltheoilcoolerinahumidplace.
(Itmaycauseanelectricshockorafire.)
*Besuretotakesufficientspaceinfrontoftheairinlet/outletsidesoftheoil
cooler.
(Performancemaydecreaseoritmaycauseabreakdownofthefanmotor)
*Installation,operation,andmaintenancemustbedonebyapropertechnician.
(Itmaycauseanelectricleakageoraninjury.)
*Carryoutwiringworksafelyandsecurelyinaccordancewiththeelectrical
equipmentstandardsandinternalwiringrules.
(Alooseconnectionorawrongconnectionmaycauseanelectricshockorafire.)
1)Installtheoilcoolersecurelyonafirmandsteadyframe.
Takesufficientspacearoundtheoilcoolerforinstallation,inspection,cleaning,andmaintenance.
Especially, be sure to clear of obstacles in front of the air inlet/outlet sides, otherwise
performancemaydecreasebytheairquantityreduction.
Minimizethevibrationoftheoilcoolerduringoperationasmuchaspossible.
Incaseoflargevibration,userubbercushionstopreventit.
8.Piping
1)Checktheoilinletandoutletbeforeconnectingthepipes.
2)ThepipejointoftheradiatorisRcthreaded.
Wrapthepipetipwithsealtapeandscrewintothejoint.
3)Whenconnectingthepipestotheradiator,tightenthepipeswithintherecommendedtightening
torquerangewhileholdingthehexagonalpartoftheoilinlet/outletwithawrench,etc.
Ifthehexagonpartisnotheldoristightenwithexcessivetorque,theradiatormaybedamaged.
4)Theradiatorismadeofaluminum.Incaseofconnectingthepipesharderthanaluminum,

9
becarefulnottodamagetheradiatorbythetightening.
5)Ifpipingvibrationisconcerned,userubberhoseorflexibletubetopreventthevibrationtothe
oilcooler.
Note:Therecommendedtighteningtorqueiswithintherangeof“15N∙m~24N∙m(Rc3/8)”.
9.Operation
⚠Caution
*Donotoperatetheoilcooleratoverthemaximumworkingpressure.
(Itmaycauseabreakdown)
*Donotputyourfingeroranyobjectintothefanmotor.
(Itmaycauseaninjury.)
*Keepawayyourhandsorbodyfromtheoilcoolersinceitcouldbeheatedtoa
hightemperatureduringoperation.
(Itmaycauseaburninjury.)
*Donottouchtheoilcoolerwhenitisnotrunningbutthepowerremainson.
(Itmaystartrunningsuddenlyandcauseaninjuryoranelectricshock.)
*Donotconverttheoilcoolerinanycase.
Disassemblyandrepairmustbedonebyapropertechnician.
(Itmaycauseafire,anelectricshock,oraninjury.)

10
9‐1Starting
1)Makesurethattheconditionsofusemeettheequipmentspecifications.
2)Attestrun,makesurethatthefanisingoodrotatingconditions(direction,vibration,wind
blowing)andinjectoilgraduallyuptotheworkingflowrate.
10.Maintenance
10‐1RoutineCheck
Checkthegroundwireifitisdisconnectedorloosened.
Checktheground/leadwireifitisnotdamaged.
10‐2PeriodicalCheck
Inspectionontheoilcoolershouldbedoneatleastonceinevery6months.
Cleaningbeforetheoutsidetemperaturerises,especiallyinsummer,isrecommended.
10‐3Cleaning
⚠Caution
*Donotsprinklewaterovertheoilcoolerhousing.
(Itmaycauseabreakdown,anelectricleakage,anelectricshock,oranearlyrust
formation.)
*Beforecleaning,besuretounplugthepowercordorturnoffthecircuitbreaker
onthedistributionpanel. (Itmaycauseanelectricshockoraninjury.)
1)Cleaningoutsideofradiator
Immersetheradiatorinhotwatersolutionofappropriateneutraldetergent,rinseit,andblow
itbythecompressedairtodry.
(Makesurethatdetergentisentirelyremovedbyrinsing.)
2)Cleaninginsideofradiator
Circulatewashingoilthroughonce,thencirculatecleanwashingoilagain.
Sincecontaminationontheoilflowchannelislessthanelsewhere,annualcleaningmaybe
enough.
3)Repairofradiatorfin
Correctthefinpositionsinceairquantitymaydecreaseifitisfallenandclogged.

11
10‐4SurgePressure
Intheoilpressurecircuit,neverincludeanyotherequipment(filters,reliefvalves,etc)afterthe
oilcooler.
Astheradiatorismadeofaluminum,itexpandsgreatly.
Ifabnormalpressureorabnormalvibrationoccurrepeatedly,itmaycausedamage.
11.Storage
Iftheoilcoolerisnotusedimmediately,storeitaccordingtothefollowingprocedures.
11‐1Short‐timeStorage
1)Keeptheoilcoolerinacleananddryroom.
2)Ifstorageplaceisoutdoororhumid,coveritcompletelywithavinylsheet,etc.
11‐2Long‐timeStorage
1)Whennotusingforalongtime,besuretoturnoffthebreakerofthedistributionboard.
(Thereisariskofelectricshock,electricleakage,orfireduetoinsulationdeterioration.)
2)Beforeusingtheoilcoolerstoredformorethan1year,besuretotestatthemaximumworking
pressureandconfirmthattherearenoproblems.
Table of contents