Taizhou Tianchen Intelligence & Electrics L2700 User manual

Please read this manual carefully before use
Please keep this manual for future reference
ROHS
ROBOT MOWER
USER MANUAL

T
Thank you for purchasing our product. We know that you will enjoy the
extra free time you will have while using our robot lawn mower to mow
your lawn. You will be impressed with your lawn's appearance and vest of
all, 2000series did it for you.
IMPORTANT!
Robot lawn mower can be dangerous
if incorrectly used!
WARNING
The following pages contain important safety and operating instructions.
Please read and follow and instructions in this manual. Carefully read and
review all safety instructions, warnings and cautions contained in this
manual.
Failure to read and follow these instructions, warnings and cautions
statements may result in severe injury or death to persons and pets or
damage to personal property.

CONTENTS
1. INTRODUCTION AND SAFETY······················································P1
2. PRESENTATION··········································································P7
3. INSTALLATION···········································································P15
4. CONTROL PANEL AND REMOTE CONTROL·································P26
5. USE····················································································P28
6. MAINTENANCE AND STORAGE··············································P41
7. TROUBLE SHOOTING····························································P45
8. EXPLODED VIEW··································································P51
1.1Introduction P1
1.2Symbols on 2000series P2
1.3 Symbols in the User Manual P4
1.4 Safety instructions P5
2.1 What's in box P7
2.2 Function of 2000series P9
2.3 Technical date P12
2.4 Working route P14
3.1 Preparations P15
3.2 Hardware adjustments P15
3.3 Charging station installation P17
3.4 Virtual wire installation P19
3.5 Virtual wire and charging station connecting P25
3.6 Power connection P25
4.1Control Panel view P26
5.1 Preparation P28
5.3 Stopping mower /Turn off mower P30
5.4 Restart mower P30
5.5 Emergency Switch P30
5.6 Operation pattern P32
5.7 System time setting P32
5.8 Password setting P33
5.9 Address setting P34
5.10 Working schedule setting P35
5.11 Delete working schedule P36
5.12 OTHER setting P37
5.13 Recharging P40
6.1 Robot cleaning P41
6.2 Robot Storage P43
6.3 Blade replacement P43
6.4 Fuse replacement P43
6.5 Battery P44
5.2 Starting the mower P29
8.1 Mower Exploded View P53
8.2 Charging station Exploded View P52
4.2Remote control P27

1.1 Introduction
Product, product specifications and this document are subject to change
without notice. All other trademarks are property of their respective
owners.
The lawn mower may be used only by those who know how to operate it
after reading and understanding the instructions in this manual.
Model: 2000 series (L2700, L2800, L2900 named 2000series)
CE, RoHS approved.
The following pages contain important safety and operating instructions.
Please read and follow all instructions in this manual. Carefully read and
review all safety instructions, warnings and cautions contained in this
manual.
Failure to read and follow these instructions, warnings and cautionary
statements may result in severe injury or death to persons and pets or
damage to personal property.
WARNING
Robot lawn mower can be dangerous
if incorrectly used.
1.INTRODUCTION AND SAFETY
1. Introduction and safety
IMPORTANT INFORMATION
Read through the Operators Manual
carefully and understand the content
before
1.2 Symbols on 2000series
These symbols can be found in the mower. Study them carefully so you
understand their significance.
1. The symbol is pasted on the top of mower, please read it carefully
before using the appliance.
2. Handle symbol.
Always lift the mower by Handle.
1.INTRODUCTION AND SAFETY
WARNING
severe injury or death may cause
if incorrectly lift the mower.
HANDLE HANDLE
1 2
0
54 6
7 8 9
5.WARNING-Operatethe disabling device bef ore wor king on o r lifti ng the machine
-P1- -P2-

1.INTRODUCTION AND SAFETY
This label is pasted on charging
station, please make sure to
position this side towards lawn
interior. Failure to do may result
in damage to property or
persons.
DANGER! Sharp rotating blades.
Keep hands and feet away. Serious
injury can occur.
DANGER
3. Specifications symbol
Pasted on mower Pasted on charging station
: Waste electrical products should not be disposed of with household
waste. Please recycle where facilities exist. Check with your Local
Authority or retailer for recycling advice.
4. Charging station symbol.
5. Warning symbol.
ADDRESS: XX
Enter XX to mower, in order to match the communicate
between charging station and robot lawn mower.
Position his side of the charging
station towards lawn interior
1.INTRODUCTION AND SAFETY
1.3 Symbols in the User Manual
These symbols can be found in this owner/operating manual. Study them
carefully so you understand their significance.
A warning box indicates a risk of personal injury exist, especially when the
stated instructions are not followed.
An information box indicates a risk of material damage exist, especially
when the stated instructions are not followed. The box is also used where
there is a risk of user error.
WARNING
xxxxxxxxxxxxxxxxxxxxxxxxx.
IMPORTANT INFORMATION
xxxxxxxxxxxxxxxxxxxxxxxxxxxxxxx.
Taizhou Tianchen Intelligence &Electrics Co,Ltd
Product name: Robot lawn mower
Model: XXXXX IPX4
Input: XXX V --- 2A 85W
20X X
Made in China
S.N.: XXXXXXXXXXX
RoHS
S.N.: XXXX XX XX XXX
year month date number
-P4--P3-
Taizhou Tianchen Intelligence &Electrics Co,Ltd
Product name: Robot lawn mower
Model: L2X00 IPX4
Input: XXX V — 2A 8 5 W
Made in China
ROHS
S.N.:XXXXX XXXXXX
Address:XX
Taizhou Tianchen Intelligence &Electrics Co,Ltd
Product name: Robot lawn mower
Model: L2X00 IPX4
Input: XXX V --- 2A
Ouput XXX 2A
: V —
Made in China
ROHS

1.INTRODUCTION AND SAFETY
1.4 Safety instructions
- Read the owners/operation manual carefully and follow all the safety
and warning instructions.
- This machine has sharp rotation blades! Never allow the mower to
operate unattended; keep bystanders, children and pets away from
mower when in operation.
- Never allow anyone to ride or ait on mower.
- Never allow anyone or person who is not familiar with the safe operation
of the mower to operate the mower.
- Keep hands and feet away from the cutting blades and other moving
parts.
- Never attempt to service or adjust the mower while it is in operation.
- Inspect and clear the mowing area of all debris (toys, tree branches,
items of clothing, debris' height less than 6cm. etc) before operating the
mower.
- Never raise the mower or attempt to inspect the blades while the mower
is operating.
- Always turn off the power before lifting the mower or attempting any
adjustment.
- When operating the mower in manual mode, maintain a safe distance
from behind or around the mower and wear proper foot apparel.
- Do not operate the mower on slopes greater than 20 degrees or use it in
manual operation on slopes where a firm footing is not possible.
- Do not operate the mower if any safety feature or device is damaged or
inoperable.
- Do not attempt to disable or defeat any safety feature or device.
- Use heavy gloves when inspecting or servicing the blades.
- Wear eye protection and use gloves when installing the virtual wire and
driving the wire stakes/pegs. Firmly drive all pegs in order to keep the
wire from becoming a tripping hazard.
- Do not use the charging station power supply with an extension cord.
- Use only the original equipment power pack and power supply/charger
with this mower.
- Do not use the power supply/charger if the cord has become damaged.
- Do not place metal objects in the area of the charging contacts on the
charging station.
- Do not place metal objects across the charging pins of the mower.
- Do no spray water directly into the docking area of the charging station
or onto the operating panel of the charging station.
- The mower has sharp rotating blades! Please care the mower when it is
mowing, in case of serious injury occur.
- Keep the lawn mower in perfect operating conditions by performing the
maintenance procedures outlined by the manufacturer. Good
maintenance
guarantees better performance and longer service life.
- In order not to irreversibly damage electric and electronic parts, do not
wash the robot with water jets at a high pressure and do not plunge it
partially or thoroughly in water, as it is not watertight.
- It is absolutely forbidden to use the robot in explosive and flammable
environments.
1.INTRODUCTION AND SAFETY
- The operator or user is responsible for accidents or hazards occurring to
other people or their property.
-P6--P5-

2. PRESENTATION
2. Presentation
This chapter contains information you should be aware of when planning
the instalation.
2.1 What's in box
1
28
6
3
5
4
7
9
12
13
11
16
10
15
14
17
18 20 21 22 23
24
9
Consumable parts
1. Blade
2. Virtual wire
3. Virtual wire connectors
4. Pegs
5. Fuse
1Clamshell:
Open it to adjust cutting height.
2Adjusting knob:
Screw it to adjust cutting height.
3Fuse
4Charging terminal:
Connect with Charger for
recharging directly.
5Ultrasonic sensor
6Charging head
7Control panel
8Emergency switch:
Press it at any time,
the mower turn off at once.
99
10 Blade
11 Blade sheld
12 Home button
Press it when it is operating,
it goes back to charging station
automatically.
13 Virtual wire light
Colorless: in good connecting
Red: Broken wire/ idle
14 Charging light
Red: charging
Green: full charged / idle.
15 Power terminal
16 Virtual wire terminal
17 Copper sheet
18 Charger
19 Virtual wire (100m):
Used to mark mowing area and
create a virtual wall for the mower.
20 Virtual wire connectors (10pcs):
Used to connect virtual wire.
21 Pegs (100pcs):
Used for fix the virtual wire to the
ground around the lawn perimeter
and around obstacles.
22 Stakes (4pcs):
Used for fix the charging station to
the ground.
23 Fuse (2pcs)
24
Inner hexagon spanner
25
English user manual
2. PRESENTATION
-P8--P7-
MO W
19
25 2627
27
26
Remote control battery
Remote control
Handle (Human sensor)
Touch it when it’s working,
it stops at once.

2. PRESENTATION
2.2 Function of 2000series
- Lift sensor
There are lift sensors located on each omni-directional wheel. If the
mower was lifted 2cm from the ground in level way, it will stop working
within 2 seconds.
- Tilt sensor
There is tilt sensor installed on the mower too, when the mower was
tilted over 30 degree at any direction, it also will stop working within 2
seconds.
- Ultrasonic sensors
Compare to traditional bumpers, the ultrasonic obstacles is much more
safety. The mower selects a new direction before it bumps people or
obstacles automatically. That means no touch! Don't worry, the mower
will never hit your children and pets. Ultrasonic sensors can be selected,
that means it can be turn on or turn off freely.
- Bump sensors
In front of the mower there equipped with bump sensors that will activate
when the mower strikes solid, fixed object when that object is at least 6cm
in vertical height from the supporting surface of the mower. When the
bump sensor is activated, the mower will stop movement in that direction
and reverse itself away from the obstacle.
- Rain sensors
There are two rain sensors on top cover of mower. The mower will go back
to the charging station automatically when it's raining. Rain sensors can
be selected from control panel or remote control.
Turn on it: the mower will go back to home if it is raining.
Turn off it: the mower will go on mowing when it is raining.
- Human sensor
Touch the handle when the mower is cutting, it will cease function within 2
seconds.
- Wireless controller
To control the operate of mower in manual pattenr.
2. PRESENTATION
- Mowing schedule
Set up one week (From Monday to Sunday, once for each day) cutting
schedule from control panel. The mower is on auto pattern when in
schedule functioned, if it feels is powerless, it will go back to charging
station for recharge automatically, and it will goes on cutting after it
finishes recharge.
- Anti-theft function
User must enter the correct password then the mower can be started.
What's more, the mower can not be turned on without charging station.
- Cutting width:30cm
- Humanistic cutting height selection
3cm-6cm humanistic design.
Easier for user to choose the cutting height. Just screw it!
- Auto recharge system
When the mower is operating it feels powerless, the cutting motor turn off
at once and it will find the virtual wire then go alone it back to charging
station for recharge automatically. (this allows you to keep the charger
connected with the charging station all the time, even after the battery is
fully charged.) On auto pattern, the mower will go on mowing after fully
recharge. But if it is on manual pattern, it will just stay on charging station
after fully recharge.
- Emergency stop switch
There is an emergency stop switch located on the top of mower and red in
color. If you press it in any case during operating, the mower must stop all
movement and stop the rotating of blades immediately. Rotating the
switch to reset it and the mower is in taskstate by entering the correct
password and choose operate pattern to restart it.
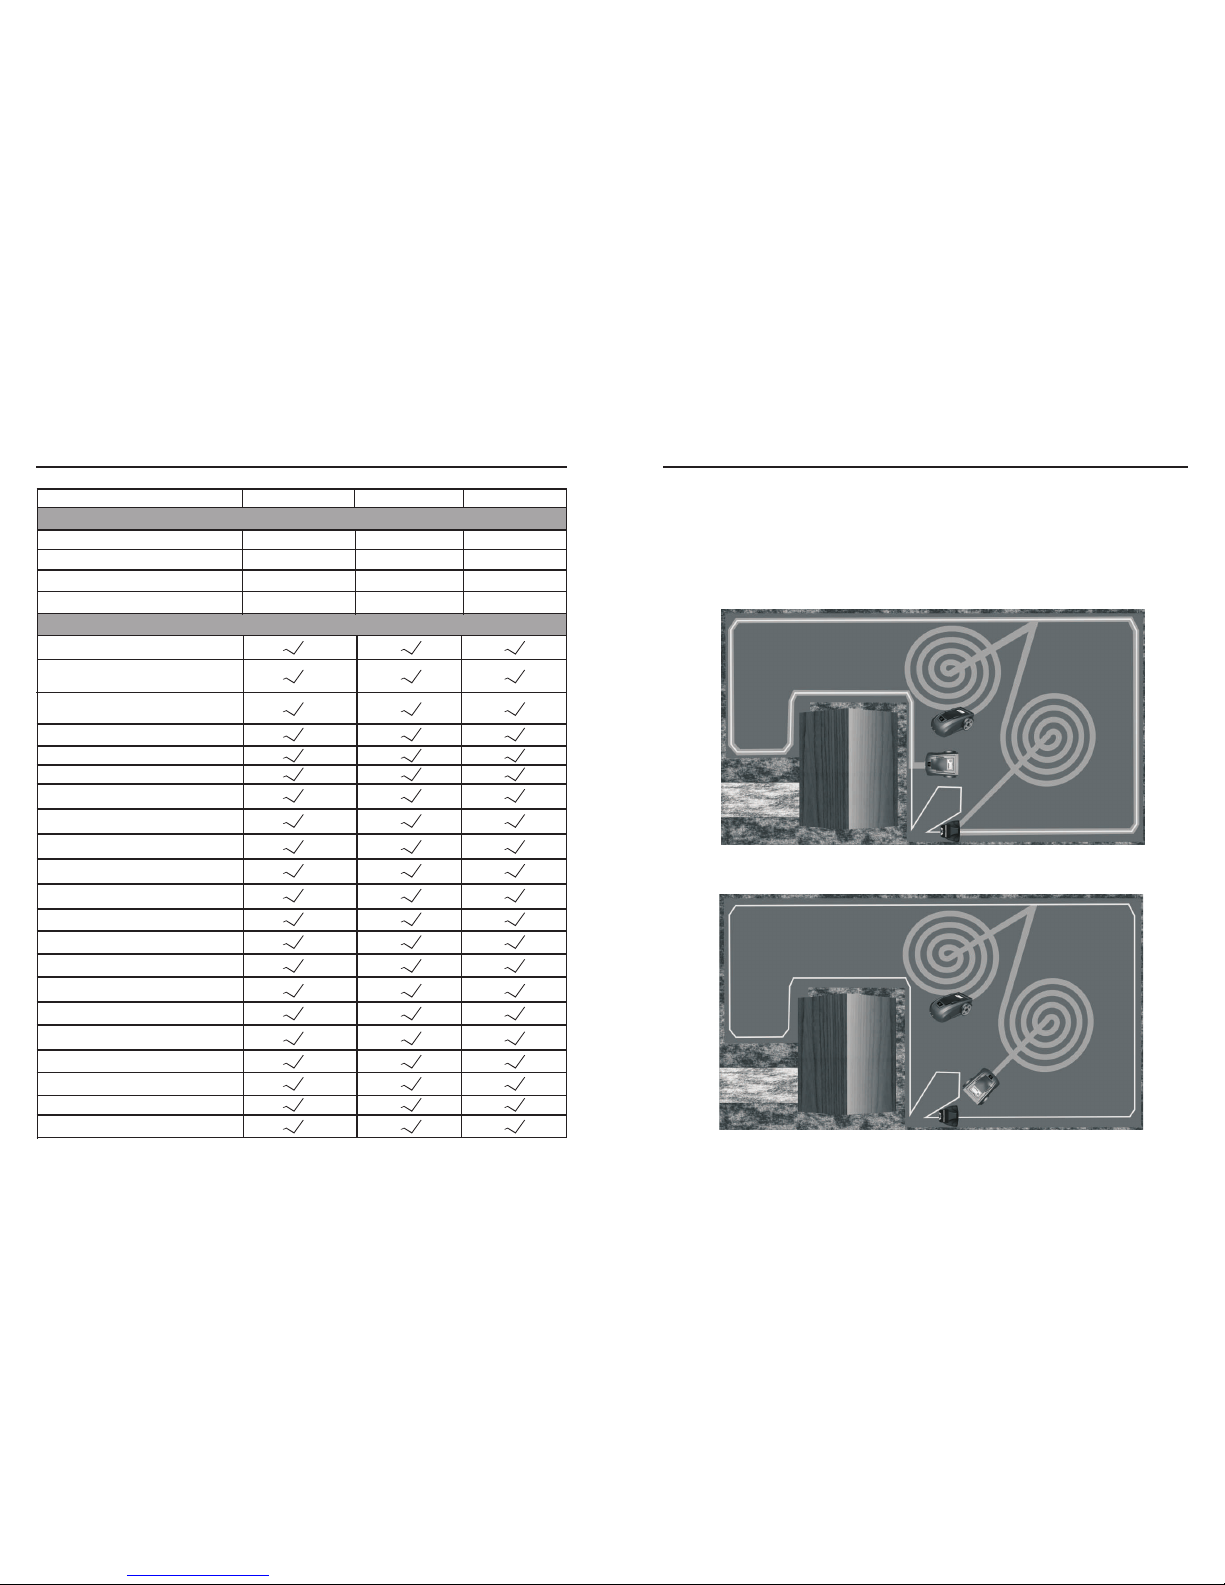
- Two cutting modes
There are two cutting modes of the mower, go straight and go circle (high
efficiency). On manual pattern, we can choose the cutting mode from
remote control. On auto pattern, mower selects cutting mode intelligently.
It goes straight if the grass has be cut, and it goes circle if the grass is
long.
-P10--P9-

2. PRESENTATION
-
The robot lawn mower can't operate without a virtual wire. (we suggest to
use 100m-300m of virtual wire). It leads the mower back to charging
station and the mower will take it as a wall when it is operating. It will get
on the virtual wire until it meets charging sheet which localed in front of
charging station, then it gets off virtual wire and starts cutting.
- Mower stops working if virtual wire has be cut or charging station is
out of power
If virtual wire has been cut off or it's out of sign, the mower must stop
working within 3 seconds. If the charging station is out of power, the
mower also will stop working within 3 seconds.
- Three steps to safe start the appliance
Three necessary steps to start the mower: firstly, connect virtual wire to
charging station and make sure it is in good connecting (virtual wire light
on charging station is colorless). Second, connect charging station with
power supply through charger and the charging station light is in green
color. Third, turn on the power of mower by entering the correct password
and choose operating pattern, the mower started.
- Overload protect
Each of the two blade motors and each of the two wheel driving motors
are monitored continuously during operation for any situation that may
cause these motors to over-heat. In the event this is detected, the mower
will stop operation.
- Fuse protect
There is a fuse hold under clamshell (top cover) next to charging jack, it
contains a one-time-use fuse in the event of a short-circuit or power
malfunction.
- Waterproof
Waterproof design, there is an inner cover under top cover which protect
inside parts from humidify.
- LED display
Virtual wire
2. PRESENTATION
2.3 Technical date
L2700 L2800 L2900
Model
Coverage(for once charging)
800m2+20%800m2+20%
2000m2+20%2000m2+20%
Working capacity
1200m2+20%
2600m2+20%
70*48*27cm(LWH) 70*48*27cm(LWH)
24KGS 22KGS
20KGS 18KGS
Mower size
Gross weight
Net weight
Warranty 1 year 1 year 1 year
70*48*27cm(LWH)
21KGS
17KGS
85W 85W 85W
≤65db ≤65db ≤65db
1pc
1pc 1pc
2.5-6cm 2.5-6cm 2.5-6cm
30cm 30cm 30cm
20m/min 20m/min 20m/min
4000rpm
4000rpm
4000rpm
30degree Maxslope
30de gree Max slop e
30degree Max slope
40℃40℃
Qty for cutting blades
Blades rotate speed
Max ambient functioning temp.
Power
Noise
Cutting height
Cutting width
Cutting speed
Hill capability
Mower technical date
40℃
PS:
How large an area is mown per once recharge depends primarily on the
condition of the blade and the type of grass, growth rate and humidity. The
shape of garden is also significant. If the garden mainly consists of open
lawns, mower can mow more per hour than if the garden consists of
several small lawns separated by trees, flower beds and passages.
300m 300m 300m
100m 100m 100m
Virtual wire maximum length
Standard virtu al wire le ngth
45*38.5*23.5cm(LWH)
Charging station size
Charging station and virtual wire
45*38.5*23.5cm(LWH) 45*38.5*23.5cm(LWH)
-P12--P11-

2. PRESENTATION
Around virtual wire walking option
virtual wire has be cut
Intelligent lawn testing
Rain sensor
Auto recharge
Intelligent spiral
Go straight
Anti theft
Lift sensor
Tilt sensor
Ultrasonic wave
Bumper sensor
LED display
Waterproof
Human sensor
Time set-up system
Emergency switch
set up password
Rain sensor option
Around virtual wire option
Functions:
Model L2700 L2800
L2900
3hours 3hours
Lead-acid battery Lithium battery
7.2Ah 7.2Ah
3-4hours 3-4hours
Average working time
Type of battery
battery
Charging time
4.5hours
5-6hours
Battery
10Ah
Lithium battery
Mower can’t be started when
charging station is powerless
2.4 Working route
Manual pattern
Mower's running path by user's willingness.
Auto pattern
Cutting route when Line is turned on.
2. PRESENTATION
-P14--P13-
Cutting route when Line is turned off.

3. INSTALLATION
3. Installation
This chapter describes how you install this mower. Before starting the
installation read the previous chapter 2. Presentation.
Read the whole of this chapter too before starting the installation. How
the installation is made also affects how well the mower will work. It is
therefore important to plan the installation carefully.
3.1 Preparations
Training
- Read the instructions carefully. Be familiar with the controls and the
proper use of the appliance.
- Never allow people unfamiliar with these instructions or children to use
the appliance. Local regulations may restrict the age of the operator.
- The operator or user is responsible for accidents or hazards occurring
to other people or their property.
3.2 Hardware adjustments
Blade adjustment
The mowing system used by this mower is based on an effective and
energy efficient principle. Unlike normal lawn mowers, the mower cuts the
grass instead of striking it off.
Rain sensors on the mower can be selected(see P38), we recommend
you allow the mower to mainly mow in dry wether to obtain the best
possible result. Even the mower can mow in rain, however, wet grass
easily collects on the mower and the risk of slipping on steep slopes is
greater.
The blades must be in good condition to obtain the best mowing result. In
order to keep the blade sharp for as long as possible it is important to
keep the lawn free from branches, small stones and other objects
(especially the objects less than 6cm height).
How to adjust the cutting height:
1.Press the clamshell and open
it.
2. Screw the adjusting knob to the
cutting height you are willing to.
3. Close the clamshell.
Cutting height from 2.5cm to 6cm.
3CM
Cutting height explanation :
For example the cutting height
is in 3cm level. Grass
Height
Cut ting heigh t: 3cm
3. INSTALLATION
Adjusting knob
-P16--P15-

3. INSTALLATION
3.3 Charging station installation
- Choose best installation place, please make sure which is flat, no water,
no magnetic interference and no obstacle in the front of charging
station.
- Please fix the charging station in level place.
OK
Charging station best install place:
1. Make sure it
2. No magnetic interference
3. No water
4. No obstacle in front
3. INSTALLATION
- Lay virtual wire in the middle of
charging station.
- Fix the charging station with four
stakes.
Virtual wire
Peg
IMPORTANT INFORMATION
Before fix the charging station on the lawn, please examine the
lawn and decide the best location which is easy for the mower
to find the station for recharge.
-P18-- P17-

3.4 Virtual wire installation
The virtual wire can be installed in one of the following ways:
- Securing the wire to the ground with staples.
It is preferable to staple down the virtual wire, if you want to make
adjustments to the virtual wire during the first few weeks of operation.
- Bury the wire
It is preferable to bury the virtual wire if you want to dethatch or aerate
the lawn.
If necessary both methods can be combined so one part of the virtual
wire is stapled down and the remainder is buried.
3. INSTALLATION
- Dig virtual wire with pegs 1 meter per piece in straight-line. Dig corner as
picture.
- Bury virtual wire below grass and fasten it on the ground with pegs, so
that the mower should not cut the wire. If the grass grow up, we can still
keep the virtual wire as before.
virtual wire Add pegs in order to pull the
virtual wire down to the ground
surface, below the grass tips.
OK
3. INSTALLATION
- A minimum distances of front charging station and obstacle is 2 meters.
And make sure the distance from corner to front of charging station is at
least 2.5 meters. Make sure to lay a 2.5 meters minimum straight-light of
virtual wire in front of charging station.
45°Straight - line
at least 2.5 m
IMPORTANT INFORMATION
The charging station is not water-proof,
It’s best to make a Rain Shed above the charging station.
Greater than
50cm
-P20-- P19-
IMPORTANT INFORMATION
Hard or dry ground may cause pegs to break when driving them in.
In extreme cases, watering the lawn where the pegs will be driven.

- If a high obstacle, for example a wall or fence, borders the working area,
the virtual wire should be laid at least 50cm from the obstacle. This will
prevent mower from colliding with the obstacle and reduce body wear.
- Use the virtual to demarcate areas inside the working area by creating
islands around obstacles that can not withstand a collision, for example,
flower beds and fountains. Run the cable out to the area, route it around
the area to be demarcated and then back along the same route. If
staples are used, the wire should be laid under the same staple on the
return route. When the virtual wire to and from the island are close
together, the mower can drive over the wire.
3. INSTALLATION
Greater than
50cm
Greater than
50cm
Virtual wire
Root
Max: 1cm
Max: 1cm
Max: 1cm
Virtual wire
Max:20cm
3. INSTALLATION
- The wires leading to the island and
returning from it should be parallel
and touding. But do not cross them!
If protected obstacles are grouped
closely together demarcate them by
a single. Continuous virtual island if
obstacles are dose to edge, leave
them out of the mowing area.
- The distance between charging station and virtual loop should at least
2.5 meters.
Greater
than 2.5 m
Tree with hole or flowers
around require placing a
wire around it
1cm 1cm
-P22--P21-
50cm

3. INSTALLATION
45°
Rain shed
Greater than
50cm
- How to set virtual wire on the ground which has swimming pool.
Distance between
two wire: 1m
3. INSTALLATION
- Joining the boundary wire .
If the boundary wire is not long enough
and needs to be spliced: Use original
solderless couper. It is waterproof and
gives a reliable electrical connection.
To splice: Insert both cable ends in the
coupler. Now press down the button on
top of the connector fully. Use a pair of
pliers or the like, as the button on the
connector is difficult to press down by
hand
Correct corner set up,
using several angle to
avoid an angle of less
than 90°。
Greater than
2.5m
- Care must be taken not to create a corner sharper shorter than 90
degrees when setting up virtual wire. A corner sharper less than 90
degrees can cause the mower to lose track of virtual wire. We can make
greater than 90 degrees corner like follow picture shows.
-P24--P23-
IMPORTANT INFORMATION
The charging station and charger is not water proof. It’s best to set
a Rain Shed above the charging station.
Proper setup in sharp corners
Incorrect corner
setup

3. INSTALLATION
3.5 Virtual wire and charging
station connecting
- Connect two ends of virtual wire to
patch jack (virtual wire terminal
located on charging station)
randomly, there is no positive and
negative.
3.6 Power connection
1. Insert charger to the station. 2. Connect charger with power
supplier.
220V/110V
power supplier
WARNI NG
The charge r is not wat er-proo f therefor e it must be locat ed on
a place whi ch is dr y and ventilated.
Match the slop then
screw it!
4. CONTROL PANEL AND REMOTE CONTROL
4.1 Control Panel view
Home button
Press this button when the mower is operating, it goes home for
recharge automatically.
Display
123
456
4. Control panel and Remote control
1
2
15℃
AUTO
MANUAL
TUE12/14 13:31
2.1
2.2
2.3 2.4
2.5 2.6 2.7
2.8
2.1 Charging station sign
2.2 Virtual wire sign
2.3 Temperature inside the mower
2.4 Battery voltage
2.5 Month / Date
2.6 Week
2.7 Hour
2.8 Menu
-P26--P25-

3Power switch: Power on/ Power off
4Up / + : there are tree functions for this button.
-select menu, go upward
-select menu, go left
-Select figure, means +
5 Confirm button
-To confirm your choose or enter.
6Down / -
-select menu, go down
-select menu, go right
- Select figure, means -
5. USE
5. Use
IMPORTANT INFORMATION
Operation with Auto Pattern
- Do not leave the machine to operate unattended if you know that there
are pets, children or people in the vicinity
Operation with Manual Pattern
- Mow only in daylight or in good artificial light.
- Avoid operating the appliance in wet grass.
- Do not operate the appliance when barefoot or wearing open sandals.
- Always wear substantial footwear and long trousers.
- Always be sure of your footing on slopes.
- Use extreme caution when reversing the appliance towards you.
- Always switch on the mower according to instructions with feet well
away
from the blade.
5.1 Preparation
- Ensure the correct installation of the virtual wire delineation system as
instructed
- Periodically inspect the area where the appliance is to be used
and remove all stones, sticks, wires, bones, and other foreign
objects especial the objects' height is less than 6cm.
- Periodically visually inspect to see that the blades, blade bolts and
cutter assembly are not worn or damaged. Replace worn or damaged.
Read the safety instructions before you start your mower.
Keep your hands and feet away from the rotating blade.
Never put your hands or feet close to or under the body when
the motors are running.
WARNIN
WA R N I N
-P28-- P27-
4.2 Remote control
MOW
1
9
2
3
4
5
6
7
8
4. CONTROL PANEL AND REMOTE CONTROL
10
To stop the mower. Press it, the
mower enters taskstate.
Indicator light.
Go right.
Effected while mower in taskstate.
User has to stop the mower first,
then press it, the mower enters
MANUAL pattern.
Speed down
Effected while mower in taskstate.
User has to stop the mower first,
then press it, the mower enters
AUTO pattern.
Press it during mower is working,
it goes back to charging station.
Go left.
Turn ON/OFF blade.
Speed up.
1
2
3
4
5
6
7
8
9
10
IMPORTANT INFORMATION
These five buttons only effected in MANUAL pattern.
3
33 5 8910

- On multi-spindle appliances, take care as rotating one blade can
cause other blades to rotate
- Connect two terminals of virtual wire to charging station, and ensure
virtual wire is in good connecting. (Light on charging station is in
colorless).
- Insert charger to charging station and screw it. And then connect
charger to power supplier. Ensure charging station is in good
connecting, light on charging station is in Green.
1.In case LINE is on. Take the mower to
start point.
2. Press power button from control panel.
3. Clockwise rotate Emergency switch,
the mower start. Display shows as
picture.
5.2 Starting the mower
5. USE
blades and bolts in sets to preserve balance.
IMPORTANT INFORMATION
User can't start the mower if virtual wire and charging
station has problem.
4. Set ADDRESS firstly, otherwise the
mower can not be turn on.
See 5.9 ADDRESS Setting.
5. Select operate pattern (Manual pattern
or Auto pattern) from control panel or
remote control, and confirm it. mower
start cutting.
5.3 Stopping mower /Turn off mower
1. Press power button from remote control.
Mower stops, the blade motor stops.
mower goes into taskstate.
2. The appliance also can be turned off by
press emergency witch directly.
3. Press power button from control
panel to turn off the appliance.
5.4 Restart mower
1. Press power button
2. Enter password.
3. Select operate pattern and confirm it.
5.5 Emergency Switch
Press emergency switch at any time
the mower power off at once. User has to
restart the appliance.
5. USE
-P30-- P29-
Start point

Robot
mower
main
menu
Clock
Code
Time
Auto
Manual
Other
input password set password
MON,TUE,WED,THU,FRI,SAT,SUN
WAVE
LINE
RAIN
WAVE
LINE
RAIN
CODE
EXIT
ON
OFF
ON
OFF
ON
OFF
ON
OFF
month
date
week
hour
date
WAVE
LINE
RAIN
input password set address
5. USE
Address
Del Esc Set
Start End
hour min hour min
5. USE
5.6 Operation pattern
There are two operation patterns:
Auto pattern, Manual pattern.
- On Auto pattern, WAVE, LINE, RAIN shows
as picture.
- Manual pattern, WAVE, LINE, RAIN shows
as picture.
16°C
TUE
12/14 13:31
AUTO
MANUAL
5.7 System time setting
1. Select CLOCK and press button to
enter system time setting.
2. To set Month and Date.
- Press or to scroll the correct
Month, press to confirm it
- The moves on Date, press
or to scroll the correct Date ,
press to confirm it.
3. To set week (MON, TUE, WED, THUR,
FIR, SAT, SUN) by or and
confirm it.
arrow
15°C
CLOCK
CODE
TUE
12 / 14 13 : 31
16°C
TUE
12/14 13:31
CLOCK
16°C
TUE
12/14 13:31
CLOCK
16°C
TUE
12/14 13:31
CLOCK
16°C
TUE
12/14 13:31
CLOCK
16°C
TUE
12/14 13:31
CLOCK
16°C
TUE
12/14 13:31
CLOCK
18°C
TUE
12/14 13 : 39
AUTO
RAIN
LINEWAVE
18°C
TUE
12/14 13:40
RAIN
WAVE
MANUAL
-P32--P31-
TOUCH ON
OFF

4. To set Hour and Minute.
- Press or to scroll the correct
Hour and press to confirm it.
- The moves to Minute. Press
or to scroll the correct Minute and
press to confirm it.
5. Return back to menu automatically.
arrow
5.8 Password setting
1. Select CODE from menu and enter it.
2. Enter Initial password: 0000
- the following message appears on the
display.
- Press one of the keys or to set the
first figure.
- Press the key to confirm it. the arrow
moves on to the next position.
- Repeat the procedure to set all the
numbers of Initial password.
5. USE
16°C
TUE
12/14 13 : 31
CLOCK
16°C
TUE
12/14 13 : 31
CLOCK
15°C
CODE
ADDRESS
TUE
12 / 14 13 : 31
16°C
TUE
12 / 14 13 : 31
INPUT PASSWORD
0
16°C
TUE
12 / 14 13 : 31
INPUT PASSWORD
0000
3. Enter new password
- The following messages appears on
the display.
- Press one of the keys or to set
the first new figure. TUE
12 / 14 13 : 31
SET PASSWORD
0
16°C16°C16°C
16°C16°C16°C16°C
5.9 Address setting
the mower cold communicate with charging
station, there is an ADDRESS between
mower and charging station. User has to set
the address before using the mower.
Otherwise the mower can not start working
in Auto model. A label with Address Code
paste on charging station.
1. Select ADDRESS from menu and press
to enter it.
2. Enter password.
3. Press Address Code as the label shows.
5. USE
- Press the key to confirm it, the
arrow moves on to the next position.
- Repeat the procedure to set all the
numbers of new password.
- Press to confirm it and press it again
to return back to menu.
TUE
12 / 14 13:31
SET PASSWORD
1234
16°C16°C16°C16°C
ADDRESS
TUE
12 / 14 13:31
TIME
16°C16°C16°C16°C
16°C
TUE
12 / 14 13 : 31
INPUT PASSWORD
0
-P34--P33-
Address:XX
Taizhou Tianchen Intelligence &Electrics Co,Ltd
Product name: Robot lawn mower
Model: L2X00 IPX4
Input: XXX V --- 2A
Ouput XXX 2A
: V
Made in China
ROHS
This manual suits for next models
2
Table of contents
Other Taizhou Tianchen Intelligence & Electrics Lawn Mower manuals

Taizhou Tianchen Intelligence & Electrics
Taizhou Tianchen Intelligence & Electrics Robot Mower L2X00 IPX4 User manual

Taizhou Tianchen Intelligence & Electrics
Taizhou Tianchen Intelligence & Electrics S520 User manual

Taizhou Tianchen Intelligence & Electrics
Taizhou Tianchen Intelligence & Electrics E1800 User manual

Taizhou Tianchen Intelligence & Electrics
Taizhou Tianchen Intelligence & Electrics TC-G158 with lead-acid User manual