TAMARIT GE-33B-RCE User manual

User’s Manual Introduction
Electric Oven with digital control
Model No.:GE-33B-RCE

IMPORTANT SAFEGUARDS
When using electrical appliances, basic safety precautions should always
be followed including the following:
Danger:
1. Read all instructions.
2. Do not touch hot surfaces. Use handles or knobs.
3. To protect against electrical shock do not immerse cord, plugs, or the
appliance body in water or other liquid.
4. Close supervision is necessary when any appliance is used by or near
children.
5. Unplug from outlet when not in use and before cleaning. Allow to cool
before putting on or taking off parts.
6. Do not operate any appliance with a damaged cord or plug or after the
appliance malfunctions or has been damaged in any manner. Return
appliance to the nearest authorized service facility for examination, repair,
or adjustment.
7. The use of accessory attachments not recommended by the appliance
manufacturer may cause injuries.
8. Do not use outdoors.
9. Do not let cord hang over edge of table or counter, or touch hot surfaces.
10. Do not place on or near a hot gas or electric burner, or in a heated
oven.
11. Extreme caution must be used when moving an appliance containing
hot oil or other hot liquids.
12. Always attach plug to appliance first, then plug cord into the wall outlet.
To disconnect, turn any control to “OFF”, then remove plug from wall outlet.
13. Do not use appliance for other than intended use.
14. Use extreme caution when removing tray or disposing of hot grease.
15. Do not clean with metal scouring pads. Pieces can break off the pad
and touch electrical parts, creating a risk of electric shock.
16. Oversize foods or metal utensils must not be inserted in a toaster-oven
as they may create a fire or risk of electric shock.
17. A fire may occur if the toaster-oven is covered or touching flammable
material, including curtains, draperies, walls, and the like, when in opera-
tion.
02

18. Do not store any item on top of the appliance when in operation.
19. Extreme caution should be exercised when using containers construct-
ed of other than metal or glass.
20. Do not store any materials, other than manufacturers recommended
accessories, in this oven when not in use.
21. Do not place any of the following materials in the oven: (that is, paper,
cardboard, plastic, and the like).
22. Do not cover crumb tray or any part of the oven with metal foil. This will
cause overheating of the oven.
23. Keep all ingredients from contact with heating elements. It may cause
fire hazard.
24. Excess oil may cause fire hazard.
25. Do not touch the inside of the appliance while it is operating. Hot
surface may cause severe burns.
26. Do not place the appliance on non-heat-resistant surface.
27. Do not set anything heavy on the open door.
28. Do not splash water onto the glass during or immediately after use. It
may cause the glass to break or shatter.
29. Do not put the oven close to a gas burner or other source of high
temperature or direct to an electric fan, which may affect proper tempera-
ture control.
Warning:
1. Check if the voltage indicated on the appliance fits the local power
voltage.
2. Do not go to any unauthorized person to replace or fix damaged main
cord.
3. Keep this appliance and its mains cord out of the reach of children.
4. Do not plug, unplug or operate the appliance with wet hands. May result
in electric shock.
5. Always hold the plug when unplug the cord. Never pull the cord.
6. Make sure that the appliance is plugged in to a properly grounded wall
socket. Always make sure that the plug is inserted into the wall socket
properly.
7. Do not connect appliance to an external timer switch.
8. Do not place the appliance against a wall or against other appliance.
Leave at least 4 inches free space on the top, back and sides of the appli-
ance.
03

9. Do not leave appliance unattended while operating.
10. The oven body surface may become very hot during operation. It could
cause severe burns. Use the Door Handle to open and close the oven
door.
11. Use Tray Handle to insert or remove the tray form the oven.
12. During operation, hot steam is released through the air outlet openings.
Keep body parts at a safe distance from the steam and form the air outlet
openings. Also be careful of hot steam and air when you remove the basket
from the appliance. Any accessible surfaces may become hot during use.
13. Immediately unplug the appliance if you see dark smoke coming out of
the appliance. Wait for the smoke emission to stop before you remove the
pan from the appliance. Do not spray with water.
Caution:
1. Ensure that appliance in placed on a horizontal, flat and stable surface.
2. This appliance is designed for household use only. It may not suitable to
be safely used in environments such as staff kitchens, farms, motels, and
other non-residential environments.
3. Warranty is voided if the appliance is used for professional or semi-pro-
fessional purposes, or it is not used according to instructions.(never use the
appliance when the plug is damaged.)
4. Allow the appliance approximately 30 minutes to cool down before
handling or cleaning safely.
Attention:
a) A short power-supply cord should be used to reduce the risk resulting
from becoming entangled in or tripping over a longer cord.
b) Longer extension cords are available and may be used if care is exer-
cised in their use.
c) If a longer extension cord is used:
1) The marked electrical rating of the cord set or extension cord should be
at least as great as the electrical rating of the appliance;
2) The cord should be arranged so that it will not drape over the countertop
or tabletop where it can be pulled on by children or tripped over unintention-
ally; and
3) The extension cord should be a grounding-type 3-wire cord.
04

General description (Fig.1)
05
1
2
3
4
56
7
8
10
11
12
9
13
14
15
17 16

1. Top heater temperature control
2. Bottom heater temperature control
3. Timer selector
4. Function selector
5. Convection button
6. Rotisserie button
7. Oven lamp button
8. Start/Cancel button
9. Door handle
10. Convection fan
11. Heating elements
12. Slide out crumb tray
13. Bake tray
14. Wire rack
15. Rotisserie handle
16. Tray handle
17. Rotisserie set
Technical Data
Basic appliance for electrical outlet: 120V / 60Hz / 1400W
cETLus approved.
Before first use:
1. Remove all packaging materials and stickers or labels.
2. Wash all accessories and pan with hot water, some dish washing liquid
and a non-abrasive sponge. These parts are also safe to clean in dish-
washer.
3. Wipe inside and outside of the appliance with a clear cloth.
4. The heating element has been slightly greased and as a result the oven
might slightly smoke when switched on for the first time. After a short while,
this will cease. Let the oven operate at MAX for 15 minutes before first
used. This will remove the smell and smoke.
General description (Fig.1)
06

07
Quick Guide
1. Plug in the power plug, the oven will have a "Bi" sound, indicating that
the power supply has been connected.
2. At this time, the oven light button can be turned on and off the oven light,
the oven light will be delayed for 1 minute off. If you still need to turn on the
oven light, you need to press the oven light button again, the oven light will
turn off after one minute.
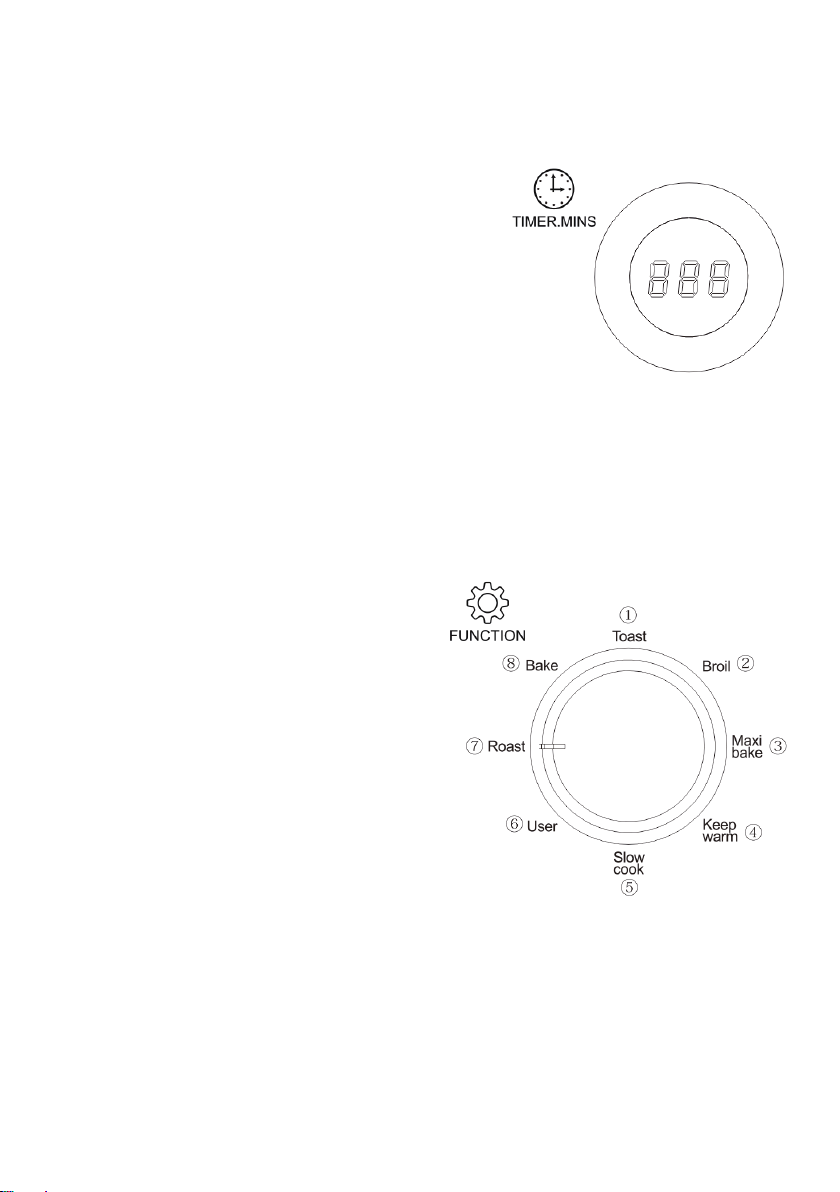
3. Rotate the function gear switch (toast, broil, Maxi bake, keep Warm,
Slow cook, USER, Roast, Bake), at this time, the temperature, time are
displayed default values. USER function means user can set their required
time and temperature.
4. Adjust the temperature knob to the desired temperature value, rotate
clockwise to increase, counterclockwise to decrease the temperature value
(rotate to the maximum value and then continue to rotate will return to the
minimum value).
5. Adjust the timer knob to the desired time value, rotate clockwise to
increase and counterclockwise to decrease the temperature value (rotating
to the maximum value and continuing to rotate will return to the minimum
value).
6. Then press the start/cancel button to start the oven, and press the
button again to switch off the oven.
7. When the oven has started, the temperature and time displays will begin
to flash and the oven will enter preheat mode. At this time, the Rotisserie
and Convection button can be operated. Press and hold the oven light
button for 3-4 seconds to enter the child lock state, the temperature and
time display "CL" and can not be operated, press and hold the oven light
button for 3-4 seconds to release the child lock state.
8. When the oven reaches the preheating temperature, the temperature
and time display stop flashing and the time display starts counting down.
9. Open the oven door, put the food into the oven, close the oven door.
10. When the food is finished baking, there will be 5 beeps "Bi-Bi-Bi-Bi-Bi"
and the time display will show "END".
11. Press the start/cancel button to switch off the oven.

Using the appliance:
1. Place the appliance on a stable, horizontal and even surface.
Do not place the appliance on non-heat-resistant surface.
2. Preheat the appliance for 3 minutes when it is cold.
Settings:
Top heating coil temperature selector
Turn the knob to select the desired temperature
for the top heating elements from 85°F to 450°F.
Accurate digital control coincides with the LED
digital display is for your convenience.
Bottom heating coil temperature selector
Turn the knob to select the desired temperature
for the bottom heating elements from 85°F to
450°F.
Accurate digital control coincides with the LED
digital display is for your convenience.
Note: Please keep the differential between the Top and Bottom heating
coil temperature within 120°F. i.e.: by setting the top temperature to
450°F, and bottom temperature set to 250°F could cause erratic cook-
ing result.
08

TIMER SELECTOR
Turn the knob to select the desired cooking
time. The Oven will automatically shut off at
the end of the selected cooking time while
sounding a bell signal.
The Keep warm function is from 5 to 720
minutes.
The Slow cook function is from 6 to 10 hours.
The other function is from 1 to 120 minutes.
The LED digital display will be helpful for your easy control.
UNCTION SELECTOR
1.Toast
2.Broil
3.Maxi bake
4.Keep warm function: Only the bottom
heater will be working. The oven will
keep a constant temperature.
5.Slow cook function: Only the bottom
heater will be working. The oven will
keep a constant temperature. Used to
ferment dough and defrost frozen foods.
6.User-defined: You can set your
own-defined cooking time, temperature
and mode in your first use. The oven will remember your last used setting
7.Roast
8.Bake
09

FUNCTION BUTTON
1.Convection button: Starting and stopping the Convection
function.
2.Rotisserie button: Starting and stopping the Rotisserie
function.
3.Internal lamp button: Turns internal lamp on or off. Oven
lamp will turn off automatically after 60 seconds.
4.Start/Cancel control: To start or cancel the function you
selected.
HOW TO USE THE OVEN:
1. Place the removable bake tray or wire rack into the desired position.
2. Place the food inside and close the oven door.
3. Turn the timer selector to the desired cooking time.
4. Turn the Temperature Selector dial to the desired temperature.
5. Turn the Function selector dial to the 1-8 position.
6. Press the Start/Cancel button to start the cooking.
7. When finished baking, press the Start/Cancel button to stop the cooking.
HOW TO USE THE ROTISSERIE FUNCTION:
1. Set the temperature Selector to desired temperature.
2. Set the Heating Selector to Roast.
3. Insert the pointed end of SPIT through skewer towards square of the spit
and secure with thumbscrew.
4. Place food to be cooked on the spit by running the spit directly through
the Center of the food.
5. Place the second skewer into the other end of the roast of poultry and
secure skewer with the thumbscrew.
10

6. Check the food is centered on the SPIT.
7. Insert the point end of the spit into the Drive Socket. Make sure the
square end of the spit rests on the spit support.
8. Turn the Timer selector to the desired cooking time.
9. When complete, turn the Timer Selector till “0” to switch off.
10. Remove the spit by placing the hooks of the rotisserie handle under the
grooves on either side of the spit. Take out the left of the spit first by lifting
it up and out. Then pull the spit out of the drive socket and carefully remove
the roast from the oven.
11. Take the food off of the spit and place it on cutting board or platter.
Tips:
Baking List
Note: The above information is for reference only.
Type of Food
Bread
Cake
Fish
Chicken/ Duck
Bake/ Pancake
Spare Ribs
Eggs/ Peanuts
370
370
450
320
450
Temperature (°F)
400 ~ 450
260 ~ 300
Time (Minutes)
10 - 15
25 - 35
20 - 25
30 - 70
10 - 15
25 - 30
10 - 18
11
Function Time
(min)
Temperature
Range (°F)
Temperature
Difference (°F)
For Upper And/Or Down
Heating Tubes
Toast
Broil
Maxi Bake
Keep Warm
Slow Cook
User
Roast
Bake
1-120
1-120
1-120
5-720
6H-12H
1-120
1-120
1-120
85-450
85-360
85-390
85-115
108-115
85-450
120-360
120-360
+/-15
+/-15
+/-15
+/-7
+/-7
+/-15
+/-30
+/-30
Upper and down heating tubes
Upper heating tube
Down heating tube
Down heating tube
Down heating tube
Upper and down heating tubes
Upper heating tube
Upper and down heating tubes

Cleaning:
1. Clean the appliance after every use.
2. Do not clean the pan, basket and the inside of the appliance with metal
kitchen utensils or abrasive cleaning materials, as this may damage the
interal
3. Remove the power plug from the wall socket and allow the appliance
cool down.
4. Wipe the outside of the appliance with a moist cloth.
5. Clean the pan, grill, or other parts with hot water, some dishwashing
liquid and a non-abrasive sponge.
6. Do Not Submerge oven or wash under running water. Remove any
remaining dirt with degreasing liquid and sponge.
Note: The pan, brill and accessories are dishwasher safe.
Clean the inside of the appliance with hot water and non-abrasive sponge.
Clean the heating element with a cleaning brush to remove any food
residues.
Allow all parts and surfaces to dry thoroughly before operating the oven.
Storage:
Unplug the appliance and let it cool down thoroughly.
Make sure all parts are clean and dry before storage.
Environment:
Do not throw away the appliance with the normal household waste at the
end of useful life. Hand it in at official collection point for recycling. By
doing this, you do contribution to environmental protection.
12
Table of contents