TAO F125 User manual

READ THIS MANUAL CAREFULLY! It contains
important safety and service information.
F125 Owner’s Manual

This vehicle should only be assembled and prepped by an
authorized Tao Motor Dealer or professional motorcycle mechanic.
You should never try or attempt assembly of this vehicle; it should
be done by professionals. Death or serious injury could result from
failure to follow these warnings and instructions.
Please read carefully before operating this vehicle!

Thank you for purchasing the F125. This ATV is designed for years of reliable use and family fun. This manual will provide you
with a good basic understanding of the features and operation of this ATV.
This manual includes important safety information. It also includes general riding techniques, maintenance and inspection procedures.
If you have any questions regarding the F125, please contact your local
Tao Motor dealer, visit www.taomotor.com or call Customer Service at TEL: (888) 908-3816 .
AN IMPORTANT NOTE TO PARENTS:
THE F125 IS INTENDED FOR USE BY OPERATORS 14 YEARS OF AGE AND OLDER. This ATV is not a toy.
Before you let your child operate this ATV, you should understand the instructions and warnings in
this Owner’s Manual. Then be sure your child understands and will follow them. Children differ in
skills, physical abilities and judgment. Some children may not be able to operate an ATV safely.
Parents should supervise their child’s use of the ATV at all times. Parents should permit continued use
only if they determine that the child has the ability to operate this ATV safely.
The F125 has multiple safety features including an adjustable speed limiter. We recommend that all beginners start with the slowest
setting first. The speed adjusting screw may be gradually turned out as the beginner becomes more familiar with operating this
ATV. Parents should decide when to adjust for more power and speed as the rider’s riding skills improve.
As a new owner of this vehicle, the ATV owner/driver and immediate family of this vehicle
can enroll in a free hands-on training course. New purchasers of any new Tao Motor ATV models
by calling (888) 908-3816.
TIP
INTRODUCTION

IMPORTANT MANUAL INFORMATION
FAILURE TO FOLLOW THE WARNINGS CONTAINED IN THIS MANUAL CAN RESULT IN SERIOUS INJURY
OR DEATH.
Important information is distinguished in this manual by the following notations:
Product and specifications are subject to change without notice.
IMPORTANT NOTICE
This is the safety alert
symbol. It is used to alert
you to potential personal
injury hazards. Obey all
safety messages that
follow this symbol to avoid
possible injury or death.
A NOTICE indicates special
precautions that must be taken
to avoid damage to the vehicle
or other property.
A TIP provides key information
to make procedures easier
or clearer.
A WARNING indicates a
hazardous situation which, if
not avoided, could result in
death or serious injury.
TIP
NOTICE
NOTICE
The F125 ATV is designed and manufactured for off-road use only. It is illegal and unsafe to operate this
ATV on any public street, road or highway.
This ATV complies with all applicable off-road noise level and spark arrester laws and regulations.
Please check your local riding laws and regulations before operating the F125 ATV.
This ATV should not be operated by anyone under 14 years of age.

Please read and understand all of the labels on your F125.
These labels contain important information for safe and proper operation. Never remove any labels from your ATV. If a label becomes
difficult to read or comes off, request a new replacement label from your local Tao Motor dealer.
WARNING & SAFETY LABELS

Control Layout ......................................................................... 3
Main Switch .............................................................................. 4
Getting To Know Your ATV .............................................. 30-40
Maintenance & Chart ......................................................... 42-47
Emission Control System Warranty .................................. 63-66
Speed Limiter ............................................................................ 6
Parking Brake ............................................................................ 7
Choke Lever ............................................................................... 8
Fuel Tank Capacity .................................................................... 9
Fuel Tank Cap ......................................................................... 10
Fuel Cock/Fuel Valve............................................................... 11
Seat .......................................................................................... 12
Battery .................................................................................... 13
Battery Charging & Changing Fuse ........................................ 14
Pre-Ride Safety Checks....................................................... 15-16
Front & Rear Brakes .................................................................. 17
Tire Wear Limits and Chassis Fasteners ................................ 18
Starting Engine ........................................................................ 19
Engine Break-In ....................................................................... 20
Parking, Accessories & Modifications, Rear Cargo Rack ....... 21
Throttle Cable & Throttle Cable Adjustment ........................ 23
Front Brake Lever ................................................................... 24
Front Brake Lever Freeplay Lower Adjustment ..................... 25
Engine Idle Adjustment .......................................................... 28
Specification Chart ................................................................. 41
Engine Oil .......................................................................... 48-49
Cleaning Air Filter Element ................................................... 50
Spark Plug ............................................................................... 51
Drive Chain & Adjustment ............................................... 52-54
Cleaning Spark Arrester .......................................................... 58
Electrical Wiring Diagram ....................................................... 60
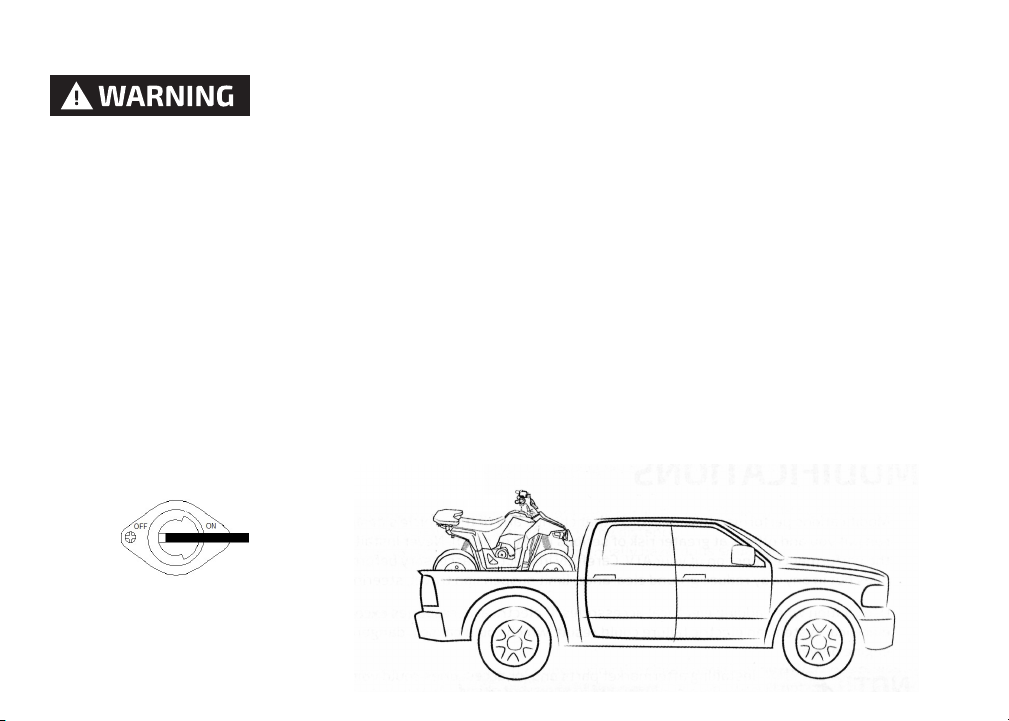
Transporting ............................................................................. 1
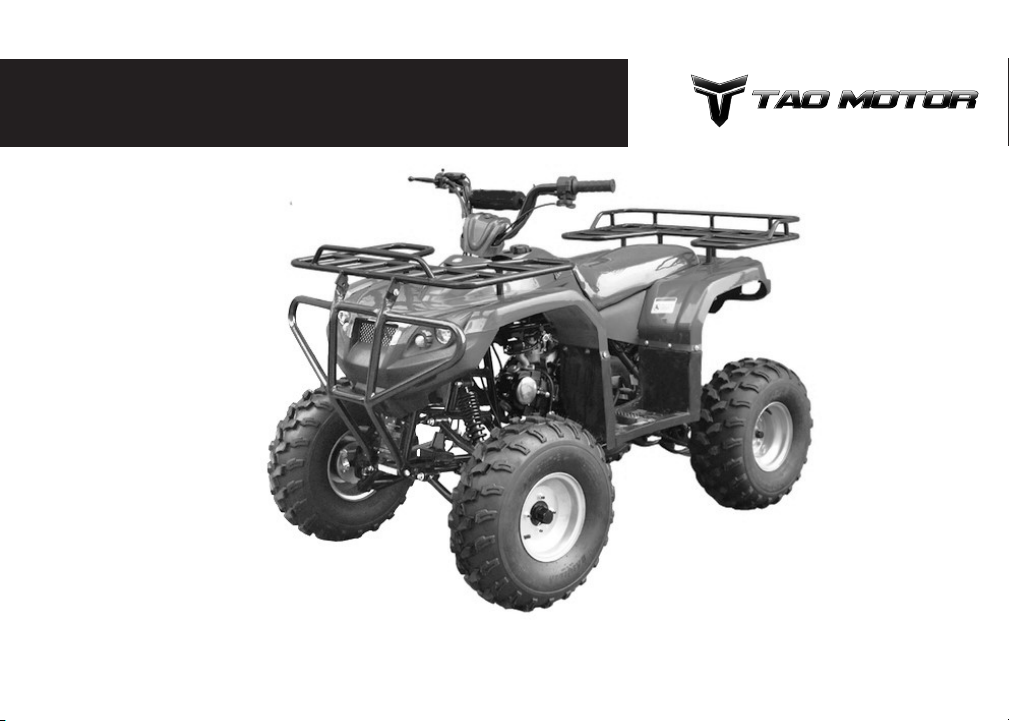
Description ............................................................................... 2
Hydraulic Rear brake & Foot Brake .................................. 25-26
Commonly Asked Questions .................................................. 62
Instrument Cluster ................................................................... 5
Gear Selector Lever.................................................................. 22
Electrical Connector Wiring Diagram .................................... 61
TABLE OF CONTENTS
Adjusting Suspension Spring Preload................................... 29
Rear Foot Brake Lever Hight Adjustment.............................. 27
Checking Wheel Hub Bearings............................................... 55
Adjusting Steering Toe-In....................................................... 56
Auto Clutch Adjustment ......................................................... 57
Vehicle Identification Location .............................................. 59

THE F125 ATV IS NOT A TOY AND CAN BE HAZARDOUS TO OPERATE.
MAKE SURE YOU UNDERSTAND ALL INSTRUCTIONS.
PAY CLOSE ATTENTION TO THE WARNING AND CAUTION LABELS ON THE ATV.
NEVER OPERATE THIS ATV WITHOUT PROPER TRAINING OR INSTRUCTION.
CHILDREN MAY NOT BE ABLE TO OPERATE THIS VEHICLE SAFELY DUE TO PHYSICAL OR MENTAL LIMITATION.
NOTICE The ATV you purchased may differ slightly from the illustrations in this Owner’s Manual.
Please consult your local Tao Motor dealer with any questions not covered in this manual.
SAFETY INFORMATION

Always avoid operating an ATV on any paved surfaces, including sidewalks, driveways, parking lots and streets.
FOR OFF-ROAD USE ONLY.
This ATV is designed for operation by a single driver at least 14 years of age, without passengers.
Never operate an ATV on any public street, road or highway, even a dirt or gravel road. This ATV is designed and manufactured for Off
Road use only no public roads.
Never operate an ATV without wearing an approved ATV/motorcycle helmet that ts p roperly. Y ou s hould a lso w ear eye
protection (goggles or face shield, gloves, boots, a long-sleeved shirt or a jacket, and long pants.
Never consume alcohol or drugs before or while operating this ATV.
Never operate the ATV on hills too steep for the ATV or for your abilities. Practice on smaller hills before attempting larger hills.
Never modify an ATV through improper installation or use of accessories.
Never attempt wheelies, jumps, or other stunts.
Always conduct a pre-ride inspection and follow the proper maintenance schedule and procedures as shown in this manual.
Always keep both hands on the handlebars and both feet on the footrests of the ATV at all times when operation the vehicle.
Always follow proper procedures for turning as described in this manual. Practice turning at low speeds before attempting to turn faster
speeds and never turn at excessive speeds.
Never let refueling be done by anyone other than an adult.
SAFETY INFORMATION

Never permit anyone other than an adult to start the ATV.
Drain gasoline from the fuel tank and carburetor prior to transporting the ATV. Also for storage over 48hrs.
The fuel tank and carburetor should be drained for any long periods of storage and for winter storage of the vehicle.
Caution the child and others near the vehicle not to get close to or touch any moving parts or any heated areas such as the engine and
exhaust pipe.
Never let your child operate an ATV without close adult supervision (a child under 14 should not operate this ATV even with adult
supervision.
Promptly correct your child if he or she begins to ride beyond his or her abilities and, if necessary.
If the child rides beyond his or her abilities, or rides in terrain that is too dicult, he or she may lose control of the ATV, causing an
accident.
Introduce new riding situations slowly and make sure the riding areas do not exceed your child’s skill level.
SAFETY INFORMATION (continued)

Avoid Carbon Monoxide Poisoning! All engine exhaust contains carbon monoxide, a deadly gas.
Breathing carbon monoxide can cause headaches, dizziness, drowsiness, nausea, confusion, and
eventually death. Carbon Monoxide is a colorless, odorless tasteless gas which may be present even if you
do not see or smell any engine exhaust. Deadly levels of carbon monoxide can collect rapidly and you can
quickly be overcome and unable to save yourself. Also, deadly levels of carbon monoxide can linger for
hours or days in enclosed or poorly ventilated areas.
If you experience any symptoms of carbon monoxide poisoning, leave the area Immediately, get fresh air,
and SEEK MEDICAL TREATMENT.
Do not run engine indoors. Even if you try to ventilate engine exhaust with fans or open windows and
doors, carbon monoxide can rapidly reach dangerous levels.
Drain gasoline from the fuel tank and carburetor prior to transporting the ATV. Also for storage over 48hrs.
When transporting the ATV in another vehicle, be sure it is kept upright and that the fuel valve is in the off
position. Fuel may leak out of the carburetor or fuel tank cap.
Fuel
Off
TRANSPORTING THE ATV
1

DESCRIPTION
RIGHT SIDE
Air Filter
Fuse 10 Amp
Spark Arrester Engine Oil
Dip Stick
Foot Rest Spark Plug
Front Shock Fuel Cap Rear Cargo Rack
Muffler
Rear Shock
Front Bumper Fuel On/Off Valve
LEFT SIDE
Battery
(Under
the Seat)
Rear Foot
Brake Lever
Gear
Shift Lever
Front Cargo Rack
2

CONTROL LAYOUT
CONTROLS & FUNCTIONS
IGNITION SWITCH
The positions of the ignition switch are as follows.
Ignition ON All electrical systems are supplied with power, and the engine can be started.
The key cannot be removed.
Ignition OFF All electrical systems are o. The key can be removed.
Ignition OFF Ignition ON
Speed Limiter Front Brake Lever
Throttle Lever
Main Switch
Start Button
Engine Start / Stop Switch Instrument Cluster
Choke Lever
3

Use this switch to "Stop" the engine in an emergency situation.
The engine will not start when this switch is set to this position.
Set this switch to "Run" position before starting the engine.
1. Headlight Hi/Low Switch
2. Headlight Switch
3. Engine Run/Stop Switch
4. Engine Start Button
5. Choke Lever
NOTICE Engine Run/Stop switch is spring loaded and will return to the center
position. In the center position push button in till you feel a click and
let go to reset the engine Stop switch.
START BUTTON
Push start button to crank the engine with starter. See the starting instructions on page 19 before
starting the engine.
Headlight Switch
The headlight switch has three positions OFF, Running Light & Headlight ON. It’s always
recommended you ride with the headlights "ON".
Headlight High/ Low Switch
High beam.
Low beam.
THROTTLE
Once the engine is running, push the throttle lever to increase the engine speed. Regulate the speed of the ATV by varying the throttle
position. The throttle lever is spring-loaded to return to the start position when let go. Before starting the engine, make sure the throttle
lever is smooth in operation and will return to the start position. If throttle lever is not smooth in operation or will not return to start
position do not start engine.
MAIN SWITCH
Engine Start/Stop Switch
4

NOTICE The ignition switch must be set to the "ON" position for the instrument cluster to display any icons.
INSTRUMENT CLUSTER
The Instrument cluster displays important information about the ATV. Make sure the rider is familiar with all the information
displayed before riding ATV.
Instrument cluster
Gear indicator icons
1,2,3,N,R
When “1” is displayed on the instrument panel first gear in engaged.
When “2” is displayed on the instrument panel second gear in engaged.
When “3” is displayed on the instrument panel third gear in engaged.
When “R” is displayed on the instrument panel the reverse gear in engaged.
When “N” is displayed on the instrument panel the neutral gear in engaged.
5

The adjustable speed limiter screw must be installed for operation. Failure to install a speed limiter
screw may result in water or dirt ingestion and potential damage to the vehicle.
FRONT BRAKE LEVER
The front brake lever is located on the right handlebar. To apply the front brake, pull the brake lever toward the
handlebar grip.
REAR FOOT BRAKE LEVER
The rear foot brake lever is located on the right foot rest . To apply the rear brake, push the brake with your
right foot toward the ground.
NOTICE
SPEED LIMITER ADJUSTMENT 1. Locknut
2. Adjustment Screw
3. Adjustment Range
Adults should always limit maximum restricted
speed within the ability and capacity of the child to
operate the ATV safely. Never allow the child to
adjust the speed limiter screw.
To increase top speed
SPEED LIMITER
The F125 ATV is equipped with a vehicle speed limiter adjusting screw. Beginning riders should start with slowest
setting to learn how to control this vehicle. Once the operator has demonstrated mastery of the ATV, the supervising
adult can adjust speed limiter screw to increase the top speed . The vehicle speed limiter keeps the throttle from
fully opening, even when the throttle lever is pushed to the maximum. The adjusting screw may be gradually
turned out as the beginner becomes more familiar with operating this ATV.
To decrease top speed
1. Loosen locknut (#1).
2. To decrease the top speed of the ATV turn the adjustment screw clockwise. (#2).
3. Tighten the locknut to set adjustment screw in desired position(#1).
1. Loosen locknut (#1).
2. To increase the top speed of the ATV turn the adjustment screw counter
clockwise. (#2).
3. Tighten the locknut to set adjustment screw in desired position(#1).
6

PARKING BRAKE
Use the parking brake before starting the engine or after parking the ATV, especially on a slope. This ATV is equipped with front axle
parking brake.
Front Axle Parking Brake: Apply the front brake lever and push down the lock button to apply the parking brake. Squeeze the front brake
lever to release the parking brake.
Always set the parking brake before starting the engine. The ATV could start moving unexpectedly if
the parking brake is not applied. This could cause loss of control or a collision. Always be sure you
have released the parking brake before you begin riding. The brakes could overheat if you ride the
ATV without releasing the parking brake. You could lose control or cause an accident.
1. Front Axle Parking Brake Button
7

CHOKE LEVER
Starting a cold engine requires a richer air-fuel mixture. Move the choke lever all the way to the left when starting a cold engine. Once
the engine is warmed up return the choke lever all the to the right in the running position.
Choke Lever
NOTICE For maximum engine life, never accelerate hard when the engine is cold or choke lever is in the open
position.
Choke Lever Positions
Position 1: Choke Fully Open
Cold engine start & with ambient
temperature below 40 F
Position 2: Choke Half Open
Cold engine with ambient temperature
below 60 F
Position 3: Choke Closed
Warm engine with ambient
temperature above 80 F
Position 3: Choke is turned off, the ATV is
ready to shift into first gear.
8

Gasoline and gasoline vapors are extremely flammable. To avoid fires, explosions and to reduce the risk
of injury when refueling, follow these instructions.
FUEL TANK CAPACITY
If any fuel spills during fueling please wipe quickly, fuel may deteriorate plastic body.
1. Before refueling, turn off the engine and be sure that no one is sitting on the vehicle. Never
refuel while smoking or while in the vicinity of sparks, open flame, or other sources of ignition
such as the pilot light of water heaters and clothes dryers.
2. Do not overfill the fuel tank. When refueling, be sure to insert the pump nozzle into the fuel
tank filler hole. Stop filling when the fuel reaches the bottom of the filler tub. Because fuel
expands when it heats up, outside heat can cause fuel to expand and overflow fuel tank.
9

Remove the fuel tank cap by turning it counter clockwise.
Turn the fuel tank cap fully clockwise to make sure it is securely closed
Your ATV’s engine has been designed to use regular unleaded gasoline with a pump
octane number of 91 or higher.
Using Ethanol-added fuel may lead to carburetor clogging due to the fuel’s sulfuric
content reacting with brass and aluminum components in the fuel system. Tao Motor
always recommends using a fuel stabilizer to help mitigate damaging corrosion. Visit
your dealer to purchase recommended stabilizers and lubricants.
FUEL TANK CAP
10

Fuel OFF Fuel ON
FUEL COCK/ FUEL VALVE
The fuel cock/valve supplies fuel from the tank to the carburetor.
The fuel cock/valve lever positions are explained as follows and shown in the illustrations.
FUEL OFF
Arrow mark positioned over “OFF” position. Fuel is off and fuel will not flow to the carburetor. Always turn the fuel valve to
the"‘OFF" position and allow the engine to idle until it burns remaining fuel in the line when the ATV is being stored. Once the
fuel in the line has been cleared, drain the carburetor bowls. Following this procedure will help reduce corrosion and carburetor
damage.
FUEL ON
Arrow mark positioned over “ON” position. Fuel is on and fuel will flow to the carburetor.
STORAGE
Drain gasoline from the fuel tank and carburetor of the ATV if being stored for more than over 48hrs.
11
Table of contents
Popular Offroad Vehicle manuals by other brands

Yamaha
Yamaha MM700A manual

Arctic Cat
Arctic Cat DVX 90/90 UTILITY Service manual

Polaris
Polaris Magnum 500 2000 Owner's manual supplement

ATI Technologies
ATI Technologies THRASHER LZ170-3A owner's manual

BOMBARDIER
BOMBARDIER outlander max 650 efi 2006 Operator's guide

Polaris
Polaris RZR XP 1000 EPS High Lifter Edition owner's manual