Tappan Top Freezer Frost Free Refrigerator User manual
P/N 218946600 (9904)
2
Product Registration
This Owner’s Guide provides specific
operatinginstructionsforyourmodel.
Userefrigeratoronlyasinstructedinthis
Owner’s Guide.
© 1999 White Consolidated Industries, Inc.
Allrightsreserved.
Contents
ThisOwner's Guide will instruct you on how to properly operate and care for your
product.Pleasereadthrough the informationcontainedinyourliterature pack to
learn more about your new appliance.
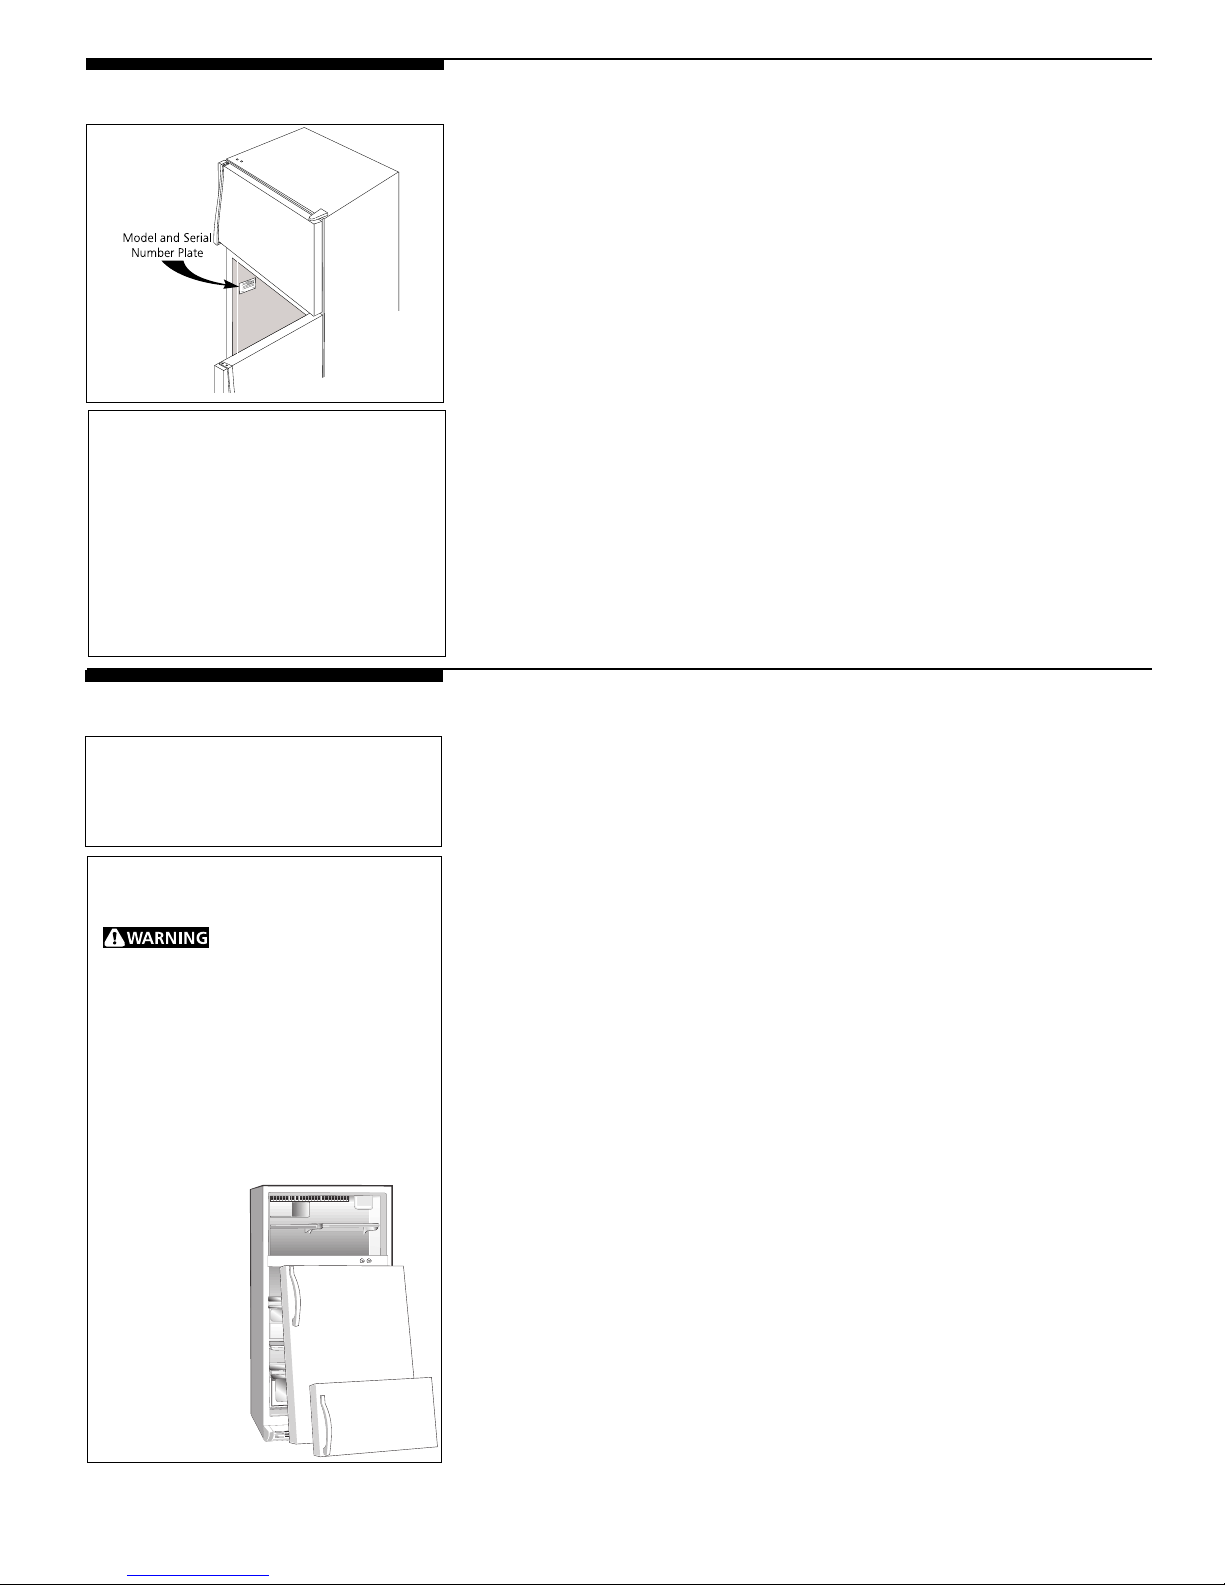
Record Your Model and Serial Numbers
RecordtheModelNo.andSerialNo.ofthisrefrigeratorinthespacesprovidedbelow.
Thesenumbersare foundonthe serialplatelocatedon topleftwall ofrefrigerator
compartment.
Model No. __________________________________________________
Serial No. ___________________________________________________
Register Your Product
The self-addressed PRODUCT REGISTRATION CARD (shown left) should be filled in
completely,signedandreturnedtoFrigidaire.
2 Product Registration
3 Important Safety Instructions
3 ForYourSafety
3 ChildSafety
3 ElectricalInformation
3 OtherPrecautions
4 FirstSteps
4 Location
4 Installation
4 Door Opening
4 Leveling
4 Cleaning
5 Energy Saving Ideas
5 Setting the Controls
5 Temperatures
5 EnergySaverSwitch
5 Moisture
6 Fresh Food Storage
7-8 Care and Cleaning
7 Inside
7 Outside
7 ReplacingLightBulb
8 Vacation and Moving Tips
8 Automatic Ice Maker
8 Ice Maker Tips
9-11 Reversible Door Instructions
12-14 Avoid Service Checklist
14 Normal Operating Sounds
15 Warranty
Versión en español
Si desea obtener una copia en español de
esteManualdelUsuario,sírvaseescribirla
dirección que se incluye a continuación.
Solicite la P/N 218946700.
Spanish Owner's Guides
Frigidaire Home Products
P.O. Box 212378
Augusta, GA 30917
Proper Disposal of Your
Refrigerator/Freezer
Risk of child entrapment.
Child entrapment and suffocation are
not problems of the past. Junked or
abandonedrefrigeratorsorfreezersare
stilldangerous—eveniftheywillsitfor
"justafewdays."Ifyouaregettingridof
youroldrefrigeratororfreezer,please
followinstructionsbelowtohelpprevent
accidents.
BEFORE YOU THROW AWAY YOUR
OLD REFRIGERATOR/FREEZER:
Remove
doors.
Leave
shelvesin
place,so
children
may not
easilyclimb
inside.

3
Important Safety
Instructions
Avoid fire hazard or
electricshock.Donotusean extension
cord or an adapter plug. Do not remove
any prong from the power cord.
Readall instructions beforeusing this refrigerator.
For Your Safety
Donotstoreorusegasolineorotherflammable vaporsandliquids inthevicinity of
thisoranyotherappliance.Readproductlabelsforflammabilityandotherwarnings.
Child Safety
• Destroycarton,plasticbags,andanyexteriorwrappingmaterialimmediately
aftertherefrigeratorisunpacked.Childrenshouldneverusetheseitemsforplay.
Cartons covered with rugs, bedspreads, plastic sheets or stretch wrap may
becomeairtightchambersandcanquicklycause suffocation.
• Remove all staples from the carton. Staples can cause severe cuts and destroy
finishesiftheycomeincontactwith otherappliancesorfurniture.
• Anempty,discardedicebox,refrigeratororfreezerisaverydangerousattraction
to children. Remove the door of any appliance that is not in use, even if
itis being discarded.
Electrical Information
These guidelines must be followed to ensure that safety mechanisms in the
design of this refrigerator will operate properly.
•The refrigerator must be plugged into its own 115 Volt, 60 Hz, AC only
electrical outlet. The power cord of the appliance is equipped with a 3-prong
grounding plug for your protection against shock hazards. It must be plugged
directly into a properly grounded 3-prong receptacle. The receptacle must be
installed in accordance with local codes and ordinances. Consult a qualified
electrician. DO NOT USE AN EXTENSION CORD OR AN ADAPTER PLUG.
• If voltagevariesby10 percent ormore,performanceof yourrefrigeratormaybe
affected. Operating the refrigerator with insufficient power can damage the
compressor.Suchdamageisnot covered under yourwarranty.Ifyoususpectyour
voltageishighorlow,consultyour power company for testing.
• Topreventtherefrigeratorfrombeingturnedoffaccidentally,donotplugtheunit
intoanoutletcontrolledbyawallswitchorpullcord.
• Do not pinch, knot, or bend the powercord in any manner.
Other Precautions
• Neverunplugtherefrigeratorbypullingonthepowercord.Alwaysgripthe plug
firmlyandpullstraightoutfromthereceptacle.
• Toavoidelectricalshock,unplugthe refrigerator before cleaningandbefore
replacingalightbulb.Note:TurningthecontroltoOFFturnsoffthecompressor,but
doesnotdisconnectpowertothelightbulborotherelectricalcomponents.
• Donotoperatetherefrigeratorin the presence of explosivefumes.
• Iftherefrigeratorhasanautomaticicemaker,avoidcontactwithanymovingparts.

4
FirstSteps
1"
1"
1/2"
1/2"
3" AIR SPACE
Clearance
Properaircirculation andlevelingwill
ensureefficientoperation.
Screw-typeLevelers(some models)
Sunken bolt (some models)
Exposed bolt (some models)
Before starting refrigerator, follow these important first steps:
Location
• Choose a place that is near a grounded electrical outlet. DO NOT use an
extensioncordoran adapter plug.
• If possible, place refrigerator out of direct sunlight and away from range,
dishwasher,or otherheatsources.
• Refrigerator must be installed on a floor that is level and strong enough
tosupportafullyloadedrefrigerator.
• Considerwatersupplyavailability for modelsequippedwithanautomatic ice
maker.
Installation
• Donotinstallrefrigeratorwheretemperaturewilldropbelow60°F(15°C)orrise
above 110°F (43°C). The compressor will not be able to maintain proper
temperatures.
• Allowspacearoundunitforgoodaircirculation.Leave a 1 inch (25 mm) space
behindanda3 inch(75mm)space above refrigeratorforadequatecirculation.
• Inarecessedinstallation, allowanextra1/2inch (10-15mm)oneachside for
installationease.
• Forbestcirculation,elevateunit1inch(25mm)fromfloor,especiallyifflooris
carpeted.
Door Opening
Doors should open to allow easy access to a counter when removing food.
• Donotpositionrefrigeratorsoyou havetowalk aroundrefrigeratordoors.
• Reversedoorsifnecessary. See"ReversibleDoorInstructions."
Leveling
Allfourcornersofrefrigeratormustrestfirmlyonasolidfloor.Somemodelsare
equippedwithadjustablescrew-typelevelers. Othersareequippedwithrollers. If
yourrefrigeratordidnotcomewithrollers,theycanbepurchasedfromyourdealer.
RefertotheInstructionSheet,packedwiththeToeGrille,toremovetheToeGrille
(somemodels).
•Toadjust screw-type levelers (some models): Tip cabinetbackslightlyand
raiseadjustingboltsasneeded.
•To adjust front rollers (some models): Use a screwdriver, 3/8" socket
wrench,ornutdrivertoadjustrollersasshown.
RAISE THE FRONT of cabinet enough so doors will close freely when opened
halfway.Levelcabinetsidetoside. RefertotheInstructionSheet,packedwiththe
ToeGrille,to replacetheToe Grille(somemodels).
Cleaning
• Washtheinside,allremovableparts,andthe outside with mild detergent and
warm water. Wipe dry. DO NOT USE HARSH CLEANERS ON THESE
SURFACES.
• Donotuserazorbladesorothersharp instruments that can scratch appliance
surface,whenremovingadhesivelabels.Anyglueleftfromtapeorenergylabel
can be removed with a mixture of warm water and mild detergent, or— touch
gluewithstickysideof the tapealreadyremoved.
• DO NOT REMOVE SERIAL PLATE.

5
Energy Saving Ideas • Installrefrigeratorincoolestpartofroom,outofdirectsunlight,andawayfrom
heatingductsorregisters.Do not place refrigeratornexttoheat-producing
appliancessuchasarange,oven,ordishwasher.Ifthisisnotpossible,asection
ofcabinetry,oranaddedlayerofinsulationbetweenthetwoapplianceswill
helprefrigeratoroperatemoreefficiently.
• Levelrefrigeratorsodoorsclosetightly.
• RefertothisOwner'sGuideforsuggested refrigeratorsettings.
• Cleaningcondenserregularlywillhelp refrigeratorrunmoreefficiently.See
Outside in "Care and Cleaning" section.
• Do not overcrowd refrigerator, or block cold air vents. Doing so causes
refrigeratortorunlongerandusemoreenergy. Shelves shouldnotbelinedwith
aluminum foil, wax paper, or paper toweling. Liners interfere with cold air
circulation,makingrefrigeratorlessefficient,whichcouldcausefoodspoilage.
• Coverfoods,and wipecontainersdrybeforeplacing theminrefrigerator.This
cutsdownonmoisturebuild-upinsideunit.
• Organize refrigerator to reduce door openings. Remove as many items as
needed at one time, and close door as soon as possible.
Setting Controls
RefrigeratorControl
Cool Down Period
Toensuresafefoodstorage,allowtherefrigeratortooperate withthedoorsclosed
for at least 8 to 12 hours before loading with food.
Refrigerator and Freezer Controls
• Tostartout,setcontroldialstothemidpointforatrialperiodof24hours.
Temperatures
• After 24 hours, adjust the controls as needed. Adjust temperatures one
number at a time. For colder temperatures, turn the dial toward COLDEST.
For warmer temperatures, turn the dial toward COLD. The temperature will
increaseordecrease,butnotnecessarilyby1, 2, or 3 degrees.
An adjustment made to one compartment may require an adjustment to the other.
• Turning the refrigerator control will change the temperature in BOTH
compartments. If the refrigerator control is turned to OFF, cooling
stops in both compartments.
• Turningthefreezercontrolwillchangeonlythetemperatureinthefreezer
compartment.
To maintain temperatures, a fan circulates air in the refrigerator and freezer
compartments. For good circulation, do not block cold air ventswith food items.
Energy Saver Switch (some models)
Ifyourrefrigeratoris equipped withanEnergySaverSwitch, keep itsetonENERGY
SAVER for lowest energy usage.
Moisture
During humid weather, or if moisture appears on the cabinet between the doors,
set switch to REDUCE EXTERIOR MOISTURE. A heater will warm the surface and
allowmoisturetoevaporate.
eco
EnergySaver
FreezerControl
6
Fresh Food Storage
SlidingShelf
CombinationCantilever/Sliding Shelfwith
PlasticClip
C
LIP
T
ALLY
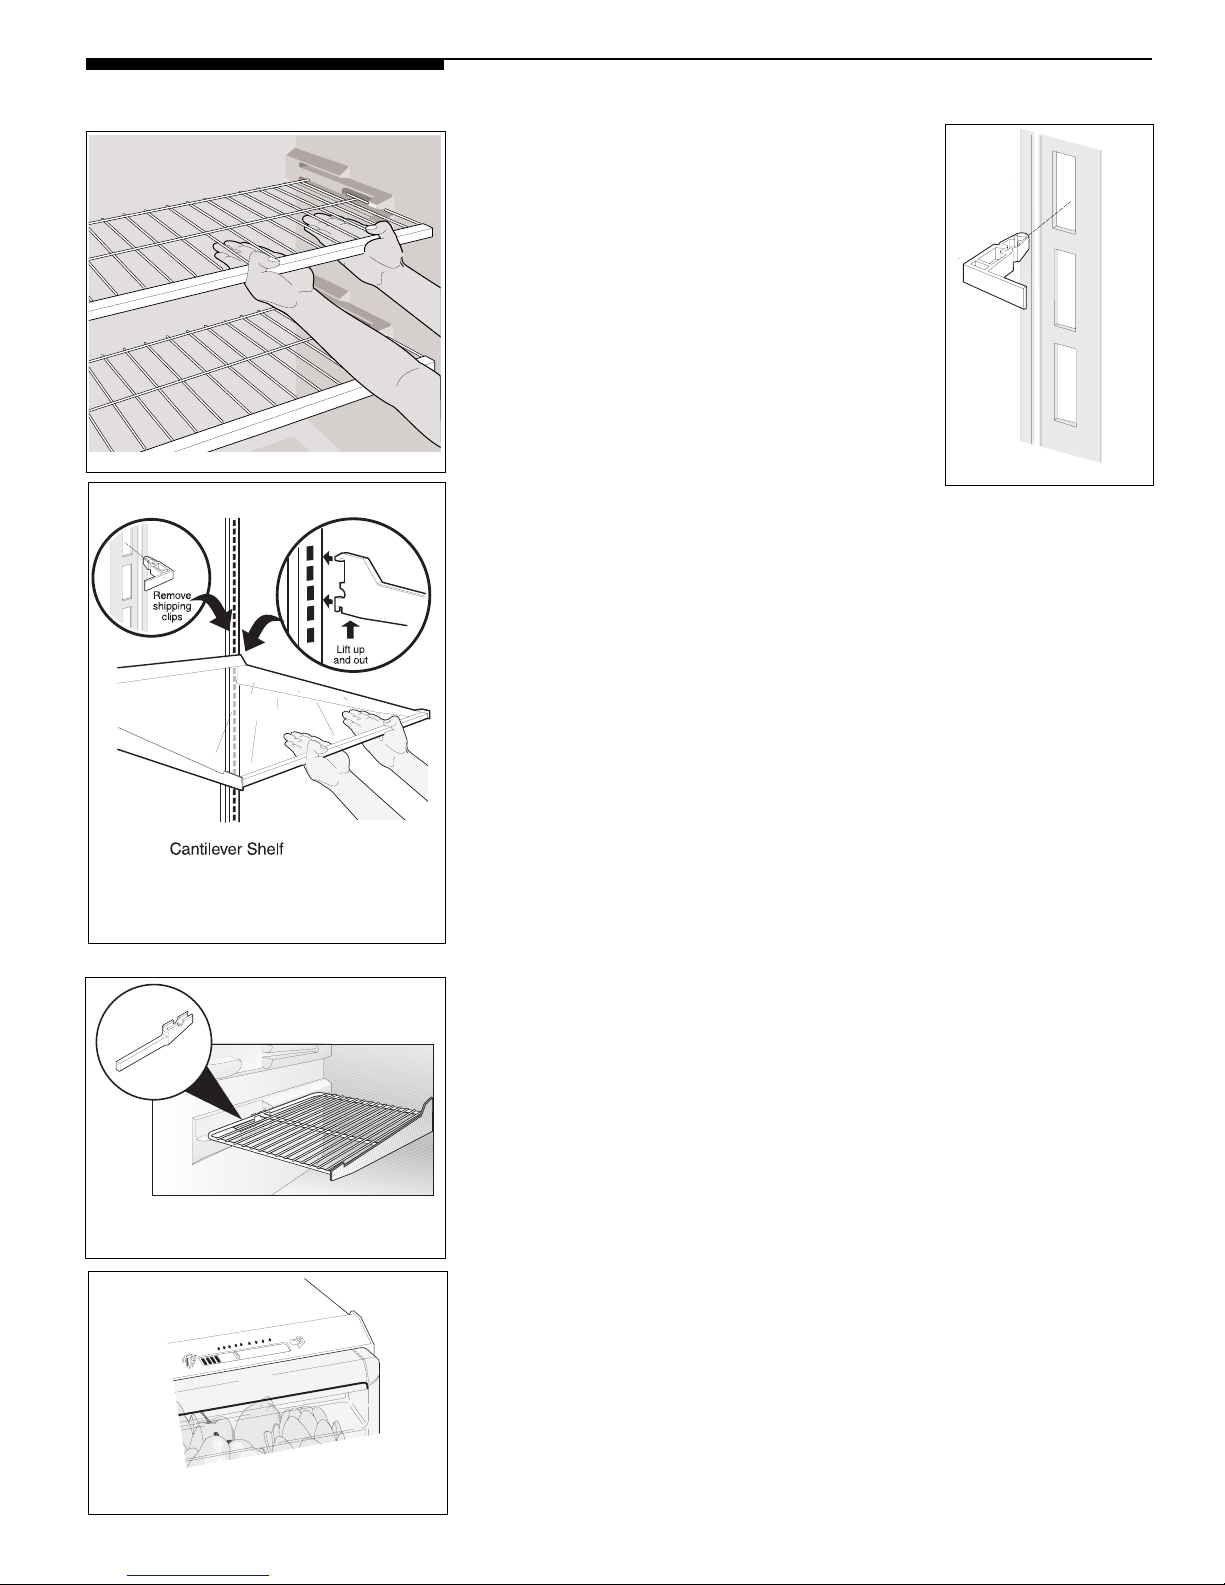
Shelf Adjustment
ShippingClips
Refrigerator shelves are easily adjustable to suit
individual needs. Some models have sliding shelves,
othershavecantilevershelves. Beforeadjustingshelves,
remove all food. Remove and discard shipping clips
wedgedintothecantileverrailabovetheshelfhook(see
below). Theseclipsstabilizetheshelvesduringshipping.
Toadjustslidingshelves,
removebypullingforwardtothe
stopposition,thenliftfrontedgeupandpullout.Replace
onanypairofrailsbyreversingthisprocedure.
Toadjustcantilevershelves
(shelvessupportedattherear
oftherefrigerator),liftthebackoftheshelfupandout.
Replaceshelfbyinsertinghooksatrearintowallbracket.
Lowerandlockintoposition.
Toadjustcombinationcantilever/slidingshelves,
remove
shelfbyliftinghooksupandoutofrearwallbracket. Next
flexplasticcliptowardscenterofrefrigerator,andpullshelfstraightout.Replaceshelf
byslidingplasticclippastsidewallsupport. Thenlockhooksatrearintowallbracket.
Note: Plasticclipwillautomaticallyfitsecurelyagainstsidewall.
Door Storage
Doorracksallowconvenientstorageofjars,bottles,andcans.Itemsusedoftenare
availableforquickselection. Somemodelshavedoor racks which can accommodate
gallon-sizeplasticdrinkcontainersandeconomysize jarsandcontainerswhichare
availabletoday. Someracksareremovable and adjustableformaximumefficiency.
Note: When storing gallon-sized items on lower door racks, do not position meat
paninitslowestpossible position. Themeatpanhandleorshelving may interfere
withthedoorclosing.
The dairy compartment is warmer than the general food storage section, and is
intendedforshortterm storage ofcheese,spreads,orbutter.
Crispers
Thecrispers,locatedunderthebottomrefrigeratorshelf,are designedforstoring
fruits,vegetables,andother freshproduce.Washitemsin clear water,andremove
excesswaterbeforeplacinginthecrispers.Itemswithstrongodorsorhighmoisture
should be wrapped before storing.
The Humidity Control (some models) allows you to adjust the humidity within the
crisperdrawer. Thiscanextendthelifeoffreshvegetables,whichkeepbestinhigh
humidity.Leafyvegetables,however,keepbestwhen stored with Humidity Control
set on HIGH, or in a drawer without a Humidity Control. This keeps incoming air to
a minimum and maintains maximum moisture content.
Meat Pan (some models)
Some models are equipped with a Meat Pan that can be positioned below any
refrigeratorshelf. Usethis panforshort termstorageofbulkmeatitems.Ifmeats
are to be kept longer than 1 or 2 days, they should be frozen.
FRESH FRUITS & VEGETABLES
LOWER
FRUITS
HIGHER
HUMIDITY CONTROL
VEGETABLES
HumidityControl
7
Keepyourrefrigeratorandfreezercleantopreventodorbuild-up.Wipeupanyspills
immediately, and clean both sections at least twice a year. Never use metallic
scouringpads,brushes,abrasivecleanersorstrongalkalinesolutionsonanysurface.
Do not wash any removable parts in a dishwasher.
Always unplug power cord from wall outlet before cleaning.
Turning the
controltoOFFdoesnotdisconnectpowertocontrols,lightbulb,orotherelectrical
components.
Inside
Washinsidesurfacesofrefrigeratorandfreezerwithasolution of 2 tablespoons
baking soda in 1 quart warm water. Rinse and dry thoroughly.
Be sure to wring
excess water out of sponge or cloth before cleaning around controls, light
bulb,oranyelectricalparts.
Washremovablepartssuchasshelvesanddrawerswithbaking soda solution or mild
detergent and warm water. DO NOT USE HARSH CLEANERS ON THESE SUR-
FACES.Rinseanddry thoroughly.Cleandoorgaskets withmildsuds,rinse withclear
water, and wipe dry. Do not use razor blades or other sharp instruments that can
scratchappliancesurfacewhenremovingadhesivelabels.Anyglue leftfromtape or
energy label can be removed with a mixture of warm water and mild detergent, or—
touch glue with sticky side of the tape already removed. DO NOT REMOVE SERIAL
PLATE.
Outside
Washcabinetandhandleswithwarmwaterandmildliquid detergent. Rinse well and
wipedrywith a cleansoftcloth.
Whenmovingrefrigerator,pullstraightout. Donotshiftrefrigeratorfromsidetoside
asthismaytearorgougefloorcovering. Ifrefrigeratorhas anautomaticicemaker,
be careful not to move refrigerator beyond plumbing connections.
Periodicallycleancondenser(blacktubesandwiresonthebackof refrigerator).
Usingavacuumwithdustingtool attachment, vacuum coils toremovedustbuild-up.
Donotallowlintordustto accumulate on coils.
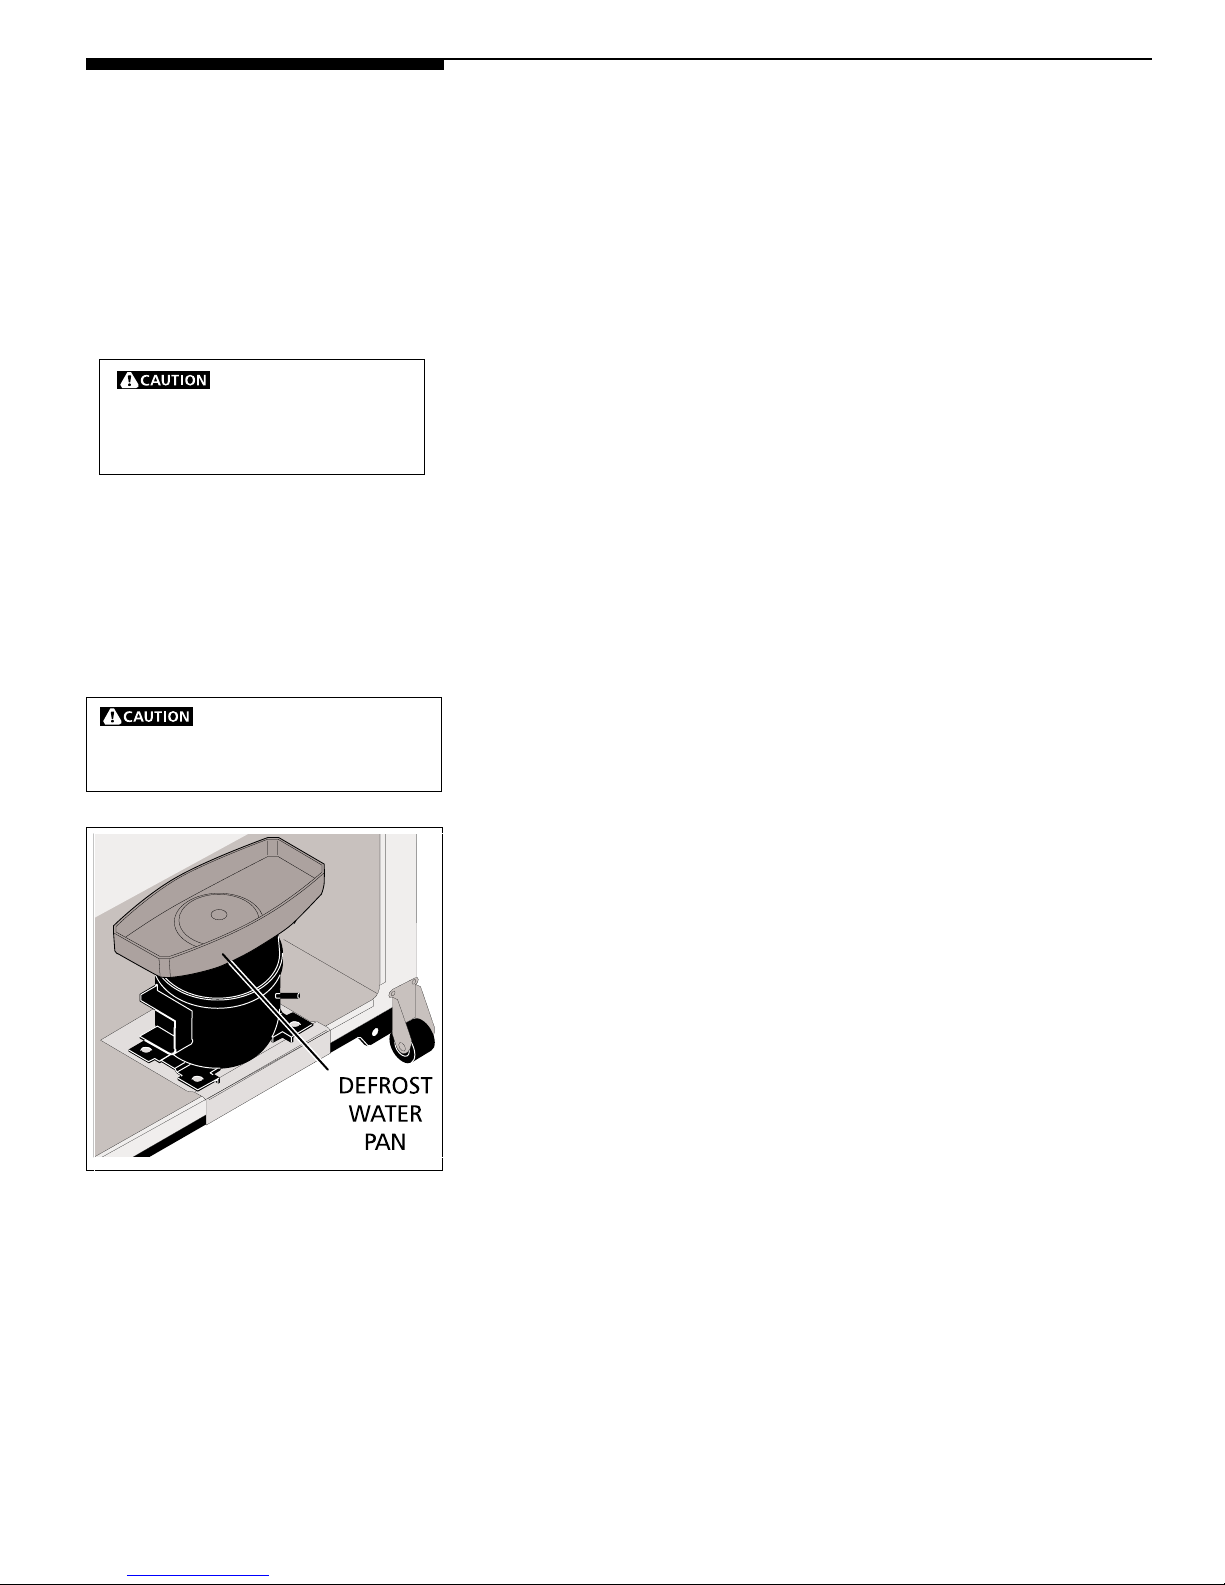
The defrost water pan is located at the bottom rear of refrigerator, on top of
compressor (shown left). The pan should be cleaned regularly. Wipe clean with a
damp cloth.
Replacing Light Bulb
To replace light bulb:
1. Unplugrefrigerator.
2. Wearglovesasprotection againstpossiblebrokenglass.
3. Replace old bulb with an appliance bulb of the same wattage.
4. Remembertoplugrefrigeratorbackin.
Care and Cleaning
To avoid damage, and
helprefrigeratorrunasefficientlyas
possible,cleancondenserregularly.
Damp objects stick to
cold metal surfaces. Do not touch
refrigerated surfaces with wet or
damp hands.
8
Care and Cleaning
(continued)
Vacation and Moving Tips
Shortvacations: Leaverefrigeratoroperatingduring vacationsof1to3weeks.Use
upallperishableitemsfromtherefrigeratorsection. Wrapandstore otheritems
inthefreezer.If the unit hasanautomaticicemaker, turn offtheicemaker.
Long vacations: Remove all food and ice if you will be gone 1 month or more. Turn
the control to OFF and disconnect the power. If the unit has an automatic ice
maker, turn off the ice maker and turn the water supply valve to the closed
position. Defrost and clean the interior thoroughly. Leave both doors open to
prevent odor and mold buildup. Block open if necessary.
Moving: When moving refrigerator, follow these guidelines to prevent damage:
• Remove all food and other items from both refrigerator and freezer
compartments. Empty ice storage bin. Defrost and clean interior
thoroughly.
• Ifahand truckisusedinmoving, loadrefrigeratorfromthe side.
• Turnfrontrollersasfarupaspossible(somemodels). Thiswillprotectthem
duringslidingormoving.
• Cabinet should be well padded and handled with care. DO NOT DROP.
Ifyourrefrigeratorhasan automaticicemaker,itwillprovideacontinuoussupply
oficefornormaluse.Theautomatic ice maker is anoptionalaccessorythatmaybe
installedinmostmodelsatanytime.Callyourlocaldealerforinstallation.
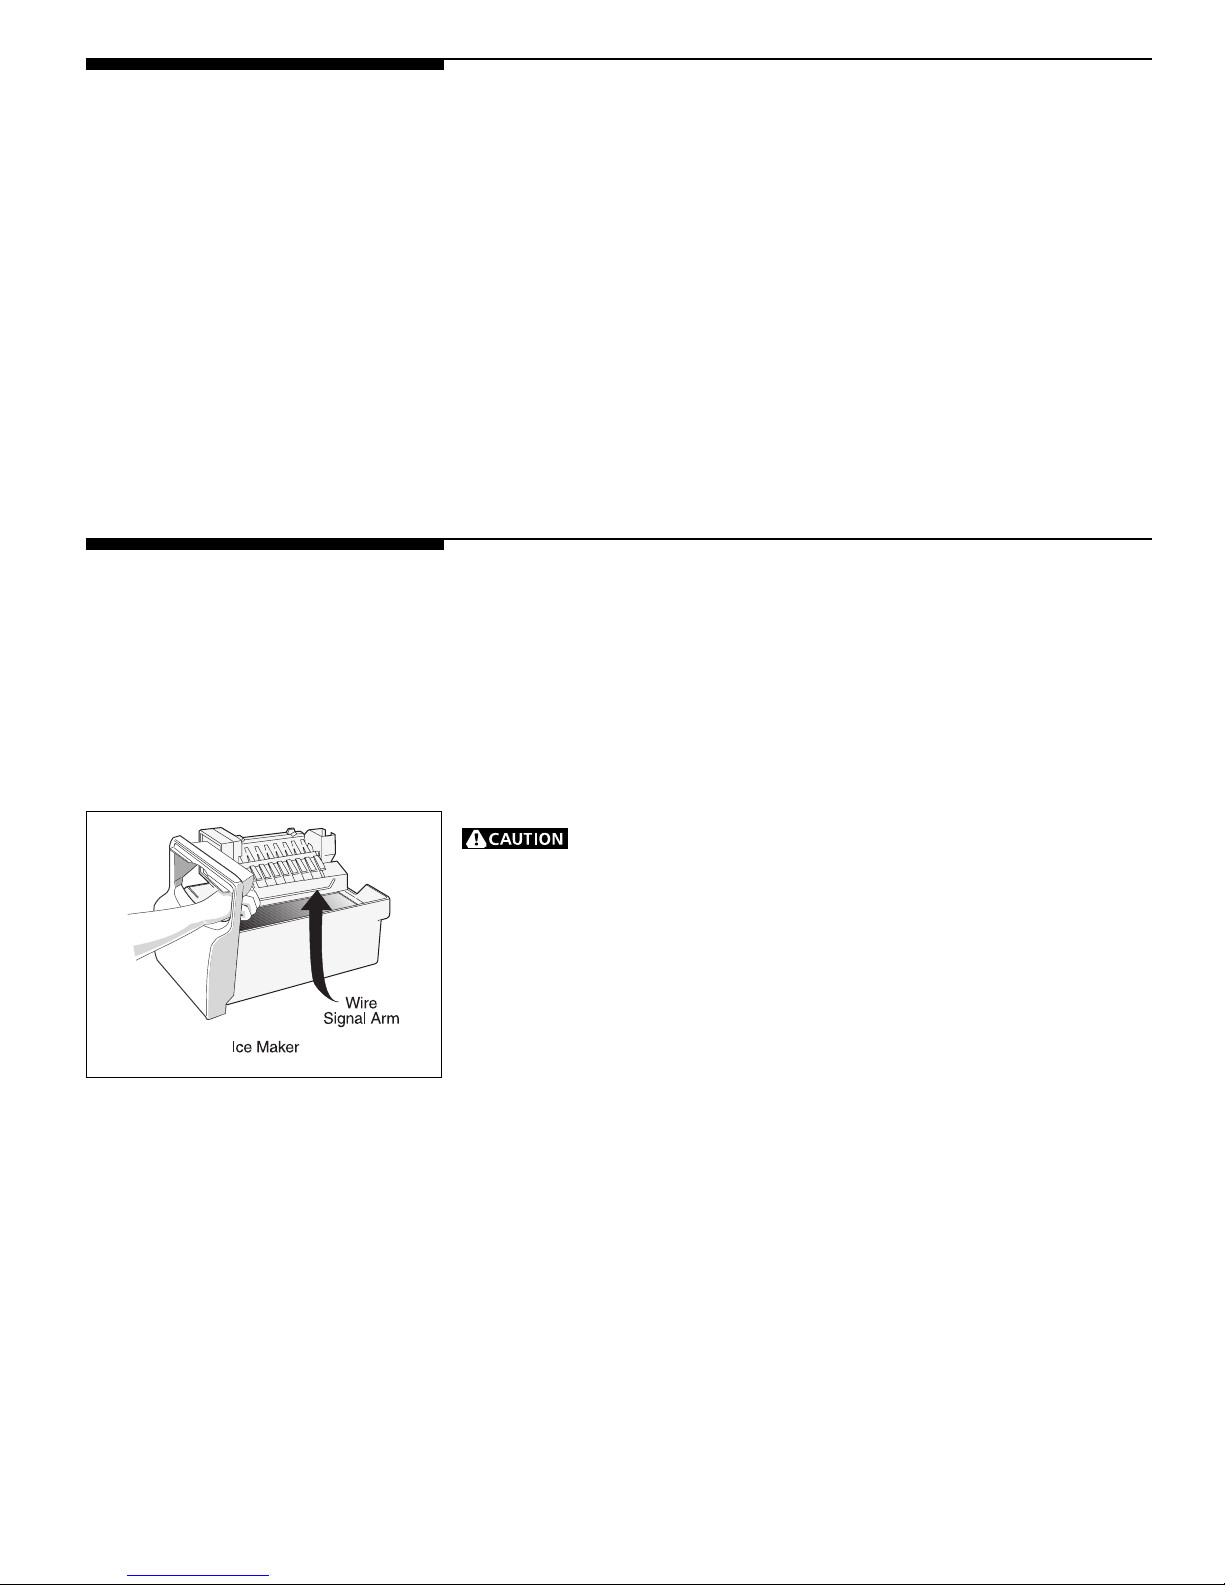
After the plumbing connections have been completed, the water supply valve must
be opened. Place the ice container under the ice maker, pushing it as far back as
possible. Lower the wire signal arm to its "down" or ON position. Because of new
plumbingconnections,thefirstproductionoficecubesmaybediscoloredorhave
an odd flavor. Throw ice away until the cubes made are free of discoloration and
taste.
Tostopicemaker,liftwiresignalarmuntilitclicksandlocksinthe"up"orOFF
position. Theicemaker turnsoffautomaticallywhen icecontainerisfull. If your
modelhasanadjustablefreezershelf,place shelfsowiresignalarmwillhittheice
whenicecontainerisfull.
Ice Maker Tips
1. Ice stored too long may develop an odd flavor. Empty the container, and be sure
wiresignalarmisin its "down"orONposition. Icemaker will then producemore
ice.
2. Occasionallyshakethecontainerto keep iceseparated.
3. Keepwiresignalarminits"up"orOFF positionuntilrefrigeratorisconnectedto
thewatersupply,or whenever water supply is turned off.
4. Certain sounds are normal when the ice maker is operating. They are:
Motor operation
Icebeingloosenedfromtray
Icebeingdroppedintocontainer
Running water
Water valve opening and closing
For more information on these operations, see "Normal Operating Sounds."
5. Wash ice container in warm water with mild detergent. Rinse well and dry.
6. Stopicemakerwhencleaningfreezer,or for short vacations.
7. Ificemakerwill be turned offforalongperiod of time, turnwatersupplyvalve
totheclosedposition.
Automatic Ice Maker
Rememberthat water quality determines your ice quality. It is best
toconnecticemakertowater that is not softened. Chemicalsfromasoftenerthat
isnotworkingproperlycan damage theicemaker. Ificemakeris connected tosoft
water,ensuresoftenerismaintainedandworkingproperly.
or
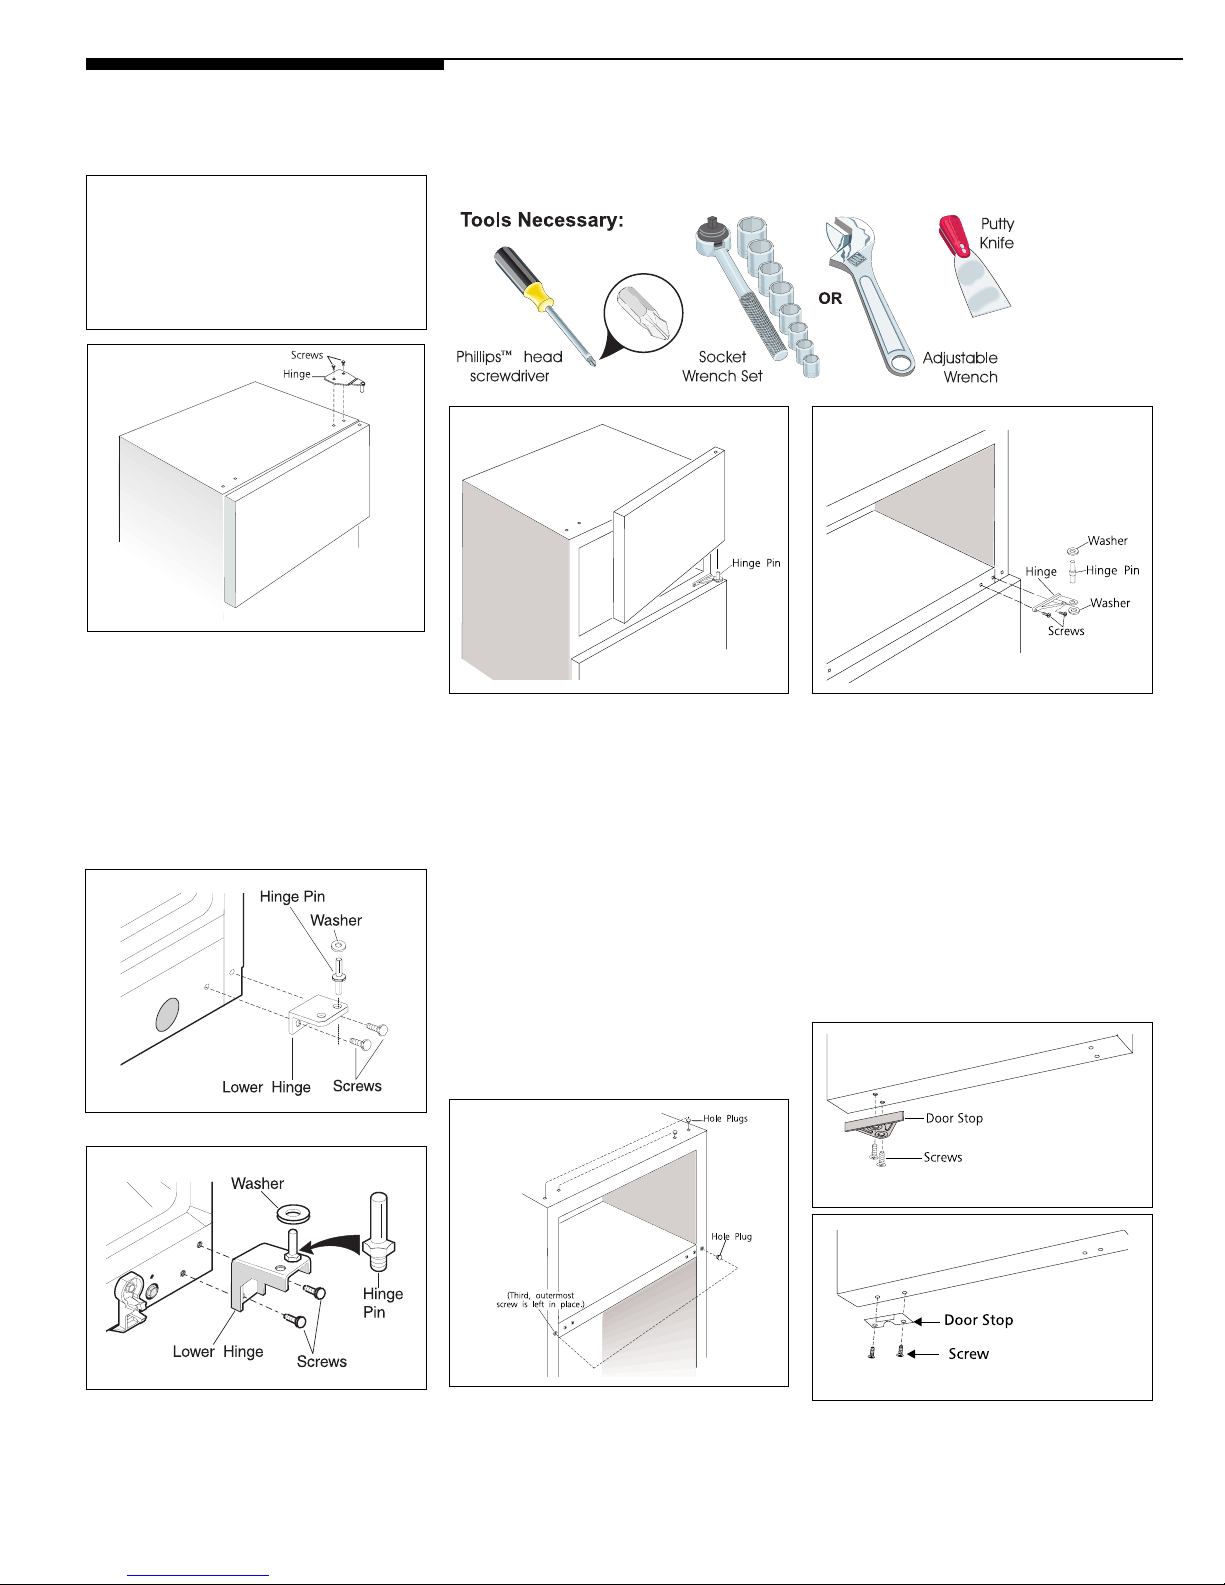
4. Remove hinge pin, hinge, and the two
screws attaching the lower hinge. Save
the hinge, hinge pin, washer (some
models) and screws for reassembly
later.
G05I0101FreezerDoor
G05I0090
6. After the handles are removed (see
steps 7 and 8), remove door stop from
bottomoffreezerandrefrigeratordoor
andreinstallonoppositeside.
RefrigeratorDoor
G05I0103 new
G05I0106 new
2. Openthefreezerdoorenoughtoallow
ittobeliftedoffthecenterhinge. 3. With the refrigerator door closed,
remove center hinge pin. (Note the
arrangement of the upper and lower
washers (some models) on the hinge pin.
The washers must be assembled later in
the same manner.) Open refrigerator
door enough to allow door to be lifted off
the lower hinge. Remove the two screws
attaching the center hinge. The third
outermost screw under the center hinge
should be left in place. Savehinge, pin,
and washers (some models) for
reassembly later. Reinstall screws in
originalholes.
5. Carefullyremove the hole plugs from
thehingeholesin thecentermullionand
topofcabinetandreinstallintheopposite
setofholes.
Yourrefrigeratorisequipped withconvertibledoorhinges.Hinging ofthedoorcan
be changed to the opposite side any time you wish. An envelope containing extra
plasticholeplugs is includedinsomemodels. Turntherefrigeratorcontrol toOFF.
Remove all food, bottles, and other items from the door. Beginwith freezer door.
Completely remove one door before beginning the other.
Reversible Door
Instructions
NOTE: Some models have “pocket”
handles,whichare recessedintothe
side of the door. On these models,
only the hinges will need to be re-
versed. A handle is built into both
sidesofeach door.
1.RefertotheInstructionSheet, packed
with the Toe Grille, to remove the Toe
Grille(somemodels).Snapoffhingecover
attopofcabinet (somemodels).Withthe
freezer door closed, remove the two
screwsattachingupperhinge tocabinet.
Liftthehingeup andoff. Besuretosave
screws and hinge for reassembly
later.

10
G05I0117
7. Reverse handles while doors are off.
Remove the two screws attaching handle to
the bottom of freezer door. Swing bottom
of handle away from door, and slide handle
straight up and off of dovetail button.
Remove screw and dovetail button and
installonotherside,usingsameholesasthe
nameplate. To move nameplate to other
side, remove magnetic nameplate from its
frame,turnframe upsidedownand installin
oldhandleholes.Insertmagneticnameplate
into frame. Reverse instructions for
reattachinghandle. Startwithhandleoffset
away from door. Place top of handle over
dovetail button, swing handle into an
uprightposition andpush upward,lockingit
into place. Secure bottom of handle with
screws.
FreezerDoor
Reversible Door
Instructions(continued)
G05I0115
8. To remove handle: Remove the two
screws attaching handle to top of
refrigerator door. Swing top of handle
away from door, and slide handle down
and off of dovetail button. Remove screw
and dovetail button and install on other
side,movinghole plugsfromcorresponding
holes to the opposite side. Reverse
instructionsfor reattachinghandle.Start
with handle offset away from door. Place
bottom of handle over dovetail button,
swing handle into an upright position and
push downward, locking it into place.
Secure top of handle with screws.
Trim Removal
(Full-Length Trim models only):
Insomemodels, therefrigeratordoor hasa
fulllengthtrim piecethatcontinues from
the bottom of handle to the bottom of the
door. Thetopof thetrimfitsintothe base
of the handle. An adhesive "trim lock" is
positioned about half-way down. The
bottomof thetrim isheld inplacebyeither
an adhesive trim lock, or a trim lock with two prongs inserted into a hole on the face of
the door. Remove trim by gently pulling trim lock areas out and away from door. When
trim is free from door, gently pull trim down and away from base of handle.
To reattach trim: Slide both trim locks out of trim. Insert new adhesive trim locks
contained in your literature pack. NOTE: Trim lock must be removed and installed by
sliding OVER the two donut shaped areas. Install trim to handle by sliding under base of
handle.Carefullyaligntrim,and pressdownat trimlocklocations. Replaceholeplug on
opposite side. Use rubbing alcohol to remove any adhesive residue from old trim lock
location(s).
RefrigeratorDoor
G05I0066
Hinge Pin
Washer
Lower Hinge
Bolts
or
9.Ifyour refrigeratordoesnot haveaToeGrille,use aputtyknife toremovethe plasticplug
(not shown) from front of base and reinstall in the opposite set of lower hinge holes.
Assemble lower hinge to cabinet. Install hinge pin in opposite hinge hole from which it was
removed. Install the washer (some models) on the lower hinge pin and insert hinge screws,
but do not tighten. Hinges will have to remain loose against cabinet to align door.

11
Reversible Door
Instructions(continued)
G05I0071
G05I0105
G05I0107
10. Turn center hinge upside down and
secure to cabinet as shown, using the
screws that are in the new holes. Install
refrigeratordooron lowerhingepin. Align
door with edge of cabinet. Hold door on
frontofcabinet.
11. Place original washer (some models)
overholeinrefrigeratordoor. Lineupholein
centerhinge. Inserthingepin through both
holes. Place washer (some models) on hinge
pin, then position freezer door on center
hinge.
Bearing Plug
12. Remove plug from upper bearing of
door,andreinstallonoppositeside.
G05I0104 new
13. Assemble upper hinge to top of cabinet
and door. Use opposite set of holes. Do not
completely tighten screws. Align doors so
thereis aparallel gapbetween doors. Adjust
doors to cabinet so gaskets seal but do not
bind. Tightenupperandlower hinge screws.
Additional adjustment may be necessary
after loading door shelves. Return food,
bottles, and other articles to doors. Turn
refrigerator control on and to the
previoussetting.
RefertotheInstruction Sheet, packed with
the Toe Grille, to replace the Toe Grille
(some models).
12
RUNNING OF REFRIGERATOR
OCCURRENCE
Refrigerator compressor does not run. Refrigeratorcontrolisoff.Set refrigeratorcontrol. SeeSettingthe Controls.
Refrigeratorisindefrostcycle.Thisisnormalforafullyautomaticdefrostingrefrigerator.Thedefrost
cycleoccursperiodically,lastingabout20 minutes.
Plugat walloutletis disconnected.Makesure plugistightly pushedinto outlet.
House fuse has blown or circuit breaker has tripped. Check and/or replace fuse with a 15 amp time-
delayfuse.Resetcircuitbreaker.
Poweroutage. Checkhouse lights.Call local electriccompany.
Roomor outsideweatherishot. Itisnormal fortherefrigerator toworklongerunder theseconditions.
Refrigerator has recently been disconnected for a period of time. It takes about 8-12 hours for the
refrigeratorto cooldowncompletely.
Automatic ice maker is operating (some models). Operation of the ice maker causes the refrigerator
torunslightlymore.
Doorsare openedtoo frequentlyortoo long.Warm airenteringthe refrigeratorcauses it torun more.
Open the doors less often.
Refrigerator or freezer door may be slightly open. Make sure refrigerator is level. Keep food and
containers from blocking door. See Occurrence section OPENING/CLOSING OF DOORS/DRAWERS.
Refrigeratorcontrol (found inrefrigeratorsection)is settoocold.Set therefrigeratorcontrolto a
warmersetting untiltherefrigerator temperatureissatisfactory. Allow24hours forthetemperature
tostabilize.Then,ifthefreezer temperature isnot right,setthefreezercontroltoacoldersetting.
Refrigeratoror freezer gasketisdirty,worn, cracked,orpoorlyfitted. Cleanorchangegasket. Leaks
indoor sealwillcause refrigeratortorun longer inorderto maintaindesiredtemperatures.
Thermostatiskeeping therefrigeratorata constanttemperature.Thisis normal. Refrigeratorgoeson
and off to keep temperature constant.
Freezercontrolissettoocold.Setthe freezer control toa warmersetting until thefreezer temperature
issatisfactory.Allow24 hoursfor thetemperaturetostabilize.
Refrigeratorcontrolissettoocold.Settherefrigeratorcontrol to awarmer setting.Allow 24 hoursfor
temperaturestostabilize.Then,ifthefreezertemperatureisnotright,setthefreezercontroltoacolder
setting.
Refrigeratorcontrolisset toocold.Seeabovesolution.
Doors are opened too frequently or too long. Warm air enters the refrigerator whenever the door is
opened. Open the door less often.
Door is open slightly. See Occurrence section OPENING/CLOSING OF DOORS/DRAWERS.
Condenser is dirty. Clean condenser. See "Outside" in Care and Cleaning.
Freezercontrolissettoowarm.Setthe freezer control toa coldersetting until thefreezer temperature
issatisfactory.Allow24 hoursfor thetemperaturetostabilize.
Refrigeratorcontrol is settoowarm. Refrigeratorcontrol hassomeeffecton freezertemperature.Set
therefrigeratorcontroltoacoldersetting.Allow24hoursforthe temperature tostabilize. Then, ifthe
freezer temperature is not right, set the freezer control to a warmer setting. Refer to Setting the
Controls.
Refrigerator runs too much or too
long.
Refrigerator compressor goes on and
offfrequently.
Temperature in the freezer is too cold
and the refrigerator temperature is
satisfactory.
Temperature in the refrigerator is too
cold and the freezer temperature is
satisfactory.
Food stored in drawers freezes.
Temperature in the freezer or
refrigerator is too warm.
Temperature in the freezer is too warm.
Temperature in the refrigerator is too
warm and the freezer temperature is
satisfactory.
TEMPERATURES ARE TOO COLD
SOLUTION
TEMPERATURES ARE TOO WARM
Avoid Service Checklist Beforecallingforservice,reviewthis list.Itmay saveyoutime andexpense.This
listincludescommonoccurrences thatarenotthe result ofdefectiveworkmanship
ormaterialsinthisappliance.
13
OCCURRENCE
WATER/MOISTURE/FROST
OUTSIDE REFRIGERATOR
AUTOMATIC ICE MAKER (some models)
Ice maker is not making enough ice.
Ice maker will not stop making ice.
Ice maker is not separating the cubes.
Ice has bad odor and taste.
Moisture collects on inside of refrigerator
walls.
Water collects on bottom side of drawer
cover.
Water collects in bottom of drawer.
Moisture forms on outside of refrigerator or
between doors.
Ice maker is not making any ice.
WATER/MOISTURE/FROST INSIDE
REFRIGERATOR
Weatheris hotandhumid whichincreasesrate of frostbuildupand internalsweating.This isnormal.
Door is slightly open. See Occurrence section OPENING/CLOSING OF DOORS/DRAWERS.
Door is opened too often or too long. Open the door less often.
Vegetablescontain andgiveoff moisture.It isnotunusual tohavemoisture onthebottom sideof the
cover.
Washed vegetables and fruits drain while in the drawer. Dry items before putting them into drawer.
Water collecting in bottom of drawer is normal.
Weather is humid. This is normal in humid weather. When humidity is lower, the moisture should
disappear. Set Energy Saver switch to the Reduce Exterior Moisture position.
Doorisslightly open, causingcoldairfrominside therefrigeratortomeetwarmair fromoutside.See
Occurrence section OPENING/CLOSING OF DOORS/DRAWERS.
Icemaker wiresignalarm isin "up" orOFF position.Move wire signal arm to "down" or ON position.
Household water line valve is not open. Turn on household water line valve.
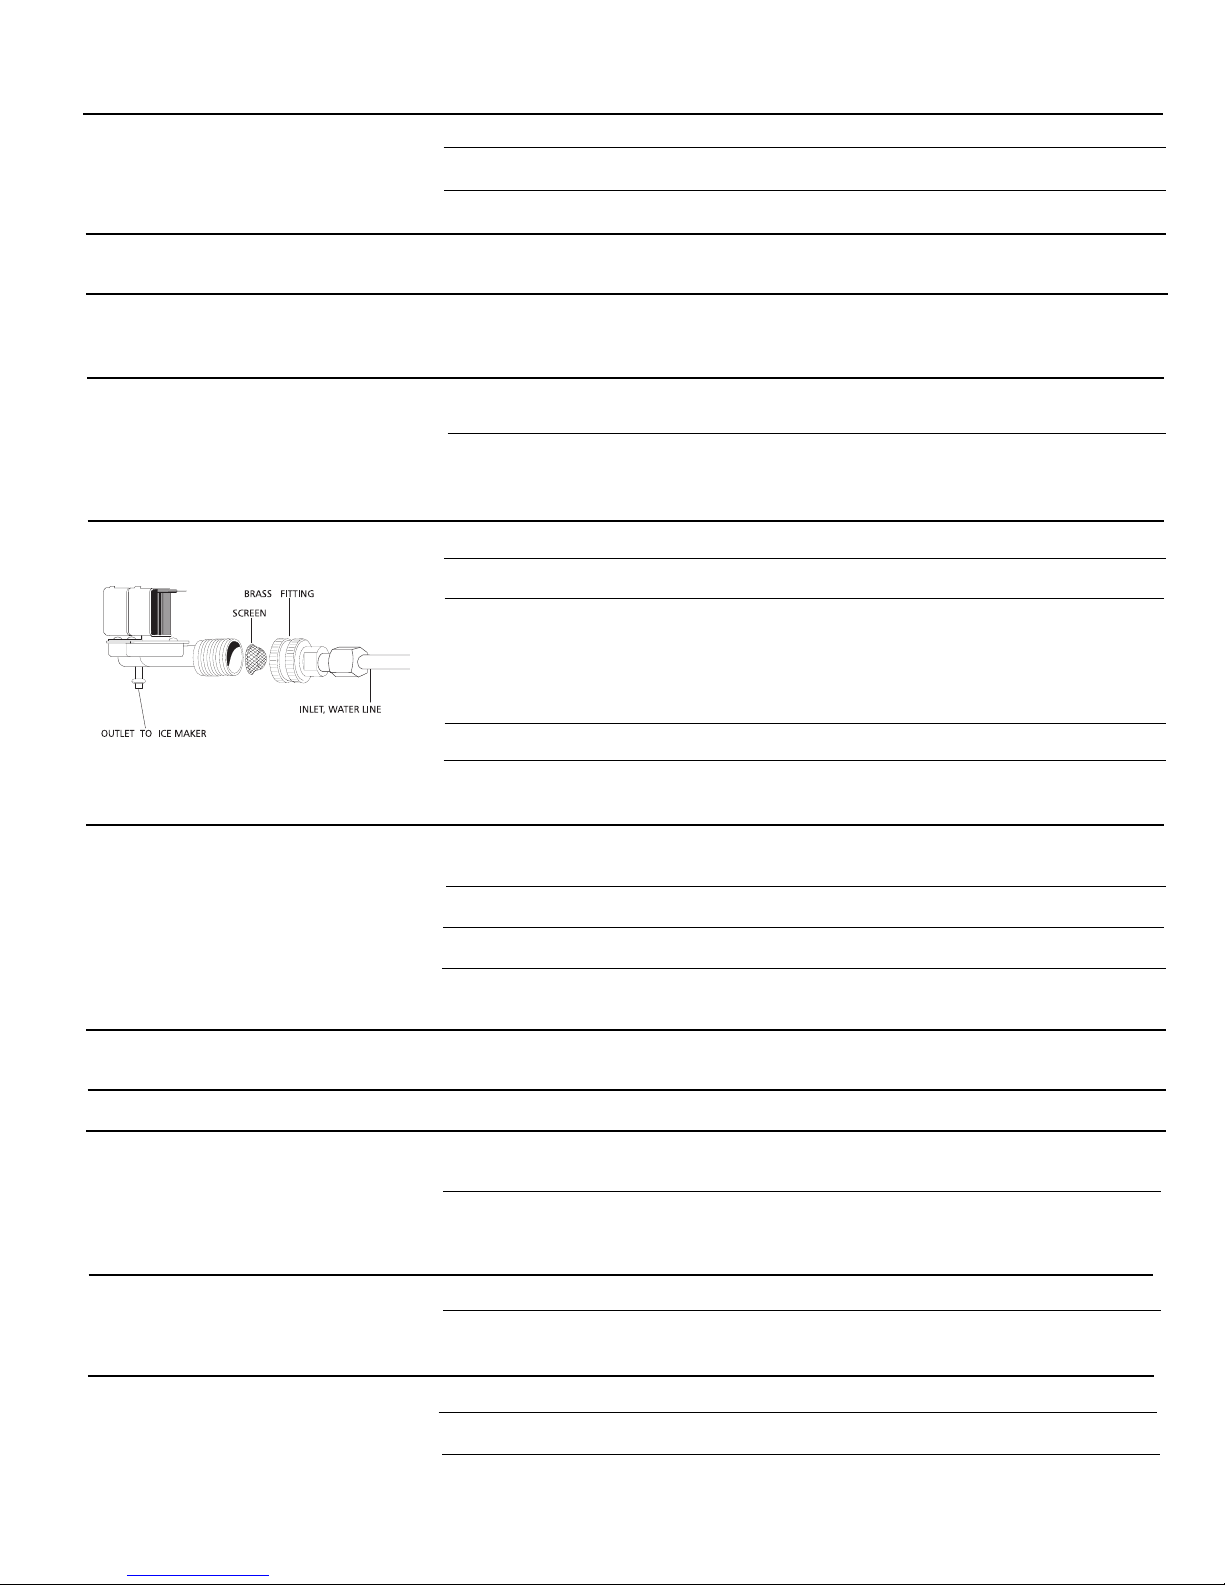
Watersupply valveinrefrigerator isbeingblocked byforeign material. Unplugthe refrigeratorand
turnoffwatersupply. Slide refrigeratorout andlocatewherewaterisconnectedto thevalve.Unscrew
the brass fitting and pull out the screen from inside the valve mesh. Clean the screen of foreign
material. Replace screen and brass fitting and turn the water supply on; check for leaks. Plug in
refrigeratorandslideintoplace.
Freezer is not cold enough. See Occurrence section TEMPERATURES ARE TOO WARM.
Saddlevalve on coldwaterpipe is blockedorrestricted byforeignmaterial.Turn offhouseholdwater
linevalve. Remove, cleanorreplace valve.
Ice maker is producing less ice than you expect. Ice maker should produce approximately
2 1/2 to 4 pounds of ice every 24 hours.
Freezer is not cold enough. See Occurrence section TEMPERATURES ARE TOO WARM.
Household water line valve is not completely open. Turn on household water line valve.
Watersupply valvein refrigeratorisbeing blockedby foreignmaterial. See Occurrence,"Ice maker
is not making any ice" above.
Ice maker wire arm is being held down by an item in the freezer. Remove item and release arm.
Remove any ice cubes which are frozen together over arm.
Icecubes arenot beingused frequentlyenough. Remove and shake ice bucket to separate cubes.
Icehaspickedupodororflavorfromstrongfoodstoredinrefrigeratororfreezer.Coverfoodstightly.
Discardstale ice. Icemakerwillproduce freshsupply.
Water running to ice maker has poor taste or odor. Add filter to ice maker. Consult a water
purifyingcompany.
Interior needs to be cleaned. Clean interior with sponge, warm water and baking soda.
Foodwithstrong odorisinrefrigerator. Cover foodtightly.
Door is not designed to swing shut automatically. Close door securely.
Door was closed too hard, causing other door to open slightly. Close both doors gently.
Refrigeratorisnotlevel.Itrocksonthefloorwhenitismovedslightly.Besurefloorislevelandsolid
andcan adequatelysupport refrigerator. Adjustlevelers orrollers(some models)as needed.
SOLUTION
ODORS IN REFRIGERATOR
OPENING/CLOSING OF DOORS/DRAWERS
Door(s) will not close.
14
Floorisunevenorweak.Refrigeratorrocksonthefloorwhenitismovedslightly.Besurefloorislevel
andcanadequatelysupportrefrigerator.Contactcarpentertocorrectsaggingorslopingfloor.
Refrigerator is touching the wall or cabinets. Be sure floor is level and can adequately support
refrigerator. Contactcarpenterto correctsaggingorslopingfloor.
Food is touching shelf on top of drawer. Keep less food in drawer.
Trackthat drawersslides onis dirty.Clean drawerand track.
Light bulb is burned out. See "Replacing the Light Bulb" in Care and Cleaning.
Lightswitch isstuck.Light switchislocated ontheceiling oftherefrigerator compartmentnear
thetemperature controlbox. Pushinlight switchtorelease.
No electric current is reaching refrigerator. See Occurrence section RUNNING OF
REFRIGERATOR.
SOLUTION
OCCURRENCE
OPENING/CLOSING OF DOORS/DRAWERS (Cont'd)
Door(s) will not close.
Drawers are difficult to move.
LIGHT BULB IS NOT ON
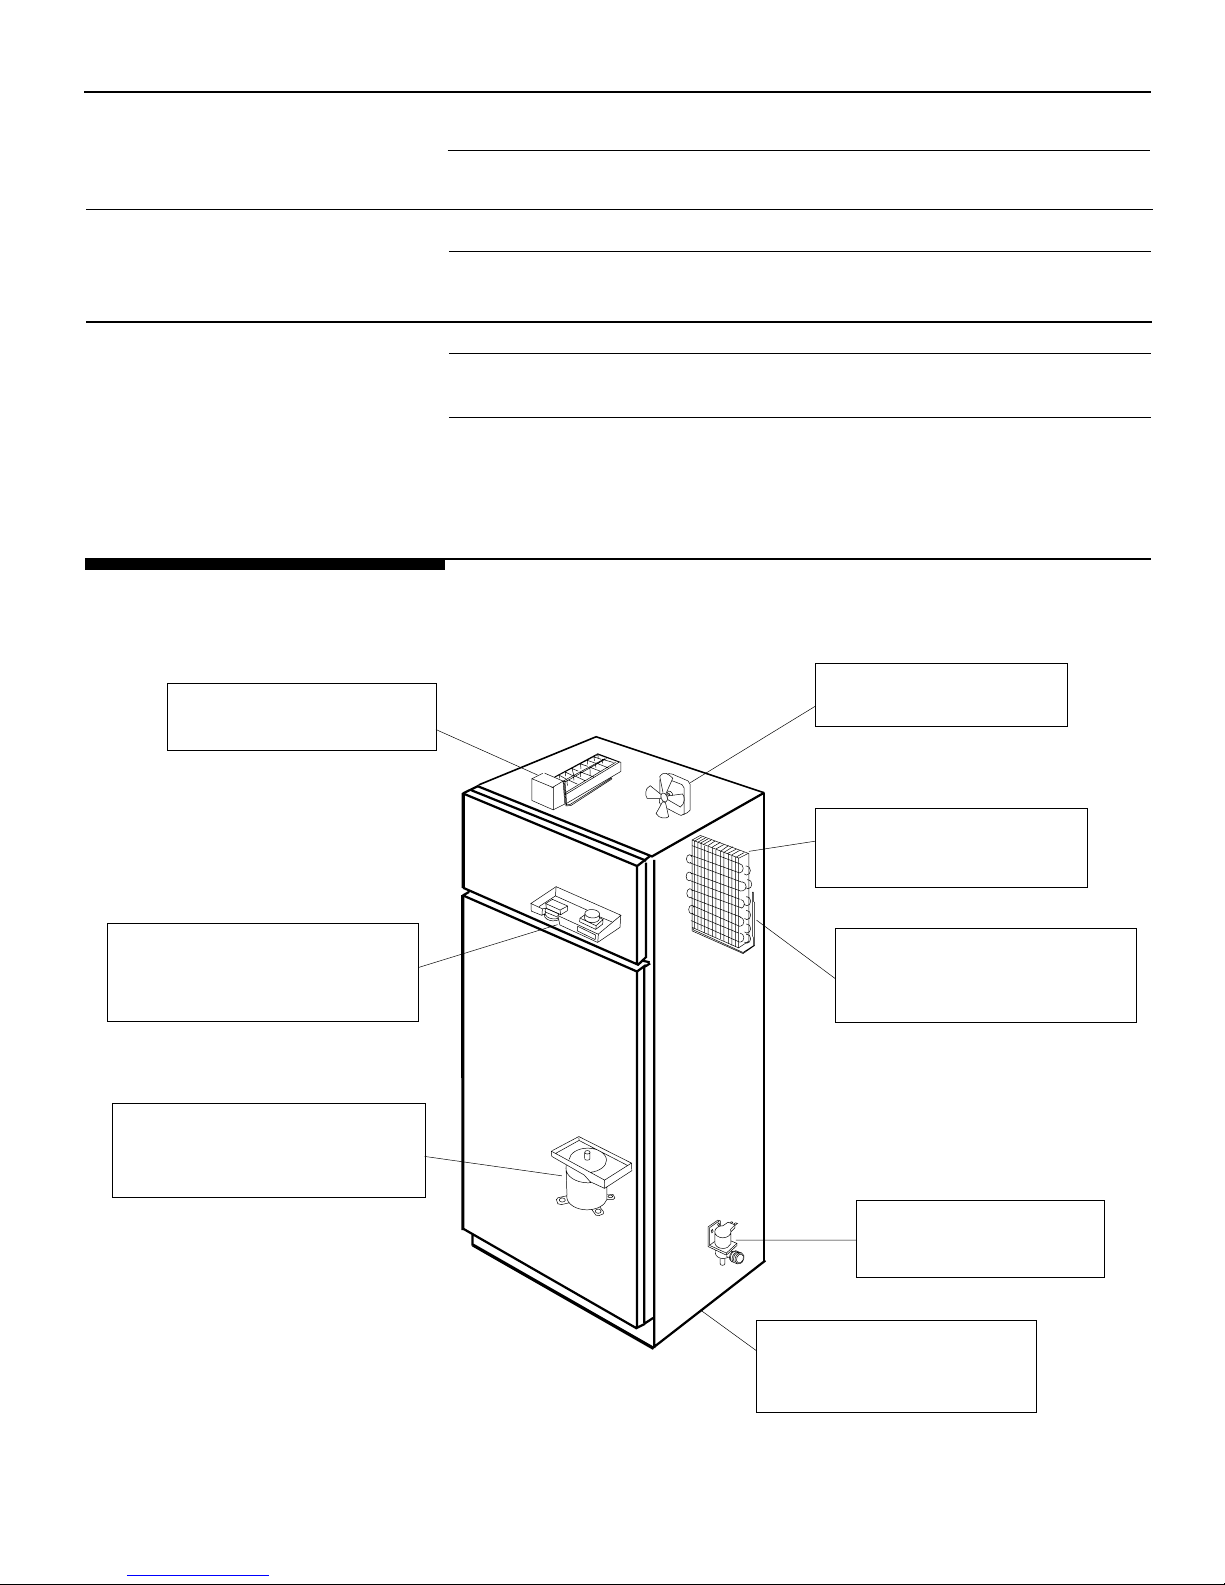
Normal Operating
Sounds
EVAPORATOR
The flow of refrigerant through the
evaporator may create a boiling
or gurgling sound.
AUTOMATIC ICE MAKER *
Occasionally you will hear ice
cubes dropping into the ice bin.
COLD CONTROL & DEFROST TIMER
These parts can produce a snapping
sound when turning the refrigerator
on or off. The timer also produces
sounds similar to an electric clock.
INSULATION
Rigid foam insulation has excellent
insulating capabilities. It is very
energy efficient; however, it does
have a tendency to amplify sound.
EVAPORATOR FAN
You may hear air being forced
through the cabinet by the fan.
DEFROST HEATER
During defrost cycles, water dripping
onto the heater may cause a hissing
or sizzling sound. After defrosting, a
popping sound may occur.
WATER VALVE *
When the ice maker fills with
water, you will hear a buzzing
sound and water running.
COMPRESSOR
Modern, high efficiency compressors
operate much faster than older models.
The compressor may have a high-
pitched hum or pulsating sound.
* On models equipped with an Automatic Ice Maker.

15
TAPPAN REFRIGERATOR WARRANTY
YourTappanproductisprotectedbythis warranty
FRIGIDAIRE, THROUGH ITS
AUTHORIZED SERVICERS, WILL:
Pay all costs for repairing or replacing any parts of this
appliance which prove to be defective in materials or
workmanship.
Repair or replace any parts in the Sealed Refrigeration
System (compressor, condenser, evaporator, drier and tubing)
which prove to be defective in materials or workmanship,
and provide the labor to install such part.
All of the provisions of the full and limited warranties above
and the exclusions listed below apply.
THE CONSUMER WILL BE
RESPONSIBLE FOR:
Costs of service calls that are listed under NORMAL
RESPONSIBILITIES OF THE CONSUMER.*
Diagnostic costs and any removal, transportation
and reinstallation costs which are required because
of service. Costs for labor, parts and transportation
other than with respect to the Sealed Refrigeration
System.
Costs of the technician's travel to the home and any
costs for pick up and delivery of the appliance
required because of service.
FULL ONE-YEAR
WARRANTY
LIMITED 2ND - 5TH
YEAR WARRANTY
(Sealed System)
LIMITED
WARRANTY
(Applicable to the
State of Alaska)
WARRANTY
PERIOD
One year from original
purchase date.
Second through fifth years
from original purchase
date.
Time periods listed above.
This warranty applies only to products in ordinary household use, and the consumer is responsible for the
items listed below:
1. Proper use of the appliance in accordance with instructions provided with the product.
2. Proper installation by an authorized servicer in accordance with instructions provided with the appliance and in
accordance with all local plumbing, electrical and/or gas codes.
3. Proper connection to a grounded power supply of sufficient voltage, replacement of blown fuses, repair of loose
connections or defects in house wiring.
4. Expenses for making the appliance accessible for servicing, such as removal of trim, cupboards, shelves, etc., which
are not a part of the appliance when it was shipped from the factory.
5. Damages to finish after installation.
6. Replacement of light bulbs and/or fluorescent tubes (on models with these features).
This warranty does not cover the following:
1. CONSEQUENTIAL OR INCIDENTAL DAMAGES SUCH AS PROPERTY DAMAGE AND INCIDENTAL EXPENSES RESULTING
FROM ANY BREACH OF THIS WRITTEN OR ANY IMPLIED WARRANTY.
Note: Some states do not allow the exclusion or limitation of incidental or consequential damages, so this limitation
or exclusion may not apply to you.
2. Service calls which do not involve malfunction or defects in workmanship or material, or for appliances not in ordinary
household use. The consumer shall pay for such service calls.
3. Damages caused by services performed by servicers other than Frigidaire or its authorized servicers; use of parts other
than genuine Frigidaire Home Products parts; obtained from persons other than such servicers; or external causes
such as abuse, misuse, inadequate power supply or acts of God.
4. Products with original serial numbers that have been removed or altered and cannot be readily determined.
Keep your bill of sale, delivery slip, or some other appropriate payment record. The date on the bill establishes the warranty
period should service be required. If service is performed, it is in your best interest to obtain and keep all receipts. This
written warranty gives you specific legal rights. You may also have other rights that vary from state to state. Service under
this warranty must be obtained by contacting Frigidaire Home Products:
800•944•9044
Frigidaire Home Products
P.O.Box 212378
Augusta, GA 30917
Product features or specifications as described or illustrated are subject to change without notice. All warranties are made
by White Consolidated Industries, Inc. This warranty applies only in the 50 states of the U.S.A. and Puerto Rico.
*NORMAL
RESPONSIBILITIES
OF THE CONSUMER
EXCLUSIONS
IF YOU NEED
SERVICE
Your appliance is warranted by White Consolidated Industries, Inc. We authorize no person to change or add to any of our obligations under this
warranty. WCI has authorized Frigidaire Home Products and its authorized servicers to perform services covered by this warranty. Our obligations for
service and parts under this warranty must be performed by Frigidaire or an authorized Frigidaire servicer.
Table of contents
Other Tappan Refrigerator manuals


Popular Refrigerator manuals by other brands


Dometic
Dometic DM20F Installation and operating manual

Thermo Scientific
Thermo Scientific 25LCEETSA Installation and operation instructions

Hotpoint
Hotpoint FFA90 quick guide

GE
GE PTU427SAMR Use & care guide

Beko
Beko SSA25020 Instructions for use

VWR
VWR 329689H01 Additional Instructions for Installation and Operation


