Tarox LightPad 1030 User manual

Notebook Computer
User’s guide
E2V-multishit.book Page i Wednesday, January 5, 2005 1:38 PM

Changes may be made periodically to the information in this publication without obligation to notify any
person of such revision or changes. Such changes will be incorporated in new editions of this manual or
supplementary documents and publications. This company makes no representations or warranties, either
expressed or implied, with respect to the contents hereof and specifically disclaims the implied warranties of
merchantability or fitness for a particular purpose.
Record the model number, serial number, purchase date, and place of purchase information in the space
provided below. The serial number and model number are recorded on the label affixed to your computer.
All correspondence concerning your unit should include the serial number, model number, and purchase
information.
Model Number : _________________________________
Serial Number:___________________________________
Purchase Date: ___________________________________
Place of Purchase: ________________________________
Copyright © 2004
All Rights Reserved
Notebook Computer User’s guide
Original Issue: November 2004
Notebook Computer
All trademarks and registered trademarks are the properties of their respective companies.
E2V-multishit.book Page ii Wednesday, January 5, 2005 1:38 PM

Contents iii
Preface ix
Connecting the computer ix
Care and maintenance xi
1 Einführung in Ihren Computer 1
Eine Einführung in den Computer 3
Vorderseite 3
Oberseite 4
Linke Seite 6
Rechte Seite 7
Rückseite 7
Unterseite 9
Funktionen 11
Display 13
Statusanzeigen 14
Tastatur 16
Sondertasten 16
Ergonomie der Tastatur 21
Touchpad 22
Starttasten 24
Speichergeräte 25
Festplattenlaufwerk 25
Optisches Laufwerk 25
4-in-1-Speichersteckplatz 28
Anschließbare Optionen 29
Ethernet (LAN) 29
Fax-/Datenmodem 29
Drahtlose Kommunikation 30
Audio 31
Audio-DJ-Bedienfeld 32
Sichern des Computers 34
Anschluß für Diebstahlsicherung 34
Kennwörter 34
1 Familiarisation avec votre ordinateur 37
Visite guidée de votre ordinateur 39
Vue frontale 39
Vue supérieure 40
Vue gauche 42
Vue droite 43
Vue arrière 43
E2V-multishit.book Page iii Wednesday, January 5, 2005 1:38 PM

Contentsiv
Vue inférieure 45
Fonctionnalités 47
Affichage 49
Voyants 50
Clavier 52
Touches spéciales 52
Ergonomie du clavier 56
Touchpad 57
Touches de lancement 59
Stockage 60
Disque dur 60
Lecteur optique 60
Emplacement mémoire 4 en 1 63
Options de connectivité 64
Ethernet (réseau) 64
Modem fax/données 64
Communication sans fil 65
Audio 67
Panneau de commande Audio DJ 68
Sécurité de l’ordinateur 70
Encoche de sécurité 70
Mots de passe 70
1 Cómo familiarizarse con su ordenador 73
Recorrido por el ordenador 75
Vista frontal 75
Vista superior 76
Vista del panel izquierdo 78
Vista del panel derecho 79
Vista posterior 79
Vista inferior 81
Características 83
Pantalla 85
Indicadores 86
Teclado 88
Teclas especiales 88
Ergonomía del teclado 93
Touchpad o almohadilla táctil 94
Teclas de ejecución 96
Almacenamiento 97
Disco duro 97
Unidad óptica 97
Ranura para tarjetas 4 en 1 100
E2V-multishit.book Page iv Wednesday, January 5, 2005 1:38 PM

v
Opciones de conectividad 101
Ethernet (LAN) 101
Módem de datos/fax 101
Comunicación inalámbrica 102
Sonido 103
Panel de control Audio DJ 104
Protección del ordenador 106
Muesca de seguridad 106
Contraseñas 106
1 Informazioni preliminari sul computer 109
Una panoramica del computer 111
Vista anteriore 111
Vista superiore 112
Vista sinistra 114
Vista destra 115
Vista posteriore 115
Vista inferiore 117
Funzioni 119
Display 121
Indicatori 122
Tastiera 124
Tasti speciali 124
Caratteristiche ergonomiche della tastiera 129
Touchpad 130
Tasti di esecuzione rapida 132
Memorizzazione 133
Disco rigido 133
Unità ottica 133
Slot 4 in 1 per schede di memoria 135
Opzioni di connettività 136
Ethernet (LAN) 136
Modem fax/dati 136
Comunicazione senza cavi 137
Audio 138
Pannello di controllo Audio DJ 139
Protezione del computer 141
Foro di sicurezza 141
Password 141
1 Getting familiar with your computer 143
A tour of your computer 145
Front view 145
E2V-multishit.book Page v Wednesday, January 5, 2005 1:38 PM

Contentsvi
Top view 146
Left view 148
Right view 148
Rear view 149
Bottom view 151
Features 153
Display 155
Indicators 156
Keyboard 158
Special keys 158
Keyboard ergonomics 162
Touchpad 163
Launch keys 165
Storage 166
Hard disk 166
Optical drive 166
4-in-1 memory slot 168
Connectivity options 169
Ethernet (LAN) 169
Fax/data modem 169
Wireless communication 170
Audio 171
Audio DJ control panel 172
Securing your computer 174
Security notch 174
Passwords 174
2 Operating on battery power 175
Battery pack 177
Battery pack characteristics 177
Installing and removing the battery pack 178
Charging the battery 179
Checking the battery level 180
Optimizing battery life 180
Battery-low warning 180
Power management 182
Advanced Configuration and Power Interface 182
3 Peripherals and options 183
External monitor 185
Using simultaneous display 186
S-video 187
External keyboard 188
E2V-multishit.book Page vi Wednesday, January 5, 2005 1:38 PM

vii
External pointing device 189
Printer 190
Audio devices 191
PC Card 192
PC Card slot 192
ExpressCard 195
ExpressCard slot 195
4-in-1 card slot 197
USB devices 199
IEEE 1394 devices 200
Miscellaneous options 201
Additional power packs 201
Key component upgrades 202
Memory upgrade 202
Hard disk upgrade 203
VGA daughterboard module upgrade 203
4 Moving with your computer 205
Disconnecting from the desktop 207
Moving around 208
Preparing the computer 208
What to bring to short meetings 208
What to bring to long meetings 208
Taking the computer home 209
Preparing the computer 209
What to bring with you 209
Special considerations 209
Setting up a home office 210
Traveling with the computer 211
Preparing the computer 211
What to bring with you 211
Special considerations 211
Traveling internationally with the computer 212
Preparing the computer 212
What to bring with you 212
Special considerations 212
5 Software 213
Launch Manager 215
BIOS Utility 216
E2V-multishit.book Page vii Wednesday, January 5, 2005 1:38 PM

Contentsviii
6 Troubleshooting 219
Frequently-asked questions 221
Error messages 224
A Specifications 229
B Notices 235
Index 241
E2V-multishit.book Page viii Wednesday, January 5, 2005 1:38 PM

ix
Preface
This notebook computer incorporates the latest mobile technologies in a slim and
portable package.
This manual should answer most of the questions you have about the day-to-day
operation of your notebook computer. You should also take advantage of the
online help files that are available with almost all of the programs shipped with
your computer.
We hope you enjoy your notebook computer. With proper care, your computer
will provide you with years of productive service.
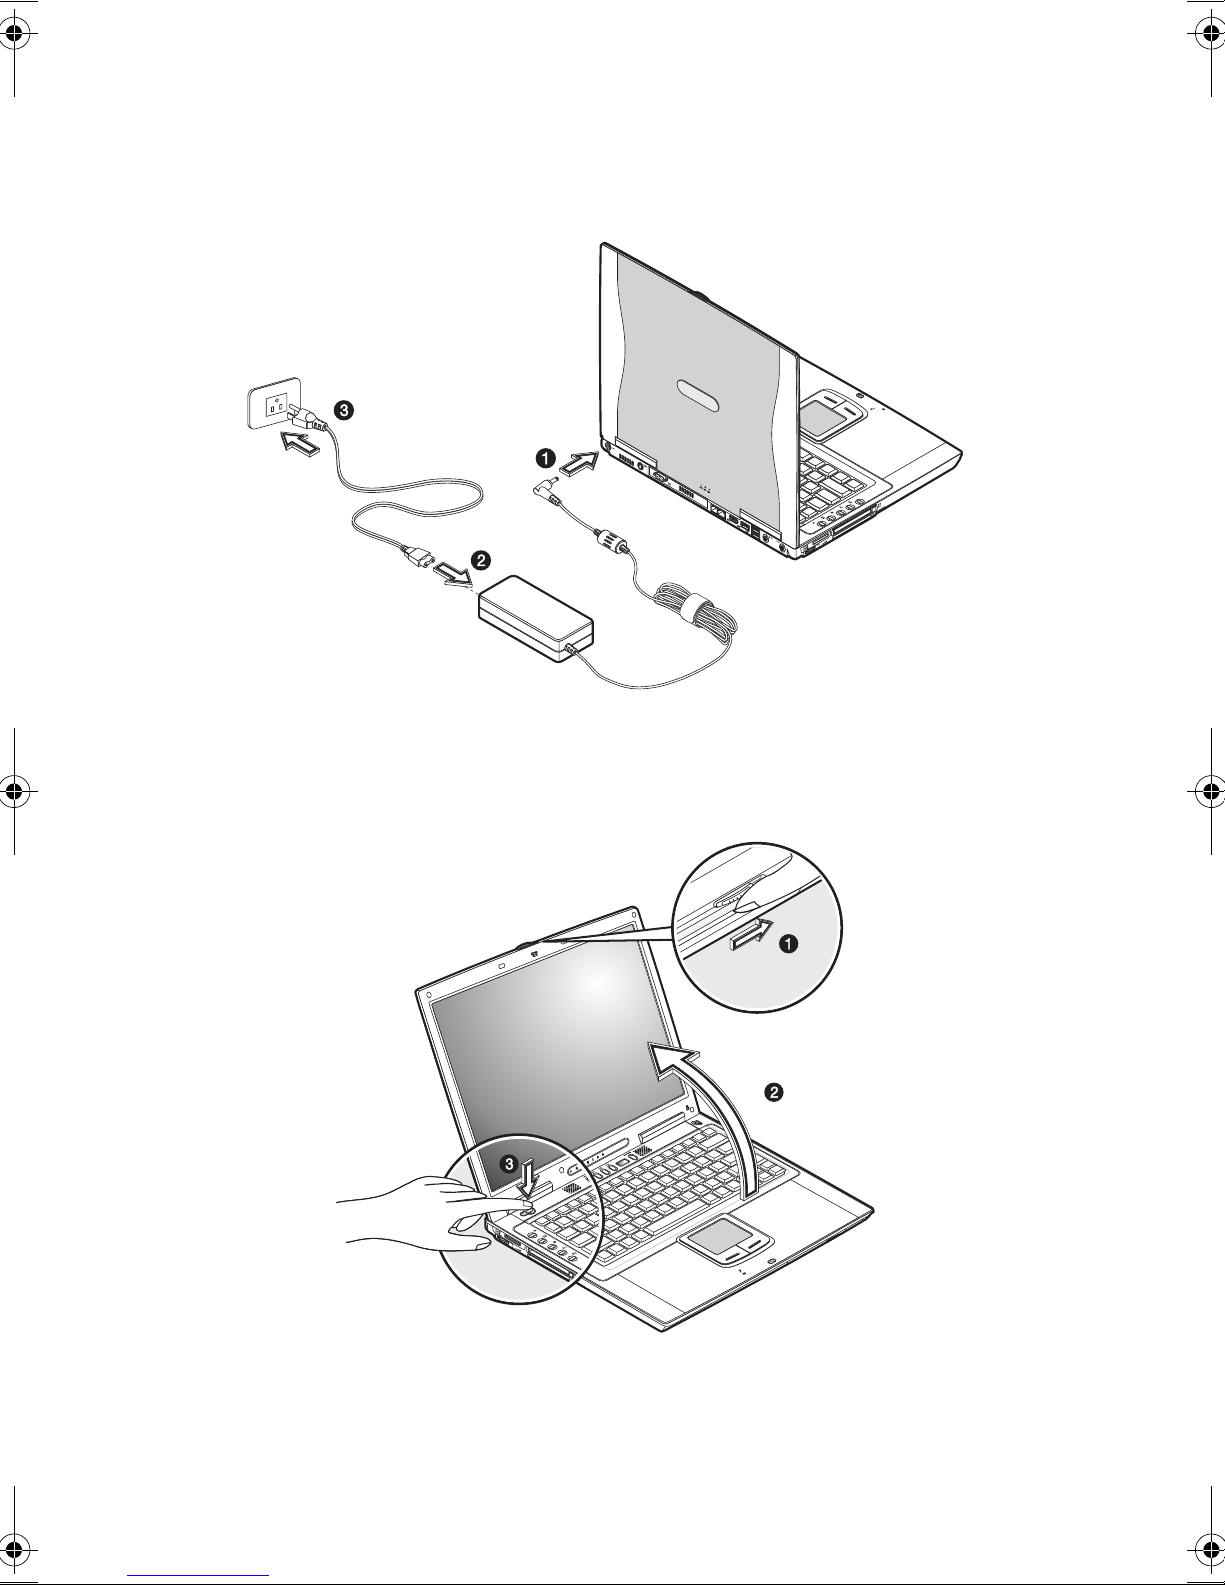
Connecting the computer
Connecting the computer is as easy as 1-2-3.
1. Insert the battery at an angle (1); press gently on the battery (2) until it clicks
into place. Then slide the battery lock to the lock position (3).
Note: When using a battery pack for the first time, fully recharge the battery,
then disconnect the adapter to use up the battery before recharging again.
Perform this action twice to condition the battery pack.
E2V-multishit.book Page ix Wednesday, January 5, 2005 1:38 PM
x
2. Connect one end of the AC adapter to the DC-in port on the computer’s rear
panel (1); connect the power cord to the AC adapter (2) and the other end to a
properly grounded power outlet (3).
3. Slide the release latch to the right (1) and open the display (2) to a
comfortable viewing angle. Press the power switch (3) to turn on the power.
The POST (power-on self-test) routine executes and Windows begins
loading.
E2V-multishit.book Page x Wednesday, January 5, 2005 1:38 PM

xi
Note: To turn off the power, use the Windows Turn Off command to shut
down the computer. If you are unable to shut down your computer normally,
press and hold the power switch for more than four seconds to turn off the
computer. If you turn off the computer and want to turn it on again, wait at
least two seconds before powering up.
Care and maintenance
Taking care of your computer
Your computer will serve you well if you take care of it.
• Do not expose the computer to direct sunlight. Do not place it near sources of
heat, such as a radiator.
• Do not expose the computer to temperatures below 0ºC (32ºF) or above 50ºC
(122ºF).
• Do not subject the computer to magnetic fields.
• Do not expose the computer to rain or moisture.
• Do not spill water or any liquid on the computer.
• Do not subject the computer to heavy shock and vibration.
• Do not expose the computer to dust and dirt.
• Never place objects on top of the computer to avoid damaging the computer.
• Never place the computer on uneven surfaces.
Taking care of your AC adapter
Here are some ways to take care of your AC adapter:
• Do not connect the adapter to any other device.
• Do not step on the power cord or place heavy objects on top of it. Carefully
route the power cord and any cables away from all potential traffic.
• When unplugging the power cord, do not pull on the cord itself but pull on the
plug.
• The total ampere ratings of the equipment plugged in should not exceed the
ampere rating of the cord if you are using an extension cord. Also, the total
current rating of all equipment plugged into a single wall outlet should not
exceed the fuse rating.
E2V-multishit.book Page xi Wednesday, January 5, 2005 1:38 PM

xii
Taking care of your battery pack
Here are some ways to take care of your battery pack:
• Use only batteries of the same kind as replacements. Turn the power off
before removing or replacing batteries.
• Do not tamper with batteries. Keep them away from children.
• Dispose of used batteries according to local regulations. Recycle if at all
possible.
Cleaning and servicing
When cleaning the computer, follow these steps:
1. Power off the computer and remove the battery pack.
2. Disconnect the AC adapter.
3. Use a soft cloth moistened with water. Do not use liquid or aerosol cleaners.
Contact your dealer or see your service technician if any of the following occurs:
• The computer has been dropped or the body has been damaged.
• Liquid has been spilled into the product.
• The computer does not operate normally.
E2V-multishit.book Page xii Wednesday, January 5, 2005 1:38 PM

1 Einführung in Ihren
Computer
E2V-multishit.book Page 1 Wednesday, January 5, 2005 1:38 PM

Dieser Computer vereint Hochleistung, Vielseitigkeit,
Energiesparfunktionen und Multimedia-Funktionen mit einer
einzigartigen Gestaltung und einem ergonomischen Design.
Arbeiten Sie mit einer unerreichten Produktivität und
Zuverlässigkeit mit Ihrem neuen starken Rechenpartner.
Dieses Kapitel erklärt die vielen Funktionen des Computers
im Detail.
E2V-multishit.book Page 2 Wednesday, January 5, 2005 1:38 PM

3
Eine Einführung in den Computer
Nachfolgende erhalten Sie eine Einführung in Ihren neuen Notebook-Computer.
Hinweis: Das Computergehäuse entspricht nicht unbedingt den Abbildungen.
Vorderseite
Hinweis: Das optische Laufwerk kann ein DVD-ROM-, DVD/CD-RW-,
DVD-Dual- oder DVD Super Multi-Laufwerk sein.
#Komponente Beschreibung
1 Display-
Abdeckungsverschlu
ß
Schieben Sie ihn nach rechts, um den Displaydeckel zu
entriegeln.
2 Optisches Laufwerk* Unterstützt eine CD oder eine DVD.
3 LED-Anzeige Leuchtet, wenn das optische Laufwerk aktiv ist.
4 Auswurftaste Drücken, um den Laufwerkträger auszuwerfen.
5 Notauswurfloch Stecken Sie einen Stift hinein, um den Laufwerkträger bei
ausgeschaltetem Computer auszuwerfen.
E2V-multishit.book Page 3 Wednesday, January 5, 2005 1:38 PM

1 Einführung in Ihren Computer4
Oberseite
#Komponente Beschreibung
1 Display Auch LCD (Liquid Crystal Display,
Flüssigkristallanzeige) genannt; dient als Anzeigegerät.
2 Statusanzeigen LEDs (lichtemittierende Dioden), die sich ein- und
ausschalten, um den Status des Computers und seiner
Funktionen und Komponenten anzuzeigen.
3
Netzschalter
Schaltet den Computer ein.
4 Starttasten Tasten zum Starten von häufig verwendeten Programmen.
E2V-multishit.book Page 4 Wednesday, January 5, 2005 1:38 PM

5
5 Touchpad Berührungsempfindliches Zeigegerät, das wie eine
Computermaus funktioniert. Kann mit dem Hotkey Fn-F6
aktiviert und deaktiviert werden (weitere Details sind in
“Hotkeys” auf Seite 19 angegeben).
6 Mikrofon Ermöglicht das Aufnehmen von Ton und Gesprochenem
auf Ihrem Computer.
7 Tasten (links und
rechts)
Die linke und die rechte Taste funktionieren wie die linke
und rechte Maustaste.
8 Handauflage Entlastet Ihre Hände bei der Arbeit mit dem Computer.
9 Tastatur Gibt Daten auf Ihrem Computer ein.
10 Lautsprecher Dient zur Tonausgabe.
11 Audio-Super-DJ-
Bedienfeld
Steuertasten für die Wiedergabe von Audio.
#Komponente Beschreibung
E2V-multishit.book Page 5 Wednesday, January 5, 2005 1:38 PM

1 Einführung in Ihren Computer6
Linke Seite
#Komponente Beschreibung
1 Lautstärkeregler Regelt die Lautstärke.
2 4-in-1-Kartensteckplatz Nimmt ein Secure Digital- (SD), Memory Stick- (MS),
xD-Picture Card- (xD) oder MultiMediaCard- (MMC)
Speicherkarte auf.
3ExpressCard-
Einsteckplatz
Nimmt ein ExpressCard/34- oder ein Express/54-
Modul auf.
4 PC-Karten-Einsteckplatz Anschluß für eine 16-Bit-PC-Karte oder 32-Bit-
CardBus-PC-Karte Typ II.
5 PC-Karten-Auswurftaste Wirft PC-Karten aus ihrem Einsteckplatz aus.
E2V-multishit.book Page 6 Wednesday, January 5, 2005 1:38 PM

7
Rechte Seite
Rückseite
#Komponente Beschreibung
1 Vorrichtung für
Diebstahlsicherung
Anschluß für eine Kensington-kompatible
Diebstahlsicherung.
#Komponente Beschreibung
1 Netzanschlußbuchse Anschluß für das Netzteil.
2 S-Videoausgang Anschluß für einen Fernseher oder ein Anzeigerät mit S-
Videoeingang.
3 Anschluß für
externen Monitor
Anschluß für einen externen Monitor (Auflösung bis zu
2048x1536).
4 Modemanschluß Anschluß für eine Telefonleitung (nur Modelle mit
eingebautem Fax-/Datenmodem).
E2V-multishit.book Page 7 Wednesday, January 5, 2005 1:38 PM

1 Einführung in Ihren Computer8
5 Netzwerkbuchse Anschluß für ein Ethernet-Base-Netzwerk.
6 IEEE 1394-Anschluß Anschluß für ein IEEE 1394-kompatibles (6-pol.) Gerät
(z.B. Digital-Videokamera).
7 USB-Anschlüsse Anschlüsse für USB-Geräte (z. B. USB-Digitalkamera).
8 Audioeingang Anschluß für Audioeingabegeräte (z. B. Audio-CD-
Player, Stereo-Walkman).
9S/PDIF-
Audioausgang
Anschluß für Audioausgabegeräte (z.B. Lautsprecher,
Kopfhörer); unterstützt S/PDIF-Verbindungen.
#Komponente Beschreibung
E2V-multishit.book Page 8 Wednesday, January 5, 2005 1:38 PM
Table of contents
Other Tarox Laptop manuals


