Taser AXON body User manual

TASER AXON body™
Quick Start Guide
For the most current product videos, instructions and warnings,
go to www.TASER.com/support/AXON.
English (U.S./Canada/Austraila/U.K.)
Congratulations on Purchasing Your AXON body On-
Officer Recording System. Read this Section to Learn
More About Your AXON body System.
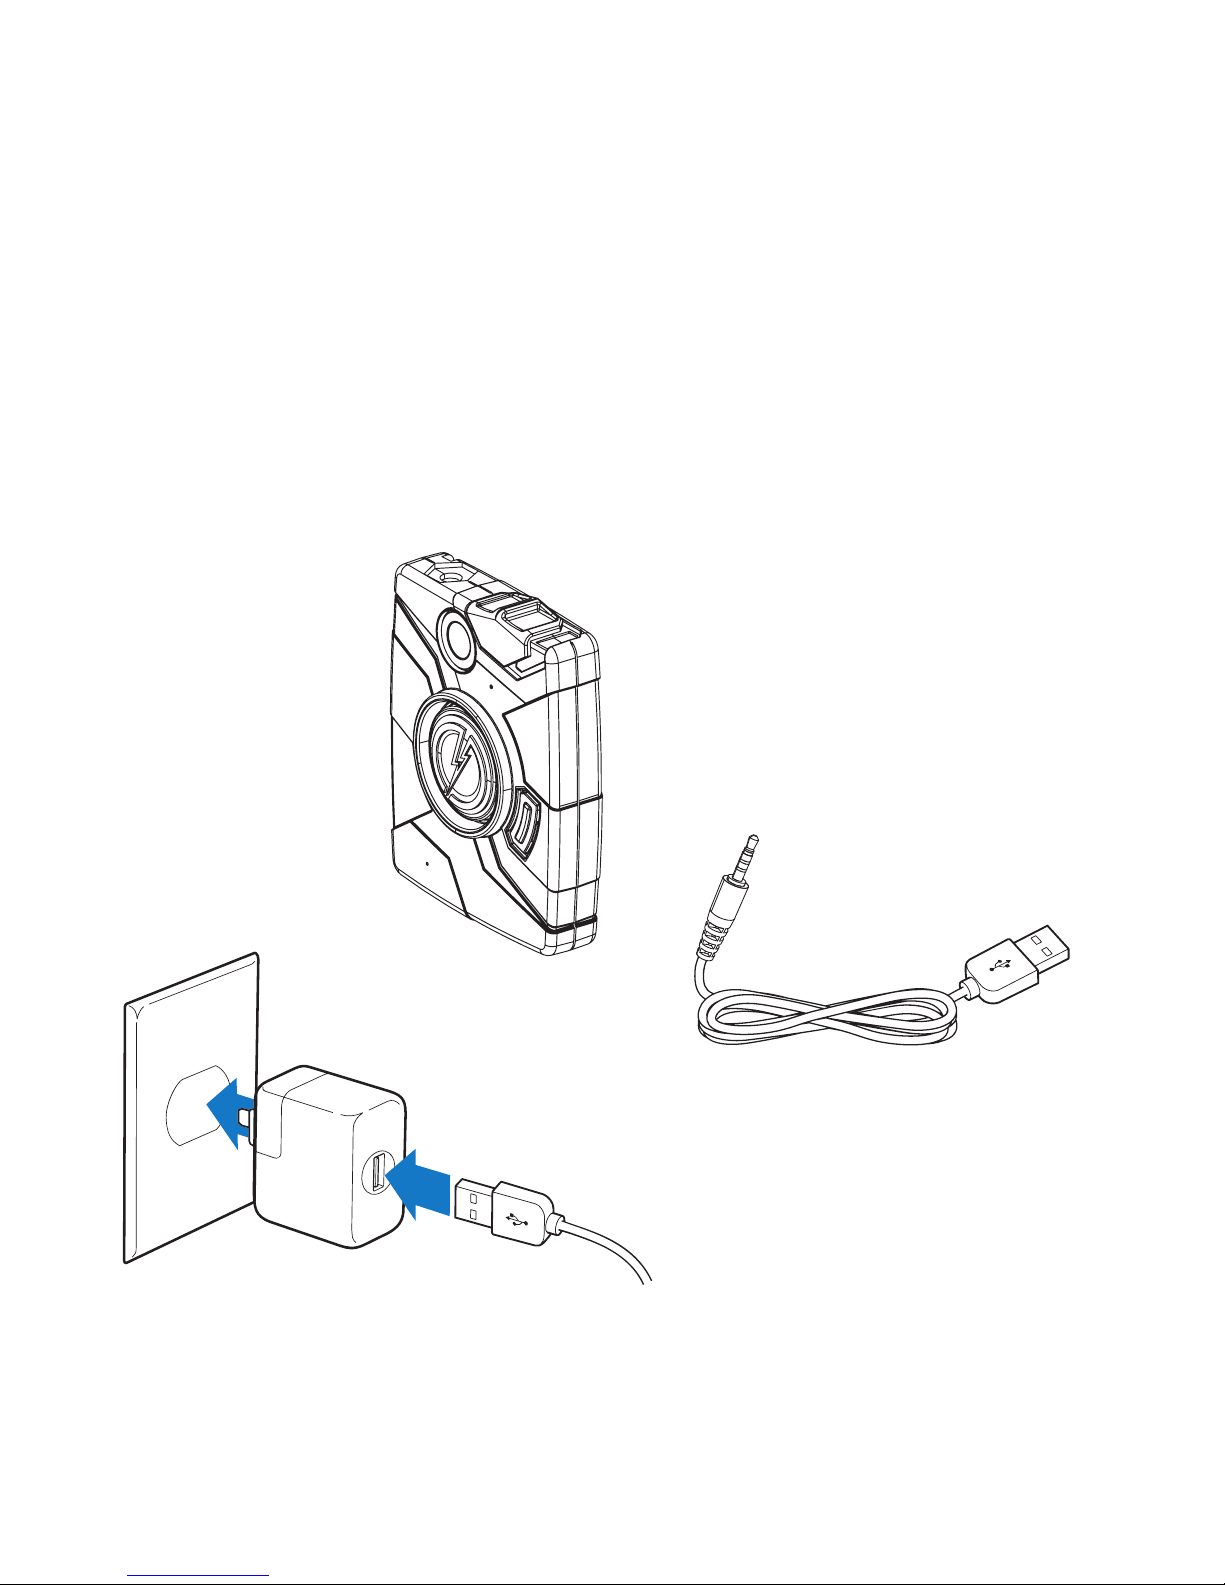
Your AXON body system includes the following components:
AXON body USB Cable
AXON body Camera
AXON body Wall Charger

Quick Reference
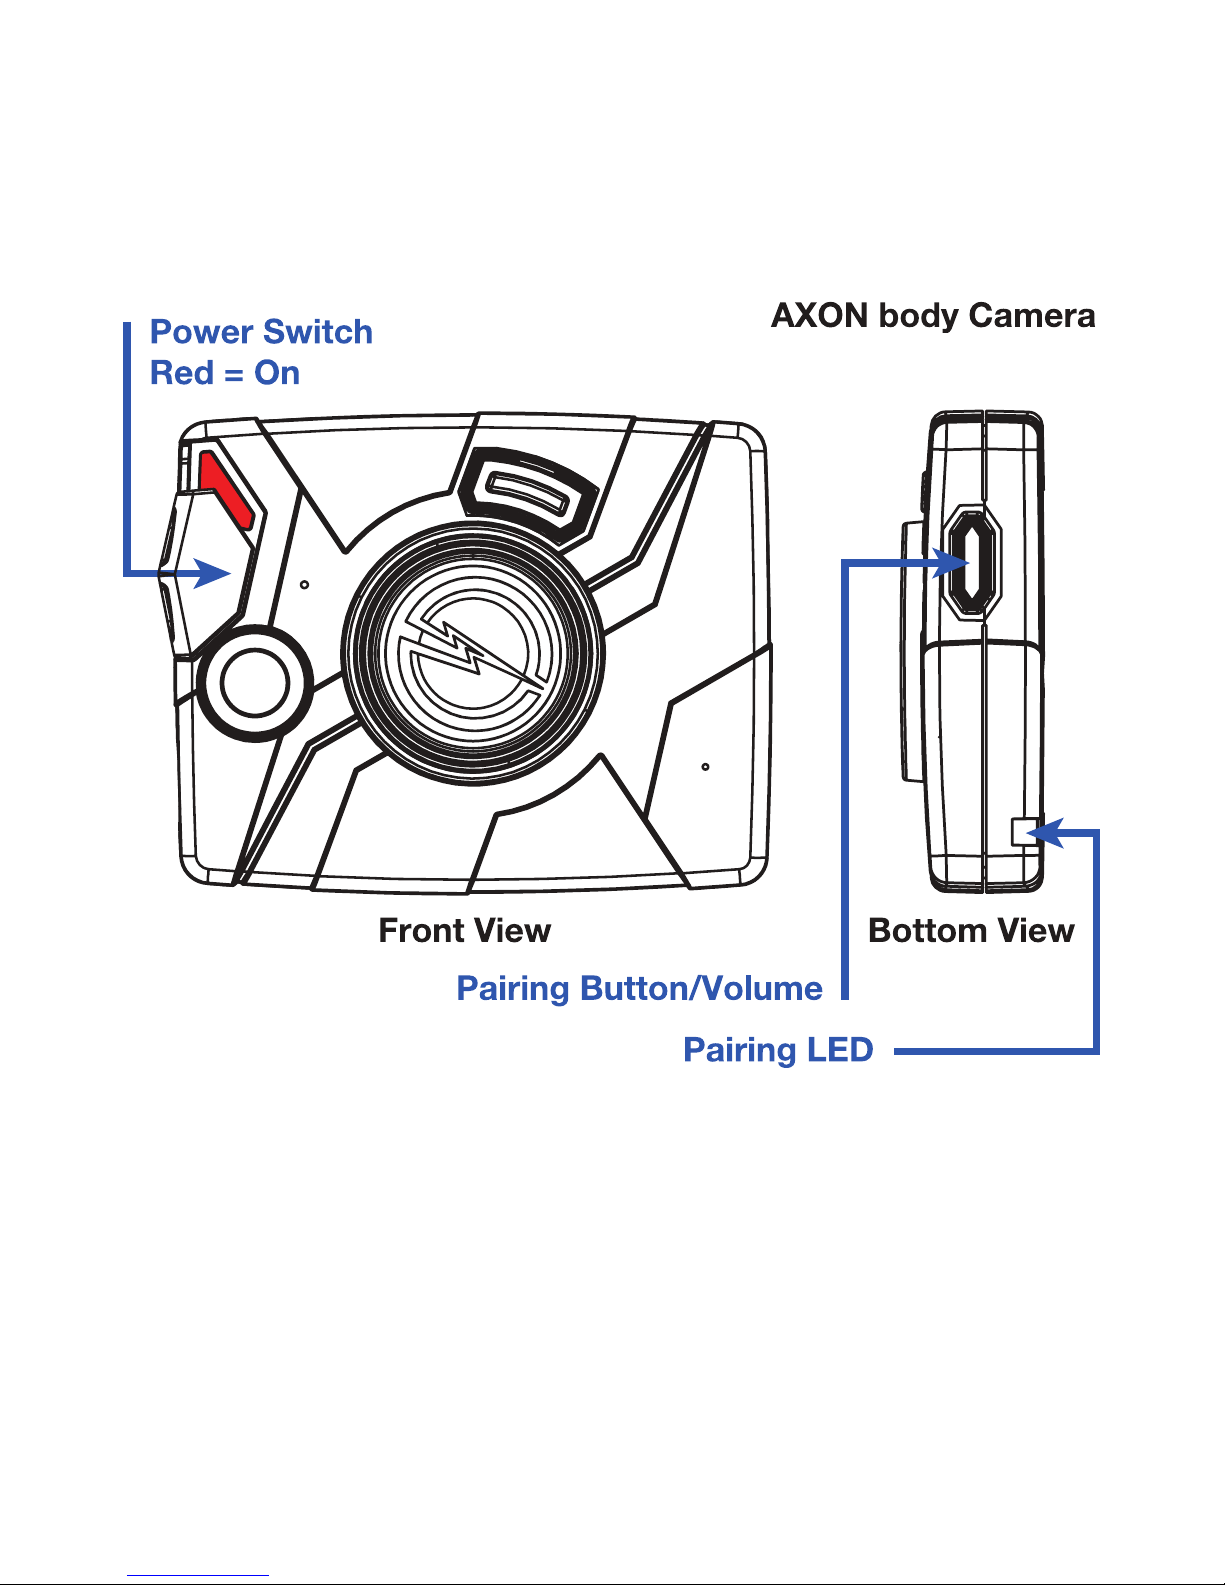
Get to Know the AXON body Camera
Power Switch
Red = On/Buffering
Event Button
Double Tap = Start Record
Hold 3 Seconds = Stop Record
Battery Status Button
Push to Show Status of
Battery
Imager
Camera Lens
Speaker
Battery LED
Green = 41% - 100%
Yellow = 20% - 40%
Red = Less Than 20%
Microphone
Recharging/Dataport
Data Transfer & Recharging
through PC or ETM
Operational LED
Record = Blinking Red
Buffer = Blinking Green
Bootup = Solid Red
Top View
ETM Status LED
Data to EVIDENCE.com via ETM
Pairing Mode with Mobile Device
Bottom View
Volume/Pairing

Step 1: Recording
The AXON body camera has two operating modes: BUFFERING and EVENT. The default mode,
or BUFFERING mode, provides pre-event buering to capture activities that occur prior to the
user activating the EVENT mode.
When you activate the EVENT mode, the buered video (not audio) captured directly before
the event will be saved and attached to the event in permanent memory. This feature is
intended to capture the video of an incident just before your activation of EVENT mode.
1 Move the ON/OFF switch to the ON position. The camera takes 5 seconds to boot up
and be ready to record (the red area under the switch will be exposed with the camera
turned ON).
•The Operation LED will be solid red and then transition to blinking green when it is
in BUFFERING mode.
•The camera will be capturing video but no audio, and will not record to permanent
memory while in BUFFERING mode.
•Buffered video duration is up to 30 seconds (00:00:30).
CAUTION
Because the system does not capture audio in BUFFERING mode, the first 30 seconds of
a recorded event will be video-only (depending on your agency’s settings). BUFFERING
mode starts only after the camera is turned on. The system does not record when the
camera is turned off.

2 When you need to record, quickly double-press the EVENT button.
•The system now records audio as well as video.
•The system will beep twice to let you know that recording has started. The 2 short
beeps will repeat every 2 minutes (if the system is muted, there will be no audio
notifications).
•The Operation LED on top of the camera will blink red.
3 To stop recording and return to BUFFERING mode, press and hold the EVENT button for
at least 3 seconds. The system will make 1 long beep.
CAUTION
Keep the holster’s plug inserted into the ETM connection socket. If the plug is not plugged
into the socket, audio recording will be distorted.
Step 2: Recharging the Battery and Uploading Data
After recording, use the Evidence Transfer Manager (ETM) to recharge your AXON body
camera and upload your files to EVIDENCE.com.
NOTE: If you do not have an ETM, go to www.TASER.com/support/AXON for instructions on
how to download files to a computer, using EVIDENCE Sync.
1 At first, the LED on the bottom of the AXON body will display red, but the color will
change to indicate the camera’s stage in the uploading process.
2 The ETM automatically uploads the data to EVIDENCE.com. When a video has uploaded
successfully to EVIDENCE.com, that video is removed from the camera. (The camera
must be registered to the end-user’s EVIDENCE.com account.)
3 At the beginning of the next shift, ensure that your AXON body battery LED is green
before removing it from the ETM.

Step 3: Using AXON Mobile
The AXON Mobile application enables you to replay video and add metadata (GPS, title, case
ID, and category) to your AXON body camera using a smart device such as a mobile phone
or multimedia player. To use the AXON Mobile application with your AXON body camera, you
will first have to pair your camera with your smart device.
1 Using your smart device, download the AXON Mobile application from the Google
Play™ store or the iTunes® App Store.
2 On your smart device, open the AXON Mobile application and follow the onscreen
instructions for Bluetooth® pairing.
Step 4: Pairing AXON body
To put AXON body camera into pairing mode:
1 Hold down the Pairing/Volume Button located on the bottom of the AXON body
camera.
2 While holding down this button, move the ON/OFF switch to the ON position.
3 Wait until you hear three audible beeps. The pairing LED on the bottom of the AXON
body will blink green.
4 Release the Volume/Pairing Button.
The AXON body camera is now ready to be paired via Bluetooth technology with your smart
device. You will hear the three beeps again when it is paired with the smart device and the
pairing LED will stop blinking green.

Step 5: Camera Operation LED
The AXON body’s operation LED displays the camera’s current operating mode:
Operating Mode Operation LED
Recording Blinking Red
Buering Blinking Green
Booting Up/Powering Down Solid Red
Step 6: Battery LED
The AXON body’s battery LED displays the battery’s remaining capacity, when the device is
being used or when recharging:
Operating Mode Battery LED
Battery Capacity is 41-100 Percent Green
Battery Capacity is 20 - 40 Percent Yellow
Battery Capacity is Less Than 20 Percent Red
Battery Too Low to Boot Up Blinking Red/Yellow

Step 7: Upload Status LED
When you plug your AXON body into the ETM, the upload status LED on the camera displays
the system’s status:
System Status Camera Bottom LED Indication
Uploading Data Blinking Yellow
DO NOT Remove from the ETM
Device Ready (All Videos Uploaded
Successfully) Solid Green
In Queue Awaiting Upload Solid Yellow
Initial Connection Solid Red (Momentary)
Device Not Assigned, Agency Mismatch,
or Camera Set in the Ofine Mode
Blinking Red
Consult ETM Support Page
ETM Has No Communication with
Camera LED Off
Firmware Update, Internal Battery
Charging, or Memory Full
Blinking Red and Yellow
DO NOT Remove from the ETM
Network Error
Blinking Red, Yellow, and then Green

Step 8: Audio Notification
The AXON body camera emits beeping sounds called audio prompts to notify you of the
system status. These audio prompts usually occur after you perform an action with the
camera:
Operating Mode Audio Notication
Powering On or Off One Beep
Recording an Event Two Beeps (Every Two Minutes)
The Device is Ending an Event and
Returning to BUFFERING Mode One Long Beep
The Battery is at 20 Percent Capacity or
Lower Four Quick Beeps (Every 20 Seconds)
The Camera Memory is Full
Alternating Frequency of Two Tones
that Occurs When You Double-Press the
EVENT Button. The Camera Will Not Start
Recording.
For more information, see the tutorial videos and the AXON body Operating Manual, available
at www.TASER.com/support/AXON.

Google Play is a trademark of Google, Inc.
Bluetooth is a trademark of the Bluetooth SIG, Inc., iTunes is a trademark of Apple, Inc.,
registered in the U.S. and other countries.
AXON body and �are trademarks of TASER International, Inc., and AXON, TASER and ©are
registered trademarks of TASER International, Inc., registered in the U.S.
© 2013 TASER International, Inc. All rights reserved.
MPC0168 Rev: A

TASER AXONbody™
Guide d’Utilisation
Rapide du Module
d’Enregistrement
Pour plus d’informations, consultez le Mode d’emploi disponible sur fr.TASER.com.
Français

Félicitations Pour Votre Achat de AXONbody Sur-
Oicier Système d’Enregistrement. Lisez Cet Article
Pour en Savoir Plus Sur Votre Système de d’AXONbody.
Votre système d’AXONbody comprend les éléments suivants:
AXONbody Câble USB
Caméra Axon
Individuelle
AXONbody Chargeur de Mur

Guide d’Utilisation Rapide
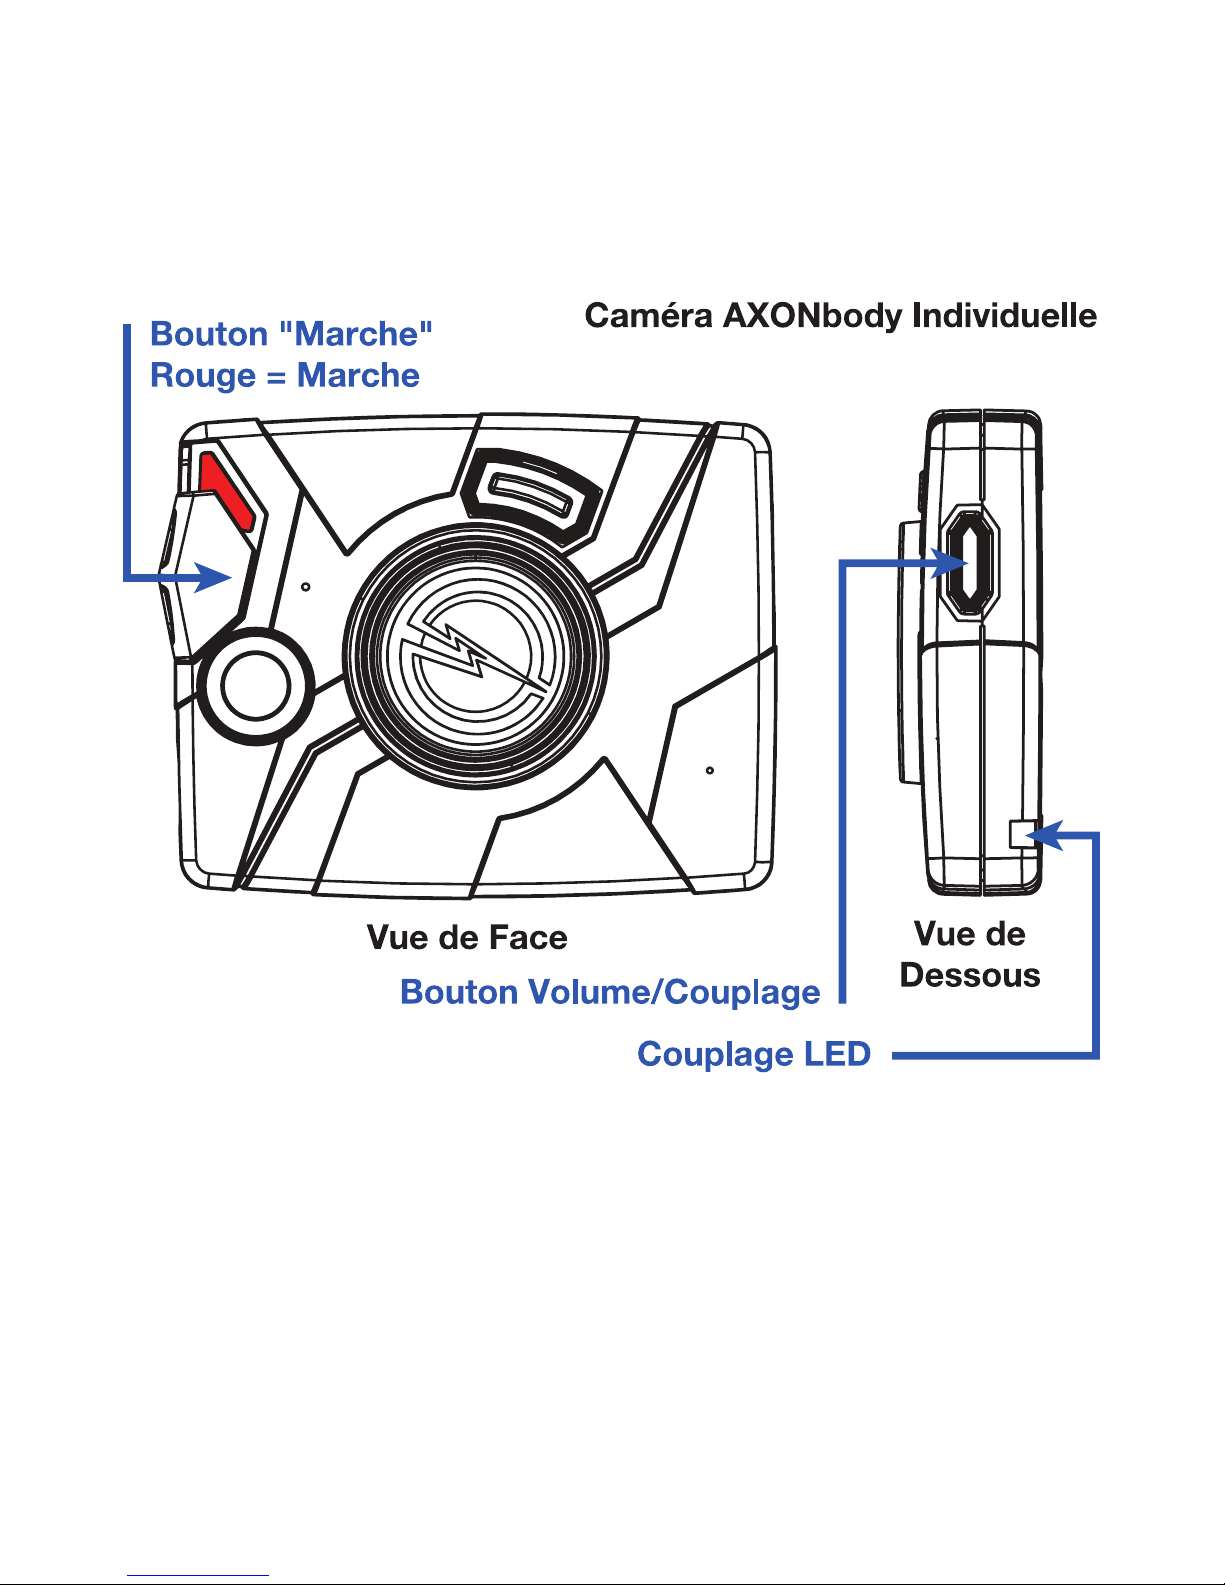
Connaître le AXONbody Caméra
Bouton“Marche”
Rouge = En Marche/Tampon
Bouton d’Enregistrement
Appuyez Deux Fois Pour
Démarrer l’Enregistrement
Maintenir le Bouton Enfoncé
Pendant 3 Secondes Pour
Interrompre l’Enregistrement
Bouton de Batterie
Appuyez Pour Acher l’état
de Batterie
Lentile
Lentile de la Caméra
Port Haut-Parleur
LED de la Batterie
Vert = 41% - 100%
Jaune = 20% - 40%
Rouge = Capacité de la
Batterie Inférieure à 20%
Microfone
Recharge/Dataport
Transfert de Données et de
Recharge Par PC ou ETM
LED de Fonctionnement
Enregistrement = Rouge Clignotant
Mise en Mémoire Tampon = Vert Clignotant
Démarrage = Rouge Continu
Vue de Dessus Vue de Dessous
ETM LED d’Etat
Les Données à EVIDENCE.com via
ETM Couplage de l’Enregistreur
Avec un Smartphone
Volume/Pairing

Étape 1: Enregistrement
AXON L’enregistreur AXONbody peut fonctionner sous deux modes. Le mode par défaut,
ou mode « BUFFERING », enregistre automatiquement dès la mise en marche (MÉMOIRE
TAMPON). Lors de l’activation volontaire de l’enregistrement (EVENT) les 30 secondes
précédant l’activation volontaire seront conservées.
Lorsque vous activez le mode ÉVÉNEMENT, la vidéo mise en mémoire tampon (sans audio)
enregistrée avant l’événement sera enregistrée et jointe à l’événement dans la mémoire
permanente. Cette fonctionnalité permet d’enregistrer la vidéo d’un incident juste avant que
vous activiez le mode ÉVÉNEMENT.
1 Mettez le bouton marche/arrêt en position de marche. En l’espace de 5 secondes, la
caméra démarre, et est prête à enregistrer (la partie rouge sous le bouton devient visible
sitôt que l’enregistreur est allumé).
•Le LED d’opération s’allume en rouge xe, puis passe au vert clignonte quand
l’appareil est mise en mémoire tampon.
•En mode MISE EN MÉMOIRE TAMPON, la caméra enregistre la vidéo sans solliciter la
mémoire permanente.
•La durée maximale de la vidéo mise en mémoire tampon est de 30 secondes
(00:00:30).

MISE EN GARDE
Dans la mesure où le système n’enregistre pas le son en mode MISE EN MÉMOIRE
TAMPON, la vidéo des 30 premières secondes sera sans son (peut être réglé diéremment
par décision hiérarchique). Le mode « MÉMOIRE TAMPON » démarre uniquement quand
l’enregistreur est allumé. Le système n’enregistre rien quand la caméra est éteinte.
2 Quand vous avez besoin d’enregistrer, appuyez deux fois rapidement sur le bouton
ÉVÉNEMENT.
•Le système enregistre alors autant l’audio que la vidéo.
•Deux bips indiquent que l’enregistrement a démarré. L’émission des 2 bips se
renouvelle toutes les 2 minutes (si le son du système est coupé, vous ne recevrez
aucune notication sonore).
•La LED de fonctionnement sur le dessus de l’enregistreur clignote en rouge.
3 Pour arrêter l’enregistrement et repasser en mode MÉMOIRE TAMPON, maintenez le
bouton ÉVÉNEMENT enfoncé pendant environ 3 secondes. Le système émet un seul bip
sonore
MISE EN GARDE
Gardez la che de l’étui inséreé dans la prise de raccordement d’ETM. Si la che n’est pas
branchée dans la prise, l’enregistrement audio sera déformée.

Étape 2: Rechargement de la Batterie et
Téléchargement des Données
Après l’enregistrement, utilisez le module Gestionnaire de transfert d’enregistrement
(Evidence Transfer Manager, ou ETM) pour recharger votre enregistreur AXON body et
télécharger vos chiers sur EVIDENCE.com.
Remarque: si vous ne disposez pas du module ETM, consultez le Mode d’emploi AXON body
pour télécharger vos enregistrements sur votre ordinateur.
1 Au début, la LED au bas de l’enregistreur s’allumera en rouge, mais la couleur
changera pour indiquer la phase à laquelle se trouve la caméra dans le processus de
téléchargement.
2 L’ETM télécharge automatiquement les données sur EVIDENCE.com. Sitôt téléchargée
sur EVIDENCE.com, la vidéo est supprimée de la caméra. (L’enregistreur doit être inscrit
sur le compte EVIDENCE.com de l’utilisateur nal.)
3 Quand vous prenez vos fonctions, vériez que l’enregistreur ache une LED verte avant
de la débrancher de l’ETM.

Étape 3: Utilisation AXON Mobile
L’application“Axon mobile” permet à partir de la camera inidviduelle Axon, de voir les videos
et d’utiliser d’autres applications (localisation,GPS, titre, ,identication et catégorie) sur
un smartphone ou un appareil multimedia. Pour utiliser l’application Axon Mobile avec la
camera Axon inidivduelle il faut tout d’abord la coupler avec le smartphone.
1 Télécharger dans le smartphone l’application“AXON Mobile”soit depuis la boutique en
ligne“Google Play™ soit depuis iTunes® App Store.
2 Ouvrir l’application sur le smartphone et suivre les instructions pour activer la
transmission Bluetooth®.
Étape 4: Couplage de l’Enregistreur AXONbody
Pour coupler la camera avec le smartphone:
1 Tenir enfoncé le bouton couplage/volume situé sur le dessous de la caméra
2 Tout en maintenant ce bouton enfoncé, placer le bouton“ON/OFF”en position“ON”.
3 Jusqu’à entendre 3 bips, le LED de couplage en bas d’AXONbody clignotera vert.
4 Relacher le bouton“couplage/volume”.
La camera individuelle est maintenant prête à transmettre vers votre smartphone via
Bluetooth. Lorsque vous entendrez 3 bips le couplage sera eectif.
Other manuals for AXON body
2
Table of contents
Languages:
Other Taser Camcorder manuals


