TDK indiDVD Installation instructions

TDK.122.02_DVD Hardware V1 10/16/02 12:02 PM Page 1

FCC NOTICE
This equipment has been tested and found to comply with the limits for a Class B digital device,
pursuant to Part 15 of the FCC Rules. These limits are designed to provide reasonable protection
against harmful interference in a residential installation. This equipment generates, uses, and can
radiate radio frequency energy, and, if not installed and used in accordance with the instructions,
may cause harmful interference to radio communications. However, there is no guarantee interference
will not occur in a particular installation. If this equipment causes harmful interference to radio or
television reception, which can be determined by turning the equipment off and on, the user is
encouraged to try to correct the interference by one or more of the following measures:
•Reorient or relocate the receiving antenna.
•Increase the separation between the equipment and receiver.
•Connect the equipment into an outlet on a circuit different from that
to which the receiver is connected.
•Consult the dealer or an experienced radio/TV technician for help.
Any changes or modifications should be approved by the party responsible for compliance with FCC
Rules. Otherwise, the user loses authority to operate the equipment.
The laser beam emitted from the optical pickup is invisible. Accordingly:
•Do not open the optical pickup housing.
•Obtain service only from TDK-authorized personnel.
LASER INFORMATION
These products have been designed and manufactured according to IEC 825-1 on the Safety of Laser
products. This product comes under "Class 1 Laser Products." A Laser Caution Marking is attached
on the top of the internal drive model: "Caution: Invisible laser radiation when open. Avoid direct
exposure to beam."
CAUTION: Use of controls or adjustments or performance
of procedures other than those specified herein may
result in hazardous radiation exposure.
CAUTION: To disconnect the drive from an electrical current,
pull out the AC power cord.
GREETINGS
Thank you for purchasing Indi DVD. Enjoy your new drive.
Before installing your drive, write down its serial number. Go the following URL
and register the drive: www.tdk.com/registration.
TDK.122.02_DVD Hardware V1 10/16/02 12:02 PM Page 2

SECTION 1 : DRIVE INSTALLATION. . . . . . . . . . . . . . . . . . . . . . . . . . . . . . . . . . . . . . . . . . . . . . . . . . 1
SECTION 2 : SOFTWARE INSTALLATION . . . . . . . . . . . . . . . . . . . . . . . . . . . . . . . . . . . . . . . . . . . . . . 9
SECTION 3 : TROUBLESHOOTING AND MAINTENANCE. . . . . . . . . . . . . . . . . . . . . . . . . . . . . . . . . . . 11
SECTION 4 : FREQUENTLY ASKED QUESTIONS (FAQs). . . . . . . . . . . . . . . . . . . . . . . . . . . . . . . . . . . 19
APPENDIX : TECHNICAL SUPPORT. . . . . . . . . . . . . . . . . . . . . . . . . . . . . . . . . . . . . . . . . . . . . . . . . 21
WHAT INDI DVD DOES...
Indi DVD is a DVD/CD burner that provides professional quality writing, rewriting and reading. SAVE YOUR BOX! If you need to ship your drive
back to TDK, send it packaged in the original
box (if possible). TDK cannot assume liability
for any damage your drive sustains during
shipment. Please ship your drive in the safest
manner possible.
TDK.122.02_DVD Hardware V1 10/16/02 12:02 PM Page 4

This chapter explains how to physically install Indi DVD.
RECORD THE SERIAL NUMBER
On the cover of this manual, record the serial number and TLA code of your drive. This will come in
handy should you need to contact TDK Technical Support.
OVERVIEW OF INSTALLATION STEPS:
1. Shut down the computer and disconnect its power cable.
2. Remove your computer’s cover.
3. Set the jumpers.
4. Insert your new drive into an unused bay.
5. Connect the cables.
6. Finish setup.
NOTE:
Prior to beginning the installation process, you may want to view the install video located on the
included Disc Blender Software Suite disc. It’s also available at www.tdk.com/support/flash.
SECTION 1 : Drive Installation 1
TDK.122.02_DVD Hardware V1 10/16/02 12:02 PM Page 6

SHUT DOWN THE COMPUTER AND DISCONNECT ITS POWER CABLE
1. Click Start, then select Shut Down. Wait while Windows shuts down.
2. Unplug the computer’s power cord and all other connected cables.
REMOVE THE COMPUTER’S COVER
1. Remove the screws or fasteners that attach the case cover to the computer. You may need a
screwdriver.
2. Carefully remove the case cover.
3. Remove the front cover.
4. Remove the cover plate from the unused drive bay into which you want to install your new drive.
5. Now touch unpainted metal, such as the inside edge of your computer’s case.
This important step discharges the static electricity that can damage electronic components.
SET THE JUMPERS
For your new drive to function properly, its jumper must be set correctly. Before setting the jumper,
determine if your PC is a Cable Select (CSEL) or a Master/Slave system.
• If ANY device is set to CSEL (hard drive, CD-ROM, etc.), then your PC is a CSEL system.
If ANY device is set to Master or Slave (hard drive, CD-ROM, etc.), then your PC is a Master/Slave system.
2Indi DVD ReWRITER : Hardware Guide
Cable Select
Slave
Master
Power
connector
IDE cable
connector
Jumper(not used)
Audio output
connector
NOTE: Computer designs vary. If unsure of how to
remove the cover, consult your PC’s User Manual.
NOTE: Some computer cases may not require removal
of the front cover. Consult your PC’s User Manual to
determine if this is necessary.
For Cable Select (CSEL) Systems Only
Some computers feature Cable Select (CSEL) functionality. In a CSEL system, the jumpers for all
drives must be set to CSEL (rather than MASTER or SLAVE). If your computer doesn’t have CSEL
functionality, drive jumpers MUST NOT be set to CSEL.
To use CSEL, you must have:
•A computer that supports CSEL.
•A special CSEL type IDE cable.
If your computer is CSEL compatible, simply change your new drive’s factory jumper setting to the
CSEL position. It is not necessary to make any adjustments to your other devices.
For Master & Slave Systems Only
If any device in your PC is set to Master or Slave, then you have a Master/Slave system as opposed to
a CSEL system. Most computers have two IDE channels/cables: PRIMARY and SECONDARY. Your hard
drive(s) is probably already connected to the Primary IDE cable. Typically, your new drive should be
connected to the Secondary IDE cable as the MASTER device, and your old CD or DVD drive should be
connected to the secondary IDE cable as a SLAVE.
Jumper Setting Examples
Here are examples of correct jumper settings for some common system configurations. (There are
many possible configurations, not all of which can be covered here.) Find an example that resembles
your system configuration and use the same jumper settings.
A. IF: Any installed device is set to Cable Select (CSEL)
THEN: Set your new drive’s jumper to CSEL and connect it to the Secondary IDE cable. If absolutely
necessary, connect to the Primary IDE cable instead.
B. IF: The Secondary IDE cable has a DVD/CD-ROM or CD-RW drive connected as Master
THEN: Change the DVD/CD-ROM drive’s jumper setting to Slave. Leave the TDK drive set as Master
and connect it to the secondary IDE cable.
C. IF: There is nothing connected to the Secondary IDE cable.
THEN: If your system is the Master/Slave type, set your new drive’s jumper to Master and connect it
to the secondary IDE cable. If your system is the Cable Select (CSEL) type, set your new drive’s
jumper to CSEL and connect it to the secondary IDE cable.
NOTE: The IDE cable included with your drive CANNOT
be used for cable select (CSEL) configurations.
NOTE: If your old drive’s IDE cable doesn’t have an
unused connector, replace the old cable with the IDE
cable supplied with your new drive. The new cable can
connect two devices.
TDK.122.02_DVD Hardware V1 10/16/02 12:02 PM Page 2

4Indi DVD ReWRITER : Hardware Guide SECTION 1 : Drive Installation 5
INDI DVD CD-ROM
INSTALLING Indi DVD
HARD DRIVE HARD DRIVE
CD-ROM
INDI DVD
HARD DRIVE HARD DRIVE
HARD DRIVE
HARD DRIVE
INDI DVD
Connected as CSEL Connected as CSEL
Connected as CSEL
Primary
IDE port
Secondary
IDE port
Connected as CSEL
Connected as Master
Primary
IDE port
Secondary
IDE port
Connected as Master Connected as Slave
Connected as Slave
Primary
IDE port
Secondary
IDE port
Set Indi DVD’s
jumper to:
CS S M
Set Indi DVD’s
jumper to:
CS S M
Set Indi DVD’s
jumper to:
CS S M
If your sytstem is
the Cable Select
(CSEL) type
Set Indi DVD’s
jumper to:
CS S M
If your sytstem is
the Master/Slave
type
NOTE: For best results, set Indi DVD’s jumper to
Master. If applicable, enable your system’s DMA
setting to achieve maximum writing speed.
The jumper’s position determines whether Indi DVD is set to Master, Slave or Cable Select (CSEL). In
the example below, Indi DVD’s jumper is set to CSEL.
Indi DVD’s rear-panel jumpers
To change Indi DVD’s jumper setting:
1. Remove the jumper with your fingers or needle nose pliers.
2. Place the jumper in the new setting. For example, to make Indi DVD a Slave, move the jumper to
the center set of pins, leaving the other pins uncovered. To change the drive to Cable Select, move
the jumper to the left set of pins. Make sure to insert the jumper vertically rather than horizontally.
See below.
To change your old drive’s jumper setting (if required):
1. Disconnect the power supply from the drive.
2. Disconnect the IDE cable from the drive.
3. Disconnect the audio cable from the drive.
4. Remove the drive from your PC.
5. Using your fingernails or needle-nose pliers, change the jumper to the new setting.
6. Place the drive back into the computer.
7. Reconnect the audio cable.
8. Reconnect the IDE cable.
9. Reconnect the power supply.
Cable Select
For Factory Use
Only
If Applicable
Master
Slave
Install jumpers this way
(vertically)
DO NOT install jumpers this way
(horizontally)
Jumper
TDK.122.02_DVD Hardware V1 10/16/02 12:02 PM Page 4

SECTION 1 : Drive Installation 7
INSERT INDI DVD INTO AN UNUSED DRIVE BAY
Before installing Indi DVD in your personal computer, double check the jumper setting. Make sure the
power to your computer and any external peripherals is OFF and verify that your computer is
UNPLUGGED from its power source.
To insert Indi DVD into the drive bay:
1. Locate an unused drive bay into which your new drive can be inserted.
2. Remove the cover plate from the unused drive bay.
3. Carefully insert the drive into the unused drive bay.
4. Using a Phillips head screwdriver, secure the drive into the drive bay with the included screws.
CONNECT THE CABLES
To connect the cables:
1. Look inside your computer’s case, locate an unused IDE connector and attach that connector to Indi
DVD’s rear panel IDE port. (If there aren’t any unused IDE connectors in the computer, replace the
old IDE cable with the included IDE cable. The included cable can connect two devices. If installing
the new IDE cable, be sure to connect one end to an unused IDE port on your computer’s
motherboard.)
2. Now find an unused power connector and attach it to the DC INPUT on the back of your new drive.
If you do not find an unused connector, see the "Do you need a power cable?" section that follows.
3. Connect an audio cable between the back of your new drive and your soundcard (optional).
4. Double check your work. Make sure the side of the IDE cable with the red stripe is matched to Pin 1
on the computer’s motherboard and on the drive.
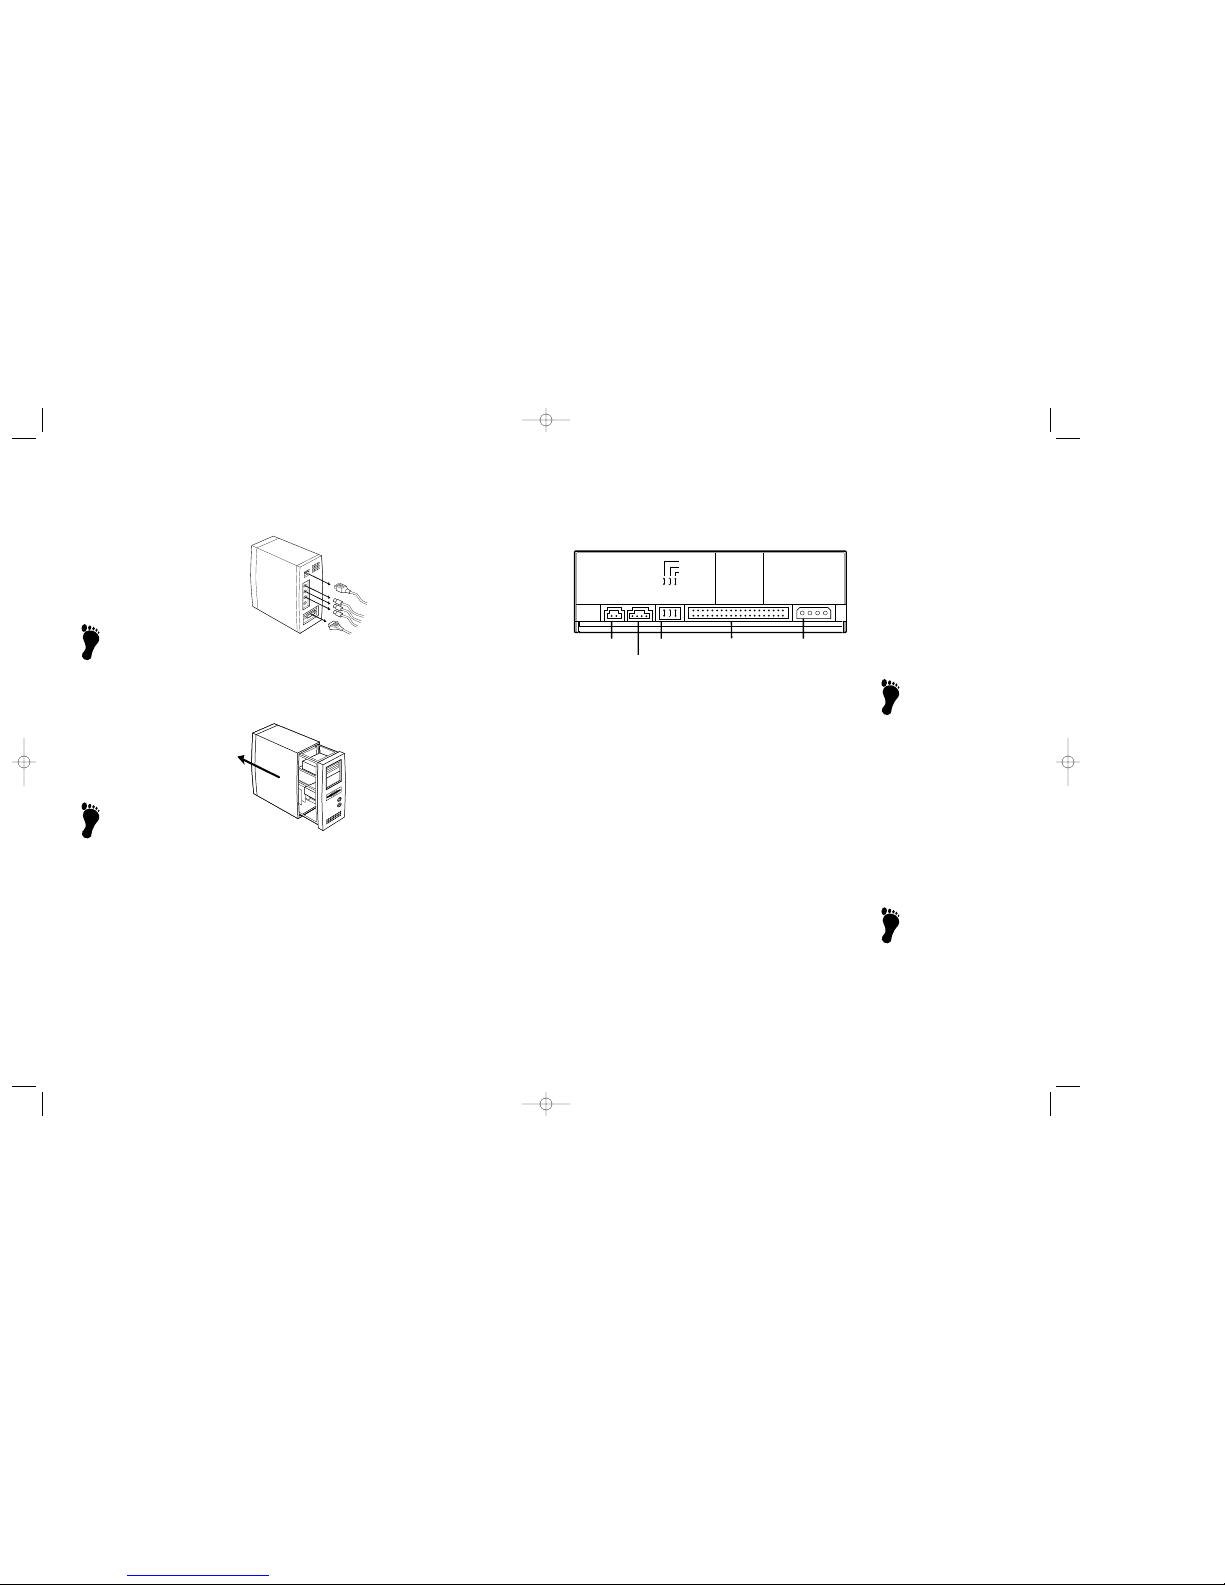
Indi DVD’s rear panel connections
6Indi DVD ReWRITER : Hardware Guide
NOTE: If your PC doesn’t have an unused drive bay,
remove your old CD-ROM, DVD-ROM or CD-RW drive,
then install Indi DVD.
NOTE: Some computers may require that drive rails be
attached to Indi DVD. If you must use mounting rails,
fasten the rails to the lower pair of holes. (In some
instances, you may need to fasten the rails to the
upper set of holes.) After attaching the rails, check
their positioning by sliding the drive into the bay before
you mount the drive or connect any cables. Rails are
not included. If you need rails, obtain them from your
computer’s manufacturer or from a computer store.
NOTE: You do not need to connect the audio cable
if you plan to use TDK Digital Mixmaster as your
CD playback software. If you plan to use another
CD playback application, it may be necessary to
connect the audio cable in order to hear music. IDE ribbon cable
Power cable
CD-ROM audio
connector on PC
Power supply
Internal Indi DVD ReWRITER
CAUTION: Install Indi DVD horizontally. TDK does not
guarantee the drive’s performance in a vertical
position.
NOTE: The IDE cable supplied with Indi DVD isn’t Cable
Select (CSEL) compatible. An IDE cable that supports
CSEL (80-pin IDE) systems looks similar to a regular
40-pin IDE cable. All 80-pin IDE cables that meet ATA
specifications support the CSEL feature. Such a cable
can still be used with Master/Slave systems.
CAUTION: Some IDE cables are keyed to prevent them
from being inserted upside down, but some cables
aren’t keyed. If your cable isn’t keyed, match the red
stripe along one side of the IDE cable to Pin 1 on the
motherboard and to Pin 1 on the drive (the pin closest
to the drive’s power connector).
CAUTION: Stringing multiple IDE cables together isn’t
recommended. The total length of an IDE cable cannot
exceed 18 inches.
The IDE Ribbon Cable
A standard IDE flat-ribbon cable has 40 pins and three connectors. One end connects to the IDE port
on your computer’s motherboard, and the other two connectors can be used to attach peripherals such
as Indi DVD or a CD-ROM drive.
Do you need a power cable?
Most computers have a few unused power connectors. There should be a cable bundle sticking out of
the power supply inside your computer. Follow the cable bundle to see if there are any unused
connectors. If so, plug one of these connectors into the power jack on Indi DVD’s rear panel. If there
aren’t any unused power connectors inside the computer, you’ll need to buy a "splitter," available at
most computer stores.
FINISH SETUP
Now it’s time to reassemble your computer, verify that Indi DVD is recognized and optimize
performance.
To reassemble your computer:
1. Using the screws or fasteners you removed, reattach the cover to your case.
2. Plug in the computer and reattach all the cables you removed.
After installation, make sure Indi DVD and your other IDE peripherals are recognized by the computer.
To verify that your new drive is recognized by the computer (Windows 98SE/ME/XP/2000):
1. Turn the computer ON. After the computer boots up, you should see the Windows display.
2. Open Windows Explorer and ensure there is an icon for Indi DVD, the hard drive, and other CD-ROM
drives, if present. Indi DVD may be labeled D:, E: or another designator.
3. If Indi DVD doesn’t appear in Windows Explorer, reboot and enter the computer’s CMOS setup
program. Enable the BIOS to recognize your new drive. Use the setup program to set up IDE Master
and Slave designations as needed for your configuration. If a Master or Slave is set to “disable”or
“none”, change to “enable”or “auto”as appropriate.
4. Save and exit the computer’s CMOS setup to restart your computer with the new settings.
5. Windows 98SE and ME only: Click the START button, then SETTINGS, then CONTROL PANEL, then
SYSTEM, then DEVICE MANAGER. Click the +sign next to the CD-ROM icon. Your Indi DVD drive
should be listed underneath the CD-ROM icon.
Windows 2000 and XP only: Click the START button on the Windows taskbar, then select SETTINGS,
then CONTROL PANEL. Double Click the SYSTEM icon in the Windows Control Panel, then select the
HARDWARE tab, then click on the DEVICE MANAGER button.
6. If you do not see the Indi DVD drive icon, or if it has a yellow diamond with an exclamation point
(!), contact your PC or motherboard manufacturer to get the appropriate IDE controller driver.
NOTE: Refer to the computer’s documentation for
information on how to run the setup program.
TDK.122.02_DVD Hardware V1 10/16/02 12:02 PM Page 6

SECTION 2 : Software Installation 9
INSTALL THE SOFTWARE
Before you use Indi DVD, install the software from the included Disc Blender Software Suite CD-ROM.
The software automatically loads all necessary device drivers as well as TDK’s Disc Blender Software
Suite. If you have any problems, TDK’s technical support staff will help you.
Also install the Pinnacle Studio 8 SE application from its disc.
INSTALL ADDITIONAL DEVICE DRIVERS (if required)
Indi DVD acts as a "CD-ROM Drive" for purposes of installation and setup. In some cases, you will
need to install additional drivers to make use of all of the drive’s features.
NOTE: For instructions on how to use the software,
read the Software Quick Guide section of this manual.
8Indi DVD ReWRITER : Hardware Guide
ENABLE DMA (DIRECT MEMORY ACCESS)
DMA allows you to free up CPU resources by accessing memory directly.
To ensure that DMA is enabled:
Windows 98SE/ME
1. In Windows, click the START button, then SETTINGS, then CONTROL PANEL.
2. Double click SYSTEM in the Control Panel folder, then the DEVICE MANAGER tab. You will see a list
of devices in your system.
3. Click the CD-ROM icon, and choose Indi DVD’s PROPERTIES button. You will see the drive properties
for Indi DVD.
4. Ensure that the DMA box is checked ON under the Settings tab.
5. Repeat steps 1 through 4 for other devices that you will be recording from and recording to such as
your hard drive and/or second CD-ROM or CD-Rewriter.
6. Reboot your computer for the change to take effect.
Windows 2000
1. Click the START button on the Windows taskbar.
2. Select SETTINGS, then CONTROL PANEL from the menu.
3. Double Click the SYSTEM icon in the Windows Control Panel.
4. Select the HARDWARE tab then click on the DEVICE MANAGER button.
5. Click on the (+) sign beside IDE ATA/ATAPI CONTROLLERS.
6. Right click on the appropriate IDE channel (Primary or Secondary), right click PROPERTIES, then
select the ADVANCED SETTINGS tab.
7. Set the “Transfer Mode”to “DMA if available”. Device 0 is the MASTER device on the IDE channel
and Device 1 is the SLAVE.
8. Click OK to accept the change and then reboot the computer for the change to take effect.
Windows XP
To enable DMA mode using the Device Manager:
1. Open Device Manager.
2. Double-click IDE ATA/ATAPI CONTROLLERS to display the list of controllers and channels.
3. Right-click the icon for the channel to which the device is connected, select PROPERTIES, and then
click the ADVANCED SETTINGS tab.
4. In the Current Transfer Mode drop-down box, select “DMA if Available”if the current setting
is “PIO Only.”
5. If the drop-down box already shows “DMA if Available”but the current transfer mode is
“PIO Only”, then the user must toggle the settings.
6. Change the selection from “DMA if Available”to “PIO only”, then click OK. Then repeat the steps
above to change the selection to “DMA if Available.”
Windows XP will turn off DMA mode for a device after encountering certain errors during data
transfer operations. If more than six DMA transfer timeouts occur, Windows will turn off DMA and
use only PIO mode on that device. In this case, the user cannot turn on DMA for this device. The
only option for the user who wants to enable DMA mode is to uninstall and reinstall the device.
NOTE: DMA is not an option on all computers.
TDK.122.02_DVD Hardware V1 10/16/02 12:02 PM Page 8

10 Indi DVD ReWRITER : Hardware Guide SECTION 3 : Troubleshooting & Maintenance 11
NOTE: If the firmware upgrade does not complete
successfully, disable DMA and try the procedure again.
NOTE: For optimal operation of Indi DVD, DMA should
be enabled. Some computers do not offer the option of
enabling or disabling DMA.
UPGRADING FIRMWARE
Occasionally, TDK may release drive firmware updates. Typically, you will not need to upgrade Indi
DVD’s firmware. But if Indi DVD doesn’t respond to other troubleshooting efforts, try loading the latest
firmware revision.
To obtain new firmware (if available) for Indi DVD:
1. Go to www.tdk.com/INDIsupport.
2. Look for firmware updates and check their intended uses.
3. Follow instructions for downloading the firmware to your computer.
To upgrade firmware:
1. Run the executable file that you downloaded.
2. Accept all defaults by clicking on the NEXT button until you see the message:
“Firmware update has completed.”
3. Reboot your system.
4. Verify DMA is enabled before using Indi DVD.
READ THIS ENTIRE SECTION.
IF A PROBLEM ARISES, YOU MAY BE ABLE TO SOLVE IT YOURSELF,
RATHER THAN WAITING FOR ASSISTANCE FROM A TDK REPRESENTATIVE.
TDK.122.02_DVD Hardware V1 10/16/02 12:02 PM Page 10

SECTION 3 : Troubleshooting & Maintenance
13
12 Indi DVD ReWRITER : Hardware Guide
TDK.122.02_DVD Hardware V1 10/16/02 12:02 PM Page 12

14 Indi DVD ReWRITER : Hardware Guide
SECTION 3 : Troubleshooting & Maintenance
15
TDK.122.02_DVD Hardware V1 10/16/02 12:02 PM Page 14

SECTION 3 : Troubleshooting & Maintenance
1716 Indi DVD ReWRITER : Hardware Guide
TDK.122.02_DVD Hardware V1 10/16/02 12:02 PM Page 16

18 Indi DVD ReWRITER : Hardware Guide SECTION 4 : Frequently Asked Questions 19
If you have problems during or right after installation of your Indi DVD drive, use these tips to help find the problem.
What media should I use for my Indi DVD?
See the included specifications sheet or visit www.tdk.com/INDIsupport for more information.
When should I record to DVD media?
Recordable DVD discs have much higher capacity than CD-R/RW discs. This makes recordable DVD discs ideal for
recording video and large multimedia files and for backing up your hard drive.
Why can’t I do disc-to-disc copying?
Some possible reasons are:
•Some CD-ROM and DVD-ROM drives will not allow direct copying to Indi DVD, or are not capable of digital audio extraction.
•You must use either a SCSI-2 drive or a supported ATAPI drive as the source.
•Some discs have copy protection or other features that prevent disc-to-disc copying.
•You cannot copy commercial DVD discs or copy protected CD discs.
Why am I getting buffer underrun errors?
If available, your recording software’s buffer underrun write assurance option should be activated. Buffer underrun
errors can occur if another application interrupts the writing process, or if the recording drive’s write speed is set too high
for the speed at which the source drive can supply data. Lack of computer memory can also cause underrun errors.
How can I optimize the recording process?
•Make sure your system meets the minimum system requirements.
•Do not run other applications while recording discs. Log off any networks, disable any FAX modems, email, screen savers,
or other programs that may send messages to your computer while it is writing a disc.
•If your computer has a power management feature, disable it.
•Run ScanDisk and Disk Defragmenter periodically on your hard drive.
•Do not record using data from a compressed hard drive. Buffer underruns may be caused by hard drive compression software.
How do I install Indi DVD if another DVD drive is already installed?
•You may need to set the old DVD drive to its Master jumper position, and Indi DVD to its Slave position.
What is the best way to label a disc that I just burned?
•With a CD/DVD labeling marker. The marker must be soft-tipped and either alcohol or water based.
Markers of other types will ruin the disc.
•Another way is to use a good quality label maker, such as TDK’s CD/DVD Labeling System.
TDK.122.02_DVD Hardware V1 10/16/02 12:02 PM Page 18

20 Indi DVD ReWRITER : Hardware Guide
Appendix : Technical Support 21
Keep TDK’s email, Web site, and phone numbers in a convenient location as indicated below. Keep
your drive’s serial number and a copy of your sales receipt handy as well. If you experience a problem
while installing or operating your Indi DVD, please refer first to the relevant sections of this manual
regarding setup and installation. If you do not uncover the solution there, please refer next to the
Troubleshooting chapter. It contains solutions to the most common types of problems fielded by our
technical support staff. You may also wish to refer to the Frequently Asked Questions (FAQ) section of
our Web site to assist you in troubleshooting the problem on your own. If you have not been
successful in your quest, our Technical Support Department will help you solve problems that relate
specifically to your Indi DVD. In many cases, a problem that appears to be caused by your Indi DVD
actually originates in another part of your computer. In such instances, our technical support staff
will try to help you identify the part at fault and will refer you to the manufacturer of that part for
further assistance.
HOW TO CONTACT US
There are several ways for you to contact TDK’s Technical Support Department:
•Visit our web site (www.tdk.com/INDIsupport) for answers to Frequently Asked Questions.
BEFORE YOU CONTACT US
Please gather as much of the following information as possible before contacting us.
•The serial number and TLA number of your Indi DVD. Your serial number can be found both on the
retail box and on a label on the drive itself. The TLA number appears both on the drive label and on
a sticker at the rear of internal drives
•The version of TDK Disc Blender Software you are using, if applicable.
•The latest version of firmware you loaded onto the drive, if applicable.
•The version of the Windows or UNIX operating system you are using.
(continued on next page)
NOTE: Most new CD-ROM drives can read CD-RW discs.
Many older drives may not be able to read CD-RW discs.
NOTE: Australian Users should call 1800.651.917 for TDK
TDK.122.02_DVD Hardware V1 10/16/02 12:02 PM Page 20

TDK LIMITED WARRANTY
One Year Limited Warranty for Hardware
Ninety Day Limited Warranty for TDK Software
TDK Electronics Corporation ("TDK") warrants to the end-user customer that this data storage product, exclusive of software (referred to herein as
"Hardware" or "Product") will be free from defects in material and workmanship for a period of one (1) year from date of purchase. If TDK receives
notice of any such defects during the warranty period, TDK will, at its option, either repair or replace the Product which it finds to be defective at no
charge (except for shipping and insurance). Repair of defective Product may be with either new or rebuilt replacement parts that will be warranted
for the remainder of the original warranty period. Any exchanged parts under this warranty will become the property of TDK. Replacement Product
may be either new or reconditioned. If the Product is discontinued and no longer available, then it may be replaced with Product determined by TDK
to be of similar value and performance.
TDK warrants to the end-user customer that the TDK-branded software included with the Product (herein referred to as "TDK Software") when
properly installed and used will not fail to execute its programming instructions due to defects in materials or workmanship for a period of ninety
(90) days from date of purchase. If TDK receives notice of any such defects during the warranty period, TDK will replace the TDK Software which it
finds to be defective at no charge (except for shipping and insurance).
Any software other than TDK Software included with the Product is supplied on an "AS IS" basis and without any representations or warranties of
any kind, whether express or implied, including but not limited to the implied warranties of merchantability, fitness for a particular purpose, title
and non-infringement. Please refer to any documentation included with such software for your rights and obligations with respect to that software.
TDK does not warrant that the operation of the Product will be uninterrupted or error free. This Limited Warranty does not apply to defects resulting
from (1) acts of God, accident, misuse, abuse, negligence, abnormal, or unusually heavy use; (2) improper installation, operation, testing, or
maintenance; (3) power failure or connection to improper voltage supply; or (4) attempted repair by any party other than TDK.
This Limited Warranty does not apply when the malfunction results from the use of the Product in conjunction with other products, software, or
accessories, or where it is determined by TDK that there is no fault with the Product itself.
This Limited Warranty is invalid if the factory applied serial number has been altered or removed from the Product. This Limited Warranty extends
only to the original end-user customer and is not transferable to any subsequent purchaser. This Limited Warranty is valid only within the United
States. For areas outside the United States, contact the authorized dealer from whom you
purchased the Product to determine what warranty, if any, applies.
In order to obtain warranty service, you must deliver the Product to TDK freight prepaid, in either its original package or packaging providing a
degree of protection equivalent to that of the original packaging, along with proof of purchase. (Please contact TDK at the number listed below or in
the manual for further information.)
TDK MAKES NO OTHER WARRANTIES, EXPRESS OR IMPLIED, INCLUDING BUT NOT LIMITED TO THE WARRANTIES OF MERCHANTABILITY OR FITNESS FOR
A PARTICULAR PURPOSE. TO THE EXTENT THAT ANY IMPLIED WARRANTIES APPLY, DESPITE THEIR EXCLUSION UNDER THIS LIMITED WARRANTY, SUCH
WARRANTIES SHALL BE LIMITED TO THE DURATION OF THE EXPRESS WARRANTIES PROVIDED HEREUNDER.
THE REMEDIES PROVIDED UNDER THIS LIMITED WARRANTY ARE THE SOLE AND EXCLUSIVE REMEDIES. TDK’S LIABILITY UNDER ANY LEGAL THEORY
FOR ANY LOSS OR DAMAGE IN ANY WAY RELATED TO THE PRODUCT SHALL IN NO EVENT EXCEED THE PURCHASE PRICE OF THE PRODUCT. IN NO
EVENT SHALL TDK BE LIABLE FOR ANY INCIDENTAL OR CONSEQUENTIAL DAMAGES RESULTING FROM USE OF THE PRODUCT.
Some states do not allow limitations on how long an implied warranty lasts or any exclusion or limitation of incidental or consequential damages, so
the above limitations or exclusions may not apply to you. This warranty gives you specific legal rights, and you may have other rights which vary
from state to state.
U.S.A.: TDK Electronics Corporation 901 Franklin Avenue Garden City, NY 11530 800-835-8326
SERIAL NUMBER ______________________
For on-line support or to contact Technical support,
please visit:
http://www.tdk.com/INDIsupport
For registration of product, please visit:
http://www.tdk.com/registration
22 Indi DVD ReWRITER : Hardware Guide
•The brand name and model number of your computer (e.g. Dell Dimension 4500, Gateway 300
Series, etc.).
•The type of VGA, Super VGA, or other graphics card you use.
•Brand name and model number of any other peripherals you have installed or connected to your
computer (e.g., CD-ROM, scanner, fax board, network board).
RETURNS
You must receive an RMA (Returned Materials Authorization) number from our Technical Support
Department before any TDK drive can be returned for repair or replacement. Any drive sent to TDK
without an RMA number will not be accepted. Drives must be sent postage prepaid. We recommend
that you insure your shipment, as TDK cannot be held responsible for any damage that may occur
during shipment.
TDK.122.02_DVD Hardware V1 10/16/02 12:02 PM Page 22
Other manuals for indiDVD
1
Other TDK DVD Drive manuals