TDX Tech GYMBOREE User manual


VeriFone & Ring Central Install Guide
Confidential Page 2 of 27 7/26/2018
The information contained in this document is privileged, confidential, and protected from disclosure. Any unauthorized use,
printing, copying, disclosure, dissemination of or reliance upon this communication by persons other than the intended recipient
may be subject to legal restriction or sanction.
Code of Conduct:
Upon acceptance of a TDX Tech work order, the technician is required to read over this document and accept all terms
and conditions. The technician’s arrival on-site will serve as an acceptance of the terms and conditions included in this
document.
If you do not agree with all terms and conditions listed or cannot meet the scheduled installation date, technician must
contact TDX Tech to get work order released immediately.
Technician will be representing TDX Tech while on site. At no time during the install should any company name other than
TDX Tech be mentioned to the client.
Technician is to look over installation guide and work order before scheduled installation. Technician is also required to
bring these documents to site, unless otherwise noted.
1. Work Order
2. Installation Guide
Please comply with the following requirements when on-site:
1. Be on time
2. Dress appropriately, business casual, and observe proper hygiene practices
3. No use of foul or offensive language
4. No food or drink on the sales floor
5. Act professional and courteous to Client’s personnel and customers
If technician is caught committing any crime while on-site, they may be prosecuted at the discretion of TDX Tech and the
Client.
Technician must have all tools listed under “Tool Requirements” section of the work order and installation guide.
Technician must also have a reliable vehicle to arrive on-site and on time.
If any complaints or issues are reported while technician is on-site, the agreed paid amount will be reduced or eliminated
and technician will no longer be used for TDX Tech projects.
Technician must submit all pictures and signed TDX Tech Work Order to TDX Tech Help Desk. If technician does not submit
pictures and signed Work Order within 24 hours of completed of install, there will be a deduction of 10% of the agreed
upon spend limit. If technician does not submit pictures and signed Work Order within 48 hours of completion on install,
the Work Order will be closed out in the amount of $0.
If technician has any questions regarding installation or documentation, they are to contact TDX Tech help desk
immediately 952-912-9222.
Thank you for accepting the work order. We appreciate your interest and look forward to working with you.

VeriFone & Ring Central Install Guide
Confidential Page 3 of 27 7/26/2018
The information contained in this document is privileged, confidential, and protected from disclosure. Any unauthorized use,
printing, copying, disclosure, dissemination of or reliance upon this communication by persons other than the intended recipient
may be subject to legal restriction or sanction.
PROJECT OVERVIEW:
Gymboree has contracted TDX Tech to assist with a VeriFone MX915 cable removal and installation for all of their
locations in the United States. The purpose of this project is to prepare the VeriFone devices already installed at the store
for the new POS equipment that will be installed later this Fall/Winter. The existing Cat5e “Yellow” cable connected to the
VeriFone MX915 will be removed and replaced with “Purple” cable. Additionally, it will add an external interface, which
will require some additional configuration after installation of the hardware.
GENERAL INSTRUCTOINS:
Observe the requirements in the Technician Code of Conduct.
Thoroughly read through installation guide and all associated documents referenced BEFORE arriving on-site.
This guide and all referenced documents MUST be brought to the service location. Failure to bring the
required documents will result in an unsuccessful installation.
Technician MUST be on time, NO exceptions.
Check IN and OUT with TDX Tech Help Desk 952-912-9222
DOCUMENTS REFERENCED:
TDX Tech Work Order: This must be completed in full and signed off by the manager. MUST be submitted to
TDX Tech upon completion of installation. (Docs@tdxtech.com)
New Store Install Guide: This guide must be printed out and brought to site each day to effectively complete
the scope.
TOOL REQUIREMENTS:
The following tools will be required to be brought to site in order to complete the work described in this guide. If tools
are missing from this list you will be asked to go purchase them at a nearby store and return with enough time to
complete the scope. You will not be paid for this time away from site.
Cabling Tool Kit
Basic PC Tool Kit
Digital Camera
Cell Phone
Screwdrivers (Phillips and Regular)
Cable Management Velcro
CHECKIN PROCESS:
Call TDX Tech Help Desk @ 952.912.9222
TDX will advise how many VeriFone’s tech will be updating on site
Introduce Self To Site Manager
Verify equipment is onsite
VeriFone & Ring Central Install Guide
Confidential Page 4 of 27 7/26/2018
The information contained in this document is privileged, confidential, and protected from disclosure. Any unauthorized use,
printing, copying, disclosure, dissemination of or reliance upon this communication by persons other than the intended recipient
may be subject to legal restriction or sanction.
VERIFHONE HARDWARE INSTALLATION:
SHIPPED EQUIPMENT:
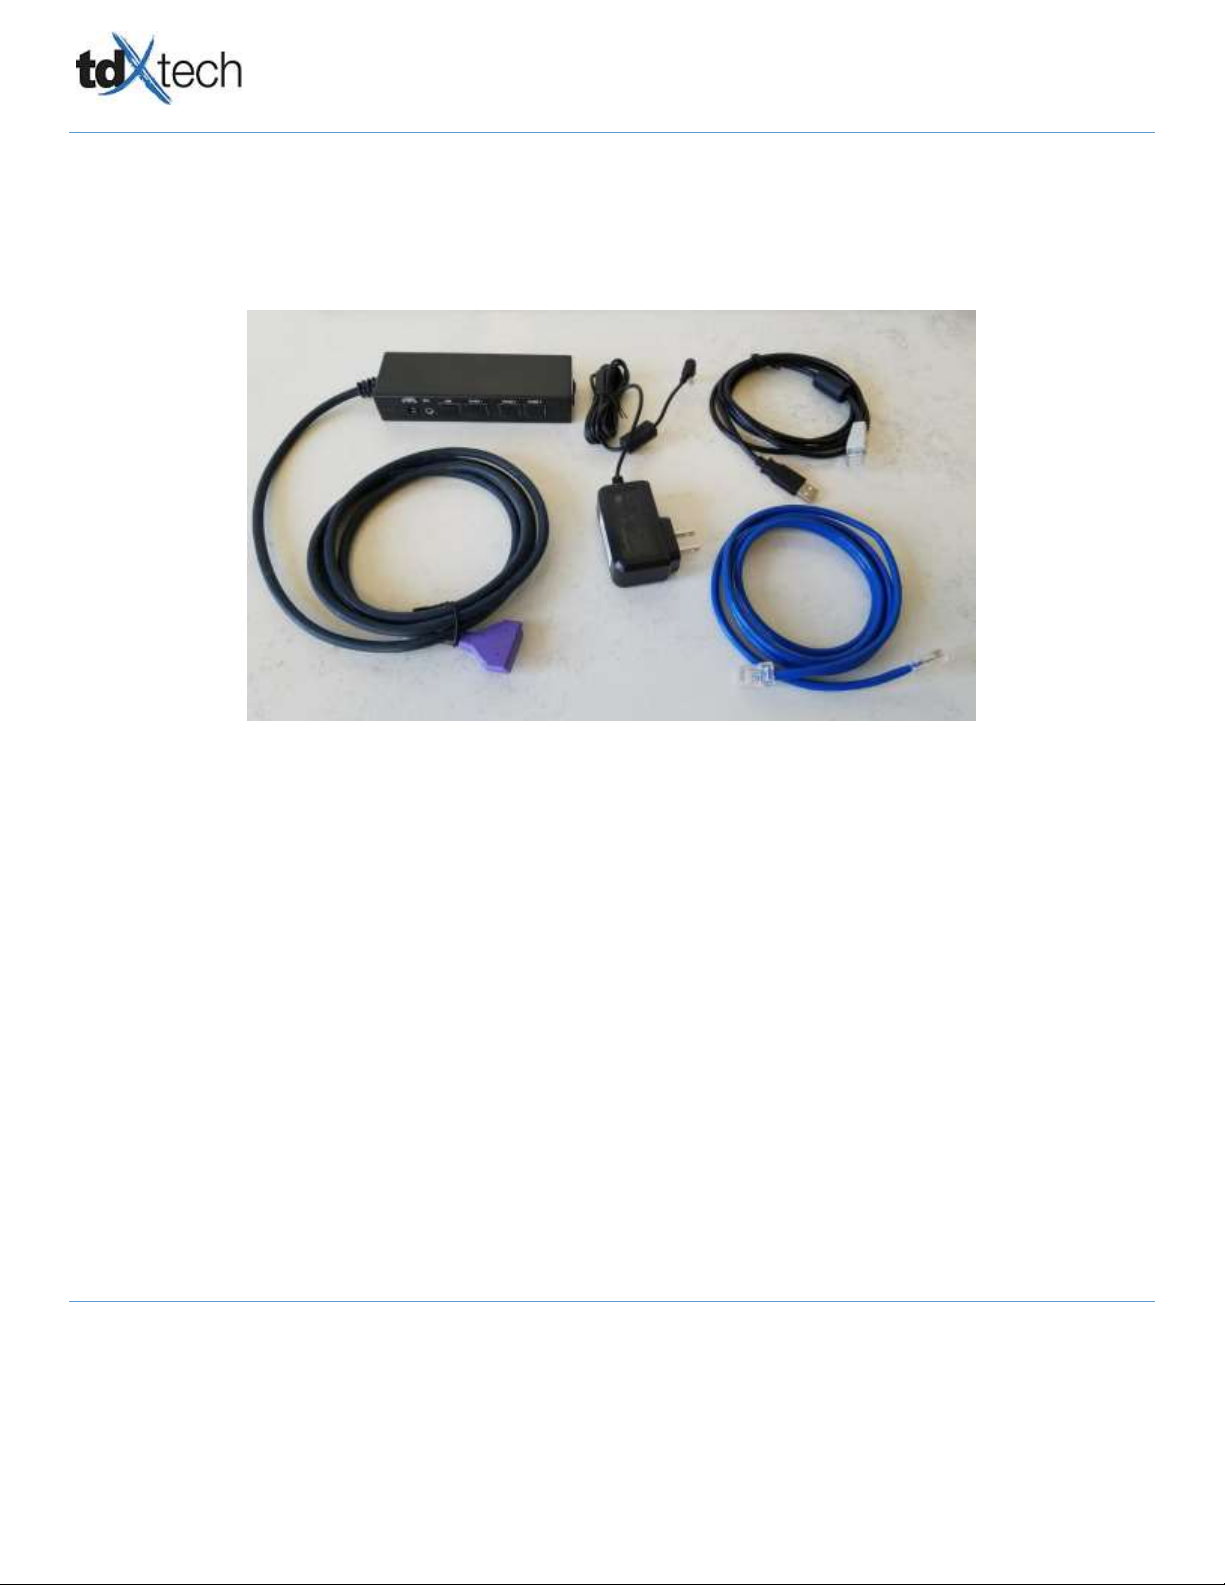
The following equipment will be shipped to the stores. There will be one set of equipment per VeriFone device that will be
reused in the future upgrade. Each set consists of the following:
-External Ethernet interface box
-External power supply
-Ethernet to USB cable
-Standard Ethernet cable
PLEASE ENSURE THE KIT IS COMPLETE BEFORE STARTING.
If not, please contact the TDX Tech Help Desk.

VeriFone & Ring Central Install Guide
Confidential Page 5 of 27 7/26/2018
The information contained in this document is privileged, confidential, and protected from disclosure. Any unauthorized use,
printing, copying, disclosure, dissemination of or reliance upon this communication by persons other than the intended recipient
may be subject to legal restriction or sanction.
1) Locate VeriFone 1 device located at POS 1 and remove it from the stand.
2) Turn over the device and locate the interface box underneath. To remove the interface box, press the two tabs
and slide the interface box out towards the back.

VeriFone & Ring Central Install Guide
Confidential Page 6 of 27 7/26/2018
The information contained in this document is privileged, confidential, and protected from disclosure. Any unauthorized use,
printing, copying, disclosure, dissemination of or reliance upon this communication by persons other than the intended recipient
may be subject to legal restriction or sanction.
3) After the box is slid out, you will see that a yellow connector is plugged into the box. Slide the metal bracket out
and remove the yellow plug.
(For reference, the other end of this cable is a large USB with green insides. The replacement USB cable will replace this
one in the same port although the shape looks different.)

VeriFone & Ring Central Install Guide
Confidential Page 7 of 27 7/26/2018
The information contained in this document is privileged, confidential, and protected from disclosure. Any unauthorized use,
printing, copying, disclosure, dissemination of or reliance upon this communication by persons other than the intended recipient
may be subject to legal restriction or sanction.
4) Replace the yellow plug cable with the purple one from the kit, and re-install the metal bracket.
5) Note the ports on the external interface box:
VeriFone & Ring Central Install Guide
Confidential Page 8 of 27 7/26/2018
The information contained in this document is privileged, confidential, and protected from disclosure. Any unauthorized use,
printing, copying, disclosure, dissemination of or reliance upon this communication by persons other than the intended recipient
may be subject to legal restriction or sanction.
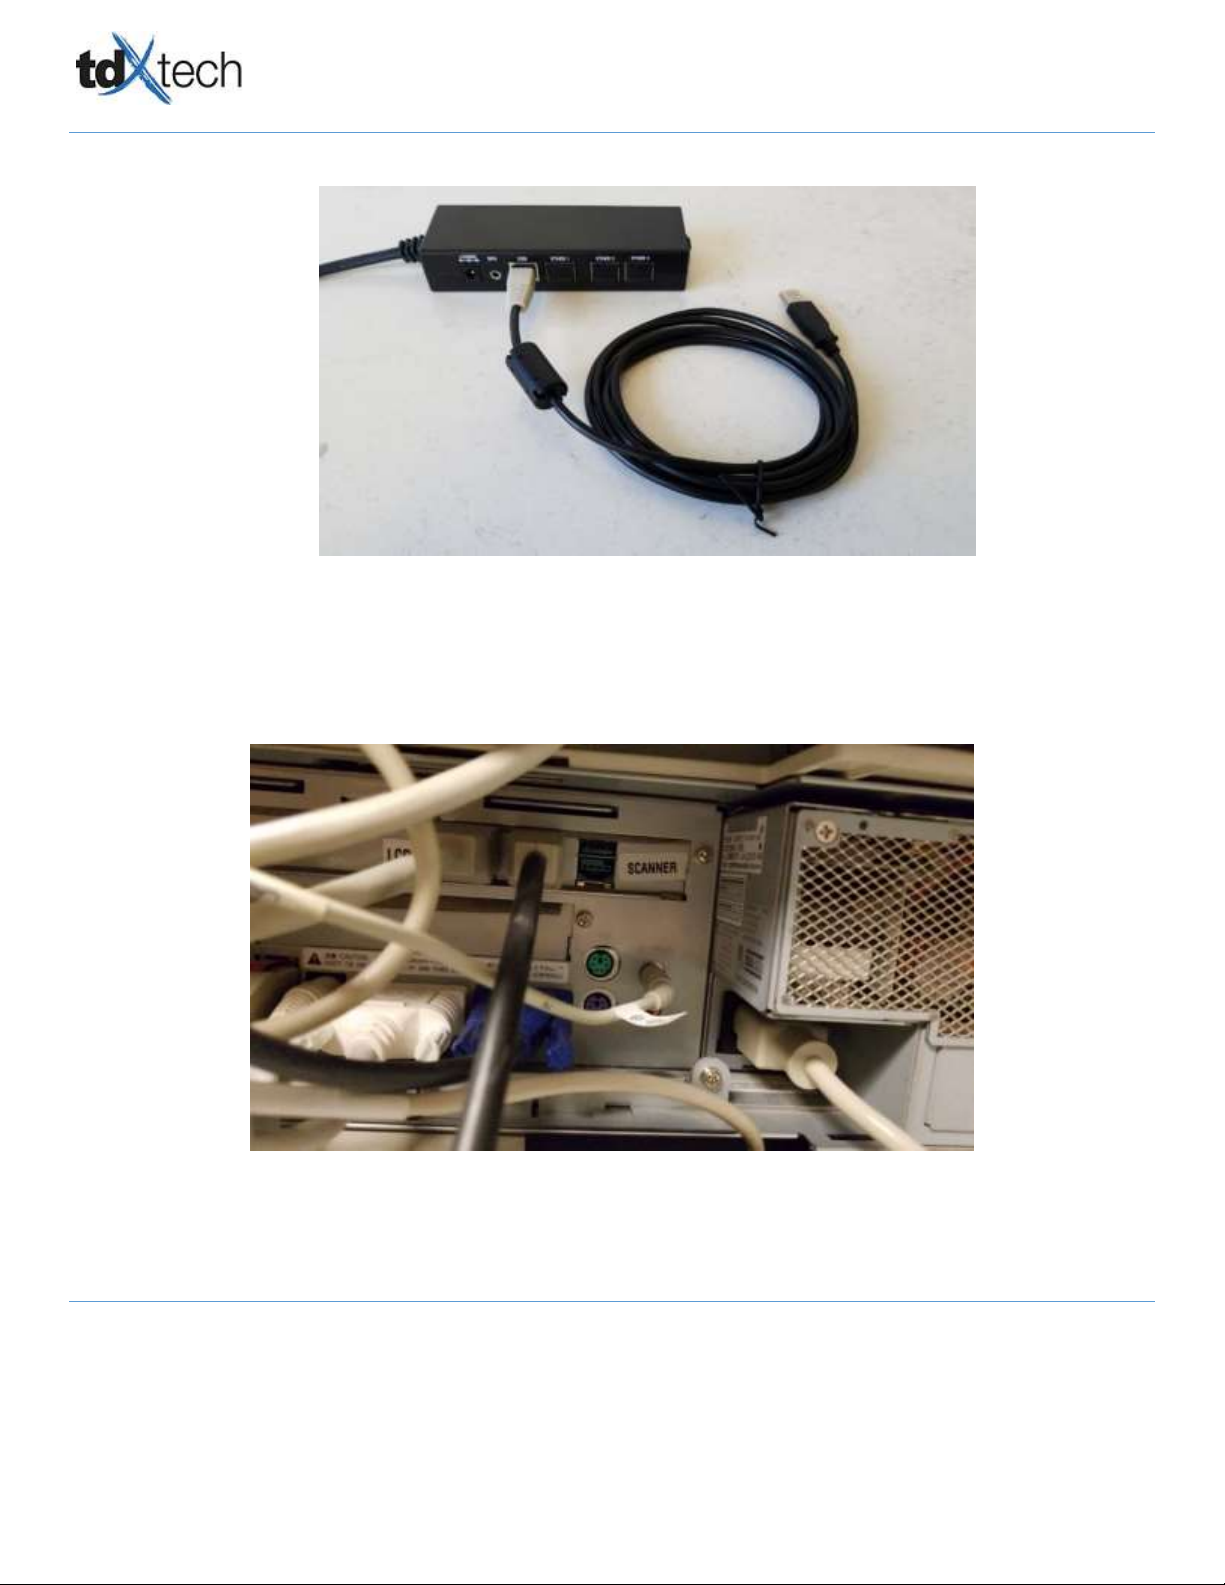
6) Install the cable with a USB connector on one end and the Ethernet plug on the other end into the USB port.
7) Connect the USB plug to the back of the register where the large green USB was (plug is still connected in this
picture).
VeriFone & Ring Central Install Guide
Confidential Page 9 of 27 7/26/2018
The information contained in this document is privileged, confidential, and protected from disclosure. Any unauthorized use,
printing, copying, disclosure, dissemination of or reliance upon this communication by persons other than the intended recipient
may be subject to legal restriction or sanction.
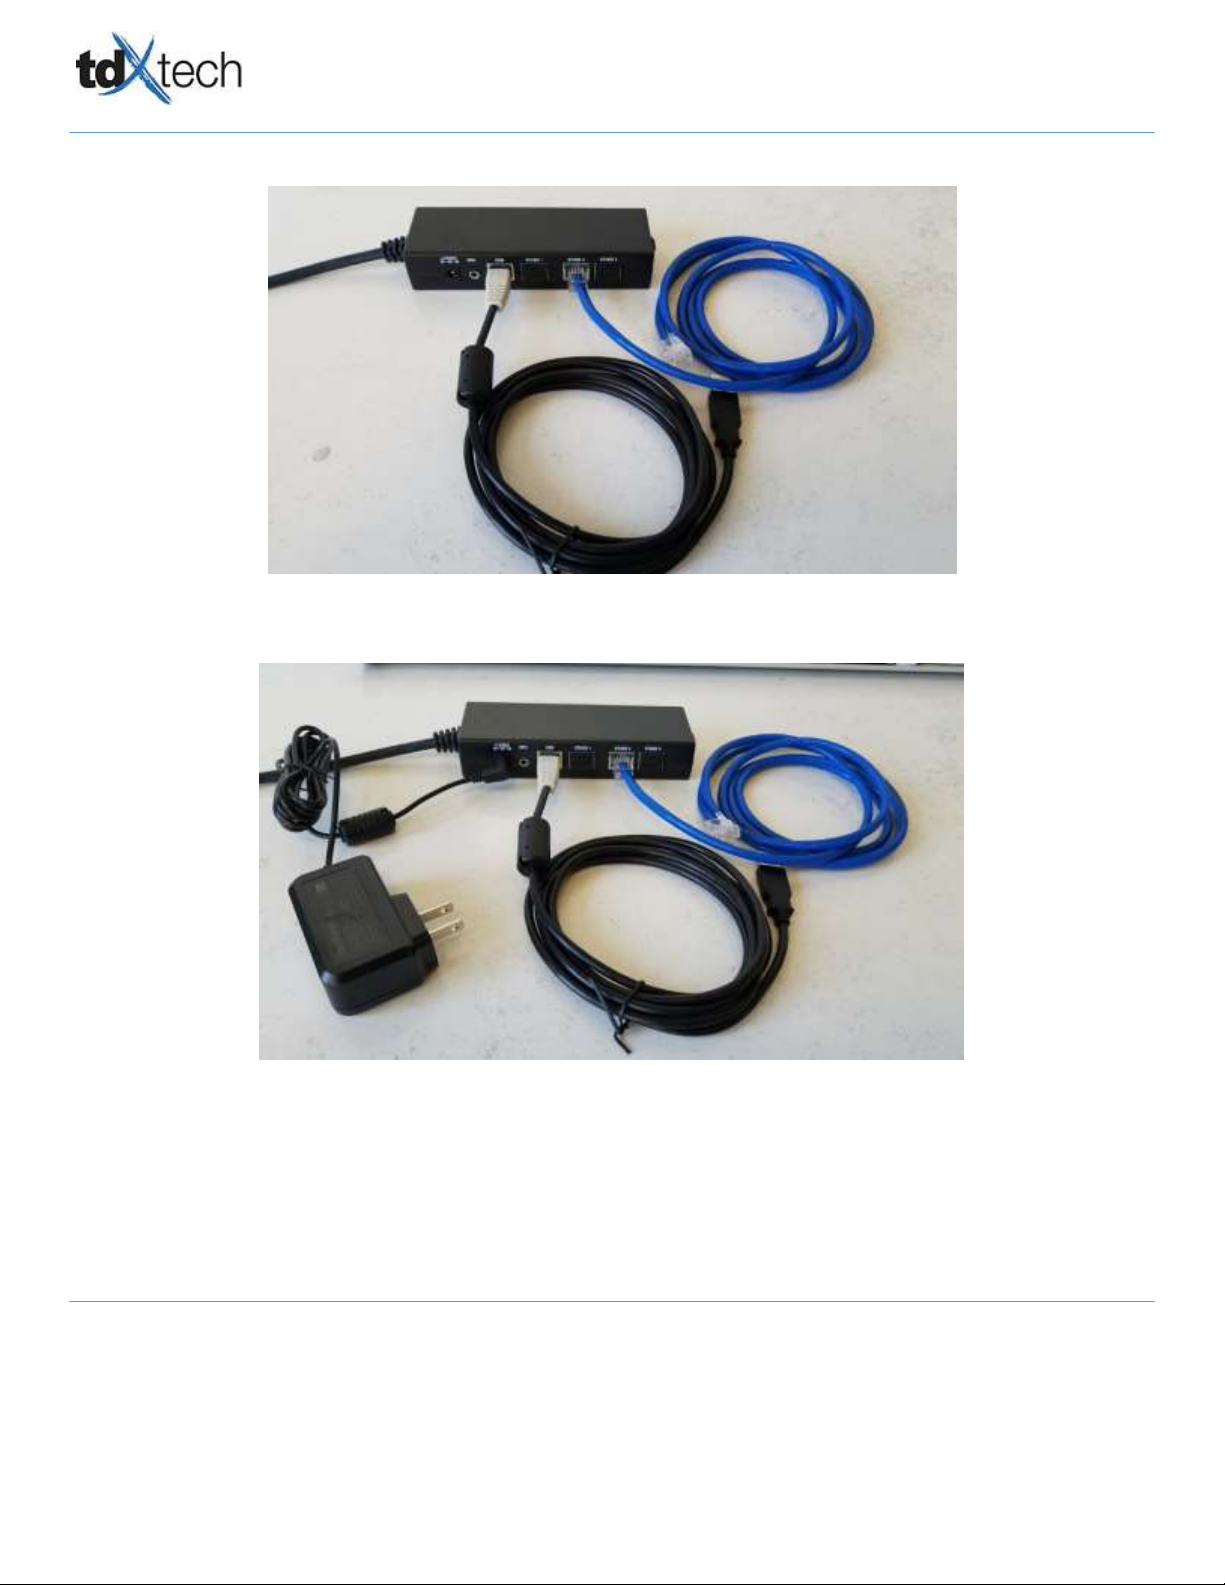
8) Install the network patch cable into ETHER Port 2.
9) Connect AC adapter to Port 12VDC.

VeriFone & Ring Central Install Guide
Confidential Page 10 of 27 7/26/2018
The information contained in this document is privileged, confidential, and protected from disclosure. Any unauthorized use,
printing, copying, disclosure, dissemination of or reliance upon this communication by persons other than the intended recipient
may be subject to legal restriction or sanction.
10) Remove network cable from the back of the register and insert that cable into ETHER 1 on the interface box.
Connect the network cable connected to ETHER 2 back into the register network port.
Register USB to USB Port
Wall Jack (internet) to ETHER 1
ETHER Port on Register to ETHER 2

VeriFone & Ring Central Install Guide
Confidential Page 11 of 27 7/26/2018
The information contained in this document is privileged, confidential, and protected from disclosure. Any unauthorized use,
printing, copying, disclosure, dissemination of or reliance upon this communication by persons other than the intended recipient
may be subject to legal restriction or sanction.
SOFTWARE CONFIGURATION:
1) Connect the AC Adapter to a power source and allow the VeriFone device to power up.
2) After it fully boots to the screen above, press keys “1”, “5” and “9” on the keypad at the same time to get to the
login screen shown below.
3) Enter 49626733 (“GYMBOREE”) as the Password then press the green circle (“Enter”) to get to the Home screen
for the options. If GYMBOREE doesn’t work try 166831 OR 166832.
VeriFone & Ring Central Install Guide
Confidential Page 12 of 27 7/26/2018
The information contained in this document is privileged, confidential, and protected from disclosure. Any unauthorized use,
printing, copying, disclosure, dissemination of or reliance upon this communication by persons other than the intended recipient
may be subject to legal restriction or sanction.
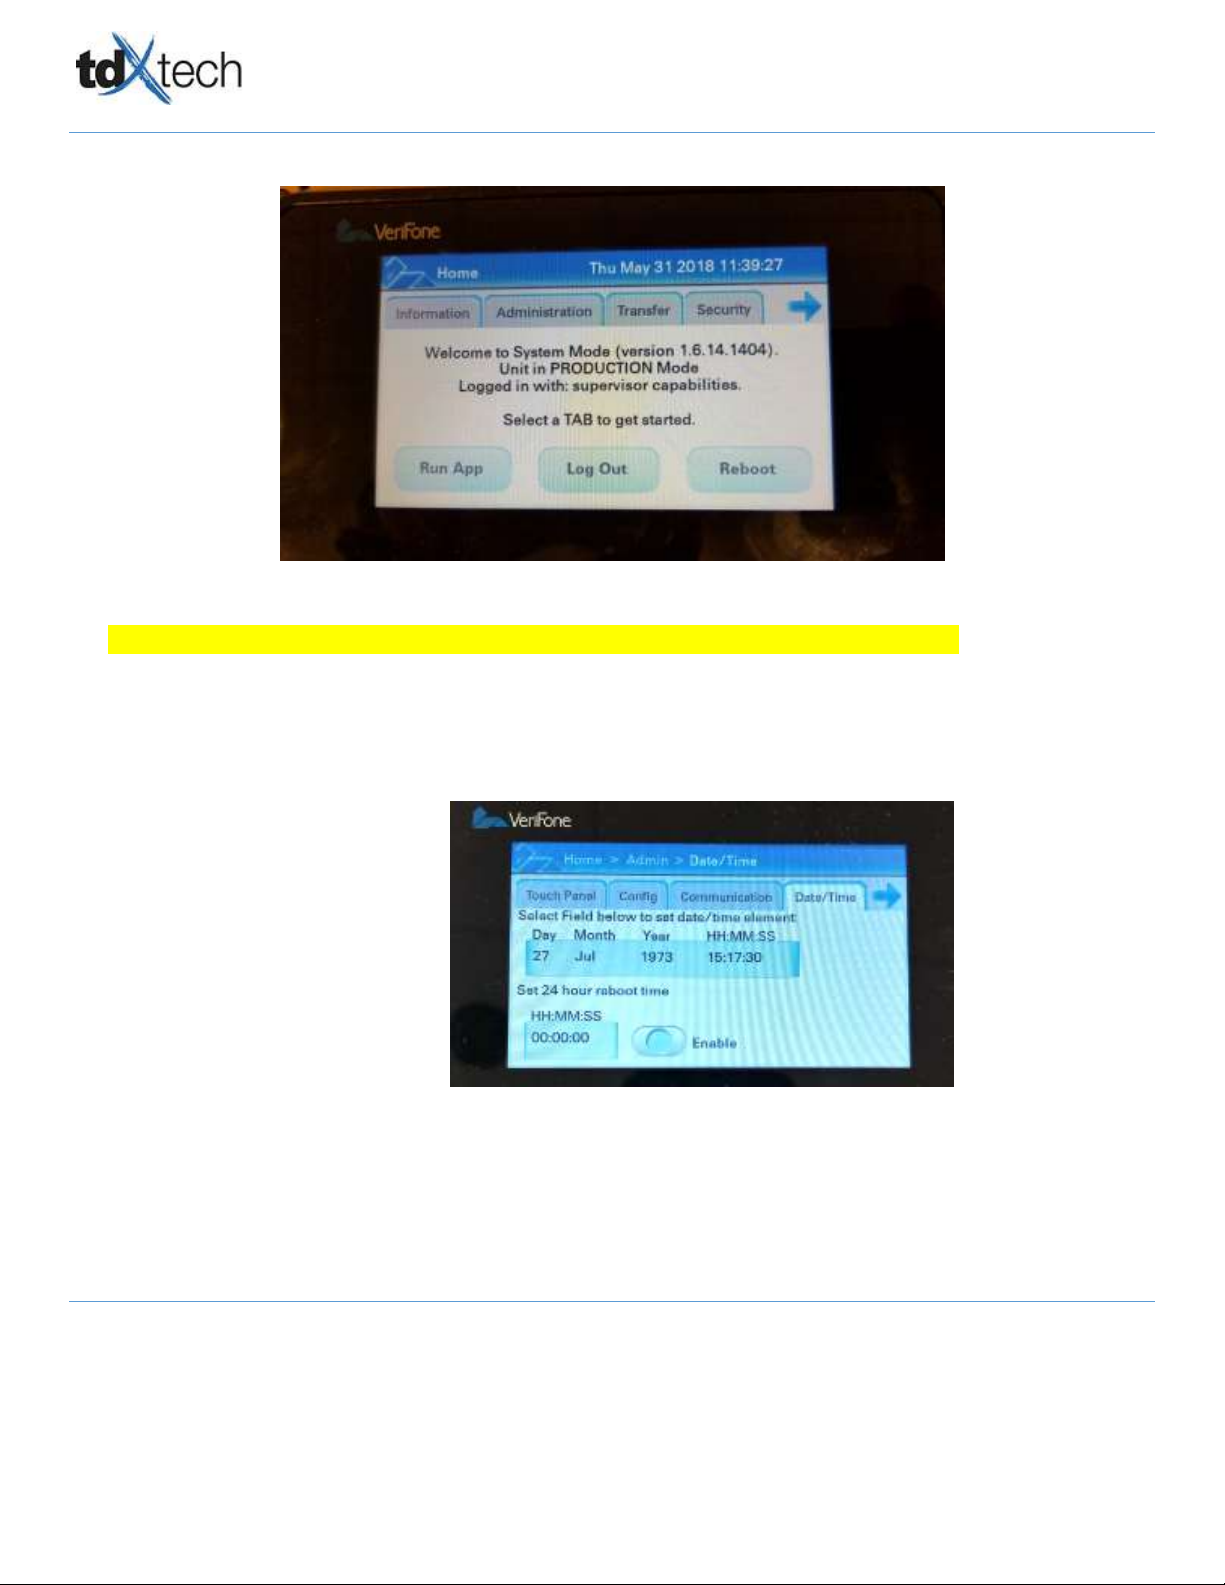
4) Once logged in, you will see the below screen
5) Tech will need to confirm the below settings are correct and capture photos of each.
Date and time are correct
oClick Home
oClick Admin
oClick Date and Time
oIF not correct –please make this correction

VeriFone & Ring Central Install Guide
Confidential Page 13 of 27 7/26/2018
The information contained in this document is privileged, confidential, and protected from disclosure. Any unauthorized use,
printing, copying, disclosure, dissemination of or reliance upon this communication by persons other than the intended recipient
may be subject to legal restriction or sanction.
Capture a picture of the VHQ Log:
oClick Home
oClick Admin
oClick Comm
oClick VHQ
oClick VHQ Log
IF you see the error: Couldn’t resolve host in the photo below–this means you will need to replace
the reused patch cable. (In step 10 below)
Capture a picture of Verifone below setting:
oAccess sysmode;
oTap on Information tab
oInstalled S/W
oScroll down until you see 2.9.36-275: vhq_sys
IF it shows 2.9.36-275: vhq_sys –upon checkout with TDX Report Yes for VHQ Agent is showing
VeriFone & Ring Central Install Guide
Confidential Page 14 of 27 7/26/2018
The information contained in this document is privileged, confidential, and protected from disclosure. Any unauthorized use,
printing, copying, disclosure, dissemination of or reliance upon this communication by persons other than the intended recipient
may be subject to legal restriction or sanction.
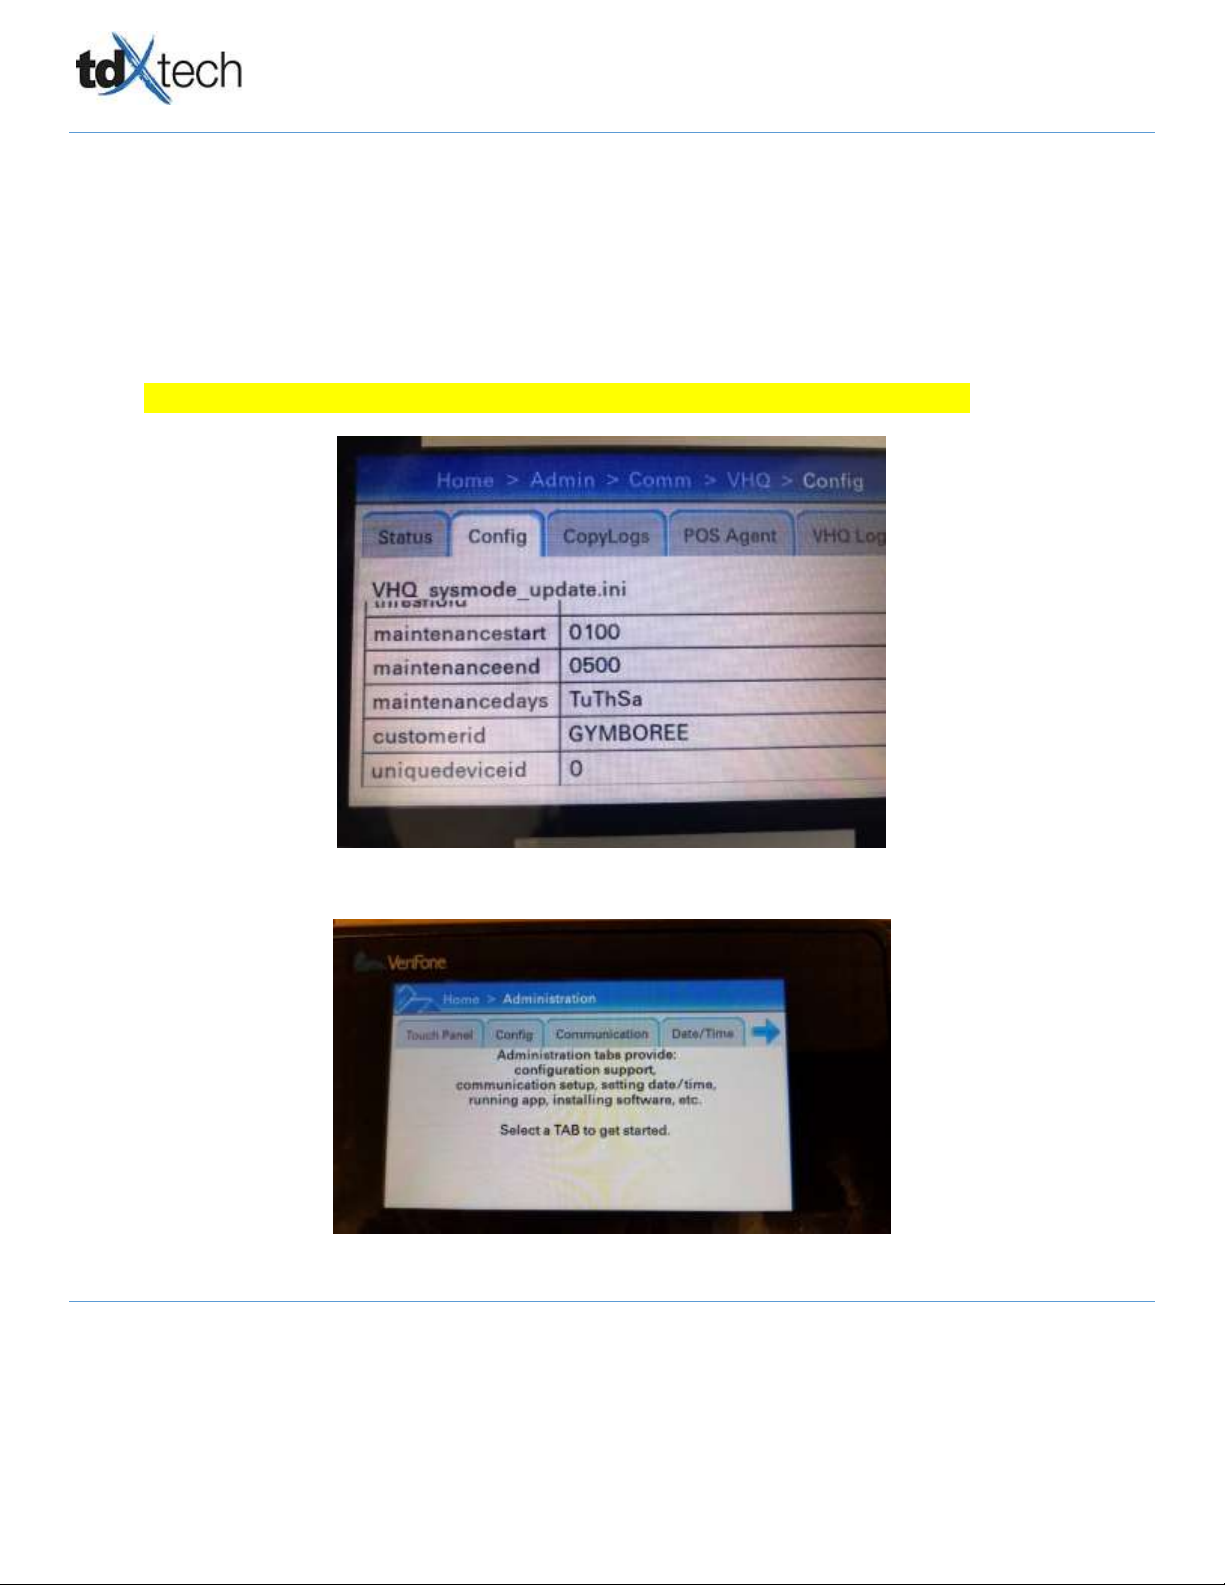
OR you can view the way below;
oTap on Administration tab
oCommunication
oVHQ Estate Mgr
oConfig
oScroll down until you see parameter “CustomerID” if it is set to “Gymboree” then the file is
installed properly.
IF it shows Gymboree –upon checkout with TDX Report Yes for VHQ Agent is showing
6) Once the above has been confirmed and captured photos. Click Home
7) Click the “Administration” tab,
VeriFone & Ring Central Install Guide
Confidential Page 15 of 27 7/26/2018
The information contained in this document is privileged, confidential, and protected from disclosure. Any unauthorized use,
printing, copying, disclosure, dissemination of or reliance upon this communication by persons other than the intended recipient
may be subject to legal restriction or sanction.
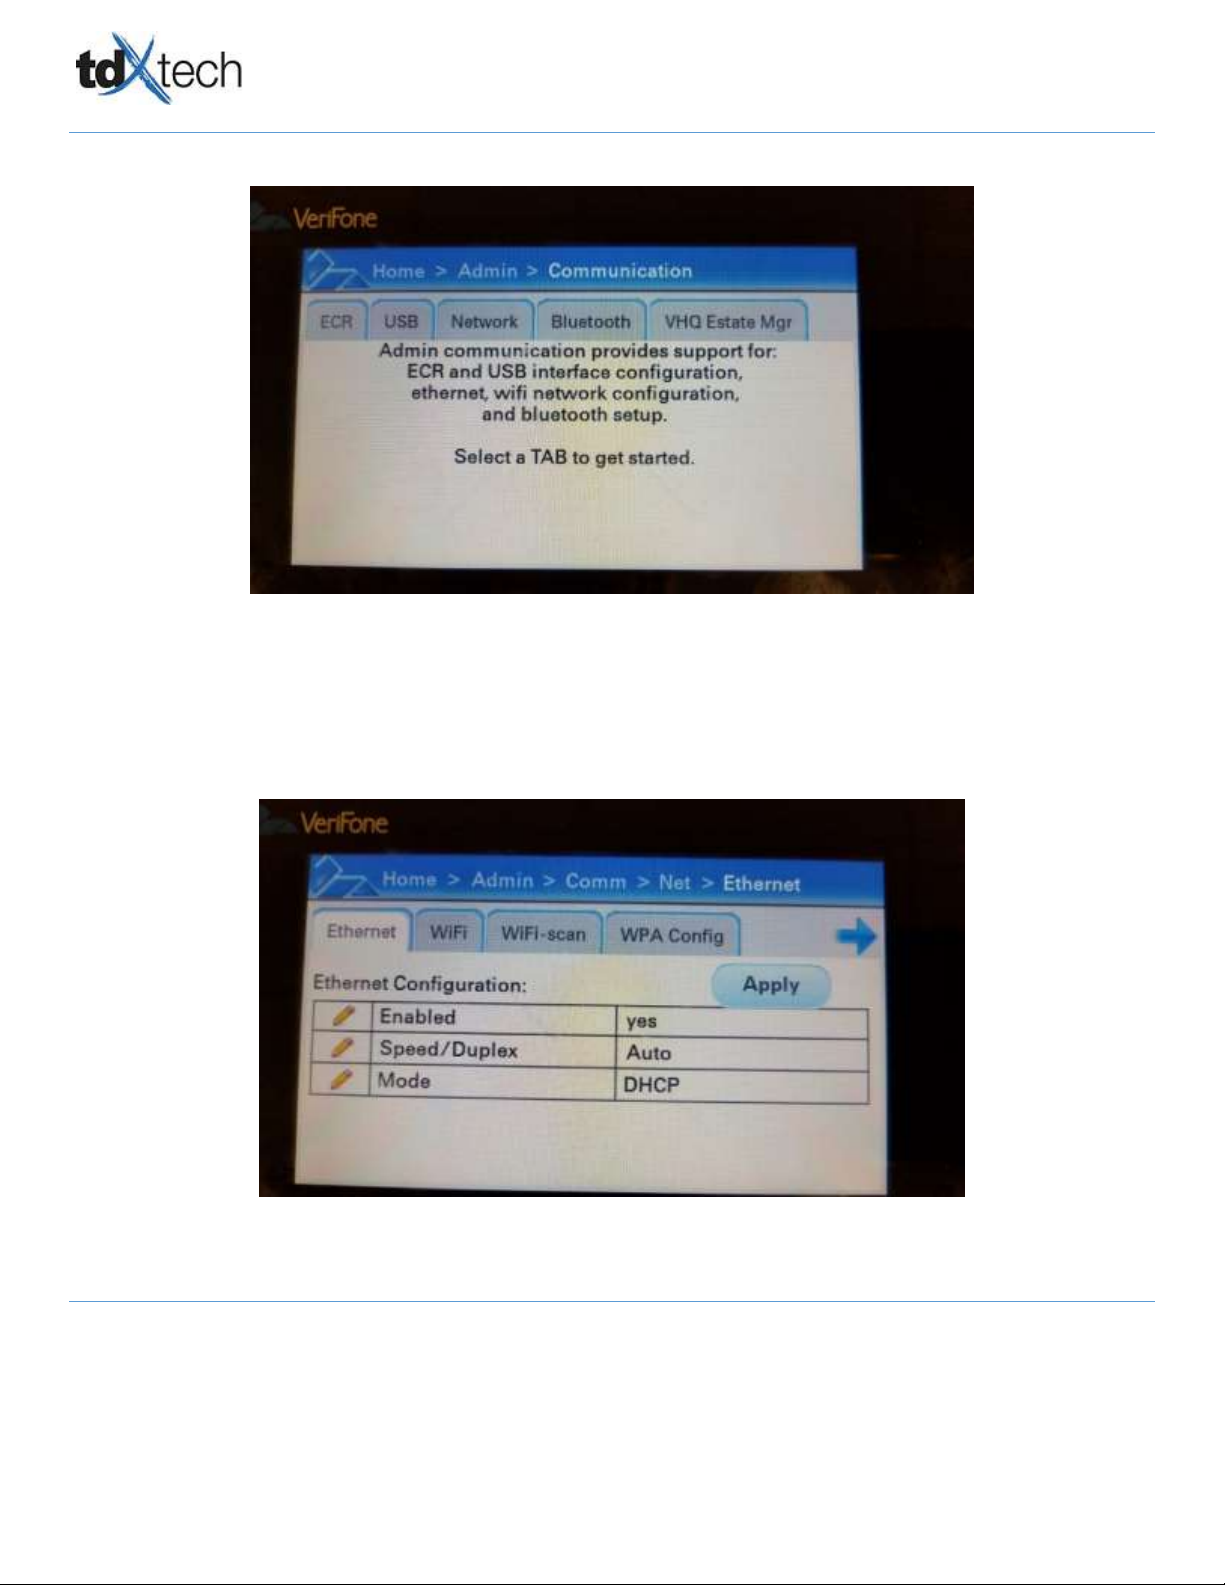
8) Then the “Communication” tab,
9) Then the “Network” tab,
10) Then the “Ethernet” tab to change the network configuration.

VeriFone & Ring Central Install Guide
Confidential Page 16 of 27 7/26/2018
The information contained in this document is privileged, confidential, and protected from disclosure. Any unauthorized use,
printing, copying, disclosure, dissemination of or reliance upon this communication by persons other than the intended recipient
may be subject to legal restriction or sanction.
11) Change the Mode from “DCHP” to “StaticIP”. The options to change the network settings will appear.
12) TDX Tech will provide Static IP and Gateway IP information upon check in.
The below netmask and DNS will be the same for all store’s;
-Netmask: 255.255.255.0
-DNS1: 172.020.000.026
-DNS2: 172.020.000.027

VeriFone & Ring Central Install Guide
Confidential Page 17 of 27 7/26/2018
The information contained in this document is privileged, confidential, and protected from disclosure. Any unauthorized use,
printing, copying, disclosure, dissemination of or reliance upon this communication by persons other than the intended recipient
may be subject to legal restriction or sanction.
13) After entering all the network information, click “Apply” to save the settings. Then navigate to the VHQ Estate
Manager via Home>Admin> Communications. The directory at the top of the screen is clickable.
14) Click “Status” and then “Enable Heartbeat” **if the Verifone sits on this screen for more than 5 minutes go ahead
and proceed to the next step.**

VeriFone & Ring Central Install Guide
Confidential Page 18 of 27 7/26/2018
The information contained in this document is privileged, confidential, and protected from disclosure. Any unauthorized use,
printing, copying, disclosure, dissemination of or reliance upon this communication by persons other than the intended recipient
may be subject to legal restriction or sanction.
15) Once you see the below hit “159” at the same time. This will take you to the “Home” screen.
**You will see many different forms of the below messages. Please make sure you capture a picture of this screen**
16) Click reboot

VeriFone & Ring Central Install Guide
Confidential Page 19 of 27 7/26/2018
The information contained in this document is privileged, confidential, and protected from disclosure. Any unauthorized use,
printing, copying, disclosure, dissemination of or reliance upon this communication by persons other than the intended recipient
may be subject to legal restriction or sanction.
17) After the VeriFone device boots back up you will see the below Systems Information Screen.
18) Once you see this have the store associate log off/restart the POS to re-initialize the connection between the
register and the VeriFone device.
19) Once the POS comes back up, the VeriFone will display the Stores Logo. (examples below)

VeriFone & Ring Central Install Guide
Confidential Page 20 of 27 7/26/2018
The information contained in this document is privileged, confidential, and protected from disclosure. Any unauthorized use,
printing, copying, disclosure, dissemination of or reliance upon this communication by persons other than the intended recipient
may be subject to legal restriction or sanction.
VERIFONE TROUBLESHOOTING STEPS:
After the above is complete and the heartbeat is still not pinging, tech will need to confirm the below steps.
Confirm Customer ID is listed as
Check network status on the device:
1. Get into the admin screen, hold down 1, 5, 9
2. Enter password, 166831 OR 166832
3. Go to Admin>communication>network
4. Is “Ethernet” up or down?
Is Ethernet enabled:
1. Get into the admin screen, hold down 1, 5, 9
2. Enter password, 166831 OR 166832
3. Go to Admin>communication>network>ethernet
4. Is “enabled’ set to yes?
5. If not tap on the box and set to yes.
If the POS and Verifone state “offline” complete the below steps:
6. Unplug the USB from the brick
7. Power brick
8. Wait 10 seconds
9. Plug USB back into the brick
10. Restart the POS
Table of contents
Popular Industrial Electrical manuals by other brands

Murata
Murata GRM21BR71E335KA73 Series Reference sheet

Velatia
Velatia ORMAZABAL ekor.rtk General instructions

Siemens
Siemens Milltronics MILLFLO instruction manual

Murata
Murata GRM1555C1E181JA01 Series Reference sheet

Murata
Murata GRM033R61A683KE84 Series Reference sheet

Siemens
Siemens SENTRON VL 3VL94-7D Series operating instructions

Murata
Murata GRM32EC81E226KE15 Series Reference sheet

Emerson
Emerson Numatics G2-2 ControlNet Series Quick start manual

Murata
Murata GRM1555C1H121GA01 Series Reference sheet

Murata
Murata GQM22M5C2H160JB01 Series Reference sheet

Murata
Murata GRM1887U1H752JA01 Series Reference sheet

Murata
Murata GRM152R60J224ME19 Series Reference sheet


