TechniSat TechniVision 22 HD Instruction manual

Quick start manual
TechniVision 22/26/32 HD
ENNL ESCZ FRPL ITHU

1 Illustrations
Rear of TV
TechniVision 22 HD
(connections, attachment, cover)
2
Rear of TV
TechniVision 22 HD
Please fold out
1 Antenna input
(DVB-C, DVB-T, analogue)
2 LNB Input (DVB-S)
3 Common Interface
4 USB port
5 DC socket
6 S-Video input
7 Audio input (R, L)
(S-Video, Video and
component input)
8 Video input
9 Component input
10 Cable guide
11 Stand attachment cover
12 HDMI input 2
13 HDMI input 1
14 Audio output digital (S/P
DIF electrical)
15 Headphone output
(3.5mm jack plug)
16 Audio input (VGA/DVI)
(3.5mm jack plug)
17 VGA connection
18 Scart socket (EuroAV)
1110
141312 1516 17 18
1
2
3
4
5
6
9
8
7

Rear of TV
TechniVision 26/32 HD
(connections, cover)
Rear of TV
TechniVision 26/32 HD
1 USB port
2 Common Interface
3 LNB Input (DVB-S)
4 Antenna input
(DVB-C, DVB-T, analogue)
5 S-Video input
6 Audio input (R, L)
(S-Video, Video and
component input)
7 Video input
8 Component input
9 Mains power switch
10 Mains power connection
11 Stand attachment cover
12 HDMI input 2
13 HDMI input 1
14 Audio output digital
(S/P DIF electrical)
15 Headphone output
(3.5mm jack plug)
16 Audio input (VGA/DVI)
(3.5mm jack plug)
17 VGA connection
18 Scart socket (EuroAV)
119 10
141312 1516 17 18
4
3
2
5
1
8
7
6
3
ENNL ESCZ FRPL ITHU

Remote control
4
Remote control
Remote control code
On/Standby
Sound on/off
Numeric keys
Recording
SFI
Page up
Back
TV/Radio mode
Rewind
Info
Fast forward
Programme +/- Volume +/-
Menu Zoom/Format
Function keys
Stop
Arrow keys Pause / playback
Function selection
Option selection
Page down
DVR mode
OK
Sleep timer
Language selection
PaT
Genre
Teletext
Freeze frame / Jogshuttle
Timer

5
Front of TV
Display
Front of TV
(Display)
Display
IR receiver
LED
ENNL ESCZ FRPL ITHU

6
Important note
Remote control
2 Please read this first
Dear customer,
This quick start manual simply describes the most important connection options and the
basic operating steps required for you to quickly get started operating the TechniVision 22,
TechniVision 26 or TechniVision 32.
3 Remote control
3.1 Changing the battery
> Open the cover on the battery compartment at the rear of the remote control by
pushing it in the direction of the arrow and then lifting it off.
> Insert the supplied batteries, ensuring that the poles are the right way around (indicator
visible in battery compartment).
> Close the battery compartment again.
3.2 Remote control code
By switching over the remote control option it is possible to use this remote control to
operate a TechniSat television and two TechniSat receivers using the same coding.
> Hold down the remote control code button to switch over the remote control option
and press the OK button as often as necessary until the LED for the desired remote
control option (TV, SAT1 or SAT2) flashes briefly.
The currently set remote control code will be displayed, as the appropriate LED
flashes, while pressing a button.

4 Connecting
a Connecting the satellite antenna using the LNB input.
b Connecting the cable connection (digital and/or analogue) or the DVB-T antenna to the
antenna input on the television.
c Connecting the television to a BluRay/DVD player using an HDMI cable or a cinch
components cable with the cable adapter.
d
Connecting the digital audio output to Hi-Fi stereo equipment or surround sound equipment.
d
TV/Radio
b
a
BluRay / DVD
Connection
7
c
ENNL ESCZ FRPL ITHU

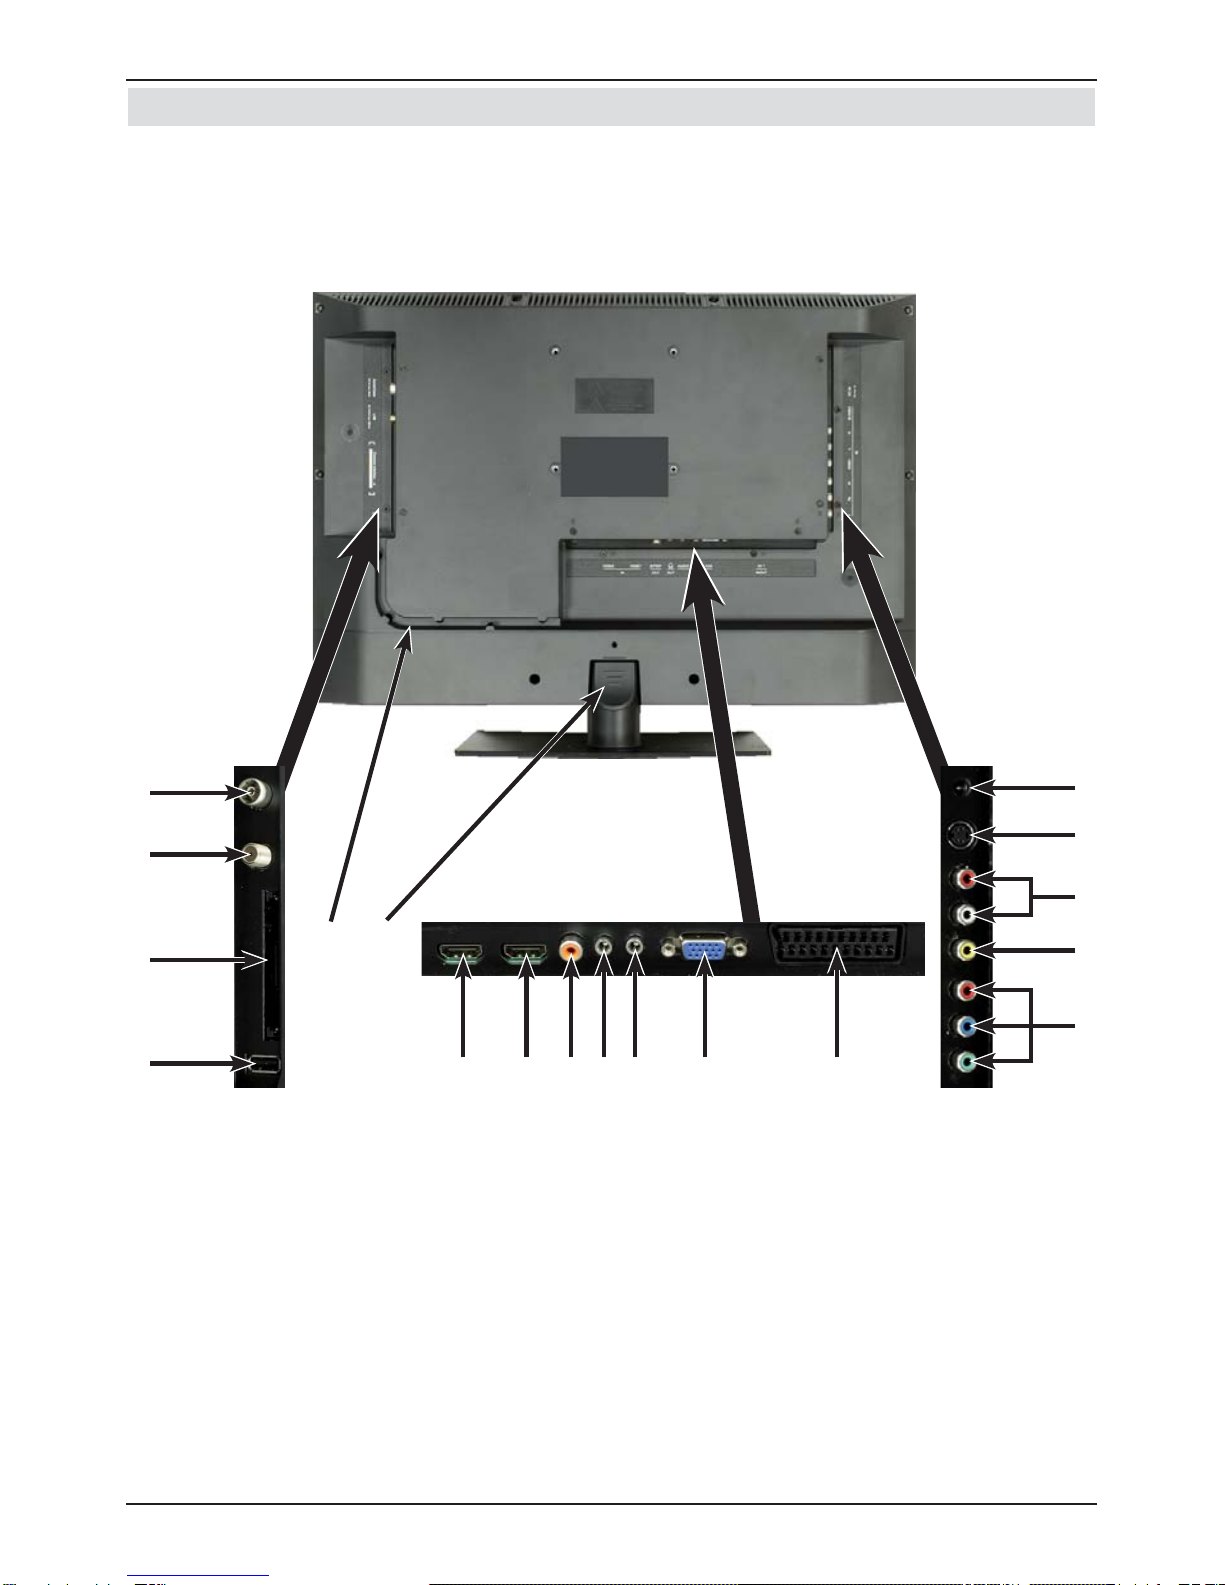
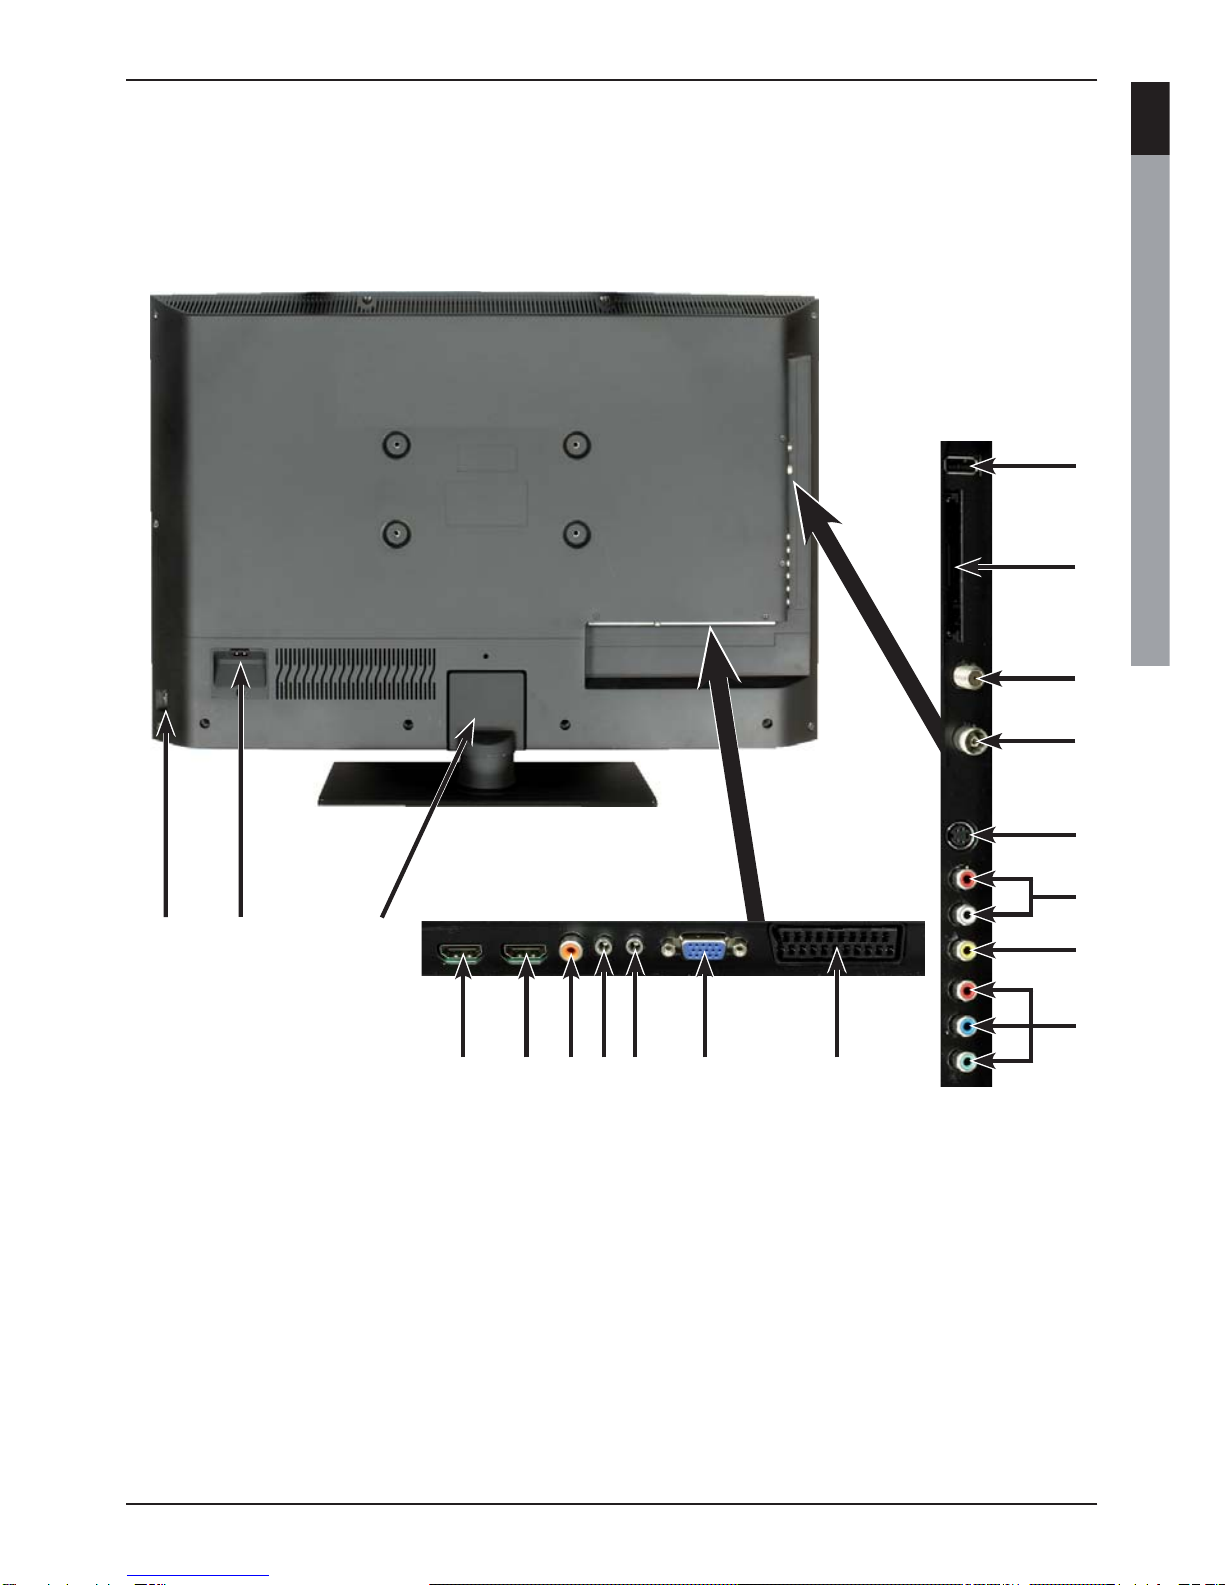
The following references a b c refer to the example connection on page 7.
4.1 Satellite antenna
a Connect LNB input 1 on the TV to your external unit using a suitable coaxial cable.
4.2 Antenna/cable connection (analogue and digital)
b Connect the antenna input for the LCD TV to either a terrestrial antenna or to the
connection socket for the cable or antenna connection.
Use the TechniSat DVB C/T Switch (Part No. 0000/3263) for simultaneous
reception of DBV-T signals and DVB-C plus analogue cable channels. This switch
automatically switches between DVB-T reception and reception of DVB-C and
analogue cable channels, thus preventing potentially conflicting frequency influences.
4.3 BluRay/DVD player
c Connect your BluRay/DVD player using an HDMI connection cable
with an HDMI connection.
4.4 Surround sound/Hi-Fi amplifier
You can connect the LCD TV to a surround sound or Hi-Fi amplifier to obtain the best
possible sound quality.
d If your amplifier has an appropriate electrical input (S/P-DIF), connect the Audio
output digital electrical to the input on your amplifier.
Depending on the broadcaster concerned, the stereo signal (PCM) and, where
broadcast, Dolby Digital signal (AC3) are available.
4.5 Mains power connection
TechniVision 22 HD
The TV should only be connected to the mains power supply using the adapter after
cable connections to the associated components have been fully set up. This will avoid
damage to the TV or other components.
> Connect the mains adapter pin connector to the DC socket (see page 2 #5).
> Then attach the mains cable to the adapter and connect it using a 230 V / 50 Hz plug.
TechniVision 26 / 32 HD
The TV should only be connected to the mains power supply using the adapter after
cable connections to the associated components have been fully set up. This will avoid
damage to the TV or other components.
> To do this, attach the mains cable to the mains power connection (see page 3
#10) and connect it using a 230 V / 50 Hz plug.
8
Connection

9
5 Basic operation
Dear Customer,
the following section starts by covering basic operation as well as recurring operating
steps for the TV. This should make it easier to read the instruction manual, since it avoids
repeated description of identical steps at each individual stage.
The so-called "On Screen Display" is used on your television. This simplifies operation of
the television since the buttons on the remote control can take on different functions, which
makes it possible to reduce the number of buttons.
In this On Screen Display (OSD for short) the selected functions or settings are highlighted.
Furthermore, you will see a line at the lower edge of the screen in which the various buttons
on the remote control are shown with their current functions.
In this instruction manual the terms shown in the OSD as well as the buttons to be
pressed are highlighted from the rest of the text by the display format used.
Warning - indicates an important note which you absolutely should observe in order to
avoid problems with the television, loss of data or unwanted operation.
Tip - indicates a note about the function described as well as other functions
associated with it and any others to be observed with reference to the respective place
in the instruction manual.
5.1 Switching the television on/off
> When the TV is on standby, you can switch it on by pressing the On/Standby button.
> When operating normally you can switch the TV to standby mode by pressing the
On/Standby button.
When switching the TV on/off, also observe point 7.1 and points 7.1.1 - 7.1.4 as well
as the instructions given under these points.
Basic operation
ENNL ESCZ FRPL ITHU

10
Basic operation
5.2
Calling up the main menu and navigating through the menus /functions
The following example will illustrate how you reach the main menu and call up a submenu.
The objective of the example is to call up the Picture settings menu.
> Press the Menu button. The main menu appears on the screen.
> Select the Settings menu item by moving the highlight over this item using the
arrow keys.
> Press the OK button to open the Settings menu.

11
Basic operation
> Use the up/down arrow keys to highlight the Picture settings item.
> The Picture settings menu is opened by subsequently pressing the OK button.
You can also highlight the individual menu points in the same way as you highlight an
item on a submenu to open it and alter the respective settings.
The menu items in some menus have to be highlighted by moving sideways. This is
done by pressing the right/left arrow keys.
By pressing the up/down arrow keys it is possible to move the highlight from line to
line and to move upwards and downwards page by page using the page up/down
buttons.
You will see the so-called menu path in the uppermost line of the menu. This shows
you the menu you are currently in and the path you took to reach this menu. In the
example shown this is Main menu > Settings > Picture settings. The menu
path is also shown throughout the instruction manual and shows you how you can
reach the respective menu with the settings described.
If the blue function key with Help is displayed in the bottom line on the screen, a
Help page can be displayed by pressing this button and hidden by pressing it again.
ENNL ESCZ FRPL ITHU

5.3 Accepting settings / Exiting menus and functions
In some menus and functions the changes made must be accepted manually in order to
save them permanently. If this does not happen, the values that existed before leaving the
menu or the function will be reset automatically.
If an Accept field or the green function key with Accept is displayed in the bottom
line of the screen, you can see that the changes made must be saved manually to
be accepted.
> By highlighting Accept using the right/left arrow keys and confirming with the
OK button or by pressing on the green function key (Accept), the changes are
saved and you return to the next menu level up.
Alternatively:
> Press the Back button.
A request appears asking whether the changes you made should be applied.
>
Use the right /left arrow keys to highlight Yes or No and confirm with the OK
button.
According to your selection the changes are now saved or rejected and you return to
the next menu level up.
Alternatively:
> Press the Menu button to leave the menu directly.
The settings that need to be saved manually will be reset in this case.
If the green function key with Accept is not displayed in the bottom line of the
screen, the changes are saved automatically when leaving the menu.
5.4 Changing a setting
You can create settings using the arrow selection method, the selection list, by
entering numbers and by using the virtual keyboard. The television dictates the
method that can be used to alter a marked setting. You can see this from the following
displayed symbols:
- Arrow selection method (Point 5.4.1)
Arrows are shown on the left or right edge of the marking.
- Selection list (Point 5.4.2)
The symbol is shown on the right edge of the marking.
- Entering numbers (Point 5.4.3)
- Virtual keyboard (Point 5.4.4)
The symbol is shown on the right edge of the highlight.
12
Basic operation

5.4.1 Arrow selection method
> If is shown on the left and on the right next to the set value, you can alter this using
the left/right arrow keys.
5.4.2 Selection list
If is shown on the right next to the set value, the value is changed using the selection list.
> Press the OK button to open the selection list.
> Highlight the setting you want using the up/down arrow keys.
By pressing the up/down arrow keys it is possible to move the highlight from
line to line and to move upwards and downwards page by page using the page
up/down buttons.
> Confirm by pressing on the OK button. The selection list is closed again and the
selected setting is shown in the menu.
Basic operation
13
ENNL ESCZ FRPL ITHU

5.4.3 Entering numbers
> Enter the new setting you want using the numeric keypad key if a question
mark or a number value or is shown inside the highlight.
Note the number of digits used in the entry as there must always be the same number
used. This means that if a five-digit value is required, for example “10600", but you
only wish to set a four-digit value, for example “9750“, then you must enter a “0” at the
beginning for every unused location. Therefore, in this example, it would be necessary
to enter “09750”.
5.4.4 Virtual keyboard
If is shown on the right next to the set value, the value is amended using the virtual
keyboard. You have three different keyboard options when using this data entry method.
You can switch the keyboard layout between the so-called QWERTY keyboard and the
alphabetic keyboard; an SMS keyboard can also be used at any time.
The functionality of the QWERTY keyboard is identical to that of the alphabetic keyboard.
They only differ in the arrangement of the various letters, numbers, characters and symbols.
> Press the OK button to open the virtual keyboard.
The keyboard now appears in the alphabetic format.
> You can switch to the QWERTY keyboard and back to the alphabetic keyboard by
pressing the Option button.
You can now enter the term you want as follows.
Arrow keys: Moves the highlight on the keys of the virtual keyboard.
OK: The highlighted character is added to the end of the term, or
the highlighted function is executed.
/ Yellow function key: The keyboard switches between upper case/lower case.
/ Red function key: Pressing/holding down deletes the character in front of the
orange highlight/the whole entry.
/ Green function key: The entered term is accepted.
/ Blue function key: The keyboard switches over to the alternative characters.
: Moves the orange highlight within the term.
Basic operation
14

15
The SMS keyboard is operated using the numeric keypad key on both the alphabetic
and the QWERTY keyboard and can be used at any time. Therefore the coloured buttons
incorporate the functions described above.
> Press one of the numeric pad keys 0 - 9 and select the various letters, numbers,
characters and symbols.
The first letter of the respective row of characters is highlighted after first pressing a
numeric keypad key.
> The highlight then moves one field to the right for every additional press of the same
numeric keypad key.
Press as often as necessary to reach the desired character. This will be added to the
entered term after a short delay.
The various numeric pad keys are assigned the following displayed letters, numbers,
characters and symbols.
0:
1:
2:
3:
4:
5:
6:
7:
8:
9:
Once you have reached the field you want with the highlight, you can then begin
selecting the next character immediately since, in this case, the character is directly
added to the term.
If you wish to continue directly selecting a character from the same numeric
keypad key, you can add the previously highlighted character to the term by
pressing the right arrow key.
Basic operation
ENNL ESCZ FRPL ITHU

5.5 Option selection
You have the option in some menus and operating modes (e.g. TV mode, music/images
playback etc.) to call up additional functions and options using option selection.
> Pressing the Option button opens the option selection in the lower right-hand corner
of the screen.
In this example we can see the option selection for the channel list.
>
Every additional press of the Option button moves the highlight down one line each time.
Some options are selected directly in this window. Other options for a number of
subordinate selection options are located in the option groups. Highlighting one of
these option groups automatically opens another window on the left.
> You can use the up/down arrow keys within the option group to highlight one of
the options listed in there.
By pressing the up/down arrow keys it is possible to move the highlight from line to
line and to move upwards and downwards page by page using the page up/down
buttons.
> The highlighted option is selected by pressing the OK button and you exit the option
selection area.
> If you do not want to select an option or wish to leave the option selection area without
making any changes, simply press the Option button until it is hidden.
16
Basic operation

17
6 Initial installation
On initial installation of the TV, the installation wizard starts AutoInstall automatically.
Using the installation wizard is the simplest way for you to create the most important
settings for your TV.
The initial installation process shown here serves merely as an example. The exact
process for the initial installation will depend on the settings you select. Therefore
please follow all instructions displayed on screen carefully.
Menu language
> Use the up/down arrow keys to highlight the menu language you want and
confirm by pressing the OK button.
The preferred audio language will be set automatically according to this selection.
Country selection
> Using the up/down arrow keys select the country in which the television will be
operated and confirm by pressing the OK button.
Automatic setting of the local time as well as changing to summer/winter time will take
place based on your selection.
Channels will also be automatically sorted in the installation wizard according to this
setting as well following a channel search.
Initial installation
ENNL ESCZ FRPL ITHU

Display mode
> Use the up/down arrow keys to select your preferred display mode and confirm by
pressing the OK button.
The values preset by the selected displayed mode can be adjusted as you want after
AutoInstall, in the main menu under Settings > Picture settings.
When selecting the intensive display mode, note the message(s) that appear and
confirm by pressing the OK button.
Selecting reception signals
> Use the up/down arrow keys to select the available reception signals.
DVB-S for digital satellite channels
DVB-C for digital cable channels
DVB-T for digital terrestrial channels;
Analogue CT for analogue terrestrial and cable channels.
> Use the right/left arrow keys to indicate whether you wish to use the highlighted
reception signal (On) or not (Off).
> Confirm by pressing the OK button.
18
Initial installation

19
Antenna configuration (DVB-S)
In this step of the installation you can adjust your TV setup to the configuration of your
satellite antenna.
If the DVB-S source has been deactivated, this page of the installation wizard does not
appear; you are taken directly to the “Antenna configuration (DVB-T)” page
instead.
> Press the OK button to accept the default antenna setting and continue with the
“Antenna settings (DVB-T)” section.
> If the configuration of your reception equipment does not match the default setting,
you can open the antenna configuration by pressing the Option button and adjust the
setting on your reception equipment.
Antenna configuration (DVB-T)
A channel spectrum with the signal levels of the various channels is displayed in this step, in
order to align the DVB-T antenna for the best reception.
The “channel search / ISIPRO” appears immediately if DVB-T has been deactivated.
> Use the right/left arrow keys to switch the voltage supply on or off.
> Press the OK button to accept the setting and access the next stage of the
installation wizard.
Initial installation
ENNL ESCZ FRPL ITHU

Channel search / ISIPRO - DVB-S only
You have various options for searching for new channels or updating the channel list. You
can use the ISIPRO service list function to download a new satellite channel list for your TV
from the satellite or run a channel search.
> To download the available current channel list, use the up/down arrow keys to
highlight the ISIPRO - service list update line and start the process by pressing
the OK button.
> If instead of updating the channel list you want to run a channel search via satellite, or
the DVB-S reception signal has not been configured, use the up/down arrow keys
to highlight the All channels or All unencrypted channels field, then start the
channel search process by pressing the OK button.
> If you do not want to start either the service list update or a channel search, you can
skip this step by pressing the Info button.
The ISIPRO - service list update item can only be selected if you have activated
the DVB-S source in "Selecting the reception signals”. After the service list
update, an automatic channel search on all other configured reception sources is then
carried out via “All Channels”.
When using All channels, free-to-receive and encrypted channels are searched for;
when using All unencrypted channels only free-to-receive channels are
searched for.
During the channel search the reception areas you have selected area automatically
scanned for channels. This procedure may take several minutes. Please note all
messages displayed on screen.
If you skip the channel search/service list update, the factory channel list is loaded, as
long as DVB-S has been configured in “Selecting the reception signals”. In this
event no channels for other sources are available. However, you can run a channel
search at any time in the main menu under Channel search.
20
Initial installation
Other manuals for TechniVision 22 HD
1
This manual suits for next models
2
Table of contents
Languages:
Other TechniSat LED TV manuals