Temium TCR96P User manual

TCO
MARQUE: 7(0,80
REFERENCE: 7&53:+,7(
CODIC:

TCR96P

UK. 1
Important Safety Instructions
Power Supply
The power adapter is designed to operate from a 230Volts, 50Hz AC mains supply.
If the power adapter becomes damaged, it should be replaced with an adapter of the same type and
rating to avoid a hazard.
Battery Handling and usage
Only adults should handle the batteries. Do not allow a child to use this product unless the Battery
Compartment Cover is securely attached to the battery Compartment.
Never throw batteries on a fire! Danger of explosion.
Dispose of used batteries according to the manufacturer’s instructions.
CAUTION
Danger of explosion if the battery is incorrectly replaced. Replace only with the same or equivalent
type.
The battery type used in the unit is 3x 1.5V AAA size batteries. The batteries are located internally
and are readily accessible.
Remove the battery cover at the bottom of the unit to remove the batteries.
WARNINGS:
• This appliance is intended for domestic household use only and should not be
used for any other purpose or in any other application, such as for non-domestic
use or in a commercial environment.
• The external flexible cable or cord of this transformer cannot be replaced; if the
cord is damaged, the transformer must be scrapped.
• The apparatus shall not be exposed to dripping or splashing and that no objects
filled with liquids, such as vases shall be place on the apparatus.
• No naked flame sources, such as candles should be placed on the apparatus.
• The ventilation should not be impeded by covering the ventilation openings with
items, such as newspapers, table-cloths, curtains etc.
Ventilation
Allow at least a 10cm gap all around the product.
This apparatus is not suitable for a tropical climate.
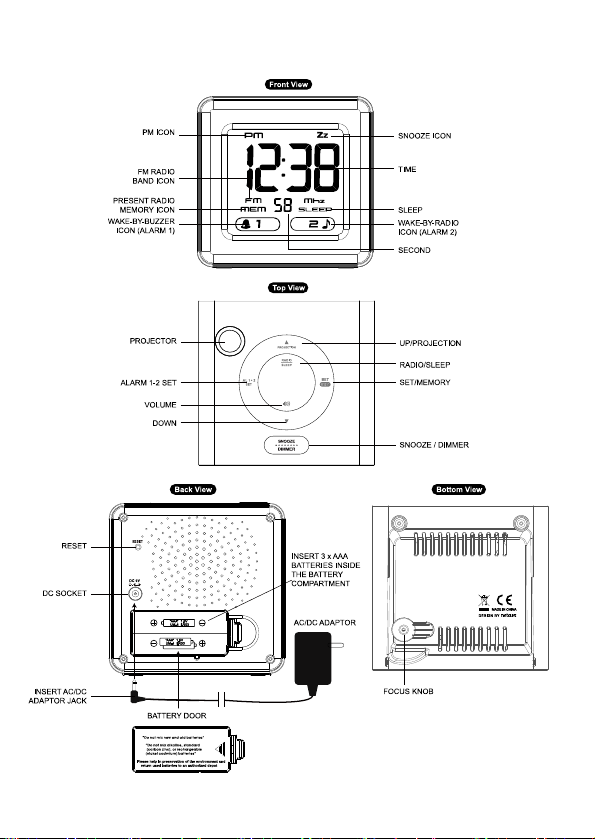
INSTRUCTION MANUAL OF BRANDT TCR96P
Alarm CLOCK RADIO WITH DUAL ALARM AND DIGITAL TUNING
UK. 2
INSTALLATION
Plug the supplied AC/DC adaptor (Input voltage 230V AC) (Output voltage 6V DC) to an AC
household outlet, and then plug the DC jack to the back of the clock radio. Your clock radio is ready
to work for you.
BATTERY BACK-UP INSTALLATION
1. Slide opens the battery cover at the bottom of your unit.
2. Insert 3 x AAA batteries into the battery compartment by observing the correct + / - polarity
signs.
3. Replace the battery cover.
4. When only batteries are being used, the always-on backlight is disabled.
TO SET TIME
1. Pr ess SET / MEM to enter time set mode, the time digits flash.
2. Pr ess / to set your desired time. Press and hold / will accelerate setting in
faster speed.
TO SET 12HR OR 24 HR TIME FORMAT
1. Pr ess SET / MEM again, the clock display shows 24Hr and flashes.
2. Pr ess / to select 12Hr or 24Hr. When 12Hr time format is selected, the PM icon will
appear on the clock display to indicate the afternoon time.
TO SET THE SNOOZE DURATION (5 TO 60 MINUTES)
1. Pr ess SET / MEM again, the clock display shows Zz and 05 flashes.
2. Pr ess / to set your desired snooze duration from 5 to 60 minutes.
3. Pr ess SET / MEM again (or if no key is pressed within 5 seconds) to return to normal clock
display mode.
TO SET THE ALARMS
1. To set Alarm 1, press AL 1 or 2 once, the LCD shows and alarm digits 6:00 flash.
2. Pr ess / to set your desired alarm time. Press and hold / will accelerate setting
in faster speed.
3. Pr ess SET / MEM one at a time to select Wake-by-Buzzer ( appears) or Wake-By-
Radio
( appears). To turn off Alarm 1, press SET / MEM until both and disappear.
4. To set Alarm 2, press AL 1 or 2 once, the LCD shows and alarm digit 6:00 flash,
repeat Step 2 and 3 above.
TO STOP AND RESET THE ALARM TO COME ON THE NEXT DAY
When Alarm 1 sounds, press the AL 1 or 2 once to stop the alarm sound and automatically reset it to
come on the following day. Similarly, stop the alarm by pressing AL 1 or 2 when Alarm 2 sounds.
TO USE THE SNOOZE ALARM
When alarm sounds press SNOOZE/DIMMER once, the alarm will be silenced and come on again
according to the set snooze duration.
UK. 3

TO USE THE PROJECTION CLOCK
Press PROJECTION button to turn on or off the projection clock. Turn the focus knob on the projector
to adjust the image of the projected time onto the wall or ceiling.
TO USE THE HI-LO-OFF DIMMER
This clock radio features an adjustable display backlight with “high / low / off” settings. To select a
backlight setting, press SNOOZE/DIMMER one at a time until the brightness is reached. This can
only be done when the radio is off.
Note: Please note the always-on backlight will not work while the clock is operating on battery power.
TO SET UP THE FM ANTENNA
Extend the FM wire antenna fully and vary the direction for best FM reception. Do not strip, alter or
attach to other antennas.
TO TUNE AND PLAY THE RADIO
Press SLEEP/RADIO, the LCD will show “ON” for few seconds and then shows the radio frequency
readings in Mhz.
1. Pr ess / to tune into a desired radio station. To scan the stations, press / for a
few seconds and release. The radio will search and stop on the next strong station.
2. Pr ess once, the LCD shows “VOL“, press / to adjust volume from 0 (minimum) to
15 (maximum)
3. Pr ess SNOOZE/DIMMER to turn off the radio.
Remark: keep your radio away from fluorescent lamps, which may cause interference to the radio.
TO USE THE MEMORY SET (RADIO PRESET) FUNCTION
This clock radio features a total of 10 preset memory of FM radio .These allow you to preset your
favorite stations and access them quickly.
1. Turn on the radio by press of RADIO / SLEEP. Press / to select a radio station you
like to preset memory.
2. Press and hold the SET / MEM until “MEM” appears and “01” flashes below the time digits.
Press and hold SET / MEM until “01” stops flashing. The preset is now stored in Memory
01.
3. Pr ess / to select another station you like to preset. Then press and hold SET / MEM
until “MEM” appears and “01” flashes below the time digits. Press SET / MEM once, “02”
appears. Then press and hold SET / MEM to store Memory 02.
To move to next preset without storing, repeatedly press the SET/MEM button.
4. Repeat Step 2 - 3 to preset up to ten FM stations.
5. To listen to a preset station at any time, simply press the SET / MEM to select a preset
station while the radio is on.
6. To edit a preset station, select another station and then repeat Step 2-4. This overrides the
original setting.
UK. 4

UK. 5
TO USE THE SLEEP TIMER
1. Pr ess the RADIO/SLEEP twice to enter the sleep mode. The clock display shows the
SLEEP icon and “5” (5 minutes) and flashes keep pressing the RADIO/SLEEP to select a
10-, 15-, 30-, 45-, 60-, 75-, 90-minute sleep timer. The sleep timer display remains for few
seconds and then returns to normal clock display. The SLEEP icon will appear, showing
the radio timer is activated.
2. The radio will play for the programmed sleep time and then shut off. To check how many
sleep time is remaining, press RADIO/SLEEP once.
3. To turn off the radio before the sleep time has elapsed, press SNOOZE/DIMMER once.
TROUBLE SHOOTING
If your clock displays irrelevant time or does not function properly, which may be caused by electro-
static discharge or other interference, use a thin object to press the RESET button at the back. The
clock radio will be reset to default settings and you need to set it again.
CARE OF YOUR PRODUCT
1. Place your clock radio on a stable surface, away from sources of direct sunlight or
excessive heat or moisture.
2. Protect your furniture when placing your units on a natural wood and lacquered finish by
using a cloth or protective material between it and the furniture.
3. Clean your unit with a soft cloth moistened only with mild soap and water. Stronger agents
such as Benzene, thinner or similar materials can damage the surface of the unit. Make
sure the unit is unplugged before cleaning.
4. Do not mix old and new batteries. Do not mix alkaline, standard (carbon-zinc), or
rechargeable (nickel-cadmium) batteries.
5. If the unit is not to be used for a prolonged period, such as a month or longer, remove the
batteries to prevent possible corrosion. Should the battery compartment become corroded
or dirty, clean the compartment thoroughly and replace the batteries.

UK. 6
SECIFICATIONS
Power adapter
Input: 230V~ 50Hz
Output: 6V DC @ 300Ma
FM frequency range 87.0 – 108.0MHz
We apologise for any inconvenience caused by minor inconsistencies in these instructions, which
may occur as a result of product improvement and development.
Kesa Electricals© UK, HU1 3AU 15-11-2011
Table of contents


