Tesco TL120 User manual

Produced after 13th August 2005
Waste electrical products should not be disposed of with household waste. Please recycle where
facilities exist. Check with your Local Authority or retailer for recycling advice.
Tesco Stores Ltd
Delamare Road, Cheshunt
Herts EN8 9SL
Tesco Helpline 0845 456 6767

Larder Fridge Model TL120
guidelines for use

2
SAFETY
Do not allow children to tamper with the controls or play with, in or
around the Larder Fridge.
Disposal
The refrigerant used in your appliance and insulation materials require
special disposal procedures. An environmentally friendly method of
disposal will ensure that valuable raw materials can be recovered and used
again. Ensure that none of the pipes on the back of the appliance are
damaged prior to disposal. Up to date information concerning options for
disposing of your old appliance and packaging from the new one can be
obtained from your retailer or local council office.
Locks
If your Larder Fridge is fitted with a lock, to prevent children being
entrapped keep the key out of reach and not in the vicinity of the
appliance. If disposing of an old Larder Fridge break off any old locks or
latches as a safeguard
ELECTRICAL CONNECTIONS
Note: This appliance must be earthed.
This appliance is fitted with a fused three-pin plug to BS 1363 which
will be suitable for use in all houses fitted with sockets to current
specifications. If the fitted plug is not suitable for your socket outlets,
it should be cut off and carefully disposed of. To avoid a possible shock
hazard, do not insert the discarded plug into a socket.
Fitting a new plug
If for any reason you need to fit a new plug, the flexible mains lead must
be connected as shown here.
The wires in the mains lead fitted to this appliance are coloured in
accordance with the following code:
If the colours of the wires in the mains lead of this appliance do not
correspond with the coloured markings identifying the terminals in your
plug, proceed as follows:
The green or yellow wire MUST be connected to the terminal which is
marked with the letter or symbol E (Earth) or that is coloured green.
The blue or brown wire MUST be connected to the terminal that is marked
with the letter L or coloured red.
CONNECT GREEN
AND YELLOW TO
EARTH (E) (Note:
some appliances do
not have earth wires.)
CONNECT
BLUE TO
NEUTRAL (N) MAKE SURE THE CABLE IS
HELD BY THE CLAMP
CONNECT
BROWN TO
LIVE (L)
Before refitting the plug cover, check that there are no cut or stray
strands of wire inside the plug.
Use a 13 Amp BS1362 fuse, only BSI or ASTA approved fuses should be
used. If you are in any way unsure which plug or fuse to use, always refer
to a qualified electrician.
Note: After replacing or changing a fuse on a moulded plug which has
a fuse cover, the cover must be refitted to the plug, the appliance must
not be used without a fuse cover. If lost, replacement fuse covers can be
obtained from an electrical shop.
This appliance complies with the following EEC Directives: 73 / 23 EEC
(Low Voltage Directive) 89 / 336 EEC (EMC Directive).

GETTING TO KNOW YOUR LARDER FRIDGE
Location
■ Your Larder Fridge must be placed on a firm and flat surface. Your Larder Fridge must be level, if it is not the
door’s magnetic seal alignment will be affected.
■ The room must be well ventilated, dry and have an average room temperature of between 16°C and 32°C.
■ Don’t locate your Larder Fridge near a heat source, e.g. a cooker, boiler or radiator.
■ Avoid placing your Larder Fridge in direct sunlight in sun lounges or conservatories.
■ If you are placing your Larder Fridge in an out-building such as a garage, make sure the Larder Fridge is place
above the damp course to avoid condensation.
■ Never place the Larder Fridge in a wall recess or into fitted cabinets or furniture.
■ When in place your Larder Fridge must have 100mm of space to the sides and rear, and
200mm of space above.
■ The door should be able to open to a 160° angle. Note: The door of your Larder Fridge
is reversible. See instructions on page 4 for details on how to do this.
■ Your Larder Fridge must be level, if it is not the door’s magnetic seal alignment will be
affected. Adjust the front feet to suit the level of the floor.
Switching on
WARNING: Before switching on your Larder Fridge, allow your fridge to stand for at least 4 hours after you have
moved it. This allows the coolant fluid time to settle.
■ Before switching on your Larder Fridge you may want to clean the inside of your Larder Fridge. Wipe with a
weak solution of bicarbonate of soda and rinse with warm water. For full cleaning instructions see page 5.
■ First check that the power socket is compatible with the plug supplied with your Larder Fridge. If not, see
Electrical Connections on page 7.
■ Make sure that the power cord is straight without kinks or coils. DO NOT allow the power cord to sit near the
compressor at the back of the Larder Fridge as it can become quite hot during operation.
■ Allow your Larder Fridge to operate for 24 hours before placing any food into it. You can then be sure that it is
working properly and you will have allowed time for it to reach its correct temperature.
Note: If the Larder Fridge won’t be used for a long period of time switch it off, unplug and clean it. Leave the door
open to prevent the formation of mildew and smell.
Before use
Please read these instructions carefully before using your new Tesco Larder Fridge.
The Larder Fridge is for indoor and domestic use only.
CONTROL DIAL
LEVELLING FEET
INSTALLATION
SALAD BIN
ADJUSTABLE SHELVES
BOTTLE STORAGE
3

4
USING YOUR LARDER FRIDGE
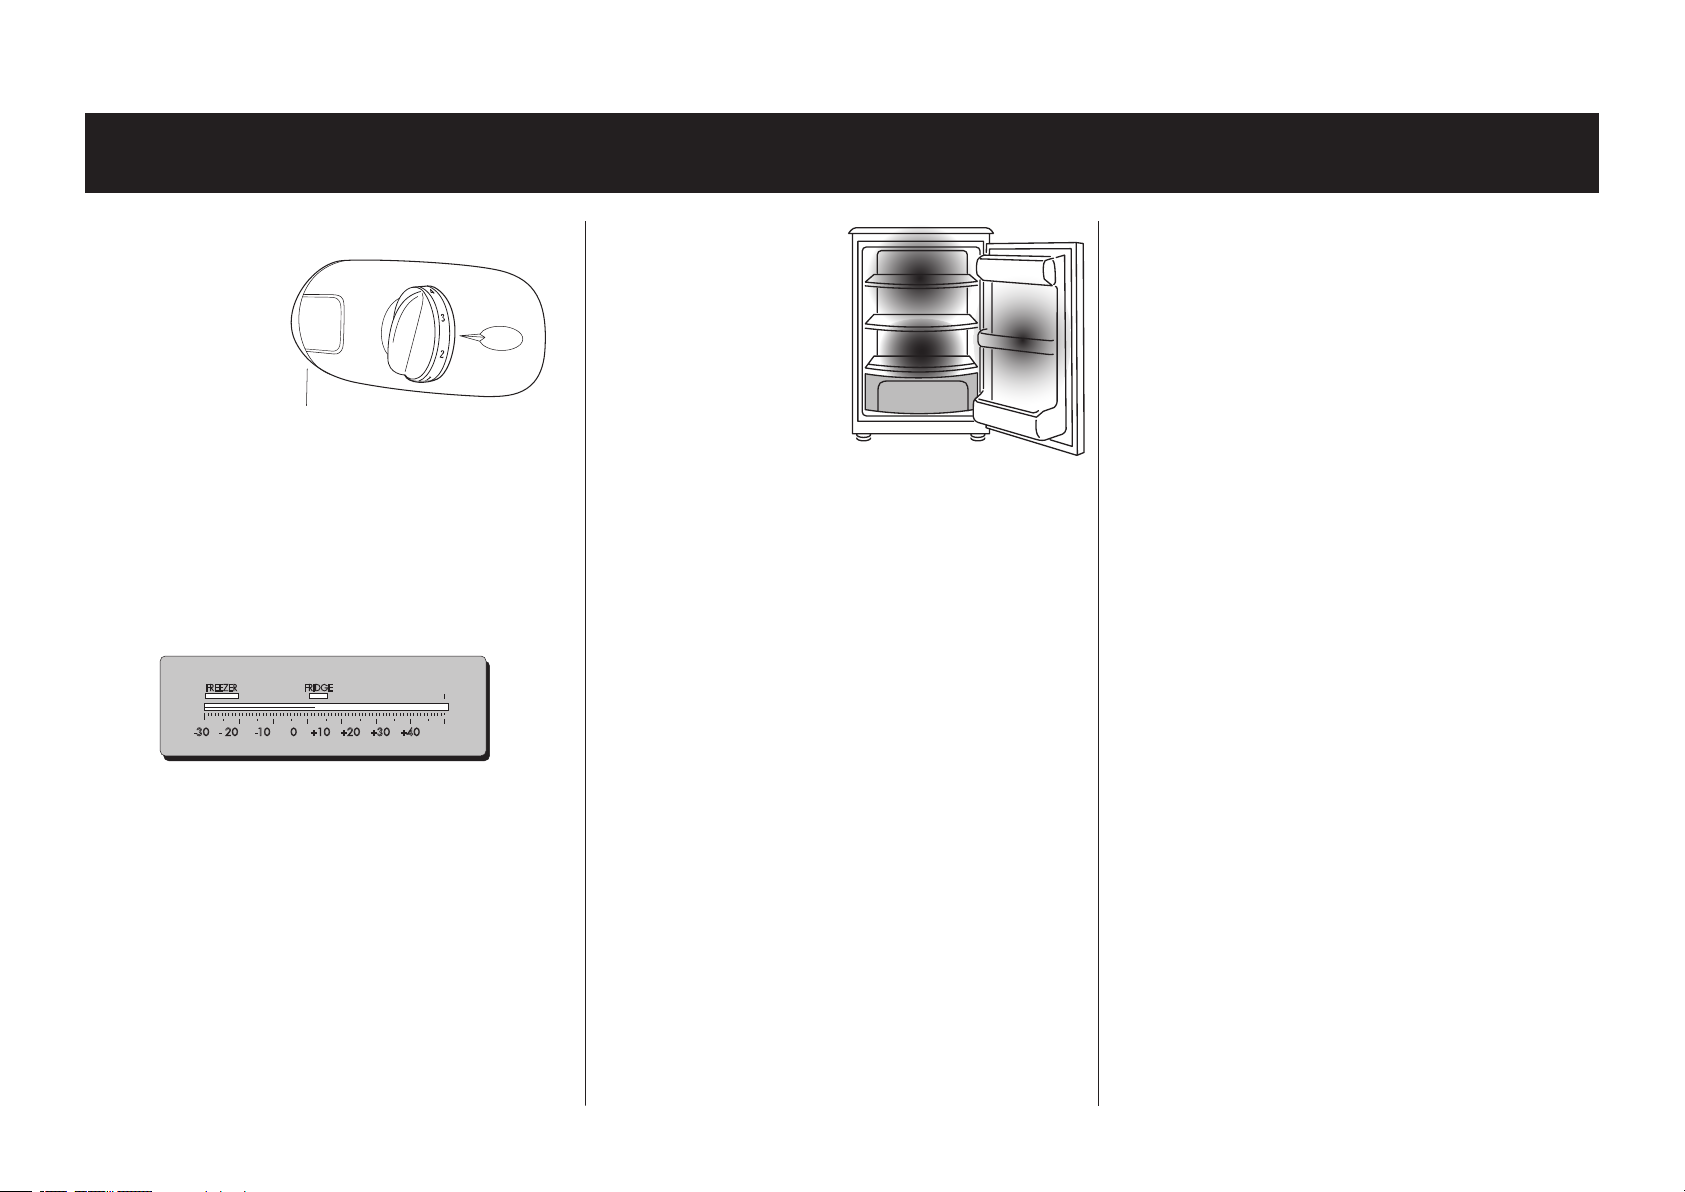
Adjusting the temperature
To change the internal
temperature of the Larder
Fridge use the control
dial, located inside the
fridge. The recommended
setting at normal room
temperature is 3.
The Larder Fridge may not operate at the correct temperature if it is in a
particularly hot or cold room or if you open the Larder Fridge doors very
often. In this case you will need to adjust the control dial accordingly.
Checking the temperature
If you are concerned that your Larder Fridge is not being kept cold
enough, you can check the temperature of your fridge using a special
fridge thermometer. They are available from most supermarkets and
hardware shops.
To take the temperature of your Larder Fridge, place the thermometer
on the middle shelf of the fridge overnight for an accurate reading.
Handy hints
Shopping
■ Always refrigerate your food as soon as possible after purchasing.
Leaving food in your car or at room temperature for a prolonged
period of time could raise food temperature to the level at which
harmful bacteria may grow.
■ When you are shopping or when you are traveling home, if you keep
all the chilled foods together they will help to keep each other cold.
■ Special insulated bags can be bought from most supermarkets and
hardware shops. However, these should only be used to get the chilled
foods home, not for storing for any prolonged period of time.
■ Always unpack and place chilled foods in the Larder Fridge before
storing dry foodstuffs.
Storing
■ Cooked meats should always be stored on a shelf above raw meats
to avoid bacterial transfer. Keep raw meats on a plate, which is large
enough to collect juices and cover it with cling film or foil.
■ Leave space around food and do not over-stock your fridge. This will
allow cold air to circulate around the Larder Fridge.
■ To prevent transfer of flavours and drying out, food should be
separately packed or covered.
■ Always let pre-cooked food cool down before you put it in the Larder
Fridge. This will stop the internal temperature of the Larder Fridge
from rising.
■ To prevent cold air escaping, limit the number of times you open the
door. When returning from shopping, sort foods to be kept in your
Larder Fridge while the door is closed.
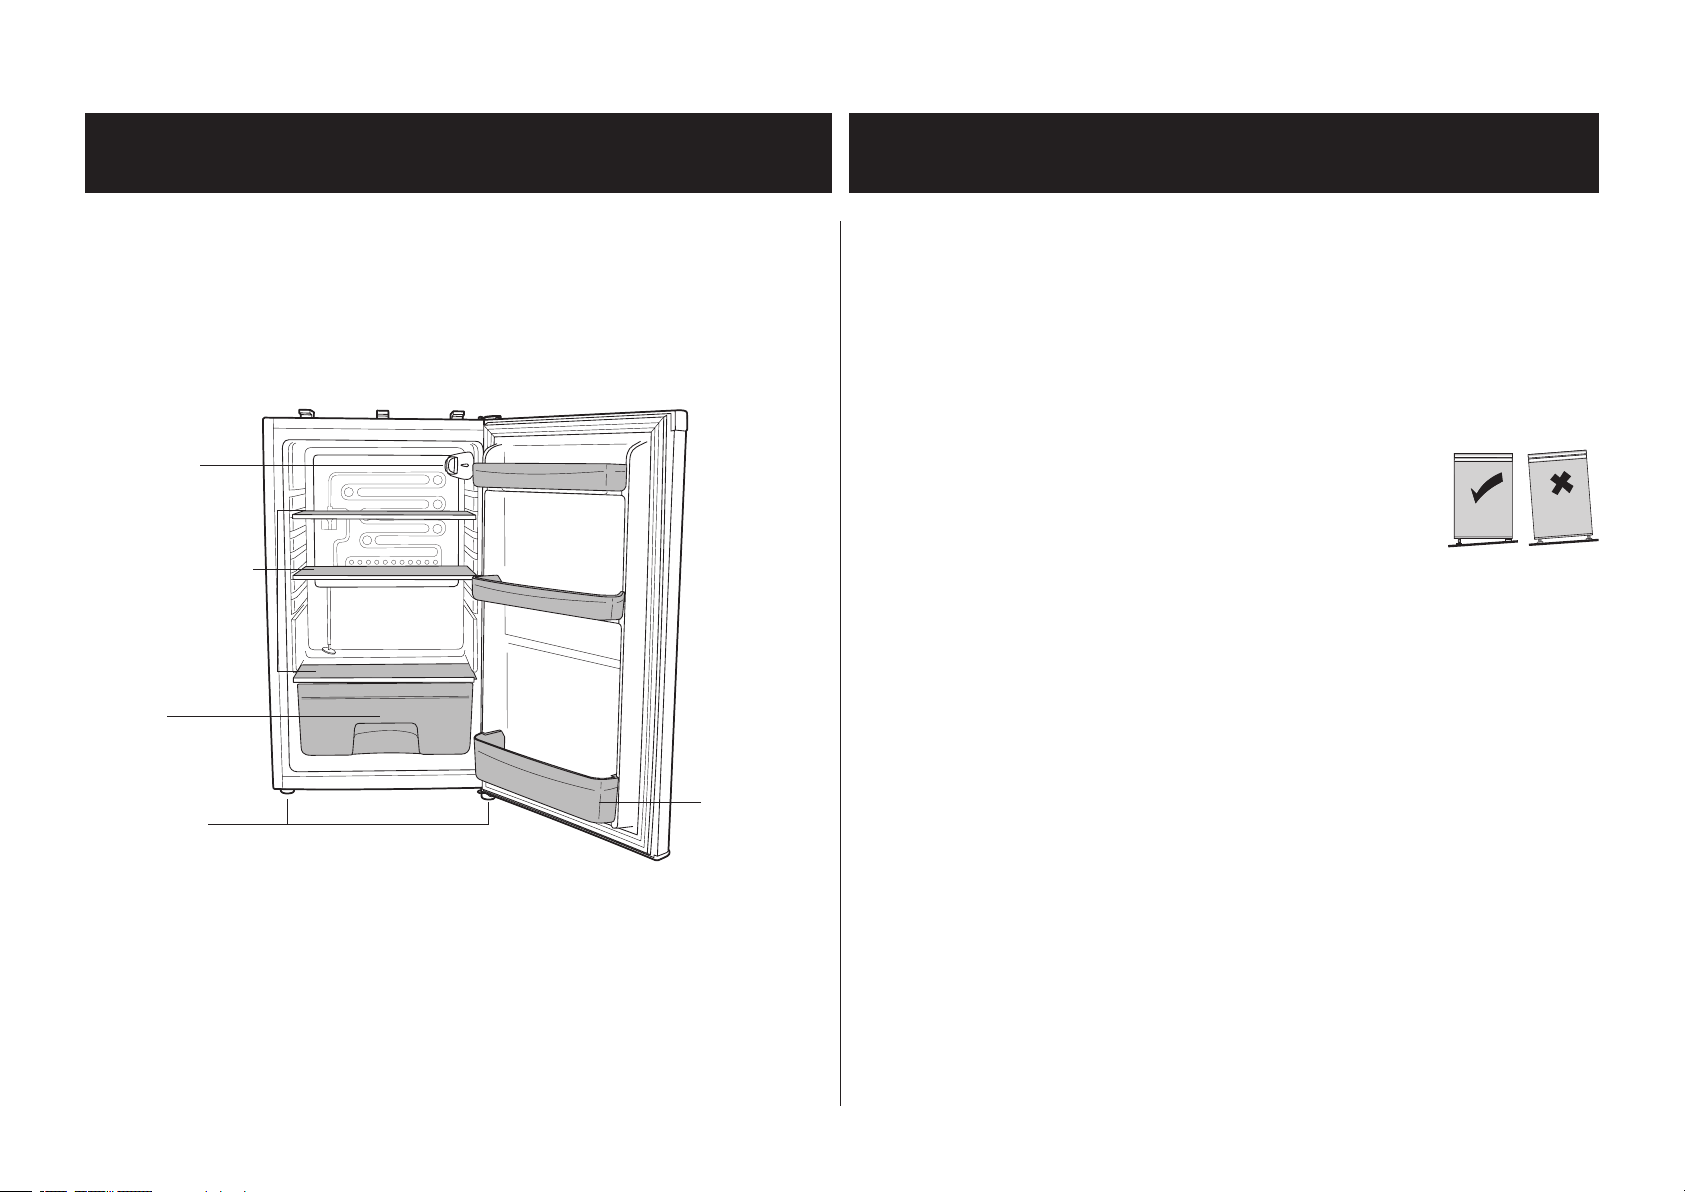
The temperature in the fridge should
be between 2˚C and 5˚C .
There are three areas of varying
temperature in your Larder Fridge
allowing you to store your food in
the best way.
Cool area
Store foods such as milk, eggs,
yoghurt, fruit juices, hard cheeses,
jarred or bottled sauces or jams, and
fats such as butter or margarine.
Cold area
Store raw or uncooked foods, chilled or precooked meats or ready-meals,
prepared salads, desserts or cream.
Note: Always wrap raw meat of fish before placing in your Larder Fridge
to prevent cross-contamination. Place them on the bottom shelf to
prevent them from dripping onto other goods.
Salad bin
This is the most humid part of the fridge. Store whole vegetables, fruit,
fresh salad items, eg. lettuce, tomatoes, radishes, here.
Note: We recommend that all produce kept in the salad bin be wrapped.
DO NOT STORE FLAMMABLE GASES OR LIQUIDS IN THE FRIDGE.
FRIDGE/FREEZER THERMOMETER C
FRIDGE
FREEZER
-30 - 20 -10 0 +10 +20 +30 +40
COOL
COOL
COLDEST
SALAD BIN

REVERSING THE DOOR SWING
The doors of your Larder Fridge can be reversed. First,
ensure the Larder Fridge is unplugged and empty.
We recommend you have someone to assist you.
You will need:
■ Phillips style screwdriver
■ Flat-bladed screwdriver
■ Adjustable spanner.
Note: You should never tip it back by more than 45º.
The Larder Fridge must rest on soft foam packaging or
similar material to avoid damaging the cooling pipes
at the rear of the Larder Fridge.
Remove the two screws that hold the upper hinge
and door in place. Detach the hinge.
Lift the door away from the pivot on the lower
hinge and place it on a padded surface to prevent
scratching.
Remove the two screws that hold the lower hinge in
place and detach it from the Larder Fridge body. Unscrew
the foot on the opposite side of the Larder Fridge., and
reattach in the place of the removed lower hinge.
You can then replace the bolt pin and lower the
Larder Fridge door back into place. Make sure the
door is the right way up.
Before replacing the lower hinge, remove the bolt
pin and unscrew the foot to reverse the direction of
the lower hinge.
Make sure your Larder Fridge is levelled again before
tightening the screws and replacing the upper hinge cover.
This will ensure that the magnetic door seal is aligned.
With the door closed, reattach the upper hinge on the
new swing side and secure with the two screws.
6
5
8
2 3
4
9
Remove the top hinge cover using the flat edge of a
screwdriver.
1
Secure using the lower hinge to the opposite side
and secure using the two screws.. Then reattach
the levelling foot.
7
5

6
MAINTENANCE
■ Clean the Larder Fridge internally with a weak solution of bicarbonate
of soda and rise with warm water using a damp sponge or cloth.
■ Always wipe the interior of the Larder Fridge dry before replacing
the food.
■ Wash the baskets and shelves in warm soapy water. Ensure they are
completely dry before replacing in the Larder Fridge.
■ Use standard furniture polish to clean the Larder Fridge exterior.
■ When cleaning the exterior, make sure that the doors are closed, to
prevent polish getting on the magnetic door seal or inside.
■ The grille of the condenser at the back of the Larder Fridge and
the adjacent components can be vacuumed using a soft brush
attachment.
■ Defrost and clean when food stocks are low.
CLEANING
Changing the internal light
■ Before carrying out the bulb replacement always switch off the
Larder Fridge and disconnect the electrical supply.
■ Push the lever at the base of the light to the rear to release the
light cover.
■ Remove the old bulb by unscrewing in an anti-clockwise direction.
■ Replace with a new bulb (10w) by screwing it in a clockwise direction
making sure that it is secure in the bulb holder.
■ Replace the light cover back into position and click back into place.
■ Re-connect your Larder Fridge to the electrical supply and switch on.
The Larder Fridge is not working
■ Check it is plugged in and switched on.
■ Check that the fuse in the plug has not blown. Plug in another
appliance, such as a lamp, to see if the socket is working.
Condensation appears on the outside of the
Larder Fridge
This may be due to a change in the room temperature. Wipe off any
residue of moisture. If the problem continues call the Customer Service
Department.
The Larder Fridge is making noises
■ Gurgling or whooshing - These noises are caused by the circulation
of the refrigerant liquid in the cooling system. It has become more
pronounced since the introduction of CFC free gases. This is not a fault
and will not affect the performance of your Larder Fridge.
■ Humming, purring or pulsating - This is the compressor motor
working, as it pumps the refrigerant around the system.
Warranty
Your Tesco appliance is covered by a warranty for 12 months from the
date of purchase. If a fault develops during this period, please contact
the Tesco technical help line on 0845 456 6767. Please have your original
purchase receipt with you when you call. This warranty in no way affects
your consumer rights.
TROUBLESHOOTING

Space required:
TECHNICAL SPECIFICATIONS
Model TL120
Rated Voltage 220-240
(V)
Rated Frequency 50
(Hz)
Energy Class A+
Appliance type Larder Fridge
Total Useable volume 92L
Climate Class N
Ambient range 16-32ºC
Gross Volume
(Litres) 120
(Cubic Feet) 4.24
Weight
gross (kg) 24
net (kg) 27
Product Dimension h/w/d 840/480/500
(cm)
Sound Decibel Rating 39
(dB[A])
1059mm
599mm
7
Table of contents
Popular Refrigerator manuals by other brands

Whirlpool
Whirlpool GI6SDRXXQ cabinet parts

Frigidaire
Frigidaire FGHT2146K F Factory parts catalog

Samsung
Samsung RF265B Series user manual

Amica
Amica BM203.3 operating manual

GE
GE GSH22JFXCC - Refrigerator w/ Glass ESTAR Dimensions and installation information

Frigidaire
Frigidaire GHSC39ETE Factory parts catalog