TGA BREEZE S Quick start guide

BREEZE S
Operating Instructions
and Owner’s Handbook

Introduction page 3
Items included with your Breeze page 3
Your scooter controls page 4
Driving your scooter page 5
Transporting the Breeze page 7
Parking brake release page 7
Safety overload switch page 8
Battery charging page 8
A guide to safe and lasting batteries page 8
Maintenance page 9
Troubleshooting page 10
Warranty page 11
Tips for scooter users page 12
Sensible guidelines for safety page 13
Driving your Breeze on the road page 13
Disposal of product, batteries and charger page 14
Technical specifications page 14
Contents
23

Welcome to the TGA family!
This manual provides important operational and maintenance information. Please take the
time to read in full before venturing out on your new Breeze S.
Important safety related issues will be drawn to your attention with this warning symbol:
WARNING!
Please keep this manual in a safe place for future reference.
Introduction to your Breeze S
Product overview
Your TGA Breeze S mobility scooter is designed to be used outdoors by a range of clients,
whose mobility has been reduced or removed by a person’s age, disability or chronic illness.
The Breeze is fitted with large wheels and fully active front and rear suspension making it
ideal for rough terrain and cross country as well as normal use. It is capable of climbing
slopes and negotiating obstacles as defined in the specifications section of this handbook.
The design incorporates a single user, battery powered 3 or 4 wheeled scooter, with full
suspension, capable of 8mph maximum speed. The product is intended to be used as a
wheeled conveyance to enhance the mobility of a person, with a maximum mass of 200kg,
where mobility is impaired. The design ergonomically accommodates a wide range of
disabilities for all ages of user over the age of 14. Suitability is dependent upon the degree
and nature of disability and should be determined through a thorough risk assessment
carried out by a qualified medical professional. This scooter can be suitable for assisting
in rehabilitation, restoring independence and in some instances long term alleviation of
disabilities and chronic illnesses.
Consideration must be given at point of prescription to required usage with regard to your
capabilities and the environment and terrain on which the product will be used. Your dealer
must provide you with instruction around how to operate your scooter safely before you can
independently operate your product. Consider initially operating the scooter under their
supervision until you feel confident to operate it independently.
The TGA Breeze S is imported into the EU by TGA Mobility Ltd and is placed on the EU
market, CE marked, as a Medical Device and complies with the Essential Requirements of the
Medical Device Directive 93/42/EEC and the Medical Device Regulation (EU) 2017/745.
Testing carried out indicates that if this product is used in line with this user handbook and
maintained in accordance with a service plan, the product life cycle is five years. With ongoing
maintenance and care it may exceed five years in life.
Items included with your Breeze S
• Key
• Charger
23

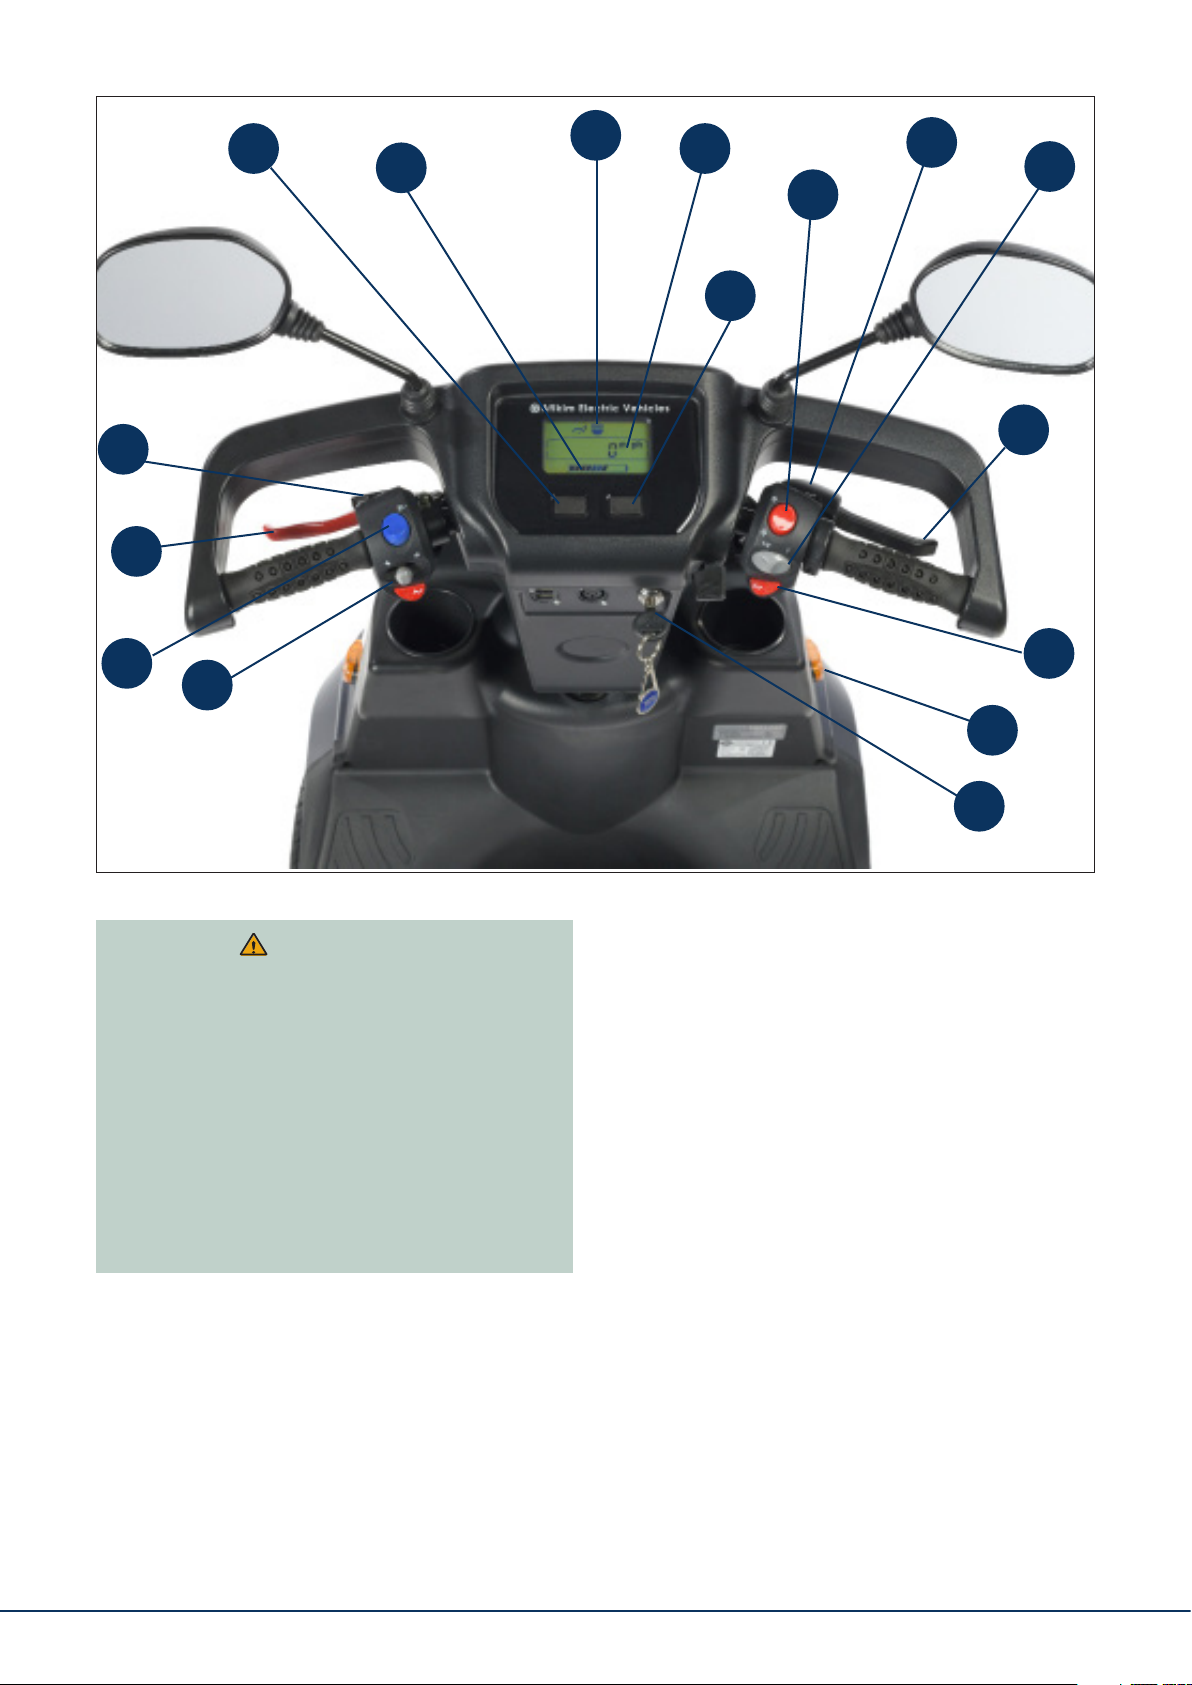
Your scooter controls
1. Speed Control Lever – Speed is
controlled by the lever located on the right-
hand handlebar (left-hand option available).
Always use the lever gently. The more you
pull the lever towards you, the quicker you
will go. To stop, release the lever.
2. Emergency Brake – All braking is
automatic and the emergency hand brake
should never need to be used. It is only for
emergency use in the unlikely event that the
automatic braking fails.
3. Horn – Buttons located either side of
handlebar. The horn will automatically sound
when using reverse.
4.Indicators – Left and right-hand. Push
the switch in the same direction as you need
to turn. To turn off, return the switch to the
central position.
5. Indicator Warning Lights – Shows when
using indicators.
6. Hazard Warning Light Switch –
Operates all indicator lights together. For
emergency use only. Audible warning
option available.
7.Head Light Switch – This switches on
front and rear lights.
8. Head Light Warning Light – Shows
when lights are in use.
9. Power On/Off Switch – With a
removable key.
10. Forward/Reverse Switch – Select your
desired direction by pressing the switch as
marked. When using reverse the horn will
sound. WARNING! Always come to a
complete stop before changing direction.
11. Speed Selector Switch – This has
two positions, ‘1’ which is the high speed
(approx 8 mph - see warning on p5) and
‘1/2’ which is the slow speed (approx 4mph).
12. Brake Release Button – Switch on the
keyswitch and squeeze the button located
at the front of the right-hand handlebar. This
will release the brake and allow the scooter
to be moved manually.
13. Battery Condition Indicator – When
all 10 segments are showing it indicates you
have fully charged batteries. When you get
down to the last 2 segments it is important
to recharge as soon as possible.
14. Speed Indicator Display – Displays
speed in mph or kph.
15. Mode Button – This button will change
the digital reading from speed to distance
or time travelled. To reset, press Mode until
the time or distance is showing and then
hold mode for 7 seconds.
16. Set Up Button – For setting up time
and date. To set up / change the time or
date, press Mode until the clock is showing
and then hold Mode for 7 seconds. In set up
mode use the Mode button to select each
unit of time.
NOTE:
The Speed Control Lever is also fitted
with a panic sensor which is activated
if the lever is pulled in hard against the
handlebar. If this happens all power
to the motor with be shut down and
the brakes will come on immediately
causing the machine to stop very
suddenly. Please be aware of this fact
and brace yourself accordingly. This is
intended for emergency use. In normal
use, take care not to pull the lever
hard onto the handlebar. It is best to
familiarise yourself with this safety
device.
45
8
9
1
7
6
4
2
3
5
10
11
12
13 1416
15
Driving your scooter
Before driving, check that the seat is
correctly adjusted, battery is fully charged
and that the tyres do not appear to be soft,
(see Maintenance section for details of
monthly checks and tyre pressures). Check
the key is switched OFF before entry onto
your Breeze. When comfortably sat, ensure
the seat lever has locked the seat securely.
Ensure the armrests are in the down
position.
WARNING!
• Do not ride your Breeze without
fully reading and understanding this
instruction manual first.
• Do not carry passengers or exceed
the maximum carrying weight (see
Technical Specifications).
• Do not get on / off your Breeze
unless it is switched off.
NEVER fit a strap or device that holds
the throttle open, or interferes with the
standard controls.
Flip up the armrest to make it easier
to get on or off the seat. The seat can
be swiveled through 90° to get on/off.
When sitting on the seat operate the seat
release lever to swivel into the desired
position.
Set the Breeze speed to slow. Hold the
tiller with both hands and gently squeeze
the right control lever to move forward.
The more you squeeze the lever, the
faster you will go. Always come to a stop
before changing the High or Low speed
switch, or forward and reverse.
Releasing the control lever automatically
operates the brakes to slow down and
stop. Once stopped, the parking brake
will automatically come on.
Use the tiller to steer your scooter left and
right. Move your left hand towards you to
steer left and your right hand towards you
to turn right. Always slow down before
turning.
45
Table of contents


