Thames & Kosmos GeeKeR User manual

Franckh-Kosmos Verlags-GmbH & Co. KG, Pfizerstr. 5-7, 70184 Stuttgart, Germany | +49 (0) 711 2191-0 | www.kosmos.de
Thames & Kosmos, 301 Friendship St., Providence, RI, 02903, USA | 1-800-587-2872 | www.thamesandkosmos.com
Thames & Kosmos UK LP, Goudhurst, Kent, TN17 2QZ, United Kingdom | 01580 212000 | www.thamesandkosmos.co.uk
550017-03-040215
Safety information
WARNINGS. Only for use by children aged 8 years and older. Instructions for
parents or other supervising adults are included and have to be observed.
Keep the packaging and instructions as they contain important information.
Not suitable for children under 3 years. Choking hazard — small parts may
be swallowed or inhaled. Strangulation hazard — long wires may become
wrapped around the neck.
The wires are not to be inserted
into socket-outlets. Never perform
experiments using household current!
The high voltage can be extremely
dangerous or fatal!
Two AAA batteries (1.5-volt/LR03) are
required, which could not be included
in the kit due to their limited shelf
life.
Different types of batteries or new
and used batteries are not to be
mixed.
Do not mix old and new batteries.
Do not mix alkaline, standard
(carbon-zinc), or rechargeable (nickel-
cadmium) batteries.
Batteries are to be inserted with the
correct polarity. Press them gently
into the battery compartment.
Non-rechargeable batteries are not to
be recharged. They could explode!
Notes on experimenting with batteries
Rechargeable batteries are only to be
charged under adult supervision.
Rechargeable batteries are to be
removed from the toy before being
charged.
Exhausted batteries are to be
removed from the toy.
The supply terminals are not to be
short-circuited. A short circuit can
cause the wires to overheat and the
batteries to explode.
Dispose of used batteries in
accordance with environmental
provisions.
Be sure not to bring batteries into
contact with coins, keys, or other
metal objects.
Avoid deforming the batteries.
Have an adult check the assembly
before you use it so you can be sure it
was assembled properly!

Music is a big part of our lives. It’s hard to imagine life without it. And it’s nice
when we can take our favorite music along with us and listen to it together
with our friends. This science project kit was created with that in mind. To
help your child use this device safely, read through the instructions together
before starting the experiments, discuss the safety information, and help your
child with the experiments.
An optional experiment at the end of the manual requires you to help your
child find, download, and use a signal generator app for your smartphone
or tablet. You may want to also help your child find some supplemental
information on the Internet, especially cool video examples of cymatics, or
visible sound wave patterns, which you will learn about in this kit.
Have fun listening to the music and performing the experiments!
Advice for parents and supervising adults
550017-02-040215
1

Notes on disposal of electrical components
None of the electrical or electronic components in this kit should be
disposed of in the regular household trash when you have finished using
them. Instead, they must be delivered to a collection location for the
recycling of electrical and electronic devices. The symbol on the product,
instructions for use, or packaging will indicate this. The materials are reusable in
accordance with their designation. By reusing or recycling used devices, you are
making an important contribution to the protection of the environment. Please consult
your local authorities for the appropriate disposal location.
NOTE! The additionally required items
are highlighted in italic script in the
individual experiments. Before starting
the experiments, carefully read through
everything that will be required and make
sure to have all the materials ready.
2

KIT CONTENTS
Vibration speaker
Bag of sand
Plastic tray
Protective film for speaker (on the speaker’s adhesive pad)
YOU WILL ALSO NEED: Two AAA batteries (1.5-volt, type AAA/LR03); small
Phillips head (cross-head) screwdriver; audio source such as an MP3 player,
cell phone with headphone jack, or sound system; empty box (such as
a cereal box); two books or blocks; adhesive tape; signal generator app
(optional)
1
2
3
4
Hey Audio Geeks!
Are you ready to rock out to some great
beats — and learn about the science of
sound and how speakers work in the
process? The vibration speaker in this
kit turns practically any surface into a
larger speaker. Stick the speaker onto a
variety of surfaces and objects to find out
which materials produce the best sound.
Experiment to see sound waves ripple through
a tray of sand or water. These instructions will
show you how to do it. So let’s get going!
1 2
3
Hi! I’m Boomer!
3

Installing the
batteries
You will first have to install batteries
in the sound booster. It’s best to let
an adult help you. Open the battery
compartment by loosening the small
screw on the bottom of the device.
Insert two 1.5-volt batteries, type
AAA/LR03. The + and – symbols on
the batteries and in the compartment
show you the correct way to insert
them. Finally, put the lid back on the
battery compartment and screw it on
tight with the small screw.
Now you are ready to rock! Let’s get
your vibration speaker jammin’.
POWERING UP WITH
BATTERIES
GEEK
OUT!
You will need:
Vibration speaker, two AAA batteries
(1.5-volt, type LR03), small Phillips
head (cross-head) screwdriver
Woo-hoo! Get your
batteries ready.
Time to pump up the
volume!
4

How to use the
vibration speaker
USING YOUR
GEEKER SPEAKER
PART
1
Here’s how:
1
Make sure you have installed the
two AAA batteries correctly, and
that the batteries are charged.
2
Your vibration speaker has a short
wire on the bottom with a 3.5-mm
phone jack. This plug will fit in
almost any common device that
plays music.
3
Once you have hooked up a
suitable device, turn on the
vibration speaker by sliding the
power switch. The illuminated
light next to the switch shows
you the device is turned on.
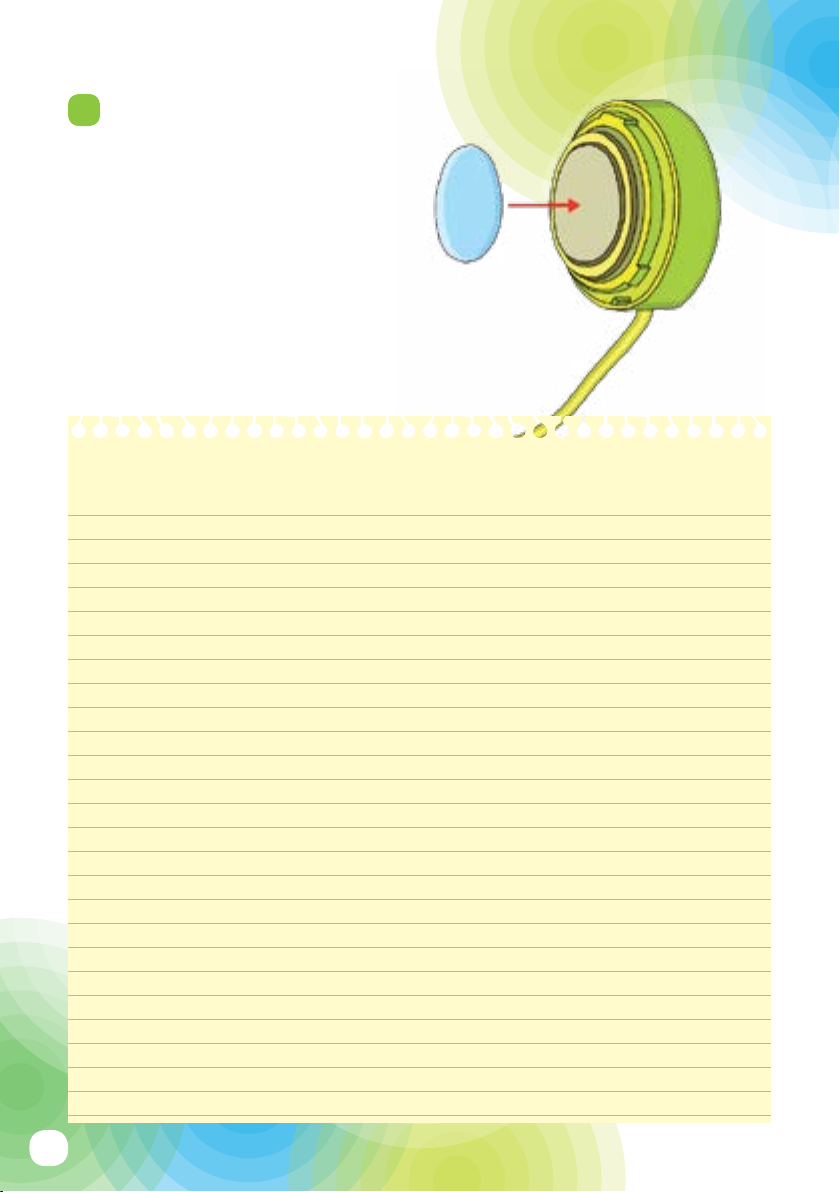
4
Take the vibrating pod out of the
device. That’s the round green
part mounted on the top of the
vibration speaker body. Pull it
out of the device and take a look
at its underside. You will find
an adhesive pad there. Pull the
film off of the adhesive pad, affix
the vibrating pod to the sound
booster box, and start the music.
You will need:
Vibration speaker; an audio source
such as an MP3 player, a cell phone
with a headphone jack, or a sound
system; empty box (such as a cereal
box) to use as a sound booster box
5
5
IMPORTANT!
Do not throw away the protective
plastic film that was stuck onto
the adhesive pad. It protects the
adhesive pad from getting dirty.
You can keep using the adhesive
pad over and over. If the adhesive
pad does get dirty and won’t
stick well anymore, simply wipe
it off with a damp finger. Then it
should stick like new again.
Time to make a hypothesis (or educated guess):
What materials and objects do you think will sound the best with the
vibration speaker? Write down your initial guesses here, and why you
think so.
And below, write down a list of songs you want to experiment playing
when the vibration speaker is attached to each of the above materials
and objects. Make sure you test each song with each material and object.
6

Experiment 1: Music
without a resonating
body
Here’s how:
1
Connect the vibration speaker
to an audio source and start the
music.
2
Remove the vibrating pod from
its housing and take a look at it.
Can you see the way the speaker
membrane vibrates along with
the music?
NEW WAVES:
SPEAKER EXPERIMENTS
PART
2
What’s happening?
These vibrations are passed
along when you attach the
speaker to another object.
When you do that, the object
is acting as a so-called
resonating body, or sound box.
Without a resonating body, the
speaker sounds pretty weak.
Hey! Turn it up!
7
What’s happening?
You will hear a different sound
depending on the material you
use. Metallic objects, for example,
don’t sound as nice as ones made
from wood. The volume will
also change as you use different
objects. In general, the sound will
be louder with hollow objects.
But it also matters how well the
material vibrates. Record your
findings on page 16.
You will need:
Vibration speaker, audio source,
a selection of various objects and
materials from around your home or
classroom
Here’s how:
1
Remove the protective film from
the vibrating pod, stick the
speaker onto whatever object
you have on hand, and start
the music. Do you hear how the
sound changes?
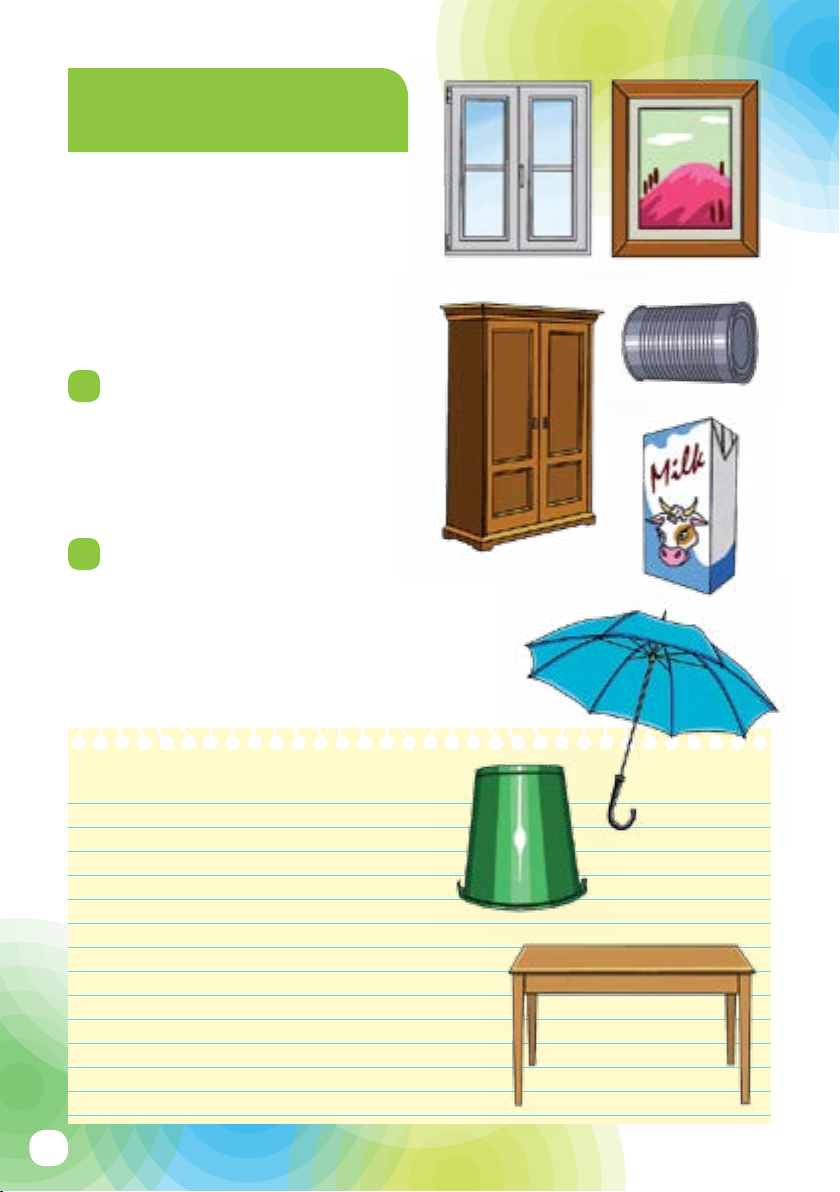
2
Try this experiment with a
variety of different objects and
materials. On this page, you can
see a few examples of things you
can try. But there are really no
limits to what your imagination
can come up with.
Experiment 2:
Various materials
8

You will need:
Vibration speaker, black plastic tray,
sand, audio source, two books or
blocks, adhesive tape
Here’s how:
1
Attach the vibration speaker’s
vibrating pod to the underside
of the plastic tray. To keep the
experiment tray from sitting
on the vibration speaker’s wire
or resting on the vibrating pod
itself, just set it on two equally-
thick books or blocks. If the
speaker becomes disconnected
from the basin, you can also try
securing it with some adhesive
tape.
2
Cover your work area in
newspaper or work in a place
where some sand can be spilled
and things can get a little bit
messy.
Experiment 3:
Making sound visible
3
Pour just a little sand into the
tray — not so much that the
bottom of the basin would be
completely covered if the sand
was spread out evenly.
4
Start your music, ideally a song
with a lot of bass. If you have
done everything right, the sand
will move around in the basin
and create some cool patterns.
5
Experiment with different songs
and different volume levels.
9
What’s happening?
Sound vibrations travel through air. They also travel through
liquids, like water, and through solids. The medium through
which sound travels greatly affects the way the vibrations
move, and thus the way we perceive the sound.
It may seem weird to you that sound can travel through liquids
and solids, but as long as there are particles that can vibrate,
there can be sound. Think of all the particles in a solid table,
for example, as being connected together with tiny springs in
between each particle. When you push one particle, the energy
is transmitted through the spring to the next particle, and so
on. In fact, the less compressible a material is, the faster sound
travels through it! Sound travels four times faster in water than
air, and 15 times faster in iron than air.
You will need:
Setup from Experiment 3
Here’s how:
1
Try the “Making sound visible”
experiment with water. It also
produces some very interesting
visual effects, even though it
looks totally different. You can
also try a combination of sand
and water. You may be able to
think of other materials to try
with this experiment as well.
Experiment 4:
Making sound visible
in water
Oontz Oontz Oontz Oontz!
10

You will need:
Setup from Experiment 3,
smartphone or tablet, signal
generator app (have an adult help you
with this)
Here’s how:
1
Have an adult help you find and
download a signal generator app
onto your smartphone or tablet.
Search for “signal generator” or
“tone generator.” There are many
free and paid apps available.
Bonus Experiment:
Frequency patterns
2
With a signal generator app,
you can produce much more
consistent sound patterns
than with music. Use the
same experiment setup as in
the “Making sound visible”
experiment.
3
Simply connect your smartphone
or tablet to the vibration speaker,
start the app, and push the app’s
“on” button. You can use the
controls to adjust the volume
and frequency. You can also try
adjusting the frequency very
precisely by inputting numbers.
Can you find a frequency at
which the grains of sand or drops
of water will start to dance in
interesting patterns?
Sine wave
Square wave
Triangle wave
Sawtooth wave
11
GEEK
OUT!
WHAT IS
SOUND?
The sound that we hear is nothing
other than compressed air
pushing against the inner parts
of our ears. For example, when
we snap our fingers, this action
compresses, or pushes together,
the air at the location impacted by
our fingers. The air particles are
condensed for a moment and then
expand again. This vibration, or
fluctuation in pressure, passes on
to the surrounding air particles,
which in turn pass it on to the
air particles next to them. In
this way, the vibration spreads
out like waves in all directions.
The particles themselves do not
necessarily move very far — rather
the vibration travels through the
medium, from particle to particle.
If we could see this, it would look
something like the waves that are
created when you toss a rock into
the water, only in three dimensions
instead of two. The vibration
speaker transfers sound waves
to other objects and gets them to
start vibrating.
By the way, vibrations can travel
through all sorts of media: solids,
liquids, and gases. We can hear
sound under water because sound
vibrations spread out very easily in
water. In outer space, on the other
hand, we wouldn’t hear anything
at all, because there is no medium
such as air or water through which
the sound can spread out. There is
simply nothing to vibrate in space.
Sound vibrations travel
through materials like
waves in a pool of water.
Sounds good
to me!
12
Sound is indicated in frequencies. The frequency indicates how many
waves there are per second at a particular spot. As mentioned on the
previous page, a sound wave in this sense can be thought of as a change
from most compressed state to least compressed state and back again.
The number of times this happens in a particular time, or period, is the
frequency.
The unit for frequency is the hertz. One wave per second equals 1 hertz.
GOOD VIBRATIONS:
SOUND FREQUENCIES
GEEK
OUT!
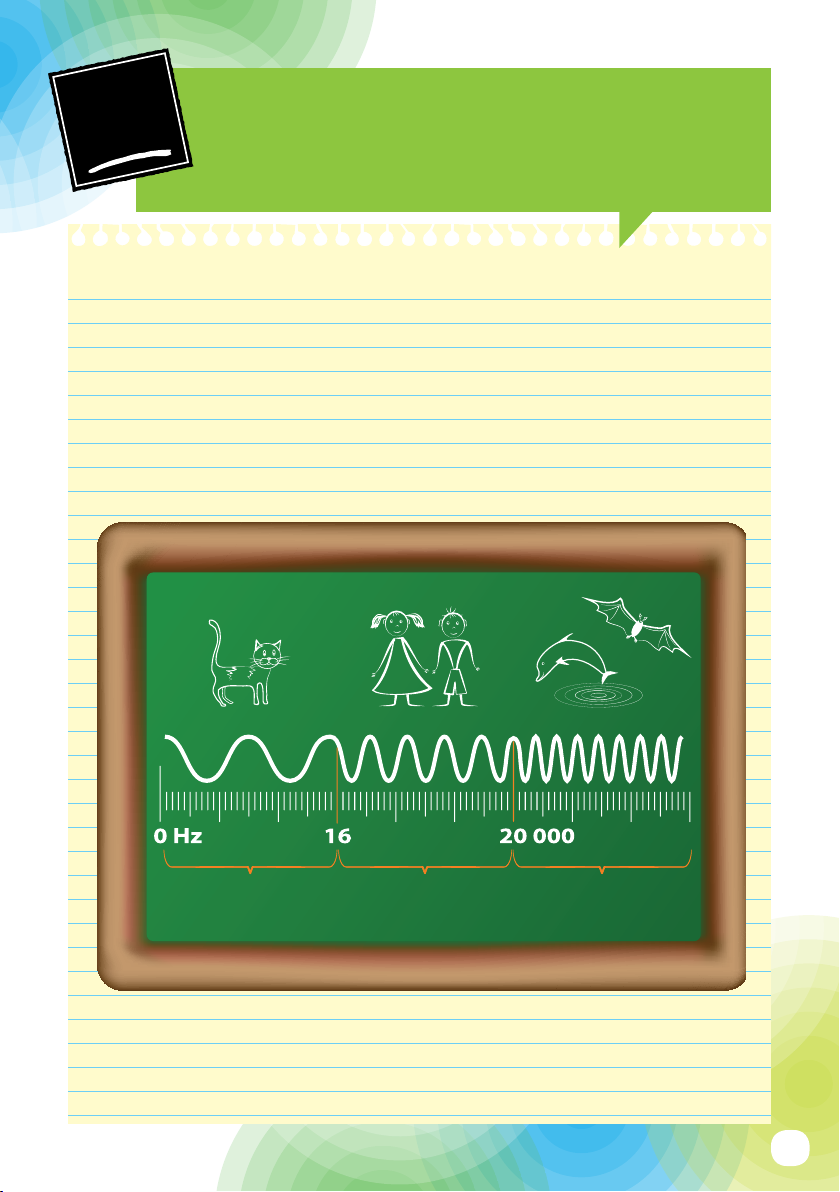
Humans can perceive frequencies between 16 and 20,000 hertz. Some
animals can hear lower frequencies and others can hear higher ones.
Subsonic
frequencies
Audible
frequencies
Supersonic
frequencies
13

Cymatics is the study of techniques for
making sounds and sound waves visible.
A pioneer of cymatics was the German
physicist and musician Ernst Chladni (1756
– 1827). He would draw his violin bow over a
thin metal plate to make it start vibrating.
When he sprinkled sand on the plate as he
made it vibrate, complex patterns would
form that would differ depending on the
frequency of the vibrations. He recorded
these patterns in his book Die Akustik
(“Acoustics”). Today, these patterns are
known as Chladni figures.
SEEING SOUND WAVES:
CYMATICS
GEEK
OUT!
Ernst Chladni
You can find cool videos online
showing Chladni figures being
formed on vibrating plates. Ask an
adult to help you.
14

SPEAKER SCIENCE
There are many types of speakers. What all
speakers have in common is that they convert
fluctuations in current into sound vibrations.
Speakers can be built in many different ways.
But all have a large, flexible membrane to set
the greatest possible quantity of air into
vibration.
Simple speakers use the piezoelectric
effect for this: Certain materials become
elastically deformed under the influence of
current fluctuations, rising and falling in
rhythm with the fluctuations and thereby
creating sound vibrations in the air.
GEEK
OUT!
Better speakers, by contrast, have
a movable suspended coil made of
fine wire, with the coil positioned
near a strong magnet and
connected to the membrane. When
current flows through the coil,
the coil itself becomes magnetic.
As this current fluctuates, the
magnetism rapidly changes in
strength and direction, so the
coil is attracted one moment by
the external magnet and repelled
the next. It is these movements
that are transferred through
the membrane to the air. Ears
interpret the vibrations in the air
as sound.
15

What surfaces and materials produce
the best sound with your vibration
speaker? Record your findings here...
Hear you later,
alligator!
16

1st Edition 2015
© 2015 Franckh-Kosmos Verlags-GmbH & Co. KG, Pfizerstrasse 5-7, D-70184 Stuttgart, Germany. Tel. +49 (0)711 2191-343
This work, including all its parts, is copyright protected. Any use outside the specific limits of the copyright law without
the consent of the publisher is prohibited and punishable by law. This applies specifically to reproductions, translations,
microfilming, and storage and processing in electronic systems and networks. We do not guarantee that all material in this
work is free from copyright or other protection.
Project management: Jonathan Felder
Technical product development: Elena Ryvkin
Manual design concept: Atelier Bea Klenk, Berlin
Layout and typesetting, manual and packaging: Studio Gibler, Stuttgart
Manual illustrations: Tanja Donner, Riedlingen
Packaging design concept and layout: Peter Schmidt Group GmbH, Hamburg
Photos: Designua (panel); Georges Kyrillos (note); Valentina Proskurina (water); Yanas (box); Kjpargeter (silhouettes); iunewind
(audio background) (all previous © shutterstock.com); H. Adlard (Chladni portrait); pro-studios, Michael Flaig, Stuttgart
(materials photo); Elena Ryvkin (vibration speaker rendering); John Tyndall (acoustic patterns)
The publisher has made every effort to locate the holders of image rights for all of the photos used. If in any individual cases
any holders of image rights have not been acknowledged, they are asked to provide evidence to the publisher of their image
rights so that they may be paid an image fee in line with the industry standard.
1st English Edition © 2015 Thames & Kosmos, LLC, Providence, RI, USA
Thames & Kosmos® is a registered trademark of Thames & Kosmos, LLC.
Editing: Ted McGuire
Additional illustrations: Dan Freitas, Ashley Greenleaf, and Ted McGuire
Packaging artwork: Dan Freitas
Distributed in North America by Thames & Kosmos, LLC. Providence, RI 02903
Phone: 800-587-2872; Web: www.thamesandkosmos.com
Distributed in United Kingdom by Thames & Kosmos UK, LP. Goudhurst, Kent TN17 2QZ
Phone: 01580 212000; Web: www.thamesandkosmos.co.uk
We reserve the right to make technical changes.
Printed in China / Imprimé en Chine
P.A.
Props Bender
Boomer
Mega
Bell
Toney
Cadet
Wheeler
Sprout
Nimbus
Zapp
Drop
Helo
Spur Quartz
Racket
MEET THE NEXT-GEN GEEKERS!
550017-03-040215

Kosmos Quality and Safety
More than one hundred years of expertise in
publishing science experiment kits stand behind
every product that bears the Kosmos name. Kosmos
experiment kits are designed by an experienced team
of specialists and tested with the utmost care during
development and production. With regard to product
safety, these experiment kits follow European and
US safety standards, as well as our own refined
proprietary safety guidelines. By working closely
with our manufacturing partners and safety testing
labs, we are able to control all stages of production.
While the majority of our products are made in
Germany, all of our products, regardless of origin,
follow the same rigid quality standards.
Table of contents


