The Coffeehouse DSK-C10-FNM-M4 User manual

Esprso MacneEsprso MacneEsprso Macne
Model : DSK-C10-FNM-M4Model : DSK-C10-FNM-M4Model : DSK-C10-FNM-M4

FeeFeeFee
Elegant European Espresso MachineElegant European Espresso MachineElegant European Espresso Machine
111Grind the bean just before brewing allows to Grind the bean just before brewing allows to
enjoy a deep aroma and soft avor.enjoy a deep aroma and soft avor.
Grind the bean just before brewing allows to
enjoy a deep aroma and soft avor.
Fully Automatic Micom SystemFully Automatic Micom SystemFully Automatic Micom System
222The easy to use Micom Control System enable The easy to use Micom Control System enable
to control any function conveniently.to control any function conveniently.
The easy to use Micom Control System enable
to control any function conveniently.
Smart Brewing SystemSmart Brewing SystemSmart Brewing System
Easy to use and control with LCD DisplayEasy to use and control with LCD DisplayEasy to use and control with LCD Display
333
555
No need to change the brewer as per coee No need to change the brewer as per coee
ground dose and versatle brewing chamber can ground dose and versatle brewing chamber can
hold various coee ground dose according to hold various coee ground dose according to
users preference.users preference.
No need to change the brewer as per coee
ground dose and versatle brewing chamber can
hold various coee ground dose according to
users preference.
All process of bean to cup can be shown at LCD All process of bean to cup can be shown at LCD
screen, which allows the easy to use and control.screen, which allows the easy to use and control.
All process of bean to cup can be shown at LCD
screen, which allows the easy to use and control.
Fully Automatic Bean to Cup SystemFully Automatic Bean to Cup SystemFully Automatic Bean to Cup System
Able to adjust hot water temperature Able to adjust hot water temperature
at personal preferenceat personal preference
Able to adjust hot water temperature
at personal preference
444
666
Just touch a button leads you to have a nice cup Just touch a button leads you to have a nice cup
of coee, fully automatically from bean to cup.of coee, fully automatically from bean to cup.
Just touch a button leads you to have a nice cup
of coee, fully automatically from bean to cup.
Enable to make more tender and thicker Enable to make more tender and thicker
espresso shot through hot water temperature espresso shot through hot water temperature
control quite freely.control quite freely.
Enable to make more tender and thicker
espresso shot through hot water temperature
control quite freely.
Easy MaintenanceEasy MaintenanceEasy Maintenance
777Usefull instruction displayed in LCD let user know Usefull instruction displayed in LCD let user know
when take care of cleaning rell and check when take care of cleaning rell and check
internal components. internal components.
Usefull instruction displayed in LCD let user know
when take care of cleaning rell and check
internal components.
ContentContentContent
1. Feature / Content.....................................................................................................................................................................................11. Feature / Content.....................................................................................................................................................................................1
2. Note/Accessories.....................................................................................................................................................................................22. Note/Accessories.....................................................................................................................................................................................2
3. Description of Parts..................................................................................................................................................................................43. Description of Parts..................................................................................................................................................................................4
4. Installation - Bean Hopper ....................................................................................................................................................................54. Installation - Bean Hopper ....................................................................................................................................................................5
5. Installation - How to t and ll powder canisters................................................................................................................................65. Installation - How to t and ll powder canisters................................................................................................................................6
6. Installation - How to connect water supply hose & test working.....................................................................................................76. Installation - How to connect water supply hose & test working.....................................................................................................7
7. Installation - Adjust coee bean grinder level ...................................................................................................................................87. Installation - Adjust coee bean grinder level ...................................................................................................................................8
8. Reset brewer / Clean the internal components automatically / Water supply.............................................................................98. Reset brewer / Clean the internal components automatically / Water supply.............................................................................9
9. Alarming "Empty Waste Box" / Alarming Empty water out of drip tray .........................................................................................109. Alarming "Empty Waste Box" / Alarming Empty water out of drip tray .........................................................................................10
10.Set beverage volume ............................................................................................................................................................................1110.Set beverage volume ............................................................................................................................................................................11
11. Price setting ..........................................................................................................................................................................................1311. Price setting ..........................................................................................................................................................................................13
12. Hot water temperature setting ..........................................................................................................................................................1512. Hot water temperature setting ..........................................................................................................................................................15
13. Count Cup..............................................................................................................................................................................................1613. Count Cup..............................................................................................................................................................................................16
14. Vend Test.................................................................................................................................................................................................1714. Vend Test.................................................................................................................................................................................................17
15. Bean Volume Test ................................................................................................................................................................................1815. Bean Volume Test ................................................................................................................................................................................18
16. Cup Sensor Setting...............................................................................................................................................................................1916. Cup Sensor Setting...............................................................................................................................................................................19
17. Tray Senosr setting...............................................................................................................................................................................2017. Tray Senosr setting...............................................................................................................................................................................20
18. Waste box alarming count setting mode..........................................................................................................................................2118. Waste box alarming count setting mode..........................................................................................................................................21
19. Recipe Reset.........................................................................................................................................................................................2219. Recipe Reset.........................................................................................................................................................................................22
20. Trouble shooting .................................................................................................................................................................................2520. Trouble shooting .................................................................................................................................................................................25
21. Disassemble components..................................................................................................................................................................2621. Disassemble components..................................................................................................................................................................26
22. How to clean and cleaning scedule..................................................................................................................................................2722. How to clean and cleaning scedule..................................................................................................................................................27
23. How to replace fuse / Specication..................................................................................................................................................2923. How to replace fuse / Specication..................................................................................................................................................29
1. Feature / Content.....................................................................................................................................................................................1
2. Note/Accessories.....................................................................................................................................................................................2
3. Description of Parts..................................................................................................................................................................................4
4. Installation - Bean Hopper ....................................................................................................................................................................5
5. Installation - How to t and ll powder canisters................................................................................................................................6
6. Installation - How to connect water supply hose & test working.....................................................................................................7
7. Installation - Adjust coee bean grinder level ...................................................................................................................................8
8. Reset brewer / Clean the internal components automatically / Water supply.............................................................................9
9. Alarming "Empty Waste Box" / Alarming Empty water out of drip tray .........................................................................................10
10.Set beverage volume ............................................................................................................................................................................11
11. Price setting ..........................................................................................................................................................................................13
12. Hot water temperature setting ..........................................................................................................................................................15
13. Count Cup..............................................................................................................................................................................................16
14. Vend Test.................................................................................................................................................................................................17
15. Bean Volume Test ................................................................................................................................................................................18
16. Cup Sensor Setting...............................................................................................................................................................................19
17. Tray Senosr setting...............................................................................................................................................................................20
18. Waste box alarming count setting mode..........................................................................................................................................21
19. Recipe Reset.........................................................................................................................................................................................22
20. Trouble shooting .................................................................................................................................................................................25
21. Disassemble components..................................................................................................................................................................26
22. How to clean and cleaning scedule..................................................................................................................................................27
23. How to replace fuse / Specication..................................................................................................................................................29
1

NoNoNo
In OperatingIn OperatingIn Operating
2
1. 1. 1.
CautionCautionCaution
GrinderGrinderGrinder
It might cause troubles in mixing small stone piece or worden piece with coee bean.It might cause troubles in mixing small stone piece or worden piece with coee bean.
The after service following above cause is compensation by customer. The after service following above cause is compensation by customer.
The grinding volume can dierence following kind & size of coee beanThe grinding volume can dierence following kind & size of coee bean
It might cause troubles in mixing small stone piece or worden piece with coee bean.
The after service following above cause is compensation by customer.
The grinding volume can dierence following kind & size of coee bean
2.2.2. Brewer MechBrewer MechBrewer Mech
Daily maintenance- brewer should be clean 1 times above every day.Daily maintenance- brewer should be clean 1 times above every day.
Do not set up very little volume bean powder because it might cause discharge error of bean.Do not set up very little volume bean powder because it might cause discharge error of bean.
Min. volume of bean: Above 5gram(Level of bean volume: From 5~20g) Min. volume of bean: Above 5gram(Level of bean volume: From 5~20g)
It might cause trouble in touch during operation or disassemble machine parts.It might cause trouble in touch during operation or disassemble machine parts.
Daily maintenance- brewer should be clean 1 times above every day.
Do not set up very little volume bean powder because it might cause discharge error of bean.
Min. volume of bean: Above 5gram(Level of bean volume: From 5~20g)
It might cause trouble in touch during operation or disassemble machine parts.
3.3.3. OthersOthersOthers
Install the machine inside the oce room- this can prevent down of 1st drink temperature or Install the machine inside the oce room- this can prevent down of 1st drink temperature or
material hard.material hard.
The drink volume can exchange following using condition.The drink volume can exchange following using condition.
Install the machine inside the oce room- this can prevent down of 1st drink temperature or
material hard.
The drink volume can exchange following using condition.
AccessoriesAccessoriesAccessories
Spare FuseSpare FuseSpare Fuse
(125V 20A)(125V 20A)(125V 20A)
KeysKeysKeys
(2 pcs)(2 pcs)(2 pcs)
User MannualUser MannualUser Mannual Bean HopperBean HopperBean Hopper Bean HopperBean Hopper
Connect PipeConnect Pipe
Bean Hopper
Connect Pipe
Bean BaeBean Bae
PlatePlate
Bean Bae
Plate
Bean HopperBean Hopper
holderholder
Bean Hopper
holder
Powder CanisterPowder Canister
(3 pcs)(3 pcs)
Powder Canister
(3 pcs)
Knob ScrewKnob Screw
(2 pcs)(2 pcs)
Knob Screw
(2 pcs)
Waste BinWaste BinWaste Bin
Drain BucketDrain BucketDrain Bucket
Coin BoxCoin BoxCoin Box
Drip TrayDrip TrayDrip Tray
Drain HoseDrain Hose
1pcs1pcs
Drain Hose
1pcs
O-RingO-RingO-Ring O-RingO-Ring
(P4/2pcs)(P4/2pcs)
O-Ring
(P4/2pcs) Clean BrushClean Brush
(1 pcs)(1 pcs)
Clean Brush
(1 pcs)
Multi ToolMulti ToolMulti Tool Bean HopperBean Hopper
Fixing BracketFixing Bracket
Bean Hopper
Fixing Bracket

NoNoNo
3
This section refers all instruction to use product in safe and correct way.This section refers all instruction to use product in safe and correct way.
Be sure to follow all instruction to prevent any accidents and danger.Be sure to follow all instruction to prevent any accidents and danger.
This section refers all instruction to use product in safe and correct way.
Be sure to follow all instruction to prevent any accidents and danger.
WarningWarningWarning
The warning mark refers possibility of The warning mark refers possibility of
signicant danger. death and re if signicant danger. death and re if
user do not follow instructions.user do not follow instructions.
The warning mark refers possibility of
signicant danger. death and re if
user do not follow instructions. CautionCautionCaution
The caution mark refers possibility of The caution mark refers possibility of
damage, injury and loss if user do not damage, injury and loss if user do not
follow instruction.follow instruction.
The caution mark refers possibility of
damage, injury and loss if user do not
follow instruction.
Electricals Electricals Electricals Installation Installation Installation
WarningWarningWarning
Be sure to use only Be sure to use only
grounded outlet when grounded outlet when
connect the electrical connect the electrical
plug to the outlet.plug to the outlet.
It might cause re or It might cause re or
electric shock. electric shock.
Be sure to use only
grounded outlet when
connect the electrical
plug to the outlet.
It might cause re or
electric shock.
WarningWarningWarning
Do not keep inammables Do not keep inammables
near by machinenear by machine
or put it into.or put it into.
It might cause It might cause
explosion, re and injury explosion, re and injury
Do not keep inammables
near by machine
or put it into.
It might cause
explosion, re and injury
WarningWarningWarning
WarningWarningWarning
Do not connect multiple Do not connect multiple
plugs of appliances plugs of appliances
to one outlet at the to one outlet at the
same time. and do same time. and do
not connect electrical plugnot connect electrical plug
to outlet when the outlets is looseto outlet when the outlets is loose
It might cause reIt might cause re
Do not connect multiple
plugs of appliances
to one outlet at the
same time. and do
not connect electrical plug
to outlet when the outlets is loose
It might cause re
Stop operation when Stop operation when
the plug and outlet the plug and outlet
is damage.is damage.
It might cause Electric Shock or Fire.It might cause Electric Shock or Fire.
Be sure to call your local A/S service team to repair itBe sure to call your local A/S service team to repair it
Stop operation when
the plug and outlet
is damage.
It might cause Electric Shock or Fire.
Be sure to call your local A/S service team to repair it
WarningWarningWarning
CautionCautionCaution
Use of subterranean water, tap water Use of subterranean water, tap water
cause problem in operation due to cause problem in operation due to
calcication.calcication.
Recommend to use only the water Recommend to use only the water
ltered by UF Membrane lter.ltered by UF Membrane lter.
Use of subterranean water, tap water
cause problem in operation due to
calcication.
Recommend to use only the water
ltered by UF Membrane lter.
Be sure to operate the Be sure to operate the
machine for indoor-use machine for indoor-use
only at room temperature.only at room temperature.
It might cause burst in winter whenIt might cause burst in winter when
keep it outside. keep it outside.
It might cause an electric leakageIt might cause an electric leakage
and re due to rain or snow. and re due to rain or snow.
At the place below 0 , be sure toAt the place below 0 , be sure to
turn on machine. turn on machine.
Be sure to operate the
machine for indoor-use
only at room temperature.
It might cause burst in winter when
keep it outside.
It might cause an electric leakage
and re due to rain or snow.
At the place below 0 , be sure to
turn on machine.
WarningWarningWarning
Do not handle the power Do not handle the power
cord with wet hand.cord with wet hand.
It might cause Electric Shock or Fire.It might cause Electric Shock or Fire.
Do not handle the power
cord with wet hand.
It might cause Electric Shock or Fire.
WarningWarningWarning
When stop operating the machineWhen stop operating the machine
for a long time, unplug power for a long time, unplug power
to the machine and empty to the machine and empty
bean hopper & canisters.bean hopper & canisters.
It might cause trouble.It might cause trouble.
When stop operating the machine
for a long time, unplug power
to the machine and empty
bean hopper & canisters.
It might cause trouble.
CautionCautionCaution
In winter season, there would be In winter season, there would be
possibility of freeze and burst. Make sure possibility of freeze and burst. Make sure
to use the equipment at room to use the equipment at room
temperature and keep turning power on.temperature and keep turning power on.
Manufacture will not be responsible for any Manufacture will not be responsible for any
damages or troubles caused by freeze and burst. damages or troubles caused by freeze and burst.
In winter season, there would be
possibility of freeze and burst. Make sure
to use the equipment at room
temperature and keep turning power on.
Manufacture will not be responsible for any
damages or troubles caused by freeze and burst.
Installation Installation Installation
WarningWarningWarning
Do not disassemble withoutDo not disassemble without
conrmation from authorized conrmation from authorized
service agent.service agent.
It might cause re or It might cause re or
electric shock. electric shock.
Do not disassemble without
conrmation from authorized
service agent.
It might cause re or
electric shock.
WarningWarningWarning
Do not clean with water Do not clean with water
on machine directly or on machine directly or
with benzene, with benzene,
thinner.thinner.
Electrical shock or damage Electrical shock or damage
in parts by any change. in parts by any change.
Do not clean with water
on machine directly or
with benzene,
thinner.
Electrical shock or damage
in parts by any change.

Dcripon PartsDcripon PartsDcripon Parts
4
FrontFrontFront Rear sideRear sideRear side
Bean hopperBean hopperBean hopper
LCD displayLCD display
and mode buttonand mode button
LCD display
and mode button
Drinks buttonDrinks buttonDrinks button
Door nozzleDoor nozzleDoor nozzle
Cup Sensor Cup Sensor Cup Sensor
Drip trayDrip trayDrip tray
Power switchPower switchPower switch
FuseFuseFuse
Power cordPower cordPower cord
Exhaust FanExhaust FanExhaust Fan
Drain outletDrain outletDrain outlet
Water supplyWater supply
inletinlet
Water supply
inlet
Inside Inside Inside Door insideDoor insideDoor inside
CanistersCanistersCanisters
Bean hopperBean hopperBean hopper
111222333
GrinderGrinderGrinder
Cord heater switchCord heater switchCord heater switch
Bewer MechBewer MechBewer Mech
Mixing bowlMixing bowlMixing bowl
NozzleNozzleNozzle
Waste binWaste binWaste bin
Drain bucketDrain bucketDrain bucket
Topping Canister reset buttonsTopping Canister reset buttonsTopping Canister reset buttons
Setting buttonsSetting buttonsSetting buttons
Coin sensorCoin sensor
(Optional)(Optional)
Coin sensor
(Optional)
Coin boxCoin box
(Optional)(Optional)
Coin box
(Optional)

Ilion-Be HopperIlion-Be HopperIlion-Be Hopper
5
How to fit and fill bean hopperHow to fit and fill bean hopperHow to fit and fill bean hopper
Fit bean hopper holder groove into square hole on upside of machine Fit bean hopper holder groove into square hole on upside of machine
Press bean hopper connecting pipe download and t to the grind level disk.Press bean hopper connecting pipe download and t to the grind level disk.
Fit bean hopper holder groove into square hole on upside of machine
Press bean hopper connecting pipe download and t to the grind level disk.
111
Bean hopper holderBean hopper holderBean hopper holder Bean hopper connecting pipeBean hopper connecting pipeBean hopper connecting pipe
Grind level diskGrind level diskGrind level disk
Fit the clamp connect-cani into the bean hopper connecting pipe as gure.Fit the clamp connect-cani into the bean hopper connecting pipe as gure.
Then screw knob screw (2pcs) to the hole of main chassis and the xing bracket tightly.Then screw knob screw (2pcs) to the hole of main chassis and the xing bracket tightly.
(knob screws packed in the accessory part)(knob screws packed in the accessory part)
Fit the clamp connect-cani into the bean hopper connecting pipe as gure.
Then screw knob screw (2pcs) to the hole of main chassis and the xing bracket tightly.
(knob screws packed in the accessory part)
222
Clamp connect-caniClamp connect-caniClamp connect-cani
Knob screwKnob screwKnob screw
Fit the bean hopper into hole of the bean hopper holder as gure.Fit the bean hopper into hole of the bean hopper holder as gure.
Turn the bean hopper connecting pipe anticlockwise to x it.Turn the bean hopper connecting pipe anticlockwise to x it.
The bean hopper connecting pipe anticlockwise to x it. The bean hopper connecting pipe anticlockwise to x it.
Fit the bean hopper into hole of the bean hopper holder as gure.
Turn the bean hopper connecting pipe anticlockwise to x it.
The bean hopper connecting pipe anticlockwise to x it.
333
Fit the bean baeplate into the bean hopper hole Fit the bean baeplate into the bean hopper hole
and push the plate completely to get the bean outlet open and push the plate completely to get the bean outlet open
When do not push the place completely, the bean is not able to be supplied to When do not push the place completely, the bean is not able to be supplied to
grinder, which cause trouble in vending a cup. grinder, which cause trouble in vending a cup.
1 Close 2 Open 1 Close 2 Open
Fit the bean baeplate into the bean hopper hole
and push the plate completely to get the bean outlet open
When do not push the place completely, the bean is not able to be supplied to
grinder, which cause trouble in vending a cup.
1 Close 2 Open
444
Unlock the bean hopper lid with key.Unlock the bean hopper lid with key.
Fill the bean hopper with coee bean. After ll Fill the bean hopper with coee bean. After ll
out the hopper, close the lid and lock. out the hopper, close the lid and lock.
Be sure to use roasted whole bean only only, not pre-ground coee.Be sure to use roasted whole bean only only, not pre-ground coee.
Pre-ground coee cause trouble.Pre-ground coee cause trouble.
Recommend to use the Arabica Coee Bean for espresso and do not use.Recommend to use the Arabica Coee Bean for espresso and do not use.
over roasted bean. over roasted bean.
Unlock the bean hopper lid with key.
Fill the bean hopper with coee bean. After ll
out the hopper, close the lid and lock.
Be sure to use roasted whole bean only only, not pre-ground coee.
Pre-ground coee cause trouble.
Recommend to use the Arabica Coee Bean for espresso and do not use.
over roasted bean.
555

Iion-d PrauonIion-d PrauonIion-d Prauon
How to fit and fill powder canister.How to fit and fill powder canister.How to fit and fill powder canister.
Lift the canister up slightly and pull front part of canister toward user.Lift the canister up slightly and pull front part of canister toward user.
Remove any wetness inside of canister perfectly to prevent ingredients from being solid. Remove any wetness inside of canister perfectly to prevent ingredients from being solid.
Then put ingredients into canisters. Then put ingredients into canisters.
Lift the canister up slightly and pull front part of canister toward user.
Remove any wetness inside of canister perfectly to prevent ingredients from being solid.
Then put ingredients into canisters.
111
Fill canisters with toppings correctly and close canister lid.Fill canisters with toppings correctly and close canister lid.
When lling up ingredients, be sure to rotate the ingredient dispense guide so that itWhen lling up ingredients, be sure to rotate the ingredient dispense guide so that it
points up (loading position). points up (loading position).
And slide canister backward and hold it carefully to prevent spilling. And slide canister backward and hold it carefully to prevent spilling.
When lling up ingredients, do not tamp the ingredient.When lling up ingredients, do not tamp the ingredient.
It might cause ingredient being solid and blocking ingredients outlet. It might cause ingredient being solid and blocking ingredients outlet.
Fill canisters with toppings correctly and close canister lid.
When lling up ingredients, be sure to rotate the ingredient dispense guide so that it
points up (loading position).
And slide canister backward and hold it carefully to prevent spilling.
When lling up ingredients, do not tamp the ingredient.
It might cause ingredient being solid and blocking ingredients outlet.
222
Fit the xing hole of canister into the rotation shaft correctly asFit the xing hole of canister into the rotation shaft correctly as
shown.shown.
Be sure to check label on canister and panel if each canister is tted to the correct Be sure to check label on canister and panel if each canister is tted to the correct
position . position .
Fit the xing hole of canister into the rotation shaft correctly as
shown.
Be sure to check label on canister and panel if each canister is tted to the correct
position .
333
Fit the jut in bottom of canisters into panel hole correctly.Fit the jut in bottom of canisters into panel hole correctly.Fit the jut in bottom of canisters into panel hole correctly.
444
Fit the bean hopper into panel then place the ingredientFit the bean hopper into panel then place the ingredient
dispense guide as shown in gure. dispense guide as shown in gure.
Fit the bean hopper into panel then place the ingredient
dispense guide as shown in gure.
555
Rotation ShaftRotation ShaftRotation Shaft
Rotation ShaftRotation ShaftRotation Shaft
Project PartProject PartProject Part
Panel GroovePanel GroovePanel Groove
111222333
Canister CapacityCanister CapacityCanister Capacity
6
ChocolateChocolateChocolate CreamCreamCream SugarSugarSugar BeanBeanBean
13,00g13,00g13,00g 10,80g10,80g10,80g 18,50g18,50g18,50g 12,00g12,00g12,00g

Iion d PrauonIion d PrauonIion d Prauon
How to connect How to connect
water supply hose water supply hose
& test working& test working
How to connect
water supply hose
& test working
Clean the machine. Clean the machine.
Place the machine on a at level.Place the machine on a at level.
If it is not leveled, it might cause noise.If it is not leveled, it might cause noise.
Space of 15cm from wall is required when install.Space of 15cm from wall is required when install.
Clean the machine.
Place the machine on a at level.
If it is not leveled, it might cause noise.
Space of 15cm from wall is required when install.
111
Connect water supply hoseConnect water supply hose
Connect Water tap with water supply (Tefron) hose at machine rear sideConnect Water tap with water supply (Tefron) hose at machine rear side
(water supply hose is the left side at machine rear side.) and(water supply hose is the left side at machine rear side.) and
Connect 1/4inch (Tefron) hose set and fasten tightly.Connect 1/4inch (Tefron) hose set and fasten tightly.
Connect water supply hose
Connect Water tap with water supply (Tefron) hose at machine rear side
(water supply hose is the left side at machine rear side.) and
Connect 1/4inch (Tefron) hose set and fasten tightly.
222
Connect drain hoseConnect drain hose
1. Drain Bottle should be installed below side of machine.1. Drain Bottle should be installed below side of machine.
2. Adjust the length of drain hose properly to let. 2. Adjust the length of drain hose properly to let.
the drain hose 5~10cm below from the top of the bottle. the drain hose 5~10cm below from the top of the bottle.
It the hose and drain bottle is not installed incorrectly, it might cause It the hose and drain bottle is not installed incorrectly, it might cause
water back ow into machine. water back ow into machine.
If the drain hose would be bent, it might cause water back ow. If the drain hose would be bent, it might cause water back ow.
Connect drain hose
1. Drain Bottle should be installed below side of machine.
2. Adjust the length of drain hose properly to let.
the drain hose 5~10cm below from the top of the bottle.
It the hose and drain bottle is not installed incorrectly, it might cause
water back ow into machine.
If the drain hose would be bent, it might cause water back ow.
Fill the powder canisters with each product, such asFill the powder canisters with each product, such as
choco, cream, sugar, coee bean.choco, cream, sugar, coee bean.
* After lling, install the grinder as instructed at page 8.* After lling, install the grinder as instructed at page 8.
* Please refer to page 5~6 to ll the canisters.* Please refer to page 5~6 to ll the canisters.
Fill the powder canisters with each product, such as
choco, cream, sugar, coee bean.
* After lling, install the grinder as instructed at page 8.
* Please refer to page 5~6 to ll the canisters.
333
Be sure to plug in its own grounded electrical outlet. Be sure to plug in its own grounded electrical outlet.
Turn on power switch at the right side of machine.Turn on power switch at the right side of machine.
(1) Machine works to supply water to water tank and heater tank.(1) Machine works to supply water to water tank and heater tank.
(2) When nish heating, the machine is at standby condition.(2) When nish heating, the machine is at standby condition.
Be sure to plug in its own grounded electrical outlet.
Turn on power switch at the right side of machine.
(1) Machine works to supply water to water tank and heater tank.
(2) When nish heating, the machine is at standby condition.
444
7
Depending on the water used might cause calcication inside of Depending on the water used might cause calcication inside of
internal components.internal components.
Recommended to check it in every 6 months to prevent any Recommended to check it in every 6 months to prevent any
problem in machine working.problem in machine working.
Be sure to use water ltered by UF Membrane lter.Be sure to use water ltered by UF Membrane lter.
Depending on the water used might cause calcication inside of
internal components.
Recommended to check it in every 6 months to prevent any
problem in machine working.
Be sure to use water ltered by UF Membrane lter.
Water Water
supply supply
hosehose
Water
supply
hose
Drain ConnectorDrain ConnectorDrain Connector
Drain HoseDrain HoseDrain Hose
Drain BucketDrain BucketDrain Bucket
5~10cm5~10cm5~10cm
Insert coins and then press drink button to select. Insert coins and then press drink button to select.
When LCD screen displays "Enjoy a cup!", take out the cupWhen LCD screen displays "Enjoy a cup!", take out the cup
Insert coins and then press drink button to select.
When LCD screen displays "Enjoy a cup!", take out the cup
555

Iion-adjt Iion-adjt
be grd lebe grd le
Iion-adjt
be grd le
How to adjust coffee bean grind levelHow to adjust coffee bean grind levelHow to adjust coffee bean grind level
Able to adjust the level by rotating the worm level Able to adjust the level by rotating the worm level
equipped in the upside of grinder.equipped in the upside of grinder.
The grind level is veried from 1 to 7 level and factory setting level is 4.The grind level is veried from 1 to 7 level and factory setting level is 4.
If set at too ne or too coarse level, it might cause trouble in extracting espresso. If set at too ne or too coarse level, it might cause trouble in extracting espresso.
Recommend to set at from 3 to 5 level. Recommend to set at from 3 to 5 level.
Able to adjust the level by rotating the worm level
equipped in the upside of grinder.
The grind level is veried from 1 to 7 level and factory setting level is 4.
If set at too ne or too coarse level, it might cause trouble in extracting espresso.
Recommend to set at from 3 to 5 level.
111
8
CoarseCoarseCoarse
FineFineFine
worm worm
lvevellvevel
worm
lvevel
How to install GrinderHow to install GrinderHow to install Grinder
1. Press the mode button inside of front door.1. Press the mode button inside of front door.
2. Press the mode button 6 times then Bean Volume Test displayed on LCD.2. Press the mode button 6 times then Bean Volume Test displayed on LCD.
*Refer to Bean Volume Test. *Refer to Bean Volume Test.
3. Press any menu button 2 or 3 times to test bean and to ll the grinder with ground bean.3. Press any menu button 2 or 3 times to test bean and to ll the grinder with ground bean.
1. Press the mode button inside of front door.
2. Press the mode button 6 times then Bean Volume Test displayed on LCD.
*Refer to Bean Volume Test.
3. Press any menu button 2 or 3 times to test bean and to ll the grinder with ground bean.
Tips when the bean chute is blockedTips when the bean chute is blockedTips when the bean chute is blocked
1. remove the bean chute by turning it.1. remove the bean chute by turning it.
2. remove any impurities inside of grinder with small brush.2. remove any impurities inside of grinder with small brush.
3. t the bean chute then do the above instruction, install grinder.3. t the bean chute then do the above instruction, install grinder.
1. remove the bean chute by turning it.
2. remove any impurities inside of grinder with small brush.
3. t the bean chute then do the above instruction, install grinder.
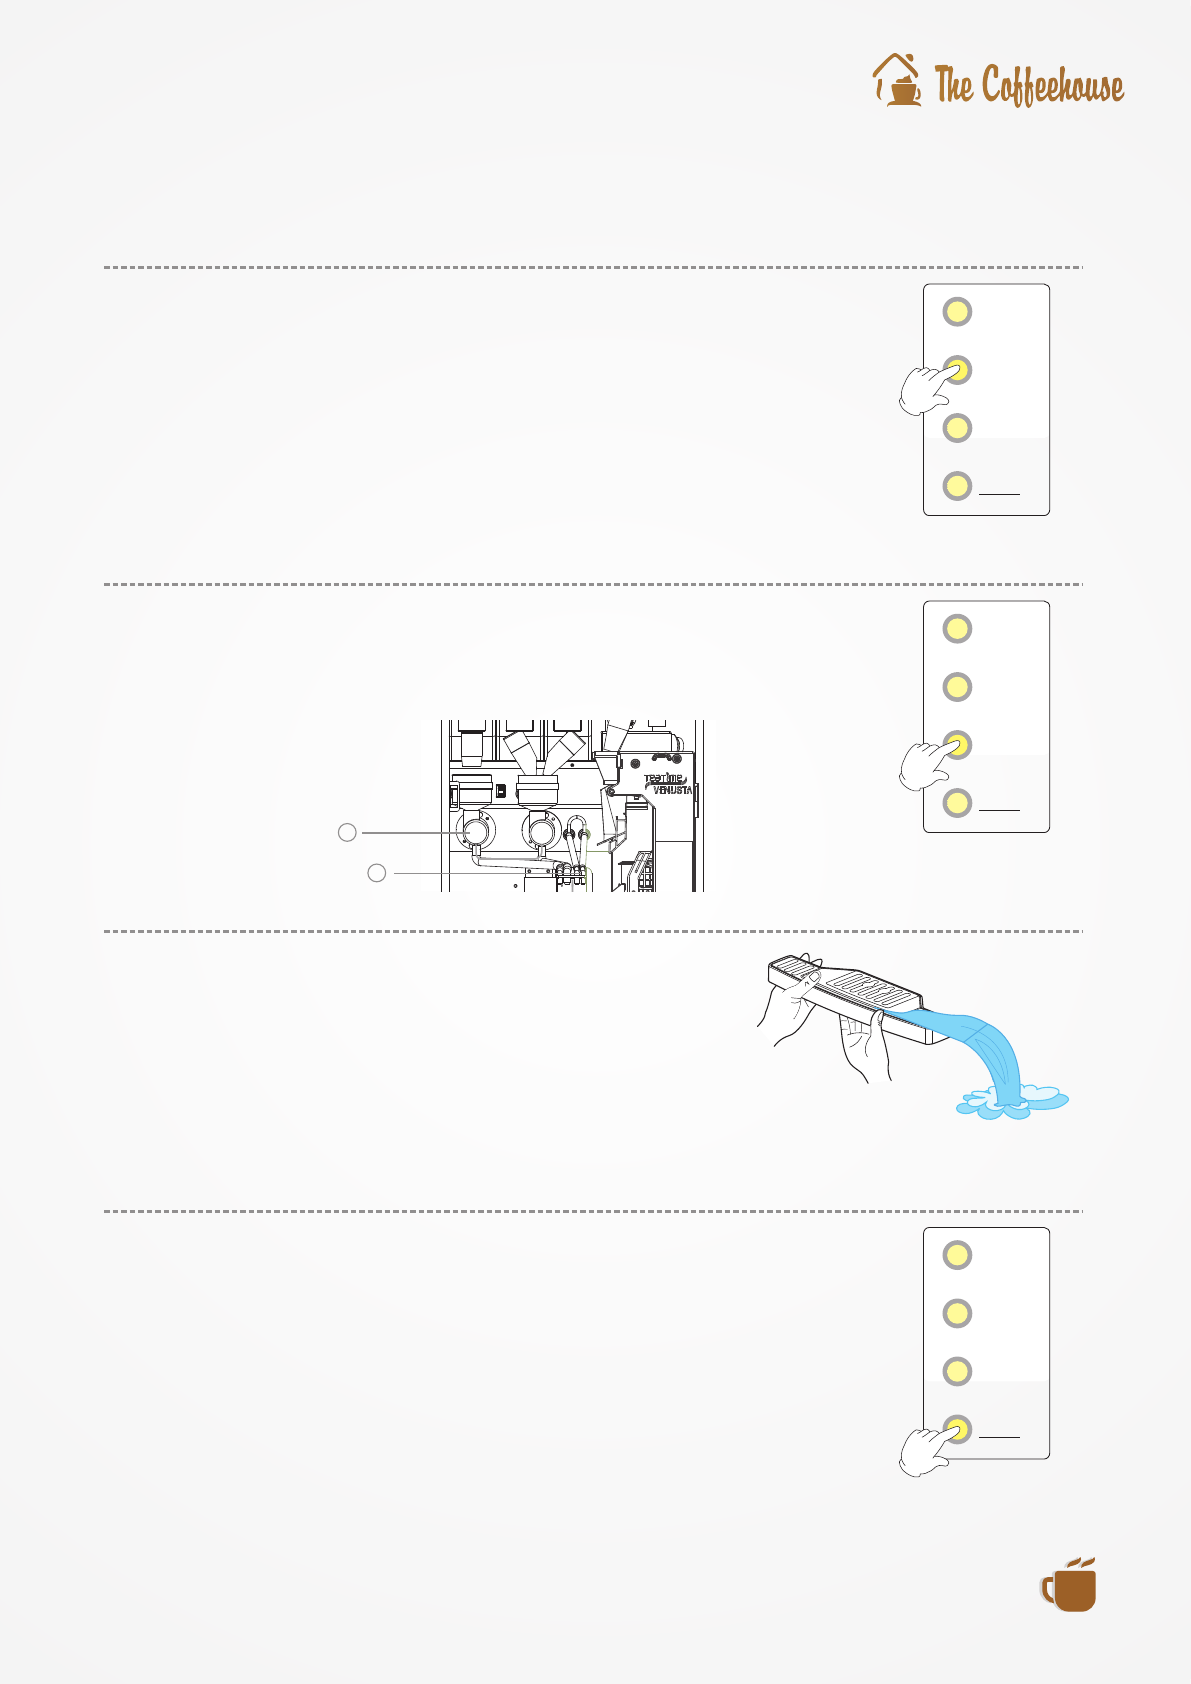
Reset BrewerReset BrewerReset Brewer
A function to get brewer to standby condition.A function to get brewer to standby condition.
Press the brewer reset button inside of front door then brewer moves Press the brewer reset button inside of front door then brewer moves
to standby mode position. to standby mode position.
Brewer excursion error is due to brewer motor or some demage in circuit. Brewer excursion error is due to brewer motor or some demage in circuit.
When this message is displayed in LCD, need to call authorized local When this message is displayed in LCD, need to call authorized local
A/S service team. A/S service team.
A function to get brewer to standby condition.
Press the brewer reset button inside of front door then brewer moves
to standby mode position.
Brewer excursion error is due to brewer motor or some demage in circuit.
When this message is displayed in LCD, need to call authorized local
A/S service team.
111
9
SettingSettingSetting
BrewerBrewer
ResetReset
Brewer
Reset
CleanCleanClean
Clean the internal Components automaticallyClean the internal Components automaticallyClean the internal Components automatically
Press the button 1 time : clean brewerPress the button 1 time : clean brewer
Press the button 2 time : clean mixing bowl of (1) Press the button 2 time : clean mixing bowl of (1)
Press the button 3 time : clean mixing bowl of (2) Press the button 3 time : clean mixing bowl of (2)
Press the button log time once : clean the water circuit in turns Press the button log time once : clean the water circuit in turns
Press the button 1 time : clean brewer
Press the button 2 time : clean mixing bowl of (1)
Press the button 3 time : clean mixing bowl of (2)
Press the button log time once : clean the water circuit in turns
111
Mixing bowlMixing bowlMixing bowl 111
Mixing bowlMixing bowlMixing bowl 222
Empty the drip tray.Empty the drip tray.
During cleaning be cautions at the owing hot water through During cleaning be cautions at the owing hot water through
dispense nozzle dispense nozzle
After cleaning be sure to empty the drip tray. After cleaning be sure to empty the drip tray.
Empty the drip tray.
During cleaning be cautions at the owing hot water through
dispense nozzle
After cleaning be sure to empty the drip tray.
222
Water SupplyWater SupplyWater Supply
Press the water supply button inside of front door then Press the water supply button inside of front door then
water is supplied to water reservoir. water is supplied to water reservoir.
Water will be fed to the reservoir until the upper water level Water will be fed to the reservoir until the upper water level
sensor in the reservoir is reset.sensor in the reservoir is reset.
At condition of standby mode, water is supplied at every 5 minutes automatically. At condition of standby mode, water is supplied at every 5 minutes automatically.
Press the water supply button inside of front door then
water is supplied to water reservoir.
Water will be fed to the reservoir until the upper water level
sensor in the reservoir is reset.
At condition of standby mode, water is supplied at every 5 minutes automatically.
111
SettingSettingSetting
BrewerBrewer
ResetReset
Brewer
Reset
CleanCleanClean
WaterWaterWater
SupplySupplySupply
ResetResetReset
WaterWaterWater
SupplySupplySupply
ResetResetReset
SettingSettingSetting
BrewerBrewer
ResetReset
Brewer
Reset
CleanCleanClean
WaterWaterWater
SupplySupplySupply
ResetResetReset

Alarming Empty Waste BoxAlarming Empty Waste BoxAlarming Empty Waste Box
When counter set in advanced to alarm the full of waste box by coee reach When counter set in advanced to alarm the full of waste box by coee reach
to the preset count. to the preset count.
LCD screen will display Empty Waster Box by ickering. LCD screen will display Empty Waster Box by ickering.
Machine will stop vending of all products using roasted whole Machine will stop vending of all products using roasted whole
bean when this alarming message is displayed on LCD bean when this alarming message is displayed on LCD
(Menu button will be o.) (Menu button will be o.)
Empty the waste box then press the setting buttonEmpty the waste box then press the setting button
inside of front door for 2seconds more to reset the counter set. inside of front door for 2seconds more to reset the counter set.
When counter set in advanced to alarm the full of waste box by coee reach
to the preset count.
LCD screen will display Empty Waster Box by ickering.
Machine will stop vending of all products using roasted whole
bean when this alarming message is displayed on LCD
(Menu button will be o.)
Empty the waste box then press the setting button
inside of front door for 2seconds more to reset the counter set.
10
Empty Waste boxEmpty Waste boxEmpty Waste box
SettingSettingSetting
BrewerBrewer
ResetReset
Brewer
Reset
Alarming Empty Waste out of drip trayAlarming Empty Waste out of drip trayAlarming Empty Waste out of drip tray
When the drip tray is full of coee dregs and water,When the drip tray is full of coee dregs and water,
the machine will be stop. the machine will be stop.
Empty water out of drip tray will be displayed on the LCD screen. Empty water out of drip tray will be displayed on the LCD screen.
Take the drip tray out and clean it up.Take the drip tray out and clean it up.
After that, install it again on the machine. After that, install it again on the machine.
When the drip tray is full of coee dregs and water,
the machine will be stop.
Empty water out of drip tray will be displayed on the LCD screen.
Take the drip tray out and clean it up.
After that, install it again on the machine.
EmptyEmpty
Waste outWaste out
of drip trayof drip tray
Empty
Waste out
of drip tray

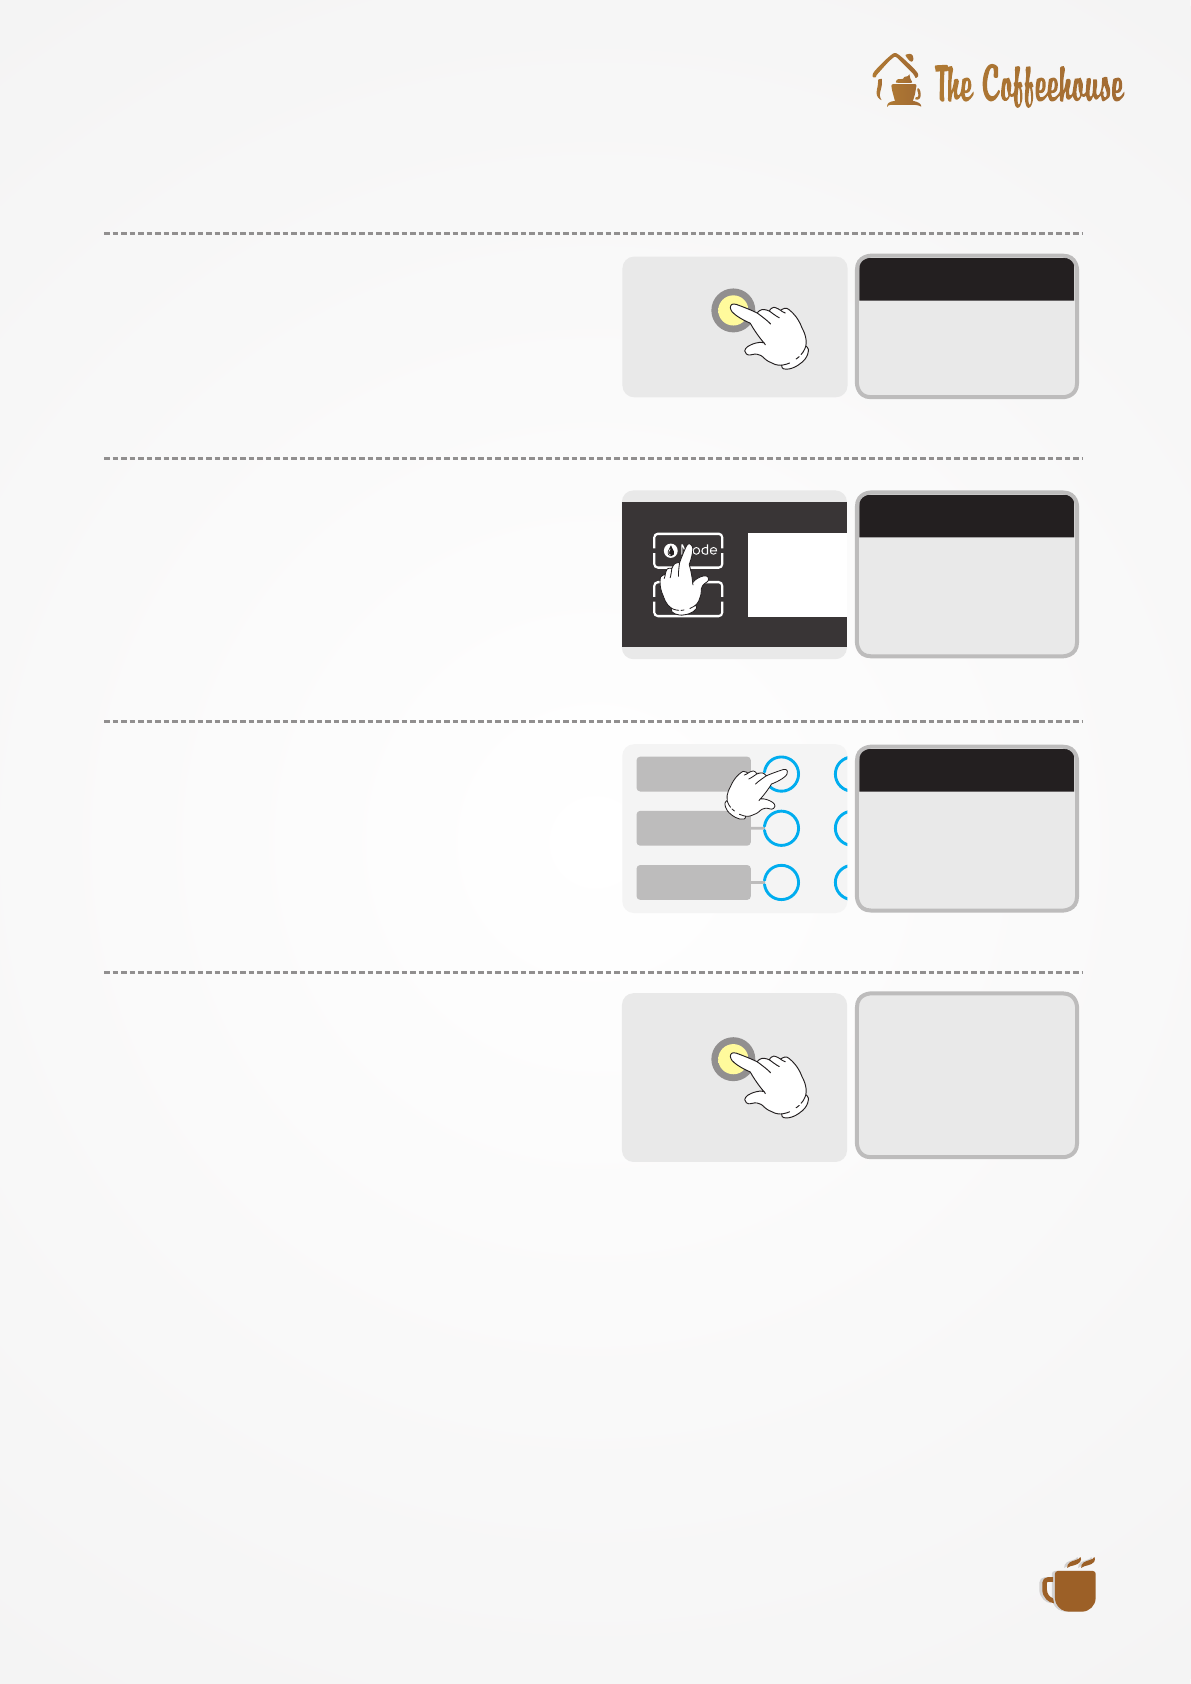
S beverage voleS beverage voleS beverage vole
Press the setting button inside of front door.Press the setting button inside of front door.Press the setting button inside of front door.
111
Press the Mode Button in Front Press the Mode Button in Front
Panel 1 time.Panel 1 time.
You can nd how to set small cup size.You can nd how to set small cup size.
Press the Mode Button in Front
Panel 1 time.
You can nd how to set small cup size.
222
Press the drink button to adjust volumePress the drink button to adjust volume
Ex) When adjust Americano (Black Coee),Ex) When adjust Americano (Black Coee),
press Americano (Black Coee) button. press Americano (Black Coee) button.
can adjust each product and water volume. can adjust each product and water volume.
Press the drink button to adjust volume
Ex) When adjust Americano (Black Coee),
press Americano (Black Coee) button.
can adjust each product and water volume.
333
Press small(+)/Large(-) buttonPress small(+)/Large(-) button
in the front panel to adjust.in the front panel to adjust.
To go next item, press tab button. To go next item, press tab button.
Press small(+)/Large(-) button
in the front panel to adjust.
To go next item, press tab button.
444
After setting, press the setting After setting, press the setting
button inside of front panel.button inside of front panel.
Then the adjusted setting value will Then the adjusted setting value will
be stored with beep sound.be stored with beep sound.
After setting, press the setting
button inside of front panel.
Then the adjusted setting value will
be stored with beep sound.
555
11
SettingSettingSetting
Set ModeSet ModeSet Mode
Press Mode ButtonPress Mode ButtonPress Mode Button
Ingredient volumeIngredient volumeIngredient volume
SmallSmall
Select drink buttonSelect drink button
to adjustto adjust
Small
Select drink button
to adjust
AmericanoAmericanoAmericano
CappuccinoCappuccinoCappuccino
Café latteCafé latteCafé latte
(Black Coee)(Black Coee)(Black Coee) Ingredient volumeIngredient volumeIngredient volume
Small (button No 1)Small (button No 1)
bean: 10.3secbean: 10.3sec
water: 2.5ozwater: 2.5oz
Small (button No 1)
bean: 10.3sec
water: 2.5oz
LargeLargeLarge
Ingredient volumeIngredient volumeIngredient volume
Small (button No 1)Small (button No 1)
bean: 10.5secbean: 10.5sec
water: 2.5ozwater: 2.5oz
Small (button No 1)
bean: 10.5sec
water: 2.5oz
SettingSettingSetting
Refresh Time withRefresh Time with
Premium CoeePremium Coee
Select Drink buttonSelect Drink button
Refresh Time with
Premium Coee
Select Drink button

S beverage voleS beverage voleS beverage vole
Press the setting button inside of front door.Press the setting button inside of front door.Press the setting button inside of front door.
111
Press the Mode Button in Front Press the Mode Button in Front
Panel 2 time.Panel 2 time.
You can nd how to set Largel cup size.You can nd how to set Largel cup size.
Press the Mode Button in Front
Panel 2 time.
You can nd how to set Largel cup size.
222
Press the drink button to adjust volumePress the drink button to adjust volume
Ex) When adjust Americano (Black Coee),Ex) When adjust Americano (Black Coee),
press Americano (Black Coee) button. press Americano (Black Coee) button.
can adjust each product and water volume. can adjust each product and water volume.
Press the drink button to adjust volume
Ex) When adjust Americano (Black Coee),
press Americano (Black Coee) button.
can adjust each product and water volume.
333
Press small(+)/Large(-) buttonPress small(+)/Large(-) button
in the front panel to adjust.in the front panel to adjust.
To go next item, press tab button. To go next item, press tab button.
Press small(+)/Large(-) button
in the front panel to adjust.
To go next item, press tab button.
444
After setting, press the setting After setting, press the setting
button inside of front panel.button inside of front panel.
Then the adjusted setting value will Then the adjusted setting value will
be stored with beep sound.be stored with beep sound.
After setting, press the setting
button inside of front panel.
Then the adjusted setting value will
be stored with beep sound.
555
12
SettingSettingSetting
Set ModeSet ModeSet Mode
Press Mode ButtonPress Mode ButtonPress Mode Button
Ingredient volumeIngredient volumeIngredient volume
LargeLarge
Select drink buttonSelect drink button
to adjustto adjust
Large
Select drink button
to adjust
AmericanoAmericanoAmericano
CappuccinoCappuccinoCappuccino
Café latteCafé latteCafé latte
(Black Coee)(Black Coee)(Black Coee) Ingredient volumeIngredient volumeIngredient volume
Small (button No 1)Small (button No 1)
bean: 10.3secbean: 10.3sec
water: 2.5ozwater: 2.5oz
Small (button No 1)
bean: 10.3sec
water: 2.5oz
LargeLargeLarge
Ingredient volumeIngredient volumeIngredient volume
Small (button No 1)Small (button No 1)
bean: 10.5secbean: 10.5sec
water: 2.5ozwater: 2.5oz
Small (button No 1)
bean: 10.5sec
water: 2.5oz
SettingSettingSetting
Refresh Time withRefresh Time with
Premium CoeePremium Coee
Select Drink buttonSelect Drink button
Refresh Time with
Premium Coee
Select Drink button

Pri SngPri SngPri Sng
Press the setting button inside of front door.Press the setting button inside of front door.Press the setting button inside of front door.
111
Press the Mode Button in Front Press the Mode Button in Front
Panel 3 time.Panel 3 time.
You can nd how to set Small cup size.You can nd how to set Small cup size.
Press the Mode Button in Front
Panel 3 time.
You can nd how to set Small cup size.
222
Press the drink button to set price.Press the drink button to set price.
Ex) When adjust Americano (Black Coee)Ex) When adjust Americano (Black Coee)
Press the drink button to set price.
Ex) When adjust Americano (Black Coee)
333
Adjust the price with the Small(+)/Adjust the price with the Small(+)/
Large (-) button. Large (-) button.
Adjust the price with the Small(+)/
Large (-) button.
444
After setting, press the setting After setting, press the setting
button inside of front panel.button inside of front panel.
Then the adjusted setting value will Then the adjusted setting value will
be stored with beep sound.be stored with beep sound.
At standby condition, press a menu button then At standby condition, press a menu button then
LCD displays the set price. LCD displays the set price.
After setting, press the setting
button inside of front panel.
Then the adjusted setting value will
be stored with beep sound.
At standby condition, press a menu button then
LCD displays the set price.
555
13
SettingSettingSetting
Set ModeSet ModeSet Mode
Press Mode ButtonPress Mode ButtonPress Mode Button
AmericanoAmericanoAmericano
CappuccinoCappuccinoCappuccino
Café latteCafé latteCafé latte
(Black Coee)(Black Coee)(Black Coee) Button No 1 : 0.25Button No 1 : 0.25
Set with Small (+)Set with Small (+)
Large(-) buttonLarge(-) button
Button No 1 : 0.25
Set with Small (+)
Large(-) button
LargeLargeLarge
SettingSettingSetting
Refresh Time withRefresh Time with
Premium CoeePremium Coee
Insert MoneyInsert Money
Refresh Time with
Premium Coee
Insert Money
This price setting is applied to the model with coin mechanism only.This price setting is applied to the model with coin mechanism only.
for the mode without the coin mechanism, make sure to set the vending price at free (0).for the mode without the coin mechanism, make sure to set the vending price at free (0).
This price setting is applied to the model with coin mechanism only.
for the mode without the coin mechanism, make sure to set the vending price at free (0).
Set Price (Small)Set Price (Small)Set Price (Small)
Select drink buttonSelect drink button
to adjustto adjust
Select drink button
to adjust
Button No 1 : 0.50Button No 1 : 0.50
Set with Small (+)Set with Small (+)
Large(-) buttonLarge(-) button
Button No 1 : 0.50
Set with Small (+)
Large(-) button

Pri SngPri SngPri Sng
Press the setting button inside of front door.Press the setting button inside of front door.Press the setting button inside of front door.
111
Press the Mode Button in Front Press the Mode Button in Front
Panel 4 time.Panel 4 time.
You can nd how to set Small cup size.You can nd how to set Small cup size.
Press the Mode Button in Front
Panel 4 time.
You can nd how to set Small cup size.
222
Press the Menu button to set price.Press the Menu button to set price.
Ex) When adjust Americano (Black Coee)Ex) When adjust Americano (Black Coee)
Press the Menu button to set price.
Ex) When adjust Americano (Black Coee)
333
Adjust the price with the Small(+)/Adjust the price with the Small(+)/
Large (-) button. Large (-) button.
Adjust the price with the Small(+)/
Large (-) button.
444
After setting, press the setting After setting, press the setting
button inside of front panel.button inside of front panel.
Then the adjusted setting value will Then the adjusted setting value will
be stored with beep sound.be stored with beep sound.
At standby condition, press a menu button then At standby condition, press a menu button then
LCD displays the set price. LCD displays the set price.
After setting, press the setting
button inside of front panel.
Then the adjusted setting value will
be stored with beep sound.
At standby condition, press a menu button then
LCD displays the set price.
555
14
SettingSettingSetting
Set ModeSet ModeSet Mode
Press Mode ButtonPress Mode ButtonPress Mode Button
AmericanoAmericanoAmericano
CappuccinoCappuccinoCappuccino
Café latteCafé latteCafé latte
(Black Coee)(Black Coee)(Black Coee) Button No 1 : 0.25Button No 1 : 0.25
Set with Small (+)Set with Small (+)
Large(-) buttonLarge(-) button
Button No 1 : 0.25
Set with Small (+)
Large(-) button
LargeLargeLarge
SettingSettingSetting
Refresh Time withRefresh Time with
Premium CoeePremium Coee
Insert MoneyInsert Money
Refresh Time with
Premium Coee
Insert Money
This price setting is applied to the model with coin mechanism only.This price setting is applied to the model with coin mechanism only.
for the mode without the coin mechanism, make sure to set the vending price at free (0).for the mode without the coin mechanism, make sure to set the vending price at free (0).
This price setting is applied to the model with coin mechanism only.
for the mode without the coin mechanism, make sure to set the vending price at free (0).
Set Price (Large)Set Price (Large)Set Price (Large)
Select drink buttonSelect drink button
to adjustto adjust
Select drink button
to adjust
Button No 1 : 0.50Button No 1 : 0.50
Set with Small (+)Set with Small (+)
Large(-) buttonLarge(-) button
Button No 1 : 0.50
Set with Small (+)
Large(-) button

Hot wr Tempere SngHot wr Tempere SngHot wr Tempere Sng
Press the setting button inside of front door.Press the setting button inside of front door.Press the setting button inside of front door.
111
Press the Mode Button in Front Press the Mode Button in Front
Panel 5 time.Panel 5 time.
Press the Mode Button in Front
Panel 5 time.
222
Adjust hot water temperatureAdjust hot water temperature
with the Small (+)/Large(-) button.with the Small (+)/Large(-) button.
Setting temperature range: 60~98 CSetting temperature range: 60~98 C°°
Adjust hot water temperature
with the Small (+)/Large(-) button.
Setting temperature range: 60~98 C°
333
After setting, press the setting After setting, press the setting
button inside of front panel.button inside of front panel.
Then the adjusted setting value will Then the adjusted setting value will
be stored with beep sound.be stored with beep sound.
After setting, press the setting
button inside of front panel.
Then the adjusted setting value will
be stored with beep sound.
444
15
SettingSettingSetting
Set ModeSet ModeSet Mode
Press Mode ButtonPress Mode ButtonPress Mode Button
LargeLargeLarge
SettingSettingSetting
Refresh Time withRefresh Time with
Premium CoeePremium Coee
Insert MoneyInsert Money
Refresh Time with
Premium Coee
Insert Money
Set Hotwater Temp.Set Hotwater Temp.Set Hotwater Temp.
With the small(+),With the small(+),
Large(-) buttonLarge(-) button
H.W. Temp: 98°CH.W. Temp: 98°C
With the small(+),
Large(-) button
H.W. Temp: 98°C
Button No 1 : 0.50Button No 1 : 0.50
Set with Small (+)Set with Small (+)
Large(-) buttonLarge(-) button
Button No 1 : 0.50
Set with Small (+)
Large(-) button

t Cupt Cupt Cup
Press the setting button inside of front door.Press the setting button inside of front door.Press the setting button inside of front door.
111
Press the Mode Button in Front Press the Mode Button in Front
Panel 6 time.Panel 6 time.
Press the Mode Button in Front
Panel 6 time.
222
Press a Menu button to count.Press a Menu button to count.
Ex) When adjust Americano (Black Coee).Ex) When adjust Americano (Black Coee).
Count free or paid cup per each menu is available.Count free or paid cup per each menu is available.
Press a Menu button to count.
Ex) When adjust Americano (Black Coee).
Count free or paid cup per each menu is available.
333
Press Tab button to check Press Tab button to check
the total free/paid cup.the total free/paid cup.
Press Tab button to check
the total free/paid cup.
444
After counting, press the setting After counting, press the setting
button inside of front panel.button inside of front panel.
Then return to standby modeThen return to standby mode
with beep sound.with beep sound.
After counting, press the setting
button inside of front panel.
Then return to standby mode
with beep sound.
555
16
SettingSettingSetting
Set ModeSet ModeSet Mode
Press Mode ButtonPress Mode ButtonPress Mode Button
AmericanoAmericanoAmericano
CappuccinoCappuccinoCappuccino
Café latteCafé latteCafé latte
(Black Coee)(Black Coee)(Black Coee) Button No 1 : 2Button No 1 : 2
Paid : 2Paid : 2
Amount : 0.50Amount : 0.50
Free : .....................0Free : .....................0
Button No 1 : 2
Paid : 2
Amount : 0.50
Free : .....................0
TabTabTab
SettingSettingSetting
Refresh Time withRefresh Time with
Premium CoeePremium Coee
Insert MoneyInsert Money
Refresh Time with
Premium Coee
Insert Money
Count Vend cupCount Vend cupCount Vend cup
Select drink buttonSelect drink button
to countto count
Select drink button
to count
Total : 10Total : 10
Paid : 2Paid : 2
Amount : 0.50Amount : 0.50
Free 0Free 0
Total : 10
Paid : 2
Amount : 0.50
Free 0
ModeModeMode
MMM
Vend TtVend TtVend Tt
Press the setting button inside of front door.Press the setting button inside of front door.Press the setting button inside of front door.
111
Press the Mode Button in Front Press the Mode Button in Front
Panel 7 time.Panel 7 time.
Press the Mode Button in Front
Panel 7 time.
222
Choose the cup size which is willing to test.Choose the cup size which is willing to test.
Press the menu button to test.Press the menu button to test.
Ex) When press the Americano (Black Coee) buttonEx) When press the Americano (Black Coee) button
after choosing small cup size.after choosing small cup size.
Choose the cup size which is willing to test.
Press the menu button to test.
Ex) When press the Americano (Black Coee) button
after choosing small cup size.
333
After testing, press the setting After testing, press the setting
button inside of front panel.button inside of front panel.
Then return to standby modeThen return to standby mode
with beep sound.with beep sound.
After testing, press the setting
button inside of front panel.
Then return to standby mode
with beep sound.
444
17
SettingSettingSetting
Set ModeSet ModeSet Mode
Press Mode ButtonPress Mode ButtonPress Mode Button
AmericanoAmericanoAmericano
CappuccinoCappuccinoCappuccino
Café latteCafé latteCafé latte
(Black Coee)(Black Coee)(Black Coee)
Vend testVend testVend test
Select Cup buttonSelect Cup button
to adjustto adjust
Select Cup button
to adjust
Vend testVend testVend test
SmallSmall
Select Drink to testSelect Drink to test
Small
Select Drink to test
SettingSettingSetting
Refresh Time withRefresh Time with
Premium CoeePremium Coee
Insert MoneyInsert Money
Refresh Time with
Premium Coee
Insert Money
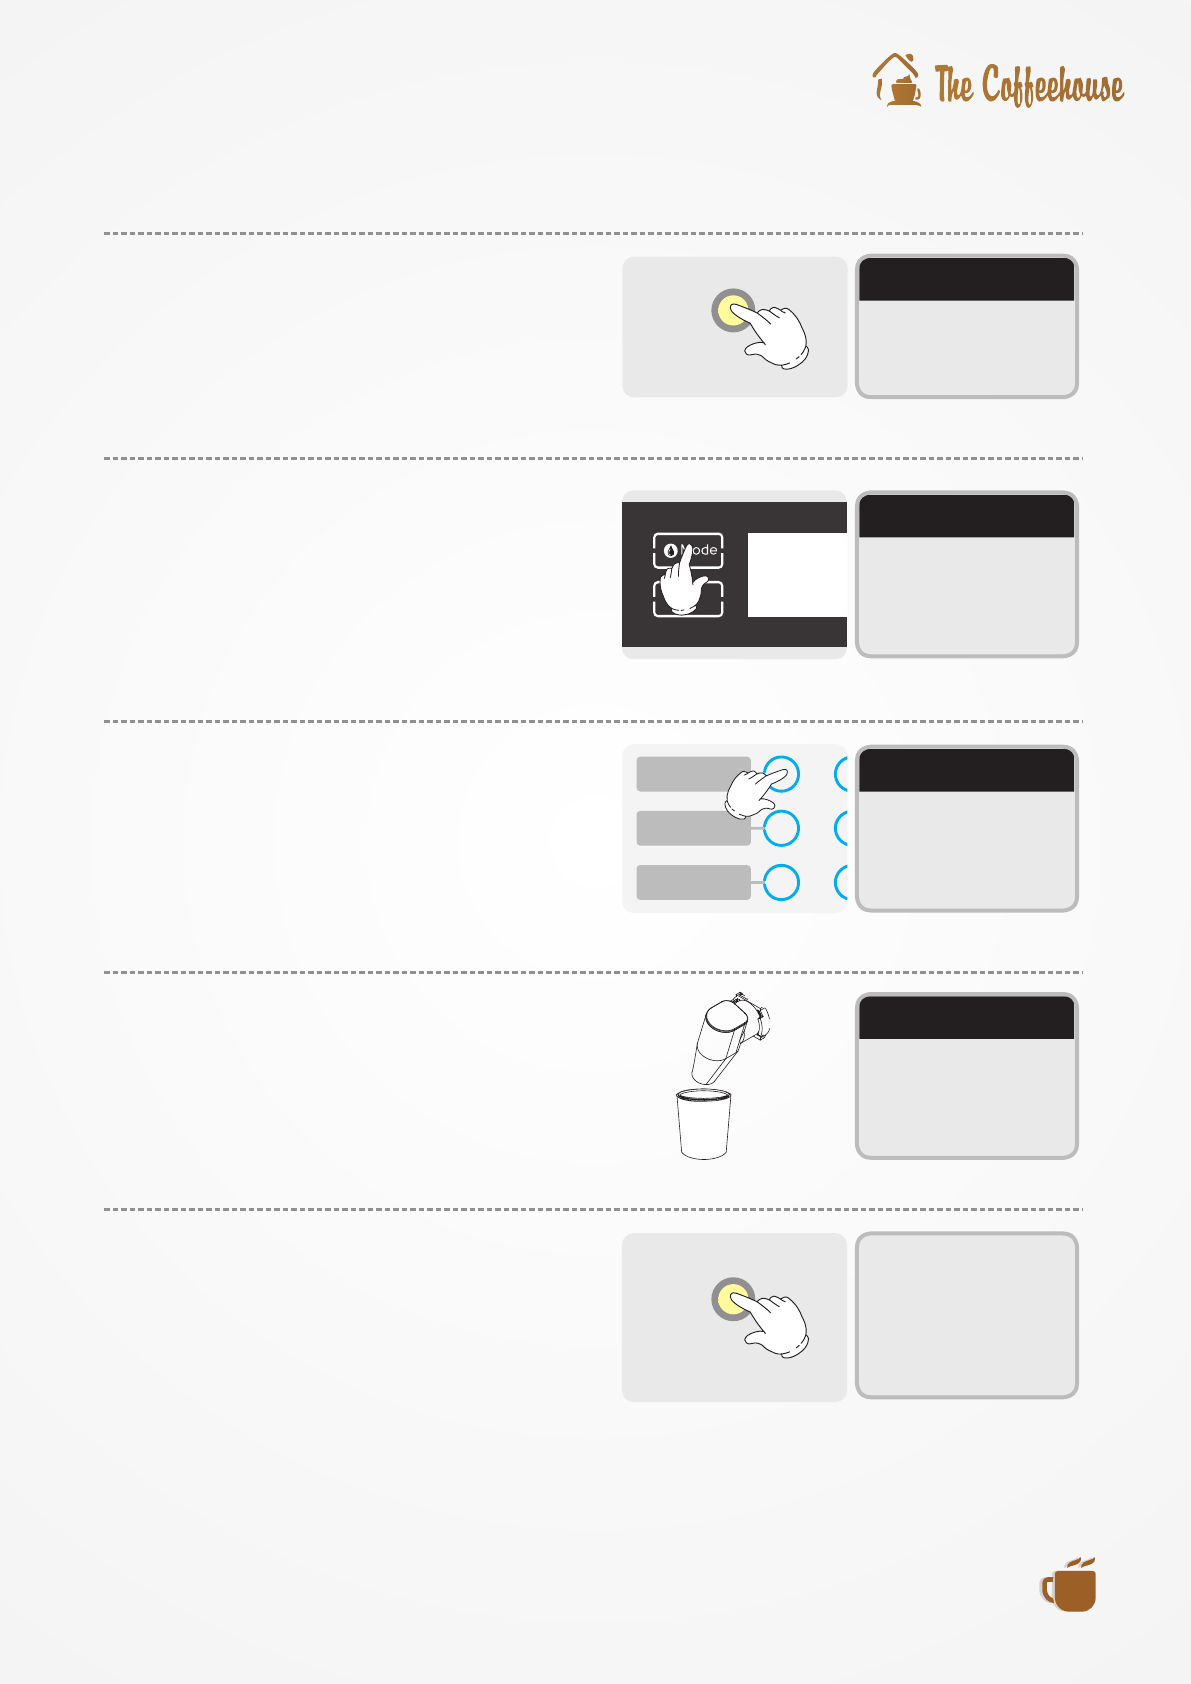
Be Vole TtBe Vole TtBe Vole Tt
Press the setting button inside of front door.Press the setting button inside of front door.Press the setting button inside of front door.
111
Press the Mode Button in Front Press the Mode Button in Front
Panel 8 time.Panel 8 time.
Press the Mode Button in Front
Panel 8 time.
222
Press a cup just below the bean Press a cup just below the bean
chute.chute.
Press the button of cup size which is Press the button of cup size which is
willing to test prior to choosing coee.willing to test prior to choosing coee.
Press a cup just below the bean
chute.
Press the button of cup size which is
willing to test prior to choosing coee.
333
Check the bean volume poured Check the bean volume poured
into cup.into cup.
Need to check if the bean volume is appropriate Need to check if the bean volume is appropriate
and when adjustment is necessary, and when adjustment is necessary,
adjust the bean volume. adjust the bean volume.
Check the bean volume poured
into cup.
Need to check if the bean volume is appropriate
and when adjustment is necessary,
adjust the bean volume.
444
After testing, press the setting After testing, press the setting
button inside of front panel.button inside of front panel.
Then return to standby modeThen return to standby mode
with beep sound.with beep sound.
After testing, press the setting
button inside of front panel.
Then return to standby mode
with beep sound.
555
18
SettingSettingSetting
Set ModeSet ModeSet Mode
Press Mode ButtonPress Mode ButtonPress Mode Button
AmericanoAmericanoAmericano
CappuccinoCappuccinoCappuccino
Café latteCafé latteCafé latte
(Black Coee)(Black Coee)(Black Coee)
SettingSettingSetting
Refresh Time withRefresh Time with
Premium CoeePremium Coee
Insert MoneyInsert Money
Refresh Time with
Premium Coee
Insert Money
Bean Volume TestBean Volume TestBean Volume Test
Select Cup buttonSelect Cup buttonSelect Cup button
to adjustto adjustto adjust
Remove brewerRemove brewerRemove brewer
Bean Volume TestBean Volume TestBean Volume Test
SmallSmallSmall
Select Drink buttonSelect Drink buttonSelect Drink button
to testto testto test
Remove brewerRemove brewerRemove brewer
Bean Volume TestBean Volume TestBean Volume Test
Select Drink buttonSelect Drink button
to testto test
Select Drink button
to test

Cup Seor SngCup Seor SngCup Seor Sng
Press the setting button inside of front door.Press the setting button inside of front door.Press the setting button inside of front door.
111
Press the Mode Button in Front Press the Mode Button in Front
Panel 9 time.Panel 9 time.
Press the Mode Button in Front
Panel 9 time.
222
Press the Small (+)/Large(-) button.Press the Small (+)/Large(-) button.
to activate the cup sensor.to activate the cup sensor.
Use : The sensor need to recognize the cup inUse : The sensor need to recognize the cup in
order to serve beverage. order to serve beverage.
Not use: Regardless of the sensing cup.Not use: Regardless of the sensing cup.
beverage will be served. beverage will be served.
Press the Small (+)/Large(-) button.
to activate the cup sensor.
Use : The sensor need to recognize the cup in
order to serve beverage.
Not use: Regardless of the sensing cup.
beverage will be served.
333
After setting, press the setting After setting, press the setting
button inside of front panel.button inside of front panel.
Then the adjusted setting value will Then the adjusted setting value will
be stored with beep sound.be stored with beep sound.
When the sensor is set at o, user shouldWhen the sensor is set at o, user should
place a cup at the station to get the beverage place a cup at the station to get the beverage
dispensed from the nozzle. dispensed from the nozzle.
After setting, press the setting
button inside of front panel.
Then the adjusted setting value will
be stored with beep sound.
When the sensor is set at o, user should
place a cup at the station to get the beverage
dispensed from the nozzle.
444
19
SettingSettingSetting
Set ModeSet ModeSet Mode
Press Mode ButtonPress Mode ButtonPress Mode Button
LargeLargeLarge
SettingSettingSetting
Refresh Time withRefresh Time with
Premium CoeePremium Coee
Insert MoneyInsert Money
Refresh Time with
Premium Coee
Insert Money
Set Cup SensorSet Cup SensorSet Cup Sensor
With the small(+),With the small(+),
Large(-) buttonLarge(-) button
Sensor : UseSensor : Use
With the small(+),
Large(-) button
Sensor : Use
Set Cup SensorSet Cup SensorSet Cup Sensor
With the small(+),With the small(+),
Large(-) buttonLarge(-) button
Sensor : Not UseSensor : Not Use
With the small(+),
Large(-) button
Sensor : Not Use
When water leaks from the nozzle pipe continously at standby condition. When water leaks from the nozzle pipe continously at standby condition. When water leaks from the nozzle pipe continously at standby condition.
It occurs when valve is blocked by such as It occurs when valve is blocked by such as
limescale build-up in it.limescale build-up in it.
Be sure to call authorised local A/S service team to checkBe sure to call authorised local A/S service team to check
and repair it. and repair it.
It occurs when valve is blocked by such as
limescale build-up in it.
Be sure to call authorised local A/S service team to check
and repair it.
Table of contents


