ThePondguy ClearVac Instruction Manual
ClearVac
Dual-Chamber Pond Vacuum
Installation & Maintenance Manual
(Item # 160192)
3 Year Warranty
8
™
18 19
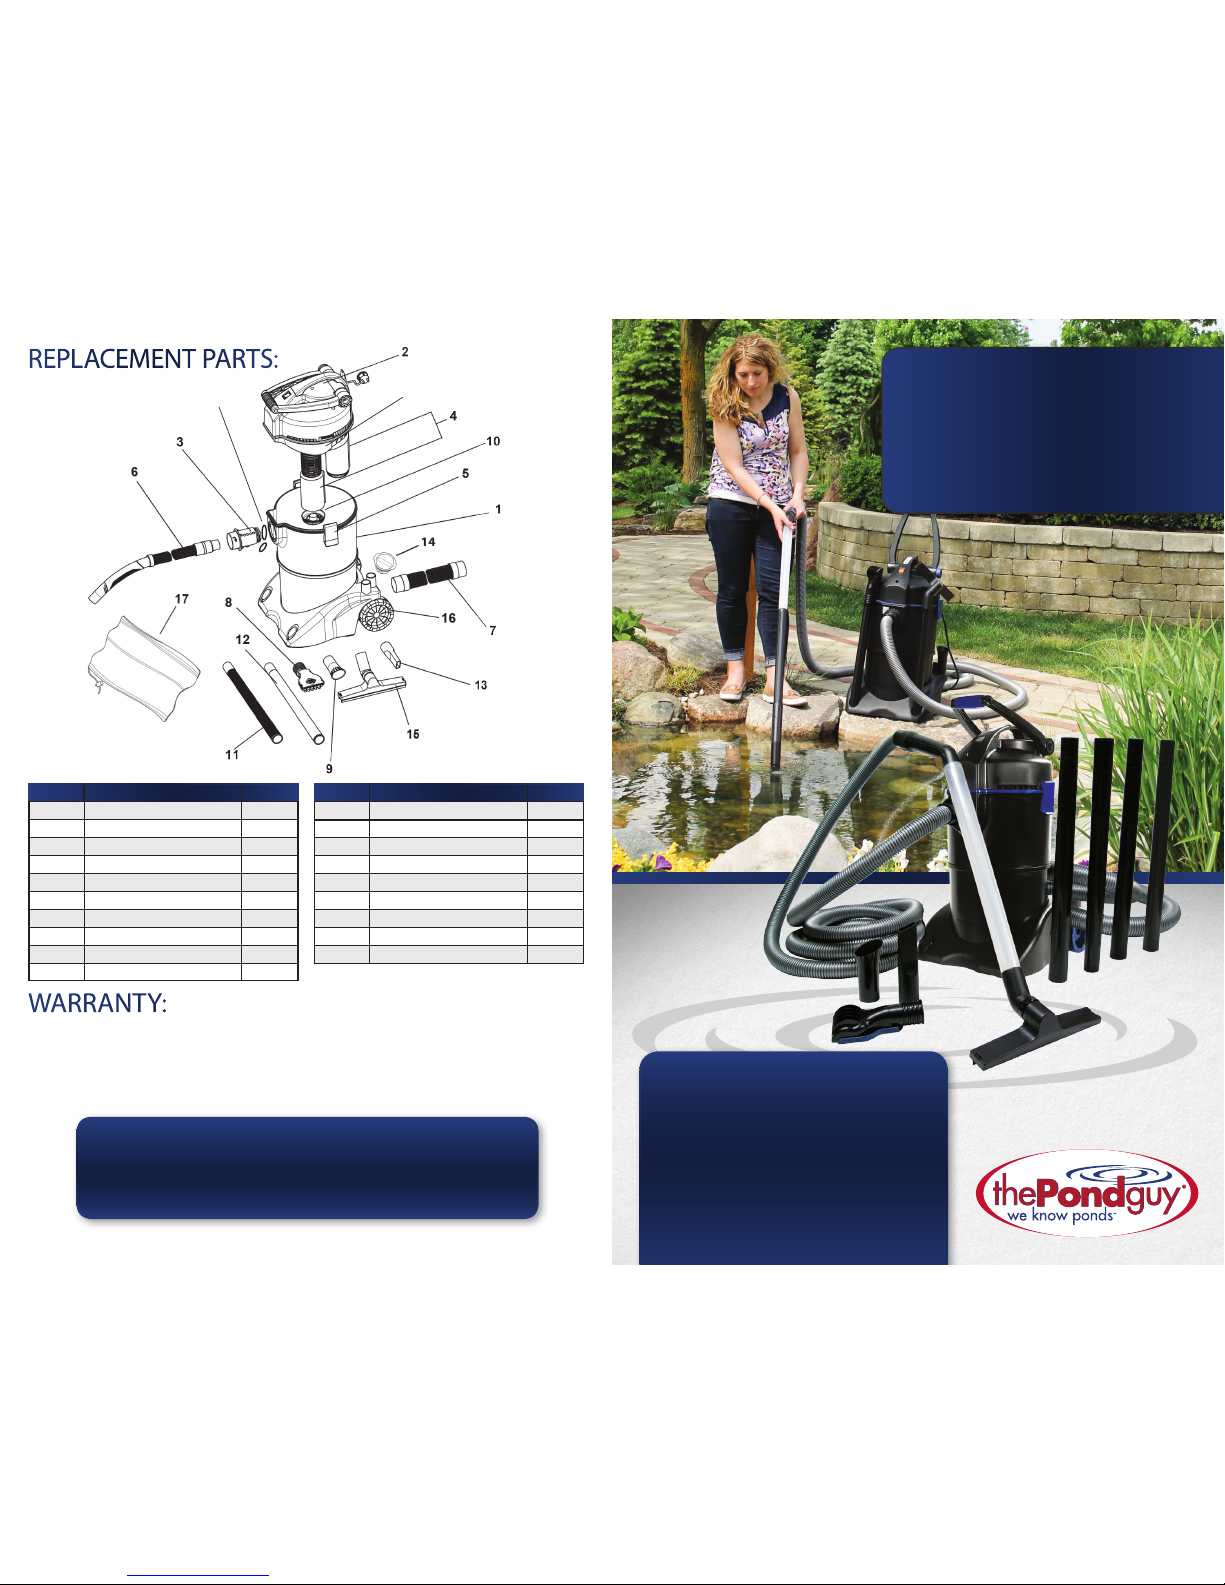
REPLACEMENTPARTS:
NUMBER NAME SKU
1 Collection Chamber 160277
2 Handle 160241
3 Intake Distributer 160242
4 Filter Foam 160243
5 Clamp Replacement Kit 160244
6 Suction Hose – 13’ x 1.5” 160246
7 Discharge Hose – 8’ 160247
8 Gravel Nozzle 160248
9 String Algae Nozzle 160249
10 Filter Retainer Plate 160266
NUMBER NAME SKU
11 Suction Extension Tube (Black) 160267
12 Suction Extension Tube (Clear) 160268
13 Narrow Nozzle 160269
14 Replacement Plug 160278
15 Wide Nozzle 160271
16 Wheel 160272
17 Debris Bag 160273
18 Vacuum Seal Replacement Kit 160274
19 Vacuum Distributer Assembly 160275
WARRANTY:
All ClearVac™ Vacuums carry a 3-year warranty. The Pond Guy® will repair or replace any units found to be defective. This
limited warranty is extended exclusively to the original purchaser and begins from the date of original purchase receipt. The
lter foam and o-rings are wearable items and are not covered by this warranty. Abuse or misuse of this product, power cord
alterations or use of an improper extension cord voids all warranty. Please call for a Return Authorization Number prior to
returning product by calling our Customer Care Department at 866-766-3435. Failure to request an RMA number may result
in delay or dismissal of your warranty claim.
View other great products on-line at www.thepondguy.com
THANK YOU FOR CHOOSING:
The Pond Guy®Inc.
We Know Ponds™
15425 Chets Way
Armada, MI 48005
866-POND-HELP (766-3435)
thepondguy.com
Important Information........................2
Package Contents.............................3
Technical Specs ...............................3
Assembly Instructions....................... 4-5
Using Your ClearVac™ Vacuum..................6
Maintenance, Storage & Troubleshooting .......7
Replacement Parts ...........................8
Warranty Information.........................8
Table of Contents:

IMPORTANT INFORMATION:
Please read these instructions thoroughly before use. Failure to follow instructions may
result in equipment damage or failure, losses, injury or death.
DANGER:
To avoid possible electric shock:
• If the power cord has been damaged, DO NOT operate, the ClearVac™ Vacuum should be replaced.
• Prior to installation, inspect the ClearVac™ Vacuum to ensure there was no damage during transportation.
• If the ClearVac™ Vacuum falls into the water, DO NOT reach for it. First unplug and then retrieve it.
• Close supervision is necessary when used near children.
WARNING:
To reduce the risk of electric shock:
• Connect only to a properly grounded receptacle, which is serviced by a Ground Fault Circuit Interrupter
and never remove the ground pin from the plug.
• Provide a“drip loop”for the power cord. This is a loop in the cord below the level of the receptacle or plug
that prevents water from traveling along the cord in the direction of the receptacle.
• ALWAYS unplug the ClearVac™ Vacuum from the power source when it is not in use, and before installing,
removing or servicing the ClearVac™ Vacuum components.
• If an extension cord is necessary, use only a 10 or 12 gauge outdoor rated extension cord no longer than 50
feet. A cord may overheat if the cord is rated for less amperes or watts than the unit rating.
• DO NOT immerse the ClearVac™ Vacuum or plug in water or attempt to use a wet plug.
• The ClearVac™ Vacuum is NOT suitable for use in swimming pools, swimming ponds, or other situations
where bodily contact is made with the water. Although the ClearVac™ Vacuum is designed for outdoor use,
it should never be submerged in water.
CAUTION:
To reduce the risk of equipment damage or failure:
• DO NOT place ClearVac™ Vacuum near ammable or other dangerous materials or objects.
• ClearVac™ Vacuum is NOT submersible; do not place ClearVac™ Vacuum where it might contact or fall into
the water.
• DO NOT operate during freezing conditions. Drain the ClearVac™ Vacuum and store in a protected location.
• DO NOT use the ClearVac™ Vacuum to vacuum ammable, toxic or volatile substances.
• Be sure to clean debris from the vacuum after each use, and before storing the unit, to avoid poor
performance during future use.
IMPORTANT:
The Pond Guy® is not responsible for equipment damage or failure, losses, injury or death resulting from
failure to follow safety precautions, misuse or abuse of equipment.
Package Contents
CLEARVAC™:
ClearVac™ Note: Some of the components may be packaged inside the vacuum chamber
A1 - ClearVac ™Vacuum F1 - 13’Suction Hose
B4 - Suction ExtensionTube (Black) G1 - 8’Discharge Hose
C1 - Suction ExtensionTube (Clear) H1 -Plug
D4 - InterchangableNozzles
(String Algae, Narrow,Wide & Adjustable Gravel Nozzles) I2 -Wheels
E1 - DebrisBag J1 -IntakeDistributor
TECHNICALSPECS :
MODEL VOLTS MOTOR SIZE MAX OPERATING DEPTH POWER CORD LENGTH
ClearVac™115V 1600 Watts 6’ 13’
A
B
C
D
FG
I
J
E
H
thepondguy.com | 866-POND-HELP (766-3435) 15425 Chets Way | Armada, MI 48005
2 3

ASSEMBLY INSTRUCTIONS CLEARVAC™:
See video instructions of the ClearVac™ vacuum online @
www.thepondguy.com/clearvac
Step 1
Unlock the Chamber
Remove stored parts from the collection chamber by
unlocking the vacuum chamber clamps and removing the
top of the vacuum. Replace the vacuum top and lock the
clamps back into place.
Step 2
Attach Wheels
Attach the wheels to the rear base of the ClearVac™.
Step 4
Connect the Suction Hose
Connect the suction hose to the intake distributor.
Step 5
Connect the Discharge Hose
Connect the discharge hose to the drain opening located
towards the bottom of the unit.
Step 6
Position the Discharge Hose
Lay the discharge hose so it lies at and away from the
pond. If desired, attach the debris bag to the end of the
discharge hose by placing the end of the hose in the debris
bag and tightening the drawstring.
Note:
The debris bag will collect only larger debris for disposal.
We do not recommend returning water to the pond from
the discharge hose, as it may result in cloudy water.
Step 7
Attach the Extension Tubes
Attach extension tubes to the suction hose. The clear
extension tube will allow you to monitor the ClearVac™
performance.
Step 8
Choose a Nozzle
Attach one of the four interchangeable nozzles to the
extension tube:
• String Algae Nozzle
• Narrow Nozzle for hard to reach places
• Adjustable Gravel Nozzle great for cleaning ponds
with gravel bottoms
• Wide Nozzle for large areas
Step 3
Attach Intake Distributor
Attach the intake distributor to the intake opening and twist
to lock into position.
String Algae
Nozzle
Adjustable
Gravel
Nozzle
Narrow
Nozzle
Wide
Nozzle
thepondguy.com | 866-POND-HELP (766-3435) 15425 Chets Way | Armada, MI 48005
4 5
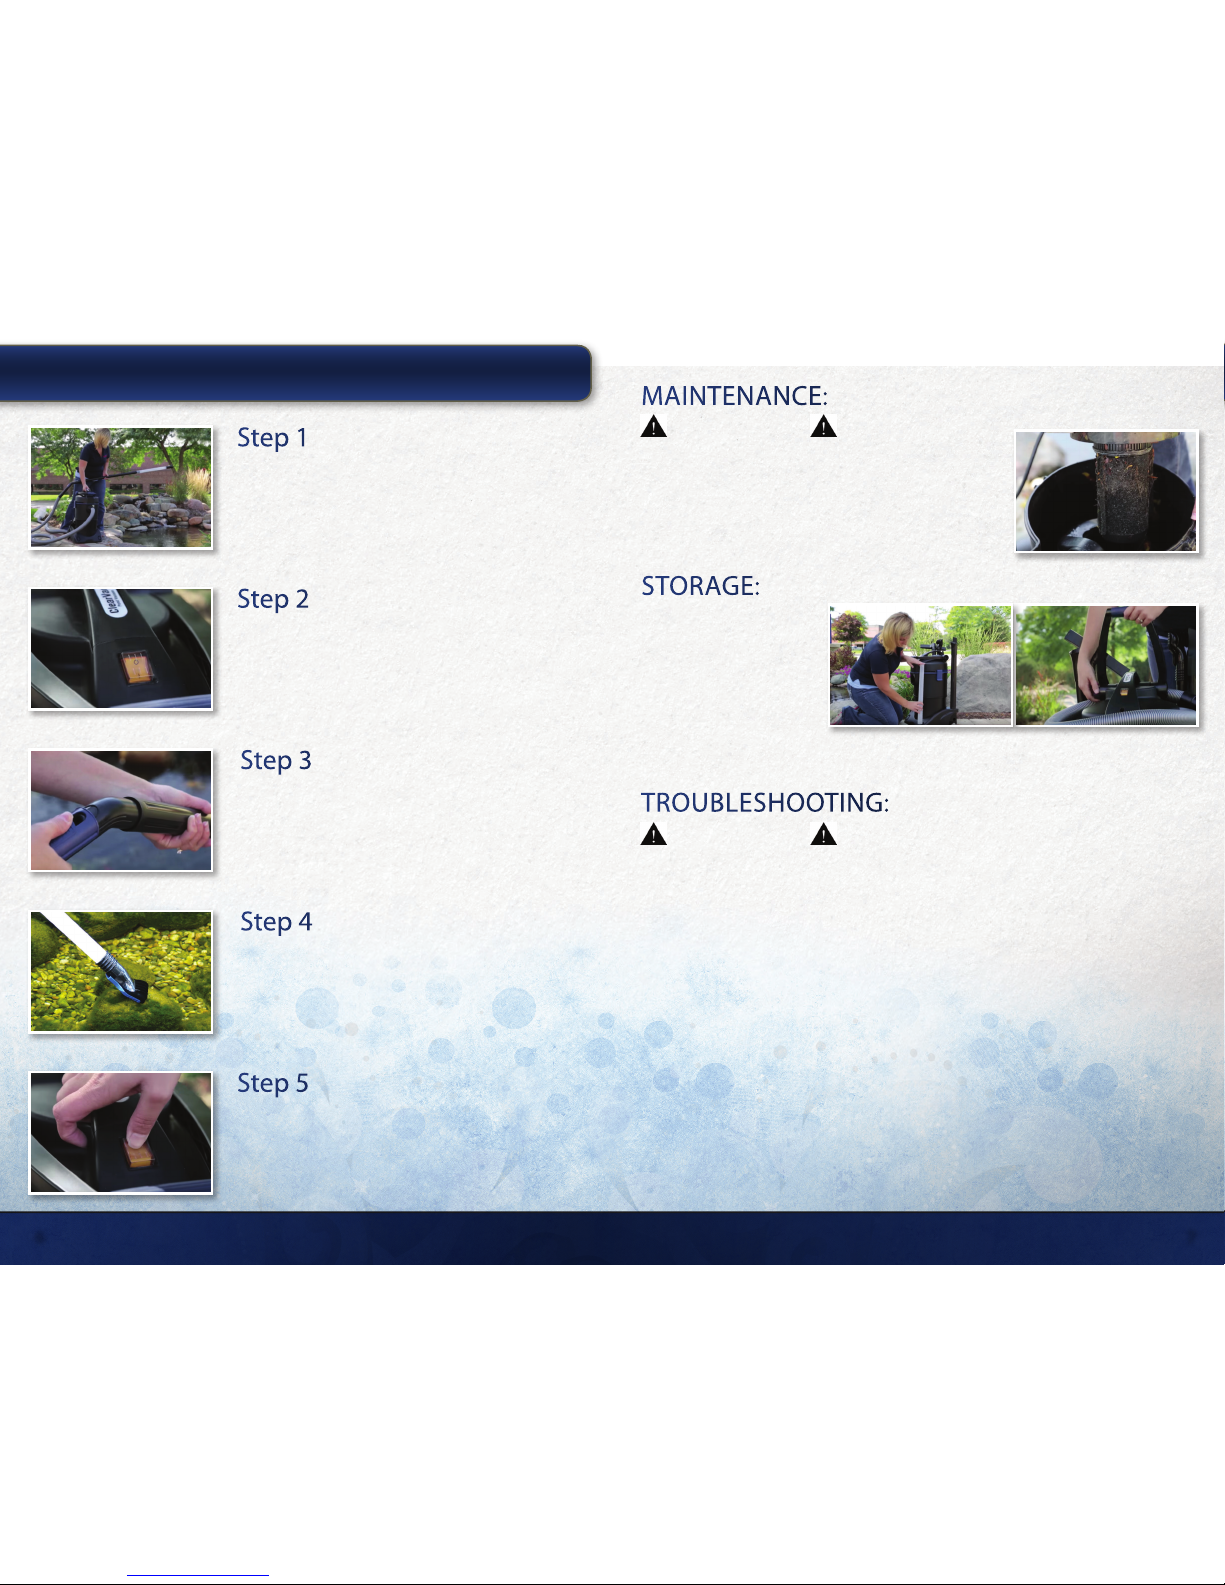
USING THE CLEARVAC™ VACUUM: MAINTENANCE :
TROUBLESHOOTING :
STORAGE :
Step 1
Position the Vacuum
Position the ClearVac™ near the ponds edge and plug into
a GFCI outlet. The ClearVac™ can be used with an extension
cord but it must be a 10 or 12 gauge outdoor rated
extension cord no longer than 50’.
Step 2
Turn on the Vacuum
Turn the power switch to the “ON” position and submerge
the end of the suction hose in the pond.
Step 4
Vacuum Debris
Move in a slow, uniform fashion to remove sludge, debris
and algae. When the reservoir becomes full, the ClearVac™
will automatically switch reservoirs and drain allowing for
continuous vacuuming.
Step 5
Turn O the Vacuum
When nished, turn the power switch to the “OFF” position
and unplug the ClearVac™. Be sure to clean the unit after
each use before storing.
Step 3
Adjust the Suction
Using the vacuum level adjustment on the handle of
the suction hose, slowly close the valve to increase the
suction and lift unwanted debris.
WARNING:
Before performing any maintenance, always unplug the ClearVac™
from the power source.
• Clean the collection chamber, tubes and foam lters after
operating and rinse with clean water.
• Check o-rings and foam lters for wear or damage and replace
if needed.
WARNING:
For your protection, always unplug the ClearVac™ from your power source before servicing.
Little or no suction is produced:
• Be sure the ClearVac™ is positioned at or near water level.
• Remove and inspect the intake distributor, intake and suction hoses for obstructions.
• Reduce the number of extension tubes used
• Be sure the suction hose is lying as at as possible with no kinks.
• Check to be sure that o-rings are installed properly.
Unit does not reach full capacity or collection chamber does not drain:
• Clean foam lters
• Remove and inspect the intake distributor, intake and suction hoses for obstructions.
• Check for kinks in discharge hose, lay discharge hose at or at a slight decline to aid in draining.
• Check drain opening for blockages
Unit develops noise or heavy vibration:
Turn the power switch o for 20 seconds and then restart the unit. If issue persists try the following:
• Make sure collection chamber is not full and that it is draining properly
• Clean foam lters
• Remove and inspect the intake distributor, intake and suction hoses for obstructions.
Vapor escapes from the unit:
• In cold weather, condensation forms in the unit and it released as water vapor. This is normal and no
remedy is necessary.
• The ClearVac™ hoses and
extensions easily disassemble
and can be stored right on
the unit.
• The ClearVac™ includes a
handle for easy mobility.
Simply unthread the tension
knob, adjust the handle
and retighten.
• The ClearVac™ should be stored in a dry, temperature controlled room.
thepondguy.com | 866-POND-HELP (766-3435) 15425 Chets Way | Armada, MI 48005
6 7
Other ThePondguy Vacuum Cleaner manuals


