THOMSON 14CB10C User manual

1
The type and production number of your appliance are printed on the guarantee certificate delivered with your video recor-
der. Keep this certificate as well as the invoice.These documents are indispensable for claiming your guarantee rights.
• All repairs during the guarantee period must be carried out by an authorised technician represen-
ting our brand.
• If this condition is not met, your rights will no longer be valid.
• Never open the appliance yourself, since this may be dangerous for you or damage the equipment.
GUARANTEE
SETTING UP - Ensure that the mains supply in your house complies with that indicated on the identification sticker located on
the back of your appliance. Install the video recorder horizontally, away from any source of heat (fireplace) or appliances crea-
ting strong magnetic or electric fields.
If you install your video recorder in a purpose-built unit, check that the air vents are not obstructed.Allow a clearance of 10
cm on either side and at the rear of the appliance and at least 7 cm above.
Even when the on/off switch is off, the Combi TV-video recorder is not completely cut off from the mains.To disconnect it
completely, it is necessary to remove the mains plug from the mains socket
For MAINS powered apparatus and for apparatus producing internal voltages greater than 35V (peak) a.c. or d.c., having no
protection against splashing water, the instructions for use shall state that the apparatus shall not be exposed to dripping or
splashing and that no objects filled with liquids, such as vases, shall be placed on the apparatus.
The ventilation should no be impedes by covening the ventilation openings with item, such as newspapers, table-cloths, cur-
tains, etc…
No naked flame sources, such as lighted candies, should be placed on the apparatus.
USE -If your appliance, or a cassette, has been stored in a very cold atmosphere for a certain amount of time (transported
during winter for example), wait approximately 2 hours before using your video recorder. The openings located on the top
and the bottom are for ventilation purposes.They should not be obstructed. In the event of lightning, the appliance should be
disconnected from the external aerial.
Under no circumstances should this appliance be put to industrial use. It is designed solely for domestic operation.
MAINTENANCE - Use a dry, clean, soft cloth. Do not use any scouring agents, solvents or abrasive products, etc. If an object or
liquid enters inside the appliance, unplug it immediately and have it checked by an authorised technician.
PRECAUTIONS
Maximum ambient temperature: 35°
Maximum humidity ratio: 85%
USE
ENGLISH
It is illegal to make total or partial copies of recordings protected by copyright laws without explicit permission of the
copyright holder.
Thomson Multimédia is not liable if the television is used other than in
accordance with this manual.
2 Combo(GB-D-IT-ES) 17/05/1999 19:58 Page 1

2
CONTENTS
BASIC CONNECTIONS
. . . . . . . . . . . . . . . . . . . . . . . . . . . . . . . . . . . . . . . . . 3
NAVIGATION PRINCIPLES
. . . . . . . . . . . . . . . . . . . . . . . . . . . . . . . . . . . . . . 3
INSTALLING TV CHANNELS ON THE COMBI TV-VIDEO RECORDER FOR
THE FIRST TIME . . . . . . . . . . . . . . . . . . . . . . . . . . . . . . . . . . . . . . . . . . . .13
Sorting your channels . . . . . . . . . . . . . . . . . . . . . . . . . . . . . . . . . . .14
SETTING THE CLOCK . . . . . . . . . . . . . . . . . . . . . . . . . . . . . . . . . . . . .14
NEW CHANNELS . . . . . . . . . . . . . . . . . . . . . . . . . . . . . . . . . . . . . . . .15
OPERATING BASIC COMBI TV-VIDEO RECORDER FUNCTIONS . . . . . . . .17
AUDIO VIDEO 1/2 . . . . . . . . . . . . . . . . . . . . . . . . . . . . . . . . . . . . . . . . . .20
RECORDING . . . . . . . . . . . . . . . . . . . . . . . . . . . . . . . . . . . . . . . . . . . . . . .21
Instant recording of a TV programme . . . . . . . . . . . . . . . . . . . . . .21
Recording with automatic stop . . . . . . . . . . . . . . . . . . . . . . . . . . . .21
PROGRAMMING A RECORDING WITH SHOW VIEW CODES . . . . . . . . . . .22
SETTING TIMER RECORDING . . . . . . . . . . . . . . . . . . . . . . . . . . . . . . . . . .23
ERASING A TIMER RECORDING . . . . . . . . . . . . . . . . . . . . . . . . . . . . . . . .25
PREFERENCES . . . . . . . . . . . . . . . . . . . . . . . . . . . . . . . . . . . . . . . . . . . . .26
HOW TO USE VIDEOTEXT ?. . . . . . . . . . . . . . . . . . . . . . . . . . . . . . . . . . .27
ADDITIONAL INFORMATION . . . . . . . . . . . . . . . . . . . . . . . . . . . . . . . . . .28
IDENTIFYING AND SOLVING PROBLEMS . . . . . . . . . . . . . . . . . . . . . . . . . .32
BEFORE YOU START
In our efforts to improve the quality of our products, we reserve the right to change their features.The information
contained in these instructions are therefore liable to change and are not contractual.
ENGLISH
MENU
EXIT
2
1
5
8
4
7
AV
6
9
3
0000
SP/LP
MONITOR
PR
0
/--
GOTO 0000
TRK
REW.
PLAY
REC. PAUSE
F.FWD
STOP
INFO
TEXT
SHOWVIEW TV
VPS
PREF.
-
+
SIZE AAA 1,5 V 0%MERCURY
GREENELL
EXTRA HEAVY DUTY
-
+
SIZE AAA 1,5 V 0%MERCURY
GREENELL
EXTRA HEAVY DUTY
Dipole antenna
or
Loop antenna *
Antenna adaptator *
Remote control unit and batteries
Getting started
guide and operating
instructions
These documents have been printing on environnementally-friendly recycled, non-bleached paper.
* If included
2 Combo(GB-D-IT-ES) 17/05/1999 19:58 Page 2

Plug existing aerial cable or use the dipole antenna
into the Combi TV-Video ( IN ).
Connect the Combi TV-Video to the mains using the
power cord.
2
1
Always point the remote control at the Combi TV-Video recorder.
CALLING UP A MENU - The key on the remote control calls up the menu which enables you to use the features of
your Combi TV-Video recorder and to adjust it.
NAVIGATION WITHIN THE MENUS :
1- To choose a function, select a line with or .
2 -
To validate your choice, press
.
3
- To make an adjustment (i.e. to select an option, increase or decrease a given value), you must use key or .
4
- To exit a menu, press key .
EXAMPLE :The symbols C/Bdisplayed on the screen indicate that an option is available. To select an option, press key
or .
EXIT
MENU
ABOUT THIS INSTRUCTION BOOKLET :this document applies to several Combi TV-Video recorder models. Certain functions or
settings may, therefore, not be included in the model which you have bought.
ABOUT THE SWITCH:the position of the On / Off
B
switch varies from model to model. It may be located on the front panel
or on the right side.
BASIC CONNECTIONS
NAVIGATION PRINCIPLES
3
220 - 240 V
1
1
2
ENGLISH
2
1
*
Please respect the environment! Before throwing any batteries away, consult your distributor
who may be able to take them back for specific recycling.
* If included
12 3
!
▲
C
OK
B
▼
EXIT MENU
MENU
EXIT
GOTO 0000
VPS
2 Combo(GB-D-IT-ES) 17/05/1999 19:58 Page 3

4
Auf dem Garantieschein sind der Typ und die Seriennummer Ihres Gerätes angegeben. Bitte den Garantieschein zusammen
mit der Rechnung sorgfältig aufbewahren, da diese bei einem eventuellen Garantiefall unbedingt erforderlich sind.
• Jede Reparatur während der Garantiezeit muß von einemTechniker vorgenommen werden, der als
Vertreter unserer Marke zugelassen ist.
• Bei jedem Verstoß gegen diese Regel verfällt Ihr Garantieanspruch.
• Öffnen Sie Ihr Gerät nie selbst. Sie könnten sich selbst gefährden oder das Gerät beschädigen.
GARANTIE
INSTALLATION -Stellen Sie sicher, daß die Netzspannung in Ihrer Wohnung mit der übereinstimmt, die auf dem Typenschild auf
der Gerätrückseite angegeben ist. Stellen Sie den Kombi TV-Videorecorder waagerecht und in großer Entfernung von bedeu-
tenden Wärmequellen (Kamin usw.) oder Geräten auf, die starke Magnet- bzw. Kraftfelder erzeugen.
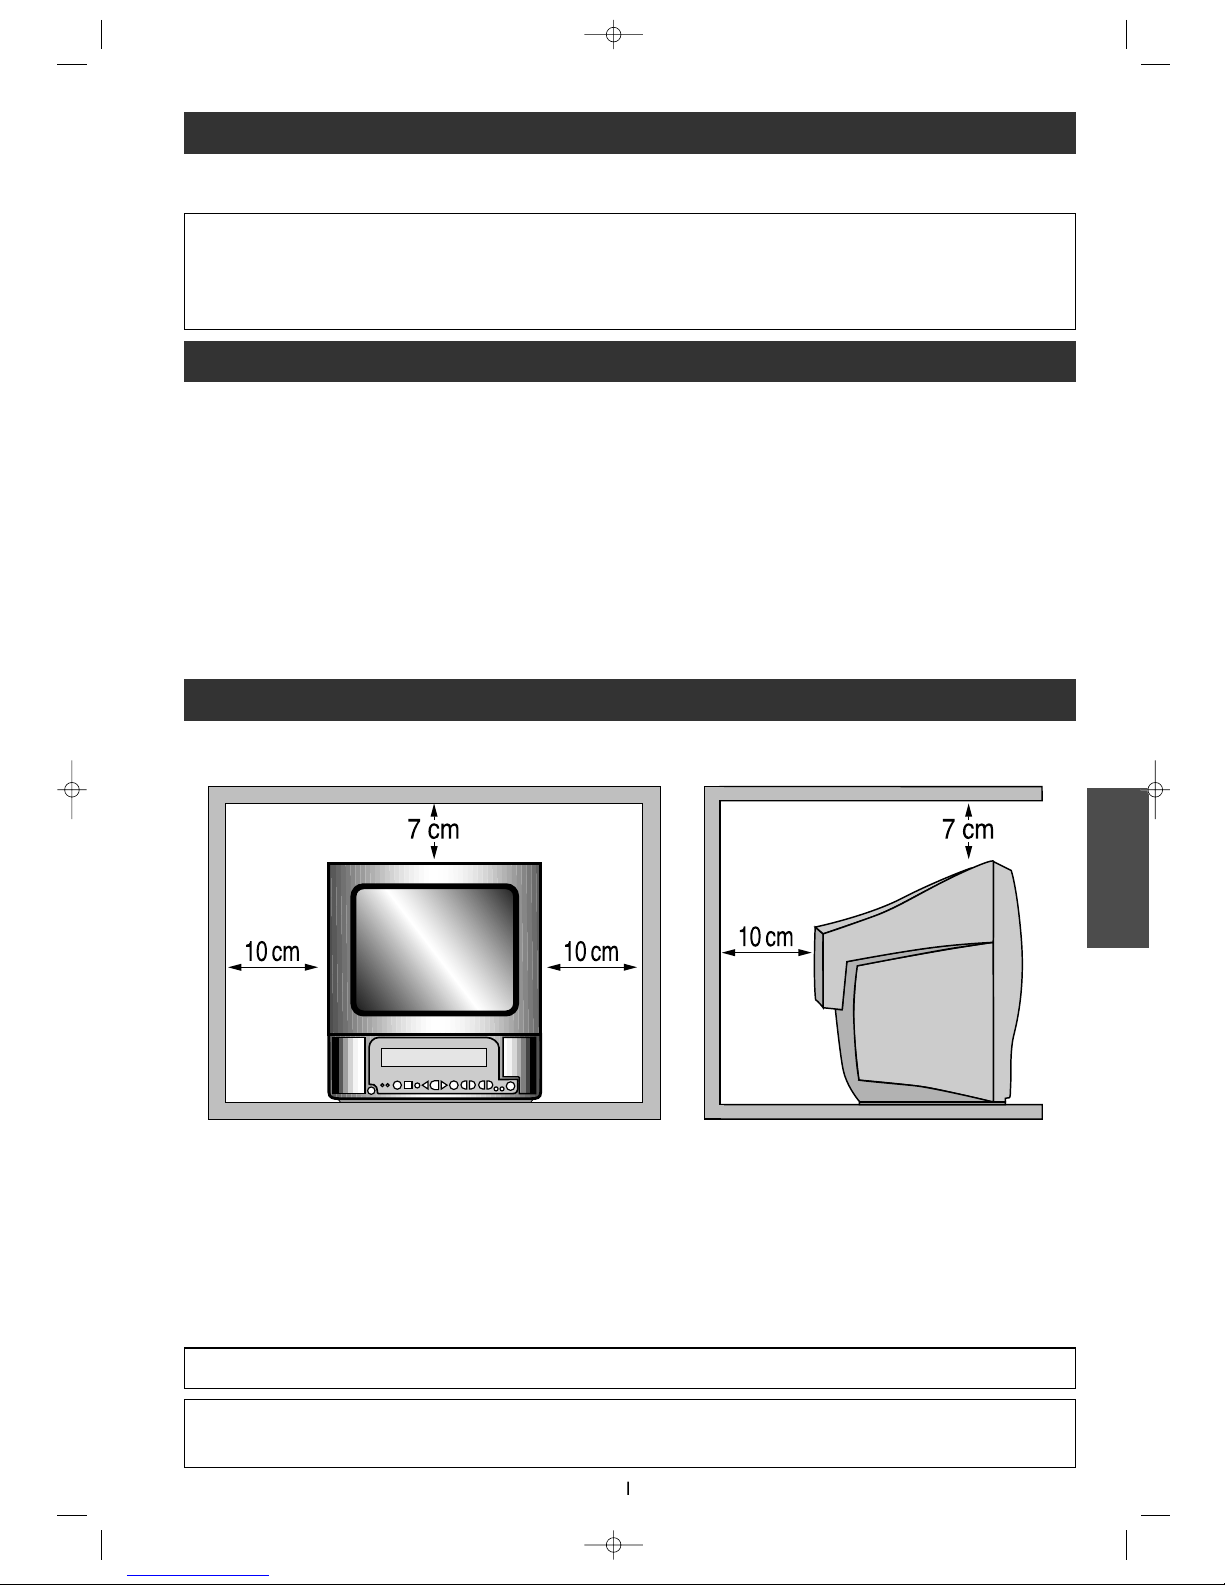
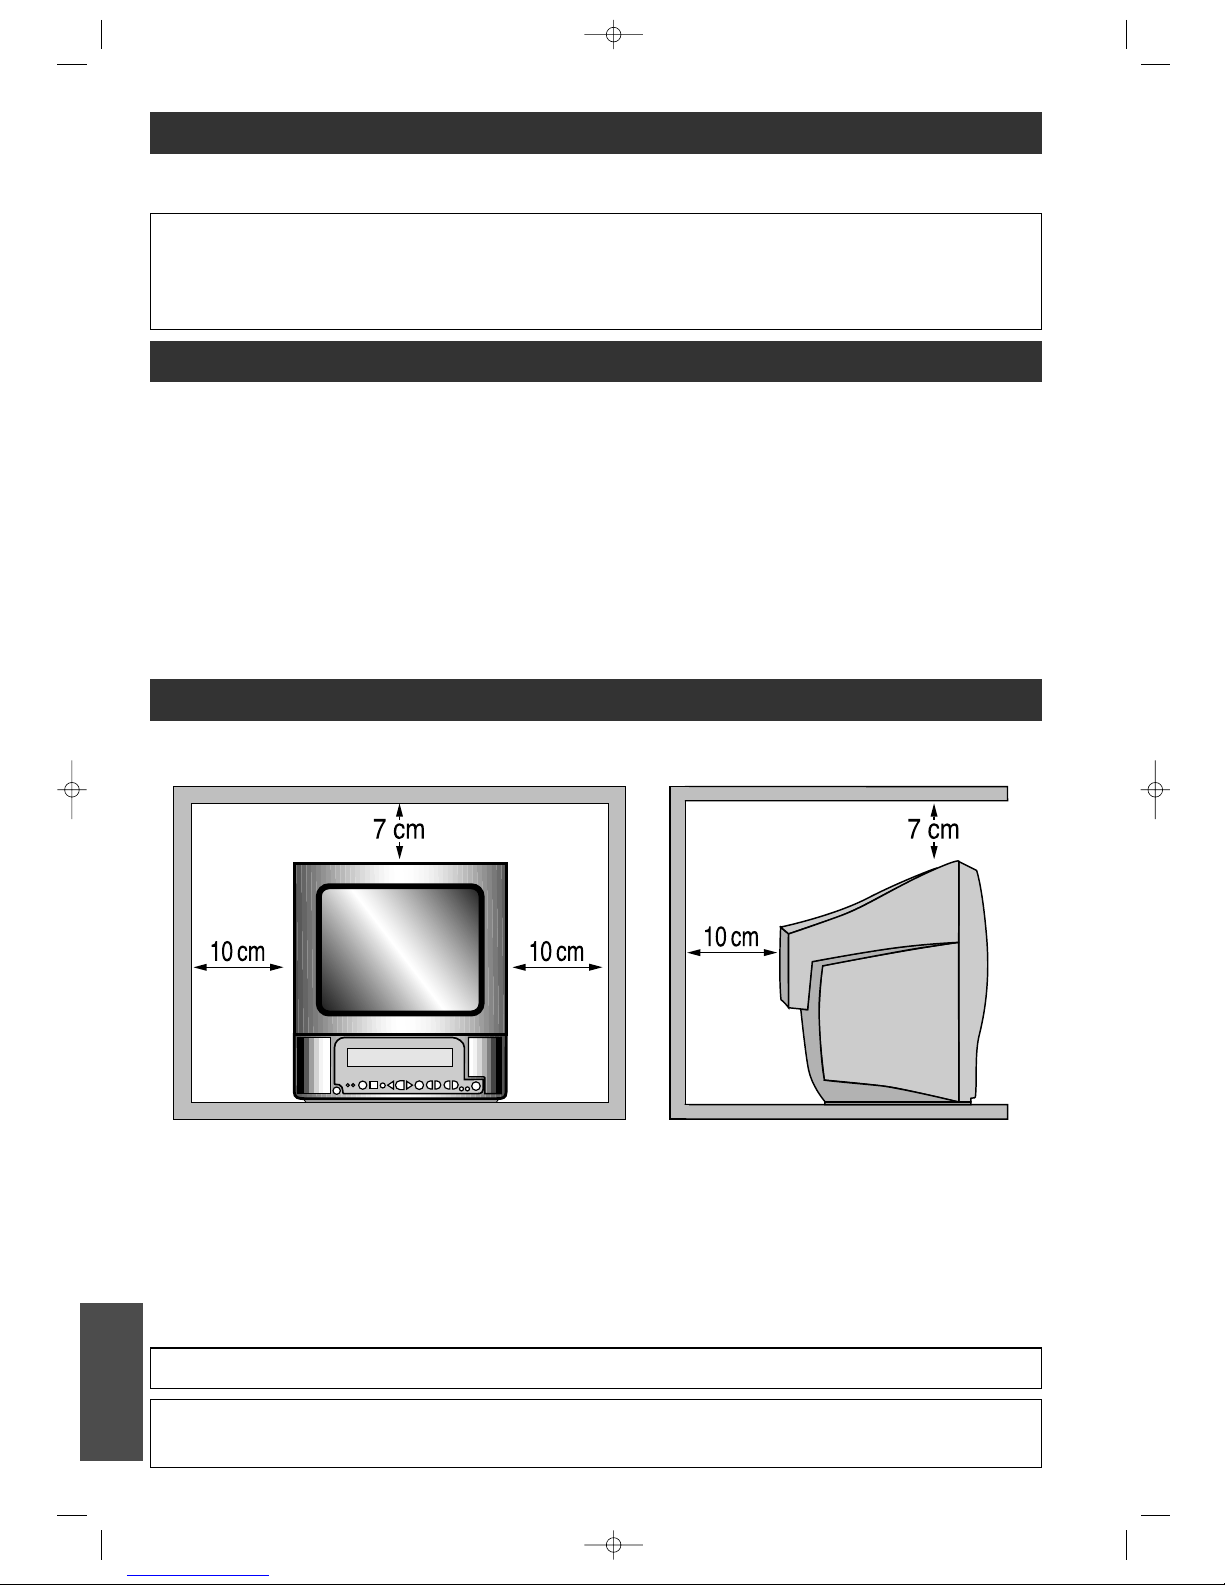
Falls Sie den Kombi TV-videorecorder in einem eigens dafür vorgesehenen Möbelstück installieren, sollten Sie auf eine ein-
wandfreie Belüftung achten.Lassen Sie an den Seiten sowie auf der Rückseite des Geräts mindestens 10 cm und oberhalb min-
destens 7 cm Zwischenraum.
Selbst wenn der Schalter Ein/Aus auf Aus steht, ist der Kombi TV-Videorecorder nicht vollständig vom Netzt getrennt. Um ihn
vollständig vom Netzt zu trennen, ist es notwendig, den Netztstecker aus der Steckdose zu ziehen.
Für Geräte, die an das Stromnetz angeschlossen werden und interne Spannungen über 35 V (Peak) über Mittelfeld- oder
Wechselstrom erzeugen und die keinen Schutz gegen Wasserspritzer aufweisen, wird in den Bedienungsanleitungen angege-
ben, daß das Gerät nicht einer Berieselung oder Wasserspritzern ausgesetzt werden und daß kein mit Flüssigkeit gefülltes
Gefäß, wie z.B. eine Vase, auf dem Gerät abgestellt werden darf.
DieVentilation darf nicht durchVerschließen derVentilationsöffnungen mit Gegenständen wie z.B.Zeitschriften,Tischservietten,
Vorhängen etc. behindert werden.
Auf dem Gerät darf keine offene Flamme, etwa eine brennende Kerze abgestellt werden.
INBETRIEBNAHME -Wenn Ihr Gerät oder eine Cassette längere Zeit in einer kalten Umgebung war, etwa während eines
Transports im Winter, sollten Sie vor dem Gebrauch des Videorecorders ungefähr 2 Stunden warten. Die Öffnungen über und
unter dem Gerät dienen der Entlüftung und sind stets freizuhalten. Bei Gewittern empfiehlt es sich, den Stecker des Geräts
aus der Buchse zu ziehen, die an die Außenantenne angeschlossen ist.
Dieses Gerät darf auf keinen Fall zu gewerblichen Zwecken verwendet werden, sondern dient ausschließlich dem
Heimgebrauch.
WARTUNG - Verwenden Sie einen weichen, trockenen, sauberen Lappen ohne Beiz- und Lösungsmittel, scheuernde Substanzen
usw. Ziehen Sie den Stecker des Geräts sofort aus der Buchse, falls ein Gegenstand oder eine Flüssigkeit in das Geräteinnere
eindringen, und lassen Sie den Videorecorder von einem zugelassenen Techniker überprüfen.
VORSICHTSMAßNAHMEN
Maximale Raumtemperatur: 35°
Maximaler Feuchtigkeitsgehalt: 85%
INBETRIEBNAHME
Das vollständige oder teilweise Kopieren von Aufnahmen, die den gesetzlichen Bestimmungen bezüglich der Urheberrechte unterliegen,
verstößt ohne die ausdrückliche Genehmigung des Rechtsinhabers gegen die geltenden Vorschriften.
Sollte das Fersehgerät nicht in Übereinstimmung mit den Anweisungen der vorliegenden
Anleitung benutzt werden, sind alle Rechtsansprüche gegen Thomson Multimédia
ausgeschlossen.
DEUTSCH
2 Combo(GB-D-IT-ES) 17/05/1999 19:58 Page 4

5
INHALTSVERZEICHNIS
GRUNDANSCHLÜSSE
. . . . . . . . . . . . . . . . . . . . . . . . . . . . . . . . . . . . . . . . . . 6
NAVIGATIONSPRINZIPIEN
. . . . . . . . . . . . . . . . . . . . . . . . . . . . . . . . . . . . . . . 6
ERSTMALIGE EINSTELLUNG DER FERNSEHSENDER IN IHREM
KOMBI TV-VIDEORECORDER . . . . . . . . . . . . . . . . . . . . . . . . . . . . . . . . . .13
Sortieren der Sender . . . . . . . . . . . . . . . . . . . . . . . . . . . . . . . . . . . .14
EINSTELLEN VON DATUM UND UHRZEIT . . . . . . . . . . . . . . . . . . . . . . . .14
NEUE SENDER . . . . . . . . . . . . . . . . . . . . . . . . . . . . . . . . . . . . . . . . . .15
BENUTZEN DER GRUNDLEGENDEN FUNKTIONEN DES
KOMBI TV-VIDEORECORDERS . . . . . . . . . . . . . . . . . . . . . . . . . . . . . . . . .17
AUDIO VIDEO 1/2 . . . . . . . . . . . . . . . . . . . . . . . . . . . . . . . . . . . . . . . . . .20
AUFNEHMEN . . . . . . . . . . . . . . . . . . . . . . . . . . . . . . . . . . . . . . . . . . . . . .21
Sofortaufnahme einer Fernsehsendung . . . . . . . . . . . . . . . . . . . . . .21
Aufnahme mit automatischem Ausschalten . . . . . . . . . . . . . . . . . . .21
PROGRAMMIEREN EINER AUFNAHME MIT HILFE DER SHOWVIEW CODES
.22
TIMER-PROGRAMMIERUNG . . . . . . . . . . . . . . . . . . . . . . . . . . . . . . . . . . . .23
LÖSCHEN EINER PROGRAMMIERTEN AUFNAHME . . . . . . . . . . . . . . . . . .25
VORZUGSEINSTELLUNGEN . . . . . . . . . . . . . . . . . . . . . . . . . . . . . . . . . . . .26
WIE KANN MAN VIDEOTEXT BENUTZEN?. . . . . . . . . . . . . . . . . . . . . . . .27
ZUSÄTZLICHE INFORMATIONEN . . . . . . . . . . . . . . . . . . . . . . . . . . . . . . .28
FEHLERERKENNUNG UND ABHILFEMAßNAHMEN . . . . . . . . . . . . . . . . . . .32
VOR DER INBETRIEBNAHME
Im Bermühen um eine ständigeVerbesserung unserer Produkte behalten wit uns vor, die technischen Daten ohne
Vorankündigung zu verändern. Die in der vorliegenden Anleitung enthaltenen Angaben sind daher Änderungen
unterworfen und keinesfalls rechtsverbindlich.
DEUTSCH
MENU
EXIT
2
1
5
8
4
7
AV
6
9
3
0000
SP/LP
MONITOR
PR
0
/--
GOTO 0000
TRK
REW.
PLAY
REC. PAUSE
F.FWD
STOP
INFO
TEXT
SHOWVIEW TV
VPS
PREF.
-
+
SIZE AAA 1,5 V 0%MERCURY
GREENELL
EXTRA HEAVY DUTY
-
+
SIZE AAA 1,5 V 0%MERCURY
GREENELL
EXTRA HEAVY DUTY
Dipolantenne
oder
Spulenantenne *
Antennenadapter *
Fernbedienung und batterien
Installationsanleitung
und
benutzerhandbuck
Um weiteren Belastungen der Umwelt vorzubeugen, sind diese Handbücher auf ungebleichtem
Recyclingpapier gedruckt worden.
* bei entsprechend ausgestatteten Modellen
2 Combo(GB-D-IT-ES) 17/05/1999 19:59 Page 5

6
Richten Sie die Fernbedienung stets auf den Kombi TV-Videorecorder.
AUFRUF EINES MENÜS -Die Taste der Fernbedienung ruft das Menü auf, daß Ihnen das Benutzen der Funktionen
Ihres Kombi TV-Videorecorders bzw. dessen Einstellung ermöglicht.
NAVIGATION IN DEN MENÜS
1 - Um eine Funktion zu wählen, eine Zeile mit oder wählen.
2 - Zum Bestätigen Ihrer Wahl auf drücken.
3 - Zum Vornehmen einer Einstellung (eine Option wählen, einen Wert erhöhen oder verrungen) sind die Tasten
oder zu benutzen.
4 - Zum Verlassen eines Menüs die Taste drücken.
B
EISPIEL
:
Die auf dem Bildschirm angezeigten Symbole C/Bgeben an, daß eine Option vorhanden ist.ZurWahl einer Option
die Taste oder drücken.
EXIT
MENU
NAVIGATIONSPRINZIPIEN
1
2
Schließen Sie das Kabel der Außenantenne oder der
Dipolantenne an die Buchse ( IN ). Ihres Kombi
TV-Videorecorders an.
Schließen Sie den Kombi TV-Videorecorder über das
Netzkabel an eine Steckdose an.
2
1
ZU DIESER ANLEITUNG:die vorliegende Bedienungsanleitung bezieht sich auf mehrere Kombi TV-Videorecordermodelle, so daß
gewisse Funktionen oder Einstellungen von Ihrem Modell abweichen bzw. fehlen können.
ZUR TASTE EIN/AUS :Je nach Modell kann sich die Taste Ein/Aus
B
vorne oder an der Seite des Videorecorders befinden.
GRUNDANSCHLÜSSE
220 - 240 V
1
1
2
DEUTSCH
*
Batterie-Entsorgung : batterien gehören nicht in den Hausmüll. Als Verbraucher sind Sie
gesetzlich verpflichtet, gebauchte Batterien zurückzugeben. Sie können Ihren alten Batterien
bei den öffentlichen Sammelstellen in Ihrer Gemeinde oder überall dort abgeben, wo
Batterien der betreffenden Art verkauft werden.
* bei entsprechend ausgestatteten Modellen
12 3
!
▲
C
OK
B
▼
EXIT MENU
MENU
EXIT
GOTO 0000
VPS
2 Combo(GB-D-IT-ES) 17/05/1999 19:59 Page 6

7
Nel certificato di garanzia rilasciato con il videovision è indicato il tipo ed il numero di fabbricazione dell'apparecchio.
Conservatelo con la ricevuta fiscale. Questo certificato e la ricevuta fiscale sono infatti i documenti indispensabili per fare vale-
re i vostri diritti di garanzia.
• Qualunque riparazione durante il periodo di garanzia deve essere effettuata da
un tecnico di un nostro Centro Assistenza autorizzato.
• Qualunque violazione o questa regola comporta l'annullamento dei diritti di garanzia.
• Non aprite mai il vostro apparecchio da soli. Ciò potrebbe essere pericoloso per voi, o potrebbe
danneggiare l'apparecchio stesso.
GARANZIA
INSTALLAZIONE -Accertatevi che la tensione in rete della vostra abitazione sia conforme a quella indicata sull'etichetta di iden-
tificazione situata sulla parte posteriore dell'apparecchio. Installate il videovision orizzontalmente, lontano da fonti di calore
(camini...) o da apparecchi produttori di campi magnetici o elettrici elevati.
Se installate il videovision in un mobile apposito, controllate che l'aerazione non sia ostruita. Lasciate 10 cm minimo da ogni
lato e nella parte posteriore dell'apparecchio, e 7 cm minimo nella parte superiore.
Anche se l’interruttore di accendimento/spegnimento è in posizione spegnimento, il videovision non è completamente scolle-
gato dalla rete di alimentazione. Per scollegarlo completamente, estrarre la presa del videovision dalla presa di alimentazione.
Per gli apparecchi funzionanti su rete e gli apparecchi che producono tensioni interne superiori s 35V (picco), a corrente conti-
nua o alternata, che non sono provvisti di protezioni contro spruzzi d’acqua, le istruzioni di funzionamento precisano che l’ap-
parecchio non deve essere esposto ad acqua corrente o a spruzzi e che non dovranno essere posti sull’apparecchio oggetti
pieni di liquido, come vasi ecc.
L’aerazione non deve essere impedita otturando le bocche di aerazione con oggetti come giornali, tovaglioli da tavola, tende
ecc.
Non dovranno essere poste sull’apparecchio fiamme libere come candele accese.
USO - Se l’apparecchio o una cassetta sono rimasti per un certo tempo in un ambiente freddo, per esempio in occasione di
un trasporto, in inverno, aspettare circa 2 ore prima di utilizare l’apparecchio. Le aperture situate sopra e sotto sono previste
per la ventilazione e non devono essere coperte. In caso di temporale, si consiglia di scollegare il videovision dalla presa col-
legata all ‘ antenna esterna. Questo apparechio è stato concepito per l’uso domestico. Non deve venir utilizzato a fini indus-
triali.
MANUTENZIONE -Utilizzare uno strofinaccio morbido, asciutto e pulito, non utilizzare mai prodotti abrasivi, solventi, ecc. Se un
oggetto o un liquido penetra nell'apparecchio, scollegatelo immediatamente e fatelo controllare da un tecnico autorizzato.
PRECAUZIONI
Temperatura ambientale massima : 35°
Tasso d’umiditá massimo : 85%
UTILIZZO
ITALIANO
La copia totale o parziale di registrazioni protette dalla legislazione sui diritti d'autore, senza autorizzazione esplicita
del titolare dei diritti, è vietata dalla legislazione in vigore.
Thomson Multimédia declina ogni responsabilità in caso di utilizzo non
conforme a quanto indicato nel presente libretto d'istruzioni.
2 Combo(GB-D-IT-ES) 17/05/1999 19:59 Page 7

8
SOMMARIO
COLLEGAMENTI DI BASE
. . . . . . . . . . . . . . . . . . . . . . . . . . . . . . . . . . . . . . . 9
CRITERI DI NAVIGAZIONE
. . . . . . . . . . . . . . . . . . . . . . . . . . . . . . . . . . . . . . . 9
COME INSTALLARE PER LA PRIMA VOLTA I CANALI TV
SUL VIDEOVISION . . . . . . . . . . . . . . . . . . . . . . . . . . . . . . . . . . . . . . . . . . .13
Riordinare i vostri canali . . . . . . . . . . . . . . . . . . . . . . . . . . . . . . . . .14
REGOLAZIONE DELL’OROLOGIO . . . . . . . . . . . . . . . . . . . . . . . . . . . . . .14
NUOVO CANALE . . . . . . . . . . . . . . . . . . . . . . . . . . . . . . . . . . . . . . . .15
UTILIZZARE LE FUNZIONI DI BASE DEL VIDEOVISION . . . . . . . . . . . . . . .17
AUDIO VIDEO 1/2 . . . . . . . . . . . . . . . . . . . . . . . . . . . . . . . . . . . . . . . . . .20
REGISTRARE . . . . . . . . . . . . . . . . . . . . . . . . . . . . . . . . . . . . . . . . . . . . . .21
Registrare immediatamente una trasmissione TV . . . . . . . . . . . . . .21
Registrazione con interruzione automatica . . . . . . . . . . . . . . . . . . .21
PROGRAMMARE UNA REGISTRAZIONE CON I CODICI SHOW VIEW . . . .22
PROGRAMMARE UNA REGISTRAZIONE . . . . . . . . . . . . . . . . . . . . . . . . . . .23
CANCELLARE UNA PROGRAMMAZIONE . . . . . . . . . . . . . . . . . . . . . . . . .25
PREFERENZE . . . . . . . . . . . . . . . . . . . . . . . . . . . . . . . . . . . . . . . . . . . . . .26
COME UTILIZZARE IL TELEVIDEO ?. . . . . . . . . . . . . . . . . . . . . . . . . . . . .27
INFORMAZIONI COMPLEMENTARI . . . . . . . . . . . . . . . . . . . . . . . . . . . . . .28
IDENTIFICARE E RISOLVERE I PROBLEMI . . . . . . . . . . . . . . . . . . . . . . . . . .32
PRIMA DI COMINCIARE
Al fine di migliorare la qualit
á dei nostri prodotti, ci riserviamo il diritto di modificarne le caratteristiche. Le infor-
mazioni contenute in questo manualetto d’istruzioni possono quindi venir modificate e non rivestono
carattere contrattuale.
ITALIANO
MENU
EXIT
2
1
5
8
4
7
AV
6
9
3
0000
SP/LP
MONITOR
PR
0
/--
GOTO 0000
TRK
REW.
PLAY
REC. PAUSE
F.FWD
STOP
INFO
TEXT
SHOWVIEW TV
VPS
PREF.
-
+
SIZE AAA 1,5 V 0%MERCURY
GREENELL
EXTRA HEAVY DUTY
-
+
SIZE AAA 1,5 V 0%MERCURY
GREENELL
EXTRA HEAVY DUTY
Antenna bipolare
o
Antenna ad anello *
Adattatore antenna *
Telecomando e batterie
Manuali di
installazione
e di utilizzazione
Rispettosi dell’ambiente, abbiamo stampato questi documenti su carta riciclata non sbiancata.
* solo su certi modelli
2 Combo(GB-D-IT-ES) 17/05/1999 19:59 Page 8

9
Per l'uso rivolgere sempre il telecomando verso il Videovision
PER SELEZIONARE UN MENU - Il tasto sul telecomando permette di visualizzare il menu che vi consentirà di utiliz-
zare le funzioni del vostro Videovision o di regolarlo.
NAVIGAZIONE NEI MENU :
1 -
Per selezionare una funzione, scegliete una linea con o .
2 -
Premete su per confermare la vostra scelta.
MENU
3 -
Per effettuare una regolazione, (selezionare un'opzione, aumentare o diminuire un valore) utilizzate i tasti o .
4 -
Per uscire da un menu, premete su
.
ESEMPIO :I simboli C/Bsullo schermo indicano che un'opzione è accessibile.
Per selezionare un'opzione, premete i tasti o .
EXIT
CRITERI DI NAVIGAZIONE
1
2
Collegare alVideovision ( IN ) il cavo d'antenna
esistente o utilizzare l’antenna bipolare.
Collegare il Videovision alla presa di corrente con il
cavo elettrico.
2
1
A PROPOSITO DI QUESTO MANUALETTO:il presente documento è comune a più modelli diVideovision, pertanto alcune funzioni
o determinate regolazioni possono mancare sul modello da voi acquistato.
A PROPOSITO DELL’INTERRUTTORE:la posizione dell’interruttore On/Off
B
è diversa a seconda dei modelli. Può trovarsi sul lato
anteriore o sul lato destro.
COLLEGAMENTI DI BASE
220 - 240 V
1
1
2
ITALIANO
*
Rispettate l'ambiente! Non buttate via le pile, rivolgetevi ai punti di raccolta, che sono inca-
ricarti di recuperarle se possono subire un riciclaggio speciale.
* solo su certi modelli
12 3
!
▲
C
OK
B
▼
EXIT MENU
MENU
EXIT
GOTO 0000
VPS
2 Combo(GB-D-IT-ES) 17/05/1999 19:59 Page 9

10
El certificado de garantía entregado con el Combi TV-vídeo indica el tipo y el número de fabricación de su aparato. Guárdelo
con la factura. Se trata de los documentos imprescindibles para utilizar el derecho a la garantía.
• Toda reparación efectuada durante el periodo de garantía deberá ser realizada por un técnico de
un Centro de Asistencia autorizado.
• Toda infracción de esta regla implicará la anulación del derecho de garantía.
• No abra nunca el aparato usted mismo. Puede ser peligroso para usted y causar daños al equipo.
GARANTÍA
INSTALACIÓN - Asegúrese de que la tensión de la red eléctrica de su domicilio es la misma que la que indica la etiqueta de iden-
tificación, situada en la parte trasera de su aparato. Instale horizontalmente el Combi TV-vídeo, lejos de cualquier fuente de
calor importante (chimenea...) y de aparatos que produzcan campos magnéticos o eléctricos importantes.
Si usted instala el Combi TV-vídeo en un mueble previsto para ello, controle que la ventilación no esté obstaculizada. Deje 10
cm como mínimo por cada lado y por detrás del aparato y al menos 7 cm por la parte de arriba.
Incluso cuando el interruptor marcha/parada está en posición parada, el Combi TV-vídeo no está completamente separado del
sector. Para desconectarlo completamente, es necesario retirar el enchufe de la toma de alimentación.
Para los aparatos que funcionan con la red eléctrica y aquellos que producen voltajes internos superiores a 35V (pico), en cor-
riente directa o alterna, que no presenten ninguna protección contra las salpicaduras de agua, las instrucciones de funciona-
miento precisarán que el aparato no debe ser expuesto al chorreo o las salpicaduras, y que no se le debe colocar encima
ningún objeto lleno de líquido, como un florero.
No deben haber obstáculos a la ventilación por obturación de las mangas de ventilación con objetos tales como periódicos,
servilletas, cortinas, etc.
No se debe colocar sobre el aparato una llama descubierta, tal como una vela encendida.
UTILIZACIÓN - Si su aparato, o si una cinta, ha permanecido durante algún tiempo en un ambiente frío, por ejemplo debido a un
transporte en invierno, espere aproximadamente 2 horas antes de utilizar su aparato de video. Las aberturas situadas por
encima y por debajo han sido previstas para la ventilación. No deben ser recubiertas. Durante las tormentas, se aconseja
desenchufar el video de la toma conectada a la antena exterior. Este aparato ha sido previsto para un uso doméstico. No debe
ser nunca utilizado para fines industriales.
MANTENIMIENTO -Utilice un paño suave, límpio y seco,no utilice productos decapantes, disolventes, abrasivos, etc... Si un objeto
o un líquido se introduce en el aparato, desenchúfelo inmediatamente y póngase en contacto con un técnico autorizado.
PRECAUCIÓN
Temperatura ambiente máxima: 35°C
Grado medio de humedad: 85%
UTILIZACIÓN
Es ilegal hacer copias completas o parciales de las grabaciones protegidas por la ley de copyright, sin tener autorización
explícita del titular de los derechos.
Thomson Multimedia no se responsabiliza por la utilización no conforme a las
indicaciones de estas instrucciones.
ESPAÑOL
2 Combo(GB-D-IT-ES) 17/05/1999 19:59 Page 10

11
INDICE
CONEXIONES BÁSICAS
. . . . . . . . . . . . . . . . . . . . . . . . . . . . . . . . . . . . . . . . 12
INSTRUCCIONES DE NAVEGACIÓN
. . . . . . . . . . . . . . . . . . . . . . . . . . . . . . . . 12
CÓMO SINTONIZAR POR PRIMERA VEZ LOS CANALES DE TV EN EL
COMBI TV-VÍDEO . . . . . . . . . . . . . . . . . . . . . . . . . . . . . . . . . . . . . . . . . .13
Clasificación de canales . . . . . . . . . . . . . . . . . . . . . . . . . . . . . . . . . .14
Y AJUSTE DEL RELOJ . . . . . . . . . . . . . . . . . . . . . . . . . . . . . . . . . . . . . .14
NUEVOS CANALES . . . . . . . . . . . . . . . . . . . . . . . . . . . . . . . . . . . . . . .15
FUNCIONES BÁSICAS DEL COMBI TV-VÍDEO . . . . . . . . . . . . . . . . . . . . .17
AUDIO VÍDEO 1/2 . . . . . . . . . . . . . . . . . . . . . . . . . . . . . . . . . . . . . . . . . .20
GRABAR . . . . . . . . . . . . . . . . . . . . . . . . . . . . . . . . . . . . . . . . . . . . . . . . .21
Grabación inmediata de un programa . . . . . . . . . . . . . . . . . . . . . .21
Grabación con parada automática . . . . . . . . . . . . . . . . . . . . . . . . . .21
CÓMO PROGRAMAR UNA GRABACIÓN CON LOS CÓDIGOS
SHOW VIEW . . . . . . . . . . . . . . . . . . . . . . . . . . . . . . . . . . . . . . . . . . . . . .22
GRABACIÓN PROGRAMADA . . . . . . . . . . . . . . . . . . . . . . . . . . . . . . . . . . .23
CÓMO SUPRIMIR UNA GRABACIÓN PROGRAMADA . . . . . . . . . . . . . . . . .25
PREFERENCIAS . . . . . . . . . . . . . . . . . . . . . . . . . . . . . . . . . . . . . . . . . . . .26
¿CÓMO UTILIZAR EL TELETEXTO?. . . . . . . . . . . . . . . . . . . . . . . . . . . . .27
INFORMACIONES SUPLEMENTARIAS . . . . . . . . . . . . . . . . . . . . . . . . . . . . .28
IDENTIFICACIÓN Y SOLUCIÓN DE PROBLEMAS . . . . . . . . . . . . . . . . . . . .32
ANTES DE COMENZAR
Preocupados por mejorar la calidad de nuestros productos, nos reservamos el derecho de modificar sus caracteris-
ticas. Por lo tanto las informaciones contenidas en esta nota pueden cambiar y no son contractuales.
ESPAÑOL
MENU
EXIT
2
1
5
8
4
7
AV
6
9
3
0000
SP/LP
MONITOR
PR
0
/--
GOTO 0000
TRK
REW.
PLAY
REC. PAUSE
F.FWD
STOP
INFO
TEXT
SHOWVIEW TV
VPS
PREF.
-
+
SIZE AAA 1,5 V 0%MERCURY
GREENELL
EXTRA HEAVY DUTY
-
+
SIZE AAA 1,5 V 0%MERCURY
GREENELL
EXTRA HEAVY DUTY
Antena de dipolo
u
Antena de bucle *
Adaptador de antena *
Mando a distancia y pilas
Manuales de instala-
ción y
de utilización
Respetuosos con el medio ambiente, hemos impreso estos documentos en papel reciclado no blanqueado.
* en los modelos equipados
2 Combo(GB-D-IT-ES) 17/05/1999 19:59 Page 11

12
Dirija el mando a distancia hacia el Combi TV-vídeo cuando pulse una tecla.
SELECCIÓN DE UN MENÚ - Mediante la tecla del mando a distancia se accede al menú que permite utilizar las fun-
ciones del Combi TV-vídeo o sintonizarlo.
CÓMO MOVERSE POR LOS MENÚS :
1 - Para seleccionar una función, elija la línea por medio de o .
2 - Para confirmar su selección, pulse .
3 -
Para realizar algún ajuste (seleccionar una opción, aumentar o disminuir un valor), utilice las teclas
o
.
4 - Para salir de un menú, pulse .
EJEMPLO :Los símbolos C/Bque aparecen en la pantalla indican que una opción se encuentra accesible. Para seleccionar una
opción, pulse las teclas o .
EXIT
MENU
INSTRUCCIONES DE NAVEGACIÓN
1
2
Conecte el cable de la antena exterior o de la
antena de dipolo a la toma ( IN ) del CombiTV-
vídeo.
Conecte el Combi TV-vídeo a un enchufe de la red
mediante el cable de alimentación.
2
1
220 - 240 V
ACERCA DE LAS INSTRUCCIONES:este documento es común a varios modelos de Combi TV-Vídeo. Por ello, ciertas funciones o
ajustes pueden no estar disponibles en el modelo adquirido por usted.
ACERCA DEL INTERRUPTOR:la posición del interruptor Marcha/Parada
B
difiere de unos modelos a otros.
CONEXIONES BÁSICAS
1
1
2
ESPAÑOL
*
¡Respete el medio ambiente! Antes de tirar las pilas, infórmese en su distribuidor,quien podrá
encargarse de recuperarlas si las mismas son objeto de un reciclaje especial.
* en los modelos equipados
12 3
!
▲
C
OK
B
▼
EXIT MENU
MENU
EXIT
GOTO 0000
VPS
2 Combo(GB-D-IT-ES) 17/05/1999 19:59 Page 12

13
Switch on your Combi TV-Video recorder using the on
button which is located on the front of your Combi TV-
Video recorder.
Accendete ilVideovision con il tasto di accensione situato
sulla parte anteriore del Videovision.
Schalten Sie den Kombi TV-Videorecorder mit Hilfe der
Taste Ein/Aus auf derVorderseite des Videorecorders ein.
Encienda su Combi TV-Vídeo con la tecla de encendido
que hay en la cara delantera de su aparato.
Press
B
button to turn on your Combi TV-Video
recorder The Power LED will turn green.
Premete il tasto
B
per accendere il Videovision. Il
diodo verde si accende.
Zum Einschalten Ihres Kombi TV-Videorecorders die
Taste
B
drücken. Die grüne Anzeigelampe leuchtet auf.
Pulse la tecla
B
para encender el Combi TV-vídeo. El
piloto se encenderá de color verde.
By means of key V/W, select the language you prefer for
display of the menus. Confirm with OK.
Con il tasto V/Wdel telecomando scegliete la lingua che
preferite per visualizzare i menu che appariranno via via
sullo schermo. Convalidate con OK.
Mit der Taste V/Wdie von Ihnen für die Anzeige der
Bildschirmmenüs bevorzugte Sprache wählen. Mit OK.
bestätigen.
Utilice la tecla V/Wdel mando a distancia para elegir el
idioma en el que desea que aparezcan los menús en la pan-
talla. Para confirmar su selección, pulse OK.
Press C/Bbuttons until the country you are currently
residing in is selected. Confirm with OK.
Premete il tasto C/Bper selezionare il vostro paese di
residenza abituale. Convalidate con OK.
Zur Wahl des Landes, in dem Sie wohnen, die Taste C/B
benutzen. Mit OK. bestätigen.
Pulse las teclas C/Bpara seleccionar su país de
residencia. Para confirmar su selección, pulse OK.
You are informed by a message that your
Combi TV-Video recorder is now scanning the channels
which can be received in your region and is storing them.
You'll have to wait a fairly long time until a message
informs you that channel storage is completed.
Press OK to sort the channels.
Un messaggio indicher
à che il
Videovision sta cercando e
memorizzando i canali che potete ricevere nella vostra
regione. Alla fine dell’operazione, un messaggio segnalerà
la fine della memorizzazione dei canali.
Premete OK per procedere al riordino dei canali.
Eine Meldung informiert Sie, daß Ihr Kombi TV-
Videorecorder die in Ihrer Region empfangenen Sender
sucht und anschließend speichert.Warten Sie solange, bis
Sie die Meldung erhalten, daß die Senderspeicherung
abgeschlossen ist.
Zum Sortieren der Sender OK drücken.
Un mensaje le indicará que su Combi TV-vídeo está bus-
cando los canales que se pueden recibir en su región y los
guardará en la memoria. Espere un rato (hasta 10 minu-
tos); aparecerá un mensaje indicando que ha finalizado la
memorización de los canales.
Pulse OK para clasificar los canales.
1
2
3
4
5
Continue on the following page.
Weiter auf der nächsten Seite.
Continua nella pagina seguente
Contin
ú
a en la página siguiente.
!
MENU
TEXT
TV
For easy identification of the channels, we suggest you look up the programmes in a TV-magazine.
INSTALLING THE CURRENT TV CHANNELS IN THE COMBI TV-VIDEO RECORDER FOR THE 1ST TIME
Um Ihnen das Erkennen der Programme zu erleichtern, sollten Sie eine Programmzeitschrift zur Hand haben.
ERSTMALIGE EINSTELLUNG DER FERNSEHSENDER IN IHREM KOMBI TV-VIDEORECORDER
Per aiutarvi ad identificare i canali, vi consigliamo di consultare un programma TV.
COME INSTALLARE PER LA PRIMA VOLTA I CANALI TV SUL VIDEOVISION
Para poder identificar los distintos canales, le sugerimos que consulte la programación de TV.
CÓMO SINTONIZAR POR PRIMERA VEZ LOS CANALES DE TV EN EL COMBI TV-VÍDEO
▲
C
OK
B
▼
EXIT MENU
MENU
EXIT
GOTO 0000
VPS
ENGLISH
DEUTSCHITALIANOESPAÑOL
2 Combo(GB-D-IT-ES) 17/05/1999 20:00 Page 13

... Sorting your channels
Menu Organizer
... Riordinare i vostri canali
Menu Ordine dei canali
... Sortieren der sender
Menu Programm-Organisation
... Clasificación de los canales
Menu Organizador
14
If the channel number does not match the picture: select
the command "Swap with Pr", enter the correct channel
number and confirm by pressing OK (Oand 1for PRI).
Se il numero di canale non corrisponde alle immagini: sele-
zionate la linea “Cambiare con Pr”, digitate il numero gius-
to e confermate con OK (0e 1per PRI).
Sollte die Programmnummer nicht mit derAnzeige übereinstimmen:
wählen Sie“Wechseln mit Pr.”,geben Sie die richtige Programmnummer
ein und bestätigen Sie mit OK (0und 1für PRI).
Si el número del canal no corresponde a las imágenes:selec-
cione la línea “Permutar con Pr”, introduzca el número de
canal correcto y valide con OK (0y 1para PRI).
Press "OK" key to continue. If the programme number
matches the pictures you are viewing, press key
B
to go
on to the next programme .
Se il numero di canale proposto corrisponde all'immagi-
ne trovata, premete su
B
per passare ad un altro canale.
Wenn die Nummer des vorgeschlagenen Senders dem
gefundenen Bild entspricht, drücken Sie die Taste
B
,um
auf den nächsten Sender weiterzuschalten.
Si el número del canal propuesto corresponde a la ima-
gen encontrada, pulse
B
para pasar a otro canal.
When you find a channel you want to delete, set
the cursor on the line D
ELETE
PR and then
press
OK.
Quando trovate un canale da cancellare, posizionatevi
sulla linea C
ANCELLARE
PR, poi premete su
OK.
Wenn Sie auf einen Sender löschen möchten, den
Cursor auf die Zeile P
ROGR
.
LÖSCHEN
setzen und dann
OK
drücken.
Si encuentra un canal que desea suprimir, sitúese en la
línea B
ORRE CANAL
y pulse
OK.
If you wish to sort the TV channels, repeat steps 1 to
3; otherwise move on to step 5.
Se volete continuare a riordinare i canaliTV, ripetete le
tappe da 1 a 3; in caso contrario passate alla tappa 5.
Wenn Sie weitereTV-Sender sortieren möchten, wiederholen
Sie die Schritte 1 bis 3; andernfalls gehen Sie zu Schritt 5 über.
Si desea continuar ordenando los canales de TV, repita
las etapas 1 a 3; de lo contrario, pase a la etapa 5.
Call up the S
UMMARY
menu with key
MENU
.With key
V/W
, select the line Installation and press
OK.
Select
the line
Clock set
with key
V/W
and press
OK.
Visualizzate il menu S
OMMARIO
con il tasto
MENU
.
Posizionatevi sulla linea Installazione con
V/W
e pre-
mete su
OK.
Posizionatevi sulla linea Regolazione oro-
logio con
V/W
e premete su
OK.
Rufen Sie das
Ü
BERSICHT
mit der Taste MENU auf. Mit den
Tasten V/Wdie Zeile Installation wählen und OK. drücken.
Mit den Tasten V/Wdie Zeile Uhr wählen und OK drücken.
Para ver el menú I
NDICE
pulse la tecla
MENU
. Sitúese
en la línea I
NSTALACIÓN
con
V/W
y pulse
OK.
Sitúese en la línea Puesta en hora reloj con
V/W
y
pulse
OK.
Press E
XIT
button to remove menu.
Premete il tasto E
XIT
per uscire dal menu.
Zum Verlassen des Menüs die Taste E
XIT
drücken.
Pulse la tecla E
XIT
para que desaparezca el menú.
2
3
1
Use the digit buttons (0-9) to enter the time & date in
the following order: hour, minute, day, month, year.
Servendovi dei tasti numerici (da 0 a 9) digitate l’ora
e la data nel seguente ordine: ora, minuti, giorno, mese,
anno.
Mit Hilfe der Zifferntasten (0-9) die Uhrzeit und das Datum in
folgender Reihenfolge eingeben:Stunde,Minuten,Tag,Monat,Jahr.
Utilice las teclas numéricas (0-9) para introducir la
hora y la fecha en el siguiente orden:hora, minutos, día,
mes, año.
2
Press
OK
button to confirm.
Premete il tasto
OK
per convalidare.
Zum Bestätigen die Taste
OK
drücken.
Pulse la tecla
OK
para confirmar. 3
4
5
…Et réglage de l’horloge
1
To add, modify or install new channels (decoder), refer to page 15.
Informationen über das Hinzufügen, Ändern oder Installieren neuer Programme (Decoder) entnehmen Sie der Seite 15.
Per completare, modificare o installare nuovi canali (decodificatore) vedi pagina 15.
Para completar, modificar o sintonizar nuevos canales (descodificador) remítase a la página 15.
!
...And clock setting
... E regolazione dell’orologio
…Und einstellenvon datum und uhrzeit
...Y ajuste del reloj
ENGLISHDEUTSCHITALIANOESPAÑOL
2 Combo(GB-D-IT-ES) 17/05/1999 20:00 Page 14

15
Call up the SUMMARY menu with key MENU. Press
W
or
V
to select the line installation. Press OK.
Press
W
or
V
to select the line MANUAL INSTALLA-
TION. Press OK.
Visualizzate il menu SOMMARIO con il tasto
MENU.Premete su
W
o
V
per selezionare la linea
Installazione. Premete su OK. Premete su
W
o
V
per selezionare la linea INSTALLAZIONE MANUALE.
Premete su OK.
Rufen Sie das ÜBERSICHT mit derTaste MENU auf.
Drücken Sie
W
bzw.
V
, um die Zeile INSTALLATION
zu wählen.
OK
drücken. Drücken Sie
W
bzw.
V
,um
die Zeile MANUELLE INSTAL. zu wählen.
OK
drüc-
ken.
Para ver el menú INDICE pulse la tecla MENU.
Pulse
W
o
V
para seleccionar la línea INSTALACIÓN.
Pulse OK. Pulse
W
o
V
para seleccionar la línea
INSTALACIÓN MANUAL. Pulse OK.
The option STANDARD is pre-selected.Press
C/B
to
select the TV standard.With
W/V
, select the line
RECEPTION and choose aerial or cable with
C/B
(CABLE for cable TV channels, AERIAL for the chan-
nels received via your roof aerial).
La linea STANDARD è già selezionata, premete su
C/B
per scegliere la norma di ricezione.
Selezionate la linea RICEZIONE con
W/V
e sceglie-
te Antenna o Cavo con
C/B
.(CAVO per i canali
trasmessi via cavo,Antenna per i canali captati dalla
vostra Antenna televisiva sul tetto).
Die Zeile EMPFANGSSTANDARD ist bereits vor gewählt,
drücken Sie nun zurWahl der Empfangsnorm C/B Mit
W/Vdie Zeile KANALTYP wählen und Normal oder
Sonder mit C/Bwählen (SONDER für die
Kabelfernsehprogramme, NORMAL für die über Ihre
Hausantenne empfangenen Sender).
La línea NORMA DE VÍDEO ya se encuentra seleccio-
nada. Pulse
C/B
para elegir la norma de recepción.
Seleccione la línea RECEPCIÓN con
W/V
y elija
Antena o Cable por medio de
C/B
.(CABLE para los
canales por cable,Antena para los canales captados
a través de la antena del tejado).
Press W/Vto select the line AUTO SEARCH.
Premete su W/Vper selezionare la linea RICERCA
AUTOMAT.
Drücken Sie W/V, um die Zeile SUCHLAUF zu
wählen.
Pulse W/Vpara seleccionar la línea BUSQUEDA
AUTO.
B
EGINNING INSTALLATION
Press C/Bto begin installation. When a channel is
found, the picture is displayed. IF THE PICTURE QUALITY
IS POOR,use the Fine tuning buttons (W,C/B then W).
COMINCIARE L'INSTALLAZIONE
Premete su C/Bper cominciare l'installazione . Quando
un canale viene trovato, appaiono le immagini.
SE LA QUALITÀ DELL’IMMAGINE È SCADENTE : provate la
Sintonia fine (W,C/B poi W).
SENDERSUCHE STARTEN
Die Sendersuche mit C/Bstarten. Wird ein Sender
gefunden, erscheinen seine Bilder. WENN DIE
BILDQUALITÄT SCHLECHT IST, die Feineinstellung benut-
zen (W,C/B dann W). (Feinabstimmung)
COMENZAR LA SINTONIZACIÓN
Pulse C/Bpara comenzar la instalación . Cuando se
encuentra un canal, aparecen las im
á
genes correspon-
dientes. Si la imagen es de mala calidad: pruebe el
Sintonía fina (W,C/B yW).
VIDEOPLUS+ code (If included)
OPTION: These codes are stored automatically when pro-
gramming the first time
VIDEOPLUS+ CODE (channel ID)
Check these codes to make sure that yourVideoplus+-pro-
grammed recording is successful. Most TV magazines
contain a list ofVideoplus+ numbers attributed to the satel-
lite and terrestrial channels. If aVideoplus+ programming on
a channel has not worked properly (wrong channel, wrong
times), check and correct the Videoplus+ number.
N° SHOWVIEW (solo su certi modelli)
FACOLTATIVO : questi codici si iscrivono automaticamente
al momento della prima programmazione.NR. SHOWVIEW
N° SHOWVIEW (N° GUIDA)
Per effettuare con successo le vostre registrazioni pro-
grammate con i codici
SHOWVIEW
,verificate questi nume-
ri. La maggior parte delle riviste di programmi TV pub-
blicano una lista dei numeri guida
SHOWVIEW
attribuiti ai
canali via satellite e terrestri.
SHOWVIEW-Nr (bei entsprechend ausgestatteten Modellen)
OPTION: diese Codes werden bei der ersten
Programmierung automatisch eingetragen.
SHOWVIEW-SENDERKENNZAHL
Prüfen Sie diese Kennzahlen,damit Ihnen Ihre mit den
SHOWVIEW
-Codes programmierten Aufnahmen gelin-
gen. Die meisten Fernsehprogrammzeitschriften
enthalten eine Liste der den Funkfernseh- und
Satellitensendern zugeordneten
SHOWVIEW
-
Nº SHOWVIEW (en los modelos equipados)
OPCIONAL: estos códigos quedan registrados de forma
automática al realizar la primera programación.
Nº SHOWVIEW (Nº GUÍA)
Para la buena ejecución de sus grabaciones programadas
con los códigos SHOWVIEW, compruebe estos números. La
programación deTV en la mayoría de las publicaciones apa-
rece acompañada de una lista de los números guía
SHOWVIEW asignados a los canales por satélite y terrestres.
…Et réglage de l’horloge
New channel
Nuovo canale
Neuer sender
Nuevos canales
1
2
4
3
5
ENGLISH
DEUTSCHITALIANOESPAÑOL
2 Combo(GB-D-IT-ES) 17/05/1999 20:00 Page 15

16
ENGLISHDEUTSCHITALIANOESPAÑOL
I
f the channel is scrambled, set the cursor on
DECODER
(W)
and tick off the box by pressing the
OK key, otherwise continue with the next step.
Se il canale è in codice, posizionatevi su
DECODIFICATORE
(W)
e selezionate la casella col
tasto OK, altrimenti passate al punto seguente.
Wenn der Sender verschlüsselt ist, den Cursor auf
DECODER (W) setzen und das Kästchen durch
Drücken der OK-Taste ankreuzen, sonst mit dem
nächsten Schritt fortfahren.
Si el canal está codificado, sitúese sobre
DESCODIFICADOR (W) y marque la casilla por medio de
la tecla OK. En caso contrario, pase a la etapa siguiente.
Set the cursor to STORE ON PRand assign a num-
ber to the channel with key
C/B
.
(0 and 1 for PR1)
Posizionatevi su MEMORIZ.SU N. PRed attribuite
un numero di canale servendovi dei tasti
C/B
.
(0 e 1 per PR1)
.
Den Cursor auf SPEICHERN AUF PR.setzen und dem
Programm mit den Tasten C/Beine Sendernummer
zuteilen. (0 und 1 für PR1)
Sitúese en MEMORIZAR EN PRy asigne un número
al canal mediante las teclas
C/B
.
(0 y 1 para PR1)
If you want to continue searching for otherTV channels,
repeat step 4-9.
Se desiderate proseguire la ricerca dei canali TV, ripete-
te le tappe da 4 a 9.
Wenn Sie die Sendersuche fortsetzen möchten,
nun die Schritte 4-9 wiederholen.
Si desea seguir buscando otros canales de TV,
repita los pasos 4-9.
Press
OK
button to store.
Premete il tasto
OK
per memorizzare questo numero.
Zum Speichern der Sendernummer OK drücken.
Pulse la tecla OK para guardar.
Press
EXIT
button to remove menu.
Premete il tasto
EXIT
per uscire dal menu.
Zum Verlassen des Menüs die Taste
EXIT
drücken.
Pulse la tecla
EXIT
para salir del menú.
6
7
8
9
10
SHOWVIEW is a registered trademark of Gemstar Development Corporation.
The SHOWVIEW system is manufactured under licence from Gemstar Development Corporation.
SHOWVIEW ist ein eingetragenes Warenzeichen der Gemstar Development Corporation.
Das SHOWVIEW-System wurde hergestellt unter der Lizenz der Gemstar Development Corporation.
SHOWVIEW è un marchio registrato di Gemstar Development Corporation.
Il sistema SHOWVIEW è prodotto su licenza di Gemstar Development Corporation.
SHOWVIEW es una marca registrada por Gemstar Development Corporation.
El sistema SHOWVIEW está fabricado bajo licencia de Gemstar Development Corporation.
Tape ejection :
To eject a tape, press on button
STOP/EJECT on the front of
your combined TV-VCR unit.
Cassettenauswurf :
Um eineVideocassette auszuwer-
fen, drücken Sie auf die Auswer-
ftaste STOP/EJECT an der
Frontseite Ihres TV-Video-
Kombigerätes.
Espulsione di una cassetta :
Per l’espulsione di una cassetta
premere il tasto STOP/EJECT
sul frontale del vostro videovision.
Extracción de un casete :
Para extraer un casete, pulsar la
tecla STOP/EJECT en la fachada
del TV-Vídeo
▲
C
OK
B
▼
EXIT MENU
MENU
EXIT
GOTO 0000
VPS
2 Combo(GB-D-IT-ES) 17/05/1999 20:00 Page 16

17
THE MAIN FUNCTIONS OF YOUR REMOTE CONTROL CAN BE FOUND ON THE VCR FRONT.
O
PERATING BASIC
C
OMBI
TV-V
IDEO RECORDER FUNCTIONS
DIE HAUPTFUNKTIONEN IHRER FERNBEDIENUNG SIND AUF DER VORDERSEITE IHRES VIDEOREKORDERS ZU FINDEN.
B
ENUTZEN DER GRUNDLEGENDEN
F
UNKTION DES
K
OMBI
TV-V
IDEORECORDERS
TROVERETE LE PRINCIPALI FUNZIONI DEL VOSTRO TELECOMANDO SULLA FACCIA ANTERIORE DEL VIDEOREGISTRATORE.
U
TILIZZARE LE FUNZIONI DI BASE DEL
V
IDEOVISION
ENCONTRARÁ LAS PRINCIPALES FUNCIONES DE SU MANDO A DISTANCIA EN LA PARTE FRONTAL DEL VÍDEO.
F
UNCIONES BÁSICAS DEL
C
OMBI
TV-
VÍDEO
Powering up the Combi TV-Video
recorder from standby mode.
Press the
B
button.
Per accendere il Videovision messo
in standby :
Premete il tasto
B
.
Einschalten des auf Bereitschaft ste-
henden KombiTV-Videorecorders :
Taste
B
drücken.
Encender el CombiTV-vídeo cuando se
encuentra en modo de espera :
Pulse la tecla
B
.
Putting the Combi TV-Video
recorder into standby mode.
Press the
B
button.
Per mettere il Videovision in
standby:
Premete il tasto
B
.
Um den Kombi TV-Videorecorder
auf Bereitschaft zu schalten :
Taste
B
drücken.
Poner el Combi TV-vídeo en modo
de espera :
Pulse la tecla
B
.
MENU
EXIT
PR
GOTO 0000
TRK
INFO
TEXT
SHOWVIEW TV
VPS
PREF.
MENU
EXIT
PR
GOTO 0000
TRK
INFO
TEXT
SHOWVIEW TV
VPS
PREF.
Watching the TV channels instal-
led in yourVCR :
Press the digit (0-9) or PR. + /-.
Per guardare i canali TV installati
sul vostro videoregistratore :
premete sui tasti numerici (da 0 a 9) o
su PR. + /-.
Sie möchten die auf Ihrem Videorecorder
gespeicherten TV-Programme sehen :
drücken Sie die Zifferntasten (0-9) oder die
Tasten PR. + /-.
Ver los canales deTV sintonizados
en el vídeo :
pulse las teclas numéricas (0-9) o las
teclas PR. + /-.
To select a programme above 9 :
E.g.: press 0/-- then 1 and 7 for Pr. 17.
Per selezionare un programma
superiore a 9 :
Esempio : premete il tasto 0/-- poi 1 e 7
per il programma 17.
Wahl eines zweistelligen Programmes
(über 9) :
Beispiel:drücken Sie dieTaste 0/ - gefolgt von
I und 7, um das Programm 17 zu wählen.
Para seleccionar un programa supe-
rior a 9 :
Ejemplo: pulse la tecla 0/-- y luego 1 y 7
para Pr 17.
Volume. Use the volume a+/- buttons
to increase or decrease the sound volume.
Regolazione dell'audio. Tramite i tasti
audio a+/-, è possible aumentare o
ridurre il livello audio dell'apparecchio.
Läutstärke :erhöhen bzw.senken Sie die
Lautstärke mit den Tasten a+/-.
Ajuste del volumen : con las teclas
a+/-, aumente o disminuya el volumen
de sonido..
Sound mute. Press to mute the
sound, press again to restore.
Esclusione dell'audio. Una pressione
sul tasto elimina l'audio che può
essere in seguito ripristinato esercitando
una seconda pressione sullo stesso tasto.
Ton abstellen. Durch Drücken der
Taste können sie denTon abstellen;
durch erneutes Drücken der Taste wird
der Ton wieder eingestellt.
Interrupción del sonido.Al presionar
la tecla el sonido se interrumpe, al
volverla a presionar se restablece.
2
1
5
8
4
7
AV
6
9
3
0000
SP/LP
MONITOR
PR
0/--
GOTO 0000
REW
PLAY
F FWD
2
1
5
8
4
7
AV
6
9
3
0000
SP/LP
MONITOR
PR
0/--
GOTO 0000
PLAY
MENU
EXIT
2
1
5
4 6
3
0000
SP/LP
MONITOR
PR
GOTO 0000
VPS
MENU
EXIT
2
1
5
4 6
3
0000
MONITOR
PR
GOTO 0000
TEXT
VPS
PREF.
ENGLISH
DEUTSCHITALIANOESPAÑOL
2 Combo(GB-D-IT-ES) 17/05/1999 20:00 Page 17

18
ENGLISHDEUTSCHITALIANOESPAÑOL
Releasing the pause mode on a
video tape. Press the
PLAY
button.
Per riprendere la lettura di una
registrazione video : premete il
tasto
PLAY
.
Fortsetzen der Wiedergabe einer
Kassette : drücken Sie die Taste
PLAY
.
Finalizar la pausa en una cinta de
vídeo. Pulse la tecla
PLAY
.
5
8
4
7
AV
6
9
0000
SP/LP
0/--
REW.
PLAY
REC. PAUSE
F.FWD
STOP
Performing a backward search
on a video tape. Press the
REW
but-
ton while in playback mode.
Per cercare una registrazione
video andando verso l’inizio della
videocassetta : premete il tasto
REW
(videoregistratore in lettura).
Bildsuchlauf rückwärts : drücken
Sie während der wiedergade einer
Kassette die Taste
REW
.
Búsqueda hacia atrás en una
cinta de vídeo. Pulse la tecla
REW
con el vídeo en modo “PLAY”.
Performing a pause on a video
tape. Press the PAUSE button while
in playback mode.
Per interrompere momentanea-
mente la lettura di una registra-
zione video : premete il tasto PAUSE.
Vorübergehendes Stoppen der
Wiedergabe einer Kassette : drüc-
ken Sie die Taste PAUSE.
Pausa en la lectura de una cinta
de vídeo. Pulse la tecla PAUSE.
5
8
4
7
AV
6
9
0000
SP/LP
0/--
REW.
PLAY
REC. PAUSE
F.FWD
STOP
5
8
4
7
AV
6
9
0000
SP/LP
0/--
REW.
PLAY
REC. PAUSE
F.FWD
STOP
Playing back a video tape.
Press the PLAY button.
Per leggere una videocassetta :
premete il tasto PLAY.
Wiedergabe einerVideokassette :
Taste PLAY drücken.
Ver una cinta de vídeo.
Pulse la tecla PLAY.
To watch a TV channel or a program-
me as it is being recorded :
press the
MONITOR key.
(On models equipped with 1 tuner.)
Guardare un canale o una registra-
zione in corso
:
premete il tasto
MONITOR.
(Con modello munito di 1 tuner)
Betrachten von Bildern eines Programmes
bzw. Bildern, die gerade aufgezeichnet
werden :
Drücken Sie die Taste Monitor MONITOR.
(Bei Modellen, die mit 1 Tuner ausgerüstet
sind)
Ver las imágenes de una cadena o las
imágenes que se están grabando:
Pulse la tecla MONITOR.
(En el modelo equipado con 1 tuner)
Stopping a video tape playback.
Press the
STOP
button.
Per interrompere la lettura di una
videocassetta :
Premete il tasto
STOP
.
Stoppen der Wiedergabe einer
Videokassette :
Taste
STOP
drücken.
Para una cinta de vídeo.
Pulse la tecla
STOP
.
5
8
4
7
AV
6
9
0000
SP/LP
0/--
REW.
PLAY
REC. PAUSE
F.FWD
STOP
5
8
4
7
AV
6
9
0000
SP/LP
0/--
REW.
PLAY
REC. PAUSE
F.FWD
STOP
5
8
4
7
AV
6
9
0000
SP/LP
0/--
REW.
PLAY
REC. PAUSE
F.FWD
STOP
Performing a forward search on a
video tape. Press the
F.FWD
button
while in playback mode.
Per cercare una registrazione video
andando verso la fine della video-
cassetta
: premete il tasto
F.FWD
(video-
registratore in lettura).
Bildsuchlauf vorwärts : drücken Sie
während der wiedergade einer
Kassette die Taste
F.FWD
.
Búsqueda hacia delante en una
cinta de vídeo. Pulse la tecla
F.FWD
con el vídeo en modo “PLAY”.
5
8
4
7
AV
6
9
0000
SP/LP
0/--
REW.
PLAY
REC. PAUSE
F.FWD
STOP
2 Combo(GB-D-IT-ES) 17/05/1999 20:00 Page 18

19
Selecting standard play (SP) or
long play (LP)*.
Press the SP/LP button
(2 seconds).
Per selezionare durata normale
(SP) o lunga durata (LP)* :
premete il tasto SP/LP
(2 secondi).
Zur Wahl von Standardspielzeit
(SP) oder Langzeit (LP)* :
drücken Sie die Taste SP/LP
(2 Sekunden).
Selección de duración normal
(SP) o larga duración (LP)* :
pulse la tecla SP/LP
(2 segundos)
2
1
5
8
4
7
AV
6
9
3
0000
SP/LP
MONITOR
PR
0/--
REW.
PLAY
F.FWD
Manually tracking a video tape for
improved viewing. Press the
TRK +/-
buttons to manually track the tape.
Per comandare la regolazione
manuale della testina di lettura
rispetto alla pista registrata (fase)
allo scopo di migliorare l’immagi-
ne : premete il tasto
TRK +/-
(videore-
gistratore in lettura).
Manuelles Spureinstellung zur
Verbesserung der Wiedergabe :
drücken Sie während der wiedergabe
die Taste TRK +/-.
Ajuste manual del cabezal de lec-
tura a la cinta grabada (fase) para
mejorar la calidad de la imagen.
Pulse las teclas TRK +/- con el vídeo en
modo “PLAY”.
MENU
EXIT
PR
GOTO 0000
TRK
INFO
TEXT
SHOWVIEW TV
VPS
PREF.
Viewing the status of the Combi
TV-videorecorder. Press the INFO
button.
Per sapere in che modo si trova il
videovision : premete il tasto INFO.
Anzeige des momentanen
Betriebszustandes des KombiTV-
Videorecorder :
drücken Sie die Taste
INFO.
Ver el modo en que se encuentra
el Combi TV-vídeo. Pulse la tecla
INFO.
MENU
EXIT
PR
GOTO 0000
TRK
INFO
TEXT
SHOWVIEW TV
VPS
PREF.
Playing a video tape fast forward.
Press the
F.FWD
button while in STOP
mode.
Per far avanzare il nastro : preme-
te il tasto
F.FWD
(videoregistratore su
STOP).
Schneller Vorlauf : drücken Sie die
Taste
F.FWD
(Videorecorder auf STOP).
Avance rápido de una cinta de
vídeo. Pulse la tecla
F.FWD
con el
vídeo en modo “STOP”.
Rewinding a video tape. Press the
REW button while in STOP mode.
Per riavvolgere il nastro : premete
il tasto REW (videoregistratore su
STOP).
Schneller Rücklauf : drücken Sie
die Taste REW (Videorecorder auf
STOP).
Rebobinar una cinta de vídeo.
Pulse la tecla REW con el vídeo en
modo “STOP”.
Variable speed* : Press the REW or
F.FWD button several times.(Combi TV-
Video recorder in pause mode).
Rallentatore variabile* : Premere più
volte il tasto REW o F.FWD
(Videovision su PAUSE)
Einstellbares Replay* : Drücken Sie
mehrere Male auf REW bzw. F.FWD
(Videorecorder in Pause-Stellung).
Cámara lenta variable* : Pulse varias
veces la tecla REW o F.FWD
(Combi TV-Vídeo en pausa).
5
8
4
7
AV
6
9
0000
SP/LP
0/--
REW.
PLAY
REC. PAUSE
F.FWD
STOP
5
8
4
7
AV
6
9
0000
SP/LP
0/--
REW.
PLAY
REC. PAUSE
F.FWD
STOP
5
8
4
7
AV
6
9
0000
SP/LP
0/--
REW.
PLAY
REC. PAUSE
F.FWD
STOP
ENGLISH
DEUTSCHITALIANOESPAÑOL
* If included / bei entsprechend ausgestatteten Modellen / solo su certi modelli / en los modelos equipados
2 Combo(GB-D-IT-ES) 17/05/1999 20:00 Page 19

20
ENGLISHDEUTSCHITALIANOESPAÑOL
TO VIEW AND/OR COPY PICTURES FROM A CONNECTED SET
AUDIO VIDEO 1/2.
ZUR WIEDERGABE UND/ODER DER AUFNAHME VON EINEM ANGESCHLOSSENEN GERÄT
AUDIO VIDEO 1/2.
PER VEDERE E/O COPIARE LE IMMAGINI DI UN APPARECCHIO COLLEGATO
AUDIO VIDEO 1/2.
PARA VER Y/O DUPLICAR LAS IMAGENES DE UN APARATO ADICION
Á
L CONECTADO
AUDIO VIDÉO 1/2.
Press the AV key on the remote control to select
the unit connected to socket AV1 or AV2.
Premete il tasto AV del telecomando per selezio-
nare un apparecchio collegato alla presa AV1 o
AV2.
Drücken Sie die Taste AV der Fernbedienung, um
ein an den Anschluß AV1 bzw. AV2 angeschlos-
senes Gerät zu wählen.
Pulse la tecla AV del mando a distancia para selec-
cionar un aparato conectado a la toma AV1 y AV2.
AV 2 AV 1
Á
2 Combo(GB-D-IT-ES) 17/05/1999 20:00 Page 20
This manual suits for next models
11
Table of contents