RCA TV/VCR COMBINATION User manual

U
SER
’
S
G
UIDE
TV/VCR COMBINATION

i
Important Information
WARNING
RISKOFELECTRICSHOCK
DO NOT OPEN
This symbol indicates
“dangerous voltage”
inside the product that
presents a risk of electric
shock or personal injury.
This symbol indicates
important instructions
accompanying the
product.
WARNING
To reduce the risk of fire or shock
hazard, do not expose this
product to rain or moisture.
CAUTION: To prevent electric shock, match wide blade of plug
to wide slot, fully insert.
ATTENTION: Pour éviter les chocs électriques, introduire la
lame la plus large de la fiche dans la borne correspondante de la
prise et pousser jusqu’au fond.
FCC regulations state that unauthorized changes or modifications to this equipment
may void the user’s authority to operate it.
Product Registration
Please fill out the product registration card and return it immediately. Returning
this card allows us to contact you if necessary.
Keep your sales receipt to obtain warranty parts and service and for proof of
purchase. Attach it here and record the serial and model numbers in case you
need them. The numbers are located on the back of the product.
Model No.______________________________________________________
Serial No. ______________________________________________________
Purchase Date: _________________________________________________
Dealer/Address/Phone: _________________________________________
________________________________________________________________
________________________________________________________________
Important Information
Note to Cable TV Installer
Cautions
TO REDUCE THE RISK OF ELECTRIC SHOCK, DO
NOT REMOVE COVER (OR BACK). NO USER
SERVICEABLE PARTS INSIDE. REFER SERVICING
TO QUALIFIED SERVICE PERSONNEL.
This reminder is provided to call your attention to Article 820-40 of the National
Electrical Code (Section 54 of the Canadian Electrical Code, Part 1) which provides
guidelines for proper grounding and, in particular, specifies that the cable ground
shall be connected to the grounding system of the building as close to the point of
cable entry as practical.
If fixed(non-moving) images are left on the screen for long periods, they may be
permanently imprinted on the screen. Such images include network logos, phone
numbers, and video games. This damage is not covered by your warranty.
Extended viewing of channels displaying these images should be avoided.

Introduction
Table of Contents
1
Important Information
Warning ______________________________ i
Cautions ______________________________ i
Note to Cable TV Installer _______________ i
Product Registration ____________________ i
Setting Up the TV/VCR
Startup
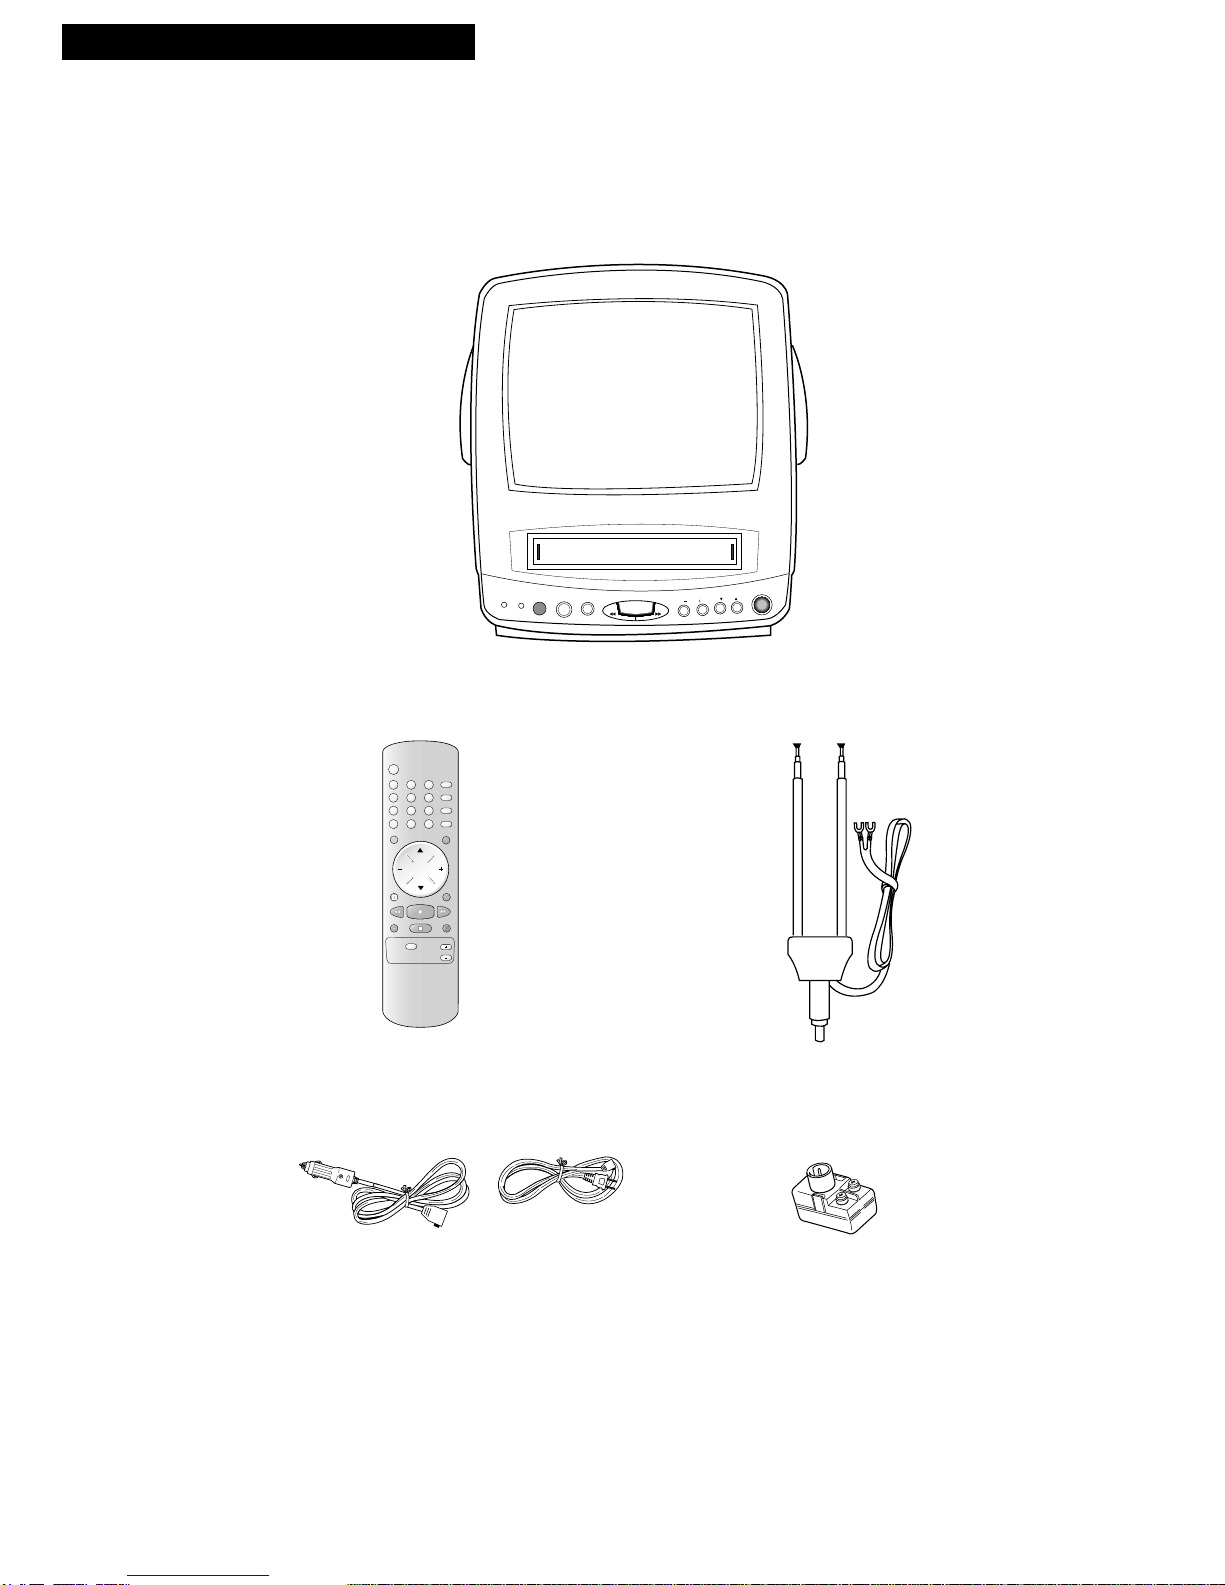
Check Parts Included With TV/VCR _ 2
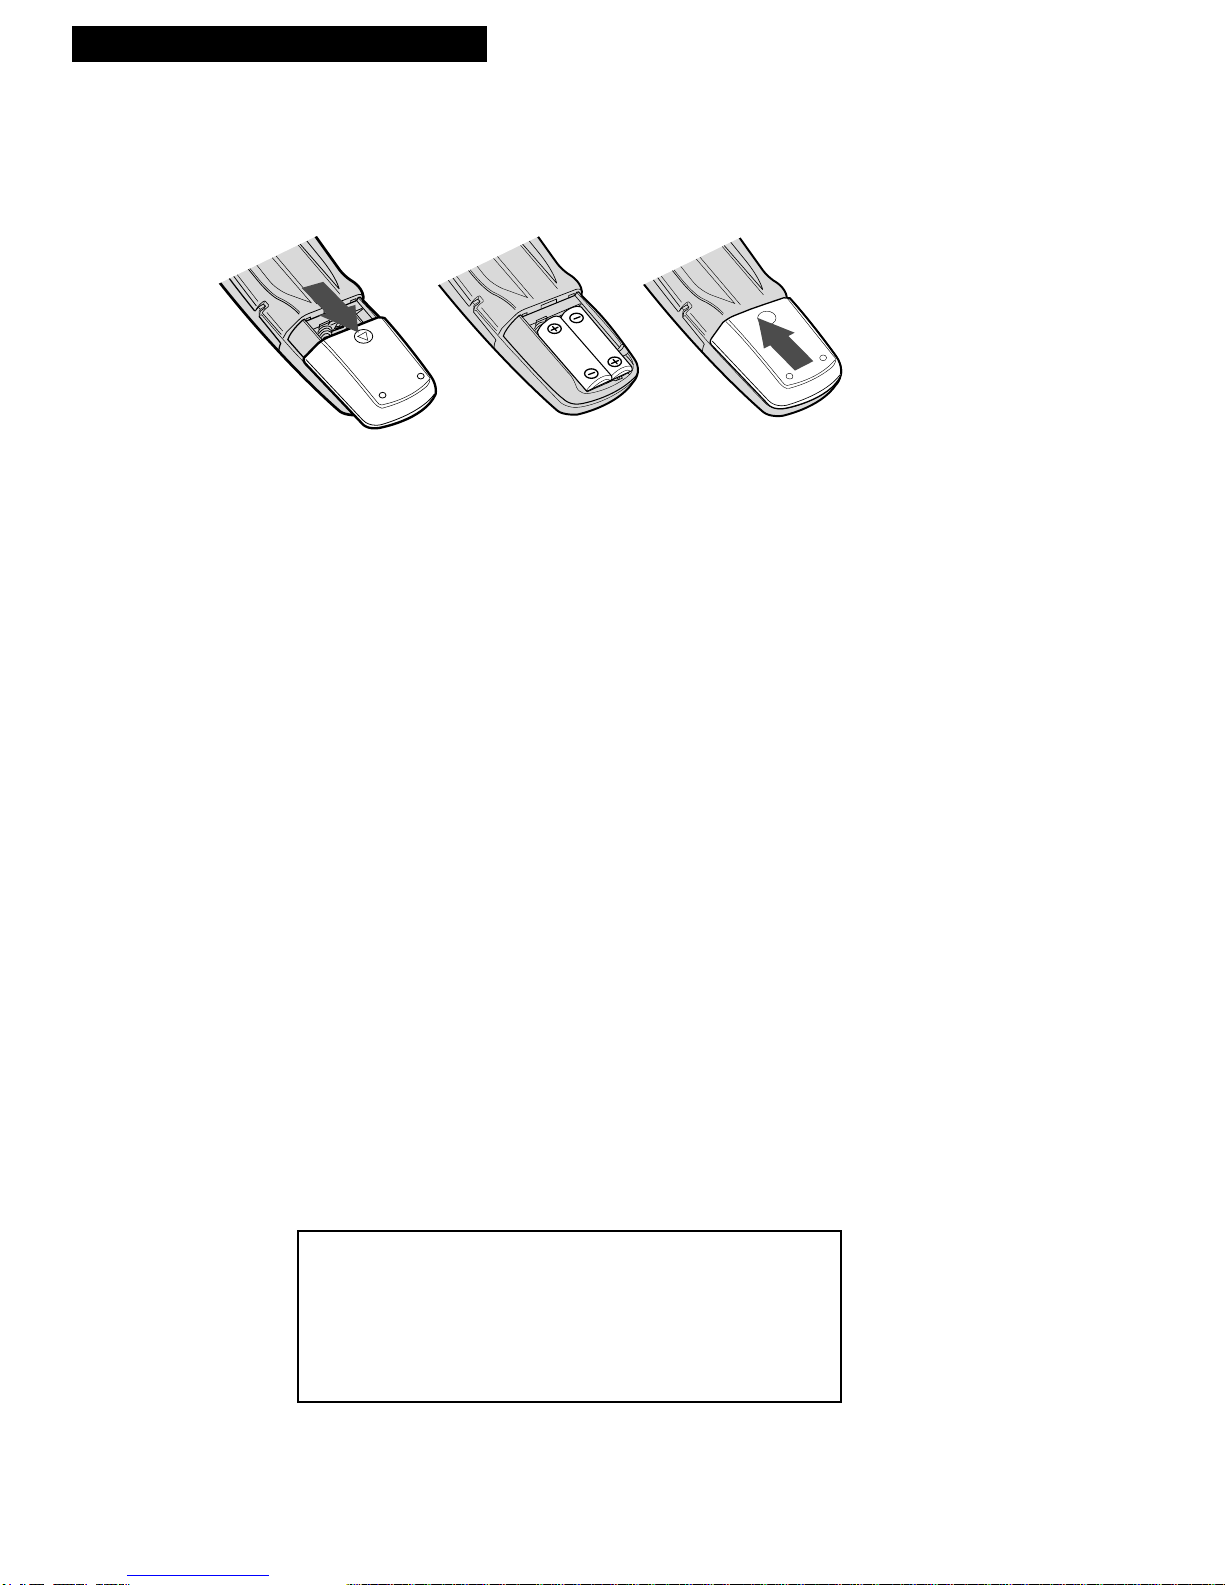
Insert Batteries in Remote ___________ 3
Place Your TV/VCR on a
Stable Surface _____________________ 3
Connect Antenna or Cable TV System__3
Connect Power Cord to the TV/VCR__3
Turn On the TV/VCR ______________ 3
Set the Signal Type _________________4
Program Channels into Memory
(Auto Program)____________________ 4
Add or Remove Channels from
TV/VCR's Memory ________________ 5
Set the Time and Date (Clock) _______ 6
Select the Language ________________ 6
View the Demonstration Mode ______ 7
Using the Remote Control
Buttons _______________________________ 8
TV/VCR Features
Using the TV/VCR Features
On-Screen Displays ________________ 9
Adjust the Video __________________ 10
Closed Captioning ________________ 11
Sleep Timer ______________________ 12
On/Off Timer ____________________ 13
Playing a Tape
Operating Instructions _________________14
To Play a Tape____________________ 14
Using the Playback Features ____________15
Pause____________________________ 15
Picture Search ____________________ 15
Automatic Tracking _______________ 15
Manual Tracking__________________ 15
Time Counter_____________________ 16
Memory Stop_____________________ 16
True Repeat Feature _______________ 17
Block Repeat Feature ______________ 18
Recording a Program
Recording Features ____________________19
Recording Speeds _________________ 19
Recording Pause __________________ 19
Types of Recordings ___________________20
Basic Recording _______________________20
Recording TV Programs
as You Watch _____________________20
One-Touch Recording__________________21
Using One-Touch Recording ________21
Recording at a Later Time
(timer recording) ______________________22
Setting a Timer Recording __________22
Program Review (checking or clearing
timer recordings)__________________ 23
Video Dubbing
(copying and editing tapes) _____________24
Location of Controls
Front Panel___________________________ 25
Back and Side Panels __________________ 25
Hooking Up the TV/VCR
Connecting the TV/VCR to a
Power Supply_________________________26
Choosing a Signal Hookup _____________ 26
Connecting Antennas or Cable Systems
Without a Cable Box___________________ 27
Connecting Cable Systems _____________ 28
Connecting a VCR or Camcorder for Video
Dubbing (copying and editing tapes) ____ 29
References
Trouble Checks ____________________ 30-31
Care and Cleaning ____________________ 32
Specifications_________________________ 32
Limited Warranty _____________________ 33

2
Setting Up the TV/VCR
1. Check parts included with TV/VCR combination.
Contact your dealer if any items are missing.
Remote
Control
Antenna Adapter
(300-75 Ohm)
Startup
123
56
4
89
7
0
POWERPOWER
DISPLAYDISPLAY
MENUMENU GO BACKGO BACK
REC STOPSTOP
PLAYPLAY
REVERSEREVERSE FORWARDFORWARD
PAUSEPAUSE
MUTEMUTE
EJECTEJECT
CLEARCLEAR
LINE INLINE IN
SPEEDSPEED
REPEATREPEAT
PICTUREPICTURE
+100+100
TRACKTRACK
CH
CH
VOLVOL
STOP/ EJECT
REC
POWER
PLAY
REC
POWER
REW FF
VOL CH
TV/VCR combination
DC car cord and AC cord
Antenna

3
Setting Up the TV/VCR
Startup
2. Insert two AAA batteries in the remote control as shown.
3. Place your TV/VCR on a stable surface.
CAUTION: To reduce the risk of personal injury or damage to the
TV/VCR, take care in selecting a stable surface or a strong steady
stand and a location where the TV/VCR cannot be tipped over or
easily pulled off, particularly by children. Do not attempt to carry or
move this product with one hand. Grasp the TV/VCR with both
hands, with the front of the TV/VCR against your body, to prevent it
from slipping out of your grasp.
4. Connect antenna or cable-TV system.
Connect the supplied dipole antenna, a different home antenna, or a
cable-TV system. Details on page 27 and 28.
5. Connect power cord to the TV/VCR.
Connect either the AC power cord or the DC car cord to the back of
the TV/VCR. Then, if you chose the AC power cord, plug the other
end into a 120-volt electrical outlet, or, if you chose the DC car cord,
plug the other end into a 12- or 24-volt cigarette-lighter socket in
your vehicle.
6. Turn on the TV/VCR.
Press POWER on the TV/VCR or remote. The POWER indicator on
the front of the TV/VCR will light.
If moving the TV/VCR from a cold area to a warm area,
moisture may develop inside the unit. If this happens, unplug
the power cord and allow the TV/VCR to reach room
temperature before playing a tape. This is especially important
when using this unit in a vehicle where temperature changes
can be dramatic.

7. Set the Signal Type.
The first step in programming your TV/VCR is to select the signal source.
A. Press MENU on the remote to display the main menu. Then press CH
3
or
4
until Setup is highlighted. Press VOL+ or - to display the Setup menu.
B. From the Setup menu, using the VOL- or VOL+ buttons, select Antenna if
your TV/VCR is connected to an antenna, or, depending on what type of
cable you have, select Cable STD, Cable HRC or Cable IRC. If you are not
sure what type of cable system you have, contact your cable company.
8. Program the channels into memory (Auto Program).
In order to automatically program channels into the TV/VCR’s memory, you
must have already selected the signal source (see step 6), and the antenna or
cable system must be connected to the TV/VCR.
A. Press MENU on the remote to display the main menu. Then press the CH
3
or
4
button until Setup is highlighted. Press VOL+ to display the Setup menu.
B. From the Setup menu, press CH
3
until Auto Program is highlighted.
C. Press the VOL+ or - button to begin programming channels into memory. The
TV/VCR places available channels in its memory. This may take a couple
minutes. Press MENU if you want to interrupt this process and return to
normal viewing. When the process is complete, press CH
3
or
4
to scan your
newly programmed channels.
4
Setting Up the TV/VCR
Startup
Video
Time Set
Timer Record
Setup
VCR Setup
Closed Caption
:Enter
:Move
:Exit
Air/Cable
Auto Program
Add/Erase
Sleep
Language
:Adjust
:Move
:Menu
Antenna
Added
Off
English
Setup
Auto Program
ANT 16
Air/Cable
Auto Program
Add/Erase
Sleep
Language
:Adjust
:Move
:Menu
Antenna
Added
Off
English
Setup
Air/Cable
Auto Program
Add/Erase
Sleep
Language
:Adjust
:Move
:Menu
Cable IRC
Added
Off
English
Setup
Video
Time Set
Timer Record
Setup
VCR Setup
Closed Caption
:Enter
:Move
:Exit

5
Setting Up the TV/VCR
Air/Cable
Auto Program
Add/Erase
Sleep
Language
:Adjust
:Move
:Menu
Antenna
Added
Off
English
Setup
Air/Cable
Auto Program
Add/Erase
Sleep
Language
:Adjust
:Move
:Menu
Antenna
Erased
Off
English
Setup
9. Add or remove channels from the TV/VCR’s memory.
You may want to add or remove channels if some of them are not
active, have weak signals, or you do not want them in your channel
memory. A channel that has been removed can still be selected by
pressing number buttons on the remote.
A. Use the number buttons on the remote to select the channel you
want to add or erase from memory.
B. Press MENU on the remote to display the main menu, then use the
CH
3
or
4
button until Setup is highlighted. Press VOL+ to display
the Setup menu.
C. Press CH
3
until Add/Erase is highlighted.
D. To add or erase the desired channel, press VOL+ or - until the
display reads Added or Erased.
E. Press MENU twice to remove the menu from the screen and return
to normal viewing.
To add a 3-digit channel, such as channel 104, press the +100 button on
the remote, followed by the next two digits, in this case “0” and “4”.
Startup
Note: The 100+ button on the remote works only when
the TV/VCR is in cable mode. In antenna mode, the
highest channel that can be tuned is channel 69.

6
Setting Up the TV/VCR
Startup
10. Set the Time and Date (Clock).
To record programs or to use the sleep timer, you must set the
date and time (clock).
A. Press MENU on the remote to display the main menu. Then press
the CH
3
or
4
button until Time Set is highlighted. Press VOL+
to display the Time Set menu.
B. Press VOL+ to select the the part of the display you wish to
adjust; then use the CH
3
or
4
buttons to adjust the time and
date. The day of the week will automatically appear when you
enter the date.
• Press VOL- to return to an incorrect entry; use CH
3
or
4
to
correct an entry.
C. Press MENU on the remote to lock the time and date – this will
also return you to the main menu. Press MENU once more to
return to TV viewing.
11. Select the language.
You can choose to have your menus displayed in English, Spanish or
French.
A. Press MENU on the remote to display the main menu. Then press
the CH
3
or
4
button until Setup is highlighted. Press VOL+ to
display the Setup menu.
B. Press CH
3
until Language is highlighted.
C. Press VOL+ or - to select the desired language.
Air/Cable
Auto Program
Add/Erase
Sleep
Language
:Adjust
:Move
:Menu
Antenna
Added
Off
English
Setup
Aire/cable
Program. Automática
Agreg./Borr.
Dominar
Language
:Ajustar
:Mover
:Menu
Antena
Agregado
Apagado
Español
Ajuste
Air/Câble
Progr. Automatique
Ajout./Efface
Veilleuse
Language
:Régler
:Déplacer
:Menu
Antenne
Ajouté
Arrêt
Français
Réglage
Video
Time Set
Timer Record
Setup
VCR Setup
Closed Caption
:Enter
:Move
:Exit
Clock
01/01/1995 Sun
On Time
Off Time
Timer
:Move
:Adjust
:Menu
09:00 am
––:––am
––:––pm
Off
Time Set
Clock
08/18/1995 Fri
On Time
Off Time
Timer
:Move
:Adjust
:Menu
09:30 am
07:30 am
08:00 am
On
Time Set

7
Setting Up the TV/VCR
Startup
12. View the demonstration mode.
The demonstration mode displays all on-screen menus and
programmable features.
A. Press MENU on the remote to display the main menu. Then press
the CH
3
or
4
button until VCR Setup is highlighted and press
VOL+ or - to display the VCR Setup menu.
B. Press CH
3
until Demonstration is highlighted and press VOL+
or - to choose On, activating the demonstration.
The TV/VCR will display each of the menus available in the
system briefly. The entire demonstration cycle will continually
repeat.
C. To turn off the demonstration, repeat steps A and B, choosing Off
in step B to deactive the demonstration.
Video
Time Set
Timer Record
Setup
VCR Setup
Closed Caption
:Enter
:Move
:Exit
VCR Setup
True Repeat
Block Repeat
Demonstration
:Adjust
:Move
:Menu
Off
Off
Off

8
Using the Remote Control
Buttons
PLAY
Plays a tape.
POWER
Turns TV/VCR on or off.
REC (Record)
Starts the recording process. Also
used for one-touch recording.
REPEAT
Repeats a tape or a section of a tape.
REVERSE
Rewinds the video tape. Searches the
picture in reverse during playback.
SPEED
Selects a recording speed.
STOP
Stops functions such as record, play,
rewind, fast forward and pause.
TRACK + or -
Lets you manually adjust the
tracking to reduce the streaks that
may appear in the picture during
tape playback.
VOL (Volume) + and -
Raises and lowers sound. Selects and
adjusts features and functions when
menus are on-screen.
Numbers (0 through 9)
Select a cable channel up to 69 by
pressing two numbers. Select a cable
channel higher than 69 by pressing
the +100 button followed by the next
two digits of the cable channel.
CH
3
3
and
4
(Channel up and
down)
Selects next higher or lower channel
in channel memory. Selects and
adjusts features and functions when
menus are on-screen.
CLEAR
Allows you to change menu entries
or clear a timer recording and resets
time counter to 00:00:00.
DISPLAY
Displays TV/VCR’s on-screen
menus.
EJECT
Ejects a tape.
FORWARD
Fast forwards the video tape.
Searches forward during playback.
GO BACK
Switches between the last two
channels.
LINE IN
Switches between signals from the
audio and video input jacks on the
right side of the TV/VCR.
MENU
Displays the main menu.
MUTE
Turns sound on or off.
PAUSE
Pauses the tape during playback.
PICTURE
Selects custom or standard picture
settings.
123
56
4
89
7
0
POWER
DISPLAYDISPLAY
MENUMENU GO BACKGO BACK
REC STOPSTOP
PLAYPLAY
REVERSEREVERSE FORWARDFORWARD
PAUSEPAUSE
MUTEMUTE
EJECTEJECT
CLEARCLEAR
LINE INLINE IN
SPEEDSPEED
REPEATREPEAT
PICTUREPICTURE
+100
TRACK
CH
CH
VOLVOL

9
TV/VCR Features
Using the TV/VCR Features
On-Screen Displays
When you change channels, adjust volume or use
a VCR feature, an on-screen display will appear to
alert you of the TV/VCR’s status.
To Access the Main Menu
1. Press MENU on the remote to display the main
menu.
2. Press MENU again to remove the main menu
from the screen. (The menu will disappear
from the screen if no buttons are pressed
within 15 seconds.)
To Access On-Screen Displays
1. Press DISPLAY to display the signal source,
channel, function, time counter, time and tape
speed. If no tape is in the TV/VCR, the display
will read “No tape”.
2. Press DISPLAY again to display the time
counter only.
3. Press DISPLAY again to display the time
counter memory only.
4. Press DISPLAY again to remove all displays.
ANT 16
Stop
00:00:00
3:50 pm SP
00:00:00
00:00:00M
Video
Time Set
Timer Record
Setup
VCR Setup
Closed Caption
:Enter
:Move
:Exit
With first
press of
DISPLAY
With
second
press of
DISPLAY
With
third
press of
DISPLAY
With
press of
MENU

10
TV/VCR Features
Using the TV/VCR Features
Adjust the Video Use the VIDEO menu to adjust the picture to suit your personal
preferences. The TV/VCR will remember the settings you select.
To Adjust Video 1. Press MENU on the remote, then press the CH
3
or
4
button until
Video is highlighted. Press VOL+ to display the Video menu.
2. Press CH
3
or
4
to select contrast, brightness, sharpness, color or
tint; then press VOL+ or - to change the setting.
3. Press MENU (or wait a few seconds) to preserve your setting and
to return to the video menu. Once you make a change to a
setting, that setting is used by the TV/VCR each time you turn it
on.
4. Press MENU again to exit the Video menu.
To Return to Standard Picture Settings
1. Press PICTURE on the remote control. Custom appears on the
screen, indicating that custom settings have been stored in
memory.
2. Press PICTURE again to reset to the levels set at the factory.
Standard appears on the screen when settings are reset.
Contrast
Bright
Sharpness
Color
Tint
:Adjust
:Move
:Menu
100
50
50
50
50
Video
Contrast 90
Standard
Custom

11
TV/VCR Features
Using the TV/VCR Features
Video
Time Set
Timer Record
Setup
VCR Setup
Closed Caption
:Enter
:Move
:Exit
Caption
Mode
Channel
Field
:Adjust
:Move
:Menu
On
Caption
1
1
Closed Caption
Caption
Mode
Channel
Field
:Adjust
:Move
:Menu
On
Text
1
1
Closed Caption
Closed Captioning
The closed captioning feature displays the audio of a program as text
on the TV screen. This is useful to anyone who is hearing impaired,
anyone who wants to watch a program without sound or anyone
who wants to see a program’s translations.
Closed captioning is not available on all channels. Check your TV
program listings for CC (closed caption) broadcasts.
To View Closed Captions
1. Press MENU on the remote, then press the CH
3
or
4
button until
Closed Caption is highlighted. Press VOL+ to display the Closed
Caption menu. Press VOL+ to turn on or off the closed
captioning feature.
2. Press the CH
3
or
4
button to highlight Mode. Press VOL+ to
choose Caption or Text.
3. Press CH
3
or
4
to highlight Channel; press VOL+ to choose
Closed Caption Channel 1 or 2(CC1 or CC2).
4. Press CH
3
or
4
to highlight Field; press VOL+ to choose
Closed Caption Field 1 or 2(Text Mode 1 and Text Mode 2).
5. Press MENU twice to return to normal TV viewing.
Text mode displays general information not necessarily related
to the program being watched.

TV/VCR Features
Sleep Timer
The sleep timer automatically turns the TV/VCR off after 10, 20, 30,
60, 90, 120, 240 or 360 minutes.
1. Press MENU on the remote to display the main menu.
2. Press CH
3
or
4
until Setup is highlighted and then press VOL+
or - to display the Setup menu.
3. Press CH
3
or
4
until Sleep is highlighted and then press VOL+
or - to select OFF, 10, 20, 30, 60, 90, 120, 240 or 360 minutes.
4. Press MENU twice to exit the menus.
12
Using the TV/VCR Features
Video
Time Set
Timer Record
Setup
VCR Setup
Closed Caption
:Enter
:Move
:Exit
Air/Cable
Auto Program
Add/Erase
Sleep
Language
:Adjust
:Move
:Menu
Antenna
Erased
90
English
Setup

13
TV/VCR Features
Using the TV/VCR Features
Video
Time Set
Timer Record
Setup
VCR Setup
Closed Caption
:Enter
:Move
:Exit
Clock
01/01/1995 Sun
On Time
Off Time
Timer
:Move
:Adjust
:Menu
09:00 am
––:––am
––:––pm
Off
Time Set
Clock
08/18/1995 Fri
On Time
Off Time
Timer
:Move
:Adjust
:Menu
09:30 am
07:30 am
08:00 am
On
Time Set
On/Off Timer
The timer turns the TV/VCR on at a desired time. You can set it to
wake you up in the morning or to come on when a favorite program
is about to start.
1. Press MENU on the remote to display the main menu.
2. Press CH
3
or
4
until Time Set is highlighted and then press
VOL+ or - to display the Time Set menu.
3. Press CH
3
or
4
to highlight On Time and then press VOL+ or -.
4. Use the CH
3
or
4
buttons to set the desired “on” time; use the
VOL+ or - buttons to switch from the hour digits (00:00) to the
minute digits (00:00). Press VOL+ or - again to “set” the times
you have just entered.
5. Press CH
3
to highlight Time Off, and using the CH
3
or
4
and
VOL+ or - buttons, repeat the process outlined in step 4 to set the
desired “off” time.
6. Press CH
3
to highlight Timer and use the VOL+ or - buttons to
set it to On or Off.
7. Press MENU twice to exit the menus.

14
Playing a Tape
Operating Instructions
To Play a Tape
STOP/ EJECT
REC
POWER
PLAY
REC
POWER
REW FF
VOL CH
Safety Tab
1. When you insert a tape in the TV/VCR, the TV/VCR
automatically turns on. The channel and mode indicators, time
counter and tape speed displays appear momentarily when you
insert a tape.
2. The tape automatically begins to play if the safety tab on the
cassette has been removed. Or, press PLAY if necessary.
3. If necessary, the TV/VCR will automatically adjust the tape’s
tracking. Or you can also press TRACK + or - on the remote to
manually remove any streaks from the picture during playback.
4. Press STOP on the remote or STOP/EJECT on the TV/VCR to
stop playback.
5. The TV/VCR will automatically rewind a tape when it reaches
the end. If you press POWER while a tape is rewinding, the
TV/VCR will rewind the tape fully and then shut itself off.
6. Press EJECT on the remote or STOP/EJECT on the TV/VCR to
eject the tape once it is completely rewound.
A cassette may be ejected with the power turned off.

15
Using the Playback Features
Pause This feature pauses the tape and allows you to examine the details of
the scene. Pause works best for tapes recorded in SLP speed.
1. Press PAUSE on the remote during playback to pause the action.
To prevent excessive wear, the TV/VCR will automatically play
back the tape after five minutes in pause mode.
2. To return to playback, press PAUSE again or press PLAY.
Picture Search You can search a video tape during playback. Sound is turned off
during picture search. Picture search works best for tapes recorded
in SLP speed.
1. During playback, press FORWARD to search forward or
REVERSE to search in reverse.
2. Press FORWARD or REVERSE again, or press PLAY to return to
playback.
Automatic Tracking
The TV/VCR has automatic tracking which adjusts the picture when
playing a tape. Automatic tracking is turned on each time a tape is
inserted.
Manual Tracking
Occasionally, you may need to manually adjust the tracking.
Tracking has no effect during recording.
• When streaks or snow appear in the picture during normal
playback or slow motion, press TRACK + or - on the remote for the
best possible picture.
Playing a Tape
123
56
4
89
7
0
POWER
POWER
DISPLAYDISPLAY
MENU
MENU GOBACK
GO BACK
RECSTOP
STOP
PLAY
PLAY
REVERSE
REVERSE FORWARD
FORWARD
PAUSE
PAUSE
MUTEMUTE
EJECTEJECT
CLEARCLEAR
LINE INLINE IN
SPEEDSPEED
REPEAT
REPEAT
PICTUREPICTURE
+100
+100
TRACK
TRACK
CH
CH
VOL
VOL
Tracking

16
Using the Playback Features
Playing a Tape
Time Counter
The time counter helps locate the beginning or end of programs you
taped. The time counter automatically resets to 00:00:00 each time a
tape is inserted.
1. While a tape is playing, press DISPLAY twice to continuously
display the time counter in the upper left corner of the screen.
2. Press CLEAR to set the time counter to 00:00:00.
3. Press DISPLAY twice to remove the time counter from the screen.
Memory Stop
Memory stop will mark the beginning or end of programs or
particular scenes so that you can easily locate them later.
1. While a tape is playing, press DISPLAY twice to show the time
counter in the upper left corner of the screen.
2. Press CLEAR to set the time counter to 00:00:00.
3. Press DISPLAY again to enter the scene into memory. An “M”
appears next to the time counter. The scene is now entered into
memory.
4. To return to the scene, press STOP (the timer counter/memory
stop marker, the “M”, must be on the screen in order for this to
work properly – if not, press DISPLAY until the display appears).
5. Press FORWARD or REVERSE to return to the desired scene. The
TV/VCR stops when it reaches the time counter/memory stop
marker.
6. Press PLAY to view the scene.
00:00:00
00:00:00M

17
Playing a Tape
Using the Playback Features
Setting the True Repeat Feature
This feature tells the TV/VCR to automatically rewind and replay a
tape after it has played to the end.
1. Press MENU on the remote to display the main menu; press CH
3
or
4
until VCR Setup is highlighted; press VOL + or - to display
the VCR Setup menu.
2. Press CH
3
or
4
to highlight True Repeat.
3. Press VOL + to select “On”.
Using True Repeat
With the True Repeat feature on, a tape will automatically
rewind after it has reached the end and will be replaying.
1. To start the tape playing, press the PLAY button. To stop the
tape playing, press the STOP button.
2. To turn off the True Repeat feature, repeat steps 1 through 3,
selecting “Off” in step 3.
Note: If the TV/VCR reaches an unrecorded section of tape
during playback, it will search forward and check the tape again.
The TV/VCR will continue to search until it finds a recorded
section, when it will begin playing.
VCR Setup
True Repeat
Block Repeat
Demonstration
:Adjust
:Move
:Menu
On
Off
Off

18
Playing a Tape
VCR Setup
True Repeat
Block Repeat
Demonstration
:Adjust
:Move
:Menu
Off
2
Off
Setting the Block Repeat Feature
This feature tells the TV/VCR to play a tape (or a “block” of part of
the tape) from one to ten times or endlessly.
1. Press MENU on the remote to display the main menu; press CH
3
or
4
until VCR Setup is highlighted; press VOL+ or - to display
the VCR Setup menu.
2. Press CH
3
or
4
to select Block Repeat.
3. Continually press VOL+ to select the number of times you want
the “block” to repeat. Select “Endless” or any number of times
from 1to 10. Press MENU twice to remove the displays.
Selecting the Area to Repeat
Block Repeat must be turned on before you can select the area to
repeat.
1. While viewing a video tape, press REPEAT at the beginning of a
block of tape that you wish to repeat. Press REPEAT again at the
end of the block. The TV/VCR will rewind the tape to the
beginning of the block and repeat it as many times as you
indicated in the Block Repeat menu. “Repeat” appears on the
screen while the tape is rewinding.
Note: the block that you select to repeat should be more than ten
seconds long.
2. To stop block repeat, press STOP or PAUSE, or rewind or fast
forward to a part of the tape that is outside the “block”. Any of
these actions cancels the block you have selected to repeat.
3. To turn off Block Repeat, repeat steps 1 to 3 in “Setting the Block
Repeat Feature”, selecting “Off” in Step 3.
Using the Playback Features
Other manuals for TV/VCR COMBINATION
1
Table of contents
Other RCA TV VCR Combo manuals