Tilswall Z1JE-KK104-13 850 User manual

-nL3\j07\!LL
Z1JE-KK104-13850
Hammer
Drill
User
Manual


Manual
Download
01
Q
&
A
01
English
Version
02
Version
Frangaise
07
Deutsche
Version
12
Versions
Italiana
17
Version
Espafiola
22

Manual
Download
Q&A
01
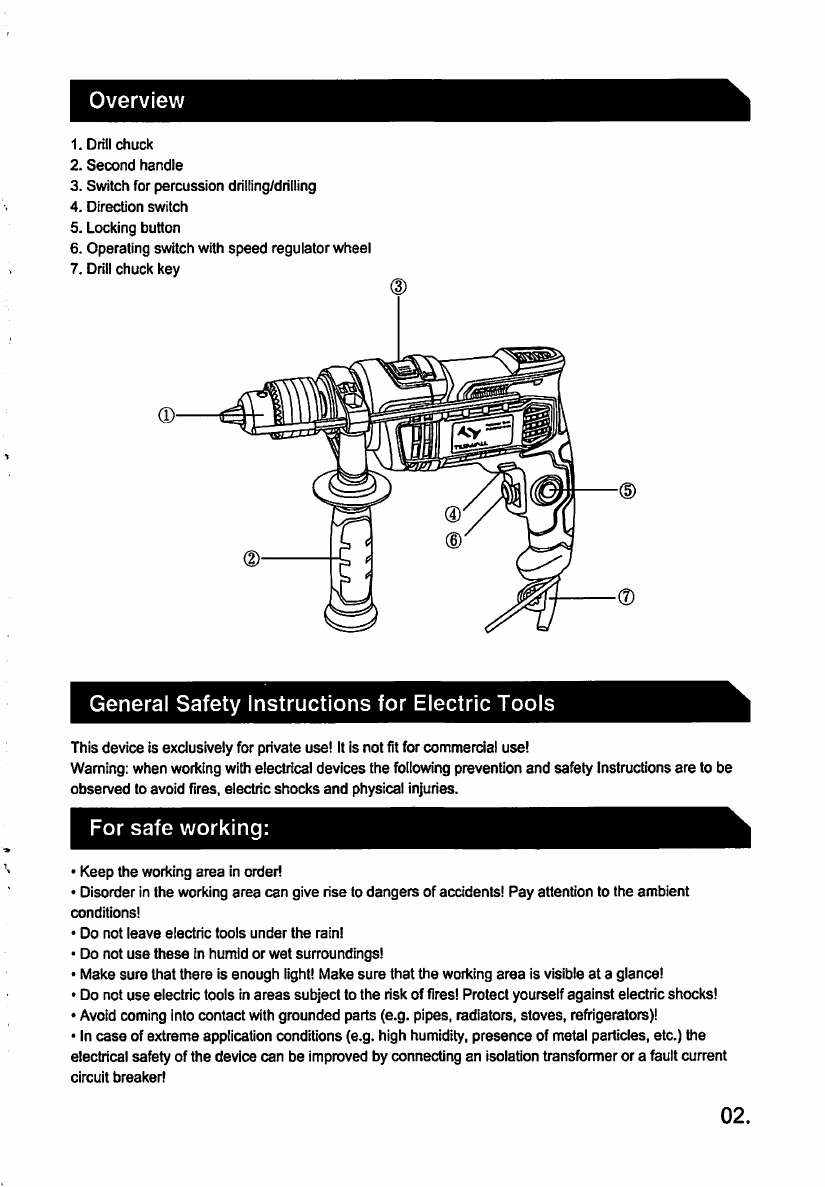
Overview
1.
Drill
chuck
2.
Second
handle
3.
Switch
for
percussion
drilling/drilling
4.
Direction
switch
5.
Locking
button
6.
Operating
switch
with
speed
regulator
wheel
7.
Drill
chuck
key
General
Safety
Instructions
for
Electric
Tools
This
device
is
exclusively
for
private
use!
It
is
not
fit
for
commercial
use!
Waming:
when
working
with
electrical
devices
the
following
prevention
and
safety
instructions
are
to
be
observed
to
avoid
fires,
electric
shocks
and
physical
injuries.
For
safe
working:
•
Keep
the
working
area
in
order!
•
Disorder
in
the
working
area
can
give
ri
se
to
dangers
of
accidents!
Pay
attention
to
the
ambient
conditions!
•
Do
not
leave
electric
tools
under
the
rain!
•
Do
not
use
these
in
humid
or
wet
surroundings!
•
Make
sure
that
there
is
enough
light!
Make
sure
that
the
working
area
is
visible
at
a
glance!
•
Do
not
use
electric
tools
in
areas
subject
to
the
ri
sk
of
fires!
Protect
yourself
against
electric
shocks!
•
Avoid
coming
into
contact
with
grounded
parts
(e.g.
pipes,
radiators,
stoves,
refrigerators)!
•
In
case
of
extreme
application
conditions
(e.g.
high
humidity,
presence
of
metal
particles,
etc.)
the
electrical
safety
of
the
device
can
be
improved
by
connecting
an
isolation
transformer
or
a
fault
current
circuit
breaker!
02.

•
Keep
children
away!
•
Do
not
let
other
people
touch
the
tool
or
the
cable!
•
Keep
other
people
out
of
the
working
area!
Make
sure
that
the
tool
is
stored
safely!
•
Unused
electric
tools
are
to
be
kept
in
a
dry,
highflying
or
closed
place,
out
of
the
reach
of
children!
•
Do
not
overload
the
electric
tool!
It
works
better
and
safer
within
the
indicated
capacity
range!
Use
the
right
electric
tool!
•
Do
not
use
weak
tools
or
adapters
for
heavy
jobs.
Do
not
use
tools
for
purposes
or
jobs
for
which
these
are
not
intended.
For
example,
hand
circular
saws
are
not
be
used
to
cut
trees
or
branches!
Always
wear
suitable
working
cloths!
•
Do
not
wear
baggy
cloths
or
jewellery!
Risk
of
being
caught
by
moving
parts!
•
When
working
outside,
it
is
advisable
to
wear
rubber
gloves
and
skid-proof
shoes!
•
If
you
have
long
hair,
wear
a
hairnet!
Use
protective
goggles!
•
Always
wear
a
breathing
mask
during
jobs
producing
dust!
Connect
the
vacuum
system
(if
available)!
•
If
devices
for
the
connection
of
vacuum
and
collection
systems
are
available,
make
sure
that
these
are
connected
and
used
correctly!
•
Do
not
tamper
with
the
cable!
•
Do
not
carry
the
tool
by
the
cable
and
do
not
use
it
to
pull
the
plug
out
of
the
socket!
•
Protect
the
cable
against
heat
sources,
oil
and
sharp
edges!
Secure
the
tool!
•
Use
chucking
devices
or
a
vise
to
keep
the
tool
still!
The
tool
can
thus
be
held
in
place
more
safely
than
by
hand
and
the
tool
can
be
used
with
both
hands!
•
Avoid
unusual
body
postures!
Always
stand
firmly
in
place
and
keep
your
balance!
Always
keep
the
tool
in
good
order!
•
Always
keep
tools
sharp
and
clean
to
work
correctly
and
safely!
•
Follow
the
maintenance
and
tool
change
instructions!
•
Check
the
plug
and
cable
on
a
regular
basis
and
have
a
qualified
technician
change
these
in
case
of
damage!
•
Check
the
extension
cable
on
a
regular
basis
and
replace
it
if
damaged!
•
Pull
the
plug
out
of
the
socket
after
use,
before
maintenance
and
when
changing
accessories
such
as
saw
blades,
drills
cutters,
etc.!
•
Avoid
the
accidental
starting
of
the
tool!
•
Never
carry
an
electric
tool
connected
to
the
power
mains
with
your
finger
on
the
switch!
•
Make
sure
that
the
switch
is
off
when
connecting
to
the
mains!
Extension
cable
outdoors:
Use
only
certified
and
duly
marked
extension
cables
outdoors!
•
Always
be
careful!
Pay
attention
to
your
work!
Proceed
carefully.
Do
not
use
the
tool
if
you
are
not
concentrated!
•
Check
the
tool
for
damages!
•
Before
using
the
tool
the
next
time
check
that
the
protection
devices
or
slightly
damaged
parts
are
in
good
working
conditions!
Check
whether
the
moving
parts
function
correctly,
that
these
are
not
Jammed
or
whether
any
parts
are
damaged!
•
All
the
parts
to
be
correctly
mounted
and
meet
all
the
requirements
for
the
proi
iper
functioning
of
the
electric
tool!
•
Damaged
protection
devices
and
parts
are
to
be
repaired
or
changed
by
a
qualified
[
technician
provided
that
the
operating
instructions
do
not
specify
otherwise!
•
Damaged
switches
are
to
be
replaced
in
a
customer
service
shop!
Do
not
use
electric
tools
that
cannot
be
switched
on
or
off!
.03
WARNING!
•
For
your
own
safety
always
use
only
the
accessories
and
attachments
specified
in
the
operating
instructions
or
recommended
or
specified
by
the
tool
manufacturer!
•
The
use
of
accessories
and
attachments
other
than
those
specified
in
the
operating
instructions
can
cause
injuries!
•
Always
have
your
tool
be
repaired
by
certified
technicians!
•
This
tool
meets
the
relevant
safety
requirements!
•
Repairs
are
to
be
carried
out
only
by
qualified
technicians
with
original
spare
parts
to
avoid
the
risk
of
injuries
to
the
user
caused
by
improper
repairs!
•
During
operating,
wear
hearing
protection
to
avoid
damage
to
your
hearing!
Special
Safety
Information
When
drilling
or
screwing
into
walls,
ceilings
etc
make
sure
beforehand
that
you
will
not
damage
any
hidden
electric
cables.
During
this
work
you
should
not
touch
any
metal
parts
of
the
machine.
Only
touch
the
machine
by
the
plastic
housing.
Your
machine
is
double
insulated.
This
means
that
two
completely
independent
types
of
insulation
prevent
you
from
coming
into
contact
with
live
metal
parts.
This
measure
represents
a
high
degree
of
protection
against
an
electric
shock.
Your
Drill
has
the
following
Functions:
The
operating
switch
(6)
is
used
for
all
work
carried
out
with
the
drilling
machine.
With
the
speed
selection
via
the
regulator
wheel
you
have
optimum
control
of
the
machine.
The
machine
can
be
set
to
continuous
operation
with
the
iocking
button
(5).
The
second
handle
(2)
gives
you
an
additional
way
of
holding
the
machine
firmly.
Depending
on
the
position
of
the
percussion
driliing/drilling
switch(3),
you
can
use
your
drilling
machine
as
a
percussion
drill
or
rotating
drill.
The
direction
switch
(4)
controls
the
direction
of
motion
when
the
machine
is
used
as
a
screwdriver
or
if
you
would
like
to
remove
a
drilling
bit
that
has
become
jammed.
Using
the
adjustable
bit
stop
you
can
fix
the
depth
of
blind
holes
accurately
during
drilling.
Inserting
the
Second
Handle
(2)
In
order
to
assemble
the
second
handle
(2),
release
it
by
rotating
the
lower
part
anti-clockwise
so
that
you
can
easily
pull
the
handle
over
the
drill
chuck
on
to
the
flange
located
behind
it.
Then
turn
the
handle
to
a
working
position
that
is
comfortable
for
you
and
fix
it
in
place
by
tightening
it
(rotating
the
lower
part
clockwise).
Adjusting
the
Bit
Stop
The
second
handle
(2)
has
a
retainer
for
the
bit
stop.
Insert
a
drill.
Now
release
the
handle.
Push
the
bit
stop
forwards
until
its
end
is
in
line
with
the
end
of
the
drill.
Now
push
the
bit
stop
back
until
the
distance
between
the
end
of
the
bit
stop
and
the
end
of
the
drill
corresponds
to
the
depth
to
which
you
would
like
to
drill.
04.
Inserting
the
Drill
First
remove
the
mains
supply
from
the
socket.
Turn
the
ring
of
the
drill
chuck
(1)
until
the
clamping
jaws
are
open
wide
enough.
Insert
the
drill
into
the
clamping
jaws
of
the
drill
chuck
(1}.
Insert
the
end
of
the
drill
chuck
key
(7)
into
one
of
the
three
holes
on
the
body
of
the
drill
chuck
(1)
and
let
the
head
of
the
key
(7)
lock
into
place
in
the
ring
of
the
drill
chuck
(1).
In
order
to
tighten
the
clamping
jaws
and
fix
the
drill
in
place,
turn
the
drill
chuck
key
(7)
in
a
clockwise
direction,
important;
Then
remove
the
key
(7)
from
the
chuck
(1)!
Working
with
the
Drilling
Machine
Ensure
that
the
mains
power
supply
voltage
is
the
same
as
the
operating
voltage
of
your
machine.
For
details,
please
see
the
type
plate.
Insert
the
correct
drill
for
the
type
of
job
to
be
performed.
If
necessary,
adjust
the
bit
stop.
Adjust
the
speed
of
the
machine
using
the
regulating
wheel
on
the
operating
switch
(6).
The
more
the
operating
switch
(6)
is
pressed
in,
the
faster
the
drili
rota_les.
Set
the
direction
switch
(4)
to
the
desired
direction
of
motion.
Never
alter
the
position
of
the
percussion
drilling
switch
(3)
or
the
direction
switch
(4)
when
the
machine
is
switched
on.
The
machine
is
switched
on
by
pressing
the
operating
switch
(6).
When
the
operating
switch
(6)
is
released,
the
machine
stops.
If
you
would
like
to
use
continuous
operation
press
the
locking
button
(5)
while
the
operanting
switch
(6)
is
pressed.
In
order
to
switch
off
the
machine
during
continuous
opei
iration,
press
the
operating
switch
(6)
again
and
then
let
it
go.
Do
not
touch
the
drill
chuck
(1)
while
the
machine
is
switched
on.
Drilling
Tips
•
Always
insert
the
correct
size
and
type
of
drill
or
screwdriver.
•
Set
the
machine
to
the
correct
speed.
•
Always
hold
the
machine
tightly
by
the
handle
and
second
handle
(2).
•
When
drilling
wood
and
metal,
set
the
percussion-drilling
switch
(3)
to
drilling.
•
When
drilling
masonry,
set
the
percussion-drilling
switch
(3)
to
percussion
drilling.
•
When
using
the
machine
as
a
screwdriver,
set
the
percussion-drilling
switch
(3)
to
drilling.
•
Set
the
direction
switch
(4)
to
the
correct
direction.
•
Never
change
the
direction
of
motion
when
the
machine
is
switched
on.
Care
of
the
Tools
Overload
Never
use
excessive
force
when
drilling.
Too
much
pressure
reduces
the
speed
of
the
machine,
and
the
required
power
is
greatly
reduced.
This
may
result
in
overloi
ad,
which
can
damage
the
motor
of
the
drilling
machine.
When
the
drilling
machine
becomes
too
hot.
allow
it
to
run
for
two
minutes
without
a
load
and
then
interrupt
working
for
a
short
time.
Clean
the
drilling
machine
with
a
clean
cloth
and
a
brush.
Ensure
that
the
ventilatiUon
slits
are
not
blocked.
Warning:
Always
use
the
additional
grips
which
come
with
the
appliance.
Losing
control
of
the
appliance
may
result
In
injuries.

Technical
Data
Voltage:
220-240V~
Frequency:
50/60HZ
Power
input:
850W
No
load
speed:
0-3000/min
Chuck
size:
13mm
Drilling
capacity:
Steel:
13mm
Concrete:
13mm
Wood:
25mm
Technical
Data
Voltage:
120V~
Frequency:
60Hz
Ampeage:
7A
No
load
speed:
0-3000/min
Chuck
size:
1/2"
Drilling
capacity:
Steel:
1/2"
Concrete:
1/2"
Wood:
1"
06.
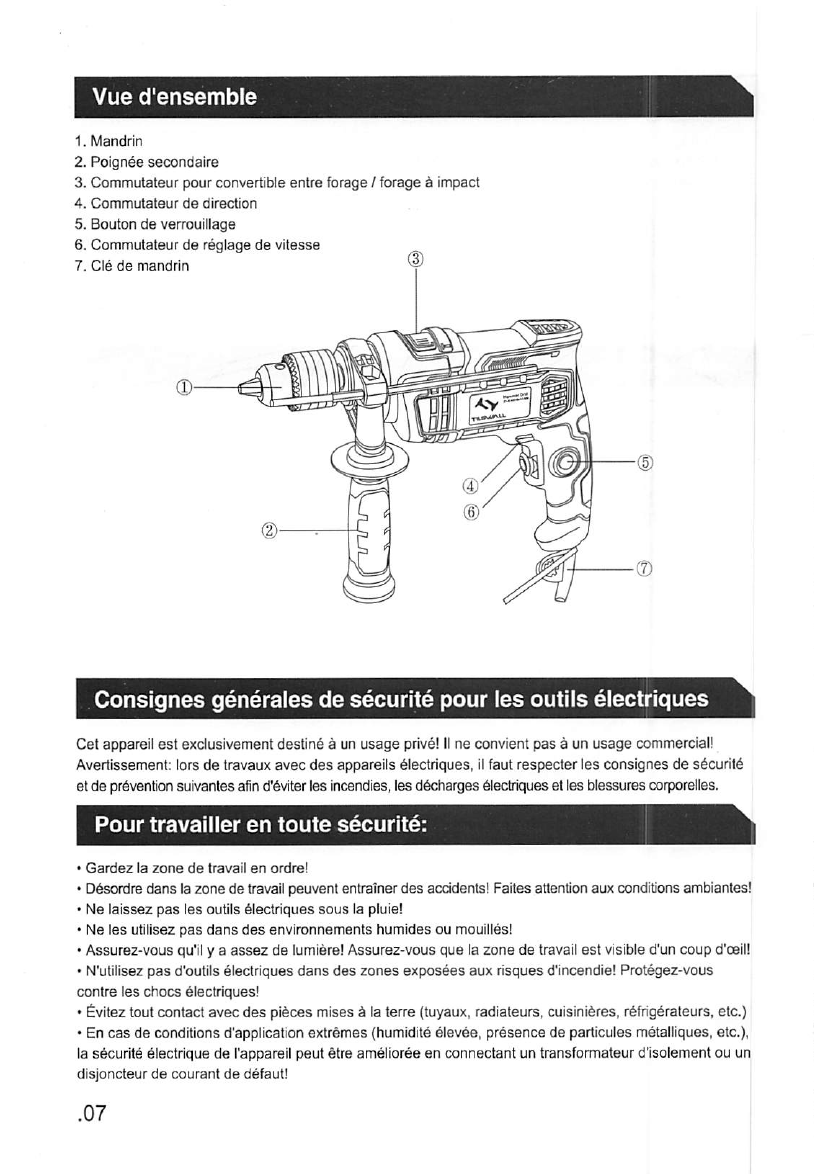
Vue
d'ensemble
1.
Mandrin
2.
Poignde
secondaire
3.
Commutateur
pour
convertible
enbe
forage
/
forage
i
impact
4.
Commutateur
de
direction
5.
Bouton
de
verrouillage
6.
Commutateur
de
reglage
de
Vitesse
7.
CId
de
mandrin
^
Conslgnes
generates
de
securite
pour
les
outils
electriques
Pour
travailler
en
toute
securite:
Cet
appareil
est
exclusivement
destine
a
un
usage
pnv6!
II
ne
convient
pas
a
un
usage
commercial!
Avertissement:
lors
de
travaux
avec
des
appareiis
61ectriques,
ii
faut
respecter
les
consignee
de
s6curit6
et
de
prevention
suivantes
afin
d'6viter
les
incendies.
les
d6charges
diectriques
et
les
blessures
corporelles.
•
Gardez
la
zone
de
travail
en
ordre!
•
O^sordre
dans
la
zone
de
travail
peuvent
entrafner
des
accidents!
Faites
attention
aux
conditions
ambiantes!
•
Ne
laissez
pas
les
outils
blectriques
sous
la
pluie!
•
Ne
les
utilisez
pas
dans
des
envlronnements
humides
ou
moullles!
•
Assurez-vous
qu'il
y
a
assez
de
lumlere!
Assurez-vous
que
la
zone
de
travail
est
visible
d'un
coup
d'ceill
•
N'utilisez
pas
d'outils
electriques
dans
des
zones
expos^es
aux
risques
d'incendie!
Prot^ez-vous
contre
les
chocs
electriques!
•
^vitez
tout
contact
avec
des
pieces
mises
S
la
terre
(tuyaux,
radiateurs,
cuisiniferes,
r6frig6rateurs,
etc.)
•
En
cas
de
conditions
d'application
extremes
(humiditd
elevee,
presence
de
particules
metalliques,
etc.),
la
s^urite
electrique
de
I'appareil
peut
§tre
amSlioree
en
connectant
un
transformateur
d'isolement
ou
un
disjoncteur
de
courant
de
defaut!
.07

•
^loignez
les
enfants!
•
Ne
laissez
pas
d'autres
personnes
toucher
des
outils
ou
des
cSbles!
•
Gardez
les
autres
personnes
hors
de
la
zone
de
travail!
Assurez-vous
que
I'outil
est
stocks
en
toute
s^rit^l
•
Les
outils
electriques
non
utilises
doivent
etre
conserves
dans
un
endroit
sec,
surdlev^
ou
ferme,
hors
de
la
portde
des
enfantsi
•
Ne
surchargez
pas
i'outil
electriquel
Cela
fonctionne
mieux
et
plus
sOr
dans
la
plage
de
capacity
indiquSel
Utilisez
le
bon
outii
electrique!
•
N'utilisez
pas
d'outils
ou
d'adaptateurs
faibles
pour
les
travaux
lourds.
N'utilisez
pas
d'outils
S
des
fins
ou
pour
des
travaux
auxquels
ils
ne
sont
pas
destines.
Par
example,
les
scies
circulaires
manuelles
ne
doivent
pas
etre
utilis^es
pour
couper
des
arbres
ou
des
branches!
Portez
toujours
des
vetements
de
travail
approprids!
•
Ne
portez
pas
de
vetements
amples
ni
de
bijoux!
Risque
d'etre
pris
par
des
pieces
en
mouvement!
•
Lorsque
vous
travaillez
a
I'exterieur,
ii
est
conseili^
de
porter
des
gants
en
caoutchouc
et
des
chaussures
anti-d^rapantes!
•
Si
vous
avez
les
cheveux
longs,
portez
un
filet
^
cheveux!
Utilisez
des
lunettes
de
protection!
•
Portez
toujours
un
masque
respiratoire
lors
de
travaux
poussi^reuxl
Connectez
le
syst^me
de
vide
(si
disponible)!
•
Si
des
dispositifs
pour
la
connexion
de
syst^mes
de
vide
et
de
collecte
sont
disponibles,
assurez-vous
qu'ils
sont
connect^s
et
utilises
correctement!
•
Ne
pas
altdrer
le
cSble!
•
Ne
transportez
pas
I'outil
par
le
c3ble
et
ne
I'utilisez
pas
pour
debrancher
la
fiche!
•
Prot^ez
le
cable
contre
les
sources
de
chaleur,
I'huile
et
les
aretes
vivesi
S^uriser
I'outil!
•
Utilisez
des
dispositlfs
de
serrage
ou
un
dtau
pour
maintenir
I'outil
immobilel
L'outil
peut
ainsi
§tre
maintenu
en
place
plus
surement
que
manuellement
et
peut
§tre
utilise
k
deux
mains!
•
^vitez
les
postures
inhabituelles!
Restez
toujours
immobile
et
restez
en
§quilibre!
Gardez
toujours
les
outils
en
bon
dtat!
•
Toujours
garder
les
outils
tranchants
et
propres
pour
travailler
correctement
et
en
toute
securite!
•
Suivez
les
instructions
de
maintenance
et
de
changement
d'outil!
•
V^rifiez
ri6gu!i§rement
la
fiche
et
le
cSble
et
faites-les
changer
par
un
technicien
qualifi^
en
cas
de
dommagel
•
V^rifiez
r^guli§rement
la
rallonge
et
remplacez-la
si
elle
est
endommag^e!
•
Retirez
la
fiche
de
la
prise
aprSs
utilisation,
avant
maintenance
et
lors
du
changement
d'accessoires
tels
que
lames
de
scie,
perceuses,
etc!
•
Evitez
le
dSmarrage
acddentel
de
I'outill
•
Ne
transportez
jamais
un
cutil
electrique
branch^
au
secteur
avec
le
doigt
sur
I'interrupteurl
•
Assurez-vous
que
I'interrupteur
est
dteint
avant
de
le
brancher
sur
le
secteurlRallonge
extdrieure:
Utilisez
uniquement
des
rallonges
certifi^es
et
bien
marquees
k
rextSrieur!
•
Toujours
dtre
prudent!
Faites
attention
k
votre
travail!
Procdder
prudemment
N'utilisez
pas
Poutil
si
vous
n'etes
pas
concentrd!
•
Vdrifiez
i'outil
pour
des
dommagesi
•
Avant
la
prochaine
utilisation
de
i'outil,
vdrifiez
que
les
dispositifs
de
protection
ou
les
pieces
l^gerement
endommagSes
fonctionnent
bien!
V^rifiez
si
les
pi^es
mobiles
fonctionnent
correctement,
si
elles
ne
sont
pas
bloqu^es
ou
si
des
pieces
sont
endommag^es!
•
Toutes
les
pieces
doivent
gtre
correctement
montSes
et
r^pondre
k
toutes
les
exigences
pour
le
bon
fonctionnement
de
I'outil
electrique!
•
Les
dispositife
et
pieces
de
protection
endommag^s
doivent
Stre
r6par6s
ou
modifies
par
un
technicien
qualifid,
k
condition
que
le
mode
d'emploi
ne
spdcifie
pas
le
contraire!
•
Les
commutateurs
endommages
doivent
Stre
remplaces
dans
un
magasin
du
service
clientele!
N'utilisez
pas
d'outils
diectriques
qui
ne
peuvent
pas
Stre
allum^s
ou
6teints!
08.

ATTENTION!
•
Pour
votre
propre
securite,
n'ulilisez
que
les
accessoires
et
accessoires
specifies
dans
le
mode
d'emploi
ou
recommandes
ou
specifies
par
le
fabricant
de
I'outil!
•
L'ulilisation
d'accessoires
et
d'accessoires
autres
que
ceux
sp^cifles
dans
le
mode
d'emploi
peut
causer
des
blessures!
•
Faites
toujours
reparer
votre
outil
par
des
techniciens
certifies!
•
Get
Qutil
repond
aux
exigences
de
securite
correspondantes!
•
Les
reparations
ne
doivent
etre
effectu^es
que
par
des
techniciens
qualifies
avec
des
pieces
de
rechange
d'origine
afin
d'eviter
tout
risque
de
blessure
pour
I'utilisateur
resultant
de
reparations
incorrecfes!
•
Pendant
le
fonctionnement,
portez
une
protection
auditive
pour
ne
pas
endommager
votre
audition!
Informations
speciales
sur
la
securite
Lors
du
perqage
ou
du
vissage
dans
ies
murs,
les
plafonds,
etc.,
veiiiez
a
ne
pas
endommager
ies
cables
electriques
caches.
Pendant
ce
travail,
vous
ne
devez
toucher
aucune
partie
metallique
de
ia
machine.
Ne
touchez
la
machine
que
par
le
boTtier
en
plastique.
Votre
machine
est
a
double
isolation.
Cela
signifie
que
deux
types
d'isolation
completement
independants
vous
empechent
d'entrer
en
contact
avec
des
pieces
m^talliques
sous
tension.
Cette
mesure
represente
un
haut
degre
de
protection
contre
les
chocs
electriques.
Votre
foret
a
les
fonctions
sulvantes:
L'interrupteur
de
commande
(6)
est
utilise
pour
tous
les
travaux
effectues
avec
la
perceuse.
Avec
la
selection
de
vitesse
via
la
molette
du
regulateur,
vous
avez
un
controle
optimal
de
la
machine.
La
machine
peut
§tre
r6gl6e
en
fonctionnement
continu
avec
le
bouton
de
verrouillage
(5).
La
deuxieme
poignee
(2)
vous
offre
un
moyen
supplementaire
de
tenir
la
machine
fermement.
En
fonction
de
ia
position
de
I'interrupteur
de
forage
/
perqage
a
percussion
(3),
vous
pouvez
utiliser
votre
perceuse
comme
perceuse
a
percussion
ou
perceuse
rotative.
Le
commutateur
de
direction
(4)
controle
le
sens
du
mouvement
lorsque
la
machine
est
utilisee
comme
tournevis
ou
si
vous
souhaitez
retirer
un
foret
coinc6.
En
utilisant
la
butee
de
foret
reglable,
vous
pouvez
fixer
la
profondeur
des
trous
borgnes
avec
precision
pendant
le
forage.
Attention!
Lorsque
vous
effectuez
les
t§ches
suivantes,
assurez-vous
toujours
que
la
machine
n'
est
pas
branches
sur
le
secteur.
Insertion
de
la
deuxieme
poignee
(2)
Pour
assembler
la
deuxieme
poignee
(2),
liberez-Ia
en
tournant
la
partie
inferieure
dans
le
sens
inverse
des
aiguilles
d'une
montre
pour
pouvoir
facilement
tirer
la
poignee
sur
le
mandrin
de
perqage
sur
la
bride
situee
derriere
celie-ci.
Ensuite,
tournez
la
poignee
dans
une
position
de
travail
qui
vous
convient
et
fxez-la
en
la
serrant
(rotation
de
la
partie
inferieure
dans
le
sens
des
aiguilles
d'une
montre).

The
second
handle
(2)
has
a
retainer
for
the
bit
stop.
Insert
a
drill.
Now
release
the
handle.
Push
the
bit
stop
forwards
until
its
end
is
in
line
with
the
end
of
the
drill.
Now
push
the
bit
stop
back
until
the
distance
between
the
end
of
the
bit
stop
and
the
end
of
the
drill
corresponds
to
the
depth
to
which
you
would
like
to
drill.
Ajuster
la
position
La
poign^e
secondaire
(2)
comporte
un
dispositif
de
retenue
pour
I'arret
de
la
perceuse.
Insurer
un
foret.
RelSchez
la
poignee
maintenant.
Poussez
le
foret
vers
I'avant
jusqu'^
ce
que
son
extr6mite
soit
align^e
avec
I'extremit^
du
foret.
Poussez
maintenant
la
perceuse
en
arri^re
jusqu'a
ce
que
la
distance
entre
la
fin
du
foret
et
la
fin
du
foret
corresponde
^
la
profondeur
que
vous
souhaitez
percer.
Inserer
ie
foret
Commencez
par
retirer
1'
alimentation
secteur
de
la
prise.
Tournez
la
bague
du
mandrin
(1)
jusqu'^
ce
que
les
machoires
de
serrage
soient
suffisamment
ouvertes.
Ins^rez
la
perceuse
dans
les
machoires
de
serrage
du
mandrin
(1).
Ins^rez
i'extr^mit^
de
la
cle
de
mandrin
(7)
dans
I'un
des
trois
trous
du
corps
du
mandrin
(1)
et
laissez
la
t§te
de
la
cle
(7)
en
place
dans
I'anneau
du
mandrin
(1).
.
Pour
serrer
les
mdchoires
de
serrage
et
fixer
la
perceuse
en
place,
tournez
la
cl^
de
mandrin
de
pergage
(7)
dans
le
sens
des
aiguilles
d'une
montre.
Important:
retirez
ensuite
la
cl6
(7)
du
mandrin
(1)1
Travailler
avec
la
presse
de
la
foreuse
Assurez-vous
que
la
tension
du
secteur
est
la
meme
que
celle
de
votre
machine.
Pour
plus
de
details,
veuillez
vous
reporter
a
la
plaque
signaletique.
Insdrez
I'exercice
correspondent
au
type
de
travail
a
effectuer.
Si
necessaire,
ajustez
le
bit
stop.
R§glez
la
vitesse
de
la
machine
a
I'aide
de
la
molette
de
r§glage
du
commutateur
de
fonctionnement
(6).
Plus
I'interrupteur
de
commande
(6)
est
enfonc6,
plus
la
perceuse
tourne
rapidement.
R6glez
le
commutateur
de
direction
(4)
dans
le
sens
de
deplacement
souhaite.
Ne
modifiez
jamais
la
position
de
I'interrupteur
de
pergage
a
percussion
(3)
ni
de
I'interrupteur
de
direction
(4)
lorsque
la
machine
est
en
marche.
La
machine
est
mise
en
marche
en
appuyant
sur
I'interrupteur
de
commande
(6).
Lorsque
I'interrupteur
de
commande
(6)
est
rel§ch§,
la
machine
s'arr§te.
Si
vous
souhaitez
utiliser
le
fonctionnement
continu,
appuyez
sur
le
bouton
de
verrouillage
(5)
tout
en
maintenant
I'interrupteur
de
fonctionnement
(6)
enfonc§.
Pour
etelndre
la
machine
en
fonctionnement
continu,
appuyez
a
nouveau
sur
I'interrupteur
de
commande
(6),
puis
reldchez-le.
Ne
touchez
pas
le
mandrin
(1)
lorsque
la
machine
est
en
marche.
Consells
de
forage
•
Toujours
inserer
la
taille
et
le
type
de
perceuse
ou
de
toumevis
appropries.
•
R^glez
la
machine
S
la
vitesse
correcte.
•
Tenez
toujours
la
machine
fermement
par
la
poign6e
et
la
deuxi6me
poign§e
(2).
•
Lors
du
pergage
du
bois
et
du
metal,
r^glez
le
commutateur
de
forage
/
forage
^
impact(3)
sur
forage.
•
Lors
du
forage
de
la
pierre
a
beton,
reglez
le
commutateur
de
forage
/
forage
d
impact(3)
sur
forage.
10.

•
Lorsque
vous
utilisez
la
machine
comma
tournevis,
reglez
le
commutateur
da
forage
I
forage
^
impact(3)
sur
forage
a
impact
•
Reglsz
le
commutateur
de
direction
(4)
dans
!e
bon
sens.
•
Ne
changez
jamais
le
sens
du
mouvement
lorsque
la
machine
est
allum^e.
Soin
des
outils
Surcharge
Ne
jamais
utiliser
une
force
excessive
lors
du
pergage.
Trop
de
pression
reduit
la
Vitesse
de
la
machine
at
la
puissance
requise
est
considerablement
r^uite.
Ceia
pourrait
entraTner
une
surcharge
pouvant
endommager
le
moteur
de
la
perceuse.
Lorsque
la
machine
de
forage
devient
trop
chaude,
laissez-ia
fonctionner
pendant
deux
minutes
sans
charge,
puis
interrompez-la
pendant
une
courte
periode.
Nettoyez
la
perceuse
avec
un
chiffon
propre
at
une
brosse.
Assurez-vous
que
les
fentes
d'aeration
ne
sont
pas
obstruees.
Avertissement:
utilisez
toujours
les
poignees
supplementaires
fournies
avec
i'appareil.
La
perte
de
controle
de
I'appareil
peut
entratner
des
blessures.
Donnees
techniques
220-240V-
50/60HZ
850W
0-3000/min
13mm

Uberblick
1.
Bohrfutter
2.
zweiler
Griff
3.
Schalter
fur
Schlagbohren
I
Bohren
4.
Richtungsschaiter
5.
Veniegelungstaste
B.Betriebsschalter
mil
Geschwindigkeitsreglerrad
7.
Bohrfutterschlussel
Allgemeine
Sicherheitshinweise
fiir
Elektrowerkzeuge
Dieses
Gerat
ist
ausschlieKlich
fur
den
privaten
Gebrauch
bestimmt!
Es
ist
nicht
fur
den
kommerzlellen
Gebrauch
geeignet!
Warnung;
Beim
Arbeiten
mil
elektrischen
Geraten
sind
die
folgenden
Vorbeugungs-
und
Sicherheitshinweise
zu
beachten,
um
Brande,
Stromschlage
und
Korperverletzungen
zu
vemneiden.
Fur
sicheres
Arbeiten:
•
Halten
Sie
den
Arbeitsbereich
in
Ordnung!
•
Unordnung
im
Arbeitsbereich
kann
zu
Unfallgefahren
fuhren!
Beachten
Sie
die
Umgebungsbedingungen!
•
Lessen
Sie
keine
Elektrowerkzeuge
im
Regen
stehen!
•
Verwenden
Sie
diese
nicht
in
feuchter
oder
nasser
UmgebungI
•
Stellen
Sie
sicher,
dass
genugend
Licht
vorhanden
ist!
Stellen
Sie
sicher,
dass
der
Arbeitsbereich
auf
einen
Blick
sichtbar
ist!
•
Verwenden
Sie
ketne
Bektrowerkzeuge
in
feuergefahrdeten
Bereichen!
Schutzen
Sie
sich
vor
Stromschlagen!
•
Vermeiden
Sie
den
Kontakt
mit
geerdeten
Teiien
(z.
B.
Rohren,
Heizkdrpern,
Herden,
Kuhischranken)!
•
Bei
extremen
Einsatzbedingungen
(z.B.
hohe
Luftfeuchtigkeit,
Vorhandensein
von
Metaiipartikein
usw.)
kann
die
eiektrische
Sicherheit
des
Gerats
durch
Anschluss
eines
Trenntransformators
oder
eines
Fehlerstromschutzschalters
verbessert
werden!
12.

•
Halten
Sie
Kinder
fern!
•
Lessen
Sie
andere
Personen
das
Werkzeug
oder
das
Kabei
nicht
beriihren!
•
Halten
Sie
andere
Personen
aus
dem
Arbeitsbereich
fern!
Stellen
Sie
sicher,
dass
das
Werkzeug
sicher
aufbewahrt
wirdi
•
Unbenutzte
Elektrowerkzeuge
sind
an
einem
trockenen,
uberfluteten
oder
verschlossenen
Ort
auKerhalb
der
Reichweite
von
Kindem
aufzubewahren!
•
Oberlasten
Sie
das
Elektrowerkzeug
nicht!
Es
funktioniert
besser
und
sicherer
innerhalb
des
angegebenen
Kapazitatsbereichs!
Verwenden
Sie
das
richtige
Elektrowerkzeug!
•
Verwenden
Sie
keine
schwachen
Werkzeuge
oder
Adapter
fur
schwere
Arbeiten.
Verwenden
Sie
keine
Tools
fur
Zwecke
oder
Jobs,
fiir
die
diese
nicht
vorgesehen
sind.
Zum
Beispiel
warden
Handkreissagen
nicht
zum
Schneiden
von
Baumen
oder
Asten
verwendet!
Tragen
Sie
immer
geeignete
Arbeitskleidung!
•
Tragen
Sie
keine
sackartigen
Tucher
oder
Schmuck!
Gefahr,
von
beweglichen
Teilen
erfasst
zu
warden!
•
Bei
Arbeiten
im
Freien
ist
es
ratsam,
Gummihandschuhe
und
rutschfeste
Schuhe
zu
tragen!
•
Wenn
du
langes
Haar
hast,
trage
ein
Haametz!
Schutzbrille
tragen!
•
Tragen
Sie
bei
staubenden
Arbeiten
immer
eine
Atemmaske!
SchlieUen
Sie
das
Vakuumsystem
an
(fails
vorhanden)!
•
Wenn
Gerate
zum
Anschluss
von
Vakuum-
und
Sammelsystemen
vorhanden
sind,
stellen
Sie
sicher,
dass
diese
richtig
angeschlossen
und
verwendet
werden!
•
Manipulieren
Sie
das
Kabei
nichtl
•
Tragen
Sie
das
Wer1<zeug
nicht
am
Kabei
und
benutzen
Sie
es
nicht,
um
den
Stecker
aus
der
Steckdose
zu
ziehen!
•
Schiitzen
Sie
das
Kabei
vor
Hitzequellen,
Gl
und
scharfen
Kanten!
Sichern
Sie
das
Werkzeugl
•
Venwenden
Sie
Spannvonichtungen
oder
einen
Schraubstock,
um
das
Werkzeug
still
zu
halteni
Das
Werkzeug
kann
somit
sicherer
als
von
Hand
gehalten
werden
und
das
Werkzeug
kann
mft
beiden
Handen
bedient
werden!
•
Vermeiden
Sie
ungewdhnliche
Korperhaitungen!
Stehe
immer
fest
und
halte
dein
Gleichgewicht!
Haiten
Sie
das
Werkzeug
immer
in
gutem
Zustand!
•
Halten
Sie
Werkzeuge
stets
scharf
und
sauber,
um
korrekt
und
sicher
zu
arbeiten!
•
Befolgen
Sie
die
Wartungs-
und
Werkzeugwechselanweisungen!
•
Kontrollieren
Sie
regelmaSig
Stecker
und
Kabei
und
lassen
Sie
diese
im
Schadensfall
von
einem
qualifizierten
Techniker
austauschen!
•
Oberpriifen
Sie
das
Verlangerungskabel
regelmaBig
und
ersetzen
Sie
es
bei
Beschadigung!
•
Ziehen
Sie
den
Stecker
nach
Gebrauch,
vor
der
Wartung
und
beim
Wechsein
von
Zubehor
wie
Sageblattem,
Bohrern
usw.
aus
der
Steckdosel
•
Vermeiden
Sie
das
versehentliche
Starten
des
Werkzeugsl
•
Tragen
Sie
niemais
ein
mit
dem
Stromnetz
verbundenes
Elektrowerkzeug
mit
dem
Finger
am
Schalter!
•
Stellen
Sie
sicher,
dass
der
Schalter
ausgeschaltet
ist,
bevor
Sie
ihn
an
das
Stromnetz
anschlieSen!
Verlangemngskabei
im
Freien:
Venivenden
Sie
nur
zugelassene
und
entsprechend
gekennzeichnete
Verlangerungskabel
im
Freien!
•
Sei
immer
vorsichtigl
Achte
auf
detne
ArbeitI
Gehen
Sie
vorsichtig
vor.
Verwenden
Sie
das
Werkzeug
nicht,
wenn
Sie
nicht
konzentriert
sind!
•
Oberprufen
Sie
das
Werkzeug
auf
Beschadigungen!
•
Bevor
Sie
das
Werkzeug
das
nachste
Mai
benutzen,
uberprufen
Sie,
dass
die
Schutzvorrichtungen
oder
die
leicht
beschadigten
Teile
in
gutem
Zustand
sind!
Oberprufen
Sie,
ob
die
beweglichen
Teile
richtig
funktionieren,
dass
diese
nicht
eingeklemmt
sind
oder
ob
Teile
beschadigt
sind!
•
Alle
Teile
mussen
konrekt
montiert
werden
und
erfullen
aile
Anforderungen
fur
die
Funktion
des
Eiektrowerkzeugs!
•
Beschadigte
Schutzgerate
und
-teile
sind
von
einem
qualifizierten
Techniker
zu
reparieren
oderzu
.13
wechsein,
sofern
in
der
Bedienungsanleitung
nicht
anders
angegeben!
•
Beschadigte
Schaiter
sind
in
einem
Kundendienst
auszutauschen!
Verwenden
Sie
keine
Elektrowerkzeuge,
die
nicht
ein-
Oder
ausgeschaltet
werden
konnen!
WARNUNG!
•
Venivenden
Sie
zu
Ihrer
eigenen
Sicherheit
immer
nur
die
in
der
Betriebsanieitung
aufgefiihrten
oder
vom
Hersteller
empfohlenen
oder
angegebenen
Zubehorteile
und
Zubehdrteiie!
•
Die
Venvendung
von
Zubehor
und
Zubehorteilen,
die
nicht
in
der
Bedienungsanleitung
aufgefiihrt
sind,
kann
zu
Verletzungen
fiihren!
•
Lassen
Sie
Ihr
Werkzeug
immer
von
zertifizierten
Technikem
reparieren!
•
Dieses
Tool
erfuilt
die
relevanten
Sicherheitsanforderungen!
•
Reparaturen
diirfen
nur
von
qualifiziertem
Fachpersonai
mit
Original-Ersatzteilen
durchgefiihrt
werden,
um
Verletzungen
durch
unsachgemaBe
Reparaturen
zu
vermeiden!
•
Tragen
Sie
wahrend
des
Betiiebs
einen
Gehorschutz,
um'Schaden
am
Gehor
zu
vermeiden!
Spezielle
Sicherheitsinformationen
Achten
Sie
beim
Bohren
oder
Einschrauben
in
Wande,
Decken
usw.
darauf,
dass
Sie
verborgene
Elektrokabel
nicht
beschadigen.
Wahrend
dieser
Arbeit
sollten
Sie
keine
Metallteile
der
Maschlne
beruhren.
Beruhren
Sie
die
Maschine
nur
am
Kunststoffgehause.
Ihre
Maschine
ist
doppeit
isoliert.
Das
bedeutet,
dass
Sie
mit
zwei
vollig
unabhangigen
Isolierungen
nicht
mit
lebenden
Metallteilen
in
Kontakt
kommen
konnen.
Diese
Malinahme
steilt
einen
hohen
Schutz
vor
einem
elektrischen
Schlag
dar.
Ihr
Bohrer
hat
die
folgenden
Funktionen:
Der
Bedienschalter
(6)
wird
fur
alle
Arbeiten
mit
der
Bohrmaschine
verwendet.
Mit
der
Geschwindigkeitswahl
uber
das
Reglerrad
haben
Sie
eine
optimale
Kontroile
uber
die
Maschine.
Die
Maschine
kann
mit
der
Verriegelungstaste
(5)
auf
Dauerbetrieb
eingesteilt
werden.
Der
zweite
Griff
(2)
gibt
Ihnen
eine
zusatzliche
Mbgiichkeit,
die
Maschine
fest
zu
halten.
Je
nach
Position
des
Schlagbohr-
/
Bohrschaiters
(3)
konnen
Sie
verwenden
Ihre
Bohrmaschine
als
Schlagbohrer
oder
rotierender
Bohrer.
Der
Richtungsschalter
(4)
steuert
die
Bewegungsrichtung,
wenn
die
Maschine
benutzt
wird
als
Schraubenzieher
oder
wenn
Sie
eine
verklemmte
Bohrspitze
entfemen
mochten.
Mit
dem
einstellbaren
Bitstop
konnen
Sie
die
Tiefe
von
Sackldchem
wahrend
des
Bohrens
genau
festlegen.
Vorberelten
der
Bohrmaschine
WamungI
Stelien
Sie
bei
den
folgenden
Arbeiten
immer
sicher,
dass
die
Maschine
funktioniert
nicht
an
das
Stromnetz
angeschlossen
Einfiigen
des
zweiten
Griffs
(2)
Um
den
zweiten
Griff
(2)
zu
montieren,
Idsen
Sie
ihn,
indem
Sie
den
unteren
Teil
gegen
den
Uhrzeigerslnn
drehen,
so
dass
Sie
den
Griff
leicht
iiber
das
Bohrfutter
auf
den
dahinter
liegenden
Flansch
ziehen
konnen.
Drehen
Sie
dann
den
Griff
in
eine
fur
Sie
angenehme
Arbeitsposition
und
fixieren
Sie
ihn
14.
durch
Anziehen
(Drehen
des
Unterteils
im
Uhrzeigersinn).
Einstellen
den
Bohrgriff
Einfiigen
des
Bohrers
Oer
zweite
Gilff
(2)
hat
eine
Halterung
fur
den
Bitstopper.
Fiigen
Sie
einen
Bohrer
ein.
Lessen
Sie
nun
den
Griff
los.
Schieben
Sie
den
Bithalter
nach
vorne,
bis
sein
Ende
mil
dem
Ende
des
Bohrers
ubereinstimmt.
Schieben
Sie
nun
den
Bithaiter
zuriick,
bis
der
Abstand
zwischen
dem
Ende
des
Bitstopps
und
dem
Ende
des
Bohrers
der
Tiefe
entspricht,
auf
die
Sie
bohren
mochten.
Ziehen
Sie
zuerst
das
Netzteil
aus
der
Steckdose.
Den
Ring
des
Bohrfutters
(1)
drehen,
bis
die
Spannbacken
weit
genug
geoffnet
sind.
Setzen
Sie
den
Bohrer
in
die
Spannbacken
des
Bohrfutters
(1)
ein.
Stecken
Sie
das
Ende
des
Bohrfutterschlussels
(7)
in
eine
der
drei
Bohrungen
am
Bohrfutterkorper
(1)
und
lassen
Sie
den
Schlusselkopf
(7)
im
Ring
des
Bohrfutters
(1}
einrasten.
.
Um
die
Spannbacken
festzuziehen
und
den
Bohrer
zu
fixieren,
den
Bohrfutterschlussel
(7)
im
Uhrzeigersinn
drehen.
Wichtig:
Dann
den
Schlussel
(7)
aus
dem
Putter
(1)
entfemen!
Arbeiten
mit
der
Bohrmaschine
Stellen
Sie
sicher,
dass
die
Netzspannung
mit
der
Betriebsspannung
Ihrer
Maschine
ubereinstimmt.
Details
finden
Sie
auf
dem
Typenschild,
FCigen
Sie
den
richtigen
Drill
fur
den
Typ
des
auszufiihrenden
Jobs
ein.
Stellen
Sie
ggf.
den
Bitstopp
ein.
Stellen
Sie
die
Geschwindigkeit
der
Maschine
mit
dem
Einstellrad
am
Bedienungsschalter
(6)
ein.
Je
mehr
der
Bedienschalter
(6)
gedriickt
wird,
desto
schneller
rotiert
der
Bohrer,
Stellen
Sie
den
Richtungsschalter
(4)
auf
die
gewunschte
Bewegungsrichtung
ein.
Andern
Sie
niemals
die
Position
des
Schlagbohrschailers
(3)
oder
des
Richtungsschalters
(4),
wenn
die
Maschine
eingeschaltet
ist.
Die
Maschine
wird
durch
Drucken
des
Betriebsschaiters
(6)
eingeschaltet.
Wenn
der
Betriebsschalter
(6)
losgelassen
wird.
stoppt
die
Maschine.
Wenn
Sie
den
Dauerbetrieb
nutzen
mochlen,
drucken
Sie
den
Sperrknopf
(5),
wahrend
der
Bedienschaller
(6)
gedrCickt
wird.
Um
die
Maschine
bei
Dauerbelrleb
auszuschalten,
den
Belriebsschalter
(6)
erneut
drucken
und
loslassen.
Beruhren
Sie
das
Bohrfutter
{1)
nicht,
wahrend
die
Maschine
eingeschaltel
ist.
Bohrspitzen
•
Setzen
Sie
immer
die
richtige
Grolie
und
Art
des
Bohrers
Oder
Schraut>enziehers
ein.
•
Stelien
Sie
die
Maschine
auf
die
richlige
Geschwindigkeit
ein.
•
Haiten
Sie
die
Maschine
immer
fest
am
Griff
und
am
zweiten
Griff
(2).
•
Beim
Bohren
von
Holz
und
Metall
den
Schiagbohrschaller
(3)
auf
Bohren
slellen.
•
Beim
Bohren
von
Mauerwerk
den
Schlagbohrschaiter
(3)
auf
Schlagbohren
stellen.
•
Wenn
Sie
die
Maschine
als
Schraubenzieher
ven/venden,
setzen
Sie
den
Schlagbohrschaiter
(3)
auf
Bohren.
•
Stellen
Sie
den
Richtungsschalter
(4)
in
die
richtige
Richtung.
•
Andern
Sie
niemals
die
Bewegungsrichtung
beim
Einschalten
der
Maschine.
Pflege
der
Werkzeuge
Uberlast
VenArenden
Sie
niemals
ubermaSige
Kraft
beim
Bohren.
Zu
viel
Druck
reduziert
die
Geschwindigkeit
der
Maschine
und
die
erforderliche
Leistung
wird
stark
reduziert.
Dies
kann
zu
einer
Uberlastung
fuhren,
die
den
Motor
der
Bohrmaschine
beschadigen
kann.
Wenn
die
Bohrmaschine
zu
heilJ
wird,
lassen
Sie
sie

zwei
Minuten
lang
ohne
Belastung
laufen
und
unterbrechen
Sie
dann
die
Arbeit
fur
kurze
Zeit.
Reinigen
Sie
die
Bohrmaschirte
mit
einem
sauberen
Tuch
und
einer
Burste.
Stellen
Sie
sicher,
dass
die
Luftungsschlitze
nicht
blockiert
sind.
Warnung:
Verwenden
Sie
immer
die
zusatzlichen
Griffe,
die
mit
dem
Gerat
geliefert
werden.
Der
Verlust
der
Kontrolle
uber
das
Gerat
kann
zu
Verietzungen
fiihren.
Donnees
techniques
Tension;
220-240V~
Frequence:
50/60HZ
Entree
de
puissance:
850W
Vitesse
de
charqement
a
vide:
0-3000/mln
Taille
du
mandrin:
13mm
Capacite
de
foraqe:
Acier:
13mm
Pierre
de
beton:
13mm
Bols:
25mm
16.

Panoramica
1.
Drill
chuck
2.
Seconfla
maniglia
3.
Interrutlore
per
foratura
/
perforazione
a
percussions
4.
Interruttore
di
direzione
5.
Pulsante
di
blocco
6.
Interruttore
di
azionamento
con
rotella
del
regolatore
di
velocita
7.
Chiave
del
mandrino
di
trapano
Istruzioni
general!
di
sicurezza
per
utensil!
eiettricl
Questo
dispositivo
e
esclusivamente
per
use
private!
Non
e
adatto
per
I'uso
commerciale!
Avvertenza:
quando
si
lavora
con
dispositivi
elettrici
si
devono
osservare
le
seguenti
istruzioni
di
prevenzione
e
sicurezza
per
evitare
incendi,
scosse
elettriche
e
lesioni
fisiche.
Per
un
lavoro
sicuro:
•
Mantenere
I'area
di
lavoro
in
ordine!
•
II
disordine
nell'area
di
lavoro
pud
dare
on'gine
a
pericoli
di
inddenti!
Prestare
attenzione
alle
condizioni
ambientali!
•
Non
lasciare
attrezzi
elettrici
sotto
la
pioggial
•
Non
usare
questi
in
ambienti
umidi
o
bagnatii
•
Assicurati
che
ci
sia
abbastanza
luce!
Assicurati
che
I'area
di
lavoro
sia
visibile
a
colpo
d'occhiol
•
Non
utillzzare
utensil!
elettrici
in
aree
soggette
al
rischio
di
incendio!
Proteggiti
dalle
scosse
elettriche!
•
Evitare
di
entrare
in
contatto
con
parti
messe
a
terra
(ad
esempio
tubi,
radiatori,
stufe,
frigoriferi)!
•
In
caso
di
condizioni
estreme
di
applicazione
(ad
esempio
alta
umiditd,
presenza
di
particeiie
metaliiche,
ecc.),
La
sicurezza
elettrica
del
dispositivo
pud
essere
migliorata
cotlegando
un
trasformatore
di
isoiamento
o
un
interruttore
automatico
di
corrente
di
guasto!
•
Tenere
lontani
1
bambini!
Table of contents
Languages:


