TLR Drones AERO-107 User manual


AERO-107
Manual TLR Drones
1
Congratulations on your purchase of your
AERO-107 !
Please read the following sections of this manual to get started with your new
Autonomous aircraft. If you are new to RC Flying GET FLIGHT INSTRUCTION!!
1-3 Meet the
Aero-107
15 Transmitter Layout / Flight Modes
4 Safety / Flying Rules 16-22 Preflight Procedures
5-7 Charging Battery 23-24 AUTO Takeoff / LANDING / Postflight
8-9 Tail Assembly 25-32 Mission Planning
10-11 Wing Assembly 33-36 Flight Modes (Expanded Info)
12 Propeller Installation 37 Recreational R/C Flying Rules
13-14 FPV overview 38-40 Commercial Part 107 Rules
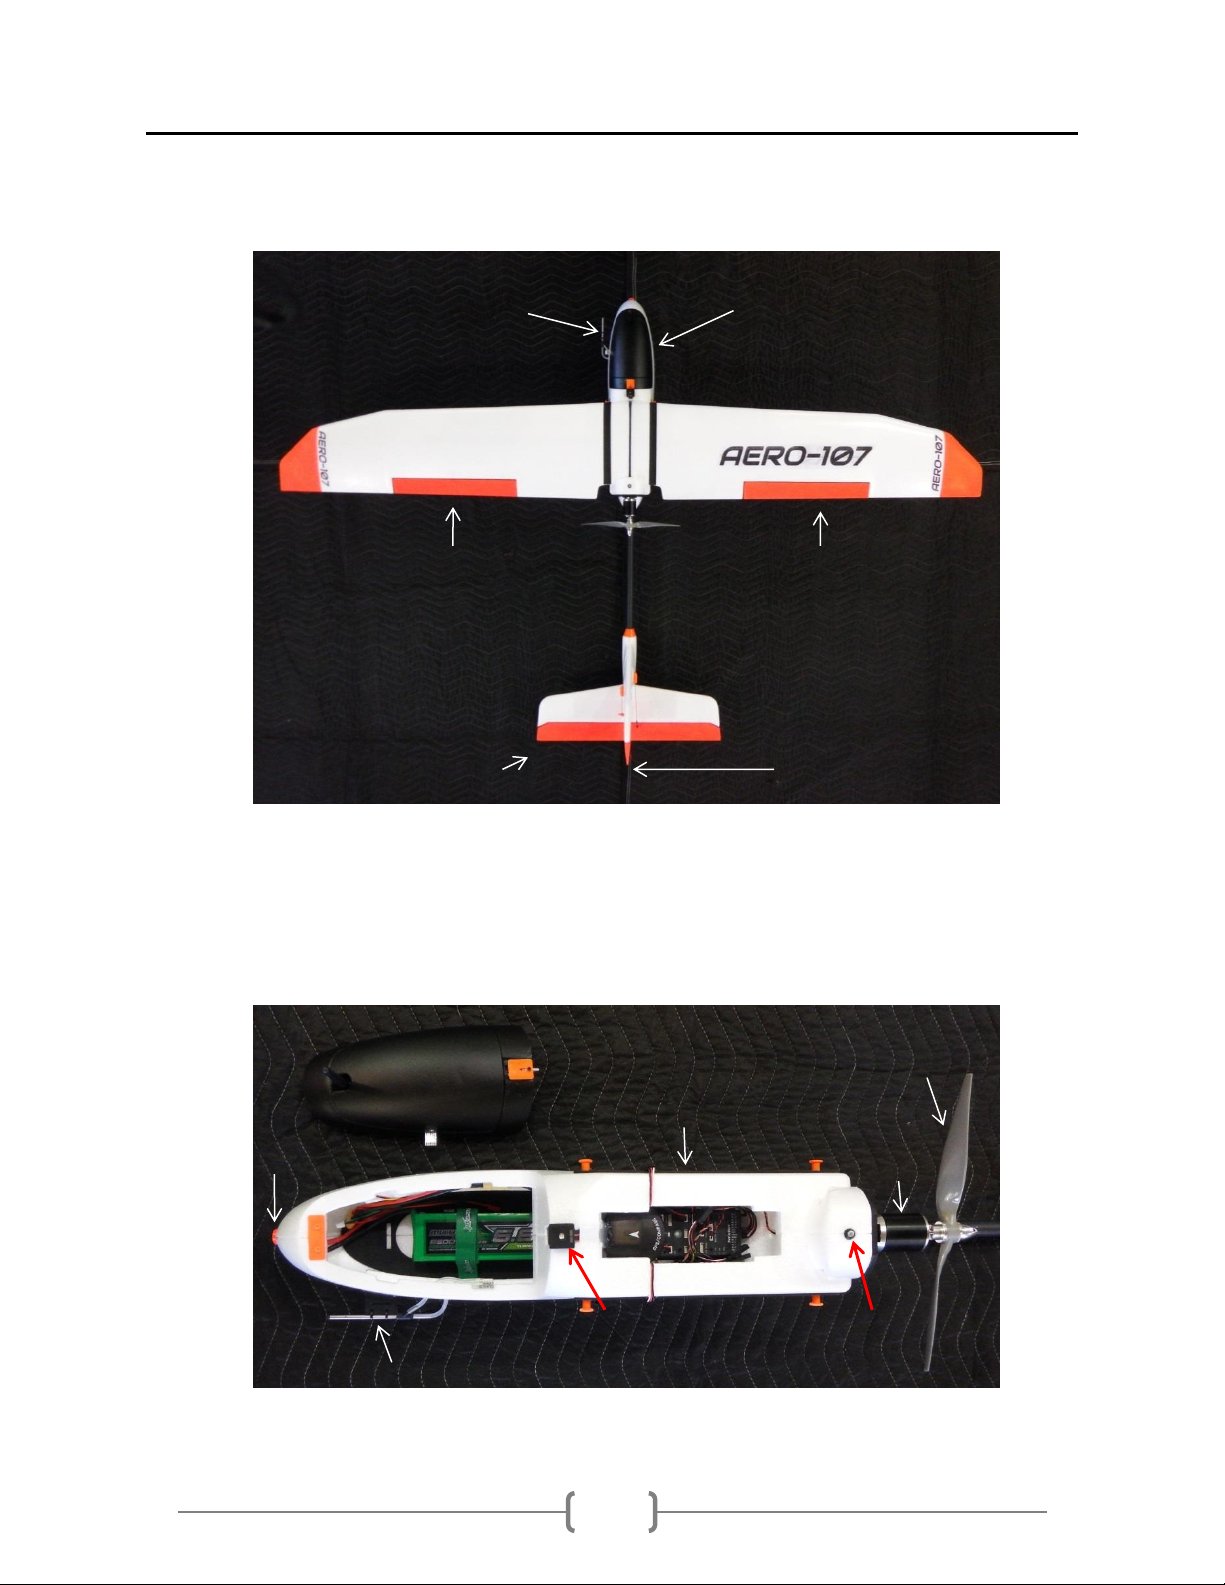
Meet the
AERO-107
NOSE
Body
Left Wing Right Wing
Motor
Tail Boom
Tail
AERO-107
Manual TLR Drones
2
Airspeed Sensor Battery Compartment
Left Aileron Right Aileron
Elevator Rudder
Canopy Prop
Electronics Compartment
FPV Camera Motor
Battery
USB / LED Safety Switch
Airspeed Sensor (Pitot Tube)
AERO-107
Manual TLR Drones
3
AERO-107
Specifications V1
Autopilot HK Pilot32 Pixhawk V2.4.6
Firmware Ardupilot 3.7.0
GPS GSP with Compass (Neo—7M digital GPS with Compass)
Telemetry Telemetry Radio v2 915 MHz (USA) or 433 MHz (International)
Transmitter SPEKTRUM DXe 2.4 GHz 9-channel / 3-Flight Modes
Receiver SPEKTRUM SPM9645 DSXM Remote Receiver
Servos Turnigy™ TGY-50090M Analog Servo MG 1.6kg / 0.08sec / 9g
Motors Turnigy G25 Brushless Outrunner 870kv (28-20/870kv)
ESC H-KING 50A w/5v, 2A Linear BEC
Propeller APC 11x7E
Battery 4S 6600 mAh 10C lithium polymer (5000mAh –13,200mAh)
Aircraft 74 in (188 cm) wingspan, 51 in (129 cm) length
Aircraft (w/battery) 4.8 lbs. (2.18 kg)
Payload capacity 2.7lbs. (1.22kg)
Radio range .6 miles* (1 km)
Flight time 60-120 min*
Flight Range 40-54 Miles (no wind)
Maximum wind speed 25 mph (11 m/s)
Landing accuracy 6 ft. latitude x 100 ft. longitude (2 m x 33 m)
Flight speed 29 mph (13 m/s)
Maximum Speed 38 mph (17 m/s)
Minimum Speed 18 mph (8 m/s)
Shipping dimensions 60 in x 12.5 in x 12.5 in (152 cm x 31.75 cm x 31.75 cm) 15lbs
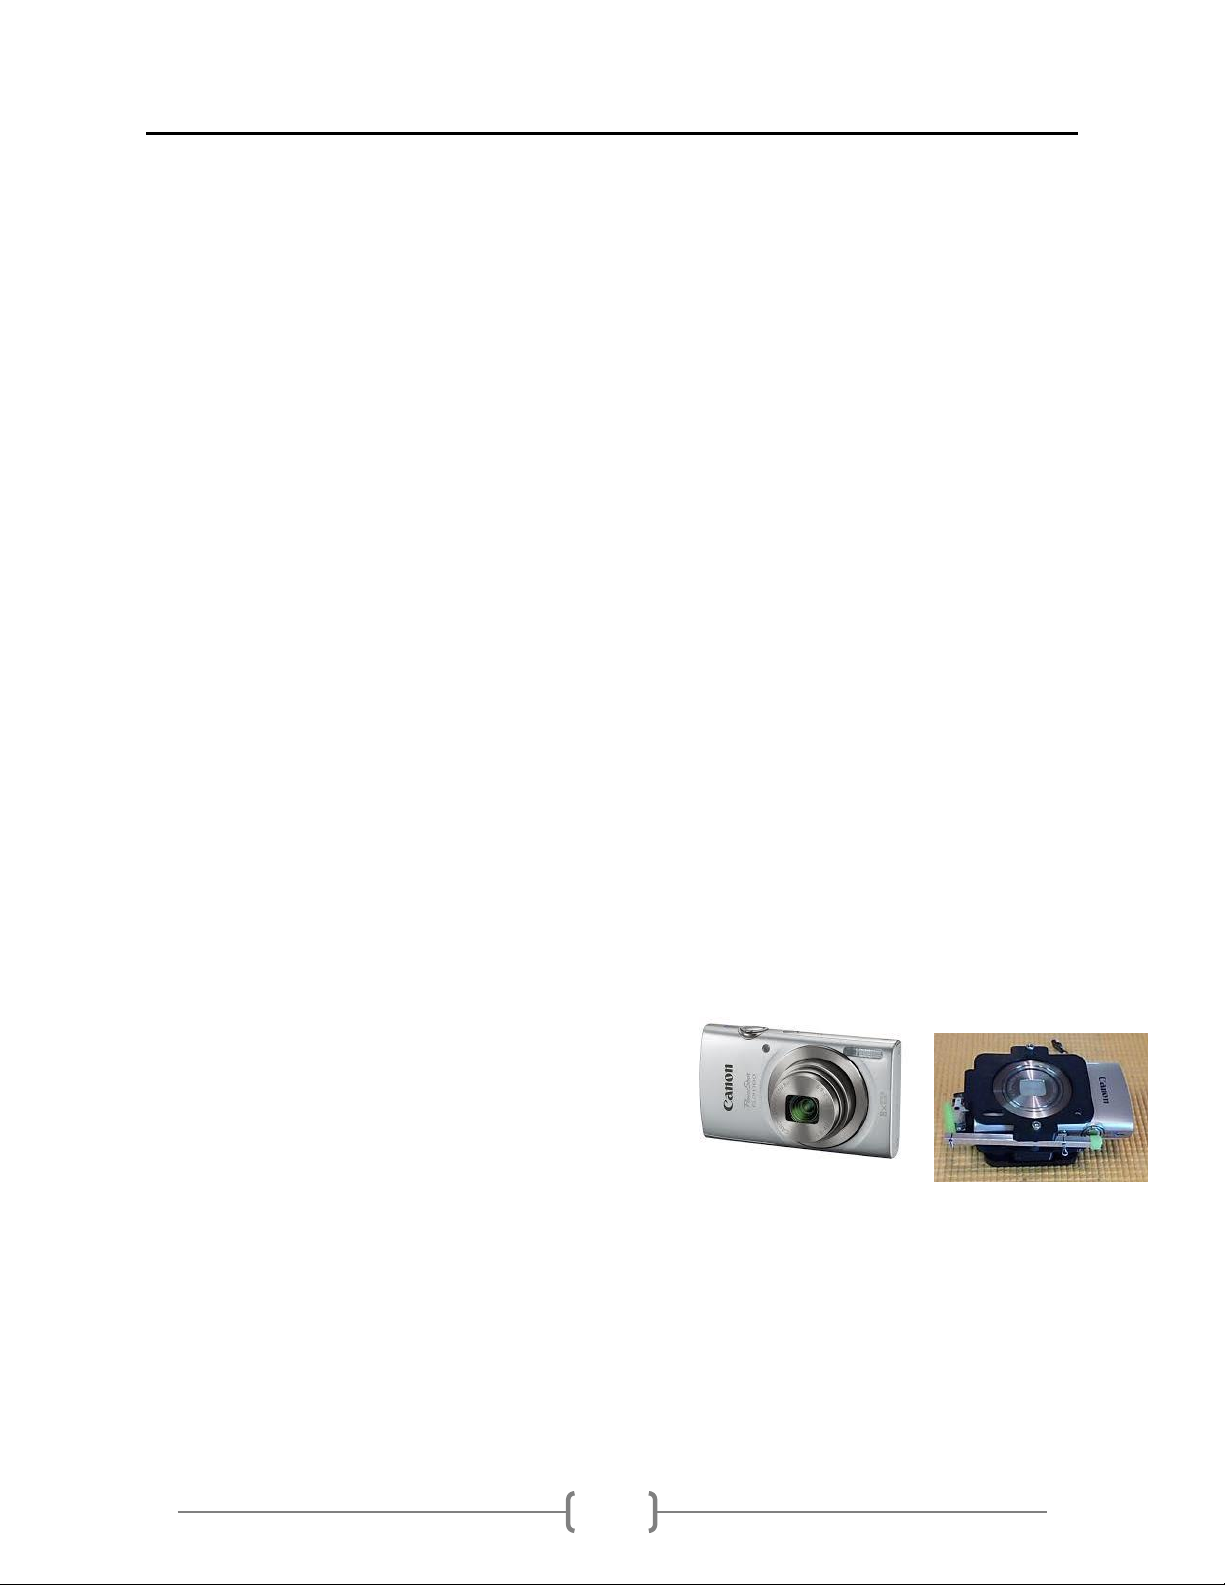
AERO-107-M
Specifications
Camera: Canon ELPH 180 20 megapixel
Camera Mount Proprietary Wing Mounts x 2 (can carry 2 cameras)
Area coverage (per flight) 465 acres* (1.87 km2)
Orthomosaic accuracy 3-16 ft. (1-5 m)
Ground sampling distance 1.45inches per pixel* (3.64 cm per pixel)
Image processing software Pix4Dmapper Basic Edition (free)
*Figures reflect estimated values at ideal operating conditions (No Wind). Environmental conditions
can affect flight time, range, area coverage, and ground sampling distance.
AERO-107
Manual TLR Drones
4
!
Safety & Flying Rules
Before you
fly,
always determine the boundaries of your safe
flying
area.
If
the
AERO-107
moves outside the designated area or exhibits instability in flight, switch to fly-by-wire mode
and land the plane manually.
The
Aero-107
will not avoid obstacles on its own, including during missions. As the operator,
it’s your job to recognize and avoid obstructions while flying. Always be ready to regain manual
control of the plane in the event of an unsafe situation.
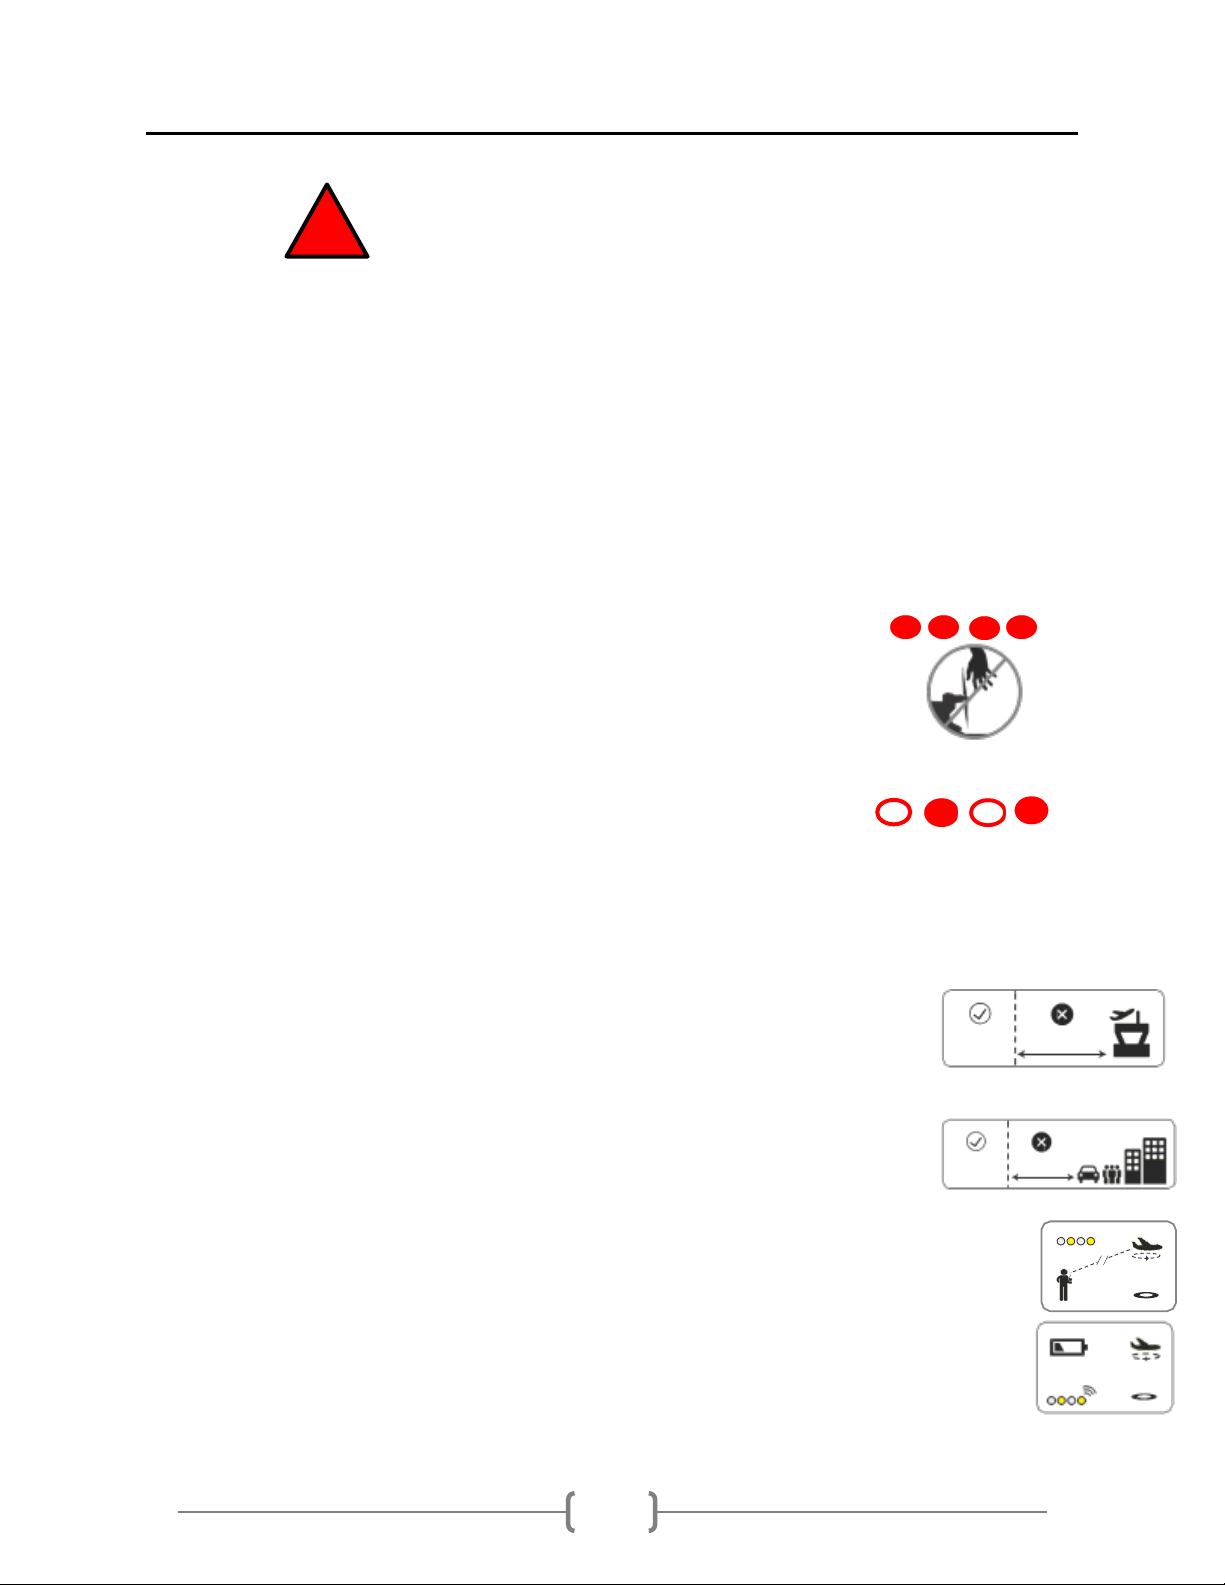
Spinning propellers can cause serious injury. The safety button indicates the status of the motor
to help you prevent hazardous contact with the
Aero-107’s
high-speed propeller. When the
Aero is powered on, the safety button will blink red; the motor is inactive and the propeller is
safe to handle. When you’re ready to fly, press and hold the safety button until it shows solid
red. This indicates that the motor is active and the propeller can spin if armed.
To make the propeller safe to handle again, press and hold the safety button until it blinks red.
Always fly below 400 ft (120 m) and within your visual line of sight. Don’t let the Aero get too far
away from you; make sure you can always see its orientation. Don’t fly in low light, heavy wind,
rain, or other conditions that might impede visibility.
Always fly at least five miles (8 km) away from airports and other areas where pilots operate
manned aircraft.
5 miles
Always fly at least 100 feet (30 m) away from people, vehicles, and buildings. Make the safety of
people and property your first priority!
100’
If the Aero looses contact with the RC transmitter, it will return to the launch point automatically
and enter into a circle pattern above the launch point, indicated by a blinking yellow status LED.
If the battery reaches 30% of its remaining charge, the
Aero-107
will return automatically to
circle above the launch point, indicated by a blinking yellow status LED and a quick repeating
tone.

AERO-107
Manual TLR Drones
5
Battery Charging
The
Aero-107
is powered by a rechargeable lithium polymer (LiPo) battery. Store (more
than 30 days)the battery at half charge, then charge fully before flying. Batteries must ship at
half charge, so please charge before your first flight. Each full battery provides approximately
60 minutes of flight time.
Step 1: To charge your batteries, plug in your battery charger and plug the XT-60 cable into
the right side of the charger as shown.
Step 2: Plug the male XT-60 connector, that is now connected to the charger, into the
Battery’s female XT-60 connector. Then connect the balance plug to the Charger’s Balance
Port.
Balance Port
XT-60 M/F Plug
AERO-107
Manual TLR Drones
6
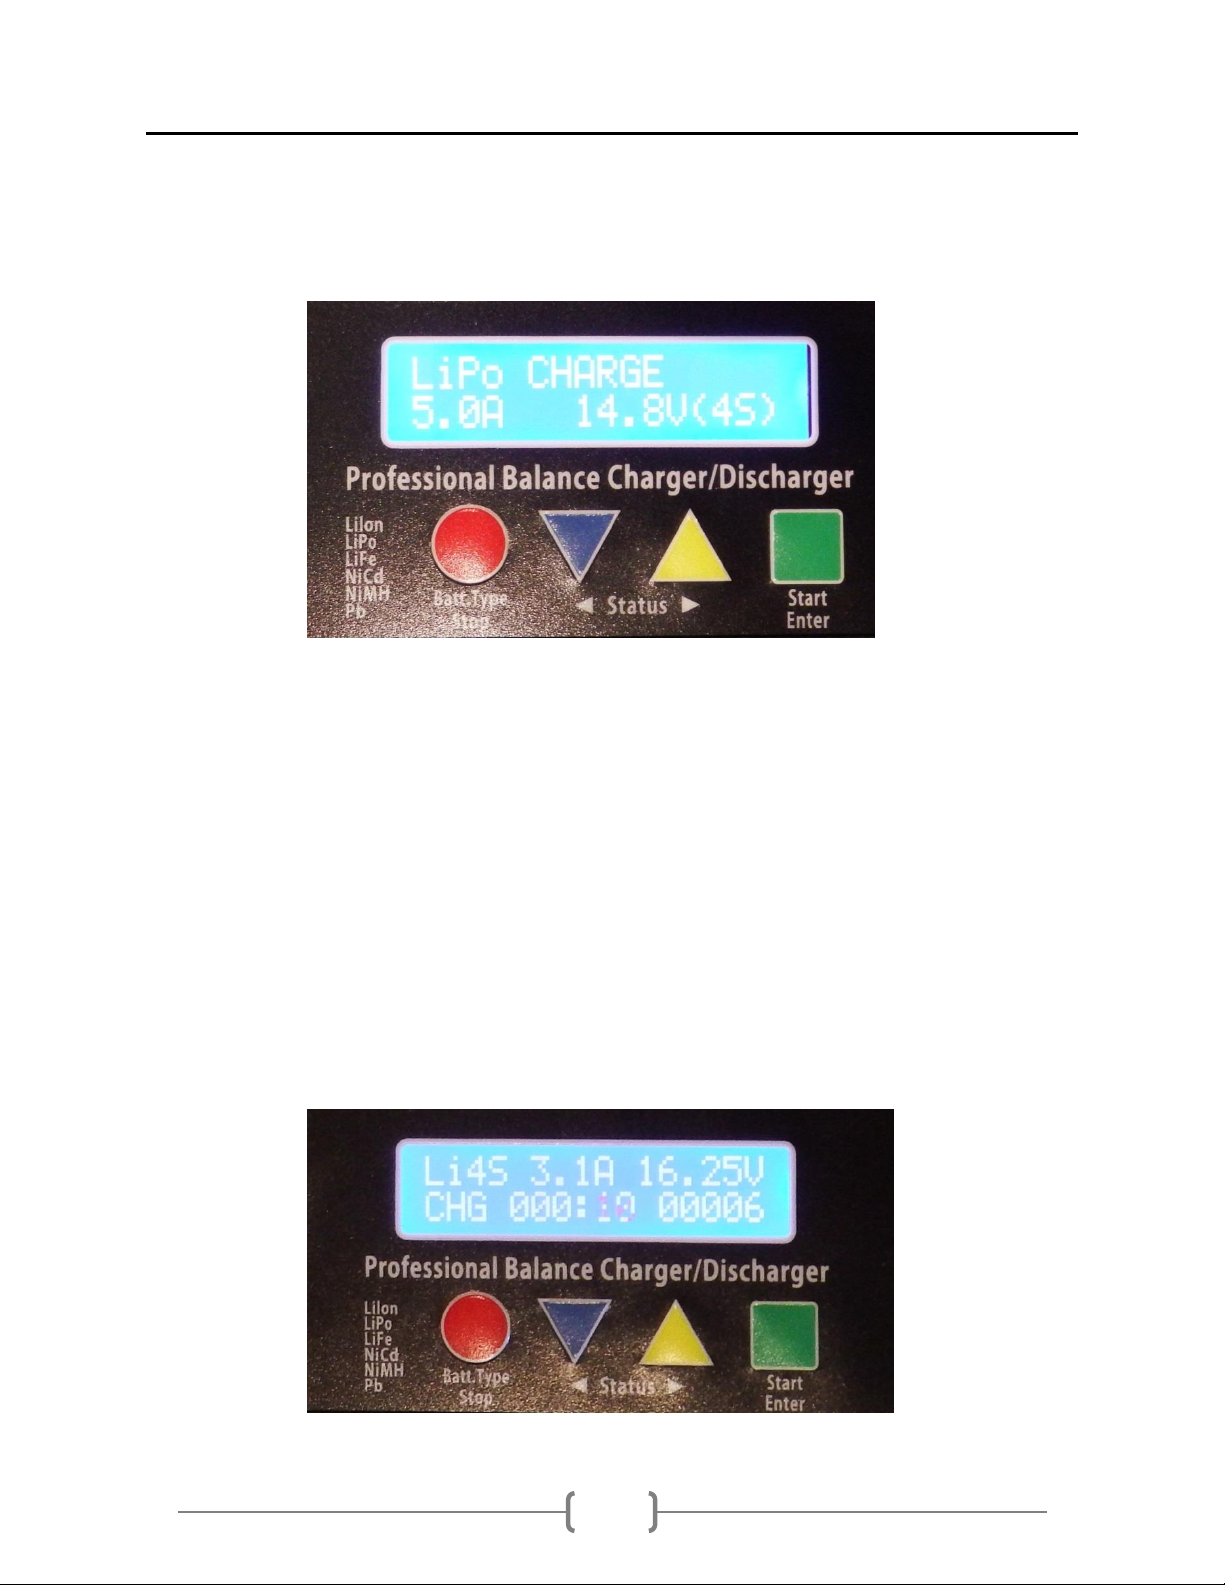
Step 3: If LiPo charge is not selected when you power on the charger press the Batt Type (the
left-most button) until it says LiPo then press the start button on the far right.
Step 4: After selecting Li Po, pressing the start button again will allow you to change the
amps. Change this according to the battery you are charging by going left or right using the
two buttons in between Batt Type and Start. Charge the 6600mAh battery at 5.0A
Step 5: After selecting the correct amount of amps, press start again. This will allow you to
change the number of cells. The 6600mAh battery is labeled a 4 cell battery, so charge it at 4S.
Step 6: After choosing the proper amps and cells, hold down the start button. After the
battery, check press start again to start the charge. When the battery is full the charger will
beep.

AERO-107
Manual TLR Drones
7
! Battery Safety
Protect the battery from extreme heat, extreme cold, puncturing, and flammable surfaces.
Always transport, charge, and store the battery in the guard bag.
Charge the battery using a designated LiPo balance charger only. Always monitor the battery
while charging.
Flying with a low battery is a safety risk and can render the battery permanently unusable.
Always fly with a fully charged battery.
Inspect the battery for damage before takeoff and after landing. If you observe any swelling
of the package or the battery ceases to function, locate your local battery recycling center to
dispose of the battery. Visit http://www.call2recycle.org to find a location In the US and
Canada. Do not dispose of the battery in the trash.
AERO-107
Manual TLR Drones
8
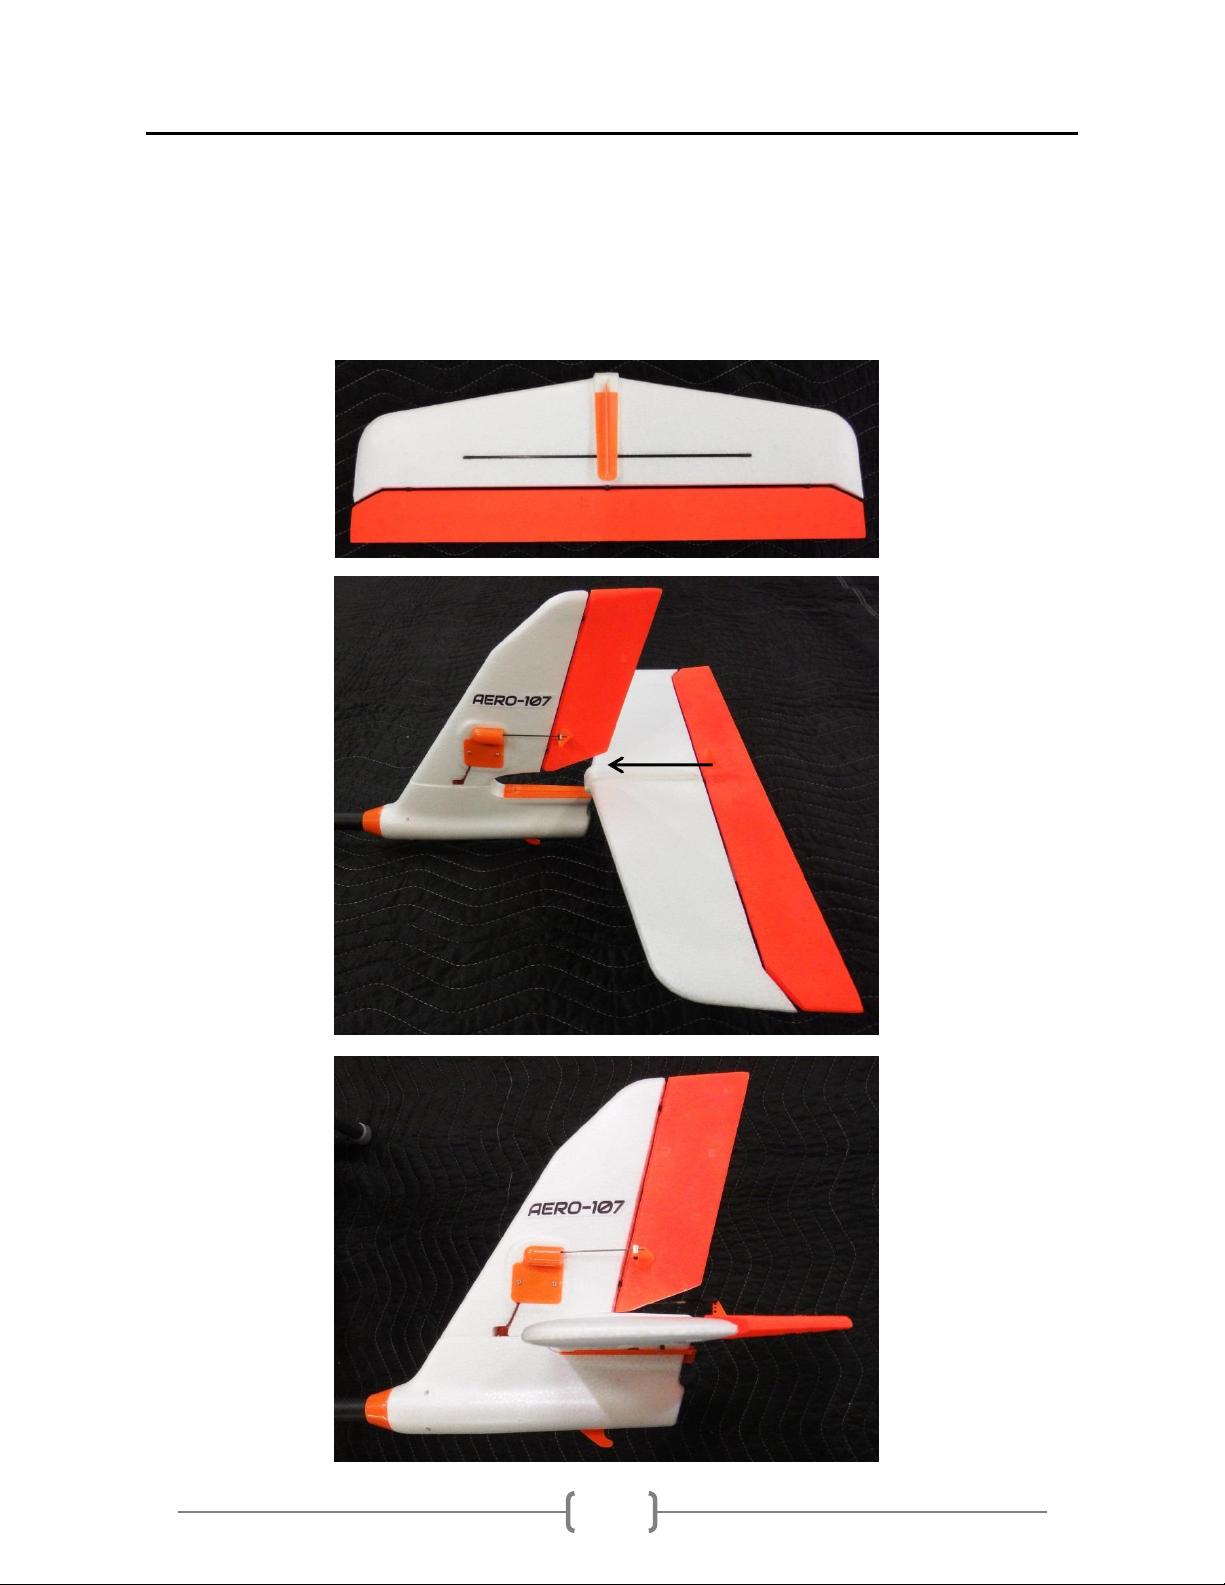
Tail Assembly
Follow instructions to take the
AERO-107
from travel configuration to flight configuration.
Step 1: Slide the horizontal stabilizer into the vertical stabilizer along the orange groove.
Make sure not to stress any of the components on the tail.
Horizontal Stabilizer Bottom Side
Vertical Stabilizer
Slide Horizontal
Tail Assembly
AERO-107
Manual TLR Drones
9
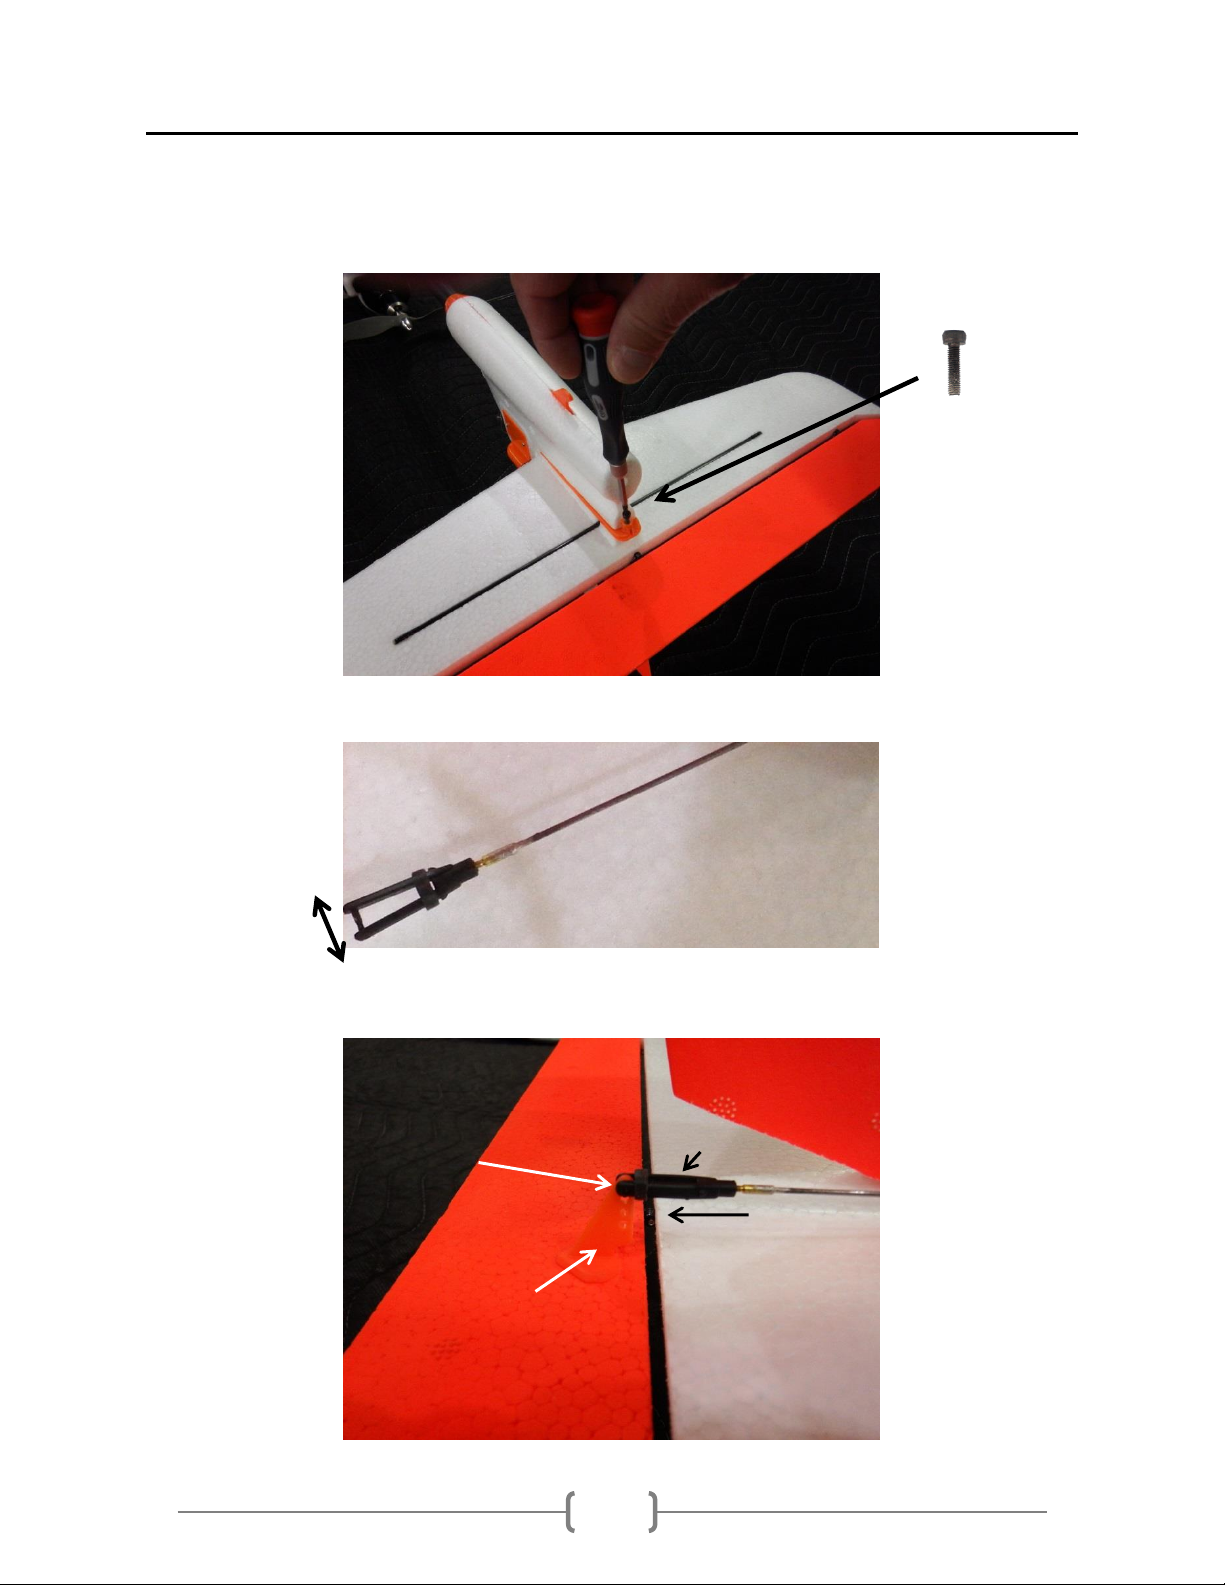
Step 2: Turn the plane over and insert the provided tail screw into the horizontal and vertical
stabilizers.
Tail Screw
Step 3: On the top of the horizontal stabilizer, open the black clevis at the end of the servo
rod.
Step 4: Insert clevis into top hole of control horn and close clevis then slide rubber ring over
clevis to secure it in place.
Insert clevis in top hole Clevis
Slide rubber ring
Control Horn

AERO-107
Manual TLR Drones
10
Wing Assembly
Step 1: Slide the long black rod (Wing Spar) into the left wing.
SLIDE long black rod
Step 2: Slide the right wing onto the wing spar.
Slide right wing onto spar
Step 3: Completed wing assembly
Step 4: Place wing on top of Body (fuselage) to connect Aileron cables to Plane cables.
Connect the Wing AILE & Plane cables
Electrics compartment
Step 5: Locate the two cables inside the electronics compartment marked AILE. Connect these
cables to the two cables on the wings marked AILE. (Either of the wing cables can connect to
either of the plane cables as the order doesn’t matter.)
Step 6: Place the wings over the body (fuselage) of the
Aero-107
with the foam squares
fitted into the matching space in the electronics compartment. Make sure not to pinch the
AILE cables.

AERO-107
Manual TLR Drones
11
Step 7: Locate the four large rubber bands. Use the bands to secure the wings to the
body of the
Aero-107
by the four orange knobs on the body around the wings.
Apply 1st rubberband in a square pattern, then place 2nd rubberband in a X pattern,
then place 3rd in a square pattern, and the 4th in a X pattern. This secures the wing in
place.
Orange Knobs
Square Pattern X-Pattern
Secured With 4 rubber bands !!

AERO-107
Manual TLR Drones
12
Propeller Installation
Step 1: Locate the rings inside the propeller package. Remove the ring with a internal
diameter that fits your motor shaft, and insert it into the back of the propeller hub.
Step 2: Remove the nut and the washer (if present) from the motor, add the propeller with
the writing on the propeller facing towards the nose of the plane !! add the washer and the
nut on the propeller, and tighten the nut. There can be 2 Prop mounts Collet / Stud Mount
Collet Mount ( V1) Stud Mount (V2)
APC Propeller Link
Stud mount (V2)
Collet ring Ring
Nut no Washer
Nut
Washer
Assorted Rings
writing on the propeller facing towards the nose of the plane !!
Nose of the Plane

AERO-107
Manual TLR Drones
13
FPV overview
Canopy
915mhz Telemetry
FPV Camera FPV Cover 600mw Transmitter
5.8ghz antenna
Note: Touch-up to black paint with Permanent Marker
Channel Button 1-8
Band Button A-D
Note:Default FPV frequency set to Band A channel 1
Power Plug in Battery compartment
FPV Camera Connection in Battery compartment

AERO-107
Manual TLR Drones
15
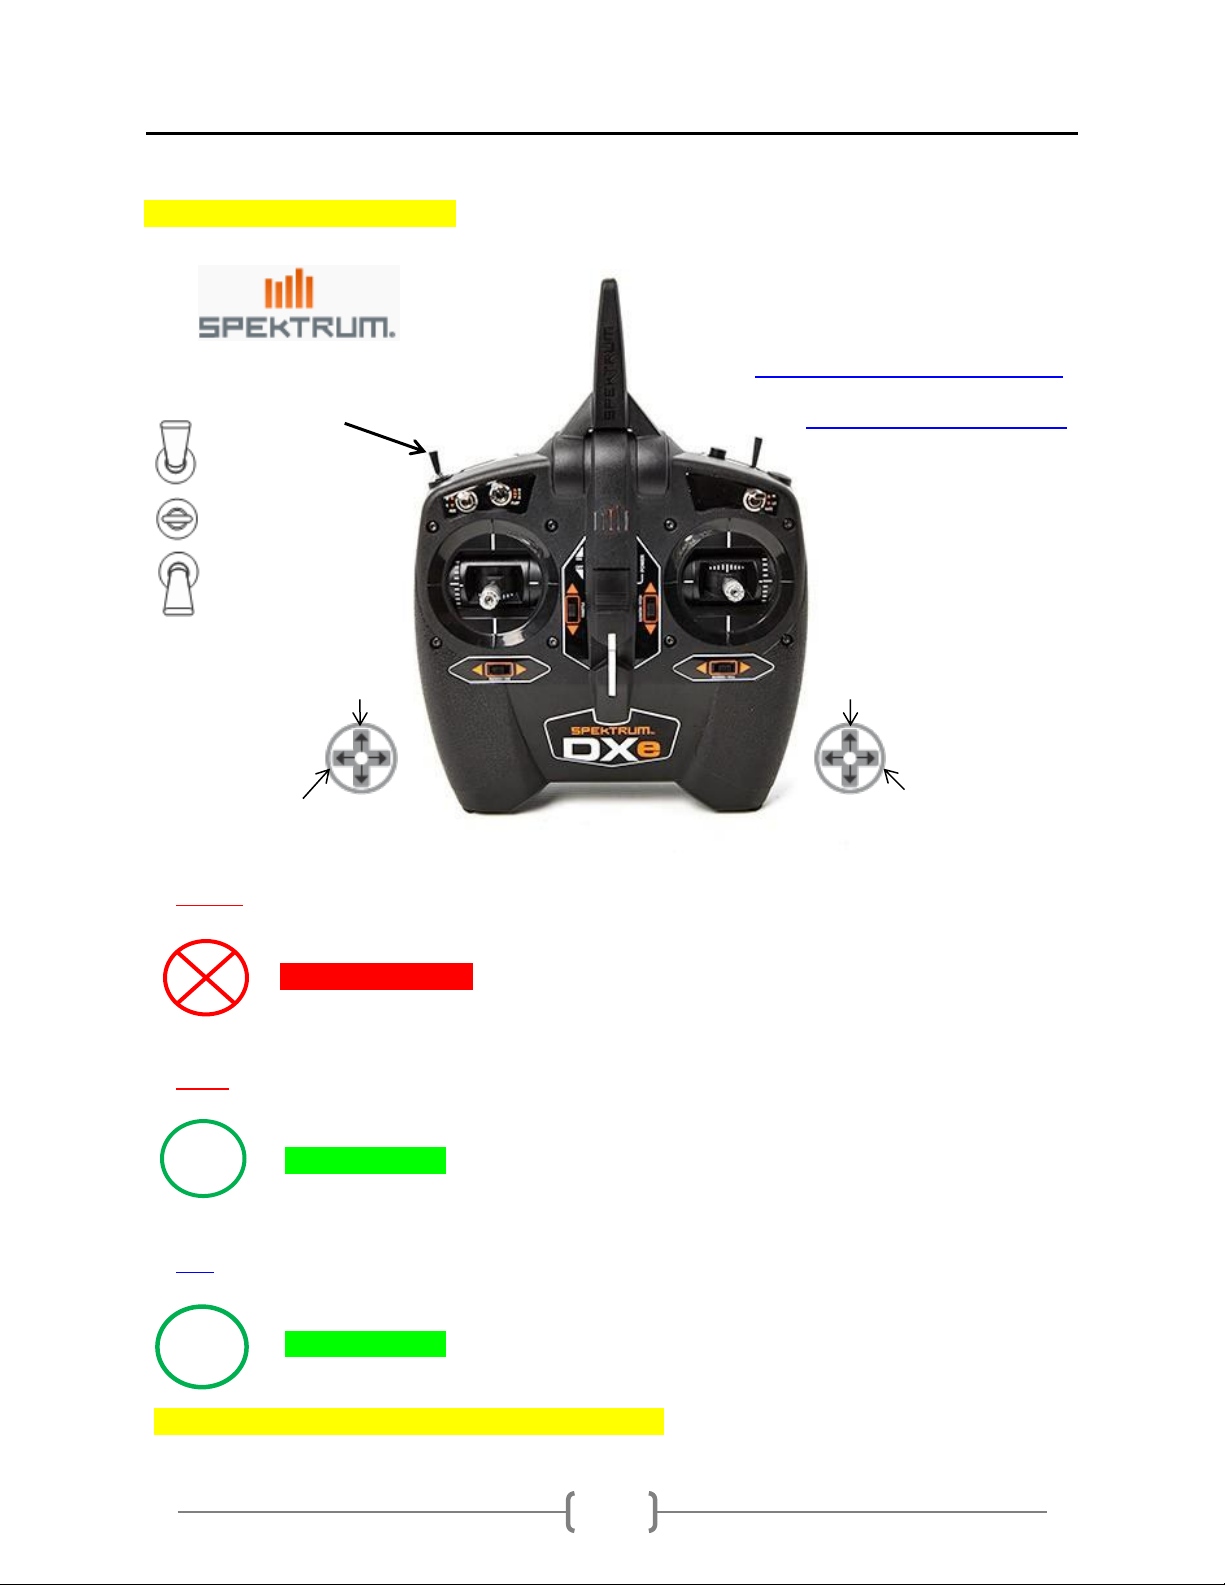
Transmitter Layout / Flight Modes
DXE Transmitter (Mode 2) Register your SPEKTRUM DXE link
Flight Mode SPEKTRUM DXE Manual Link
0=FWBA
1=AUTO
2=RLT
Throttle Pitch
Yaw Roll
0 = FBW_A In FBW_A mode this is the most popular mode for assisted flying, and is the best mode for
inexperienced flyers. (This is used for general flying and mission start)
GPS No GPS lock required Only for Experienced R/C Pilots!!
1 = AUTO In Auto mode the Plane will follow a mission (a set of GPS waypoints and other commands)
set by your ground control station (Mission Planner).
GPS GPS lock required
2 = RTL In RTL mode the plane will return to its home location (the point where the plane armed) and
loiter there until given alternate instructions (Default ALT=70m)
GPS GPS lock required
Click links above for more in depth info on Flight Modes

AERO-107
Manual TLR Drones
16
Preflight Procedures
Select an open area for flying, away from people and buildings, and remember to bring the flight
checklist and a fully charged battery. Follow these steps every time you fly.
Step1: Before flying, examine the
AERO-107
to ensure that all components are secured in safe flight
configuration.
Note: If any of the components or assemblies in these checks is not secure, tighten the screws or use
CA glue to secure the components to the foam.
A-» Check that the wings, tail, and all components are fully assembled and securely attached.
B-» Check that the propeller is secured tightly to the motor.
C-» Check that the servo rods are secured to the servo horns with screw connector.
Inspect Tail Servos Inspect Wing Servos
Step 2: Check that the airspeed sensor is secured to the side of the
AERO-107
and the tube is free
from obstructions. Install Airspeed Cover before connecting battery.
Install Pitot tube Cover
Airspeed Sensor
AERO-107
Manual TLR Drones
17
Step 3: Power on the RC transmitter, and set the throttle fully down.
Left-Stick Throttled Down
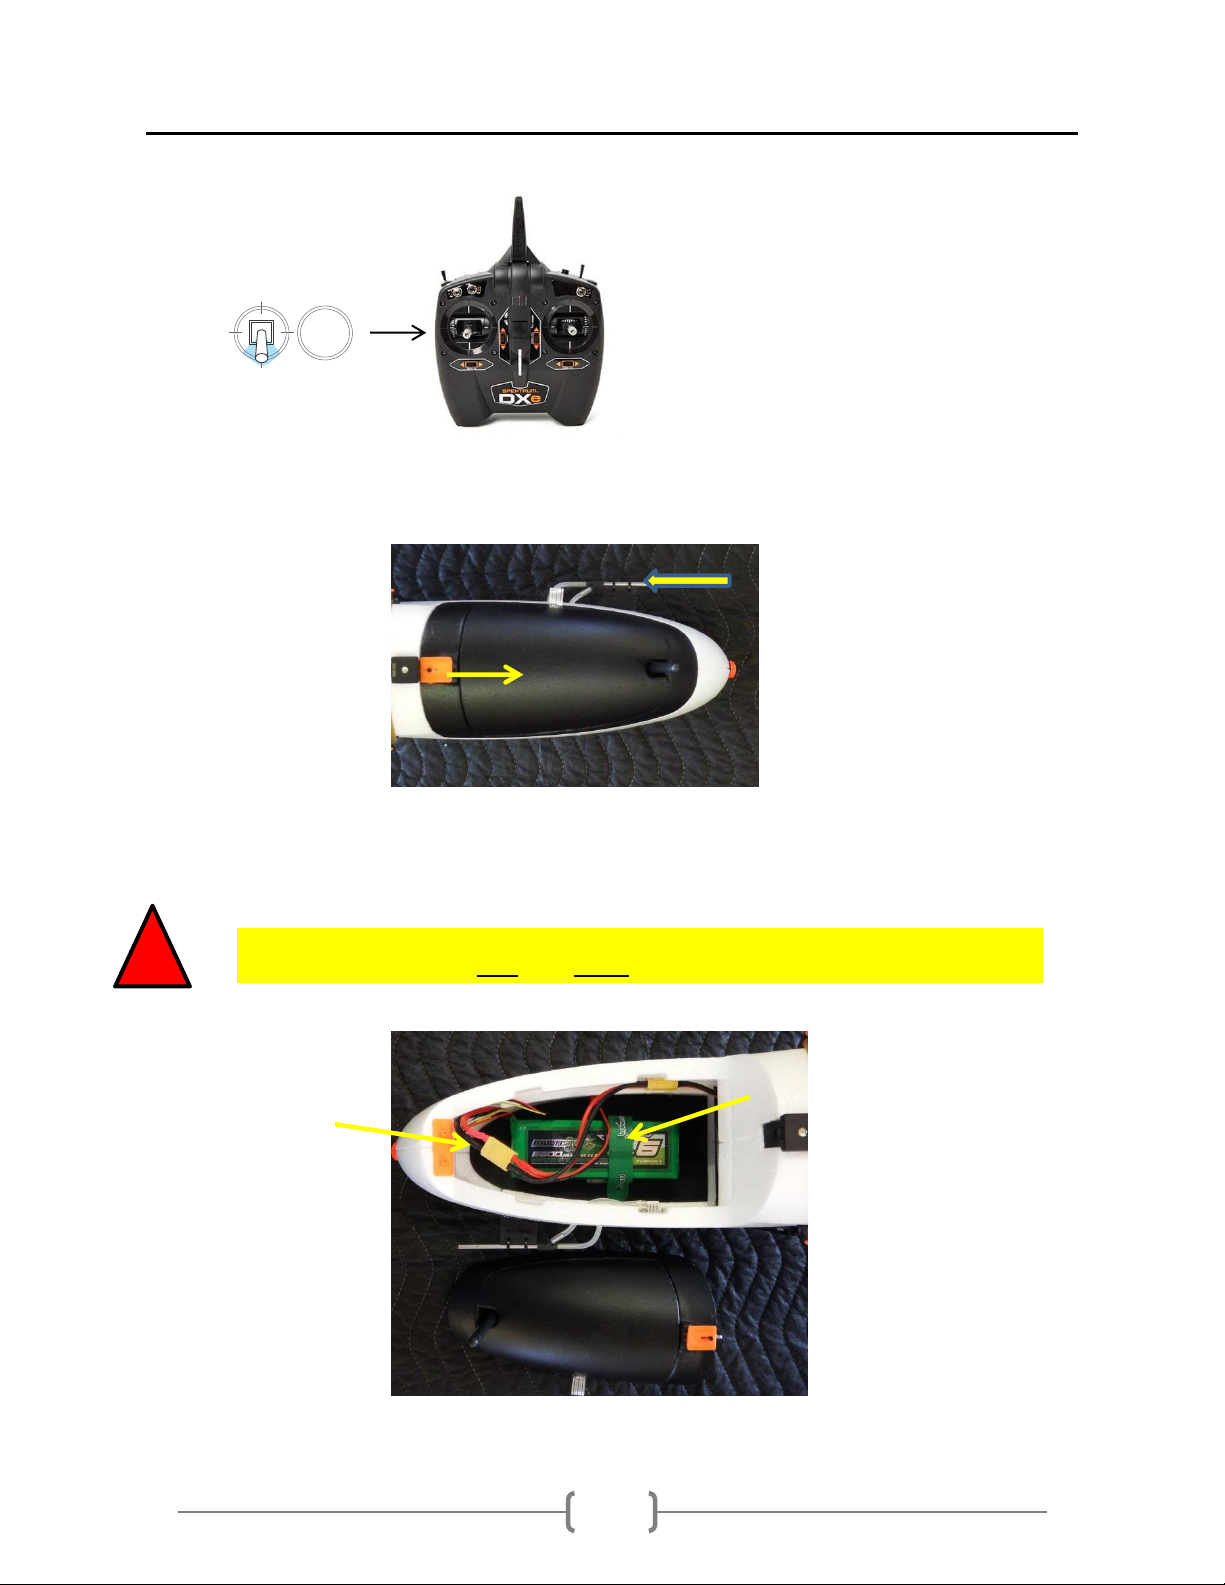
Step 4: Open the battery compartment by sliding the knob on the orange latch and lift out the black
Canopy.
Install Pitot Cover
Step 5: Center a Charged Battery, in the Battery Compartment, and secure with the Velcro strap. Then
plug the yellow connectors together and HOLD Plane STILL and LEVEL for 15 seconds, then reinstall the
Canopy.
!Hold the
AERO-107
still and level for 15 seconds while it powers on!!
Velcro strap
Plug together
Reinstall Canopy

AERO-107
Manual TLR Drones
18
Step 6: With the battery connected and the Canopy latched, Hold the
AERO-107
with one finger on
each of the BLACK Rectangles, these DOTS indicate the center of gravity.
Note: The Black Rectangles are centered over the servo wires (indents)
! Center-of-Gravity Black Rectangles
Payload Mounts
Step 7: The
AERO-107
should be LEVEL, if not move battery forward or aft to achieve a LEVEL
Attitude! Note: Level to 5degrees nose down acceptable.
Center-of-Gravity (Balance Point)
LEVEL
AERO-107
Manual TLR Drones
19
Note: Understanding LED’s
Flashing Red-Blue = Initializing, please wait / NO Flying
Flashing Yellow = Pre-Arming Waiting for GPS Lock takes 3-5 Min.
Safety Switch:
Flashing Red = Inactive Pre-ARM, Motor Disarmed
Solid Red = Active Pre-ARM, Motor Disarmed
Step 8: After 3-5 Minutes hold down Safety Switch for 2 seconds until the it turns Solid Red and the
LED Flashing Yellow turns Flashing Green. This indicates, GPS Locked and Autopilot ready.
Safety Switch
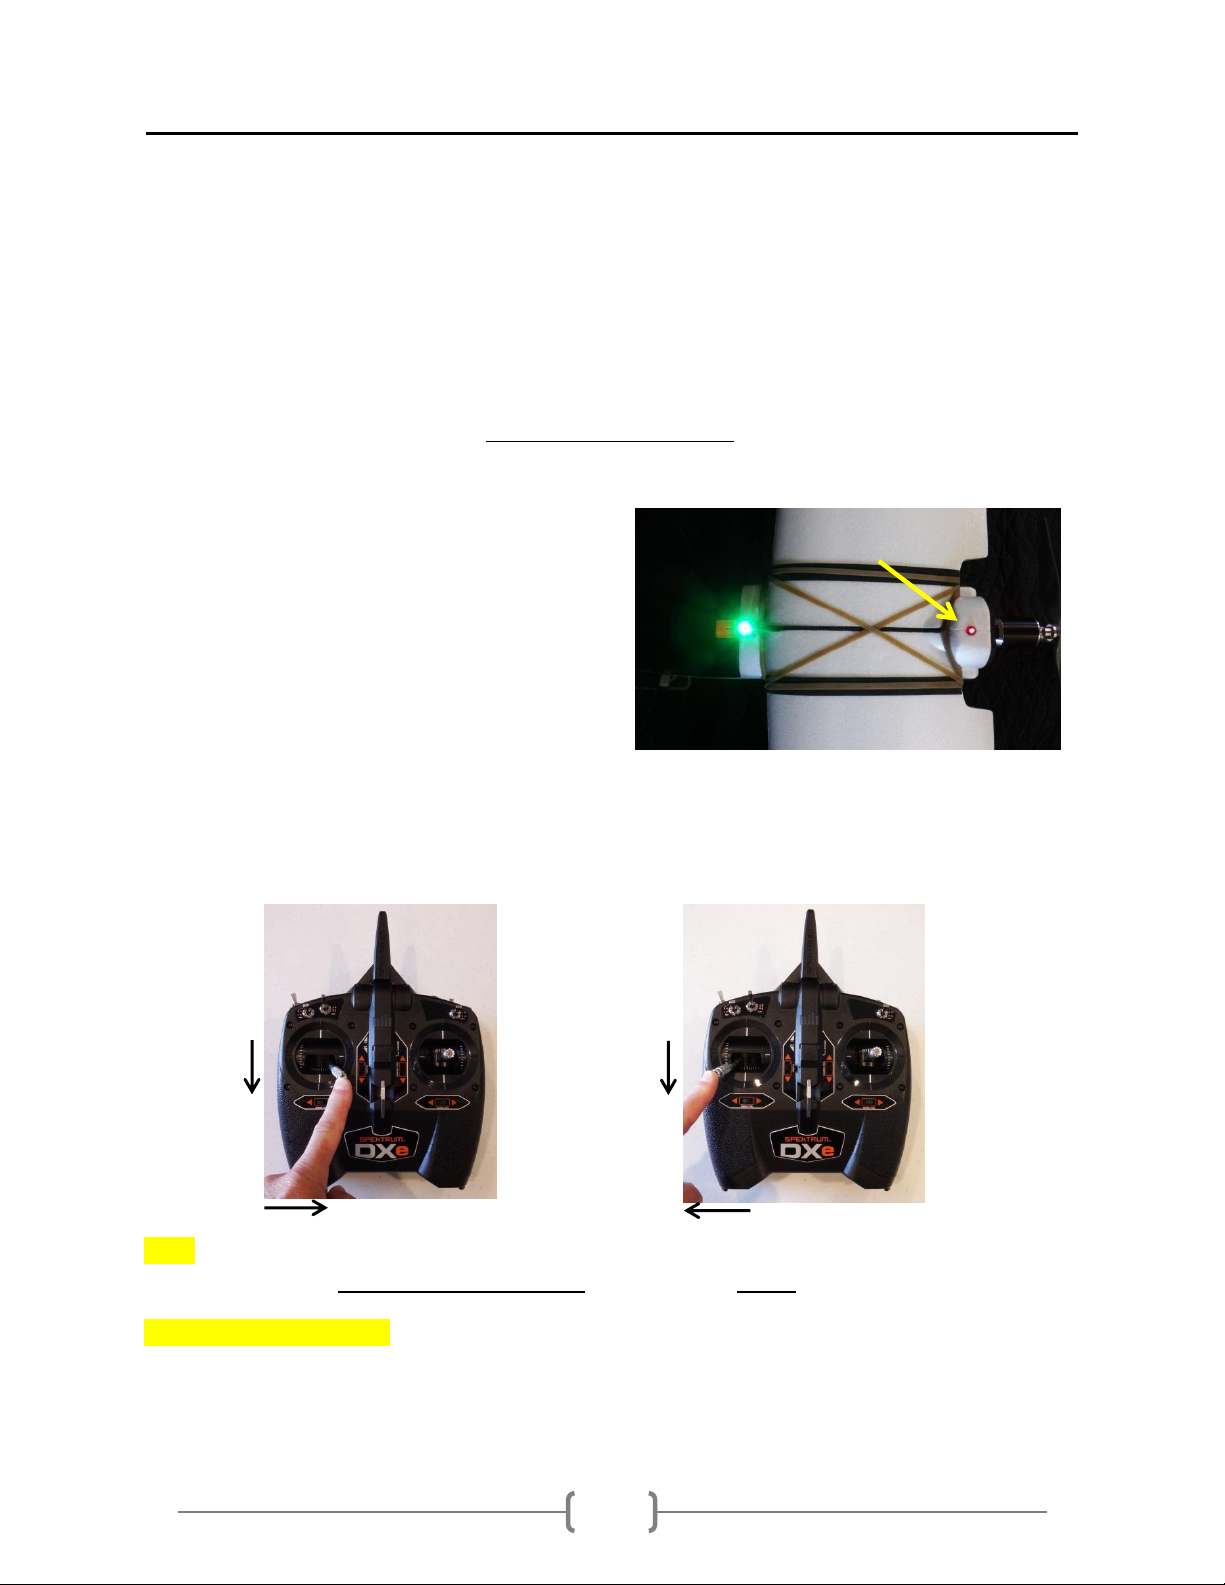
Step 9: ARM Motor by holding Throttle stick to Low throttle and full Right Rudder for 2 sec. After
tone, LED turns Solid Green “Motor ARMED”. As a Quick Test: apply a small amount of Throttle, prop
will spin, then reduce throttle to low (off).
ARM Motor DISARM Motor
DN DN
Right Left
Note: To Disarm, hold Throttle stick to Low throttle and Full Left Rudder for 2 sec. LED back to
Flashing Green, Hold Safety Switch for 2 seconds. Flashing Red = SAFE!! Motor will not spin!
To Re-ARM repeat step 8-9
Note: If you need to force ARM use Mission Planner or Tower App.
Table of contents
Popular Toy manuals by other brands

V-tech
V-tech Gadget the Learning Robot user manual

V-tech
V-tech Go! Go! Smart Wheels Car Wash Playset. user manual

LaserPegs
LaserPegs NG200 ANIMALS Caribou Model instructions

Sebart
Sebart F3A-50E-A4 Assembly manual

Sebart
Sebart Stev S 30E Assembly manual

KING CRAFT
KING CRAFT PITTS S-2B instruction manual

V-tech
V-tech V.Smile Motion: Scooby Doo user manual

V-tech
V-tech Disney Sofia the First WAVE & LEARN MAGIC... user manual

Hot Wheels
Hot Wheels SUPER START JUMP RACE instructions

HeliArtist
HeliArtist atrwolf instruction manual

Roc Hobby
Roc Hobby Critical Mass operating manual

PLAYTIVE JUNIOR
PLAYTIVE JUNIOR EF-5261 Instructions for use


