Tomberlin CrossFire 150 User manual

CrossFire 150
Service Manual

TABLE OF CONTENTS
Model Identification.................................................................................................................................................1
Starting the Engine...................................................................................................................................................1
Break in Procedure...................................................................................................................................................2
Checks and Services.................................................................................................................................................3
Engine Oil................................................................................................................................................................4
Final Gear Oil...........................................................................................................................................................5
Spark Plug................................................................................................................................................................5
Battery......................................................................................................................................................................6
Air Filter.................................................................................................................................................................10
Torque Chart...........................................................................................................................................................11
Valve Clearence Inspection....................................................................................................................................12
Valve Mechanism Inspection and Servicing..........................................................................................................13
Cylinder Head Removal/Installation......................................................................................................................13
Camshaft................................................................................................................................................................14
Cam Chain..............................................................................................................................................................17
Rocker Arm and Rocker Shaft...............................................................................................................................18
Valve and Valve Spring..........................................................................................................................................18
Cylinder..................................................................................................................................................................23
Piston......................................................................................................................................................................24
Crankcase and Crankshaft Removal......................................................................................................................26
Crankshaft Inspection............................................................................................................................................27
Crankshaft and Crankcase Installation..................................................................................................................28
Lubrication System................................................................................................................................................29
Oil System..............................................................................................................................................................30
Transmission Diagram...........................................................................................................................................32
i

Transmission..........................................................................................................................................................33
CVT Mechanism....................................................................................................................................................37
Drive Belt Pulley....................................................................................................................................................38
Clutch.....................................................................................................................................................................39
Driven Belt Pulley..................................................................................................................................................40
Transmission Belt...................................................................................................................................................42
Carburetor...............................................................................................................................................................42
Chain and Axle.......................................................................................................................................................48
Rear Axle Removal................................................................................................................................................48
Rear Sprocket Removal.........................................................................................................................................49
Axle Bearing Removal...........................................................................................................................................49
Swingarm...............................................................................................................................................................49
Charging System....................................................................................................................................................50
Ignition System......................................................................................................................................................54
Electrical Starting Mechanism...............................................................................................................................58
Armature Inspection...............................................................................................................................................59
Carbon Brush Inspection........................................................................................................................................59
Starter Motor Installation.......................................................................................................................................59
Starter Clutch.........................................................................................................................................................60
Reduction Gear Inspection.....................................................................................................................................60
Engaging Mechanism.............................................................................................................................................61
Brakes....................................................................................................................................................................62
Rear Brake Inspection............................................................................................................................................63
Front Brake Inspection...........................................................................................................................................65
ii

Brake Bleeding Fluid Change................................................................................................................................66
Rear Brake Disk Removal......................................................................................................................................66
Front End Adjustments...........................................................................................................................................67
Adjusting the Shocks.............................................................................................................................................68
Wiring Diagram.....................................................................................................................................................69
Notes......................................................................................................................................................................70
iii

MODEL IDENTIFICATION
VIN NUMBER
The vehicle identification number is stamped on a plate welded to the frame behind the driver’s seat.
ENGINE NUMBER
The engine number is stamped in the block below the left hand engine cover (directly in front of the oil drain
plug). It can also be found on the barcode decal located on the left hand engine cover.
VIN Number Location Engine Number Location
STARTING THE ENGINE
• Always wear a helmet and other essential safety gear while using the go-kart.
• Get in the kart slowly. Do not jump in.
• Fasten safety harness.
• Adjust seat position to comfort using the lever under the driver’s seat.
• Flip green ON/OFF switch to ON position.
• The foot brake must be depressed while attempting to start the go-kart.
• With brake still depressed, start the engine by turning the key clockwise.
Note: Engine will not turn over unless brake pedal is depressed.
• To immediately stop the engine -- flip the green ON/OFF switch to the OFF position.
WARNING
• The exhaust pipe, muffler, and heat shields are very hot during and after operation. DO NOT touch them until
they have cooled.
• The engine exhaust from this product contains chemicals known to cause cancer, birth defects, or other repro-
ductive harm.
• Gasoline powered engine exhaust fumes are poisonous and can cause loss of consciousness and /or death.
Avoid prolonged inhalation.
1

BREAK-IN PROCEDURE
• 0-10 hours of operation
Do Not accelerate past half (1/2) throttle for long periods of time.
Do Not operate the machine at one continuous throttle. Vary the throttle during operation. Allow the
engine to cool for ten minutes after each hour of use.
• 10-20 hours of operation
Do Not accelerate past three-quarter (3/4) throttle for long periods of time. Vary the throttle during
operation and avoid maximum acceleration. Allow the engine to cool for ten minutes after each 1.5
hours of operation.
• After 20 hours
Vary acceleration while driving. Do Not use full throttle for long periods of time. Allow the engine to
cool occasionally during long periods of operation.
• Change the engine oil after the first 5 hours of operation. Please reference the table in this manual for
suggested oil change times after the break-in process.
2

PERIODICAL CHECK AND SERVICES
The maintenance intervals in the following table are based upon average riding conditions. Riding in unusually
dusty areas require more frequent servicing.
Items
Initial
Service
Daily
Monthly
Quarterly
Yearly
Tire Pressure
Inspect
Inspect
Chassis
Inspect
Inspect
Fasteners
Inspect
Inspect
Brake Performance
Inspect
Inspect
Brake Fluid
Inspect
Air Filter
Change
Carburetor
Inspect
Inspect
Spark Plug
Change
Drive Chain
Inspect
Inspect
Inspect
Adjust
Engine Oil
Replace
Inspect
Replace
Gearbox Oil
Inspect
Replace
Valve Clearance
Adjust
Fuel Line
Inspect
Inspect
Inspect
Exhaust
Inspect
Inspect
Battery
Inspect
Inspect
Interval
(Months)
Service
Date
Service Performed By:
Type of Service
1
3
6
12
18
24
30
36
42
48
54
60

MAINTENANCE AND TUNE-UP PROCEDURE
This section describes the servicing procedures for each item in the Periodic Maintenance requirements.
ENGINE OIL
API Classification SF – SG (SAE 15W – 40)
It is important to inspect the engine oil before each period of operation. The engine oil should be changed every
50 hours.
CHECKING THE ENGINE OIL:
• Place unit on flat surface.
• Remove dipstick and wipe off with a clean cloth.
• Return the dipstick to the hole. Push the dipstick in until the threads prevent it from going any farther.
Do Not screw the dipstick into place while attempting to check the oil. Doing so will cause a false
reading.
• Check oil level to see if it is between min and max indicators.
• Add oil as necessary to reach the required level.
- Return the dipstick to its original position. Be sure to tighten the cap into place after checking the oil.
CHANGING THE ENGINE OIL:
• Run unit for at least 5 minutes or until warm, shut off.
• Place suitable container for draining oil beneath engine.
- Container should be capable of holding at least 1 gallon.
- Warning - Engine components may be hot. Use caution while attempting to change the oil.
• Remove the engine drain plug, oil filter cap, spring, and oil filter screen. Drain the oil completely.
• Check condition of O-ring and filter screen for foreign material before re-installing.
• Install the drain plug and torque to 12 ft. / lbs.
• Fill with 25 to 31 oz. of API classification SF – SG (SAE 15W – 40) oil.
• Start engine and check for leaks.
4

• Shut off engine and check the oil level with dipstick, do NOT screw the dipstick in when taking this
reading, doing so may cause a false reading. Add oil if necessary to reach safe amount; Do Not overfill.
FINAL GEAR OIL
Inspect final gear oil level monthly and change final gear oil according to the chart on the previous page..
• To check level, remove level screw on the left rear engine case. If gear oil does not come out of the
hole, add gear oil until it begins flowing out of the hole.
Drain plug
• To drain gear oil, remove the drain plug at the rear bottom of the engine case. It is recommended to
warm the engine for 10 minutes or more before attempting to drain final gear oil. Warning - Engine
components will be extremely hot after the kart has been running. Use extreme caution when working
on an engine that has been in use.
Note:
API Service Standard GL-5, GL-4, GL-3 SAE 80W 90 gear oil is recommended in the final drive case. How-
ever, in extreme cold weather conditions it is advised that a lighter viscosity oil, such as 75 weight oil be used .
Final drive capacity:
115 cc 4 oz.
SPARK PLUG - NGK C7HSA
• Clean up the carbon around the spark plug to prevent the carbon from dropping into the cylinder when
removing the spark plug.
• Remove the spark plug.
- Clean up carbon accumulation on the spark plug with a steel brush or a blade.
- Inspect the spark plug gap. The gap should have a measurement between the intervals given below.
Spark plug gap: .024 in. ~ .028 in. (0.6 ~ 0.7mm).
Note: If the carbon accumulation and wear on the spark plug appear to be excessive, replace it using a spark
plug with the same specification.
5

FILLING THE BATTERY
The following procedure should only be performed by an adult utilizing extreme caution. While attempting this
procedure, individuals should wear rubber gloves, eye protection, and have water available in case the
electrolyte solution comes into contact with skin or eyes. Children should not attempt to complete this
procedure, and should NOT be allowed near the area when attempting to fill the battery. This procedure should
be completed first so that the battery is charged when the kart assembly is complete
WARNING
: POISON - CAUSES SEVERE BURNS
Contains sulfuric acid. Avoid contact with skin, eyes, and clothing.
To prevent accidents, rinse the empty electrolyte solution container
with water after use.
- If solution comes in contact with the skin, flush the area with
water.
- If solution is swallowed contact a physician immediately.
- If solution comes in contact with the eyes flush with water for
fifteen minutes. Get immediate medical attention.
KEEP OUT OF REACH OF CHILDREN
PROCEDURE
- This procedure should be performed in a location out of reach of children and animals.
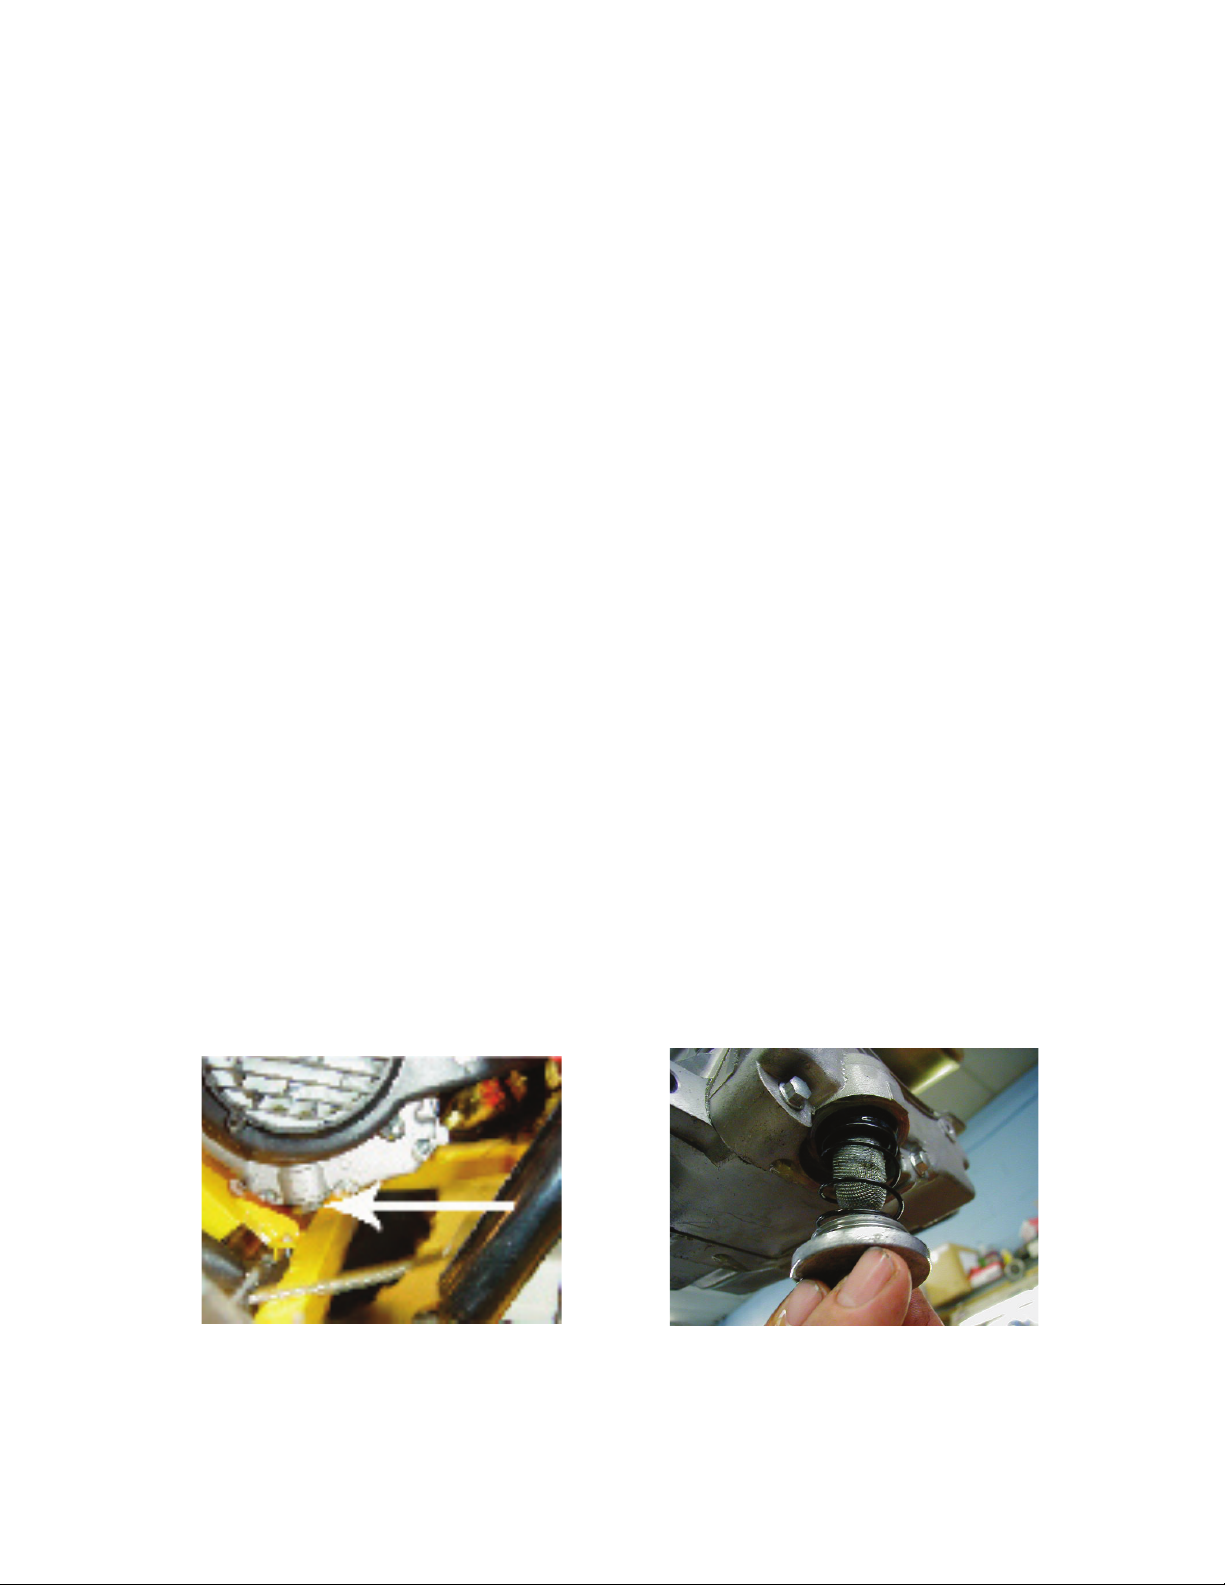
- Remove the battery and the electrolyte solution from the shipping crate.
- Place the battery on a level surface and remove the metallic sealing from the top.
- Holding the electrolyte container upside down so the sealed openings are facing the ground, align each sealed
opening of the bottles with the corresponding openings on top of the battery terminal.
- Strongly push the electrolyte container into the openings of the battery terminal so that the all of the seals on
the electrolyte container break, allowing electrolyte solution to flow into the battery. Do NOT attempt to
puncture the electrolyte container unless the six sealed openings are properly aligned with the six openings on
the top of the battery terminal.
- Air bubbles will begin rising from each opening of the electrolyte solution when they are punctured.
- If air bubbles are not rising in each individual tube, tap the top side of the electrolyte bottles.
- Leave the electrolyte bottles in their draining position until all of the electrolyte solution has drained. Do
NOT attempt to remove the electrolyte bottles while they are draining.
- Do NOT attempt to puncture or cut any part of the electrolyte container.
- Do NOT allow children near the battery at any point during the installation process.
- When the electrolyte solution has finished draining, pull the bottles gently from the top of the battery terminal
and properly discard in a location out of reach of children or animals.
6

- The battery needs to sit for Thirty (30) minutes before charging. Letting the battery sit will allow the
electrolyte to penetrate the plates and provide a longer battery life as well as better battery performance. Place
the cap strip loosely over the holes in the top of the battery while allowing it to sit.
- After sitting for thirty (30) minutes, the battery is ready for charging. Push the caps firmly into the holes. Do
not pound or hammer on the caps to force them into place This will seal the battery. Do Not attempt to remove
the caps after sealing the battery.
1
2
3
4
5
6
7
8
7

WARNING:
Do NOT open sealed caps to add water to the battery.
- Batteries contain sulfuric acid. Eye protection should ALWAYS be used when working around battery acid.
-
While attaching the red and black cables for charging, be sure that the charger is not plugged into the outlet.
- Charge the battery in a well ventilated area out of reach of children and animals.
- Do NOT smoke around batteries
- Do NOT expose batteries to open flames
CHARGING THE BATTERY
- The battery must be charged before use.
- Connect the positive (+) red clamp from the battery charger to the positive (+) pole of the battery.
- Connect the negative (-) black clamp from the battery charger to the negative pole of the battery.
- Do NOT plug the charger into the outlet until the clamps have been placed in their proper location on the
battery.
- The battery should charge between 500-700 milliampere for 6-10 hours.
- When the battery has finished charging, unplug the charger from the outlet, then proceed to remove the
clamps from the charger.
Note: Always keep the battery clean. Apply dielectric grease around the battery terminals to prevent corrosion.
INSTALLING THE BATTERY
- Place the battery into the battery tray located in front of the engine on the passenger’s side. Be sure that the
rubber mat is laying on the bottom of the tray between the tray and the battery.
- The warning label on the battery should be facing the rear of the kart when installing.
- Be sure to connect the positive side of the battery before connecting the negative side.
- Attach the positive (+) red wire to the positive terminal on the battery. Attach the negative (-) black wire to
the negative terminal on the battery.
- Cover the battery with the grey cover. Be sure to slide the wires through the openings in the cover.
- Secure the battery into place using the hooks on both ends of the strap. Strap comes with two hooks to fit
replacement batteries. For the provided battery, use the middle hook. Fold the excess strap against the battery
and attach remaining two hooks to their contact points. Utilize the proper hooks depending on battery size.
8

BATTERY CHARGING
Note: Use a battery charger with 2 amps or less.
Charging Rate: 0.7 A x 5 ~ 10 h
(Charge for 5 – 10 hours @ 0.7 Amps)
REMOVING THE BATTERY AND CHECKING VOLTAGE:
• Remove the wide, black battery cover strap and the gray battery cover.
• First remove the black negative (-) lead from the battery.
• Then remove the red positive (+) lead from the battery.
• Remove the battery from the battery tray.
• Check the battery voltage with a meter.
• If the voltage reading is below 12.3V, recharge the battery.
Battery Service Limit:
Fully charged 12.8 V
Needs charging 12.3 V
REPLACEMENT BATTERIES
YUASA - YTX7L-BS
12 Volt 6 Amp 85 Cold Cranking Amps
4(1/2) in Long x 2(13/16) in Wide x 5(1/16) in Tall
YUASA - YTZ7B-BS
12 Volt 6 Amp 90 Cold Cranking Amps
4(1/2) in Long x 2(13/16) in Wide x 5(3/16) in Tall
YACHT - CT7B-4
12 Volt 6.5 Amp 90 Cold Cranking Amps
4(1/2) in Long x 2(13/16) in Wide x 5(3/16) in Tall
POWER MAX - GTX7L-BS
12 Volt 6 Amp 90 Cold Cranking Amps
4(1/2) in Long x 2(13/16) in Wide x 5(3/16) in Tall
WARNING
• To avoid possibility of explosion, always connect battery cable in the order specified. An exploding
battery can cause serious injury or death.
• Always shield eyes with protective eye wear when working around battery acid.
• Battery acid is poisonous and can cause severe burns.
• DO NOT smoke around batteries and keep away from open flame.
9

AIR FILTER
Clean at least every 3 months. More often if operating in dusty conditions.
If the air filter is clogged with dust or debris, the performance of the kart will be affected and if left un-serviced,
engine damage can occur. Follow the procedure below to service the air box:
• Remove the 5 screws on air filter and remove the cover. Remove the 3 screws of the air filter and remove
element.
• Clean the air filter cover with a mild, soapy water mixture. Rinse and allow to dry. Do Not attempt to
clean the air filter.
• Install a new air filter and reattach cover. Tighten screws.
NOTE:
• Before and during service, inspect the air filter for rips. A torn air filter must be replaced.
• Make sure that the air filter is seated properly and no foreign material can pass by it.
10

NUTS AND BOLTS
Nuts and bolts should be checked to ensure that they are tight before every ride..
Because frequent operation can cause the kart’s nuts and bolts to loosen, they should be checked and tightened
often. When tightening nuts/bolts, please reference the chart below.
TIGHTENING TORQUE CHART
Tables
FASTENER
Thread Size
TORQUE
(ft/lbs/in lbs)
TORQUE
(Nm)
5 mm bolts and nuts
39-52 in lbs
4.5-6 Nm
6mm bolts and nuts
69-104 in lbs
8-12 Nm
8mm bolts and nuts
13-18 ft lbs
18-25 Nm
10 mm bolts and nuts
22-29 ft lbs
30-40 Nm
12 mm bolts and nuts
36-43 ft lbs
50-60 Nm
4 mm screws
22-30 in lbs
2.5-3.4 Nm
5mm screws
30-43 in lbs
3.5-5 Nm
6 mm hex bolts
87-121 in lbs
10-14 Nm
8 mm hex bolts
17-22 ft lbs
24-30 Nm
10 mm hex bolts
25-32 ft lbs
35-45 Nm
11

VALVE CLEARANCE INSPECTION
Note: Inspection and adjustment of the valves must be done when the engine is cold. Suggested temperature is
below 95° F / 35° C.
• Remove the cylinder head cover. Take care not to damage the O-ring gasket. If damaged, the gasket must be
replaced with a new gasket.
• Unfasten the fan cover by unscrewing the 4 six mm bolts. Remove the fan cover.
• Turn the crankshaft so that the “T” mark on the flywheel lines up with the corresponding mark on the
engine case. Timing marks on the cam sprocket must be aligned with the cylinder head surface. Cam lobes
must be pointing downward.
Cam timing
• Loosen the lock nuts on tappet screws to adjust valves.
• To adjust the valves use a valve adjusting wrench.
• To decrease valve clearance: turn tappet screw clockwise.
• To increase valve clearance: turn tappet screw counterclockwise.
• Use a thickness gauge to measure the valve clearance to 0.003 ~ 0.005 in.
• Take out the thickness gauge, tighten the lock nuts, and inspect the valve clearance to ensure that it falls
within the range of compliance.
Valve clearance:
Intake & Exhaust Valve clearance 0.003 ~ 0.005 in.
Note: Tightening the lock nuts may affect the amount of valve clearance. Readjust as necessary.
12

VALVE MECHANISM INSPECTION AND SERVICING
The diagram below depicts the common valve train of a four-stroke engine. It consists of an over-head valve
train with the intake port, exhaust port, and cam shaft located in the cylinder head. The valves are located in the
top of the combustion chamber.
CYLINDER HEAD REMOVAL
• Remove carburetor
• Remove exhaust
• Remove fan shroud assembly
- Remove cylinder shroud assembly
• Remove valve cover
• Remove Phillips screw and O-ring
from cam chain tensioner.
• Insert small, straight screwdriver and turn
clockwise until spring loaded tensioner locks.
This allows slack in cam chain
for removal of cam shaft. (1)
• Remove the 2 bolts and 4 flange nuts and washers.
• Remove cam shaft holder and dowel pins.(2)
• Remove cam chain from sprocket and remove cam shaft.(3)
• Remove cylinder head and gasket.(4)
(1)
(2)
(3)
(4)
13

CYLINDER HEAD INSTALLATION
• Install new gasket and dowel pins onto cylinder.
• Install cam chain guide.
• Install cylinder head.
• Align the “T” mark on the flywheel with the index mark on the engine case by turning the flywheel.
• Position the camshaft gear with cam chain so that timing marks on sprocket align with the cylinder head
surface and the large hole is on the top. (The lobes of the camshaft should be pointing downward.)
• Install the dowel pins.
• Install camshaft holder with “EX” pointing towards exhaust.
Note: Apply some oil on the thread part of the camshaft holder bolt.
The camshaft holder nuts should be tightened gradually in 2 ~ 3 times diagonally.
After installing, adjust the valve clearance.
• Torque the cylinder head nuts and bolts.
Bolts: 95 in. / lbs.
Nuts: 16 ft. / lbs.
• Insert small straight screwdriver and turn the cam chain tensioner bolt counter-clockwise and release the lock.
Do NOT tighten.
• Apply oil on the new O-ring.
• Install and tighten the cam chain tensioner cover bolt.
• The O-ring must be mounted properly in the groove.
CAMSHAFT
The camshaft is the main driving unit of the valve train. There is an air inlet cam lobe and an exhaust cam lobe.
The camshaft wear will affect the correct operation of the valve.
CAMSHAFT REMOVAL
• Remove cylinder head cover.
• Remove the cam chain tensioner bolt cap, and remove the O-ring. (See Picture Above)
• Insert small straight screwdriver into hole and turn clockwise until it locks.
14

• Turn the flywheel counter-clockwise to make the “T” mark on the flywheel align with the mark on the crank-
case.
• When the hole on the cam chain sprocket is pointing upwards and cam lobes are pointing down, it is at top
dead center position.
• Remove the cylinder head bolts.
• Remove the camshaft holder nuts and washers.
• Remove the camshaft holder and dowel pin.
• Lift the cam chain off the sprockets.
CAMSHAFT INSPECTION
• Inspect if the camshaft bearings are loose or worn. If there are excessive signs of wear – replace the whole set.
• Inspect if there is any damage on the cam surface. If the cam surface appears to be excessively damaged
– replace it.
• Measure the height of the cam lobes.
Intake Lobe 25.960 mm 1.022 in.
Exhaust Lobe 25.815 mm 1.016 in.
CAMSHAFT INSTALLATION
• Align the “T” mark on the flywheel with the index mark on the engine case by turning the flywheel.
• Position the camshaft gear with cam chain so that timing marks on sprocket align with the cylinder head sur-
face and the large hole is on the top. (The lobes of the camshaft should be pointing downward.)
• Install the dowel pins.
• Install camshaft holder with “EX” pointing towards exhaust.
Note: Apply some oil on the thread part of the camshaft holder bolt.
The camshaft holder nuts should be tightened gradually in 2 ~ 3 times diagonally.
15

After installing, adjust the valve clearance.
• Torque the cylinder head nuts and bolts.
Bolts: 95 in. / lbs.
Nuts: 16 ft. / lbs.
• Insert small straight screwdriver and turn the cam chain tensioner bolt counter-clockwise and release the lock.
Do NOT tighten.
• Apply oil on the new O-ring.
• Install and tighten the cam chain tensioner cover bolt.
• The O-ring must be mounted properly in the groove.
16
Table of contents
Popular Motorized Toy Car manuals by other brands

Hornby
Hornby AIRFIX A03014 instruction manual

Team Losi
Team Losi Desert Buggy XL-E 2.0 instruction manual

Rollplay
Rollplay W348AC-P-F Owner's manual and assembly instructions

Panda Hobby
Panda Hobby Tetra X1 instruction manual

Jamara
Jamara LiPon BL Instruction

Duratrax
Duratrax Raze ST Assembly and operation manual