Tomig Bazooka User manual

33-507
EN
LV PORTATĪVA SKAŅAS SISTĒMA
LIETOŠANAS INSTRUKCIJA
PORTATYVINĖ GARSO SISTEMA
NAUDOJIMO INSTRUKCIJA
KAASASKANTAV HELISÜSTEEM
KASUTUSJUHEND
ПОРТАТИВНАЯ АУДИОСИСТЕМА
ИНСТРУКЦИЯ ПО ИСПОЛЬЗОВАНИЮ
PORTABLE SOUND SYSTEM
USER MANUAL
LT
EE
RU

33-507- 2 -
Thank you for your purchase
USER INSTRUCTION
GENERAL SAFETY RULES
- Before using this product carefully read this instruction and retain it in a safe place together with
the sales receipt, free service requisition form and, if possible, the wrapping.
- Use the device for the designated purposes only and in a manner indicated in the instruction.
The device is designated for domestic use, not for commercial purposes.
- Do not use the device in the rain, in humid places or near water. Do not expose the device to
dust, heat, direct sunlight, high humidity (never put the device into water or other liquids) and
sharp strokes. Do not touch the device with wet hands.
- Check the device and charger regularly. If you notice any visible defects, contact an authorised
service centre for repairs.
ATTENTION! For safety reasons, do not let children play with the device, charger or
packaging materials (lm, foam, cardboard, etc.). Hazard of choking and suffocation!
DESCRIPTION
MP3 player supports listening to music from a USB ash memory or microSD / microSDHC
memory cards containing recorded MP3 tracks.
With the use of microphones, you can organise KARAOKE signing events or make voice
recordings. The device can be connected to a guitar with a silencer.
Analogue audio signal input ensures playback from MP3/MP4 player, smartphone, tablet PC,
portable computer/personal computer, CD player, etc.
Digital FM radio receiver ensures registration of received radio station frequencies in the
memory.
The rechargeable battery can be charged using a mains adapter or a 12V DC power source (car
cigarette lighter socket).
Effective speakers ensure powerful sound with little energy consumption.
Included in the kit are:
• TOMIG BAZOOKA
• Remote
• Charger
• Dynamic microphone with a 5m cable
• Audio cable 3.5mm/3.5mm
• Shoulder belt
• Operating manual in 5 languages
FUNCTIONS
- Sound system with USB ash memory, microSD and microSDHC cards, linear inputs, 3.5mm
microphone and 6.3mm guitar/microphone sockets.
- Reads microSD / microSDHC cards and USB ash memory records in MP3 format.
- Saves records to microSD / microSDHC cards or USB ash memory.
PORTABLE SOUND SYSTEMEN

33-507- 3 -
- Display shows selected operating mode.
- Full FM range overlay (87.5 - 108.0 MHz) with LED symbol display.
- After restarting renews frequency, composition and volume.
- Remote control provided for more convenient control of the device with broadened functions.
- Lithium battery ensures independent use of the device.
- Equalizer with 7 setting modes.
- Massive wood-bre ensures high-quality sound.
- Stylish and attractive design, LED lighting with rhythmic colour effects.
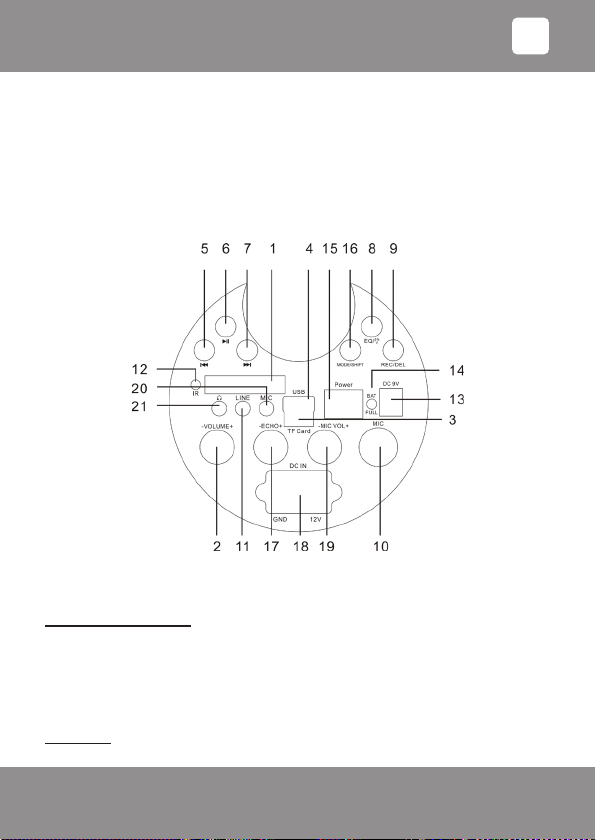
Control panel
PREPARATION (See component numbers on the control panel picture)
Charging the battery:
Insert the supplied adapter cable plug into the device's DC 9V (13) socket. A red charging mode
indicator: BAT FULL (14) will light up on the display.
The battery should be charged for approximately 2-3 hours. When the battery is fully charged,
the BAT FULL indicator (14) will light up in blue.
NOTE: If the device is powered on at the time of charging, the time of charging is longer.
USING THE DEVICE
Switching on:
To turn the device on, set the main Power switch (15) to position "I".
EN
33-507- 4 -
Adjusting the volume (basic block panel):
The device has two volume controls:
a) Analogue -VOLUME+ (2), which regulates the volume of common and analogue sources
(for LINE socket (11) and microphone sockets MIC (10; 20))
b) Digital controller with buttons [ ] (5), [ ] (7).
Press and lightly hold button [ ] (5) or [ ] (7) to turn the volume up or down.
Playing MP3 les:
1. Insert USB or microSD (TF Card) memory card containing MP3 recordings.
IMPORTANT: For the proper functioning of the memory card, be sure to insert a memory
card or USB ash drive before switching on the device by using the Power switch (15). Do
not insert or remove the memory card or USB ash drive while the device is in operation.
Inserting or removing a memory card or USB ash drive while the device is in operation
may cause loss of information and/or damage the equipment!
IMPORTANT: Insert the MicroSD memory card by holding it straight, with the gold-coloured
contacts facing up. Inserting a memory card the wrong way or at an angle may damage
contacts or cause the memory card to get stuck.
If the memory card is not inserted into the socket all the way until it clicks, data may not
be readable.
2. Turn on the device by using Power switch (15). MP3 playback will begin.
- If you have previously used another mode (''FM'', ''LINE''), press [MODE] (16) to select the MP3
mode (in "SD" or "USB" display).
- Press [ ] (6) if you wish to turn on the Pause mode - playback will be stopped.
- If you press the button [ ] (6) again, playback will be resumed from where it was stopped.
- Selecting the next or previous track:
Briey press [ ] (7) to fast-forward.
Briey press [ ] (5) to fast-backward.
NOTE: Use the [EQ/ ] button (8) during MP3 playback to activate the following equalizer
modes: norm-pop-roc-jazz-class-cut-bass.
3. After listening to recordings, press [ ] (6).
4. Turn the main Power switch (15) to position "O" and turn the device off.
5. Remove memory card.
Playback of the analogue signal from external source:
1. Put in the cable plug found in the set in the round 3.5 mm jack LINE (11), put the other cable
plug in the source (for example, smartphone, tablet PC, MP3/MP4 player, etc.) LINE OUT or
earphone jack.
2. Switch on the device and with the button [MODE] (16) choose the mode “LINE”.
3. Adjust volume.
Bluetooth wireless connection:
IMPORTANT: Bluetooth connection will not be possible if the LINE socket (11) of the
device is connected to an audio cable.
EN

33-507- 5 -
NOTES:
• Bluetooth is a technology that uses radio waves to wirelessly connect devices located
within a close range of each other.
• Since there are many different manufacturers, models and software versions, complete
functionality cannot be guaranteed.
1. Device pairing via NFC (for devices with the NFC function)
INFO: Devices can be paired instantly by using the NFC function.
a. Turn on BAZOOKA and select the “BLUE” mode.
b. Activate the NFC function on your mobile device.
c. Very slowly move the mobile device closely over the BAZOOKA NFC symbol ( ), until
you hear a signal and the mobile device receives a conrmation message.
INFO: Not all smartphones have the NFC function.
2. Device pairing (for devices without the NFC function)
a. Make sure that the Bluetooth function is activated on your mobile device (e.g.
smartphone).
To do this, refer to your mobile device's manual.
b. Turn on the device by using the Power switch (15).
c. Press the [MODE] button (16). Turn on Bluetooth mode - the word “BLUE” will begin to
ash on the display.
BAZOOKA is now attempting to connect to the device with which it was previously paired.
If BAZOOKA nds the paired device, a signal will sound and the word “BLUE” will stop
ashing on the display. If the paired device is not found, BAZOOKA is ready to be paired
with another device.
d. Find the Bluetooth menu on your mobile device and register the device on your mobile
device. To do this, refer to your mobile device's manual. Information should appear on your
mobile device’s display regarding the paired device with the name BAZOOKA.
e. Enter password "0000" (or another password, depending on your mobile device model
or software version).
INFO: Use the mobile device's controls to select the piece and play mode and set the start
volume (see the mobile device’s user manual). You can adjust the volume with BAZOOKA’s
-VOLUME+ volume control button (2) or by pressing keys [VOL-], [VOL+] on the remote.
3. Re-Connecting via Bluetooth
a. Activate the Bluetooth feature on your mobile device.
b. Turn on BAZOOKA and select the mode "BLUE".
c. If your mobile was paired only with BAZOOKA, the connection will be established
automatically. If your mobile device was paired with a number of other devices, connecting
to BAZOOKA must be carried out manually.
NOTES:
• Depending on the playback device manufacturer, re-registration may be required
(PAIRING).
EN
33-507- 6 -
• If you experience any problems connecting to the device, deactivate WiFi and mobile data
features on your device.
• Bluetooth compatibility cannot be guaranteed for devices (e.g. mobile phones), which will
be produced in the future.
• To ensure optimum connection, make sure your device's battery is fully charged.
• Some mobile devices have a power-saving mode. Deactivate the power-saving mode, as
it may cause problems in the transmission of data in the Bluetooth mode.
Reception of FM radio stations:
1. If “FM” appears on the display, it means that the radio mode is turned on (if the symbol of another
mode appears on the display, by pressing the button [MODE] (16) turn on the radio mode).
2. Press and hold button [ ] (6) on the device (not on the remote), range scanning and
registration of radio station frequencies in the memory will start - the frequency on display will
change and the number of the found transmitter memory cell will shortly appear (for example,
“P02”) and a short fragment of broadcast will be playbacked.
To stop scanning the FM radio stations, press the button [ ] (6).
When scanning of FM radio stations is done, broadcast of the radio station found rst (“P01”)
will be playbacked.
3. By shortly pressing the button [ ] (5) or [ ] (7), choose any of the xed stations in the
memory.
4. Adjust volume.
Connecting a microphone:
The device can be connected to two types of microphones: dynamic (supplied) and electret
condenser (usually attached to headsets). Each type has an appropriate connector.
1. Turn off the device.
2. Turn the echo regulators -ECHO+ (17), the main volume control -VOLUME+ (2) and the
microphone volume control -MIC VOL+ (19) to the minimum.
3. Insert the microphone plug into the appropriate socket (10) and/or (20).
IMPORTANT: Move the dynamic microphone switch to the ON position.
4. Turn on the device by using the Power switch (15) - indicator BAT FULL (14) will light up green.
5. Speak into the microphone and set the desired volume by using the main volume control
-VOLUME+ (2) and -MIC VOL+ (19) .
INFO: Use the echo regulator -ECHO+ (17) to set the required level of echo.
Connecting a guitar:
The device can be connected to a guitar with a silencer.
1. Turn off the device.
2. Turn the echo regulators -ECHO+ (17), the main volume control -VOLUME+ (2) and the
microphone volume control -MIC VOL+ (19) to the minimum.
3. Insert the guitar plug into the socket (10).
4. Turn on the device by using the Power switch (15) - indicator BAT FULL (14) will light up green.
5. Play the guitar and set the desired volume by using the main volume control -VOLUME+ (2)
and -MIC VOL+ (19).
EN

33-507- 7 -
Karaoke function:
To use the karaoke function, you must rst connect the microphones, as described under
'Connecting a microphone' and insert a USB ash drive or memory card with pre-recorded music
(you can also use a mobile device with a Bluetooth connection or another external music player,
which is connected to the LINE socket (11), as a music source).
1. Turn on the device by using the Power switch (15).
2. Press [MODE] button (16) to select the MP3 music source (USB/SD/BLUE/FM).
IMPORTANT: If LINE socket (11) is connected to an analogue signal cable, USB/SD/
BLUE/FM modes will be disconnected automatically.
3. Use control buttons -VOLUME+ (2) and -MIC VOL+ (19) to adjust the music and microphone
volume.
When using Bluetooth (BLUE) or LINE mode, also adjust volume on your mobile device or
external player.
Recording to a USB stick or memory card:
INFO: The maximum duration of recorded material depends on the memory device
capacity.
1. Recording from the linear LINE input
a. Insert a USB ash drive or a microSD/SDHC memory card into the corresponding socket.
b. Connect the external playback device to the LINE socket (11).
c. Turn on BAZOOKA.
d. To start recording, briey press the [REC] button (9).
e. To stop recording, briey press the [REC] button (9) again.
2. Recording from the FM radio
a. Insert a USB ash drive or a microSD/SDHC memory card into the corresponding socket.
b. Turn on BAZOOKA.
c. Turn on the FM radio mode and select the desired radio station.
d. To start recording, briey press the [REC] button (9).
e. To stop recording, briey press the [REC] button (9) again.
3. Recording from an external microphone
a. Insert a USB ash drive or a microSD/SDHC memory card into the corresponding socket.
b. Connect the external microphone to the MIC socket (10 or 20) .
c. Turn on BAZOOKA.
d. Turn the -ECHO+ echo regulator (17) to the minimum.
e. Adjust the microphone volume by using the -MIC VOL+ control button (19)
f. To start recording, briey press the [REC] button (9).
g. To stop recording, briey press the [REC] button (9) again.
4. Erasing a record
Find the record you wish to erase and press [DEL] (9).
Music with lights:
During playback, the device woofer will light up to the rhythm of music with multi-coloured LEDs.
If you wish to disable the lighting effects, press [EQ/] (8).
EN
33-507- 8 -
REMOTE
Functions of the keys:
[] - switching on the device/switching it to standby.
[Mode] - switching the modes (USB/SD/BLUE/FM).
[ ] - turning off the sound.
[ ] - starting/stopping playback/FM scan.
[ ] - next composition/increase FM frequency.
[ ] - previous composition/decrease FM frequency.
[EQ] - equalizer mode switching (in MP3 mode).
[VOL- ] - increasing the volume.
[VOL+ ] - decreasing the volume.
[O] - repeating/playback form selection (in USB/SD mode):
"ALL" - cyclic playback of all compositions;
"ONE" - cyclic playback of one composition;
"FOL" - cyclic playback of current folder;
"RAND" - playback of randomly chosen compositions.
- range scanning (in FM mode).
[1] - [9] - digit keys for entering MP3 composition number/station selection xed in FM memory.
[100+] - digital key for entering MP3 music pieces with numbers above 100
PROVISIONS FOR PROPER USE
This is a complex device and it must be treated carefully. For device to serve for a long time and
trustworthy, please take into consideration the following:
1. Do not place the device in a very hot place (over 40˚C). In heat, electronic devices and
batteries damage faster and plastic details can even become deformed.
2. make sure the device is not in contact with water and any other liquids.
3. Do not draw the device near powerful sources of electric eld and static electricity.
4. Do not arbitrarily open the device and repair it.
5. Do not insert non-standard, unqualied or broken spare parts, accessories, batteries in the
device.
6. If the device is brought from cold into a warm room, do not switch it on, but allow dewy details
to get dry for approximately two hours.
7. Do not allow unqualied persons to open the device.
8. Protect the device from blows, falls and powerful vibrations.
9. If the device has got wet, switch it off, wipe it and let it dry for at least 24 hours in a warm place.
CLEANING
Clean the device with soft, dry or slightly wet cloth, use no solvents (petrol, acetone, spirit etc.)
for cleaning.
Do not use any abrasive or caustic cleaning agents. After cleaning, carefully dry the device.
EN
33-507- 9 -
Technical data
Functions: USB and microSD card socket,
dynamic microphone/guitar 6.3 mm input,
electret microphone 3.5 mm input,
linear 3.5 mm output,
headphone 3.5 mm output
FM radio 87.5 - 108 MHz
Wireless connectivity: Bluetooth V2.1 EDR
NFC
Speakers: 5.25” (133,4mm) + 2" (50.8mm)
Output power: 25W
Playback freq. range: 100Hz - 20kHz
Signal/noise ratio: >80 dB
Charging power supply: 9 or 12V, 1000 mA, direct current
Battery: Li-ion 7.4V, 2400 mAh
Battery operation time*: ≤ 10 hours
Playback le format: MP3
Remote control oper. distance: 10 meters (sight line to the IR receiver)
Temperature of environment: 0˚C to 40˚C
Relative humidity of environment: 20% - 90%
Size: 380 x 170 x 230 mm
Weight: 2,5 kg
*measurement done by 50% volume and the result is approximate (depends on ash
construction and recording content).
Technical changes are possible.
Let’s conserve the environment! Don’t trash this device together with other garbage,
but bring it to the ofcial recycling collection point.
Duplication of this instruction for commercial purposes is not allowed.
EN

33-507- 10 -
Mēs pateicamies Jums par veikto pirkumu
LIETOŠANAS INSTRUKCIJA
VISPĀRĒJIE DROŠĪBAS NOTEIKUMI
- Pirms lietošanas uzmanīgi izlasiet šo instrukciju un noglabājiet to drošā vietā kopā ar kases
čeku, bezmaksas servisa pieteikuma formu un, ja iespējams, iepakojumu.
- Izmantojiet ierīci tikai paredzētajiem mērķiem un instrukcijā norādītajā veidā. Ierīce paredzēta
lietošanai mājsaimniecībā, ne komerciālai izmantošanai.
- Nelietojiet ierīci lietū, mitrās vietās vai tiešā ūdens tuvumā. Sargājiet to no netīrumiem, karstuma,
tiešiem saules stariem, mitruma (nekad neiemērciet ierīci ūdenī vai kādā citā šķidrumā) un asiem
triecieniem. Nepieskarieties ierīcei ar mitrām rokām.
- Regulāri apskatiet ierīci un lādētāju. Ja ir redzami bojājumi, neieslēdziet ierīci, bet vērsieties
autorizētā servisā, lai novērstu bojājumus.
UZMANĪBU: drošības apsvērumu dēļ neļaujiet bērniem rotaļāties ar ierīci, lādētāju un ar
iesaiņojuma materiāliem (plēvi, putuplastu, kartonu u.c.). Aizrīšanās, nosmakšanas draudi!
APRAKSTS
MP3 atskaņotājs nodrošina mūzikas klausīšanos no USB zibatmiņas vai microSD, microSDHC
atmiņas kartes, kurā ierakstīti MP3 formāta skaņdarbi.
Izmantojot mikrofonus, varat organizēt KARAOKE dziedāšanas pasākumus vai diktofona
ierakstus. Ierīcei var pieslēgt ģitāru ar skaņas noņēmēju.
Analogā audio signāla ieeja nodrošina atskaņošanu no MP3/MP4 pleijera, viedtālruņa,
planšetdatora, portatīvā/personālā datora, CD atskaņotāja u.c.
Digitālais FM radiouztvērējs nodrošina uztverto radiostaciju frekvenču automātisku ierakstīšanu
atmiņā.
Akumulatora bateriju var uzlādēt no maiņstrāvas tīkla adaptera vai 12V līdzstrāvas avota (auto
piesmēķētāja ligzdas).
Efektīvi skaļruņi nodrošina jaudīgu skaņu ar mazu enerģijas patēriņu.
Komplektācija:
• TOMIG BAZOOKA
• Tālvadības pults
• Lādētājs
• Dinamiskais mikrofons ar kabeli 5m
• Audiokabelis 3.5mm/3.5mm
• Pārnēsāšanas siksna
• Lietošanas instrukcija 5 valodās
FUNKCIJAS
- Skaņas sistēma aprīkota ar USB zibatmiņas, microSD, microSDHC kartes, lineārās ieejas,
3,5mm mikrofona un 6,3mm ģitāras/mikrofona ligzdām.
- Nolasa microSD, microSDHC atmiņas kartes un USB zibatmiņas (Flash) ierakstus MP3
formātā.
- Ieraksta microSD, microSDHC atmiņas kartē vai USB zibatmiņā.
PORTATĪVA SKAŅAS SISTĒMALV
33-507- 11 -
- Displejs ataino izvēlēto darba režīmu.
- Pilns FM diapazona pārklājums (87.5 -108.0 MHz) ar LED simbolu displeju.
- Frekvences un skaņdarba iegaumēšanas funkcija.
- Pēc pārstartēšanas atjauno frekvenci, skaņdarbu un skaļumu.
- Vadības pults paredzēta ērtākai ierīces vadībai ar paplašinātām funkcijām.
- Litija akumulatoru baterija nodrošina ierīces autonomu izmantošanu.
- Ekvalaizers ar 7 iestatījumu režīmiem.
- Masīvs kokšķiedras korpuss nodrošina kvalitatīvu skaņu.
- Stilīgs un atraktīvs dizains, LED apgaismojums ar ritmiskiem krāsu maiņas efektiem.
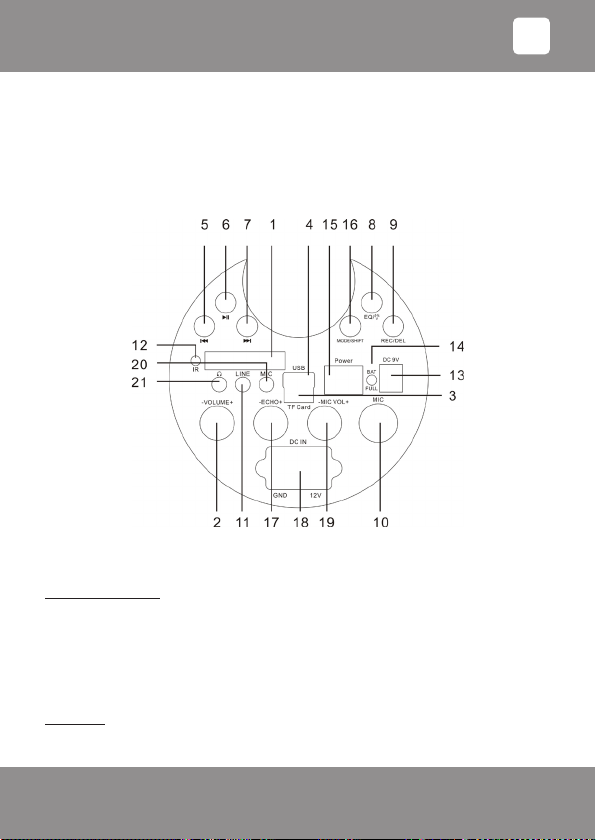
Vadības panelis
SAGATAVOŠANA (sastāvdaļu numerāciju skatiet vadības paneļa attēlā)
Akumulatora uzlādēšana:
Komplektā esošā adaptera kabeļa spraudni ievietojiet ierīces, ligzdā DC 9V (13), displejā
iedegsies sarkans uzlādēšanas režīma indikators BAT FULL (14).
Akumulatoru baterija jāuzlādē aptuveni 2-3 stundas. Kad akumulators būs uzlādējies, indikators
BAT FULL (14) iedegsies zilā krāsā.
PIEBILDE: Ja uzlādēšanas laikā ierīce ir ieslēgta, akumulatora uzlādes laiks palielinās.
LIETOŠANA
Ieslēgšana:
Lai ieslēgtu ierīci, pārslēdziet galveno slēdzi Power (15) stāvoklī "I".
LV

33-507- 12 -
LV
Skaļuma regulēšana (pamatbloka panelis):
Ierīcei ir divi skaļuma regulatori:
a) analogais -VOLUME+ (2), kas regulē kopējo un analogo avotu skaļumu (ligzdai LINE
(11) un mikrofonu ligzdām MIC (10; 20)).
b) digitālais regulators ar pogām [ ] (5), [ ] (7)
Nospiežot pogu [ ](5) vai [ ] (7) un nedaudz paturot nospiestā stāvoklī, varat
samazināt vai palielināt skaļumu.
MP3 failu atskaņošana:
1. Ievietojiet USB vai microSD (TF Card) atmiņas karti ar MP3 ierakstiem atbilstošajā ligzdā.
SVARĪGI: Lai normāli darbotos atmiņas karte, pirms ierīces ieslēgšanas ar slēdzi Power
(15), pārliecinieties, vai ir ievietota atmiņas karte vai USB zibatmiņa. Ierīces darbības laikā
neizņemiet un neievietojiet atmiņas karti vai USB zibatmiņu. Lai to darītu, ierīce ir jāizslēdz
ar slēdzi Power (15). Ja atmiņas karte vai USB zibatmiņa tiks ievietota vai izņemta no
ieslēgtas ierīces, tad iespējami informācijas vai/un aparatūras bojājumi!
SVARĪGI: Ievietojiet microSD atmiņas karti, turot to taisnā stāvoklī un lai zeltītie kontakti
būtu vērsti uz augšu. Ievietojot atmiņas karti nepareizā veidā vai šķībi, var sabojāt
kontaktus vai izraisīt atmiņas kartes iesprūšanu.
Ja atmiņas karte nav ievietota ligzdā līdz galam, līdz tā noksējas, dati var netikt nolasīti.
2. Ar slēdzi Power (15) ieslēdziet ierīci. Sāksies MP3 ieraksta atskaņošana.
- Ja iepriekš ir izmantots cits režīms (''FM'', ''LINE''), tad, nospiežot taustiņu [MODE] (16),
izvēlieties MP3 režīmu (displejā "SD" vai "USB").
- Nospiežot taustiņu [ ] (6), varat ieslēgt pauzes režīmu - atskaņošana tiks apturēta.
- Ja vēlreiz nospiedīsiet taustiņu [ ] (6), skaņdarbs atsāks skanēt no apturētās vietas.
- Nākošā vai iepriekšējā ieraksta izvēle:
Īslaicīgi nospiežot taustiņu [ ] (7), varat ''pārtīt'' uz priekšu.
Īslaicīgi nospiežot taustiņu [ ] (5), varat ''pārtīt'' atpakaļ.
PIEBILDE: MP3 ierakstu atskaņošanas laikā ar pogu [EQ/ ] (8) varat ieslēgt šādus
ekvalaizera režīmus: norm-pop-roc-jazz-class-cut-bass.
3. Pēc ierakstu klausīšanās nospiediet taustiņu [ ] (6).
4. Pārslēdzot galveno slēdzi Power (15) stāvoklī "O", izslēdziet ierīci.
5. Izņemiet atmiņas karti.
Analogā signāla atskaņošana no ārējā avota:
1. Ievietojiet komplektā esošā kabeļa spraudni apaļajā 3,5mm ligzdā LINE (11), otru kabeļa
spraudni ievietojiet signāla avota (piemēram, viedtālruņa, planšetdatora, MP3/MP4 pleijera utt.)
LINE OUT vai austiņu ligzdā.
2. Ieslēdziet ierīci un ar taustiņu [MODE] (16) izvēlieties režīmu "LINE".
3. Noregulējiet skaļumu.
Bluetooth bezvadu savienojums:
SVARĪGI: Bluetooth savienojumu nav iespējams veikt, ja ierīces ligzdai LINE (11) ir
pievienots audio kabelis.

33-507- 13 -
LV
PIEBILDES:
• Bluetooth ir tehnoloģija, kas izmanto bezvadu radioviļņu savienojumu, savienojot ierīces,
kas atrodas nelielā attālumā.
• Ņemot vērā, ka ir dažādi ierīču ražotāji, modeļi un programmatūras versijas, nevar tikt
garantēta pilnīga funkcionalitāte.
1. Ierīču sapārošana izmantojot NFC (ierīcēm ar NFC funkciju)
ZINĀŠANAI: Izmantojot NFC funkciju iespējama acumirklī sapārot ierīces.
a. Ieslēdziet BAZOOKA un izvēlieties režīmu "BLUE".
b. Aktivizējiet NFC funkciju savā mobilajā ierīcē.
c. Ļoti lēni virziet mobilo tuvu pāri BAZOOKA NFC simbolam ( ), līdz sadzirdēsiet
signālu un mobilā ierīce saņems apstiprinošu ziņojumu.
ZINĀŠANAI: Ne visiem viedtālruņiem ir NFC funkcija.
2. Ierīču sapārošana (ierīcēm bez NFC funkcijas)
a. Pārliecinieties, ka jūsu mobilajā ierīcē (piemēram, viedtālrunī) aktivizēta Bluetooth
funkcija.
Lai to izdarītu, iepazīstieties ar jūsu mobilās ierīces lietošanas instrukciju.
b. Ar slēdzi Power (15) ieslēdziet ierīci.
c. Nospiežot pogu [MODE] (16). Ieslēdziet Bluetooth režīmu, displejā sāks mirgot uzraksts
"BLUE".
Notiek BAZOOKA mēģinājums savienoties ar ierīci ar kuru bija iepriekš sapārota. Ja
BAZOOKA atrod sapāroto ierīci, atskan signāls un displejā pārtrauc mirgot uzraksts
"BLUE". Ja sapārota ierīce netiek atrasta, BAZOOKA ir gatava jaunai sapārošanai.
d. Atrodiet savā mobilajā ierīcē "Bluetooth" izvēlni un reģistrējiet ierīci savā mobilajā. Lai
to paveiktu, izmantojiet mobilās ierīces instrukciju. Jūsu mobilās ierīces displejā jāparādās
informācijai par sapāroto ierīci ar nosaukumu "BAZOOKA".
e. Ievadiet paroli "0000" (vai citu atkarībā no jūsu mobilās ierīces modeļa vai
programmatūras versijas).
ZINĀŠANAI: Izmantojiet mobilās ierīces vadības elementus, lai izvēlētos skaņdarbu,
atskaņošanas režīmu un iestatītu sākuma skaļumu (skat. mobilās ierīces lietošanas
instrukciju). Skaļumu varat regulēt ar BAZOOKA skaļuma regulatoru -VOLUME+ (2) un
tālvadības pults taustiņiem [VOL-], [VOL+].
3. Atkārtota savienošana izmantojot Bluetooth
a. Aktivizējiet Bluetooth funkciju savā mobilajā ierīcē.
b. Ieslēdziet BAZOOKA un izvēlieties režīmu "BLUE".
c. Ja jūsu mobilais bija sapārots vienīgi ar BAZOOKA, tad saslēgšanās notiks automātiski.
Ja mobilā ierīce bija sapārota ar vairākām citām ierīcēm, tad saslēgšanās ar BAZOOKA
jāveic manuāli.
PIEBILDES:
• Atkarībā no atskaņošanas ierīces ražotāja, var tikt pieprasīta atkārtota reģistrācija
(sapārošana, PAIRING).
33-507- 14 -
• Ja konstatējat problēmas, savienojot ar ierīci, deaktivējiet WiFi un mobilo datu funkcijas
jūsu ierīcē.
• Bluetooth saderība nevar tikt nodrošināta ierīcēm (piemēram, mobilajiem tālruņiem), kas
tiks ražotas nākotnē.
• Lai nodrošinātu optimālu savienojumu, pārliecinieties, ka jūsu ierīces baterija ir pilnībā
uzlādēta.
• Dažām mobilajām ierīcēm ir enerģijas taupīšanas režīms. Deaktivējiet enerģijas
taupīšanas režīmu, jo tas var radīt problēmas datu pārraidē Bluetooth režīmā.
FM radiostaciju uztveršana:
1. Ja displejā redzams "FM" - tas nozīmē, ka ieslēgts radio režīms (ja displejā redzami cita režīma
apzīmējumi, nospiežot taustiņu [MODE] (16), ieslēdziet radio režīmu).
2. Nospiediet un turiet ierīces (ne pults) taustiņu [ ] (6), sāksies diapazona skenēšana un
radiostaciju frekvenču ierakstīšana atmiņā - displejā mainīsies frekvence un īslaicīgi parādīsies
atrastā raidītāja atmiņas šūnas numurs (piemēram, "P02") un tiks atskaņots īss pārraides
fragments.
Lai apturētu FM raidstaciju meklēšanu, nospiediet taustiņu [ ] (6).
Kad staciju meklēšana būs beigusies, tiks atskaņota pirmās atrastās ("P01") radiostacijas pārraide.
3. Īslaicīgi nospiežot taustiņu [ ](5) vai [ ] (7), izvēlieties kādu no atmiņā ksētajām
radiostacijām.
4. Noregulējiet skaļumu.
Mikrofonu pieslēgšana:
Ierīcei var pieslēgt divu tipu mikrofonus: dinamisko (ir komplektā) un kondensatora elektreto
(parasti tāds ir piestiprināts austiņām). Katram tipam ir atbilstoša pieslēgšanas ligzda.
1. Izslēdziet ierīci.
2. Pagrieziet atbalss regulatoru -ECHO+ (17), galveno skaļuma regulatoru -VOLUME+ (2) un
mikrofona skaļuma regulatoru -MIC VOL+ (19) uz minimumu.
3. Ievietojiet mikrofona spraudni attiecīgā ligzdā MIC (10 vai/un 20).
SVARĪGI: Dinamiskā mikrofona slēdzi pārbīdiet stāvoklī ON (ieslēgts).
4. Ar slēdzi Power (15) ieslēdziet ierīci, indikators BAT FULL (14) iedegsies zaļā krāsā.
5. Runājiet mikrofonā un ar galveno skaļuma regulatoru -VOLUME+ (2) un regulatoru -MIC
VOL+ (19) iestatiet vajadzīgo skaļumu.
ZINĀŠANAI: Ar atbalss regulatoru -ECHO+ (17) iestatiet nepieciešamo atbalss līmeni.
Ģitāras pieslēgšana:
Ierīcei var pieslēgt ģitāru ar skaņas noņēmēju.
1. Izslēdziet ierīci.
2. Pagrieziet atbalss regulatoru -ECHO+ (17), galveno skaļuma regulatoru -VOLUME+ (2) un
mikrofona skaļuma regulatoru -MIC VOL+ (19) uz minimumu.
3. Ievietojiet ģitāras spraudni ligzdā MIC (10).
4. Ar slēdzi Power (15) ieslēdziet ierīci, indikators BAT FULL (14) iedegsies zaļā krāsā.
5. Spēlējiet ģitāru un ar galveno skaļuma regulatoru -VOLUME+ (2) un regulatoru -MIC VOL+
(19) iestatiet vajadzīgo skaļumu.
LV

33-507- 15 -
Karaoke funkcija:
Lai izmantotu karaoke funkciju, vispirms pieslēdziet mikrofonus, kā aprakstīts sadaļā ‘Mikrofonu
pieslēgšana’ un ievietojiet USB zibatmiņu vai atmiņas karti ar mūzikas ierakstiem (par mūzikas
avotu varat izmantot arī mobilo ierīci ar Bluetooth pieslēgumu vai kādu citu ārējo mūzikas
atskaņotāju, kas pieslēgts ligzdai LINE (11).
1. Ar slēdzi Power (15) ieslēdziet ierīci.
2. Nospiežot pogu [MODE] (16), izvēlieties mūzikas avotu (USB/SD/BLUE/FM).
SVARĪGI: Ja ligzdai LINE (11) būs pieslēgts analogā signāla kabelis, USB/SD/BLUE/FM
režīmi automātiski tiks atslēgti.
3. Ar regulatoriem -VOLUME+ (2), -MIC VOL+ (19) noregulējiet mūzikas un mikrofona skaļumu.
Ja izmantosiet Bluetooth (BLUE) vai LINE režīmu, tad skaļumu regulējiet arī mobilajā ierīcē vai
ārējā atskaņotājā.
Ierakstīšana USB zibatmiņā vai atmiņas kartē:
ZINĀŠANAI: Ierakstītā materiāla maksimālais ilgums atkarīgs no atmiņas ierīces ietilpības.
1. Ierakstīšana no lineārās ieejas LINE
a. Ievietojiet USB zibatmiņu vai microSD/SDHC atmiņas karti atbilstošā ligzdā.
b. Pievienojiet ārējo atskaņošanas ierīci ligzdai LINE (11).
c. Ieslēdziet BAZOOKA.
d. Lai uzsāktu ierakstīšanu, īslaicīgi nospiediet pogu [REC] (9).
e. Lai pārtrauktu ierakstīšanu, vēlreiz īslaicīgi nospiediet pogu [REC] (9).
2. Ierakstīšana no FM radio
a. Ievietojiet USB zibatmiņu vai microSD/SDHC atmiņas karti atbilstošā ligzdā.
b. Ieslēdziet BAZOOKA.
c. Ieslēdziet FM radio režīmu un izvēlieties vajadzīgo radiostaciju.
d. Lai uzsāktu ierakstīšanu, īslaicīgi nospiediet pogu [REC] (9).
e. Lai pārtrauktu ierakstīšanu, vēlreiz īslaicīgi nospiediet pogu [REC] (9).
3. Ierakstīšana no ārējā mikrofona
a. Ievietojiet USB zibatmiņu vai microSD/SDHC atmiņas karti atbilstošā ligzdā.
b. Pievienojiet ārējo mikrofonu ligzdai MIC (10 vai 20) .
c. Ieslēdziet BAZOOKA.
d. Atbalss efekta regulatoru -ECHO+ (17) pagrieziet minimālā stāvoklī.
e. Noregulējiet mikrofona skaļuma līmeni ar regulatoru -MIC VOL+ (19)
f. Lai uzsāktu ierakstīšanu, īslaicīgi nospiediet pogu [REC] (9).
g. Lai pārtrauktu ierakstīšanu, vēlreiz īslaicīgi nospiediet pogu [REC] (9).
4. Ieraksta izdzēšana
Atrodiet izdzēšamo ierakstu un nospiediet pogu [DEL] (9).
Gaismas mūzika:
Ierīces basu skaļrunis atskaņošanas laikā mūzikas ritmā tiek izgaismots ar daudzkrāsainām
LED diodēm.
Ja vēlaties šos gaismas efektus atslēgt, nospiediet pogu [EQ/ ] (8).
LV

33-507- 16 -
TĀLVADĪBAS PULTS
Taustiņu funkcijas:
[] - ierīces ieslēgšana/ pārslēgšana gaidīšanas režīmā.
[Mode] - režīmu pārslēgšana (USB/SD/BLUE/FM).
[] - skaņas izslēgšana.
[ ] - uzsākt/ beigt atskaņošanu / FM diapazona skenēšana.
[ ] - nākošais skaņdarbs/ palielina FM frekvenci.
[ ] - iepriekšējais skaņdarbs/ samazina FM frekvenci.
[EQ] - ekvalaizera režīmu pārslēgšana (MP3 režīmā).
[VOL- ] - skaļuma samazināšana.
[VOL+ ] - skaļuma palielināšana.
[O] - atkārtošanas/ atskaņošanas veida izvēle (USB/SD režīmā).
"ALL" - visu skaņdarbu cikliska atskaņošana;
"ONE" - viena skaņdarba cikliska atkārtošana;
"FOL" - esošās mapes cikliska atkārtošana;
"RAND" - nejauši izvēlētu skaņdarbu atskaņošana.
- diapazona skenēšana (FM režīmā).
[0] - [9] - ciparu taustiņi MP3 skaņdarba numura ievadīšanai / FM atmiņā ksēto staciju izvēle.
[100+] ciparu taustiņš MP3 skaņdarba numura ievadīšanai, skaņdarbiem ar kārtas numuru
virs 100
PAREIZAS LIETOŠANAS NOTEIKUMI
Šī ir sarežģīta ierīce un ar to jāapietas saudzīgi. Lai ierīce kalpotu ilgi un uzticami, lūdzu,
ievērojiet tālāk aprakstīto.
1. Nenovietojiet ierīci vietā, kur ir ļoti karsts (virs 40˚C). Karstumā ātrāk bojājas elektroniskās
ierīces, baterijas un var deformēties plastmasas detaļas.
2. Nepieļaujiet ierīci saskari ar ūdeni vai jebkādiem citiem šķidrumiem.
3. Netuviniet ierīci spēcīgiem elektriskā lauka un statiskās elektrības avotiem.
4. Patvaļīgi neatveriet korpusu un neremontējiet ierīci.
5. Neievietojiet ierīcē nestandarta, nekvalitatīvas vai bojātas rezerves daļas, piederumus,
baterijas.
6. Ja ierīce tiek ienesta no aukstuma siltā telpā, neieslēdziet to, bet ļaujiet aptuveni divas
stundas nožūt norasojušām detaļām.
7. Neļaujiet atvērt ierīci nekvalicētām personām.
8. Pasargājiet ierīci no triecieniem, kritieniem un stiprām vibrācijām.
9. Ja ierīce samirkusi, izslēdziet to, noslaukiet un ļaujiet siltā vietā žūt vismaz 24 stundas.
TĪRĪŠANA
Ierīci tīriet ar mīkstu, sausu vai nedaudz samitrinātu drānu, tīrīšanai neizmantojiet šķīdinātājus
(benzīnu, acetonu, spirtu u.c.).
Neizmantojiet abrazīvus vai kodīgus tīrīšanas līdzekļus. Pēc tīrīšanas kārtīgi nosusiniet ierīci.
LV
33-507- 17 -
Tehniskie dati
Funkcijas: USB un microSD kartes ligzda,
dinamiskā mikrofona/ģitāras 6.3 mm ieeja,
elektretā mikrofona 3.5 mm ieeja,
lineārā 3.5 mm ieeja,
austiņu 3.5 mm izeja
FM radio 87,5 - 108 MHz
Bezvadu savienojamība: Bluetooth V2.1 EDR
NFC
Skaļruņi: 5.25” (133,4mm) + 2" (50.8mm)
Izejas jauda: 25W
Atskaņojamo frekv. josla: 100Hz - 20kHz
Attiecība signāls/troksnis: >80 dB
Uzlādēšanas barošanas avots: 9 vai 12V, 1000 mA, līdzstrāva
Akumulatoru baterija: Li-ion 7.4V, 2400 mAh
Akumulatora darbības laiks*: ≤ 10 stundas
Atskaņojamo failu formāts: MP3
Vadības pults darbības distance: 10 metri (skata līnijā uz IR uztvērēju)
Apkārtējās vides temperatūra: 0˚C līdz 40˚C
Apkārtējās vides relatīvais gaisa mitrums: 20% - 90%
Izmēri: 380(pl) x 170(dz) x 230(a) mm
Svars: 2,5kg
*mērījums veikts pie 50% skaļuma un tā rezultāts ir aptuvens (atkarīgs no zibatmiņas
konstrukcijas un ieraksta satura).
Ir iespējamas tehniskas izmaiņas bez iepriekšējas brīdināšanas.
Saudzēsim apkārtējo vidi! Neizmetiet šo ierīci kopā ar citiem atkritumiem, bet nododiet
ociālā atkārtotai pārstrādei paredzēto lietu savākšanas vietā.
Dotās instrukcijas pavairošana komerciālos nolūkos nav atļauta.
LV

33-507- 18 -
Mes dėkojame Jums už pirkinį
NAUDOJIMO INSTRUKCIJA
BENDROSIOS SAUGOS TAISYKLĖS
- Prieš naudojimą atidžiai perskaitykite šią instrukciją ir laikykite ją saugioje vietoje kartu su
kasos čekiu, nemokamų paslaugų paraiškos forma ir, jeigu įmanoma, pakuote.
- Naudokite prietaisą tik numatytais tikslais ir tik instrukcijoje nurodytu būdu. Prietaisas skirtas
naudoti namų ūkyje, ne komerciniam naudojimui.
- Nenaudokite prietaiso lyjant lietui, drėgnose vietose ar arti vandens. Saugokite jį nuo
nešvarumų, karščio, tiesioginių saulės spindulių, drėgmės (niekada nemerkite prietaiso į
vandenį ar kitą skystį) ir staigių smūgių. Nesilieskite prie prietaiso drėgnomis rankomis.
- Reguliariai tikrinkite prietaisą ir įkroviklį. Pastebėję defektą nedelsdami kreipkitės į autorizuotą
techninės priežiūros centrą remontui.
DĖMESIO! Saugumo tikslais neleiskite vaikams žaisti su prietaisu, įkrovikliu arba pakuotės
medžiagomis (plėvele, putplasčiu, kartonu ir kt.). Yra užspringimo ir uždusimo pavojus!
APRAŠYMAS
MP3 grotuvas atkuria MP3 formato įrašus iš atmintuko arba microSD / microSDHC atminties
kortelių.
Prijungę mikrofoną galėsite organizuoti karaokės vakarą arba daryti balso įrašus. Du įvesties
lizdai mikrofonui ir/arba gitarai. Prietaisas gali būti prijungtas prie gitaros su garso slopintuvu.
Analoginio audiosignalo įvadas užtikrina muzikos atkūrimą iš MP3/MP4 grotuvų, išmaniųjų
telefonų, planšetinių kompiuterių, nešiojamųjų/stacionarių kompiuterių, CD grotuvų ir kt.
prietaisų.
Skaitmeninis FM radijo imtuvas automatiškai išsaugo imtuvo atmintyje priimamų radijo stočių
dažnius.
Baterija įkraunama naudojant maitinimo adapterį arba prijungiant jį prie 12V DC maitinimo
šaltinio (automobilio cigarečių degiklio lizdo).
Puikios kokybės įmontuoti garsiakalbiai užtikrina galingą garsą ir mažas energijos sąnaudas.
Komplektacija:
• TOMIG BAZOOKA
• Nuotolinio valdymo pultas
• Įkroviklis
• Dinaminis mikrofonas su 5 m ilgio kabeliu
• 3,5 mm/3,5 mm garso kabelis
• Diržas per petį
• Naudojimo instrukcija 5 kalbomis
FUNKCIJOS
- Garso sistema su jungtimis atmintukui, microSD ir microSDHC kortelėms, linijiniais įvadais, 3,5
mm mikrofono ir 6,3 mm gitaros/mikrofono jungtimis.
- MP3 grotuvas atkuria MP3 formato įrašus iš atmintuko arba microSD / microSDHC atminties
kortelių.
- Prietaisas išsaugo įrašus microSD ir microSDHC kortelėse arba atmintuke.
PORTATYVINĖ GARSO SISTEMALT
33-507- 19 -
- Ekrane rodomas pasirinktas darbo režimas.
- Pilnas FM diapazono padengimas (87.5 -108.0 MHz) su skaitmeniniu LED ekranu.
- Perkrovus grįžta į prieš tai pasirinktą dažnį, garso įrašą ir garso lygį.
- Patogiam naudojimui numatytas nuotolinio valdymo pultelis su papildomomis funkcijomis.
- Ličio jonų įkraunama baterija užtikrina autonominį prietaiso naudojimą.
- Ekvalaizeris, turintis 7 nustatymo režimus.
- Masyvus medinis korpusas užtikrina itin aukštą skleidžiamo garso kokybę.
- Stilinga ir patraukli išvaizda, šviesos diodų apšvietimas su ritmo šviesų efektais.
Valdymo skydelis
PARUOŠIMAS (žiūrėkite komponentų numerius valdymo pulto paveikslėlyje)
Baterijos įkrovimas:
Prijunkite komplekte esančio adapterio jungtį prie prietaiso DC 9V (13) jungties. Ekrane matysite
raudonos spalvos įkrovimo proceso indikatorių: BAT FULL (14).
Baterijos apytikslis įkrovimo laikas - 2-3 valandos. Baterijai įsikrovus, ekrane esantis indikatorius
BAT FULL (14) švies mėlyna spalva.
PASTABA: Įjungto prietaiso akumuliatoriaus įkrovimas trunka ilgiau, nei išjungto prietaiso.
PRIETAISO NAUDOJIMAS
Įjungimas:
Norėdami įjungti prietaisą, perjunkite pagrindinį maitinimo Power jungiklį (15) į padėtį "I".
LT
33-507- 20 -
Garso lygio reguliavimas (Pagrindinio bloko skydelis):
Yra du garso lygio valdikliai:
a) analoginis -VOLUME+ (2), reguliuojantis bendrojo ir analoginio šaltinio garsą (LINE
jungčiai (11) ir mikrofono jungčiai MIC (10; 20))
b) skaitmeninis valdiklis su mygtukais [ ] (5), [ ] (7).
Norėdami padidinti arba sumažinti garso lygį, nuspauskite ir trumpai palaikykite mygtuką
[ ](5) arba [ ](7).
MP3 formato failų atkūrimas:
1. Įstatykite atmintuką arba microSD ("TF" kortelę) atminties kortelę, kurioje yra MP3 formato įrašai.
SVARBU: siekdami užtikrinti tinkamą laikmenų veikimą, pirmiausiai įstatykite atminties
kortelę arba atmintuką į jiems skirtą lizdą, ir tik po to įjunkite prietaisą, pasinaudodami
maitinimo Power jungikliu (15). Neįstatykite ir neišimkite atminties kortelės arba atmintuko,
kol prietaisas veikia. Įstatydami atminties kortelę arba atmintuką prietaisui veikiant, galite
prarasti visą juose esančią informaciją ir/arba sugadinti įrangą!
SVARBU: Įstatydami MicroSD atminties kortelę, laikykite ją tiesiai; auksinės spalvos
kontaktai turi būti viršuje. Įstatydami kortelę kita puse arba netinkamu kampu, galite
pažeisti kontaktus arba kortelė tiesiog įstrigs jungtyje.
Įstatykite kortelę į jungtį taip, kad pasigirstų spragtelėjimas, neįstatę kortelės iki galo
negalėsite atkurti joje esančios informacijos.
2. Įjunkite prietaisą jungikliu Power (15). Prasidės MP3 įrašų atkūrimas.
- Jeigu prieš tai buvote pasirinkę kitą režimą (FM, LINE), nuspauskite [MODE] (16) ir pasirinkite
MP3 režimą (ekrane SD arba USB).
- Paspauskite [ ] (6) norėdami aktyvuoti pauzės funkciją - įrašo atkūrimas bus sustabdytas.
- Pakartotinai paspausdami mygtuką [ ] (6) aktyvuosite įrašo atkūrimą nuo vietos, kur jis buvo
sustabdytas.
- Ankstesnio arba kito įrašo pasirinkimas:
Paspauskite [ ] (7) norėdami perjungti įrašą į priekį.
Paspauskite [ ](5) norėdami grįžti atgal.
PASTABA: MP3 įrašų atkūrimo metu [EQ/] mygtuku (8) galite aktyvuoti funkcijas:
norm-pop-roc-jazz-class-cut-bass.
3. Išklausę įrašus, nuspauskite [ ] (6).
4. Perjunkite maitinimo jungiklį Power (15) į padėtį "O", norėdami išjungti prietaisą.
5. Išimkitelaikmeną.
Išorinio šaltinio analoginio signalo atkūrimas:
1. Įjunkite prietaiso komplektacijoje esančio laido kištuką į prietaiso apvalų lizdą (3,5 mm)
LINE (11), antrą laido kištuką į signalo šaltinio LINE OUT lizdą (pavyzdžiui, išmaniojo telefono,
planšetinio kompiuterio, MP3/MP4 grotuvo ir pan.) arba prie ausinių lizdo.
2. Įjunkite prietaisą, mygtuku [MODE] (16) pasirinkite režimą "LINE“.
3. Nustatykite garsą.
Belaidis Bluetooth ryšys:
SVARBU: Bluetooth ryšys neveikia, kai prie prietaiso LINE jungties (11) prijungtas garso
kabelis.
LT
Table of contents
Languages:


