Tone CE 20 User manual

TONE Factory Manual
English
Deutsch
other languages:
tone-factory.com/manual

TONE Factory | Manual EN
Controls, features and connections
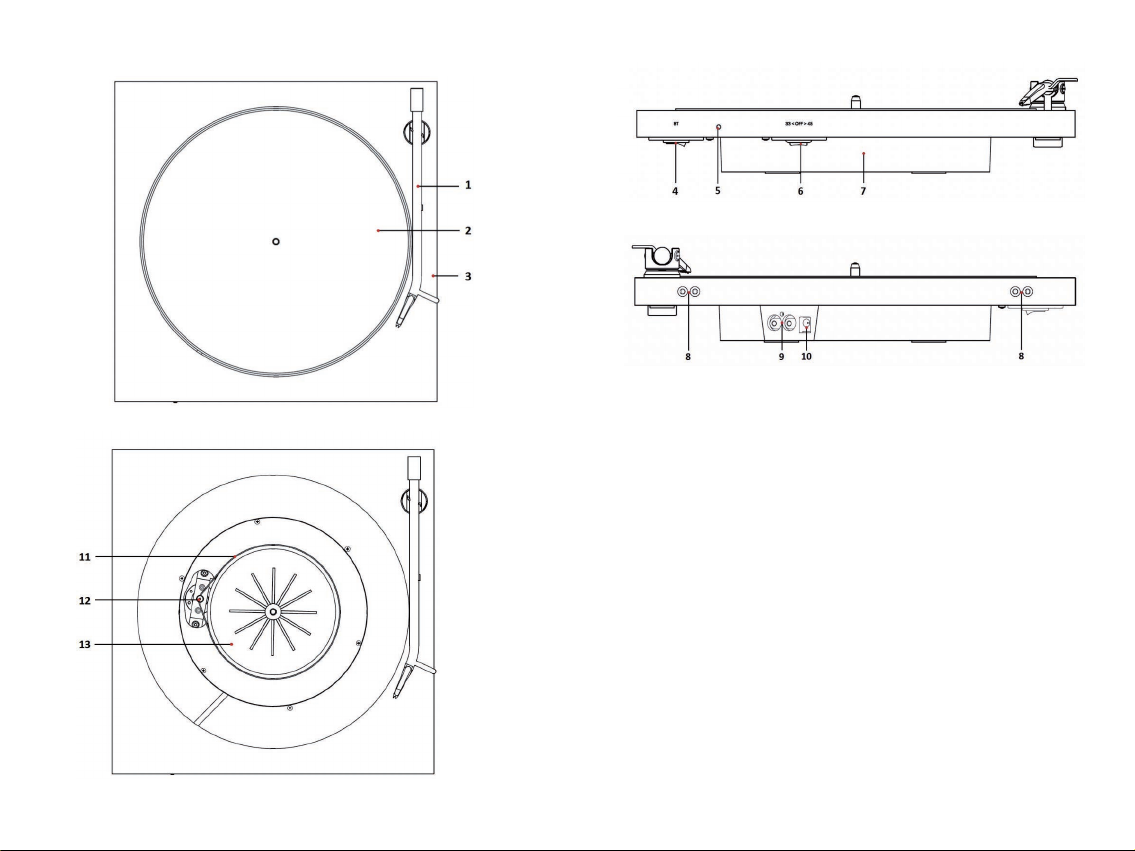
(1) Tonearm
(2) Platter with felt mat
(3) Chassis
(4) Bluetooth switch
(5) Bluetooth LED
(6) Speed control switch
(7) Base
(8) Dustcover hinge mounting hole
(9) RCA output
(10) Power input
(11) Drive belt
(12) Motor
(13) Sub-platter
EN
TONE Factory | Manual EN
3. Starting the motor
The following steps will show you how to easily turn on the
turntable motor.
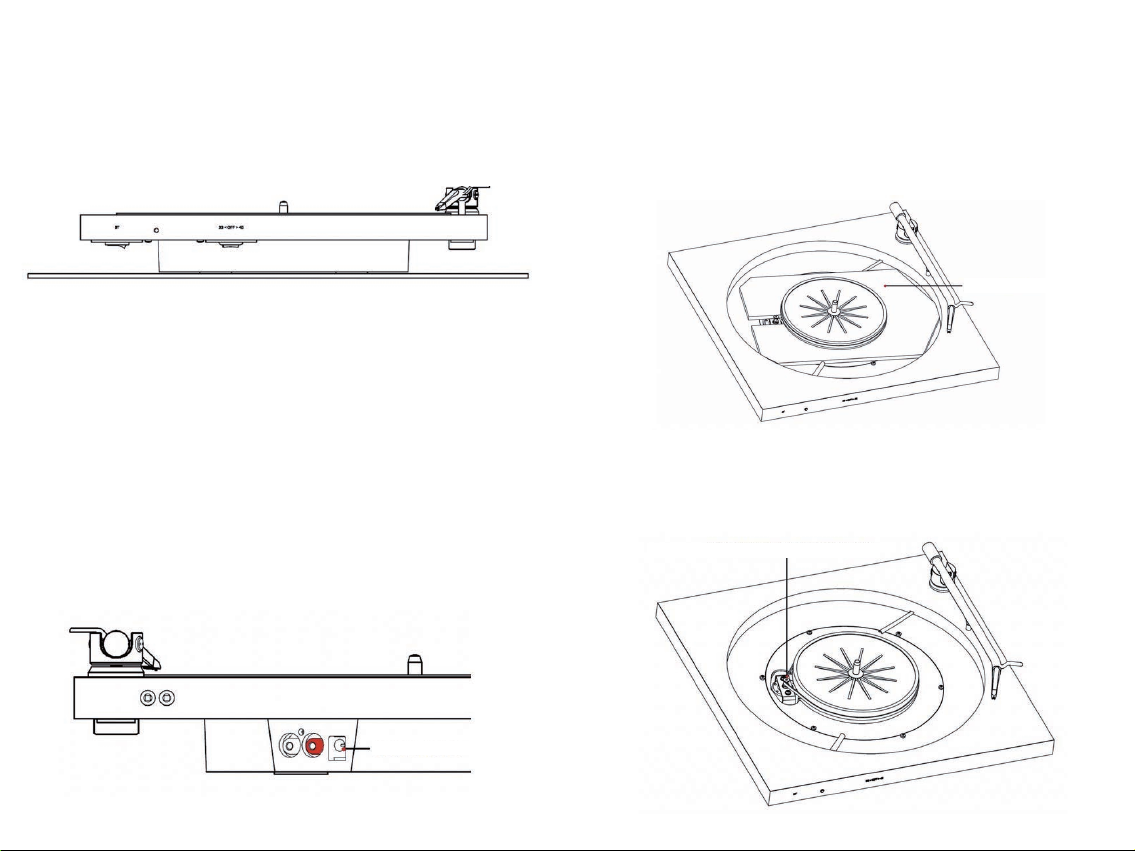
• Remove the platter and cardboard insert that protects the
turntable’s main bearing from shipping damage.
• The drive belt has already been attached to the sub-plat-
ter. After removing the paper insert, place it on the motor
pulley. Then put the platter with the felt mat back on the
sub-platter.
1. Turntable Placement
The turntable should always be placed on a at surface if
possible. Proper placement will ensure proper arm function.
We recommend checking with a spirit level.
2. Connecting the turntable to the mains
Prepare the turntable‘s power supply and connect it to the rear
terminal.
IMPORTANT NOTE:
First connect the power supply connector to the turntable,
then connect the turntable to the mains.
Connecting the power supply to the mains before connecting
it to the turntable can damage the electronics.
Power Input
Drive Belt on the Motor Pulley
Carton Insert

TONE Factory | Manual EN
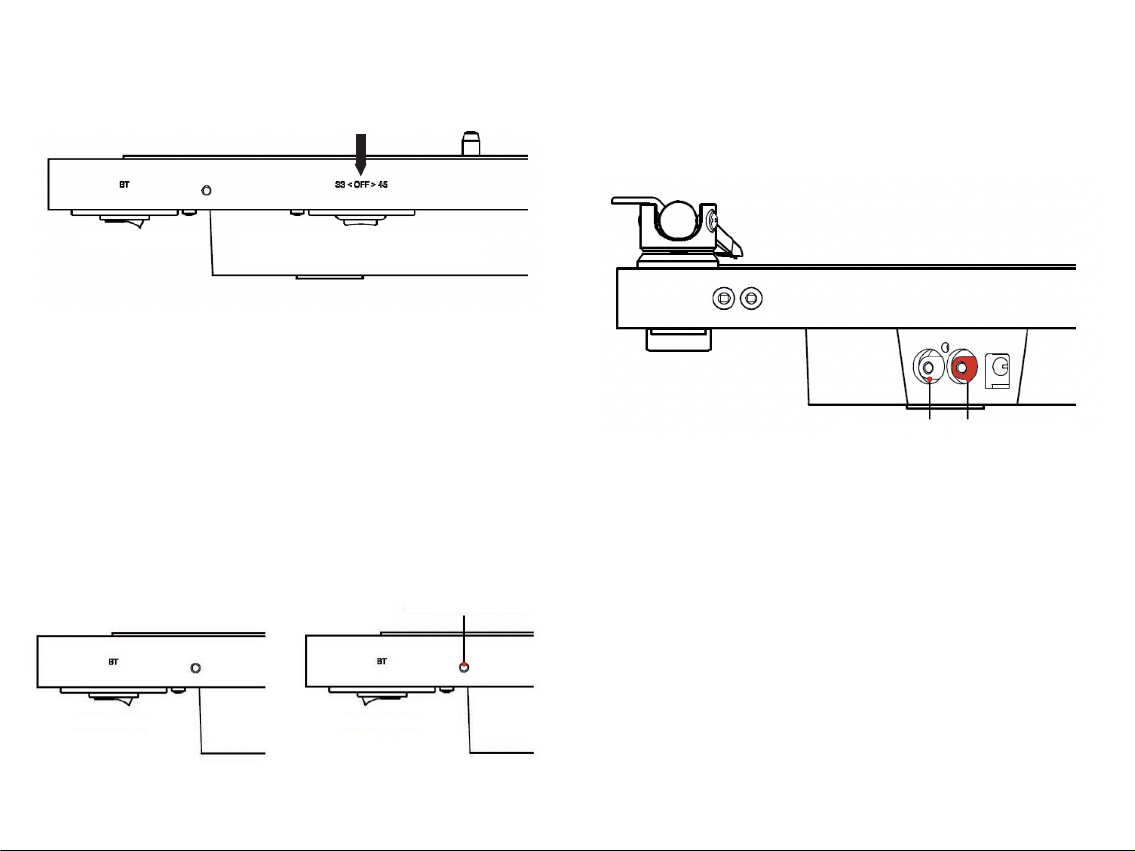
5. Cable Connection
For the cable output used, connect the RCA cable according
to the following instructions to the rear terminal of the turnta-
ble. Left channel - left (white) connector in the terminal. Right
channel - right (red) connector in the terminal.
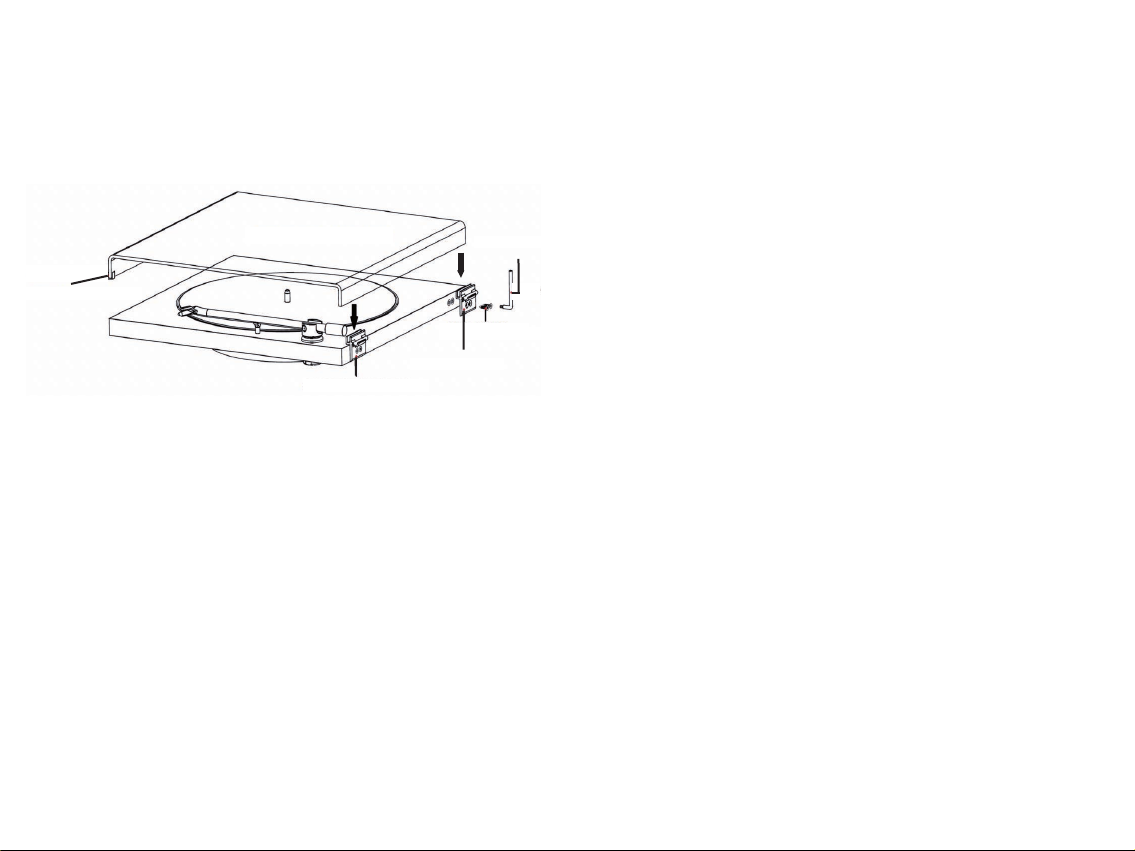
6. Dustcover Installation
The following steps will show you how to easily install the
dustcover on your Tone turntable. To mount the cover, it is
necessary to prepare the following parts, which can be found
in the hinge box.
• Set of hinges (2pcs)
• Set of screws (4pcs, 2 for each hinge)
• Tightening tool
• Dustcover
• Damping pads
• Use the rocker switch to select the playback speed. The
left position is for 33 rpm. The right position is for 45 rpm.
The middle position of the switch stops the motor.
4. Bluetooth Connection
Use the rocker switch located in the left front corner of the
turntable to turn on the Bluetooth output. The LED will start
ashing and the turntable will try to connect to the nearest
device automatically. The LED indicator ashes with a two-se-
cond pause as it tries to connect to the device. Once connec-
ted, it ashes once every 10 seconds.
Bluetooth OFF Bluetooth ON
LED Indicator
Bluetooth Speed Change
Left Channel Right Channel

TONE Factory | Manual EN
1. Remove the cover from the package and remove the pro-
tective foil from both sides.
2. Screw in both hinges to the back of the turntable.
3. Insert the damping pads on the front edge of the cover.
4. Carefully slide the cover into the hinges.
7. Technical Data
Turntable Specs
Nominal speeds: 33/45 r.p.m. (electronic change)
Speed variance: 33: ±0.75 % 45: ±0.65 %
Wow and utter: 33: ±0.22 % 45: ±0.17 %
Signal to noise: -68dB
Eective tonearm mass: 6g
Eective tonearm length: 8.6“ (218.5mm)
Tracking force: 17.5mN pre-adjusted
Overhang: 18mm
Power consumption: 3W/ 0.3W standby mode
Output: RCA Line, Bluetooth
Outboard power supply: 15V/0.8 A DC, 110 – 240V/50 –
60Hz, universal power supply
Dimensions (W x D x H): 360 x 360 x 54mm,
with dustcover 360 x 360 x 85mm
Weight: 2.8 kg / 3.5kg with dustcover
Bluetooth
Maximum transmit power per operated frequency band:
Class II, 2.5mW (4dBm) per 2.4GHz – 2.48 GHz
Technical specications built in MM phono pre-amplier
Gain: 37dB
Output voltage typically: 300mV/1kHz at 4mV/1kHz input
Input impedance: 47kohms/100pF
Noise oor: >68dB
RIAA-equalisation curve accuracy: 20Hz-20kHz / max. 0,5dB
Power consumption: 2W
8. Potential incorrect use & fault conditions
Tone turntables are manufactured to the highest standards
and undergo strict quality controls before leaving the facto-
ry. Faults that may possibly occur are not necessarily due to
material or production faults but can sometimes be caused
by incorrect use or unfortunate circumstances. Therefore the
following list of common fault symptoms is included.
The platter doesn‘t turn although the unit is switched on:
• The unit is not connected to the mains power supply.
• No mains at the socket.
• Drive belt is not tted or has slipped o.
No signal through one or other channel or both channels:
• Bluetooth speaker / Headphones not switched on / out of
battery.
• Amplier not switched on.
• Amplier or speakers defective or muted.
• No connection to the loudspeakers.
Distorted/inconsistent sound from one or both channels:
• Record player is connected to wrong input of amplier, or
MM/MC switch incorrectly set.
Hinge
Damping-Pad
Hinge
Screw
Tool

TONE Factory | Manual EN
• Needle or cantilever damaged.
• Wrong r.p.m., drive belt overstretched or dirty, platter
bearing without oil, dirty or damaged.
9. Service
Should you encounter a problem which you are not able to
alleviate or identify despite the above information, please go
to www. tone-factory.com/service and ll in the contact form.
We will contact you with further instructions.
In case the problem connot be resolved by our service team,
please send the products in the original packaging including all
inserts. In case of any damage caused by incorrect repacking
we cannot guarantee a service.
Do not send the product to any address other than the
address given by our support team.
10. Returns
We accept returns within 14 days after delivery. Shipping
costs for returns are paid by the customer .
If you want to return your products within the 14 days return
policy please go to www. tone-factory.com/returns and ll in
the contact form. We will contact you with further instructions.
Please send the products in the original packaging including
all inserts. In case of any damage caused by incorrect
repacking we cannot guarantee a full refund.
Do not send the product to any address other than the
address given by our support team.
11. Warranty
The manufacturer accepts no responsibility for damage
caused by not adhering to these instructions for use and/or by
transportation without the original packaging. Modication or
change to any part of the product by unauthorized persons,
release the manufacturer from any liability over and above the
lawful rights of the customer.
12. Copyright
TONE Factory is a Registered Trademark of H. Lichtenegger.
This guide was produced by: TONE FactoryCopyright © 2020.
All rights reserved. The information was correct at the time of
going to press. The manufacturer reserves the right to make
changes to the technical specication without prior notice as
deemed necessary to uphold the ongoing process of
technical development.
TONE Factory | Manual DE
Steuerung, Funktionen und Verbindung
(1) Tonarm
(2) Plattenteller mit Filzmatte
(3) Chassis
(4) Bluetooth Switch
(5) Bluetooth LED
(6) Geschwindigkeitsumschaltung
(7) Base
(8) Vorbohrung Staubschutzhaube
(9) RCA Ausgang
(10) Netzteilbuchse
(11) Antriebsriemen
(12) Motor
(13) Sub-Teller
DE

TONE Factory | Manual DE
3. Inbetriebnahme des Motors
• Entferne den Plattenteller und das Karton-Inlay.
Das Karton-Inlay schützt das Plattentellerlager vor
Transportschäden.
• Der Antriebsriemen bendet sich bereits auf dem Subtel-
ler. Ziehe den Antriebsriemen vorsichtig über den Motor,
nachdem das Karton-Inlay entfernt wurde. Setze den Plat-
tenteller mit der Filzmatte danach wieder auf die Achse.
Antriebsriemen über den Motor ziehen
Karton-Inlay
1. Platzierung des Plattenspielers
Der Plattenspieler sollte immer auf einer geraden (achen)
Oberäche positioniert werden. Das ist wichtig, damit der Ton-
arm korrekt funktioniert. Am besten du überprüfst die Fläche
mit einer Wasserwaage.
2. Verbindung des Netzteils
Verbinde das Steckernetzteil des Geräts nur dann mit einer
Steckdose, wenn du sichergestellt hast, dass Ihre Netzspan-
nung, der auf dem Steckernetzteil angegebenen Spannung
entspricht.
ACHTUNG:
Schließe das Netzteil zuerst an den Plattenspieler an bevor du
es mit der Steckdose verbindest. Andernfalls kann die Elektro-
nik des Plattenspielers beschädigt werden.
Netzteilbuchse
TONE Factory | Manual DE
5. Kabel Verbindung
Um den Plattenspieler mit einem Verstärker zu verbinden,
verwende das TONE-RCA Kabel. Verbinde das RCA Kabel mit
einem freien LINE Eingang des Verstärkers. Linker Kanal - lin-
ker (weißer) Stecker. Rechter Kanal - rechter (roter) Stecker.
6. Staubschutzhaube
Folgende Schritte beschreiben wie das Dustcover - die
Staubschutzhaube zu installieren ist. Neben dem Dustcover
selbst, brauchst du dazu einige Einzelteile, die in einer kleinen
Schachtel unter dem Dustcover zu nden sind:
• Scharniere (2 Stück)
• Schrauben (4 Stück, 2 pro Scharnier)
• Schraubenschlüssel
• Schutz-Pads (2 Stück)
Linker Kanal Rechter Kanal
• Mit dem rechten Schalter auf der Unterseite des Platten-
spielers kannst du die Abspielgeschwindigkeit umstellen.
Die Linke Position ist für 33 RPM. Die rechte Position für
45 RPM. Die mittlere Position stoppt den Motor.
4. Bluetooth Verbindung
Verwende den linken Schalter auf der Unterseite des Platten-
spielers, um die Bluetooth Verbindung zu aktivieren.
Das LED-Licht auf der Front leuchtet auf. Der Plattenspieler
verbindet sich automatisch mit dem nähesten Empfänger.
Das LED-Licht leuchtet während des Verbindungsprozess mit
einer zwei sekündigen Pause auf. Wenn der Plattenspieler ver-
bunden ist, leuchtet das LED-Licht alle 10 Sekunden auf.
Bluetooth Geschwindigkeits-
umschaltung
Bluetooth OFF Bluetooth ON
LED-Licht
TONE Factory | Manual DE
Bluetooth
Class II, 2.5mW (4dBm) per 2.4GHz – 2.48 GHz
Technische Daten des eingebauten
MM Phono-Vorverstärkers
Verstärkungsfaktor: 37dB
Ausgangsspannung: 300mV/1kHz bei 4mV/1kHz Eingang
Abschlusswiderstand/-kapazität: 47kOhm/100pF
Geräuschspannungsabstand: >68dB
Genauigkeit der RIAA Entzerrungskurve:20Hz-20kHz/max. 0,5dB
Leistungsaufnahme: 2W
8. Mögliche Bedienfehler und Störungen
Plattenspieler von TONE Factory werden mit größter Sorgfalt
gefertigt und unterliegen ständigen Kontrollen. Störungen,
die bei allen technischen Geräten nie ganz auszuschließen
sind, liegen nicht immer an Material- oder Fertigungsfehlern.
Sie können auch durch Bedienfehler oder andere ungünstige
Umstände auftreten. Nachstehend führen wir die häugsten
Fehlersymptome auf:
Der Plattenteller dreht sich nicht, wenn das Gerät einge-
schaltet wird:
• Das Gerät ist nicht an das Stromnetz angeschlossen oder
die Steckdose führt keine Netzspannung.
• Der Antriebsriemen ist nicht richtig aufgelegt oder ab-
gefallen.
Kein Signal auf einem oder beiden Kanälen:
• Der Bluetooth Speaker ist nicht eingeschaltet, oder hat
keinen Akku mehr.
• Der Verstärker ist nicht eingeschaltet.
• Verstärker oder Lautsprecher sind defekt oder stumm
geschaltet.
• Keine Verbindung mit den Lautsprechern.
1. Nimm das Dustcover aus der Verpackung und entferne
die Schutzfolie (beidseitig).
2. Schraube beide Scharniere an die Rückseite des Platten-
spielers. Die Löcher sind bereits vorgebohrt.
3. Befestige die Schutz-Pads an der vorderen Kante der
Staubschutzhaube.
4. Schiebe das Dustcover vorsichtig in die Scharniere.
7. Technische Daten
Plattenspieler Daten
Geschwindigkeiten: 33/45 U/min (Elektronischer Wechsel)
Drehzahlabweichung: 33: ±0.75 % 45: ±0.65 %
Drehzahlschwankungen: 33: ±0.22 % 45: ±0.17 %
Rumpeln: -68dB
E. Masse des Tonarmes: 6g
E. Länge des Tonarmes: 8.6“ (218.5mm)
Auagekraft: 17.5mN voreingestellt
Überhang: 18mm
Leistungsaufnahme: 3W/ 0.3W Stand-by
Ausgang: RCA Line, Bluetooth
Betriebsspannung externes Netzteil:
15V/0.8 A DC, 110 – 240V/50 – 60Hz, Universalnetzteil
Abmessungen (W x D x H): 360 x 360 x 54mm
Abmessungen mit Staubschutzhaube: 360 x 360 x 85mm
Gewicht: 2.8 kg (3.5kg mit Staubschutzhaube)
Scharnier
Schutz-Pad
Scharnier
Schrauben
Schlüssel

TONE Factory | Manual DE
Bitte senden Sie die Produkte in der Originalverpackung
inklusive aller Inhalte. Falls die Produkte durch eine fehlerhafte
Verpackung Schaden nehmen, können wir keine volle Rück-
erstattung garantieren.
Schicken Sie ihre Produkte ausschließlich an jene Adresse, die
Sie von unserem Service/Support Team erhalten.
11. Warranty
Bei Nichteinhaltung der oben angeführten Bedienungs-
anleitungen und Transporthinweisen kann der Hersteller nicht
für Schäden am Produkt oder der Verpackung verantwortlich
gemacht werden. Anpassungen oder Änderungen am Produkt
oder Einzelteilen des Produkts durch eine unbefugte Person
entlässt den Hersteller von seiner Picht der oben ausgeführ-
ten Rechte gegenüber dem Konsumenten.
12. Copyright
TONE Factory © 2020, alle Rechte vorbehalten.
TONE Factory ist eine eingetragene Handelsmarke von H.
Lichtenegger. Die veröentlichten Informationen entsprechen
dem Stand der Entwicklung zum Zeitpunkt der Drucklegung.
Technische Änderungen bleiben vorbehalten und ießen ohne
weitere Nachricht in die Produktion ein.
Verzerrter/Leiser Klang auf beiden Kanälen:
• Der Plattenspieler ist auf dem falschen Eingang ange-
schlossen, oder MM/MC ist falsch am Verstärker einge-
stellt.
• Nadel oder Cantilever sind beschädigt.
• Falsche Abspielgeschwindigkeit.
• Der Antriebsriehmen ist verschmutzt oder verdreckt.
• Die Achse ist verschmutzt oder beschädigt.
9. Service
Falls trotz der oben angeführten Informationen und
Anleitungen technische Probleme auftreten, besuchen Sie
bitte folgende Seite: www. tone-factory.com/service. Füllen
Sie das Kontaktformular aus und befolgen Sie die weiteren
Instruktionen unseres Service Teams.
Wenn die Probleme mit Hilfe unseres Service Teams nicht
gelöst werden können senden Sie die Produkte bitte in der
Originalverpackung inklusive aller Inhalte zurück an uns. Falls
die Produkte durch eine fehlerhafte Verpackung Schaden
nehmen, können wir kein Service garantieren.
Schicken Sie ihre Produkte ausschließlich an jene Adresse, die
Sie von unserem Service/Support Team erhalten.
10. Returns
Produkte können14 Tage nach Erhalt der Ware ohne Angabe
von Gründen zurückgegeben werden. Die Versandkosten
müssen vom Kunden getragen werden.
Wenn Sie Ihre Produkte innerhalb der Rückgaberichtlinien
retournieren wollen, besuchen Sie bitte folgende Seite:
www. tone-factory.com/returns.
Füllen Sie das Kontaktformular aus und befolgen Sie die
weiteren Instruktionen unseres Service Teams.


Ask Us
Technical questions: support@tone-factory.com
General questions: info@tone-factory.com
Orders and payment: orders@tone-factory.com
More info
Subscribe to our newsletter
tone-factory.com/newsletter
TONE Factory
a Division of Audio Tuning Vertriebs GmbH
Billing address:
Margaretenstrasse 98
A-1050 Wien
AUSTRIA
Headquarter & Logistics:
Wirtschaftspark A5 Mistelbach/Wilfersdorf
Analogweg 1, 2130 Mistelbach
AUSTRIA
Table of contents
Languages:


