Trace Acoustic TA400 User manual

Untitled-1 1 17/02/2009 11:46:52

ENGLISH................................................... 14
ESPAÑOL.................................................. 32
FRANÇAIS ................................................ 50
DEUTSCH.................................................. 70
ITALIANO .................................................. 89
PORTUGUÊS ......................................... 108
日本語.................................................... 126

Atto ad avvisare l’utente in merito alla presenza “voltaggio pericoloso” non isolato all’interno della scatola del
prodotto che potrebbe avere una magnitudo sufciente a costituire un rischio di scossa elettrica per le persone.
Atto ad avvisare l’utente in merito alla presenza di istruzioni operative e di assistenza importanti (manutenzione)
nel libretto che accompagna il prodotto.
ATTENZIONE: Rischio di scossa elettrica — NON APRIRE!
ATTENZIONE: per ridurre il rischio di scossa elettrica, non rimuovere il coperchio. Non vi sono parti utili all’utente
all’interno. Fare riferimento a personale addetto qualicato.
AVVERTENZA: per prevenire il rischio di scossa o il rischio di incendio, questo apparecchio non dovrebbe essere
esposto a pioggia o umidità, e oggetti riempiti con liquidi, come vasi, non dovrebbero essere posizionati sopra
questo apparecchio. Prima di usare questo apparecchio, leggere la guida operativa per ulteriori informazioni.
Intended to alert the user to the presence of uninsulated “dangerous voltage” within the product’s
enclosure that may be of sufficient magnitude to constitute a risk of electric shock to persons.
Intended to alert the user of the presence of important operating and maintenance (servicing)
instructions in the literature accompanying the product.
CAUTION: Risk of electrical shock — DO NOT OPEN!
CAUTION: To reduce the risk of electric shock, do not remove cover. No user serviceable parts inside.
Refer servicing to qualified service personnel.
WARNING: To prevent electrical shock or fire hazard, this apparatus should not be exposed to rain or
moisture‚ and objects filled with liquids‚ such as vases‚ should not be placed on this apparatus. Before
using this apparatus‚ read the operating guide for further warnings.
Este símbolo tiene el propósito, de alertar al usuario de la presencia de “(voltaje) peligroso” sin
aislamiento dentro de la caja del producto y que puede tener una magnitud suficiente como para
constituir riesgo de descarga eléctrica.
Este símbolo tiene el propósito de alertar al usario de la presencia de instruccones importantes sobre la
operación y mantenimiento en la información que viene con el producto.
PRECAUCION: Riesgo de descarga eléctrica ¡NO ABRIR!
PRECAUCION: Para disminuír el riesgo de descarga eléctrica, no abra la cubierta. No hay piezas útiles
dentro. Deje todo mantenimiento en manos del personal técnico cualificado.
ADVERTENCIA: Para prevenir choque electrico o riesgo de incendios, este aparato no se debe exponer a
la lluvia o a la humedad. Los objetos llenos de liquidos, como los floreros, no se deben colocar encima
de este aparato. Antes de usar este aparato, lea la guia de funcionamiento para otras advertencias.
Ce symbole est utilisé dans ce manuel pour indiquer à l’utilisateur la présence d’une tension dangereuse
pouvant être d’amplitude suffisante pour constituer un risque de choc électrique.
Ce symbole est utilisé dans ce manuel pour indiquer à l’utilisateur qu’il ou qu’elle trouvera d’importantes
instructions concernant l’utilisation et l’entretien de l’appareil dans le paragraphe signalé.
ATTENTION: Risques de choc électrique — NE PAS OUVRIR!
ATTENTION: Afin de réduire le risque de choc électrique, ne pas enlever le couvercle. Il ne se trouve
à l’intérieur aucune pièce pouvant être reparée par l’utilisateur. Confiez I’entretien et la réparation de
l’appareil à un réparateur Peavey agréé.
AVIS: Dans le but de reduire les risques d’incendie ou de decharge electrique, cet appareil ne doit
pas etre expose a la pluie ou a l’humidite et aucun objet rempli de liquide, tel qu’un vase, ne doit
etre pose sur celui-ci. Avant d’utiliser de cet appareil, lisez attentivement le guide fonctionnant pour
avertissements supplémentaires.
Dieses Symbol soll den Anwender vor unisolierten gefährlichen Spannungen innerhalb des Gehäuses
warnen, die von Ausreichender Stärke sind, um einen elektrischen Schlag verursachen zu können.
Dieses Symbol soll den Benutzer auf wichtige Instruktionen in der Bedienungsanleitung aufmerksam
machen, die Handhabung und Wartung des Produkts betreffen.
VORSICHT: Risiko — Elektrischer Schlag! Nicht öffnen!
VORSICHT: Um das Risiko eines elektrischen Schlages zu vermeiden, nicht die Abdeckung enfernen.
Es befinden sich keine Teile darin, die vom Anwender repariert werden könnten. Reparaturen nur von
qualifiziertem Fachpersonal durchführen lassen.
WARNUNG: Um elektrischen Schlag oder Brandgefahr zu verhindern, sollte dieser Apparat nicht
Regen oder Feuchtigkeit ausgesetzt werden und Gegenstände mit Flüssigkeiten gefuellt, wie Vasen,
nicht auf diesen Apparat gesetzt werden. Bevor dieser Apparat verwendet wird, lesen Sie bitte den
Funktionsführer für weitere Warnungen.
ENGLISH ESPAÑOL FRANÇAIS DEUTSCH ITALIANO
Destinado a alertar o usuário da presença de “voltagem perigosa” não isolada dentro do receptáculo do produto
que pode ser de magnitude suciente para constituir um risco de choque elétrico a pessoas.
Destinado a alertar o usuário da presença de instruções importantes de operação e manutenção (conserto) na
literatura que acompanha o produto.
CUIDADO: Risco de choque elétrico — NÃO ABRA!
CUIDADO: Para evitar o risco de choque elétrico, não remova a cobertura. Contém peças não reparáveis pelo
usuário. Entregue todos os consertos apenas a pessoal qualicado.
ADVERTÊNCIA: Para evitar choques elétricos ou perigo de incêndio, este aparelho não deve ser exposto à chuva
ou umidade e objetos cheios de líquidos, tais como vasos, não devem ser colocados sobre ele. Antes de usar
este aparelho, leia o guia de operação para mais advertências.
三角形内带有箭头闪电状符号意在敬告用户,表明产品内部有非绝缘的“危险电压”存在,而且具有足
以致人触电的危险。
三角形内的感叹号意在警告用户,表明与机器的操作和维护(维修)有关的重要说明。
警告 :触电危险—勿打开!
警告 :为了避免触电危险,请勿打开机壳。机内无用户可以维修的部件。需要维修时,请与指定的专业
维修人员联系。
警告 :为了避免触电或火灾危险,请勿将本机置于雨中或潮湿之处。请勿将装满液体的物体,例如花瓶
等置于本机之上。使用本机之前,请仔细阅读本操作说明书中的安全说明。
Tarkoitettu kiinnittämään käyttäjän huomio sellaiseen eristämättömään vaaralliseen jännitteeseen tuotteen
kotelossa, joka saattaa olla riittävän suuri aiheuttaakseen sähköiskuvaaran.
Tarkoitettu kiinnittämään käyttäjän huomio tärkeisiin käyttö- ja huolto-ohjeisiin tuotteen mukana seuraavassa
ohjeistuksessa.
VAROITUS: Sähköiskun vaara — ÄLÄ AVAA!
VAROITUS: Sähköiskuvaaran vuoksi älä poista kantta. Ei sisällä käyttäjän huollettavissa olevia osia.
Huoltaminen tulee jättää pätevän huoltohenkilöstön tehtäväksi.
VAARA: Sähköiskun tai tulipalon vaaran estämiseksi tätä laitetta ei saa altistaa sateelle tai kosteudelle, eikä sen
päälle saa asettaa nesteellä täytettyjä esineitä, kuten maljakoita. Ennen laitteen käyttöä lue muut varoitukset
käyttöohjeesta.
Är avsedd att varna användaren för förekomsten av oisolerad ”farlig spänning” inom produktens hölje som kan
vara av tillräcklig nivå för att personer ska riskera elektrisk stöt.
Är avsedd att uppmärksamma användaren på förekomsten av viktiga handhavande- och underhållsinstruktioner
(service) i den litteratur som medföljer produkten.
OBSERVERA: Risk för elektrisk stöt – ÖPPNA INTE!
OBSERVERA: För att minska risken för elektrisk stöt, avlägsna inte höljet. Inga delar inuti kan underhållas av
användaren. Låt kvalicerad servicepersonal sköta servicen.
VARNING: För att förebygga elektrisk stöt eller brandrisk bör apparaten inte utsättas för regn eller fukt,
och föremål fyllda med vätskor, såsom vaser, bör inte placeras på denna apparat. Läs bruksanvisningen för
ytterligare varningar innan denna apparat används.
ENGLISH.............................................................................................................................................. 14
ESPAÑOL............................................................................................................................................. 32
FRANÇAIS............................................................................................................................................ 50
DEUTSCH............................................................................................................................................. 70
ITALIANO ............................................................................................................................................. 89
PORTUGUÊS .....................................................................................................................................108
日本語................................................................................................................................................126
PORTUGUÊS 日本語 FINNISH SWEDISH

IMPORTANT SAFETY INSTRUCTIONS
WARNING: When using electrical products, basic cautions should always be followed, including the following:
1. Read these instructions.
2. Keep these instructions.
3. Heed all warnings.
4. Follow all instructions.
5. Do not use this apparatus near water.
6. Clean only with a dry cloth.
7. Do not block any of the ventilation openings. Install in accordance with manufacturer’s instructions.
8. Do not install near any heat sources such as radiators, heat registers, stoves or other apparatus (including amplifiers) that
produce heat.
9. Do not defeat the safety purpose of the polarized or grounding-type plug. A polarized plug has two blades with one wider than
the other. A grounding type plug has two blades and a third grounding plug. The wide blade or third prong is provided for your
safety. If the provided plug does not fit into your outlet, consult an electrician for replacement of the obsolete outlet.
10. Protect the power cord from being walked on or pinched, particularly at plugs, convenience receptacles, and the point they exit
from the apparatus.
11. Only use attachments/accessories provided by the manufacturer.
12. Use only with a cart, stand, tripod, bracket, or table specified by the manufacturer, or sold with the apparatus. When a cart is
used, use caution when moving the cart/apparatus combination to avoid injury from tip-over.
13. Unplug this apparatus during lightning storms or when unused for long periods of time.
14. Refer all servicing to qualified service personnel. Servicing is required when the apparatus has been damaged in any way, such
as power-supply cord or plug is damaged, liquid has been spilled or objects have fallen into the apparatus, the apparatus has
been exposed to rain or moisture, does not operate normally, or has been dropped.
15. Never break off the ground pin. Write for our free booklet “Shock Hazard and Grounding.” Connect only to a power supply of the
type marked on the unit adjacent to the power supply cord.
16. If this product is to be mounted in an equipment rack, rear support should be provided.
17. Note for UK only: If the colors of the wires in the mains lead of this unit do not correspond with the terminals in your plug‚
proceed as follows:
a) The wire that is colored green and yellow must be connected to the terminal that is marked by the letter E‚ the earth symbol‚
colored green or colored green and yellow.
b) The wire that is colored blue must be connected to the terminal that is marked with the letter N or the color black.
c) The wire that is colored brown must be connected to the terminal that is marked with the letter L or the color red.
18. This electrical apparatus should not be exposed to dripping or splashing and care should be taken not to place objects
containing liquids, such as vases, upon the apparatus.
19. The on/off switch in this unit does not break both sides of the primary mains. Hazardous energy can be present inside the
chassis when the on/off switch is in the off position. The mains plug or appliance coupler is used as the disconnect device, the
disconnect device shall remain readily operable.
20. Exposure to extremely high noise levels may cause a permanent hearing loss. Individuals vary considerably in susceptibility to
noise-induced hearing loss, but nearly everyone will lose some hearing if exposed to sufficiently intense noise for a sufficient
time. The U.S. Government’s Occupational Safety and Health Administration (OSHA) has specified the following permissible
noise level exposures:
Duration Per Day In Hours Sound Level dBA, Slow Response
8 90
6 92
4 95
3 97
2 100
1 1⁄2 102
1 105
1⁄2 110
1⁄4 or less 115
According to OSHA, any exposure in excess of the above permissible limits could result in some hearing loss. Ear plugs or protectors to
the ear canals or over the ears must be worn when operating this amplification system in order to prevent a permanent hearing loss, if
exposure is in excess of the limits as set forth above. To ensure against potentially dangerous exposure to high sound pressure levels, it is
recommended that all persons exposed to equipment capable of producing high sound pressure levels such as this amplification system be
protected by hearing protectors while this unit is in operation.
SAVE THESE INSTRUCTIONS!
ENGLISH

INSTRUCCIONES IMPORTANTES PARA SU SEGURIDAD
CUIDADO: Cuando use productos electrónicos, debe tomar precauciones básicas, incluyendo las siguientes:
1. Lea estas instrucciones.
2. Guarde estas instrucciones.
3. Haga caso de todos los consejos.
4. Siga todas las instrucciones.
5. No usar este aparato cerca del agua.
6. Limpiar solamente con una tela seca.
7. No bloquear ninguna de las salidas de ventilación. Instalar de acuerdo a las instrucciones del fabricante.
8. No instalar cerca de ninguna fuente de calor como radiadores, estufas, hornos u otros aparatos (incluyendo amplificadores) que
produzcan calor.
9. No retire la patilla protectora del enchufe polarizado o de tipo “a Tierra”. Un enchufe polarizado tiene dos puntas, una de ellas
más ancha que la otra. Un enchufe de tipo “a Tierra” tiene dos puntas y una tercera “a Tierra”. La punta ancha (la tercera ) se
proporciona para su seguridad. Si el enchufe proporcionado no encaja en su enchufe de red, consulte a un electricista para que
reemplaze su enchufe obsoleto.
10. Proteja el cable de alimentación para que no sea pisado o pinchado, particularmente en los enchufes, huecos, y los puntos que
salen del aparato.
11. Usar solamente añadidos/accesorios proporcionados por el fabricante.
12. Usar solamente un carro, pie, trípode, o soporte especificado por el fabricante, o vendido junto al aparato. Cuando se use un
carro, tenga cuidado al mover el conjunto carro/aparato para evitar que se dañe en un vuelco. No suspenda esta caja de ninguna
manera.
13. Desenchufe este aparato durante tormentas o cuando no sea usado durante largos periodos de tiempo.
14. Para cualquier reparación, acuda a personal de servicio cualificado. Se requieren reparaciones cuando el aparato ha sido dañado
de alguna manera, como cuando el cable de alimentación o el enchufe se han dañado, algún líquido ha sido derramado o algún
objeto ha caído dentro del aparato, el aparato ha sido expuesto a la lluvia o la humedad, no funciona de manera normal, o ha
sufrido una caída.
15. Nunca retire la patilla de Tierra.Escríbanos para obtener nuestro folleto gratuito “Shock Hazard and Grounding” (“Peligro de
Electrocución y Toma a Tierra”). Conecte el aparato sólo a una fuente de alimentación del tipo marcado al lado del cable de
alimentación.
16. Si este producto va a ser enracado con más equipo, use algún tipo de apoyo trasero.
17. Nota para el Reino Unido solamente: Si los colores de los cables en el enchufe principal de esta unidad no corresponden con los
terminales en su enchufe‚ proceda de la siguiente manera:
a) El cable de color verde y azul debe ser conectado al terminal que está marcado con la letra E‚ el símbolo de Tierra (earth)‚
coloreado en verde o en verde y amarillo.
b) El cable coloreado en azul debe ser conectado al terminal que está marcado con la letra N o el color negro.
c) El cable coloreado en marrón debe ser conectado al terminal que está marcado con la letra L o el color rojo.
18. Este aparato eléctrico no debe ser sometido a ningún tipo de goteo o salpicadura y se debe tener cuidado para no poner objetos
que contengan líquidos, como vasos, sobre el aparato.
19. El interruptor de en/lejos en esta unidad no rompe ambos lados de la red primaria. La energía peligrosa puede ser presente
dentro del chasis cuando el interruptor de en/lejos está en el de la posición. El tapón de la red o el acoplador del aparato son
utilizados como el desconecta dispositivo, el desconecta dispositivo se quedará fácilmente operable.
20. La exposición a altos niveles de ruido puede causar una pérdida permanente en la audición. La susceptibilidad a la pérdida de
audición provocada por el ruido varía según la persona, pero casi todo el mundo perderá algo de audición si se expone a un
nivel de ruido suficientemante intenso durante un tiempo determinado. El Departamento para la Salud y para la Seguridad del
Gobierno de los Estados Unidos (OSHA) ha especificado las siguientes exposiciones al ruido permisibles:
Duración por Día en Horas Nivel de Sonido dBA, Respuesta Lenta
8 90
6 92
4 95
3 97
2 100
1 1/2 102
1 105
1/2 110
1/4 o menos 115
De acuerdo al OSHA, cualquier exposición que exceda los límites arriba indicados puede producir algún tipo de pérdida en la audición.
Protectores para los canales auditivos o tapones para los oídos deben ser usados cuando se opere con este sistema de sonido para prevenir
una pérdida permanente en la audición, si la exposición excede los límites indicados más arriba. Para protegerse de una exposición a altos
niveles de sonido potencialmente peligrosa, se recomienda que todas las personas expuestas a equipamiento capaz de producir altos nive-
les de presión sonora, tales como este sistema de amplificación, se encuentren protegidas por protectores auditivos mientras esta unidad
esté operando.
GUARDE ESTAS INSTRUCCIONES!
ESPAÑOL

INSTRUCTIONS IMPORTANTES DE SECURITE
ATTENTION: L’utilisation de tout appareil électrique doit être soumise aux precautions d’usage incluant:
1. Lire ces instructions.
2. Gardez ce manuel pour de futures références.
3. Prétez attention aux messages de précautions de ce manuel.
4. Suivez ces instructions.
5. N’utilisez pas cette unité proche de plans d’eau.
6. N’utilisez qu’un tissu sec pour le nettoyage de votre unité.
7. N’obstruez pas les systèmes de refroidissement de votre unité et installez votre unité en fonction des instructions de ce manuel.
8. Ne positionnez pas votre unité à proximité de toute source de chaleur.
9. Connectez toujours votre unité sur une alimentation munie de prise de terre utilisant le cordon d’alimentation fourni.
10. Protégez les connecteurs de votre unité et positionnez les cablages pour éviter toutes déconnexions accidentelles.
11. N’utilisez que des fixations approuvées par le fabriquant.
12. Lors de l’utilsation sur pied ou pole de support, assurez dans le cas de déplacement de l’ensemble enceinte/support de prévenir
tout basculement intempestif de celui-ci.
13. Il est conseillé de déconnecter du secteur votre unité en cas d’orage ou de durée prolongée sans utilisation.
14. Seul un technicien agréé par le fabriquant est à même de réparer/contrôler votre unité. Celle-ci doit être contrôlée si elle a subit
des dommages de manipulation, d’utilisation ou de stockage (humidité,…).
15. Ne déconnectez jamais la prise de terre de votre unité.
16. Si votre unité est destinée a etre montée en rack, des supports arriere doivent etre utilises.
17. Note pour les Royaumes-Unis: Si les couleurs de connecteurs du cable d’alimentation ne correspond pas au guide de la prise
secteur, procédez comme suit:
a) Le connecteur vert et jaune doit être connectrer au terminal noté E, indiquant la prise de terre ou correspondant aux couleurs
verte ou verte et jaune du guide.
b) Le connecteur Bleu doit être connectrer au terminal noté N, correspondnat à la couleur noire du guide.
c) Le connecteur marron doit être connectrer au terminal noté L, correspondant à la couleur rouge du guide.
18. Cet équipement électrique ne doit en aucun cas être en contact avec un quelconque liquide et aucun objet contenant un liquide,
vase ou autre ne devrait être posé sur celui-ci.
19. L'interrupter (on-off) dans cette unité ne casse pas les deux côtés du primaire principal. L'énergie hasardeuse peut être
preésente dans châssis quand l'interrupter (on-off) est dans le de la position. Le bouchon principal ou atelage d'appareil est
utilisé comme le débrancher l'appareil restera facilement opérable.
20. Une exposition à de hauts niveaux sonores peut conduire à des dommages de l’écoute irréversibles. La susceptibilité au bruit
varie considérablement d’un individu à l’autre, mais une large majorité de la population expériencera une perte de l’écoute après
une exposition à une forte puissance sonore pour une durée prolongée. L’organisme de la santé américaine (OSHA) a produit le
guide ci-dessous en rapport à la perte occasionnée:
Durée par Jour (heures) Niveau sonore moyen (dBA)
8 90
6 92
4 95
3 97
2 100
1 1⁄2 102
1 105
1⁄2 110
1⁄4 ou inférieur 115
D’après les études menées par le OSHA, toute exposition au delà des limites décrites ce-dessus entrainera des pertes de l’écoute chez la
plupart des sujets. Le port de système de protection (casque, oreilette de filtrage,…) doit être observé lors de l’opération cette unité ou des
dommages irréversibles peuvent être occasionnés. Le port de ces systèmes doit être observé par toutes personnes susceptibles d’être expo-
sées à des conditions au delà des limites décrites ci-dessus.
GARDEZ CES INSTRUCTIONS!
FRANÇAIS

WICHTIGE SICHERHEITSHINWEISE
ACHTUNG: Beim Einsatz von Elektrogeräten müssen u.a. grundlegende Vorsichtsmaßnahmen befolgt werden:
1. Lesen Sie sich diese Anweisungen durch.
2. Bewahren Sie diese Anweisungen auf.
3. Beachten Sie alle Warnungen.
4. Befolgen Sie alle Anweisungen.
5. Setzen Sie dieses Gerät nicht in der Nähe von Wasser ein.
6. Reinigen Sie es nur mit einem trockenen Tuch.
7. Blockieren Sie keine der Lüftungsöffnungen. Führen Sie die Installation gemäß den Anweisungen des Herstellers durch.
8. Installieren Sie das Gerät nicht neben Wärmequellen wie Heizungen, Heizgeräten, Öfen oder anderen Geräten (auch Verstärkern),
die Wärme erzeugen.
9. Beeinträchtigen Sie nicht die Sicherheitswirkung des gepolten Steckers bzw. des Erdungssteckers. Ein gepolter Stecker weist
zwei Stifte auf, von denen einer breiter ist als der andere. Ein Erdungsstecker weist zwei Stifte und einen dritten Erdungsstift auf.
Der breite Stift bzw. der dritte Stift dient Ihrer Sicherheit. Sollte der beiliegende Stecker nicht in Ihre Steckdose passen, wenden
Sie sich bitte an einen Elektriker, um die ungeeignete Steckdose austauschen zu lassen.
10. Schützen Sie das Netzkabel, sodass niemand darauf tritt oder es geknickt wird, insbesondere an Steckern oder Buchsen und
ihren Austrittsstellen aus dem Gerät.
11. Verwenden Sie nur die vom Hersteller erhältlichen Zubehörgeräte oder Zubehörteile.
12. Verwenden Sie nur einen Wagen, Stativ, Dreifuß, Träger oder Tisch, der den Angaben des Herstellers entspricht oder zusammen
mit dem Gerät verkauft wurde. Wird ein Wagen verwendet, bewegen Sie den Wagen mit dem darauf befindlichen Gerät besonders
vorsichtig, damit er nicht umkippt und möglicherweise jemand verletzt wird.
13. Trennen Sie das Gerät während eines Gewitters oder während längerer Zeiträume, in denen es nicht benutzt wird, von der
Stromversorgung.
14. Lassen Sie sämtliche Wartungsarbeiten von qualifizierten Kundendiensttechnikern durchführen. Eine Wartung ist erforderlich,
wenn das Gerät in irgendeiner Art beschädigt wurde, etwa wenn das Netzkabel oder der Netzstecker beschädigt wurden,
Flüssigkeit oder Gegenstände in das Gerät gelangt sind, das Gerät Regen oder Feuchtigkeit ausgesetzt wurde, nicht normal
arbeitet oder heruntergefallen ist.
15. Der Erdungsstift darf nie entfernt werden. Auf Wunsch senden wir Ihnen gerne unsere kostenlose Broschüre „Shock Hazard and
Grounding“ (Gefahr durch elektrischen Schlag und Erdung) zu. Schließen Sie nur an die Stromversorgung der Art an, die am
Gerät neben dem Netzkabel angegeben ist.
16. Wenn dieses Produkt in ein Geräte-Rack eingebaut werden soll, muss eine Versorgung über die Rückseite eingerichtet werden.
17. Hinweis – Nur für Großbritannien: Sollte die Farbe der Drähte in der Netzleitung dieses Geräts nicht mit den Klemmen in Ihrem
Stecker übereinstimmen, gehen Sie folgendermaßen vor:
a) Der grün-gelbe Draht muss an die mit E (Symbol für Erde) markierte bzw. grüne oder grün-gelbe Klemme angeschlossen
werden.
b) Der blaue Draht muss an die mit N markierte bzw. schwarze Klemme angeschlossen werden.
c) Der braune Draht muss an die mit L markierte bzw. rote Klemme angeschlossen werden.
18. Dieses Gerät darf nicht ungeschützt Wassertropfen und Wasserspritzern ausgesetzt werden und es muss darauf geachtet
werden, dass keine mit Flüssigkeiten gefüllte Gegenstände, wie z. B. Blumenvasen, auf dem Gerät abgestellt werden.
19. Der Netzschalter in dieser Einheit bricht beide Seiten von den primären Haupleitungen nicht. Gerfährliche Energie kann
anwesend innerhalb des Chassis sein, wenn her Netzschalter im ab Poistion ist. Die Hauptleitungen stöpseln zu oder
Gerätkupplung ist benutzt, während das Vorrichtung abschaltet, das schaltet Vorrichtung wird bleiben sogleich hantierbar ab.
20. Belastung durch extrem hohe Lärmpegel kann zu dauerhaftem Gehörverlust führen. Die Anfälligkeit für durch Lärm bedingten
Gehörverlust ist von Mensch zu Mensch verschieden, das Gehör wird jedoch bei jedem in gewissem Maße geschädigt, der über
einen bestimmten Zeitraum ausreichend starkem Lärm ausgesetzt ist. Die US-Arbeitsschutzbehörde (Occupational and Health
Administration, OSHA) hat die folgenden zulässigen Pegel für Lärmbelastung festgelegt:
Dauer pro Tag in Stunden Geräuschpegel dBA, langsame Reaktion
8 90
6 92
4 95
3 97
2 100
1 1⁄2 102
1 105
1⁄2 110
1⁄4 oder weniger 115
Laut OSHA kann jede Belastung über den obenstehenden zulässigen Grenzwerten zu einem gewissen Gehörverlust führen. Sollte die Belastung
die obenstehenden Grenzwerte übersteigen, müssen beim Betrieb dieses Verstärkungssystems Ohrenstopfen oder Schutzvorrichtungen
im Gehörgang oder über den Ohren getragen werden, um einen dauerhaften Gehörverlust zu verhindern. Um sich vor einer möglicherweise
gefährlichen Belastung durch hohe Schalldruckpegel zu schützen, wird allen Personen empfohlen, die mit Geräten arbeiten, die wie dieses
Verstärkungssystem hohe Schalldruckpegel erzeugen können, beim Betrieb dieses Geräts einen Gehörschutz zu tragen.
BEWAHREN SIE DIESE SICHERHEITSHINWEISE AUF!
DEUTSCH

ITALIANO
IMPORTANTI NORME DI SICUREZZA:
ATTENZIONE: Durante uso di apparecchiature elettriche vanno osservate alcune precauzioni basilari, tra cui le seguenti:
1. Leggete queste istruzioni.
2. Conservate le istruzioni.
3. Rispettate tutte le avvertenze.
4. Seguite le istruzioni.
5. Non usate questo prodotto vicino all’acqua.
6. Pulite esclusivamente con un panno asciutto.
7. Non ostruite le fessure di ventilazione. Installate il dispositivo seguendo le istruzioni del produttore.
8. Il prodotto va collocato lontano da sorgenti di calore quali radiatori, pompe di calore, stufe o altri dispositivi che generano calore
(compresi gli amplificatori).
9. Non eliminate i dispositivi di sicurezza come spine polarizzate o con messa a terra. La spina polarizzata ha due lame, una
più grande dell’altra. La spina con messa a terra ha due contatti più un terzo per la terra. Il contatto più largo o terzo polo è
indispensabile per la vostra sicurezza. Se la spina fornita non adatta alla vostra presa, mettetevi in contatto con un elettricista
per la sostituzione della presa obsoleta.
10. Fate attenzione a non camminare o incastrare il cavo di alimentazione, soprattutto in prossimità della spina o del punto in cui si
collega all’apparecchiatura.
11. Usate solo accessori originali forniti dal costruttore.
12. L’apparato va usato esclusivamente con il supporto indicato dal produttore o venduto con l’apparato. Se intendete adoperare un
carrello su ruote, fate attenzione quando spostate apparecchio e supporto per evitare che la loro caduta possa causare danni a
cose o persone.
13. Scollegatelo l’apparecchio dalla presa di corrente durante un temporale con fulmini o quando non s’intende usare per un lungo
periodo.
14. L’assistenza va eseguita esclusivamente da personale autorizzato. È necessario ricorrere all’assistenza se il dispositivo ha subito
danni, per esempio si sono rovinati il cavo di alimentazione o la spina, all’interno è caduto del liquido o un oggetto, il dispositivo
è rimasto esposto alla pioggia o all’umidità, non funziona normalmente o è caduto a terra.
15. Non rimuovete lo spinotto della terra. Collegate il dispositivo esclusivamente a una presa di corrente del tipo indicato accanto
alla targhetta posta vicino al cavo di alimentazione.
16. Se questo prodotto deve essere montato a rack, è necessario sostenerlo anche nella parte posteriore.
17. Nota per UK: Se i colori dei fili nel cavo di alimentazione per questa unità non corrispondono con i terminali della vostra spina,
procedere come segue:
a) Il filo di colore verde/giallo deve essere collegato al terminale che marcato con lettera E, o simbolo di terra, o colore verde o
verde/giallo.
b) Il filo di colore blu deve essere collegato al terminale marcato con la lettera N o di colore Nero.
c) Il filo di colore marrone deve essere collegato al terminale marcato con la lettera L o di colore Rosso.
18. Questo apparato elettrico non deve essere esposto a gocce o schizzi, va in ogni caso evitato di appoggiare oggetti contenenti
liquidi, come bicchieri, sull'apparecchio.
19. L'interruttore on/off in questa unità non interrompe entrambi i lati della rete di alimentazione. All'interno dell'apparecchio può
essere presente elettricità anche con interruttore on/off in posizione off. La spina o il cavo di alimentazione è utilizzato come
sezionatore, il dispositivo di sezionamento deve restare sempre operativo.
20. L’esposizione a livelli di volume molto elevati può causare la perdita permanente dell’udito. La predisposizione alla perdita
dell’udito causata da livelli elevati di volume varia notevolmente da persona a persona, ma quasi tutti subiscono una perdita di
udito almeno parziale se soggetti a volume di livello elevato per un tempo sufficientemente lungo. L’ufficio Lavoro e Salute del
governo degli USA (OSHA) ha elaborato la seguente tabella di tolleranza ai rumori:
Esposizione giornaliera in ore Livello sonoro dBA, Slow response
8 90
6 92
4 95
3 97
2 100
1 1⁄2 102
1 110
1⁄4 o minore 115
Secondo l’OSHA, l’esposizione a livelli di volume al di sopra dei limiti stabiliti può causare una perdita almeno parziale dell’udito.
Quando si adopera questo sistema di amplificazione, è necessario indossare auricolari o apposite protezioni per il condotto
auditivo, per evitare la perdita permanente dell’udito se l’esposizione supera i limiti sopra riportati. Per evitare di esporvi al
rischio di danni derivanti da elevati livelli di pressione sonora, si raccomanda di adoperare delle protezioni per gli orecchi quando
si usano attrezzature in grado di produrre elevati livelli sonori, come quest’amplificatore.
CONSERVATE QUESTE ISTRUZIONI!
INSTRUÇÕES IMPORTANTES DE SEGURANÇA
1. Leia estas instruções.
2. Mantenha estas instruções.
3. Preste atenção a todas as advertências.
4. Siga todas as instruções.
5. Não use este aparelho perto d’água.
6. Limpe somente com um pano seco.
7. Não obstrua nenhuma das aberturas de ventilação. Instale de acordo com as instruções do fabricante.
8. Não instale perto de nenhuma fonte de calor tais como radiadores, registros de calor, fogões ou outros aparelhos (incluindo amplicadores)
que produzam calor.
9. Não desae o propósito de segurança do plugue polarizado ou do tipo aterrado. Um plugue polarizado tem duas lâminas com uma mais larga
que a outra. Um plugue do tipo aterrado tem duas lâminas e um terceiro plugue terra. A lâmina larga ou o terceiro pino são fornecidos para sua
segurança. Se o plugue disponibilizado não couber em sua tomada, consulte um eletricista para troca da tomada obsoleta.
10. Proteja o cabo de energia para não ser pisado ou espremido principalmente em plugues, recipientes e o ponto de onde sai do aparelho.
11. Use apenas conexões/acessórios fornecidos pelo fabricante.
12. Use apenas um carrinho, banqueta, tripé, suporte, ou mesa especicado pelo fabricante, ou vendido com o aparelho. Quando um carrinho for
usado, tome cuidado ao mover a combinação carrinho/aparelho para evitar ferimentos por tombamento.
13. Tire esse aparelho da tomada durante tempestades de raios ou quando for car sem usar por longos períodos de tempo.
14. Entregue todos os consertos apenas a pessoal qualicado. O conserto é necessário quando o aparelho tiver sofrido qualquer dano, tais como
o cabo de energia ou plugue estiverem danicados, líquidos tenham sido derramados ou objetos tenham caído no aparelho, o aparelho tenha
sido submetido à chuva ou umidade, não funcionar normalmente, ou tenha sido deixado cair.
15. Nunca quebre fora o pino terra. Escreva pedindo nosso livreto grátis “Perigos de Choque e Aterramento.” Ligue apenas a um suprimento de
energia do tipo marcado na unidade adjacente ao o de fornecimento de energia.
16. Se este produto for ser montado em uma estante para equipamentos, deve ser montado um suporte traseiro.
17. Note for UK only: If the colors of the wires in the mains lead of this unit do not correspond with the terminals in your plug‚ proceed as follows:
a) The wire that is colored green and yellow must be connected to the terminal that is marked by the letter E‚ the earth symbol‚ colored green
or colored green and yellow.
b) The wire that is colored blue must be connected to the terminal that is marked with the letter N or the color black.
c) The wire that is colored brown must be connected to the terminal that is marked with the letter L or the color red.
18. Este aparelho elétrico não deve ser exposto a pingos ou respingos e deve ser tomado cuidado para não colocar objetos contendo líquidos, tais
como vasos, sobre o aparelho.
19. O comutador liga/desliga nesta unidade não interrompe ambos os lados da rede elétrica primária. Energia perigosa pode estar presente dentro
do chassi quando o comutador liga/desliga estiver na posição desligado. O plugue de alimentação ou um dispositivo de união é usado como
dispositivo de desligamento, o dispositivo de desligamento deve permanecer pronto para funcionar.
20. Exposição a níveis de barulho extremamente altos podem causar perda permanente de audição. As pessoas variam consideravelmente em
susceptibilidade a perda de audição causada por ruídos, mas quase todo mundo vai perder algo da audição se exposto a ruído sucientemente
intenso por tempo suficiente. A Administração de Segurança Ocupacional e Saúde americana (OSHA) especificou os seguintes níveis
permissíveis de exposição a ruído:
ADVERTÊNCIA: Ao usar eletrodomésticos, precauções básicas devem sempre ser seguidas, incluindo as seguintes:
De acordo com a OSHA, qualquer exposição excedente aos limites permissíveis acima pode resultar em alguma perda de audição. Tampões de ouvido
ou protetores sobre os canais do ouvido ou sobre as orelhas precisam ser usados ao operar este sistema de amplicação para poder evitar uma perda
permanente de audição, se a exposição for em excesso aos limites acima estabelecidos. Para assegurar contra exposição perigosa potencial a níveis de alta
pressão de ruído, é recomendado que todas as pessoas expostas a equipamento capaz de produzir níveis de alta pressão de ruído tais como este sistema de
amplicação estejam protegidas por protetores de ouvido enquanto esta unidade estiver em funcionamento.
Duração Por Dia Em Horas dBA de Nível de Som, Resposta Lenta
890
692
495
397
2100
1 1⁄2 102
1105
1⁄2 110
1⁄4 ou menos 115
GUARDE ESSAS INSTRUÇÕES!
PORTUGUÊS

重要安全事项
1. 阅读说明书。
2. 妥善保管说明书。
3. 注意所有安全警告。
4. 按照要求和指示操作。
5. 请勿在靠近水(或其它液体)的地方使用本机。
6. 本机只能用干燥布料擦拭。
7. 请勿遮盖任何通散热口。确实依照本说明书安装本机。
8. 请勿将本机安装在任何热源附近,例如电暖器、蓄热器件、火炉或其他发热电器(包括功率放大器)。
9. 请勿破坏两脚型插头或接地型插头的安全装置。两脚型插头有两个不同宽度的插头片,一个窄,另一个宽一点。接地型插头有两个相
同的插头片和一个接地插脚。两脚型插头中宽的插头片和接地型插头接地插脚起着保障安全的作用。如果所附带的插头规格与您的插
座不匹配,请让电工更换插座以保证安全。
10. 请勿踩踏或挤压电源线,尤其是插头、插座、设备电源输入接口或者电源线和机身连接处。
11. 本机只可以使用制造商指定的零件 / 配件。
12. 本机只可以使用与本机搭售或由制造商指定的机柜、支架、三角架、托架或桌子。使用机柜时,请小心移动已安装设备的机柜,以避
免机会推翻造成身体伤害。
13. 在雷雨天或长期不使用的情况下,请拔掉电源插头。
14. 所有检查与维修都必须由指定的专业维修人员进行。如本机的任何形式的损伤都须检修,例如电源线或插头受损,有液体或物体落入
机身内,曾暴露于雨天或潮湿的地方,不能正常运作,或曾掉落后损坏等。
15. 不得拔出接地插脚。请写信索取免费手册《 Shock Hazard and Grounding》。使用前,请仔细检查确认所使用的电源电压是否匹配设备
上标注的额定电压。
16. 如果本机装在机柜中 , 其后部也应给予相应的支撑固定。
17. Note for UK only: If the colors of the wires in the mains lead of this unit do not correspond with the terminals in your plug‚ proceed as follows:
a) The wire that is colored green and yellow must be connected to the terminal that is marked by the letter E‚ the earth symbol‚ colored green
or colored green and yellow.
b) The wire that is colored blue must be connected to the terminal that is marked with the letter N or the color black.
c) The wire that is colored brown must be connected to the terminal that is marked with the letter L or the color red.
18. 本机不得暴露于滴水或溅水中。请勿将诸如花瓶等装有液体的物体放置于本机上。
19. 本机电源开关不能同时断开两端的电源,完全切断外部电源。因此当开关位于“ OFF”位置时,本机外壳仍有可能带有触电的危险。
电源插头或耦合器能够与设备或者电源容易分开,保证电源的完全切断,从而保证安全。
20. 声压级较高的噪音容易造成听力的永久性损失。因噪声而造成的听力损失程度 , 个体间的差异较大 , 但几乎每个人在声压级较高的噪
音环境里一定时间,都会有不同程度的听力损失。美国政府职业安全与保健管理局(OSHA)就此规定了下列容许噪声级 :
警告 :操作电器产品时,请务必遵守基本安全注意事项,包括 :
据 OSHA, 任何超出以上所允许的范围 , 都会造成部分听力的损失。使用本功放系统时,必须佩戴如耳塞等保护耳朵的器件,防止长时间处于上述
限制级以上的环境而引起永久性听力受损。本机运行时,如果超过上述所规定的最大限制,为了抵御较高的声压对于听受损所造成的潜在危险,建
议使用诸如功放系统等引起高声压级噪声的所有人均佩戴保护耳朵的器件。
每天持续小时数 声压级(dBA)慢反应
890
692
495
397
2100
1½102
1105
½110
¼ 或更少 115
请妥善保管本说明书!
日本語

TÄRKEÄT TURVALLISUUSOHJEET
1. Lue nämä ohjeet.
2. Säilytä nämä ohjeet.
3. Huomioi kaikki varoitukset.
4. Noudata kaikkia ohjeita.
5. Älä käytä laitetta veden lähellä.
6. Puhdista vain kuivalla kankaalla.
7. Älä tuki mitään tuuletusaukkoja. Asenna valmistajan ohjeiden mukaisesti.
8. Älä asenna lämpölähteiden, kuten pattereiden, liesien tai muiden lämpöä tuottavien laitteiden (kuten vahvistinten) lähelle.
9. Älä poista polarisoidun tai maadoitustyyppisen tulpan suojausta. Polarisoidun tulpan toinen napa on leveämpi kuin toinen. Maadoitustulpassa
on kaksi napaa ja kolmas maadoitusnapa. Leveä napa ja maadoitusnapa on tarkoitettu turvaamaan laitteen käyttöä. Jos mukana toimitettu
tulppa ei sovi pistorasiaan, kutsu sähkömies vaihtamaan pistorasia, sillä se on vanhentunut.
10. Suojaa virtajohtoa päälle kävelemiseltä ja nipistykseltä, erityisesti pistotulppien, pistorasioiden sekä laitteen ulosvientien kohdalla.
11. Käytä vain valmistajan toimittamia lisälaitteita.
12. Käytä vain valmistajan määrittämän tai laitteen mukana myydyn vaunun, jalustan, kolmijalan, kiinnikkeen tai pöydän kanssa. Käytettäessä
vaunua liikuta vaunun ja laitteen yhdistelmää varovasti, jotta vältetään loukkaantumiset kaatumisesta johtuen.
13. Irrota laite sähköverkosta ukkosmyrskyjen aikana tai jos laitetta ei käytetä pitkään aikaan.
14. Huoltaminen tulee jättää pätevän huoltohenkilöstön tehtäväksi. Huoltoa tarvitaan, kun laite on jollakin tavoin vioittunut, esim. virtalähteen
johto tai pistoke on vioittunut, laitteen sisään on joutunut nestettä tai esineitä, laite on altistettu sateelle tai kosteudelle, laite ei toimi
normaalisti tai se on pudonnut.
15. Älä koskaan katkaise maadoitusnastaa. Ottamalla meihin yhteyttä saat kirjasen "Sähköiskuvaara ja maadoitus". Kytke vain virtalähteeseen,
joka vastaa laitteen virtajohdon viereen merkittyä tyyppiä.
16. Jos laite kiinnitetään laiteräkkiin, tulee se tukea takaosastaan.
17. Note for UK only: If the colors of the wires in the mains lead of this unit do not correspond with the terminals in your plug‚ proceed as follows:
a) The wire that is colored green and yellow must be connected to the terminal that is marked by the letter E‚ the earth symbol‚ colored green
or colored green and yellow.
b) The wire that is colored blue must be connected to the terminal that is marked with the letter N or the color black.
c) The wire that is colored brown must be connected to the terminal that is marked with the letter L or the color red.
18. Tätä sähkölaitetta ei tule altistaa nestetipoille tai roiskeille, eikä laitteen päälle saa asettaa nestettä sisältäviä esineitä, kuten maljakoita.
19. Laitteen virtakytkin ei katkaise ensiövirran molempia puolia. Laitteen sisällä voi olla vaarallinen jännite, kun virtakytkin on pois-asennossa.
Virtajohto toimii pääkytkimenä, ja sen pitää olla aina käytettävissä.
20. Altistus erittäin korkeille äänitasoille voi aiheuttaa pysyvän kuulovaurion. Henkilöiden alttius melun aiheuttamille kuulovaurioille vaihtelee,
mutta lähes kaikkien kuulo vaurioituu altistuttaessa riittävän kovalle melulle riittävän kauan. Yhdysvaltain hallituksen työturvallisuus- ja
terveyshallinto (OSHA) on määrittänyt seuraavat hyväksyttävät melutasoaltistukset:
VAARA: Käytettäessä sähkölaitteita tulee aina huomioida mm. seuraavat turvallisuusohjeet:
OSHA:n mukaan altistus yo. tasoja korkeammalle määrälle voi aiheuttaa osittaisen kuulon menetyksen. Käytettäessä vahvistinjärjestelmää tulee
kuulovaurioiden estämiseksi käyttää korvatulppia tai kuulosuojaimia, mikäli altistus ylittää yllä asetetut rajat. Jotta vältetään mahdollisesti vaarallinen
altistus korkeille äänenpaineen tasoille, suositellaan, että kaikki korkeaa äänenpainetta tuottavien laitteiden, kuten tämän vahvistimen, lähistöllä olevat
henkilöt suojaavat kuulonsa, kun laite on käytössä.
Kesto päivää kohti tunteina Äänitaso dBA, hidas vaste
890
692
495
397
2100
1 1⁄2 102
1105
1⁄2 110
1⁄4 tai alle 115
SÄILYTÄ NÄMÄ OHJEET!
FINNISH

VIKTIGA SÄKERHETSINSTRUKTIONER
1. Läs dessa instruktioner.
2. Behåll dessa instruktioner.
3. Iakttag alla varningar.
4. Följ alla instruktioner.
5. Använd inte apparaten i närheten av vatten.
6. Rengör endast med en torr trasa.
7. Blockera inte ventilationsöppningarna. Installera i enlighet med tillverkarens instruktioner.
8. Installera inte i närheten av värmekällor som radiatorer, varmluftsventiler, spisar eller andra apparater (inklusive förstärkare) som ger ifrån sig
värme.
9. Motverka inte säkerhetsfunktionen hos en jordad stickkontakt. En jordad stickkontakt har två stift och metallbleck på sidorna. Metallblecket
nns där för din säkerhet. Kontakta en elektriker för utbyte av det föråldrade vägguttaget om den medföljande stickkontakten inte passar i ditt
vägguttag.
10. Skydda strömsladden från att klivas på eller klämmas, särskilt vid kontakten, grenuttag och platsen där den lämnar apparaten.
11. Använd enbart tillsatser/tillbehör som tillhandahålls av tillverkaren.
12. Använd endast med en kärra, ställ, trefot, fäste eller bord i enlighet med tillverkarens specifikationer, eller som säljs tillsammans med
apparaten. Var försiktig när du använder en kärra så att inga personskador uppstår på grund av att kombinationen kärra-apparat välter när den
yttas.
13. Koppla ur apparaten vid åskväder eller när den inte används under en längre tid.
14. Låt kvalicerad servicepersonal sköta all service. Service krävs om apparaten har skadats på något vis, till exempel om strömsladden eller
stickkontakten har skadats, vätska har spillts eller föremål har fallit ner i apparaten, apparaten har utsatts för regn eller fukt, inte fungerar
normalt eller har tappats.
15. Anslut aldrig till ojordade uttag. Skriv till oss för vårt gratishäfte ”Stötrisk och jordning”. Anslut endast till en strömkälla av samma typ som
enhetens märkning anger (bredvid strömsladden).
16. Om produkten ska monteras i ett utrustningsrack bör bakre stöd användas.
17. Note for UK only: If the colors of the wires in the mains lead of this unit do not correspond with the terminals in your plug‚ proceed as follows:
a) The wire that is colored green and yellow must be connected to the terminal that is marked by the letter E‚ the earth symbol‚ colored green
or colored green and yellow.
b) The wire that is colored blue must be connected to the terminal that is marked with the letter N or the color black.
c) The wire that is colored brown must be connected to the terminal that is marked with the letter L or the color red.
18. Denna elektriska apparat bör inte utsättas för dropp eller stänk och försiktighet bör iakttas så att inte föremål som innehåller vätskor, såsom
vaser, placeras ovanpå apparaten.
19. Enhetens strömbrytare bryter inte båda sidor av strömkretsen. Farlig energi kan förekoma inuti höljet när strömbrytaren är i av-läget.
Stickkontakten eller apparatkontakten fungerar som bortkopplingsenhet, bortkopplingsenheten ska hållas lättillgänglig.
20. Extremt höga ljudnivåer kan orsaka permanent hörselskada. Olika personer skiljer sig åt i benägenhet att få hörselskador av oljud, men i
princip alla får hörselskador om de utsätts för tillräckligt höga ljud under tillräcklig tid. Den amerikanska regeringens arbetsskydds- och
hälsoförvaltning (OSHA) har angivit följande maxnivåer för tillåten exponering för oljud:
VARNING: När du använder elektriska produkter ska grundläggande försiktighetsåtgärder iakttas, inklusive följande:
Enligt OSHA kan exponering utöver ovanstående tillåtna gränser orsaka hörselskador. Öronproppar eller skydd för hörselgången eller över öronen måste
bäras när detta förstärkarsystem används för att förebygga permanenta hörselskador, om exponeringen överskrider gränsvärdena enligt ovan. För att
skydda mot potentiellt farlig exponering för höga ljudtrycksnivåer rekommenderas det att personer som exponeras för utrustning som kan producera höga
ljudtrycksnivåer såsom detta förstärkarsystem skyddas med hörselskydd när enheten är i drift.
Längd per dag i timmar Ljudnivå dBA, långsam svarstid
890
692
495
397
2100
1 1⁄2 102
1105
1⁄2 110
1⁄4 eller mindre 115
SPARA DESSA INSTRUKTIONER!
SWEDISH

14
Congratulations on your purchase of a Trace Acoustic amplier. Our experience in design and quality of
manufacturing will ensure that you will be able to rely on this product to deliver the solid professional
sound you deserve, whether in the studio, on stage, rehearsal room or at home.
This Trace Acoustic range is the latest evolution of a line of products that were always known for their
sophisticated features, high quality construction, reliability and use of state of the art technology. Many
of the original ideas have become industry standards and are included within this range, however, around
these are even more features to inspire musicians and create the music that they want to hear.
High quality parts have been used throughout. In keeping with traditional Trace Elliot bass ampliers, the
GAIN and MASTER controls use parts that have ‘detents’ to give a professional feel. All tone and EQ
controls have a centre ‘detent’ so the user can tell where the ‘at’ setting is, and the NOTCH controls are
smooth to enable the user to ne tune the notch frequency.
All the switchable features on these ampliers are split into two types: pre-set and performance.
➢Pre-set functions are those which will be set at the start and are unlikely to be changed again during a
performance. These all use latching type switches which means they have an ‘in’ and an ‘out’ setting and
will click when changing settings.
➢Performance functions are those which it is likely the user will want to switch on or off throughout
a performance. These all use non-latching type switches which ultimately control FETs to switch the
particular function on or off. The switching is extremely quiet and therefore will not be heard during a
performance. These switches do not click when pressed and only need to be pressed lightly to operate.
In all cases the inbuilt LED for that function will be lit/unlit as it is switched. These functions are also
conveniently footswitchable using the supplied footcontroller.
Caution: Please look over this guide and read any caution or warning statement found within.
Following these warnings is crucial to your personal safety and the safety of your Trace Acoustic
amplier.
TRACE ACOUSTIC AMPLIFICATION
English

15
QUICK START
This section is for people who are either too excited or too impatient to read the whole manual before
using their new Trace Acoustic. Please at least read this rst section thoroughly and return to the rest of
the manual later, lest you don’t get the full potential out of your new amplier.
(1) Once you unpack your Trace Acoustic, check the POWER switch on the rear is in the ‘0’ (off)
position then connect the power cord and plug into a mains socket supplying the proper ac line voltage
for your unit.
(2) Turn the NOTCH and MASTER controls to the minimum, fully anticlockwise position. Set the
GAIN and all the EQ controls, LO-TRIM, HI-TRIM and GRAPHIC EQUALIZER, to the half way
position. On the EQ controls this can easily be determined by the centre detent.
(3) Connect the footcontroller (AFC-6) to the EXTERNAL CONTROL socket on the rear panel using
the eight-pin DIN cable.
(4) Plug your instrument into Ch1-INPUT on the front panel using a high quality shielded instrument
cable.
(5) Flip the power switch on the rear to the “1” (on) position to turn the unit on.
(6) Set your instrument to your normal settings and while striking a string gradually turn up the MASTER
control. Set this at the approximate desired playing volume.
(7) Now try adjusting the GAIN control between playing. While doing this observe the level indication
LED above the control. When the LED is lit green then there is adequate gain to drive the rest of the
preamp. If you continue to turn up you’ll nd the LED will start to be lit orange, this means that preamp
compression is occurring. Do not worry, this is intended to prevent any unwanted distortion and also to
smooth out the dynamics for a more consistent volume. More on this in the ‘IN DEPTH GUIDE’.
(8) You will notice that the unit will have defaulted to a setting of everything off except a little reverb. You
can now make adjustments to the GAIN, EQ and EFFECTS controls to achieve the desired sound. For
more information on EFFECTS go to the section in the ‘IN DEPTH GUIDE’.
(9) Make music! Feel free to turn on and off the other features on the unit, either by the footcontroller or
the front panel, and make adjustments to the other controls to get an idea of the exibility of the unit.
CAUTION: Please avoid pressing the “+V” switch unless the section on this in the manual has
been read fully and that this feature is really needed. If this switch it lit red then, unless it’s
needed, press the switch to turn it off as it causes unnecessary power consumption.
Never have this switched on if a normal mono type ¼” jack plug is inserted into the INPUT
on this channel.
16
IN DEPTH GUIDE
Well done! The very fact that you are reading this section means that you are serious about getting the
most out of your Trace Acoustic amplier. Although fundamentally easy to use, this guide will hopefully
explain the features of your amplier in a way that will unlock all sorts of sonic potential that may have
otherwise remained hidden.
This operating guide covers the features of all the contemporary Trace Acoustic range of ampliers.
Where a specic model is shown in brackets, e.g. (TA400), then this applies only to that product.
The feature being explained is shown in ‘quotation’ marks, the type of control is shown after. If there
are any terms you do not fully understand then please refer to the Glossary of Terms at the back of this
manual.
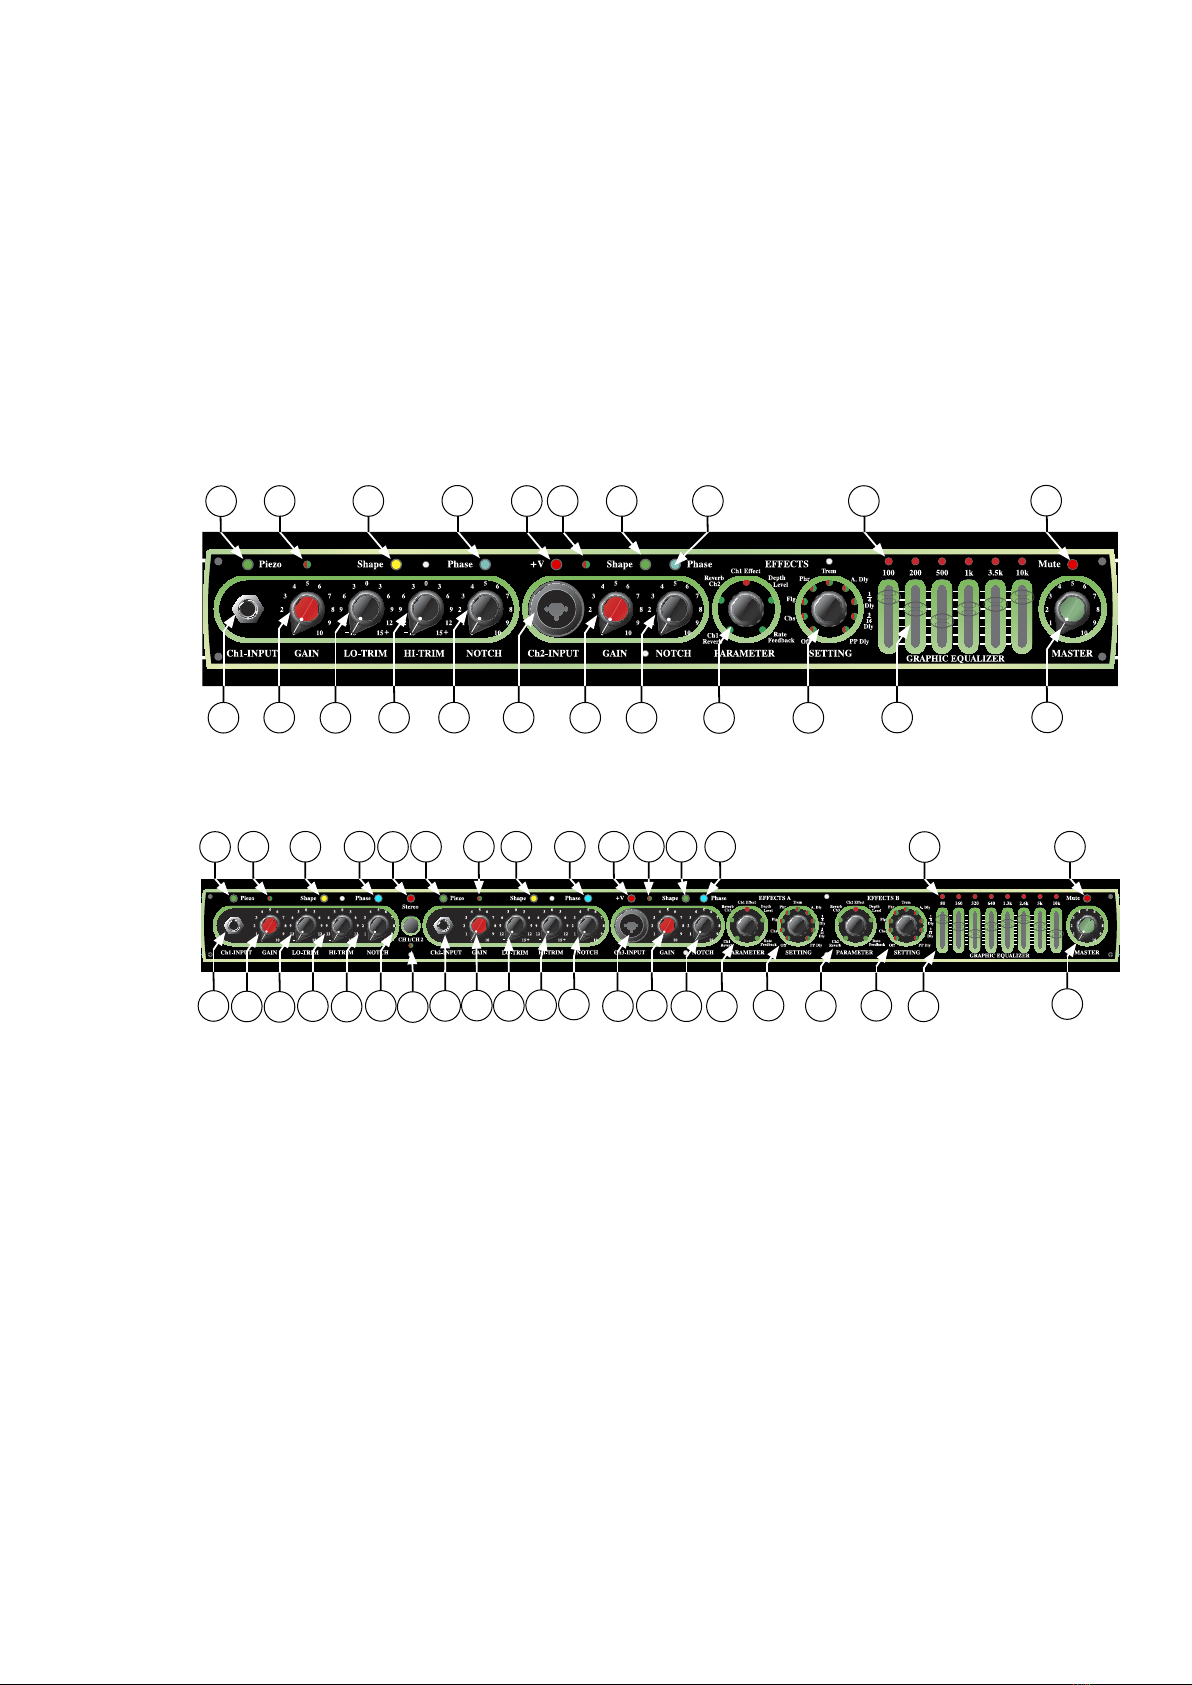
FRONT PANEL
TA100 / TA200 / TA300 Front Control Panel
TA400 Front Control Panel
There are two different front panels used for the range. Aesthetically they are very similar and they share
many features. Basically the TA100, TA200 and TA300 front panels have two channels, an EFFECTS
section, 6 band GRAPHIC EQUALIZER and MASTER control, whereas the TA400 preamp has three
channels, two EFFECTS sections, 8 band GRAPHIC EQUALIZER and MASTER control.
IN-BUILT COMPRESSORS
A very important new feature is that all channels have in-built, studio quality, compressors. These are
a ‘soft-knee’ compressor with ‘adaptive attack and release times’, that have been specially designed to
work well with acoustic instruments.
These were added for two main reasons. Firstly, because they remove any chance of clipping distortion
from occurring in the preamps; this means it keeps the sound of your instrument clean. Secondly, because
a subtle amount of compression can sound very nice and help to bring out the instrument in a mix.
Sound engineers often add compression to acoustic guitar in recordings for exactly this reason. However,
due to the simple operation of these ampliers, the user doesn’t need to be a sound engineer to use the
compressors. Instead the user merely needs to adjust the GAIN control to set the amount of compression
as desired. More on this below.
Any channel that is not being used should have the GAIN control set to ‘0’, to reduce any noise.
25923 26 28 36 37
38
35
30
29
2724
22
8
7
6
31
425
1367813
11 15 18 19 20 22 24 27 31 32 33 34 38
2 5 910 14 17 21 23 25 26 37
416
12 35
28 36

17
Ch1 (All models)
This is Channel 1, the main instrument channel with the most control over the sound and effects. For the
majority of users this will be the most commonly used channel.
(1) ‘INPUT’ ¼” JACK SOCKET
This is to connect to the ¼” jack lead from your instrument.
This is a TRS type socket meaning that it has separate connections for the ‘tip’ and ‘ring’ of the jack. If
a standard ‘mono’ type jack lead is used then this will simply send the signal to the rest of Channel 1 as
normal.
However, if a stereo/dual output guitar is used with a TRS lead, then the ‘tip’ signal will be routed through
Channel 1 and the ‘ring’ signal will be automatically routed to Channel 2 (and Channel 3 on TA400),
therefore keeping the two signals separated and enabling the user to process them separately by using the
controls on the other channel(s) as well.
Connecting anything into the other channel(s) will automatically override the Channel 1 ring signal.
(See Block Diagrams for more information)
(2) ‘PIEZO’ SWITCH & LED
This switch has two functions; to set the sensitivity and the impedance of the INPUT stage.
In the out position (LED unlit) it is set for normal sensitivity and impedance (100kΩ).
The in position (with green LED lit) is the ‘Piezo’ setting for higher sensitivity and very high impedance
(>10MΩ).
The difference in sensitivity is 10dB. Actual sensitivity is dependent on the GAIN control.
Generally, this switch should be set to the unlit out position for active instruments; and pressed in, with
the green LED lit, for instruments just using a piezo pickup without a separate preamp. However it can
also be used as a preset 10dB boost if more gain is required on an active instrument.
(3) ‘GAIN’ ROTARY CONTROL
(4) SIGNAL LEVEL LED
The GAIN control is for setting the volume level of Channel 1 and also, if turned up, will increase
the amount of compression applied in the input stage by intentionally pushing the signal level over the
compressor threshold.
The signal level indication LED is included to help the user to determine where to set the GAIN control:
➢Unlit means that there is either no signal or the signal is very low
➢Lit green means that signal is present, below threshold and therefore remains un-compressed.
➢Lit orange means that high signal is present, above threshold and compression is occurring.
➢Lit red means that very high signal is present and clipping distortion may be occurring. In practise this
should never happen due to the in-built compressors preventing this.
As mentioned before, the in-built compressor is included to stop unwanted distortion, however this can
also be a very useful tool for controlling the dynamic range as follows:-
➢If the user wants a natural sound, with minimal compression, then they should adjust the GAIN control
so that, most of the time when playing, the LED is lit green, and only when they are striking the loudest
notes should the LED occasionally go orange. Therefore only slight compression is applied on the loudest
peaks and the natural full dynamic range is preserved. This also ensures an adequate signal level is being
sent through the rest of the amplier for a good signal to noise ratio.
➢However, if the user wants to give the instrument more presence and clarity in the mix, by turning
up GAIN further so that the LED is lit orange more often, the signal level will be pushed over threshold
meaning that more compression is being applied and the dynamic range is being more tightly controlled.
The specic GAIN setting will be down to the personal preference of the user. Players usually nd that
a tasteful amount of compression can really smooth out the sound and actually make certain parts seem
easier to play, as it requires less physical effort to be heard consistently within a mix.

18
➢Of course the user may also wish to use extreme, high GAIN, settings, where the compression is on
most of the time. This is when compression becomes more of an effect. This may be useful for solos and
for adding sustain. However, some of the natural acoustic qualities will be altered due to the extreme
limiting of the dynamic range.
We can only suggest that the user experiments with different amounts of compression, to hear and feel what
works best for their application. If you prefer not to use it then simply set GAIN lower and MASTER
higher.
(5) ‘SHAPE’ SWITCH & LED
This switches in the ‘Mid Pre-Shape’ circuit. When activated, the yellow LED is lit. It can also be switched
on and off using the AFC-6 footcontroller.
The actual effect of this circuit is to boost the low and high frequencies and to cut the mid frequencies
giving an instant alternative EQ sound, which emphasizes different harmonics. It can be used to help
make some pickups (especially lower quality) sound more natural or to switch different sounds during a
performance. One example is to use the Shape setting when accompanying a vocalist; the mid cut allows
the voice to come through more. Then switch to the normal, at setting, for solo work.
(6) ‘LO-TRIM’ ROTARY CONTROL
(7) ‘HI-TRIM’ ROTARY CONTROL
These are for ne adjustment of the low and high frequencies respectively, on Channel 1. They can be
thought of as similar to Bass and Treble. Use these in conjunction with the Shape function to ne tune the
tone of your instrument as desired.
If both controls are at their middle position (when the ‘detent’ is felt) and Shape is off, then the frequency
response through the preamp is at.
Turning up the LO-TRIM will produce more body in the tone but may also increase the likelihood of
feedback. Therefore backing off also helps to keep feedback at bay.
(8) ‘NOTCH’ ROTARY CONTROL
(9) ‘PHASE’ SWITCH & LED
These are for help in controlling acoustic and microphonic feedback.
NOTCH controls the frequency of a tight bandwidth notch lter. This reduces the volume of a specic
small range of frequencies depending on where it’s set.
If playing at fairly low volumes, where feedback is not a problem, then this control should be set at the
minimum setting. This is so low that it will not affect the tone of your instrument.
At higher volumes, especially if close to the amp, it is common for acoustic instruments to start to self-
oscillate which causes the body and/or lower strings to vibrate. In these circumstances gradually turn the
NOTCH control up until the offending vibration starts to die away. This has basically tuned the frequency
of the notch lter to the frequency of vibration. Due to the notch lter having a very tight bandwidth, this
will have minimal effect on the rest of your tone.
Different settings, instruments and standing/sitting at different distances from the amp will have an effect
on where this control needs to be set. With practise the user will be able to locate the correct frequency
with ease.
Once the NOTCH has been set then the Phase switch can also be used when feedback occurs. Pressing
this merely ips the phase of this channel 180 degrees and in most cases will null the offending frequency
and cause the feedback to die away.
When the phase is reversed then the LED in the switch will be lit blue. This can also be switched by using
the footcontroller. This is particularly useful as the performer can have the footswitch on the oor in front
of them and can switch the phase without needing to stop playing. They can also continue to do this again
and again throughout a performance if they nd they have feedback problems in other keys and/or chord
positions.
It should be pointed out that although these features will help to control feedback, and therefore allow
a louder performance volume than otherwise, there will become a point at which the volume and/or
proximity to the amp will result in feedback being difcult to control. Careful use of the EQ will further
help (see GRAPHIC EQUALIZER section).

19
Points 10 to 21 are for TA400’s only, skip to point 22 for other models.
TA400’s have an additional instrument channel that can be used in several ways explained below:-
(10) ‘STEREO’ SWITCH AND LED
(11) ‘CH1/CH2’ SWITCH
(12) ‘CH1/CH2’ STATUS LED
These two switches set how Channel 1 and Channel 2 are routed and the LED’s show the status.
The Stereo switch will switch between normal mode, where either Channel 1 and Channel 2 is switched
on; and stereo mode, indicated by the red LED, where both Channel and Channel 2 are switched on and
routed separately throughout the rest of the amplier to the speakers.
In normal mode pressing the CH1/CH2 switch will switch between Channel 1 and Channel 2.
This means that a different instrument can be plugged into each channel and easily switched over during
a performance.
Alternatively, one instrument can be plugged into Ch1-INPUT and then be switched between the two
channels. Obviously then each channel can have different gain, EQ and effects settings which are also
switched.
The CH1/CH2 LED will be lit green when Channel 1 is being used and orange when Channel 2 is being used.
The switching of this function can also be operated from the AFC-6 footcontroller.
In stereo mode, with both channels switched on, the CH1/CH2 switch will operate as a gain boost,
therefore enabling two different levels of volume and/or compression on both channels. In this mode the
LED will be unlit if boost is off and red if boost is on. Again, the switching of this function can also be
operated from the AFC-6 footcontroller. Stereo mode allows the connection of a different signal into each
of the two channels. They can each have their own preamp settings, then Channel 1 will be routed through
EFFECTS A, eventually coming out of the (stage) left speakers; and Channel 2 through EFFECTS B,
eventually coming out of the (stage) right speakers.
Alternatively, a mono source can even be used in stereo mode. Connect just into Ch1-INPUT and the
signal will be automatically passed though both preamps and EFFECTS sections, again keeping channel
separation through to the speakers.
A third option in stereo mode is if a stereo signal using a TRS jack plug is sent into Ch1-INPUT. In this
case the two signals will be automatically split between Channel 1 and Channel 2 and routed separately
through the rest of the amplier as mentioned above.
Whichever conguration is used, amazing stereo psychoacoustic effects can be achieved in this stereo
mode by experimenting with different preamp and effects settings on each channel!
Ch2 (TA400 only)
This is Channel 2, the additional channel on TA400’s for an alternative sound, an additional
instrument or for stereo use.
(13) ‘INPUT’ ¼” JACK SOCKET
This is to connect to the 1/4” jack lead from an instrument.
Use this if you either: wish to switch to another instrument during a performance without needing to
unplug cables; or, in stereo mode, to insert the other side of the stereo signal. Channel separation integrity
will be retained throughout the whole amplier.
With nothing inserted into this socket, the circuitry automatically congures itself so that either the ‘tip’
or ‘ring’ signal from Channel 1 can also be routed to Channel 2, then switched on or off (normal mode)
or mixed together (stereo mode).
Connecting anything into Channel 2 will automatically override anything from Channel 1.
(See Block Diagrams for more information)
(14) ‘PIEZO’ SWITCH & LED
This switch has the same function for Channel 2 as the Piezo switch for Channel 1.
For more information on this, please refer to point 2 earlier in this manual.

20
(15) ‘GAIN’ ROTARY CONTROL
(16) SIGNAL LEVEL LED
These are for Channel 2 and work in the same way as those on Channel 1.
For more information on these, please refer to points 3 and 4 earlier in this manual.
(17) ‘SHAPE’ SWITCH & LED
This switches in the ‘Mid Pre-Shape’ circuit on Channel 2.
For more information on this, please refer to point 5 earlier in this manual.
(18) ‘LO-TRIM’ ROTARY CONTROL
(19) ‘HI-TRIM’ ROTARY CONTROL
These are for Channel 2 and work in the same way as those on Channel 1.
For more information on these, please refer to points 6 and 7 earlier in this manual.
(20) ‘NOTCH’ ROTARY CONTROL
(21) ‘PHASE’ SWITCH & LED
These are for Channel 2 and work in the same way as those on Channel 1.
For more information on these, please refer to points 8 and 9 earlier in this manual.
End of TA400 only section.
Ch2 (TA100/200/300) or Ch3 (TA400)
This is a channel for use with a microphone or low impedance instrument. It has less controls and effects
than Channel 1, therefore can be thought of as a purer channel with less processing.
(22) ‘INPUT’ COMBINATION XLR / ¼” JACK SOCKET
This is a dual purpose connector that can accept either a male XLR or ¼” jack plug.
The XLR input is a very low impedance, mixing desk type, balanced input stage, with plenty of extra
gain. Use this for vocal microphones or for microphones set up on or near instruments.
This has an internal switching contact, to automatically switch between XLR and ¼” jack, therefore
please ensure that a good quality XLR microphone cable is used where the shield/barrel of the XLR is
connected to pin 1.
If you experience a situation where there is no signal from using the XLR socket then please refer to the
Help section below.
The ¼” jack input is an input stage for use with an active instrument.
This is a TRS type socket meaning that it has separate connections for the ‘tip’ and ‘ring’ of the jack. If a
standard ‘mono’ type jack lead is used then this will simply send the signal through the rest of the channel
as normal.
However, if a stereo/dual output guitar is used with a TRS type lead, then the ‘tip’ signal will be routed
through this channel and the ‘ring’ signal will be automatically routed to Channel 1, therefore keeping
the two signals separated and enabling the user to process them separately by using the controls on
both channels.
Connecting anything into Ch1-INPUT will override the ‘ring’ signal from this channel.
(See Block Diagrams for more information)
(23) ‘+V’ SWITCH AND RED LED
Pressing this switch activates the dual-voltage, phantom power circuits. The actual voltage is
dependant on which socket is being used. When it is on, the switch LED should be lit red.
IMPORTANT: If this does not need to be on, then please keep it off, as it may cause
unnecessary current draw.
This manual suits for next models
4
Table of contents
Languages:


