TrailManor 2619 User manual

Owner’s Manual
Models 2619, 2720, 2720SL, 2720SD,
2922KB, 2922KS, 2922KD, 3124KB, 3124KS,
3124KD
(Also appl cable to Models 2518, 3023, and 3326)
TM INDUSTRIES, LLC
General Offices: 42021 268th St Parkston South Dakota
605.239.4082
Mfg. Plant: Upland Manufacturing 24221 412th Avenue
Artesian, South Dakota 57314
www.trailmanor.com
v010118

2
TABLE OF CONTENTS
CHAPTER I: WELCOME.. 4
SAFETY
4
Safety in Using LP Gas 4
Electrical System Safety . 5
Emergency Stopping Safety
6
Additional Safety Considerations.. 6
INSURANCE. 8
CHAPTER II: WARRANTY & SERVICE
BASIC SERVICE 9
FACTORY 9
OUT OF TOWN SERVICE
TRAILMANOR LIMITED WARRANTY ..
9
10
CHAPTER III: USAGE OF YOUR RV
HITCHES. 15
LOADING. 15
SAFETY CHAINS 15
PINCH POINTS .. 16
WHEEL LUGS .
16
WHEEL BEARINGS ...
16
TIRES 16
BRAKES ...
1
LEVELING
18
SET-UP. 19
CLOSING . 23
CHAPTER IV: THE SYSTEMS
PLUMBING . 26
Sanitizing Water System ...
26
Fresh Water System ..
26
Water Pump. 2
Toilet .
2
Drainage System 2
Winterizing ...
2
LP GAS SYSTEM . 28
The Gas System
28
Servicing and Filling ..
29
Checking for Leaks 30
LP Gas Regulator ..
31
Automatic Changeover Regulator ..
31
Propane Gas Leak Detector 31

3
ELECTRICAL SYSTEM . 32
General Information
32
Changes, Modifications, and Additions... 32
Converter and G.F.C.I. Breakers . 33
12 Volt DC System . 33
Battery .. 34
Battery Isolator 34
CHAPTER V: APPLIANCES
STOVE/OVEN .
35
FURNACE
35
WATER HEATER ...
36
REFRIGERATOR ...
36
General Information ...
3
Refrigerator Fan . 38
BATHROOM EXHAUST FAN . 38
CHAPTER VI: CARE OF BODY COMPONENTS
EXTERIOR, INTERIOR, SEALS .
39
WINDOW VENTS.. 39
BED SUPPORT TRACKS
39
CUSHIONS, DRAPES ..
39
CHAPTER VII: STORING ..
40
ADDITIONAL INFORMATION
Front Roof Wiring Diagrams ... 41
42
43
44
4
49
Rear Roof Wiring Diagrams
Converter/Breaker Box Details ..
LP – Gas Containers ..
Bargman Wiring Diagrams..
Trailer Weight and Towing Guidelines
Chair Placement for Slide outs . 51

4
CHAPTER I
INTRODUCTION TO R.V. OWNERSHIP
WELCOME
Welcome to the world of recreation vehicle travel. Your purchase of a TrailManor™
travel trailer allows you to enter this unique world of camping in the world’s easiest
towing travel trailer. Now you can visit those places you've always dreamed about
and enjoy the comforts of home along the way.
This owner's manual was prepared to assist you in understanding the proper use
and operation of various systems, to provide recommendations for servicing and
maintaining component parts, and to explain your warranty protection.
We have made every effort to make this manual as accurate as possible to reflect
information available at the time of publication. Components are constantly being
improved and we endeavor to upgrade our installations accordingly. You should
carefully read and understand this owner's manual and the various other
instructions supplied by the manufacturers of separately warranted products. Each
contains important operating, safety, and maintenance instructions. Keep this
owner's manual in your recreational vehicle for handy reference.
Every effort has been made to provide you with a safe, dependable product. Your
vehicle complies with applicable requirements of Federal Motor Vehicle Safety
Standards, State Regulations, and complies with requirements of ANSI Standard
A119.2, the nationally recognized Standard for Recreational Vehicles - Installation
of Plumbing, Heating, and Electrical Systems. Your follow-up with periodic
safety inspections and a program of preventative maintenance is important for
the continuation of safe and trouble-free operation.
SAFETY
SAFETY IN USING LP GAS (See also “Helpful H nts About LP Gas,” p.44)
You should check for leaks at the connections on the LP Gas system soon
after purchase and initial filling of the LP tanks. Continued periodic checks of the
system are recommended. The manufacturer and dealer have already checked
for leaks, but the vibration encountered during travel can loosen connections
or cause cracks. Your vehicle was manufactured to provide you with full
access to all gas line connections. Leaks can be found easily with a soapy water
solution applied to the outside of the gas piping connections: the soap will bubble
at the leak.

5
Do NOT use flame or l ghted matches to test for leaks. Usually tightening the
connections will close leaks. If not, ask your authorized dealer service department
to make the necessary repairs.
LP gas is heavier than air. Leaking gas tends to flow to low places. It will
sometimes pocket in a low area. LP gas can usually be detected by an identifiable
odor similar to onions or garlic. Never light a match or allow any open flame in the
presence of leaking gas.
It is very important to have the main LP gas valve shut off during refueling of tow
vehicles.
Never allow gas containers to be filled above the liquid capacity indicated on the
container. If a container is overfilled, liquid gas may flow through the regulator
causing it to freeze and/or introduce a dangerous excessive gas pressure into the
lines. In addition, an overfilled container placed in hot sunlight may expel excess
gas through the relief valve and be susceptible to ignition by any nearby open
flame.
CAUTION: TURN GAS BOTTLES OFF WHEN LOWERING
TRAILER. The refrigerator should be switched to 12-volt operation
while towing. Operation of gas appliances in the lowered trailer can
cause fire or other serious damage.
ELECTRICAL SYSTEM SAFETY
Circuit breakers and fuses are installed to protect electrical circuits from
overloading. Do not make unauthorized changes to circuitry or add fixed
appliances yourself. Before you make any changes, consult your dealer.
An approved power supply cord has been supplied with the trailer. Always use
this for hook-up to the 120-volt source. Note that the cord has a three-pin plug,
which provides proper grounding through the third (round) pin. Grounding is your
personal protection from electrical shock. Do not use any adapter, cheater, or
extension cord that will break the continuity of the grounding circuit connected to
that third pin. NEVER remove the grounding pin for the convenience of being
able to connect to non-grounded (only 2-prong) receptacle. Use a grounding
adapter with two prongs plus a "pig-tail" conductor, which should be externally
grounded.
NEVER operate your RV with a "hot skin". If you can feel even a small shock
from the RV while standing on the ground, you should immediately disconnect
the RV from the power source and locate the trouble. The fault is usually from a
break in the grounding circuit, which should be continuous from the skin or frame
to the distribution panel board to the third pin on the power supply cord and then
back to the park receptacle and earth ground.

6
EMERGENCY STOPPING SAFETY
Always carry road flares and/or reflective triangular highway warning devices to
be displayed when necessary. Pull off the roadway as far as possible when
changing a flat tire or for other emergency situations. Turn on your vehicular
hazard warning flashers when parked alongside a roadway, even if parked for
only few minutes.
ADDITIONAL SAFETY CONSIDERATIONS
The operator is ultimately responsible for the safe operation of the vehicle.
Improper operating procedures can jeopardize the safety of the occupants and
others. The following suggests some procedures to help the operator enjoy safe,
trouble-free use.
•Sanitize the fresh water supply system periodically (see sanitizing
instructions, p 26). Keep fresh water in the potable water supply tank. Make
sure that only sanitary water suitable for drinking is used to fill tank. Do not
contaminate tank with water of questionable quality.
•To reduce the chance of contamination, keep water connection fittings from
coming in contact with the ground or drain hose.
•Secure the latch bolts that fasten beds to wall sections before getting on the
bed.
•Never attempt to fix gas or electrical appliances yourself. Enlist services of a
qualified technician.
•Observe the warning labels attached to your trailer concerning LP gas, water,
electricity, and loading.
•Make sure the fire extinguisher provided with your trailer is in place and
charged properly.
•Never store gasoline or diesel fuel in an area where fuel or fuel vapor may
accumulate or may travel to an open spark.
•Disconnect television power cord and antenna lead-in during local
thunderstorms and lightning activity.
•Don't overload your vehicle. Be careful not to cause an improper load
distribution, which can adversely affect roadability and/or towing safety.
Heaviest loads should be placed from the axle forward, if possible. (See
page 51 for chair placement instructions for slide out models.)

7
•Ensure that tires are in good condition and are properly inflated. Watch
inflation especially closely: underinflated tires will overheat. Overheated
tires are a potential hazard as they may throw rubber and cause a blowout.
•Check and tighten wheel lugs regularly (every 50 miles when new until 200
miles are reached and then check lugs every 500 miles).
•Check brakes in a safe area - not while traveling a busy highway.
•Always solidly block trailer wheels before unhitching.
•Before leaving a camp area with a trailer in tow, ensure that the locking lever
is seated, break-away wire is attached to tow vehicle, the jacks are raised so
that they cannot touch the ground, the dolly wheel removed, 120-volt electric
cord properly stored, and safety chains and power cord to your tow vehicle
are connected.
•Ensure that all hold-down latches are securely fastened before travel.
•Always test running lights, brake lights, and trailer brakes before travel.
•Tow vehicle brake controller should be set such that the trailer brakes provide
nearly all of the stopping effort for the trailer.
•Obey speed limit restrictions when towing a trailer. Some states post speed
limits specific to towing trailers.

8
INSURANCE
As with your automobile, it is important that you protect yourself and others with
insurance coverage for personal liability, theft, collision, property damage, etc.
Your dealer will assist you in obtaining appropriate insurance for your protection
or you may check with the company that provides your automobile insurance.

9
CHAPTER II
WARRANTY & SERVICE
BASIC SERVICE
We are very interested in maintaining good customer relations. Only by having
your complete confidence and satisfaction with our product and its service can
we assure our continued success as a manufacturer of recreational vehicles.
We have found that continuing a pleasant and effective relationship through our
dealers is equally as important as maintaining the technical excellence of our
product. Your authorized dealer will cordially assist you in providing service,
maintenance, selection of options, parts, and instructions concerning the
operation of your vehicle.
Should you have a problem, contact your local dealer's service department for
an appointment. In addition, there my be regional parts centers where you may
obtain components for your trailer. Watch www.trailmanor.com for parts and
service updates.
FACTORY
A factory service department is operated at Upland Manufacturing
Artesian, South Dakota. If your TrailManor requires repairs that your
dealer feels could be best accomplished at the factory, you may bring it
to our plant for repairs with the following stipulations:
You must make an appointment prior to returning it to the factory.
Freight costs are the responsibility of the owner.
OUT OF TOWN SERVICE
If you should need service while you are vacationing, contact your RV dealer for
assistance or call our service line , Monday through Friday, at 605.239.4002. We
will recommend a local service department and instruct them on correct
service procedures.

10
TRAILMANOR LIMITED WARRANTY
COVERAGE
This TM Industries LLC (TrailManor) Warranty covers this recreational vehicle
for a period of two years when this recreational vehicle is used for its
intended purpose of recreational travel and camping. The warranty period
begins on the date that the RV is delivered to the first retail purchaser by an
independent, authorized TrailManor dealer, or, if the dealer places the vehicle in
service prior to the retail sale, on the date the RV is first placed in such
service, hereafter referred to as “service date.” In the event that a substantial
defect in material or workmanship, attributable to TrailManor, is found to exist
during the warranty period, it will be repaired or replaced at TrailManor’s option,
without charge to the RV owner, in accordance with the terms, conditions, and
limitations of this limited warranty.
The limited lifetime warranty on torsion bars is covered under the same terms
and conditions as listed below.
Two Year Limited Structural Warranty covers any part of the superstructure that
fails, due to faulty workmanship or material supplied by TrailManor, to perform
properly within two years of the service date. The superstructure will be repaired
without charge under the same conditions as listed below. The warranty is only
for the original purchaser and is non-transferrable.
TrailManor’s obligation to repair or replace defective materials or workmanship is
at the sole discretion of TrailManor and is TrailManor’s sole obligation under this
limited warranty. TrailManor reserves the right to use new or remanufactured
parts of similar quality to complete the work, and to make parts and design
changes from time to time without notice. TrailManor reserves the right to make
changes in the design or material of its products without incurring any obligation
to incorporate such changes in any product previously manufactured.
TrailManor makes no warranty as to the future performance of this RV, or any of
its materials, components, or parts. In addition, the RV owner’s obligation to
notify TrailManor, or one of its independent, authorized dealers, of a claimed
defect does not modify any obligation placed on the RV owner to contact
TrailManor directly when attempting to pursue remedies under state or federal
law.
This warranty gives you specific legal rights, and you may also have other rights
that vary from state to state.
LIMITATIONS, EXCLUSIONS, AND DISCLAIMER OF IMPLIED WARRANTIES
Any implied warranty that is found to arise by way of state or Federal law,
including any implied warranty of merchantability or implied warranty of fitness, is

11
limited to the duration set forth in this limited warranty unless specifically
unrestricted by State law. TrailManor makes no warrant of any nature beyond
that contained in this limited warranty. TrailManor does not authorize any person
to create any other obligation or liability for TrailManor regarding this RV, and
TrailManor is not responsible for any representation, promise, or warranty made
by any dealer or other person beyond what is expressly stated in this limited
warranty. No one has the authority to enlarge, amend, or modify this limited
warranty. No selling or servicing dealers are TrailManor’s agent, but are
independent entities.
Unless otherwise specified by state law, TrailManor shall not be liable for any
incidental or consequential damages that may result from breach of this limited
warranty or any implied warranty. This exclusion of consequential and incidental
damages shall be independent of any failure of the essential purpose of any
warranty, and this exclusion shall survive any determination that this limited
warranty or any implied warranty has failed its essential purpose.
HOW TO GET SERVICE
To obtain warranty service, the owner must do all of the following:
1. Notify an independent, authorized dealer of TrailManor, or TrailManor, of
the substantial defect in material or workmanship attributable to
TrailManor, within the warranty coverage period designated above
2. Provide the notification mentioned in (1) above, within ten (10) days of
when the owner discovered, or should have discovered, the substantial
defect in material or workmanship attributable to TrailManor
3. Promptly schedule an appointment with and take the RV to an
independent, authorized dealer of TrailManor, or TrailManor, for repairs;
and
4. Pay any freight or transportation costs, import duties, fees and all
incidental expenses associated with obtaining warranty service.
For warranty service, simply contact one of TrailManor’s independent, authorized
service centers for an appointment and then deliver your RV to the service
center on the specified appointment date. If you need assistance, you may
contact TM Industries,LLC at 42021 268th St. Parkston, South Dakota or by
calling 605.239.4002 or at www.trailmanor.com.
Note: TrailManor does not control the scheduling of service work at the
independent authorized dealerships. You may encounter some delay in
scheduling or completion of work. Also, you must notify the selling dealer at time
of delivery to have work performed on any defect that occurred at the
factory

12
during manufacture at no cost to you as provided by this limited warranty. (See
below under what is not covered.)
If two (2) or more service attempts have been made to correct any covered
defect that you believe impairs the value, use or safety of the RV, or if it has
taken longer than thirty (30) days for those types of repairs to be completed, you
must, to the extent permitted by law, notify TrailManor directly, in writing, at the
above address, of the unsuccessful repair(s) of the alleged defect(s) so that
TrailManor can become directly involved in ensuring that you are provided
service pursuant to the terms of this limited warranty.
WHAT IS NOT COVERED
By way of example only, this limited warranty does not cover any of the following
defects in materials, components, or parts of the RV not attributable to
TrailManor; items that are added or changed after the RV leaves the possession
of TrailManor; additional equipment or accessories installed at any dealership, or
any other place of business, or by any other party, other than TrailManor; any RV
used for rental or other commercial purposes (note: it shall be concluded that
the RV has been used for commercial and/or business purposes if the RV owner
or user files a tax form claiming any business or commercial tax benefit related to
the RV, of if the RV is purchased in a business name); any RV not used solely
for recreational travel and camping; normal wear, tear or usage, such as tears,
punctures, soiling, mildew, fading or discoloration of exterior plastic or fiberglass,
or soft goods, such as upholstery, drapes, carpet, vinyl, screens, cushions,
mattresses and fabrics; the effects of condensation or moisture inside the RV;
mold or any damage caused by mold to the inside or outside of the RV;
imperfections that do not affect the suitability of the RV for its intended purpose
of recreational use; items that were working as designated but with which the
customer is dissatisfied; problems, including water leaks related to misuse,
mishandling, neglect or abuse, including failure to maintain the RV in accordance
with the owner’s manual; routine maintenance such as lubricating, adjusting,
tightening of screws, tightening of lug nuts, sealing, rotating tires; damage due to
accident, whether foreseeable or not, including any acts of weather or damage or
corrosion due to the environment, theft, vandalism, fire, or other intervening acts
not attributable to TrailManor; damage or misadjustment resulting from tire wear
or tire failure; tire balancing, defacing, scratches, dents, chips on any surface or
fabric of the RV; damage caused by off road use, overloading the RV, or
alteration of the RV or any of its components or parts; wheel alignment or
adjustments to axles when misadjustment is caused by improper maintenance,
loading or damage from road hazards.
In addition, this limited warranty does not cover any materials or components of
the RV that are warranted by another entity, including, by way of example,
brakes, tires, batteries, toilet, jacks, microwave, converter, furnace, or air
conditioner. (Note: the written warranty provided by the manufacturer of the

13
component part is the direct responsibility of that manufacturer).
Defects and/or damage to interior and exterior surfaces, trim, upholstery, and
other appearance items may occur at the factory. These items are usually
detected and corrected at the factory or by the selling dealer prior to delivery to
the retail customer. You must inspect your RV for this type of damage when you
take delivery. If you find any such defect or damage you must notify the selling
dealer at the time of delivery to have these items covered by this limited warranty
and to have work performed on the items at no cost to you as provided by this
limited warranty.
EVENTS DISCHARGING TRAILMANOR FROM OBLIGATION UNDER
WARRANTY
Certain things completely discharge TrailManor from any obligation under this
warranty and void it. By way of example, the following shall discharge
TrailManor from any express or implied warranty obligation to repair or replacing
resulting defects: any rental or other commercial use or purpose of the RV (as
defined in this warranty), damage caused by a separately manufactured
component, owner neglect or failure to provide routine maintenance (see owner’s
manual), unauthorized alteration, off road use, collision or accident, whether
foreseeable or not, any environmental damage or corrosion, theft, vandalism,
fire, explosions, overloading in excess of weight ratings, and tampering with any
portion of the RV.
LEGAL REMEDIES
Any action to enforce any portion of this limited warranty, or any implied
warranty, shall be commenced within six (6) months after expiration of the
warranty coverage period designated above. Any performance of repairs shall
not suspend any limitation period from expiring. Any performance of repairs
after the warranty coverage has expired, or performance of repairs regarding
anything excluded from coverage under this limited warranty shall be considered
“good will” repairs, and they will not alter the express terms of this limited
warranty, or extend the warranty coverage period or this limitation period in this
paragraph. In addition, this warranty is not intended to extend to future
performance, and no notion in this warranty, or any action of TrailManor, or any
agent of TrailManor, shall be interpreted as an extension of the warranty or this
limitation period. Some states do not allow a reduction in the statute of
limitations, so this restriction may not apply to you.
WARRANTY REGISTRATIONS
Your warranty registration records should be completed and delivered to the
manufacturers or component parts. The selling dealership will assist you in
completing and filling out the TrailManor product warranty registration form. To

14
avoid delays in obtaining the benefits of this limited warranty, you must return the
product warranty registration form to TrailManor within ten (10) days of the
service date. Your TrailManor warranty will not be registered unless this
registration form is completed and received by TrailManor. Failure to file this
warranty registration with TrailManor will not affect your rights under this limited
warranty as long as you can present proof of purchase, but it may inhibit any
servicing facility’s ability to provide proper repairs and/or part replacement in a
timely manner.
CARE AND MAINTENANCE
It is the owner’s responsibility to perform proper care and maintenance of the
RV, and to ensure correct load distribution. For details regarding this, please
see your TrailManor’s owner’s manual and the owner’s manuals of other
component part manufacturers. These outline various procedures that are
required to maintain your RV. Please review all manuals supplied with your RV,
and contact your selling dealership or supplier of the component part if you have
questions. Note: failure to maintain the RV as a result of your failure to perform
such are is not covered under this limited warranty.
Revised 01/01/2018

15
CHAPTER III
USAGE OF YOUR R.V.
HITCHES
We recommend that you install a class III hitch on your tow vehicle for use with
all TrailManor models. We also recommend load-equalizing hitches for front-
wheel drive vehicles. See your authorized TrailManor dealer or hitch specialist
for specific installation instructions. Also, refer to your tow vehicle owner's
manual for specific towing recommendations and load ratings.
LOADING
A properly loaded vehicle will perform better and handle more safely. Store
heavy gear first, keeping it on or as close to the floor as possible. Heavy items
should be stored directly over or slightly ahead of the axle(s). Distribute weight to
obtain even side-to-side balance of the loaded vehicle. Lighter items may be
stored in cabinets, wardrobes, and drawers. Luggage, televisions, or similar
cargo transported inside your RV should be secured to prevent damage in case
of a sudden stop. The Federal Certification Sticker is located on the off-door side
of the trailer, near the front. The sticker gives the maximum weight carrying
capacity of the trailer and each axle.
The Gross Vehicle Weight Rating (GVWR) is the maximum the trailer should
weigh with water and LP gas tanks full and with food, clothing, and all other
supplies aboard. Each axle has a maximum load bearing capacity referred to as
the Gross Axle Weight Rating (GAWR). Load equalizing hitch systems may
increase the load at the trailer axle. Refer to the hitch instillation instructions to
ensure proper weight distribution.
SAFETY CHAINS
Several states have specific safety chain requirements. Please contact your
state’s Department of Transportation to ensure compliance. As delivered by your
dealer, your vehicle is equipped with chains or cables to meet SAE standard
requirements for maximum gross trailer weight. Always have the safety chains
attached when towing. Install the safety chains so that they do not restrict sharp
turns of the tow vehicle-trailer combination, but tightly enough so they do not
drag the road.

16
"PINCH POINTS"
When setting up or closing your TrailManor, there are a few places to watch to
avoid pinching your fingers. Stay clear of the door when closing the trailer. Also,
keep hands away from the lift arms, lift arm pockets, and the bed supports
when opening or closing the trailer. Before lowering the trailer, always check
both sides of the trailer to ensure that no one else is near any pinch points.
CAUTION: DO NOT ATTEMPT TO RAISE ROOF SECTIONS FROM SIDE OF
TRAILER, FINGERS MAY GET CAUGHT IN LIFT ARM POCKETS CAUSING
SERIOUS INJURY.
WHEEL LUGS
Because of the possibility that wheel lugs could work loose, it is important that
you check your wheel lugs every 50 miles when new until 200 miles are reached
and then check lugs every 500 miles. The wheel lugs should also be checked
after winter storage, before starting a trip, or following extensive braking. Also
check wheel lugs after changing a tire. Over-tightening can distort the wheel.
WHEEL BEARINGS
Proper maintenance is an important step in achieving maximum bearing life and
reducing the risk of failure.
Please refer to Dexter xle or Lippert Axle: Operation Maintenance Service
Manual included in your owner’s manual binder for instructions.
TIRES
The tires on TrailManor trailers are high-pressure steel belted radials. Air
pressure should be kept at 50 p.s.i. for 14” tires and at 65 p.s.i. for 15” tires.
Always check the tires when they are cold, such as before traveling at the
beginning of the day. Under-inflated tires may cause slight swaying during
towing. Also, under-inflated tires will overheat, which may cause a blowout.
Tires tend to deteriorate with age. Tires should be inspected and replaced when
the tread or sidewall is cracked. This may occur before the tread shows
excessive wear. Tire warranty is covered by the manufacturer of the tires.

17
CHANGING A FLAT TIRE
Before you change a flat tire, pull well off the road, turn on your vehicular
hazard warning flashers, and place a reflective triangular highway warning
device a car’s length behind your trailer for safety. Follow these steps to
change the flat tire:
1. Open both tops of the trailer and secure open with the corner latches.
2. Remove fender skirt by removing screws fastening skirt and raise the
skirt several inches vertically.
3. Place a bottle jack just behind the wheel, under the frame member.
4. Jack the tire off the ground. Trailer stabilizer jacks should be lowered for
additional safety. CAUTION: Improper placement of jack may allow
tra ler to fall.
5. Remove all lug nuts from the wheel.
6. Remove flat tire.
. Replace with new tire.
8. Tighten each nut by hand until the wheel is against the hub. Tighten
wheel lug nuts firmly in a crisscross sequence. Be sure to tighten nuts
evenly and to proper torque specifications (90 to 95 foot pounds).
BRAKES
The brakes on your new TrailManor are electric and are integrated into the brake
system of your truck or car in such a way that equal braking power may be
distributed to both trailer and towing vehicle. Explained below are several
components that make up the brake system.
Please Note: Tra lManor Models Prov ded To The M l tary Are Normally
Equ pped W th Surge Brakes Instead of Electr c Brakes. Refer To The
Surge Brake Operat on L terature Included W th the Tra ler.
The battery of your tow vehicle is used as the primary source of power. No
additional source of power is required. From the battery, the power is taken to
the controller, which will be installed in your tow vehicle. With your tow vehicle
brakes off, the controller opens the electrical circuit so no current reaches the
trailer’s brakes. When the controller is actuated (manually or automatically by
your tow vehicle’s braking system), the controller varies the amount of current
through the circuit, which in turn varies the braking of your trailer. Refer to your
brake controller manufacturer’s instruction.
ENSURE YOUR TRAILER BRAKES ARE WORKING CORRECTLY. Pulling a
TrailManor trailer should not significantly increase your vehicle’s stopping
distance if the trailer’s braking system is working properly.

18
CAUTION: TEST THE TRAILER BRAKES BEFORE EACH TRIP. Brakes
should be tested before enter ng a ma n h ghway.
LEVELING YOUR TRAILER
Before attempting to level your trailer using the stabilizer jacks, ensure that the
trailer is relatively level at the wheels, rolling the trailer onto spacers and using
chocks as necessary. Overextending the stabilizing jacks, particularly on uneven
terrain, may result in a hazardous failure of the jacks.
The simplest way to level your TrailManor is using the two-point method. After
opening your trailer, place a bubble level on the refrigerator. Using the tongue
jack, level the trailer front-to-back. Use the rear scissor jack on the low side of
the trailer to level the trailer side-to-side. To lower the scissor jacks, crank
clockwise with the jack handle provided in the trunk. Once the trailer is level, you
can mount a bubble level permanently on the tongue of your TrailManor to aid in
future leveling. Then your trailer can be easily leveled before opening.
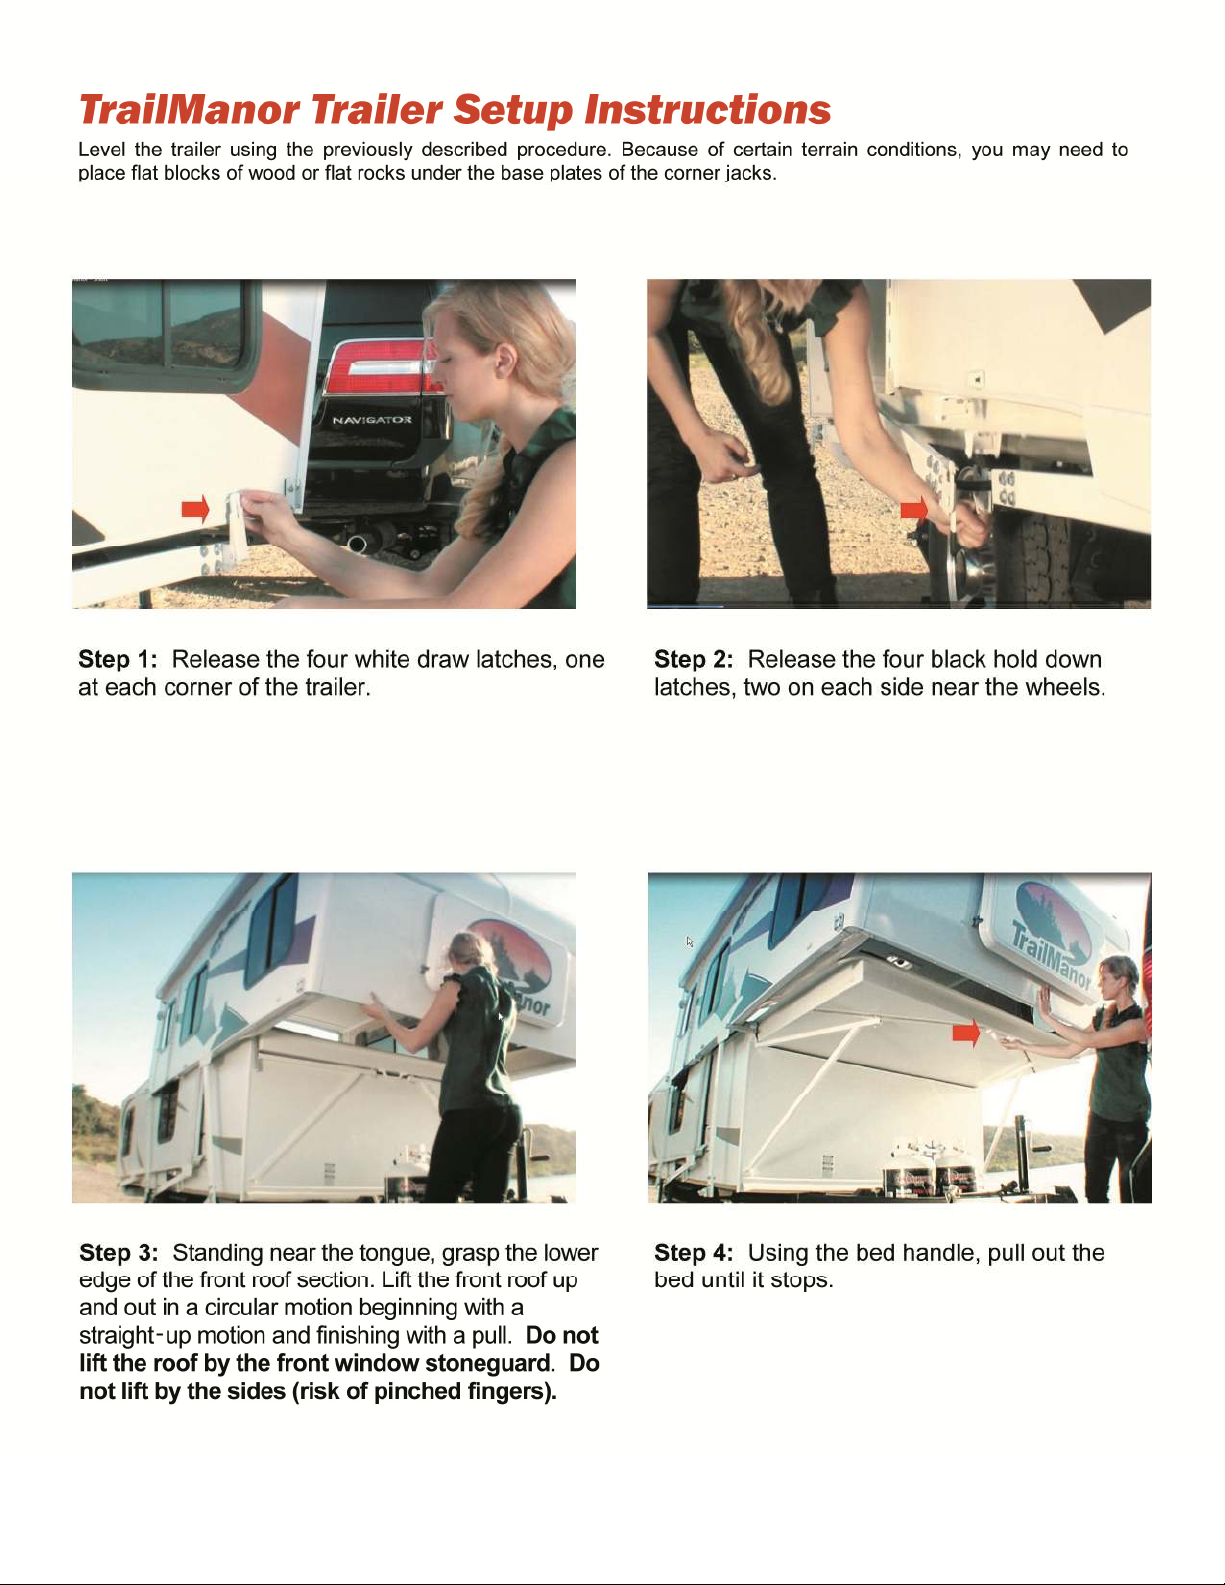
19

20
This manual suits for next models
12
Table of contents
Other TrailManor Motorhome manuals

Popular Motorhome manuals by other brands


Leisure Travel Vans
Leisure Travel Vans 2013 Unity owner's manual

Winnebago
Winnebago 2001 Ultimate Advantage owner's manual

Power Gear
Power Gear 1510000120 Installation & service manual

Pilote
Pilote P740 Evidence manual

Thor Motor Coach
Thor Motor Coach Tuscany owner's manual

Fleetwood
Fleetwood Tioga 1996 owner's manual

Fleetwood
Fleetwood EXPEDITION user manual

Winnebago
Winnebago 2006 Outlook Operator's manual

Swift Group
Swift Group Select 122 Owner's handbook

Fleetwood
Fleetwood 2014 Terra Storm owner's manual

Airstream
Airstream BAMBI 2023 owner's manual

FOUR WINDS INTERNATIONAL
FOUR WINDS INTERNATIONAL Chateau 2010 owner's manual