Treedental TR-DWD01 User manual

Instrument Washing Machine
TR-DWD01

01 Overview
Product Brief Introduction & Feature
The machine accord with the new oral disinfection
technical specification requirements, touch screen realized fully automatic
washing, simple operation, energy conservation and environmental
protection. the machine could show & print temperature at any time.
When setting the washing temperature to be 93°C, the A0 value reach and
above 3000, meeting the moist heat sterilization standard. The design of 2
layers mesh basket plus professional hand piece cleaning bracket and
super capacity can satisfy one-time cleaning of dental hand pieces,
appliance, surgical instruments and other experimental vessels. According
to the instruments type, our machine is optimized to provide six smart
washing procedures to meet the diversification of cleaning .
TR-DWD01

02 Safe Handling Attentions
Warning
Please read the instruction before using to avoid accidents
Incorrect grounding lead connection may take you dangerous.
Please check the reliability of the grounding lead connection. Do not use
self-buying power cord. If your socket is not match with our machine’s power
cord, please find a qualified electrician to match it for you
Do not use the washer before installing it properly
if the soft wire of power supply is damaged, in order to avoid danger, must ask
maker’s professional person to change for you.
Please do not use the function if the machine without.
When installing, do not over bend and squeeze the power cord.
Do not change the connection of the circuit board.
If overflow occurs, turn off the tap before repairing.
If the chassis is flooded due to overflow or leakage, the water must be wiped up
before starting the machine.
The machine must be used indoor.

Attentions
1.When the machine is working, please do not open the door to avoid burning
by the steam. If you need open the door midway, please press the "pause" button and
take safeguard protective, then open the door slowly.
2.Do not place any heavy object on the opening door of the machine. The door
should not keep in open status all the time.
3.Must be sure that the power cord of the machine is properly grounded. The
machine is with grounded lead’s connection terminal, so please use the matched
socket with the terminal. Please make sure that the power cord is connected, the
machine’s grounding wire can be effectively connected with public power of the
ground wire.
4.Do not place instruments over the cleaning tank.
5.Do not plug or pull the power plug by wet hand .
6.Do not wipe the surface of the machine by something with solvent and
abrasive.
7.Must avoid Strong electromagnetic interference when using.
8.Must use special Multi-enzyme detergent ,other products cannot instead of it.
9.The machine with water softener must use special salt, and it is not allowed to
replace the salt with edible salt. After adding salt, must run the washing program to
prevent the salt water overflow from corroding the filter, inner and other important
parts.
10.When maintenance the machine or long-term not using, must unplug the
power plug and turn off the faucet.

03 Technical Feature
Product Parameters
1.Power supply:220V 50Hz;Rated power:≤1760W
2.Rated external water pressure: 0.04-1.00MPa.
Supporting cold/hot water;
3.Internal flow pressure:0.3-0.4MPa;
4.Collocating intelligent water softener:Adding special salt can improve water
quality and enhance cleaning effect;
5.Safety device:Automatic fault diagnosis (prompt) and emergency shutdown;
6.Water inlet filter:Porosity 96%;The filter speed:20-85m/h
7.Lumen volume:160L;
8.Dry method:hot wind dry
9.Dimension-Main Unit:590*570*830(L*W*H mm);
10.Packing size:680*680*930(L*W*H mm);
11.Net weight:≤44.5kg;
12.Working Noise:≤50dB
Packing List
1.Mainframe 1 piece 7.Drain pipe 1strip
2.Cleaning basket 2 pieces 8.Specification 1 piece
3.Salt hopper 1 piece 9.Rubber Isolators 32pieces
4.Cleaning rack 1 piece 10.End cap 32pieces
5.Accessories basket 2 pieces 11.Measuring cup 2 piece
6.Water inlet 1 strip 12.Upper rack 1 piece

04 Installation Instructions
Remove the packing and install mounting plate.
Remove the packing, then open the front door of the machine and remove
accessories . It is strictly prohibited to test the machine on foam bottom mat or
cleaning it.
Place the washer
The ground should be solid and flat, you could the height of the machine can be
adjust the height through rotating the stand bar to
keep it in level.
Inlet pipe installation
The inlet pipe need connect to the inflow blast hole on the back machine, and the
inflow pipe’s elbow should be horizontal and same direction as the inlet water.
Drain-pipe connection
Put the outlet water end of the drain pipe into the sink or sewer line. In order to ensure the
washer’s performance , the length of
drainage pipe should be not exceed 5
meters, the hanging height of the drainage
pipe should be not higher than 600mm ,
not lower than 300mm.
Power connection
Connect the power socket well. The power voltage and frequency should be same as the
parameters of the product.
Power line
Inlet pipe
Inlet pipe nut Drain-pipe
Two t
y
pes
Type 1
Type 2
Max600mm
Detergent
drawer
Brightener
Open
05 Direction For Use
Dispenser Using
Gently press the open cover button to push outward along the direction of the
arrow. As the picture showing to open the drawer and add the needed
multi-enzyme detergent and brightener. Then you can push it to close it until the
“Ka”sound.
Detergent: The main washing water intake is about 3~3.5L, please add cleaning
enzyme at a ratio of 300:1 (that is, 300ml of water needs to add 1ml of cleaning
enzyme). also pls follow the instruction from detergent factory.
To fill the brightener about 70ml, it can be used for many times. And close the cover
of the brightener drawer.

Special Salt Addition
The salt to be soft the hardness of the water. If you
use the pure water. Pls do not need to add the salt.
Counterclockwise open the cover of the
water softener and insert the salt hopper.
Need add about 70g (10 pieces of special salt for
each machine, which can be used many times
for one addition. After adding salt, add water to
the water softener, do not overflow; clockwise rotate the softener cover to prevent
salt leakage from corroding the inner tank. If salt is spilled on the bladder, the
procedure must be run to flush once.
Note:The indicator light may not be off immediately after adding salt, which is normal
and will not affect normal use (Due to differences of water quality and room
temperature, it will take 2 to 6 days for salt to be dissolved and reach saturated state).
Baskets
The washing area of instruments cleaning machine is divided into two layers, which
can be used as per your demand。
open
Close

Upper hand pieces cleaning rack placement
The hand pieces are inserted directly into the rubber seat of the rack. Please do not put
it to the bottom to prevent water from flowing into the hand pieces. The rack can clean
at most 32 hand pieces each time. when the machine working, you could cover the end
cap on the rubber seat.
Bottom Layer
The sub layer basket can be used matching the accessory basket, It can be placed more
than 100 mouth mirror, 20 tooth forceps, 70 forceps apparatus sterilization box tray
and so on each time.
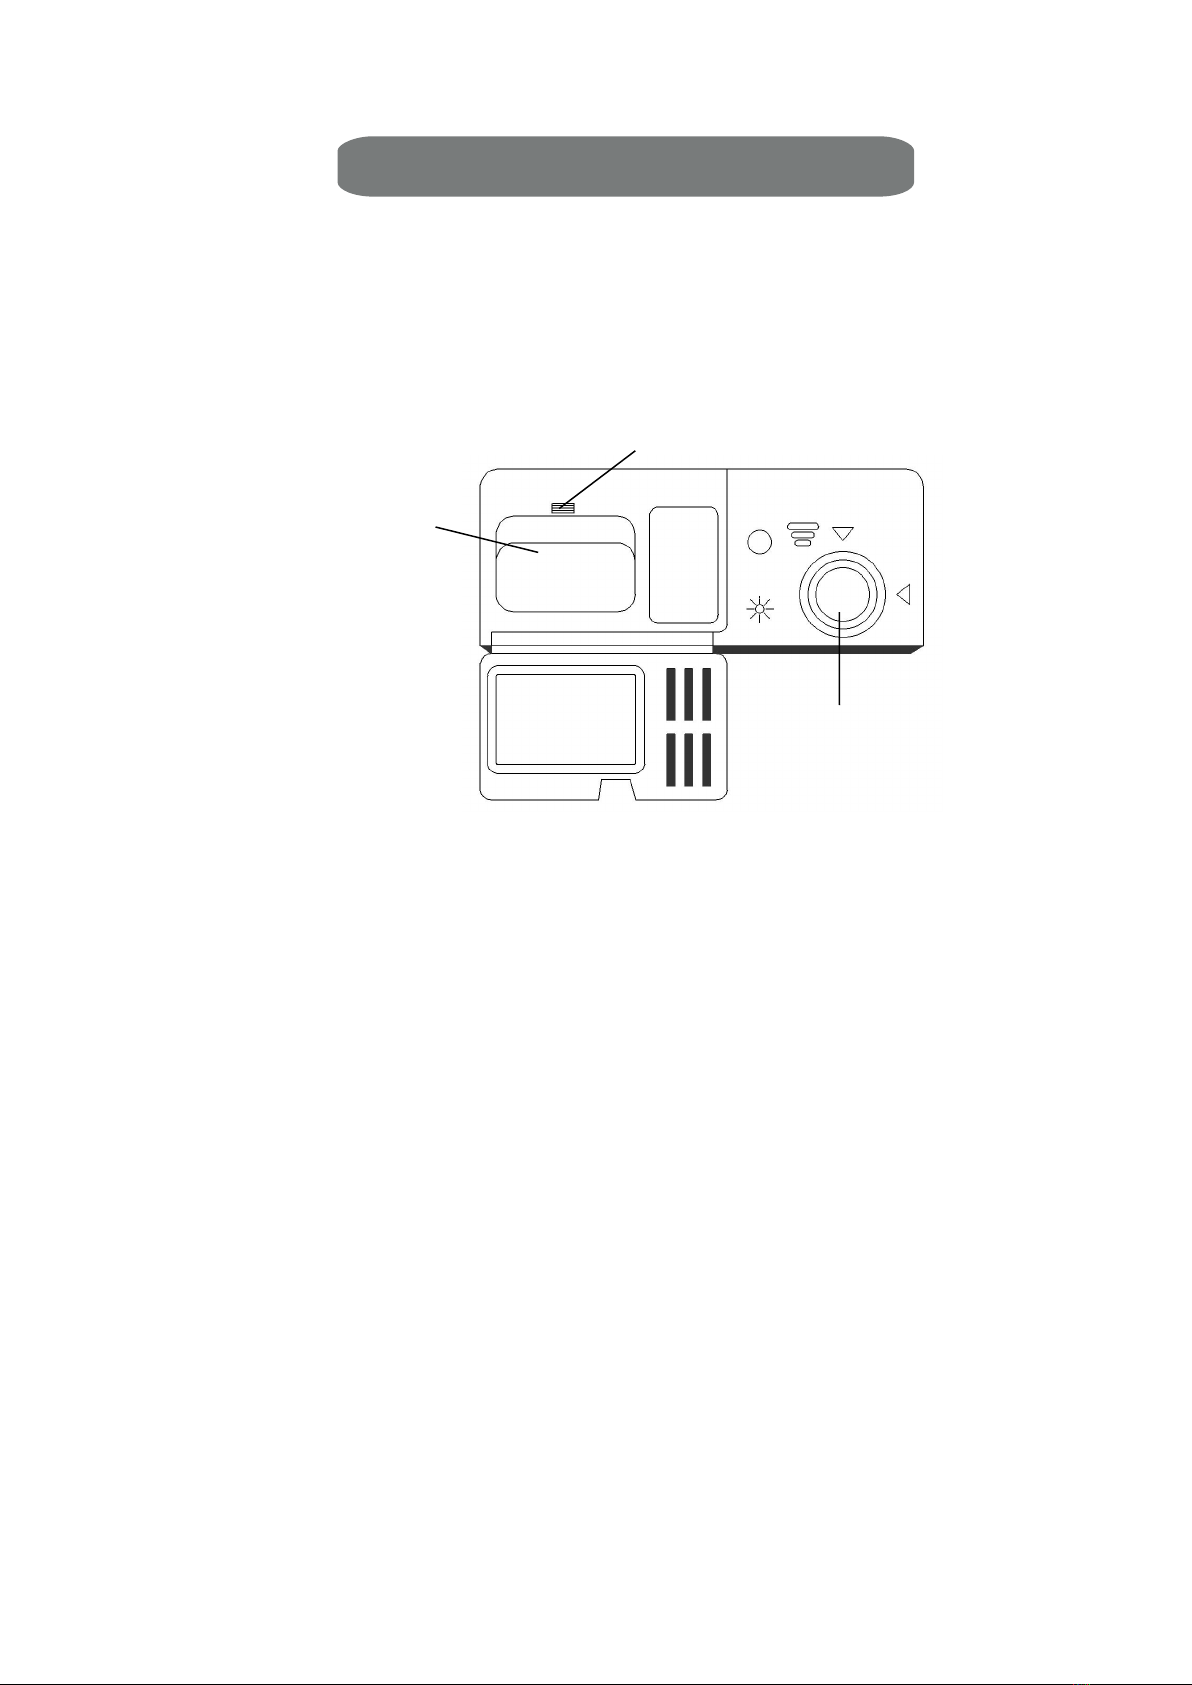
Description Of Control Panel
Display Screen Introduction
End cap
Hand pieces
Rubber Seat

The interface of the program choose
①
②
④
⑤
⑥
①choose the washing programs as per your requirements.
③
⑦
②Set up the Dry function:the dry function is closed by default. press the dry key,the
dry function is on when the key turn dark.
(not all the machine have the dry function)
③Set up Disinfect function:the disinfect function is closed by default.press the
disinfect key. The disinfect function is on when the key turn dark.
④The display of the water temperature
⑤Start/pause:after choosing the program, press the key . The program
start up. press the key to pause.
Notice: when the program is running, except the start/ pause key. other key are no longer
in force.
⑥Stop the program. Press the key .there will a notice “whether cancel this
program” . press yes, this program will be stop.
⑦when the program stop running, the machine can back to main interface.
Time
Operator
Set up system
Choose the programs

Back to interface:you can back to main interface
after setting up.
Set up the Date and time:touch it. you can edit
the date and time.
Set up the language: you can choose English or Chinese
Set up the printer:
You can set up open the printer
Or close the printer
Also you can edit the operator number
Set up the dry function:
You can set up the different dry time
As per the different programs.
Notice:The quick washing no the
dry function.

1
It could print the washing date,program,operator and the time with temperature on the
paper.
Press the ON/OFF button, enter ready mode;then press program button to select
washing mode you need on display screen interface, then press Start/Pause button, the
display screen will show the present program by words and enter washing status.
Note: when the washing program is running, the main setting interface is
forbidding using status.
Using Introduction
1. Connect the water inlet pipe and water drain pipe.
Date:2019/07/01
Program:Heavy pollution(70)
Operator:10000001
--------------------------------
09:21:35 30℃
09:26:35 35℃
09:31:35 39℃
09:36:35 40℃
09:41:35 38℃
09:42:52 Pause
09:58:31 Continue
30℃
10:03:35 32℃
10:08:35 38℃
---------------End-------------
①
③②
④⑤

2
3. Turn on the tape. Open the water valve (keep the water be on during washing).
2. Connect the power plug.
3. Open the machine’s door, press the button left as per the arrow indicating, open the
dispenser cover, pour the multi-enzyme detergent into the box then close it.
4. Place the instruments properly into the washer.
Then close the washer door and confirm the door
is closed and locked(A snap can be heard when
the lock is tight).

3
5. Press the ON/OFF, start power supply.
6. Select the washing procedure, then press the start/pause button for cleaning.
7. The machine will finish the washing work when the buzzer give the sounds like
“Di Di....” 6 times. The dry procedure will start to work.
8. Open the machine door after finish washing 5 minutes and remove the instruments.
Note: when the program is running, if you need change program, please press power
button and re-start to enter program selecting main interface.
There are small amount of steam once the water temperature up to 90℃. in order to
help the machine to Difuse the steam. Pls open the door in time after the machine
finish the program.

4
Washing Procedure Introduction
Notes: For example, with the "+disinfection" function, the running time will be
extended by about 30 minutes; with the "+drying" function, the duration can be set by
yourself. The total cleaning time is the running time of each program + disinfection
time + drying time.
The running time values provided in the table are for reference only, and there may be
differences in actual use due to differences in ambient temperature, tap water
temperature, pressure and cleaning equipment.
06 Malfunction Analysis & Exclusion
Common Fault Solving
When the washer break down, you check the Malfunction Analysis & Exclusion to
help you deal with some common faults. If you cannot solve the problem by yourself,
please ask a professional for help.
programs Description Detergent
Running time
(minutes)
Extra
program
Heavy dirty
Heavy pollution or stored
long time
10ml 65
+dry
+disinfect
Light dirty
Light pollution or
immediately washing
10ml 50
+dry
+disinfect
Handpiece
Short washing time for
hand piece
10ml 40
+dry
+disinfect
Quick
washing
Short time washing with
cold water
0ml 12 ——

5
Malfunction Possible Cause Solutions
The washer
can not
operate
Fuse blowout,
Breaker off.
Replace the fuse or reset the circuit breakers
and disconnect other devices that share same
line with the washer.
The power is not
on.
Make sure the power is turned on and the
door is closed. Make sure the power plug is
properly connected to the socket.
Water pressure is
too low.
Check the water inlet equipment to make it
connected ok and the faucet turned on.
The
drainage
pump cannot
stop.
Overflow occurs
The washer with overflow protector, When
overflow occurs, the circulating pump will be
closed and the drain pump will be opened.
Noisy
The internal
instruments were
not placed correctly
Make sure each instrument in the washer is
properly placed.
The pump hum
If the washer is not used regularly, need make
sure the water inflow and drain every week,
which could keep the sealing strip moist.
There is
foam
Incorrect use of the
detergent
Please use special detergent. If foam occurs,
running the cleaning process until the foam
cleared away.
There is
steam
Normal
phenomenon
When draining, a bit amount of steam leaks
through the door
Water
remains on
the inner
bottom
Normal
phenomenon
A bit amount of water on the inner bottom
could keep the sealing strip moist.
Leak water Uneven installation
of machine Make sure the washer is in level.
Error code: in case of failure, the washer control LCD section will display as
follows:
Display usage Implication Possible cause Solutions
The prerinse
indicator
flashes quickly
Water inflow
anomalies
The water
pressure is too
low;
Inlet pipe
clogging;
Check whether the faucet is
open and check the water
pressure or ask professional
maintenance person to repair.

6
Faucet is not
open.
The instrument
indicator
flashed quickly
Overflow
occurs
some parts of the
washer is leaking
Please turn off the tap and ask
professional maintenance
person to repair it
07 Maintenance
Maintenance
1.Wipe the washer door’s edge with a soft wet cloth every day.
2.Cut off the water and open the door slightly to prevent moisture and odor.
3.Clean the filter.
In order to maintain a good performance and washing effect, you should clean
the filter components regularly. Remove the coarse filter after each washing and rinse
under running water, Unscrew the lifting cup, then lift up to remove the lifting cup
and filter components. the filter components should be cleaned each week, Brush can
be used to clean the coarse filters and micro-filters.
Storage Conditions
The washer should be stored in a cool and dark place that the relative humidity
not more than 80% without corrosive gas and good ventilation after packing.

7
Transport Conditions and Methods
The washer can be transported by common vehicle after packing, but we should
prevent the violent impact, vibration, rain or snow splash in transportation.
Table of contents


