Trent&Steele TS7050 Operating and maintenance manual
4
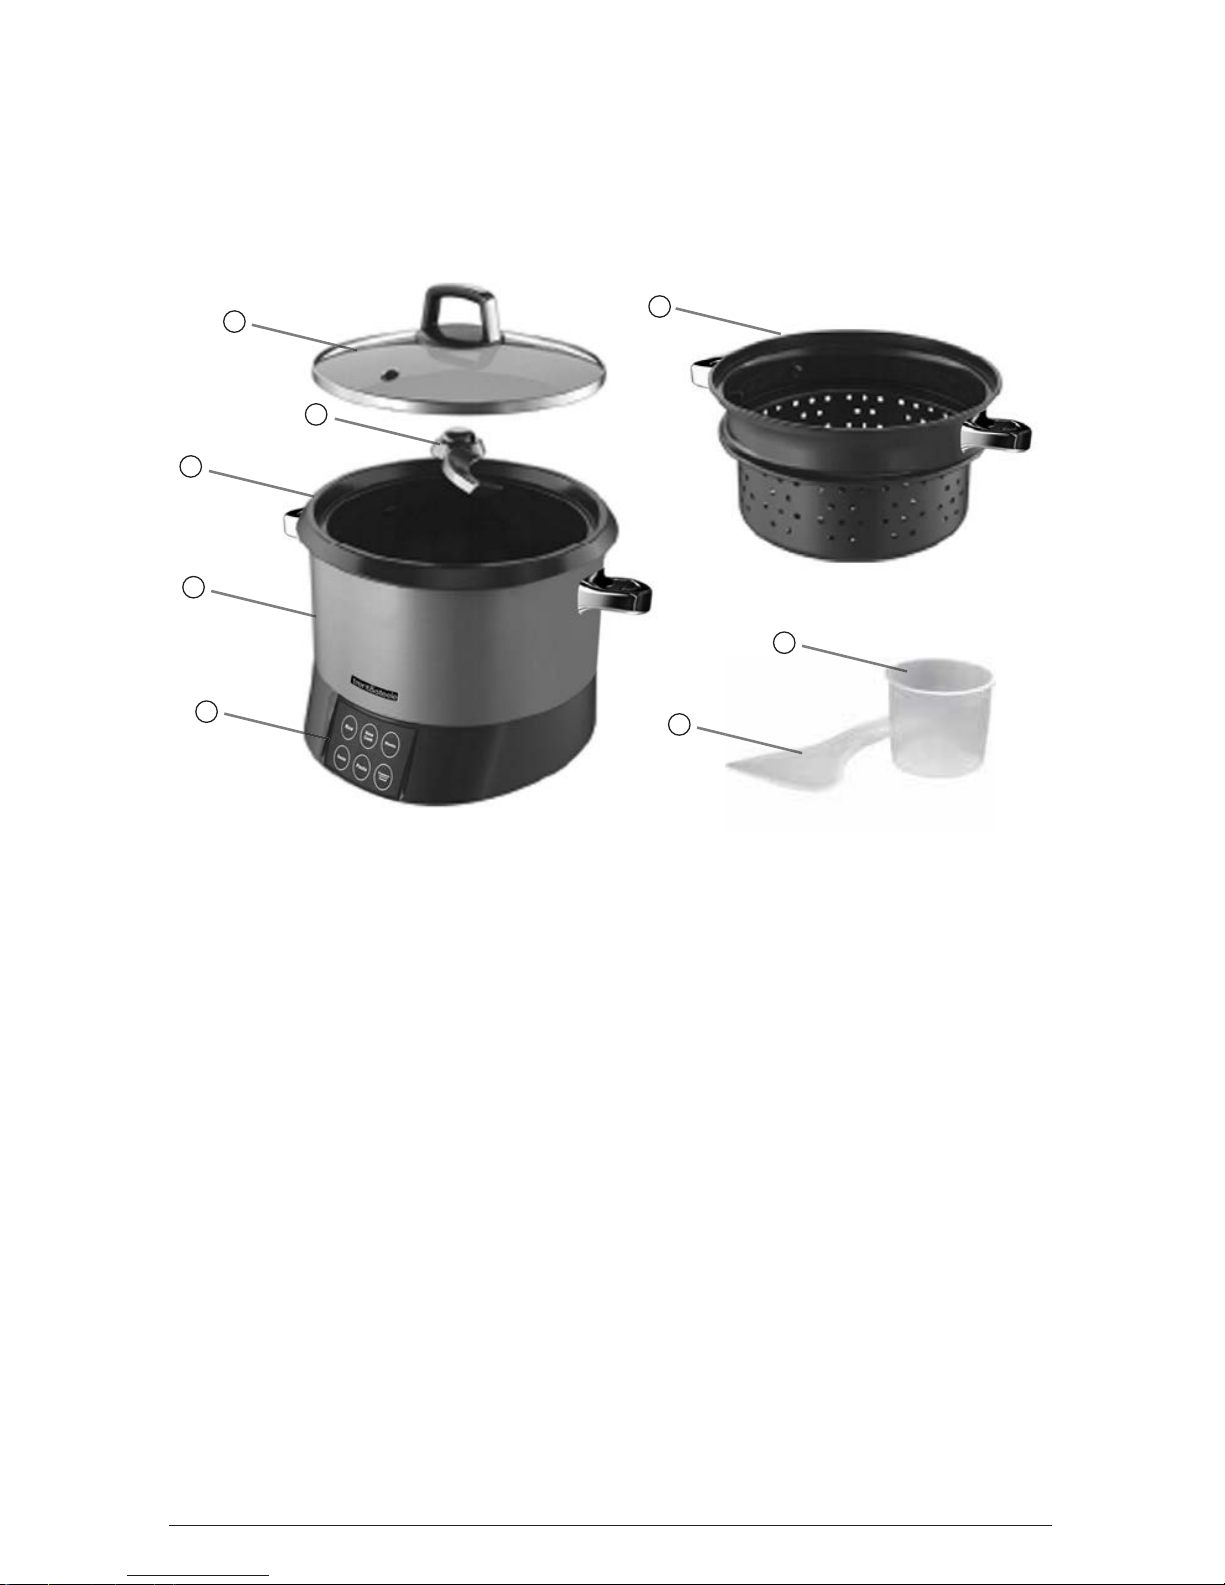
Product may vary slightly from what is illustrated.
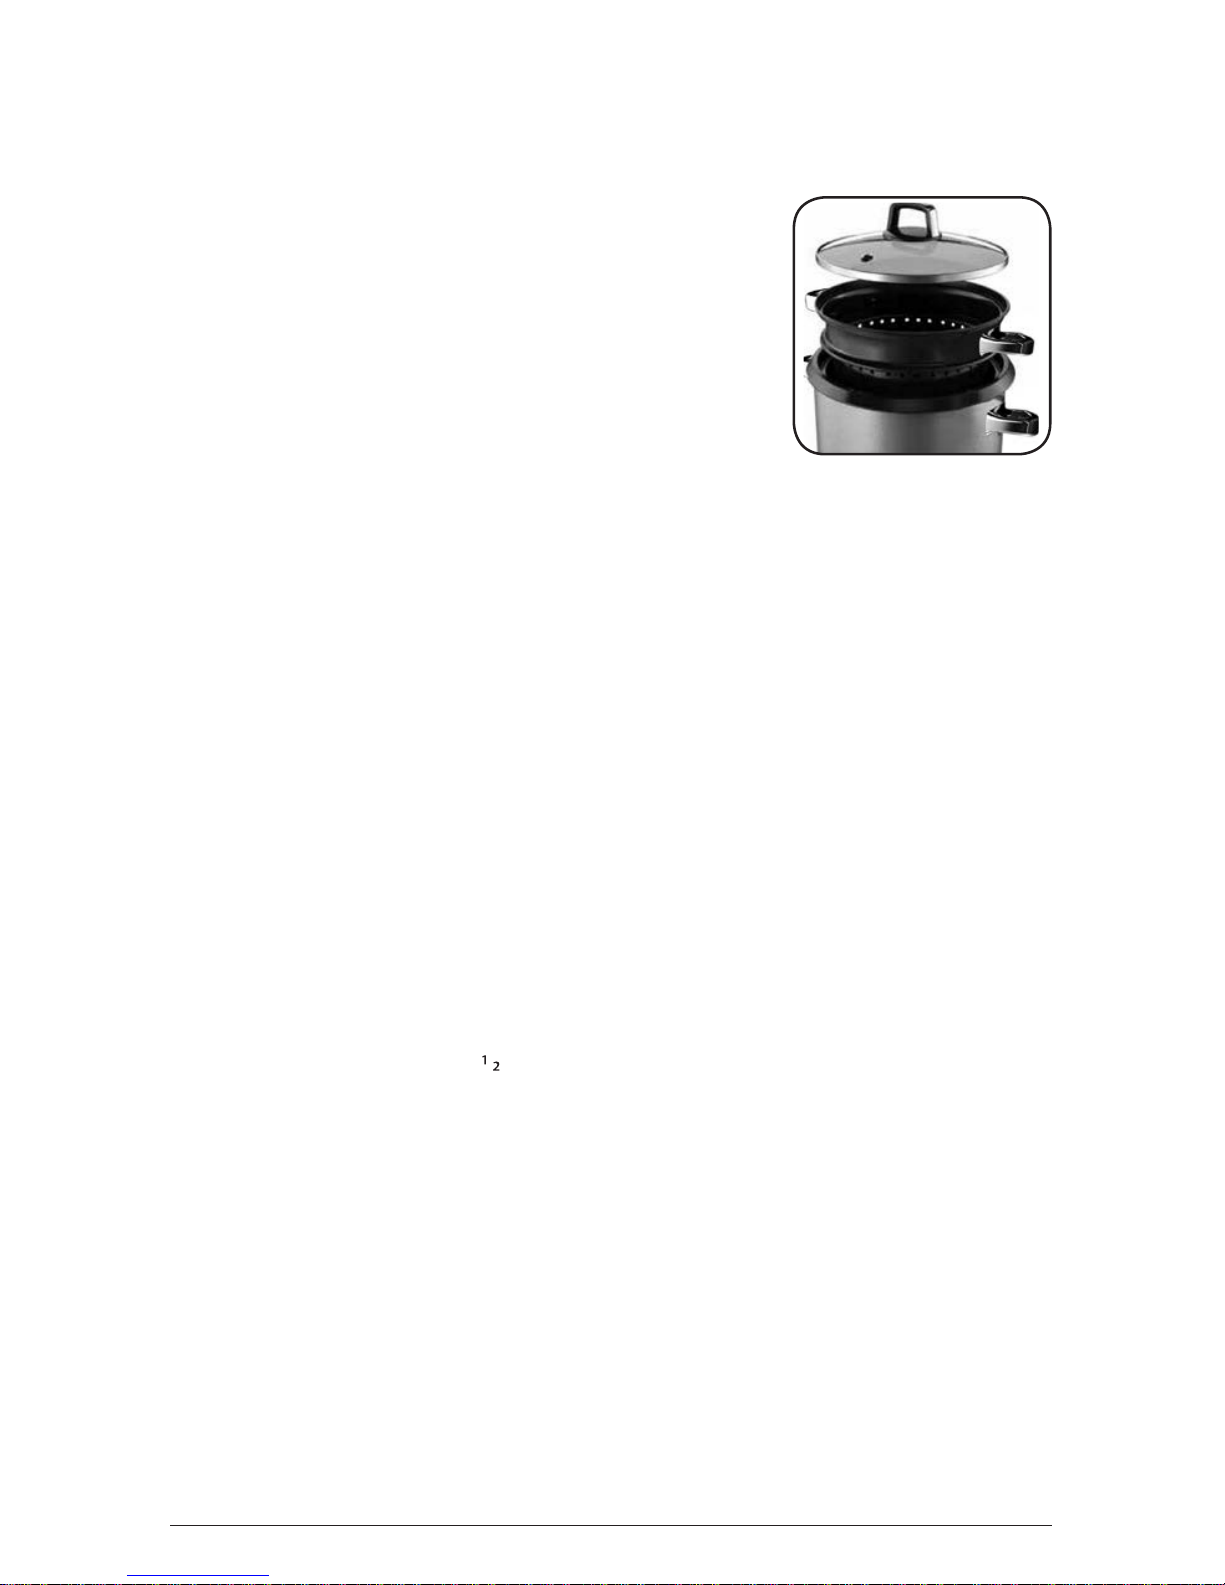
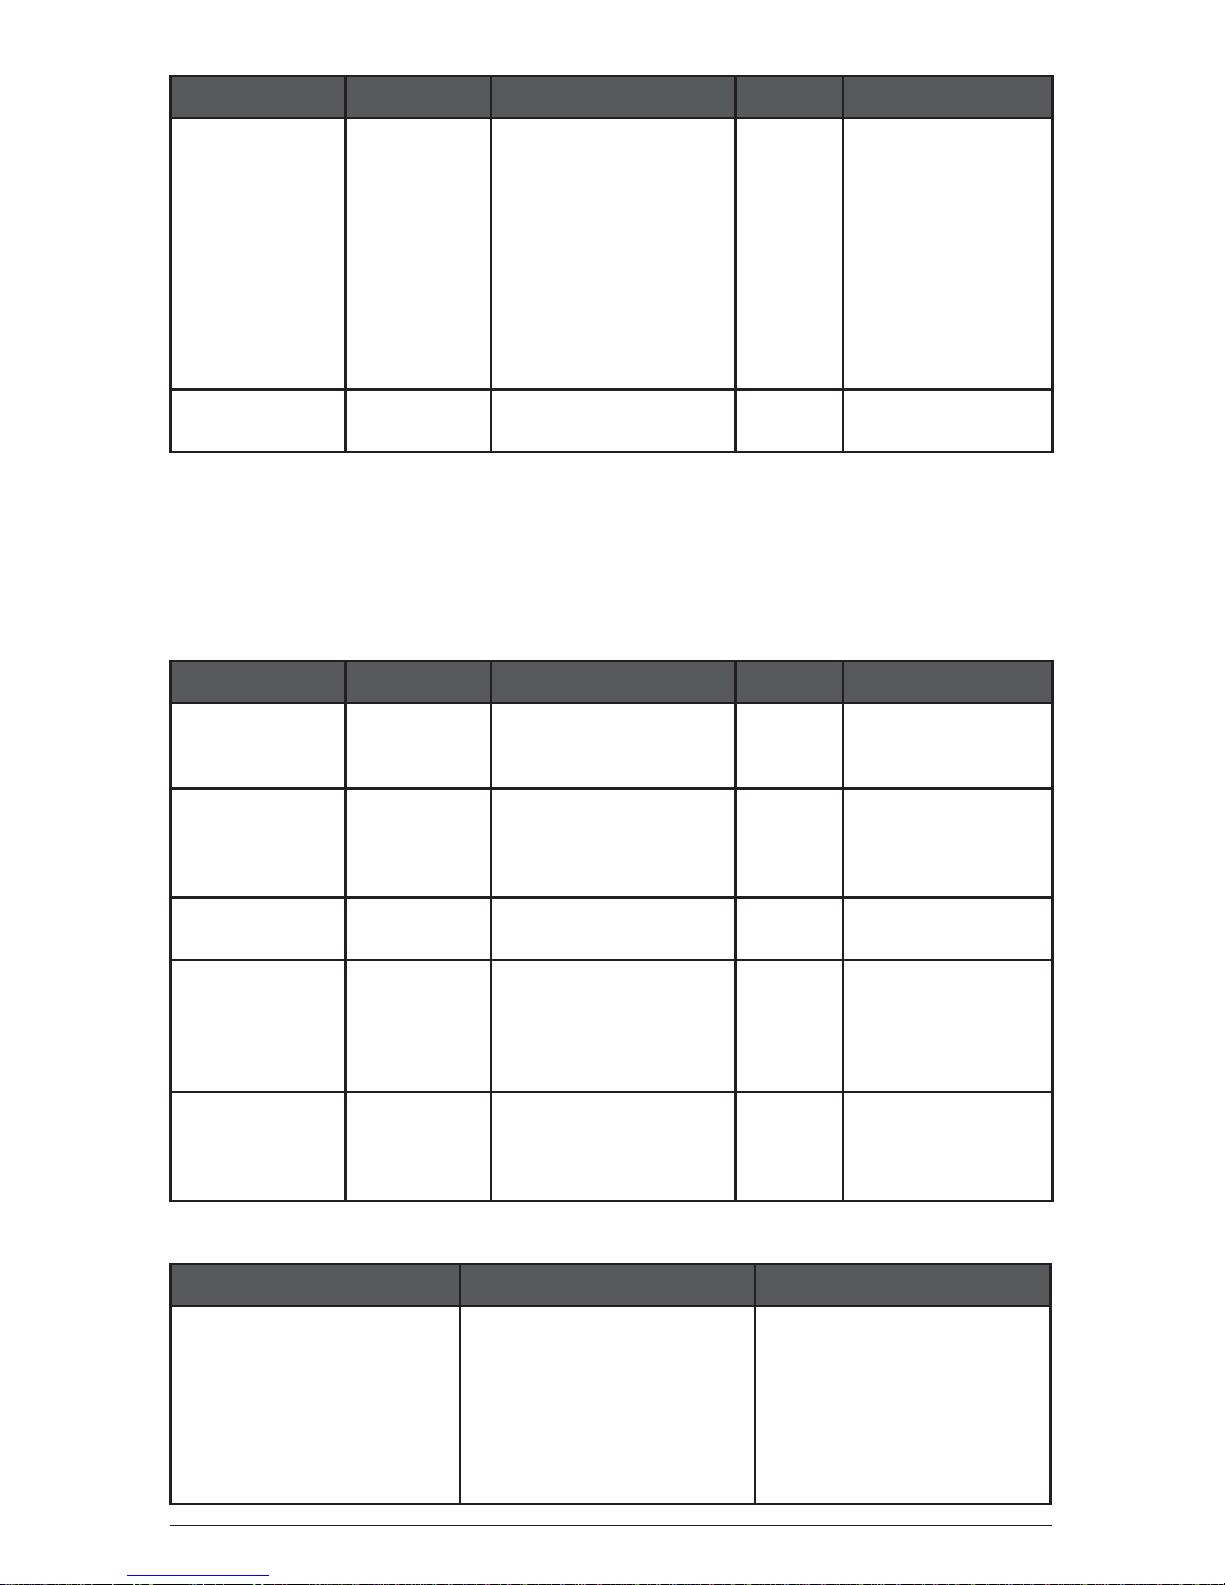
GETTING TO K NOW Y OUR MUL TI COOK ER
1. Tempered G lass L id
2. Stirring Arm
3. Cooking Bowl
4. Base Unit
5. Control Panel
6. Steam Basket
7. Rice measuring cup
8. Serving spoon
9. Power Cord Socket
(on back of Base Unit,
not shown)
1
2
8
7
3
4
5
6

5
GETTING STAR TED
This appliance is intended for household use only.
Remove all packing material, any stickers, and the plastic band around the
power plug.
Wash all removable parts as instructed in CARE AN D CL E AN I N G .
Place the clean, dry cooking bowl in the cooking base.
Select a location where this unit is to be used. Place the unit on a stable, heat
resistant surface, free from cloth, liq uids and any other ammable materials.
E nsure that the unit has enough space all the way around and above it to
allow heat to ow without damage to cabinets or walls.
IMPOR TANT INFOR MATION AB OUTY OUR APPL IANCE
This cooker gets hot. When in use, always use hot pads when touching any
part of the appliance.
D uring the first few minutes of use you may notice smoke and a slight
odor. This is caused by oil that may have been used during manufacturing
of the unit and will not impact the performance.
To switch to different functions on the appliance, you must be in the
cancel mode. The blue indicator light will be ashing above the keep warm/
cancel function. The unit is then in cancel mode and you will be able to
switch to another function.
As in most cooked meals, steam will escape through the vent in the lid.
Place glass lid on the M ulti Cooker so the steam vent is facing away
from cabinets and walls. D o not place hand over steam vent while rice is
cooking; the hot steam may burn.
Use the provided plastic serving spoon to remove food and a wooden
spoon to stir. D o not use metal utensils that can scratch the nonstick
cooking bowl.
D o not fill the cooking bowl higher than highest water marking measurement.
OPER ATING Y OUR MULTI COOK ER
There are six ways to use your M ulti Cooker; Cooking directly in the cooking
bowl (for rice, oatmeal and more), making pasta or steaming with the
provided steam basket, sauté ing in the cooking bowl, making risotto
utiliz ing the stirring arm, or slow cooking (high setting). D irections for each
are outlined below:
COOK ING R ICE
1. Plug in the appliance. The blue indicator light will start flashing above the
keep warm/cancel button. The appliance will remain in the cancel function
until the rice button is pressed.
2. Place cooking bowl into the cooking base. Use the rice measuring cup provided
with the appliance to measure the desired amount of rice (no more than 10
6
rice measures). Fill the cooking bowl with water to the corresponding water
marking, i.e. for 1 rice cup measure, fill to the 1 cup water marking, etc.
Note: D o not use a standard measuring cup. One rice measure holds
approxi mately 2/3 cup, which yields approxi mately 1 cup of cooked rice.
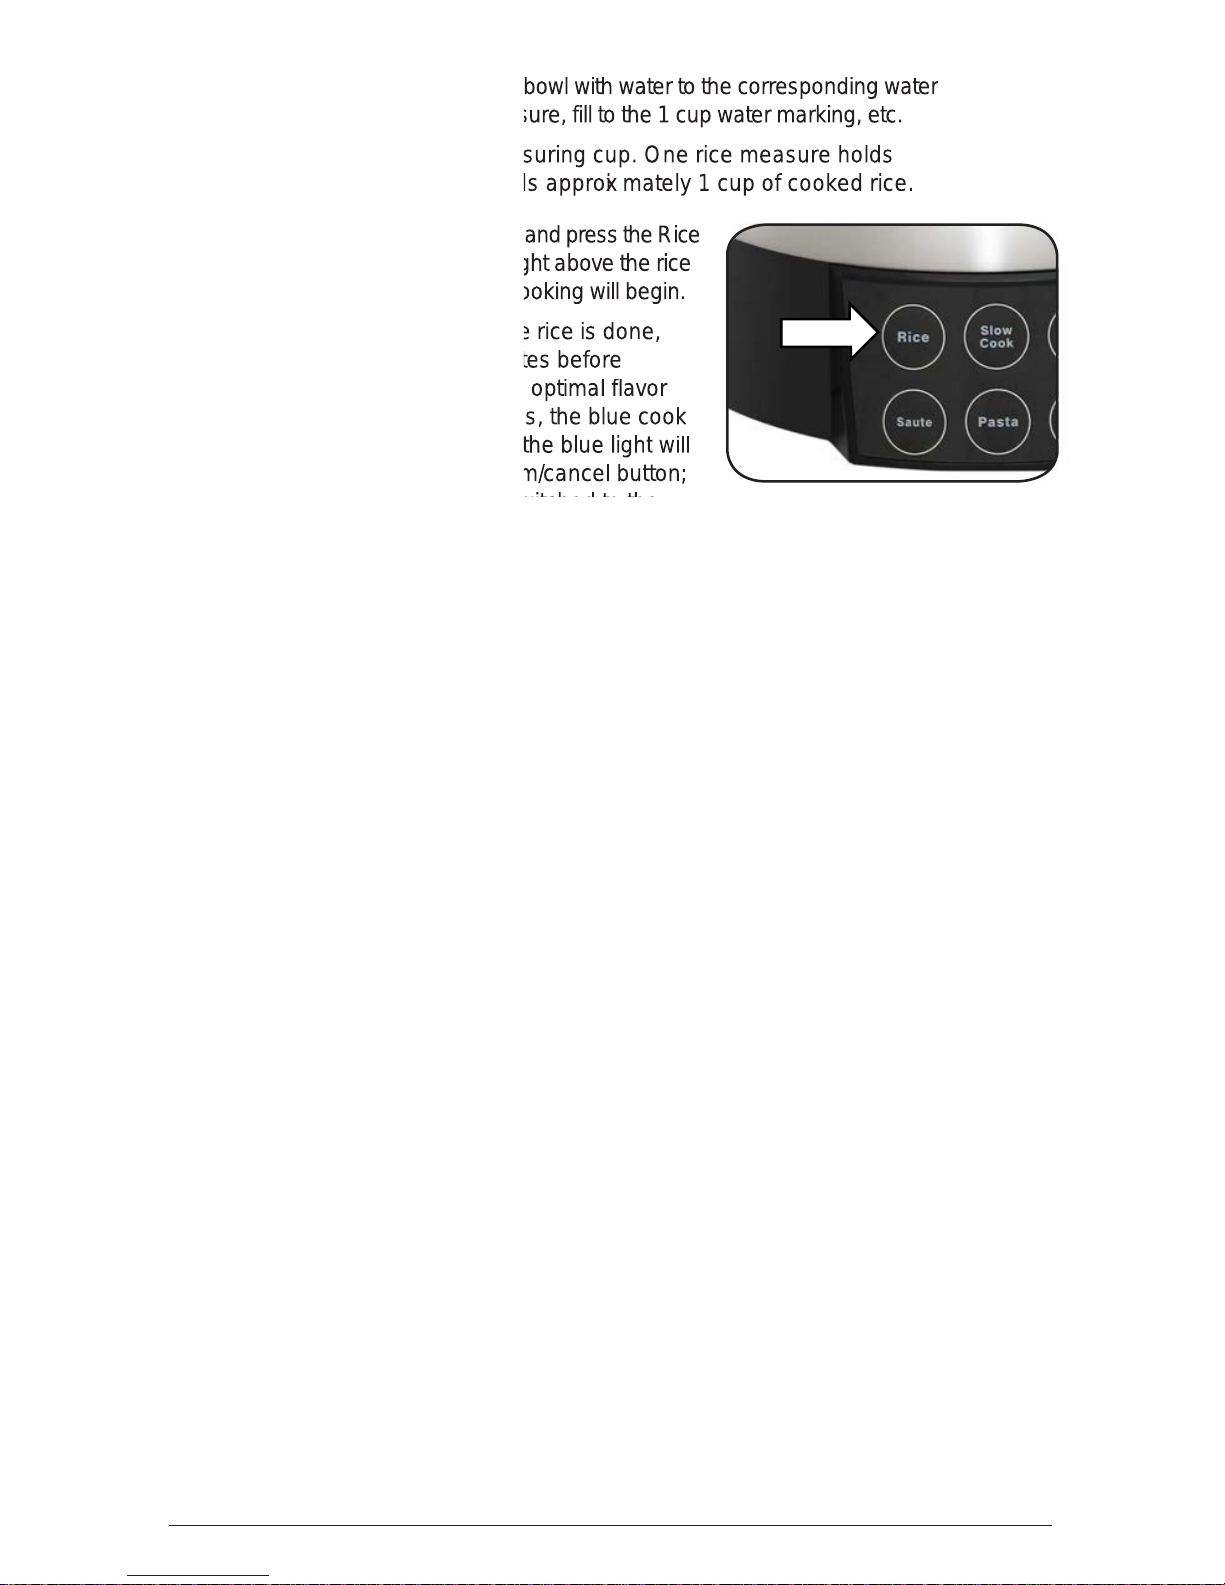
3. Place the lid on the cooking bowl and press the Rice
button. (A) The cook indicator light above the rice
button will illuminate blue and cooking will begin.
4. W h en c ook i n g r i c e: Once the rice is done,
the rice will rest for 8– 10 minutes before
switching to keep warm for the optimal flavor
and tex ture. After 8– 10 minutes, the blue cook
indicator light will shut off and the blue light will
illuminate above the keep warm/cancel button;
indicating the appliance has switched to the
warm function. The warm indicator light will stay on until the appliance
is unplugged. The cooking bowl may be hot. Always use hot pads when
removing bowl.
W h en c ook i n g s ou p s , s tew s , etc : Use a kitchen timer to determine the
cook time, as the appliance will not switch to warm when the cooking
cycle is complete for these types of foods. Y ou can manually switch the
appliance to warm by pushing the keep warm/cancel button twice. When the
blue light is solid blue, the unit is in the keep warm setting. The cooking
bowl may be hot. Always use hot pads when removing bowl.
5. Unplug the appliance when not in use. Always allow it to completely cool
before cleaning.
SAUTÉ ING
1. Plug in the appliance; the blue indicator light will start flashing above
the keep warm/cancel button. The appliance will remain in the cancel
function until the sauté button is pressed. Place cooking bowl into the
cooking base.
2. Press the sauté button. The cook indicator light above the sauté button
will illuminate blue and cooking will begin.
3. Place the lid on the cooking bowl and preheat for approx imately 3– 6
minutes.
4. Once preheated, add the food and any needed liq uids into the cooking
bowl to sauté . M anually stir as needed to ensure desired results.
Note: D o not use metal utensils as it could scratch the nonstick finish.
5. When the sauté ing is done, either continue cooking with the
instructions listed in the “ H elpful H ints” section or turn the appliance to
warm by pressing the keep warm/cancel button twice. When the blue light
is solid, the unit is in the keep warm setting. The cooking bowl may be
hot. Always use hot pads when removing bowl
rice measures). Fill the cooking bowl with water to the corresponding water
for 1 rice cup measure, fill to the 1 cup water marking, etc.
D o not use a standard measuring cup. One rice measure holds
approxi mately 2/3 cup, which yields approxi mately 1 cup of cooked rice.
3. Place the lid on the cooking bowl and press the Rice
button. (A) The cook indicator light above the rice
button will illuminate blue and cooking will begin.
Once the rice is done,
inutes before
switching to keep warm for the optimal flavor
and tex ture. After 8– 10 minutes, the blue cook
off and the blue ligh
t
will
illuminate above the keep warm/cancel button;
indicating the appliance has switched to the
A
7
6. Unplug the appliance when not in use. Always allow it to completely cool
before cleaning.
PASTA
1. Plug in the appliance; the blue indicator light
will start flashing above the keep warm/cancel
button. The appliance will remain in the cancel
function until the pasta button is pressed.
2. Fill the cooking bowl with water, up to the 9 cup
marking and place into the cooking base. Then
place the pasta basket in the cooking bowl. (B)
3. Press the pasta button. The cook indicator light
above the pasta button will illuminate blue and
heating will begin.
4. With the lid on, allow the water to come to a boil. Add up to 8 ounces of
pasta to the steam basket.
5. Cook pasta, uncovered, according to package directions. Once pasta is
cooked to desired consistency, use hot pads to remove the steam basket
to drain the pasta water into the cooking bowl.
6. When the pasta is done, press the keep warm/cancel button once.
When the blue light is flashing, the unit will stop cooking. The steam
basket handles may be hot. Always use hot pads when removing
basket.
7. Unplug the appliance when not in use. Always allow it to completely cool
before cleaning.
STEAMING (PASTA FUNCTION)
1. Plug in the appliance; the blue indicator light will start flashing above
the keep warm/cancel button. The appliance will remain in the
cancel function until the pasta button is pressed.
2. Fill the cooking bowl with 1 /cups of water and place in the cooking base.
3. Place the foods to be steamed inside of the steam basket and
set the basket inside of the cooking bowl. (B) The water level in the
cooking bowl should not be touching the basket. Cover with lid.
Note: Always keep lid on while steaming.
4. Press the pasta button. The cook indicator light above the pasta button
will illuminate and heating will begin.
5. Steaming times vary between vegetables and food types; begin
checking for doneness after initial 5 minutes. Refer to the Steaming
Chart in this instruction manual for additional steam times.
Note: When steaming vegetables or other foods without rice in the cooking
bowl, the unit will not automatically switch to warm.
6. When steaming is done (if not also cooking rice) press the keep warm/
cancel button once. When the blue light is flashing, the unit will
B
8
stop cooking. The steam basket handles may be hot. Always
use hot pads when removing basket.
7. Unplug the appliance when not in use. Always allow it to completely cool
before cleaning.
R ISOTTO
1. Plug in the appliance: the blue indicator light will
start flashing above the keep warm/cancel button.
The appliance will remain in the cancel function until
the risotto button is pressed.
2. Place cooking bowl into cooking base. Fit the
stirring arm over the prongs on the drive shaft
in the base of the cooking bowl. (C)
3. Press the risotto button. The cook indicator light above the risotto
button will illuminate blue and the unit will begin heating. The stirring
arm will start rotating after approx imately 5 seconds. The stirring arm
will cycle off and on during cooking to create the best consistency.
4. Place the lid on the cooking bowl, and let the M ulti Cooker preheat for
approx imately 3– 6 minutes.
5. Once preheated, add ingredients (Arborio, onion, garlic, etc.) and any
necessary liq uid. Cook according to recipe or package directions.
6. Place the lid back on the cooking base and allow the stirring arm to cook
the risotto.
7. Once the risotto is done, the blue cook indicator light will shut off
and the blue light will illuminate above the keep warm/cancel button. The
warm indicator light will stay on until the unit
is unplugged. The cooking bowl may be hot.
Always use hot pads when removing bowl.
8. Unplug the appliance when not in use. Always
allow it to completely cool before cleaning it
and the stirring arm.
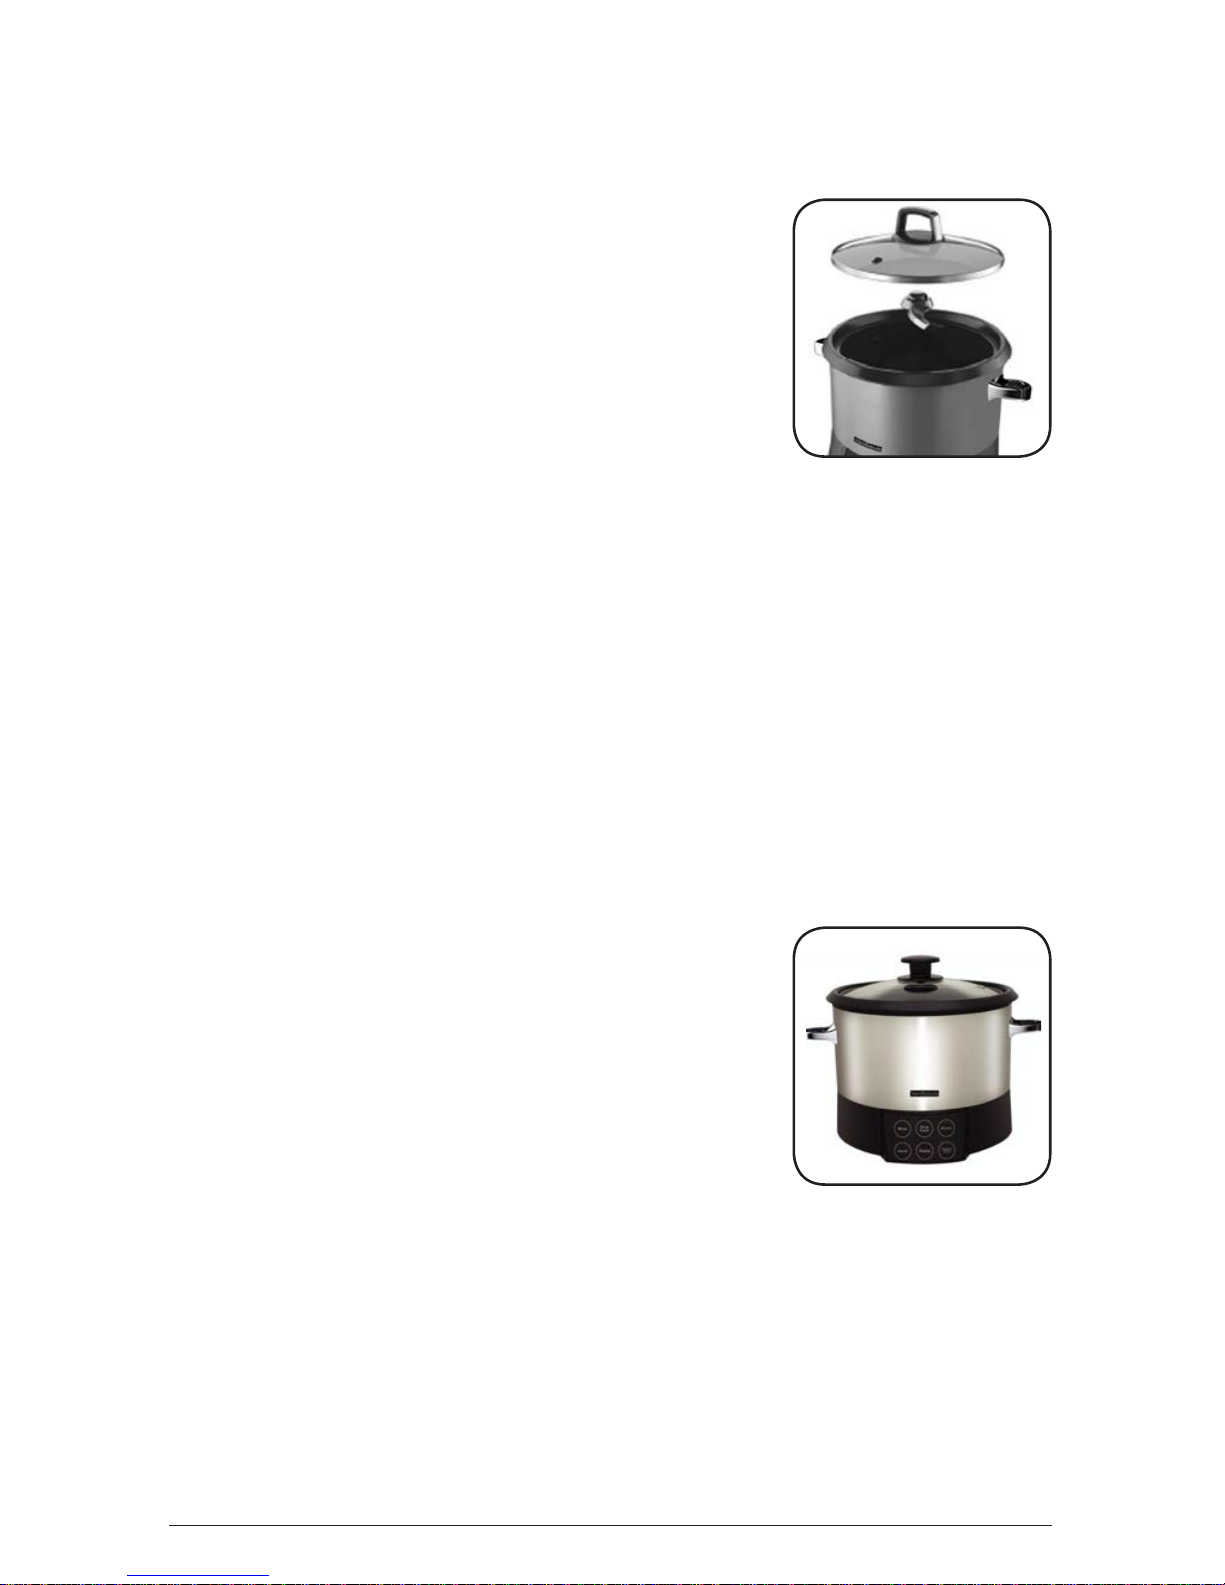
SL OW COOK
1. Plug in the appliance; the blue indicator light
will start flashing above the warm/cancel
button. The appliance will remain in the cancel function until the slow
cook button is pressed.
2. Place the cooking bowl into the cooking base and fill with desired
ingredients. (D ) D o not fill above the 9 cup marking inside the cooking bowl.
3. Press the slow cook button. The cook indicator light above the slow
cook button will illuminate blue and the unit will begin cooking.
NOTE: The slow cook function is a high setting and will cook foods faster
than a normal low setting.
C
D

9
4. The slow cook function will cook foods up to 8 hours before the unit will
switch to keep warm. I f your recipe calls for less time, manually switch
the unit to keep warm by pressing the keep warm/cancel button twice.
When the blue light is solid, the unit is in the keep warm setting. The
cooking bowl may be hot. Always use hot pads when removing bowl.
5. Unplug the appliance when not in use. Always allow it to completely cool
before cleaning.
CL EANING AND CAR E
This product contains no user serviceable parts. Refer service to q ualified
service personnel.
CL EANING
Im p or ta n t: N ever immerse cooking base in water or other liq uids.
1. Always unplug M ulticookerandallowtocoolcompletely before cleaning.
2. Wash cooking bowl and glass lid in warm, soapy water. I f food sticks to
the cooking bowl or stirring arm, fill the bowl with warm, soapy water
and allow it to soak before cleaning with plastic scouring pad.
Note: The cooking bowl, glass lid, steam basket, and stirring arm are
dishwasher safe.
3. Wipe interior and ex terior of the cooking base with a soft, slightly damp
cloth or sponge. N ever use abrasive cleaners or scouring pads to clean
the cooking base, as they may damage the surfaces.
4. Allow to dry thoroughly before storing.
STOR ING
M ake sure that the appliance is thoroughly cool and dry. N ever wrap the cord
tightly around the appliance; keep it loosely coiled. Placing the lid on upside-
down for storage can help save space.
HEL PFUL H INTS AND TIPS
R ICE TIPS
When measuring uncooked rice; do not use a standard 1 cup measuring cup.
A standard rice cup is / cup; the same siz e as the provided measuring cup.
One / cup (5 uid oz .) of dry rice will yield approxi mately 1 cup of cooked rice.
Rinse the rice with water to remove any ex cess starch and then drain.
H ow to use the water markings
- Scoop in the desired amount of rice into the cooking bowl using the
provided rice measuring cup.
- Fill the cooking bowl with water to the corresponding water marking, i.e.
for 1 rice cup, fill to the 1 cup water marking, etc.

10
To reduce foaming, add a small amount of butter or oil to the water
before cooking.
K osher salt has no impurities and dissolves faster than table salt. I f using
kosher salt, you may find you want to add a little more than if using table
salt. About ¾ tsp. of kosher salt is recommended for each rice cup
of uncooked rice.
White rice can be stored in an airtight container in a cool dark place for
up to one year.
Brown rice can be stored in an airtight container in a cool dark place for
up to six months. Refrigeration or freez ing ex tends its shelf life.
Try using broth, stock or reconstituted bouillon in place of water for
additional avor. I f you do, no additional salt may be necessary.
D o not keep small amounts of rice in the warm cycle for ex tended periods
of time because it can dry out the rice.
D uring cooking, a thin crust may develop on the rice at the bottom of the bowl.
I f you do not like rice with a crust, you can easily peel it off and discard it.
Taste/firmness will vary depending on the q uality/type of rice used and
length of time it is cooked. For softer, uffier rice, add a little more water.
For firmer rice, use less water.
For other types of grains not listed in the cooking chart, follow package
directions.
CH AR T FOR R ICE COOK ING
I f desired, add seasonings and oil or butter with rice before adding water.
AM OUN T OF RI CE AM OUN T OF
WATE R APPROX .
COOK I N G TI M E Y I E L D
(standard
8 oz . cups)
FOR WH I TE L ON G G RAI N , J ASM I N E , BASM ATI , Y E L L OW, OR M E D I UM G RAI N RI CE
2 rice measures to 2 mark 21 to 26 minutes 3.5 cups
3 rice measures to 3 mark 23 to 28 minutes 5.3 cups
4 rice measures to 4 mark 25 to 30 minutes 7 cups
5 rice measures to 5 mark 27 to 32 minutes 8.8 cups
6 rice measures to 6 mark 29 to 34 minutes 10 .5 cups
7 rice measures to 7 mark 31 to 36 minutes 12.3 cups
8 rice measures to 8 mark 33 to 38 minutes 14 cups
9 rice measures to 9 mark 35 to 40 minutes 15.8 cups
10 rice measures to 10 mark 37 to 42 minutes 17.5 cups
FOR BROWN RI CE
2 rice measures 3 cups 28 to 33 minutes 4.5 cups
3 rice measures 4 ½ cups 30 to 35 minutes 6.8 cups

11
AM OUN T OF RI CE AM OUN T OF
WATE R APPROX .
COOK I N G TI M E Y I E L D
(standard
8 oz . cups)
4 rice measures 6 cups 32 to 37 minutes 9 cups
5 rice measures 7 ½ cups 34 to 39 minutes 11.3 cups
6 rice measures 9 cups 36 to 41 minutes 13.5 cups
7 rice measures 10 ½ cups 38 to 43 minutes 15.8 cups
8 rice measures 12 cups 40 to 45 minutes 18 cups
Note: As you ex periment with different brands and types of rice, make note of
needed changes to directions and adj ust accordingly in subseq uent cooking
sessions.
ADDITIONAL USES FOR Y OUR MUL TI COOK ER
Pa c k a g ed f ood s : condensed and ready to serve soups, pastas, and stews
D o not fill the cooking bowl above the highest water marking cup level
on the cooking bowl.
For even heating, stir occasionally.
Always use a kitchen timer. D o not rely on the control switch on the cooker
since it is not intended to be an indicator of cooking time for soups and stews.
Use only boneless meats and poultry that are cut into cubes no larger than 1½
inches. I t is not necessary to brown the meats before cooking.
When cooking rice or pasta in the soup, add additional liq uid in the recipe.
Since most froz en vegetables cook very q uickly, it is best to add them at the
end of the cooking time. Stir them into the soup or stew and allow the mix ture
to cook an additional 5 to 10 minutes.
Choose recipes that will cook in 1 hour or less.
Oa tm ea l or H ot Cer ea l s
Steel-cut oats work best.
D o not fill bowl more than halfway with liq uids, as the oatmeal will
ex pand during the cooking process.
For even heating, stir occasionally.
When the oatmeal is done, the rice cooker will switch to warm.
Please note that this is for well- done oatmeal. I f you prefer a different
consistency, monitor the cooking process to manually switch to warm for
desired results.
Choose recipes that will cook in 1 hour or less.

12
CH AR T FOR STEAMED V EGETAB L ES
Steam using 1½ to 2 cups of water, stock, or vegetable broth (cold or room
temperature).
V E G E TABL E AM OUN T PRE PARATI ON TI M E SUG G E STI ON S
Fresh
Asparagus 250 g Wash; break off
woody base where
spears snap easily.
15 to 18
minutes Season with
salt, pepper, and
grated lemon peel.
Fresh G reen
Beans 250 g L eave whole, trim
end or cut into 2- inch
pieces.
15 to 18
minutes Season with salt,
pepper, and freshly
snipped dill.
Fresh Beets
(q uartered) 50 0 g (about
5 medium) Remove stem and
root ends. Peel and
cut into wedges.
26 to 28
minutes Serve with butter.
Fresh Broccoli 50 0 g Cut intrets. 15 to 18
minutes Season with
salt, pepper, and
grated lemon peel.
Brussels
Sprouts 4 cups Cut a cross in the
base of each sprout. 24 to 26
minutes G arnish with
chopped, toasted
haz elnuts.
Cabbage 50 0 g Cut in wedges. 24 to 26
minutes G arnish with
crumbled, cooked
bacon.
Carrots 375 g Slice. 18 to 20
minutes Season with salt,
pepper, and grated
orange peel.
iower 375 g Cut intrets. 22 to 25
minutes G arnish with
buttered, toasted
bread crumbs.
Corn 750 g 2– 4 ears. 20 to 22
minutes Serve with butter
and spices.
Snow peas or
Sugar Snap
Peas
250 g Trim and leave whole. 12 to 14
minutes Serve with minced
green onions and
drizzl ed with soy
sauce.
N ew potatoes
(red) 6 medium
(about 50 0 g) Cut in half. 24 to 26
minutes Toss with butter
and parsley.
Fresh leaf
spinach 4 cups
fi
packed
Use whole leaves. 10 to 15
minutes G arnish with
roasted garlic and
toasted pine nuts
Butternut
sq uash 50 0 g Peel and cut into
1- inch cubes. 24 to 26
minutes Serve with butter
and spices.
Summer
Sq uash
(yellow sq uash
or zu cchini)
50 0 g Slice. 16 to 18
minutes Season with salt
and garlic pepper
13
V E G E TABL E AM OUN T PRE PARATI ON TI M E SUG G E STI ON S
Froz en
V egetables,
including
mix ed
vegetables
such as
broccoli
medley,
broccoli
stir fry, and
pepper stir fry
315 to 50 0 g Remove from bag
and season. 16 to 18
minutes
Froz en peas 50 0 g Remove from bag. 14 to 16
minutes Stir in chopped,
fresh mint.
CH AR T FOR STEAMED FISH
Add 1 ½ cups water to rice cooking bowl. Add 1 lemon, thickly sliced, to water.
Season fish with lemon j uice and Seafood Seasoning.
FI SH AM OUN T PRE PARATI ON TI M E SUG G E STI ON S
Salmon 750 g Fillets 20 to 22
minutes Top with lemon
slices and snipped,
fresh dill.
Scallops 50 0 g M edium siz e 14 to 16
minutes V ery tender;
serve with tartar
sauce and lemon
wedges.
Snapper 50 0 g Whole, remove head
and tail 20 to 22
minutes D rizzl e with garlic,
soy vinaigrette
Shrimp 50 0 g
(20 to 24) 15 to 18
minutes
or until
shrimp
turn pink
Season with
Seafood
Seasoning and
lemon.
Sworfis 50 0 g 2 medium steaks 15 to 17
minutes V ery tender;
serve with tartar
sauce and lemon
wedges.
TR OUB L ESH OOTING
PROBL E M POSSI BLE CAUSE SOL UTI ON
Some kernels of rice do
not seem fully cooked The rice was not allowed
tfiniscooking
There was not enough
water in the cooking
bowl.
Add a few more
tablespoons of water
and cook a little longer.
Press the Rice button
again. Recheck the rice
when the appliance
switches back to warm.

14
PROBL E M POSSI BLE CAUSE SOL UTI ON
Cooking bowl is not as
clean as I would like. Starch built up on sides
and bottom of the bowl. Fill the bowl with
hot soapy water and
let stand for several
minutes; then use a
nylon scrubber along
sides and bottom.
Rinse well.
Rice boils over. Too much rice is being
cooked.
There is too much water
for the amount of rice.
M ake sure to cook no
more than maxi mum
amount suggested in
this manual. The amount
of rice to be cooked
should match the water
markings on the bowl.
Add a small amount
(1 Tbs.) of butter or oil to
water before cooking.
Rice is too dry. There is too much rice or
not enough water. Use the rice measuring
cup that comes with
the appliance. The rice
measure provided holds
/ioz. ) of
uncooked rice.
Rice is gummy. There is too much water
or not enough rice. Add water to match
water markings on the
rice bowl. M ake sure you
have the correct ratio of
/ioz) rice to
1 cup water marking.
Risotto burns. There’s not enough
liq uid in the cooking
bowl.
Add additional liq uid
to the cooking bowl
and switch back to the
risotto cooking function.
Risotto is gummy. Too much liq uid was
added all at once. Follow the recipe
directions in the
I nstruction Booklet for
adding liq uid one cup
at a time. This will allow
the risotto to cook to the
perfect consistency.
Pasta is hard. Pasta was not cooked
long enough. For al dente pasta, cook
8– 10 minutes. I f you
prefer a softer pasta,
cook 3– 5 minutes longer.
Table of contents
Other Trent&Steele Kitchen Appliance manuals


