tronical Newcomer User manual

1
2
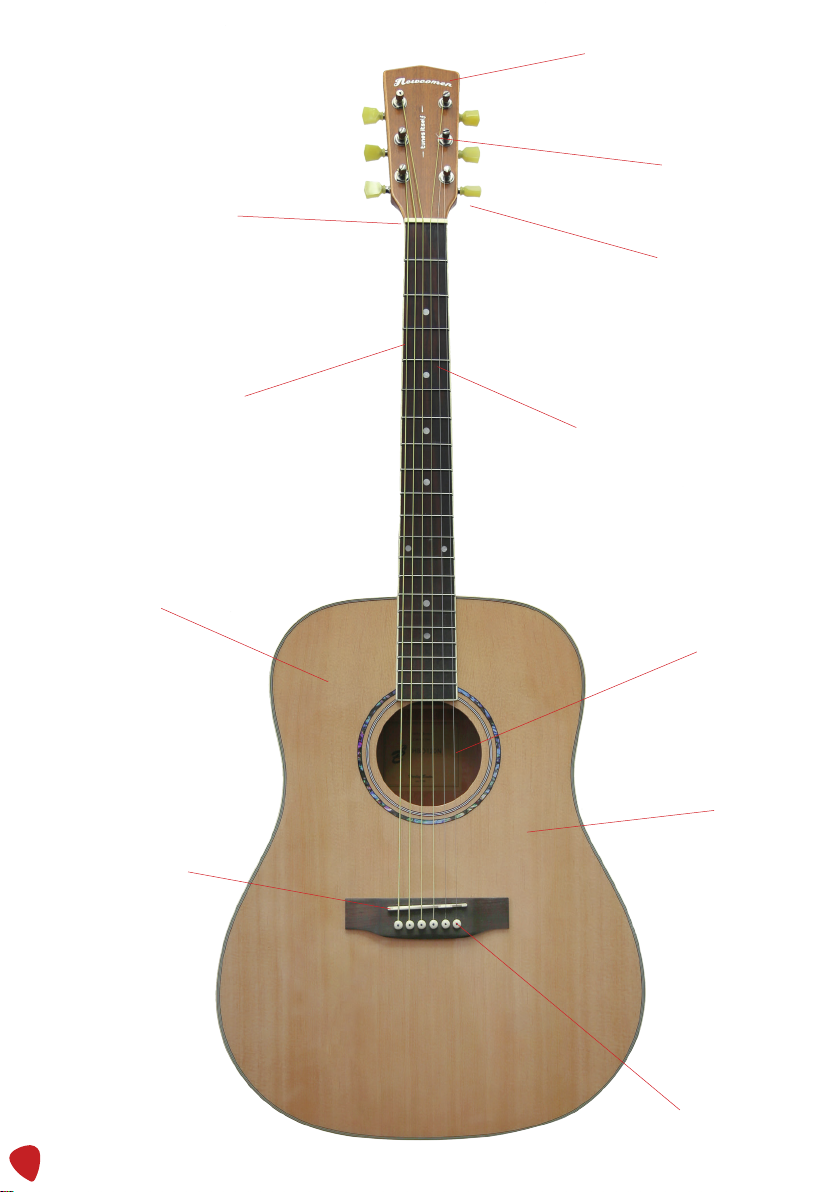
Headstock
Nut
Neck
Body
Bridge
String Pin
Key
RoboHead Tuner
Single Fret
Sound Hole
Pickguard
3
B
G
E
A
D
e
G
B e
D
E
A
OWNER’S MANUAL:
Intro............................................................................................................................................................... 3
Setup / Functions ............................................................................................................................... 4-6
How to charge the battery ...................................................................................................................7
Changing strings ..............................................................................................................................8-13
Tipps & Tricks........................................................................................................................................ 14
Safety Instructions............................................................................................................................... 15
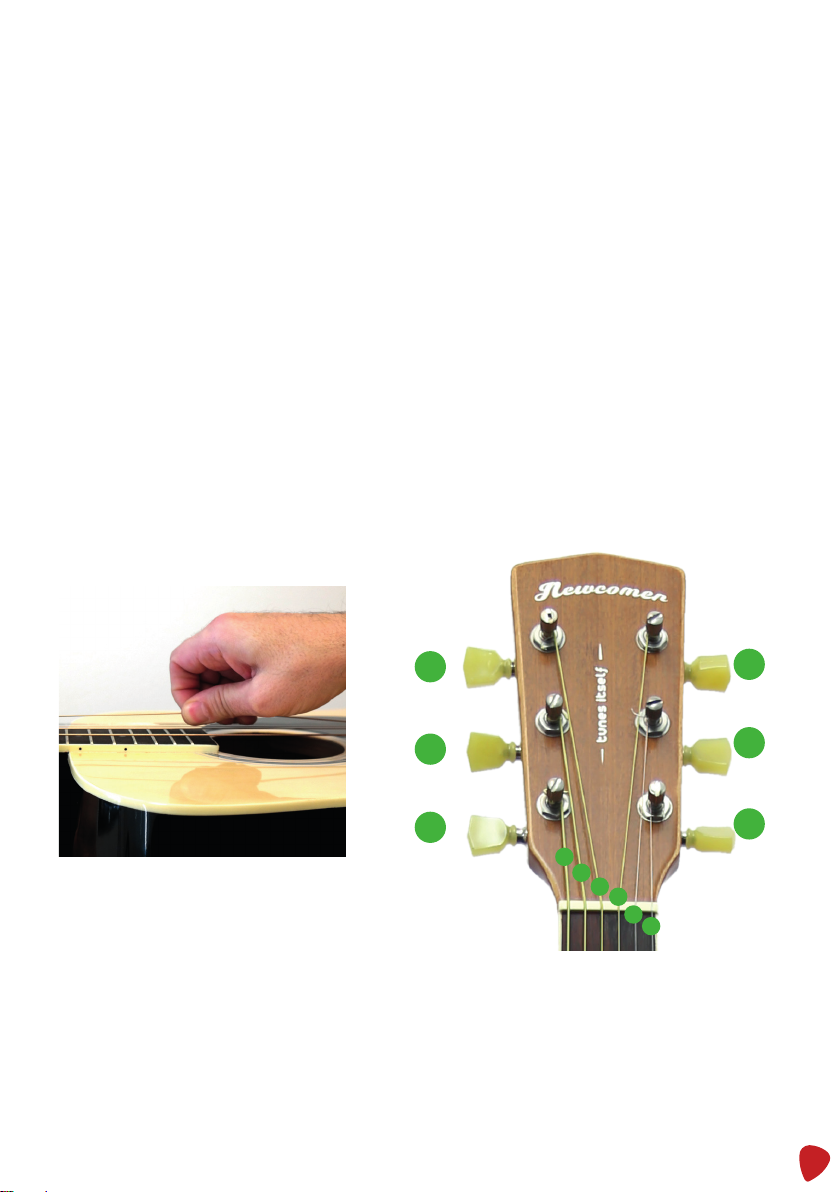
QUICK START
Starting up from scratch
1. Make sure NEWCOMER is turned off.
2. Bring the strings to tension by manually turning on the keys:
Use the key to turn the RoboHead in order to bring every string to tension until the
string cannot be pulled away from the body/neck more than 1.2 inch / 2.5 mm.
Turn the key clockwise →right – tightens, counter clockwise →left – loosens
FIRST START
1. Insert the Battery. (Page 4)
2. Press and hold the ON - button for at least 2 seconds.
3. Pluck the single string as indicated by the RED flashing LED. Let it ring 3-5 sec.
until the LED turns GREEN and switches to the next string flashing red again.
4. If all LEDs flash GREEN your guitar is in tune and the system will shut down.
5. You are ready to go.
Treble StringsBass Strings
Key
RoboHead Tuner
Sound Hole
Pickguard
4
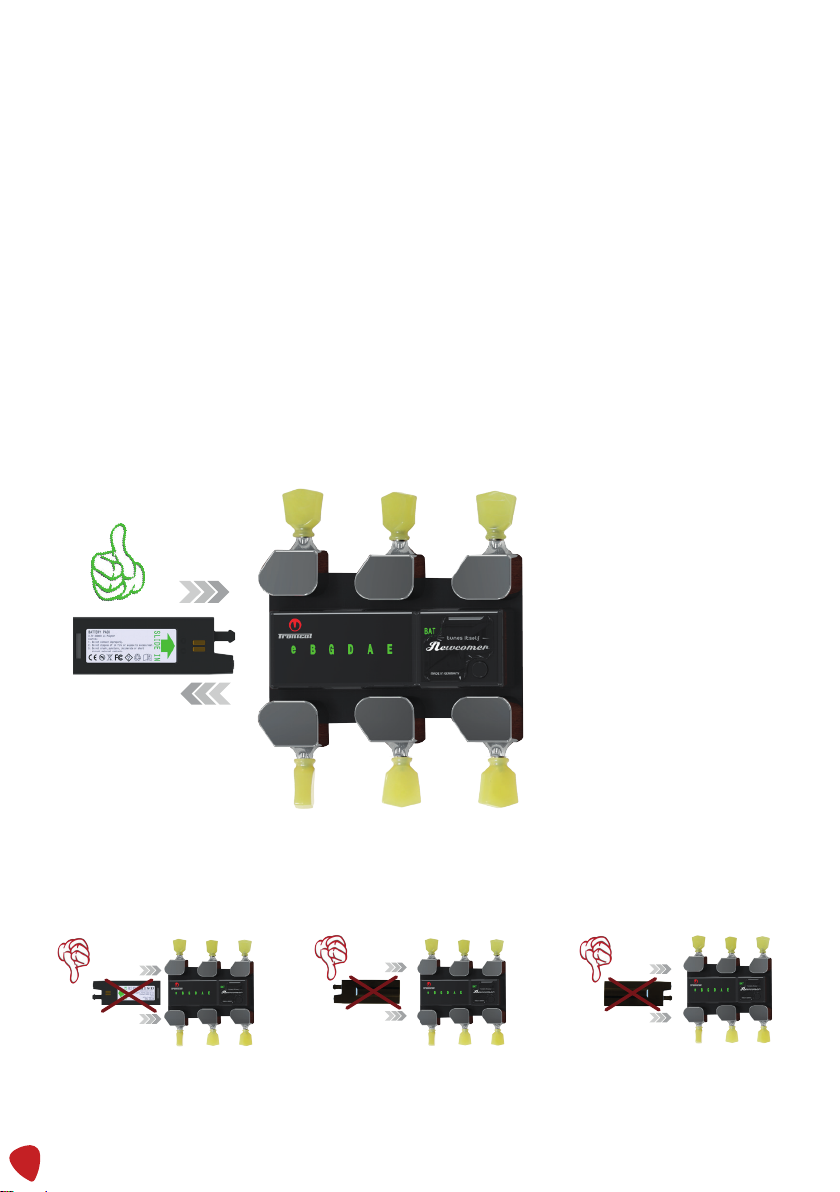
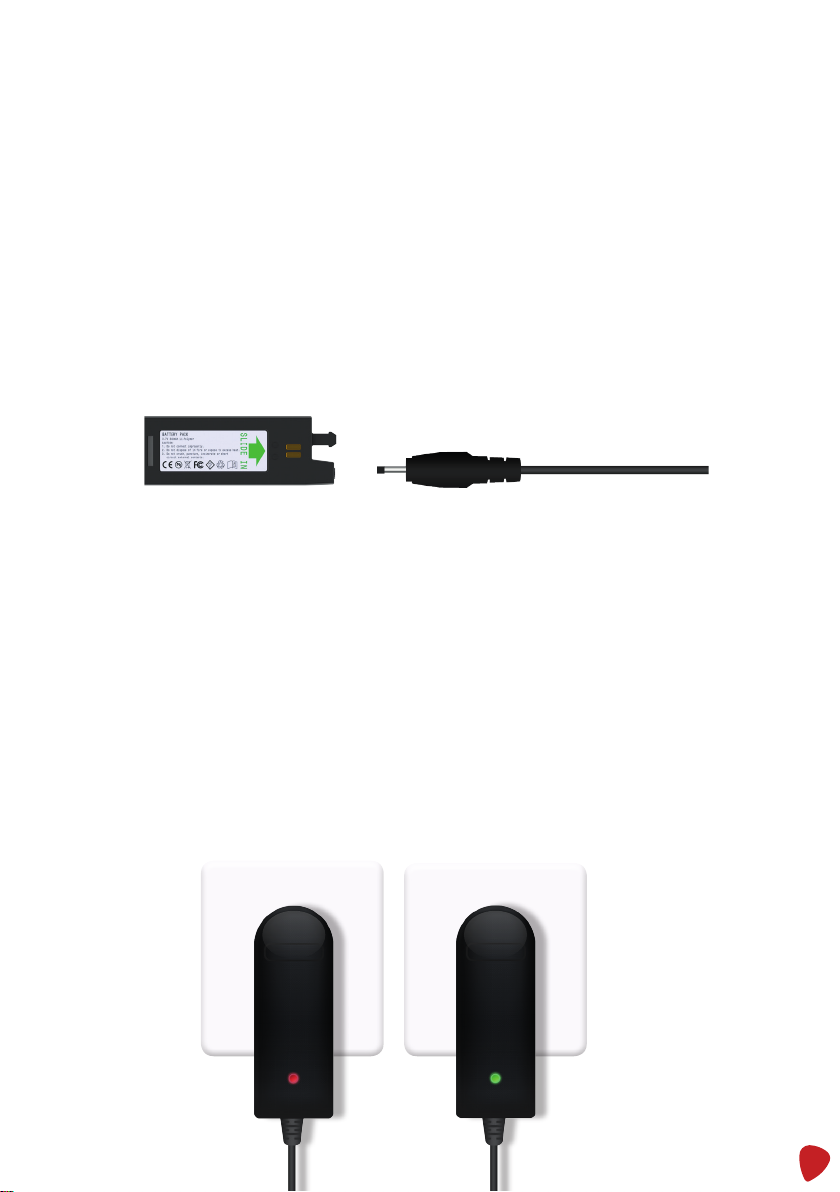
INSERTING THE BATTERY
The Battery is held by a push-push. Please insert the battery carefully with the
tip-side. There is also a GREEN ARROW on the cover of the battery showing which
way it should be inserted.
Please pay attention to the raising on the battery cover matching the guidance of
the base for insertion. Please do not force the battery into the system because you
might break it. In order to charge the battery, please give it a little push and it will
eject and you can easily pull it out.

5
USAGE AND TIPPS
●Push the ON-button to activate multi-string-tuning mode.
●Strum all strings and let them ring.
The LED’s show the status of the strings by different colors:
GREEN = string is in tune.
YELLOW = pitch of the string is being measured.
BLUE = RoboHead is moving.
MAGENTA = Pitch of the string is out of range.
RED = String is out of tune/needs to be tuned.
= Interfering frequencies.
●Strum all strings simultaneously and let them ring 3-5 sec. until all string LEDs are GREEN.
●Pluck the strings that are still showing RED LEDs single and dampen all others.
●When your guitar is in tune the system will shut down.
●You can also turn off the system by holding the ON-button for 3 seconds.
ON / OFF Button
String LEDs
Battery LED
RoboHead
6
B
G
E
A
D
e
G
B e
D
E
A
TUNING BASICS
Basically there are two ways of tuning with NEWCOMER.
You can choose multi- or single-string mode.
●MULTI STRING MODE
If you push the ON-button briefly, NEWCOMER will turn on in mutli-string mode. As all LEDs will
be lighted RED you can just strum all strings evenly close to the neck and the NEWCOMER will
start tuning the strings. Let all strings ring 3-5 seconds. Make sure to let the strings ring properly.
If a string is in tune, the LED will switch from RED to GREEN. If all LEDs are GREEN your guitar is
in tune and Newcomer switches OFF automatically. If single LEDs remain RED please dampen all
other strings and pluck the ones with the RED LED single. If individual strings are far out of pitch,
NEWCOMER will automatically switch to single string tuning mode.
●SINGLE STRING MODE
If NEWCOMER is off and you push and hold the ON-button for approximately 3 seconds, the
system will turn on in single-string mode. Please pluck the strings individually. Start with the
low-E-string as indicated by “E” LED flashing RED. Please let the individually plucked string ring
for approx. 5 seconds and dampen the others. When the LED turns GREEN the string is in tune.
Dampen the tuned string and NEWCOMER switches to the next string indicated by a RED flashing
LED. Please pluck that string individually again in the same manner as before. If all LEDs are
GREEN your guitar is in tune and Newcomer switches OFF automatically. In single-string mode it
may take a little bit longer to tune the guitar, but it is indicated in loud environments or backstage.
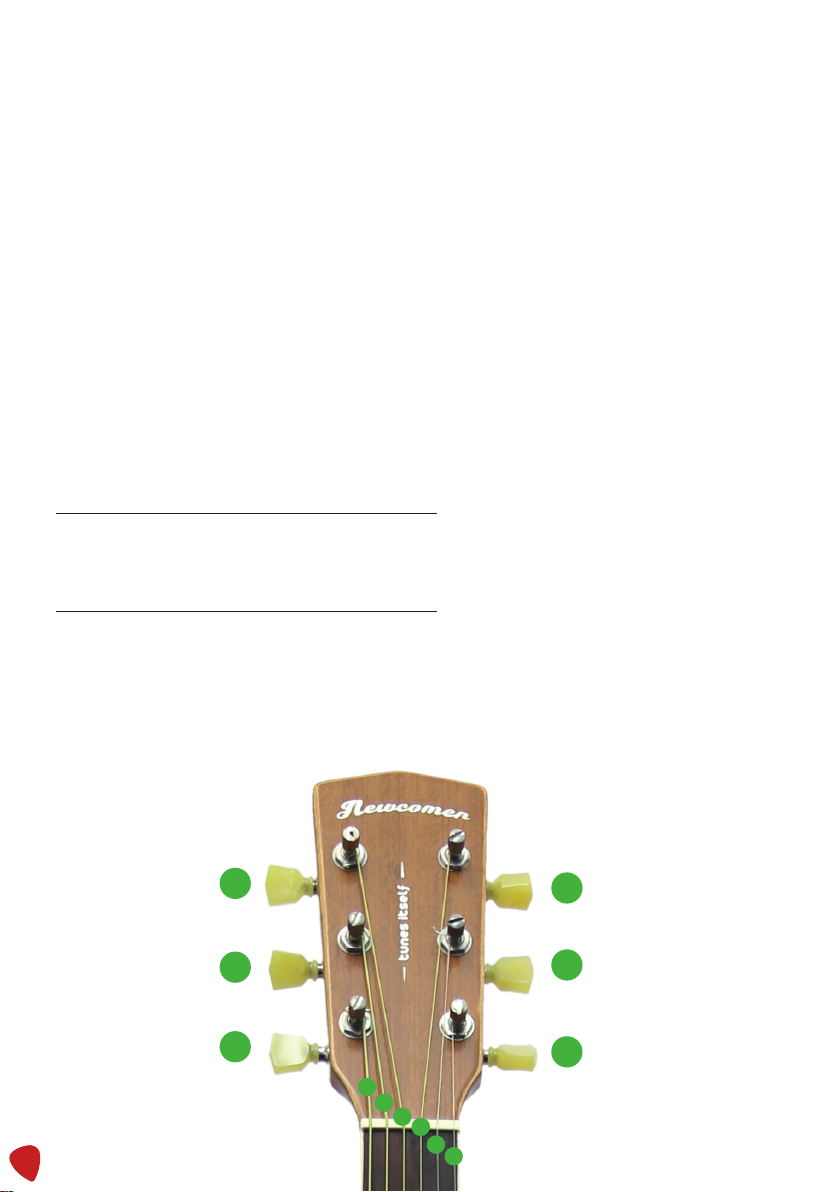
The order of the strings shown on the display is as follows:
e-B-G-D-A-E
e= lightest gauge (1st string) | E= heaviest gauge (6th string)
NOTE: In some areas the B-string might also be called H-string
ON/OFF Button
Treble Strings
Bass Strings
7
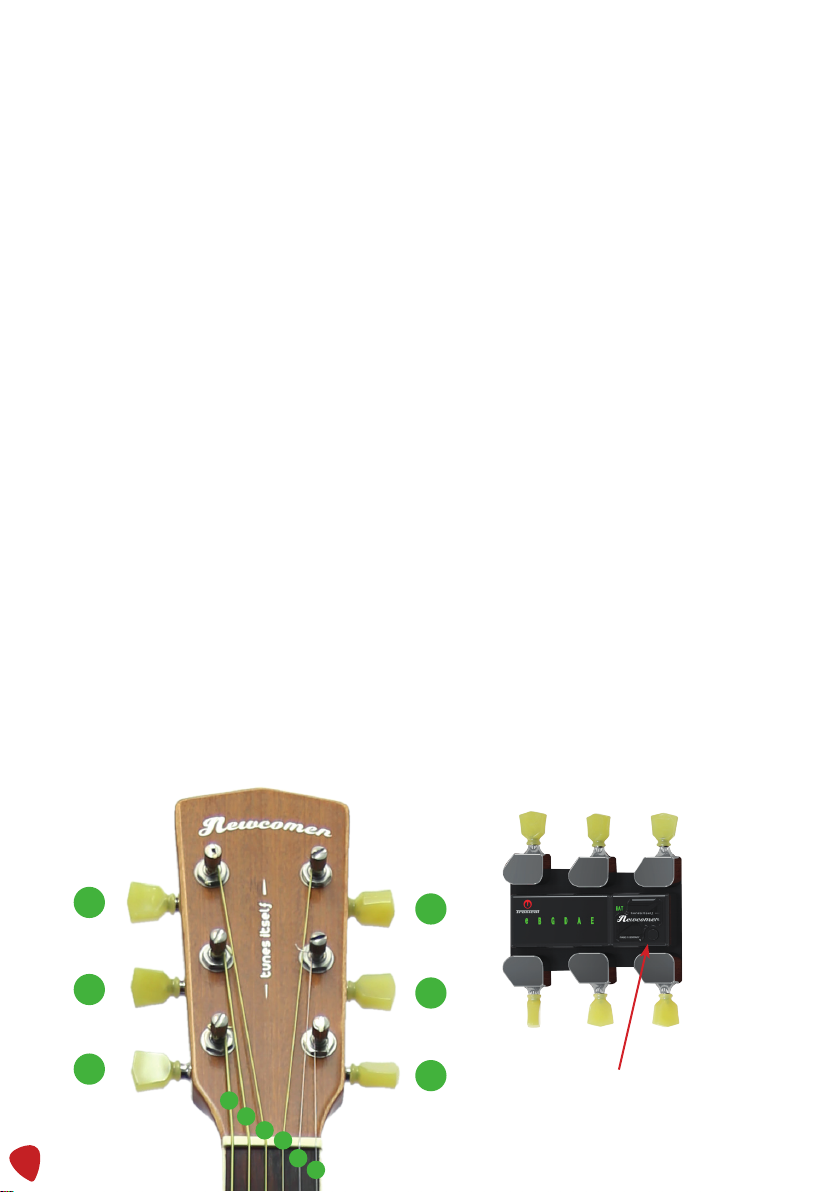
CHARGING THE BATTERY
The “BAT” LED above the ON-button indicates the battery charge status. To ensure
perfect performance the battery should be fully charged which is indicated by a green
light.
GREEN = Battery is fully charged
RED = Battery needs to be charged
A fully loaded battery should last for about 150 tunings.
In order to charge the battery, please make sure to always connect charger and
battery before connecting the charger to the electricity / wall plug. Please connect
charger and battery like shown below:
NOTE: If you do not use the system i.e. the battery often please note that the capa-
city of the battery might decrease. In order to reach full capacity with the battery
again please charge it several times.
Status LED on the charger:
RED = Charge is too low
GREEN = Battery sufficiently charged
WARNING / BE AWARE:
1. Only connect charger and battery as stated in the manual
2. Do not expose to heat or fire.
3. Do not modify, glue, solder or connect the external contacting.
8
B
G
E
A
D
e
G
B e
D
E
A
CHANGING STRINGS
You should change the strings if you feel or hear a lack of quality. Also, when a
string breaks it needs to be replaced. Guitar strings are likely to lose quality after
some time because of oxidation and dirt from the fingers sweat.
You should regularly change strings in order to maintain the best sound and feel.
The order of the strings shown on the display
is as follows:
e-B-G-D-A-E
e= lightest gauge (1st string)
E= heaviest gauge (6th string)
NOTE: In some areas the B-string might
also be called H-string.
Treble Strings
Bass Strings

9
LOCK NUT
The Lock Nut holds the string.
STRING RECESS
The string recess guides the string.
STRING SHAFT
The string shaft winds the string.
BE AWARE: Do not use a tool to tighten the lock nut because parts inside the RoboHead
might get damaged by applying extreme force. Just use a 1cent coin to tighten the lock nut.
HOW TO CHANGE THE STRINGS:
You might need a couple of tools. We suggest the following:
●Side cutting pliers to cut the strings.
●A neck cradle to secure the neck.
STEPS:
1. Take off the old strings – Do it one by one to keep the order and the tension. You
have to turn the RoboHeads manually in order to loosen the strings.
2. Every string is secured with the ball end inside the bridge the guitar. After
loosening the RoboHead by turning the key manually, you can unscrew the lock
nut and take off the string. Just remove the string pin, grab it at the ball end
and pull it out.
3. To install a new string just put the ball end of the string in the specific hole and
lock it with a string pin.
4. Now you can pull the string over the saddles and the frets through the headstock
nut at the end of the neck to apply it to the RoboHeads permanently.
10
1
2
3
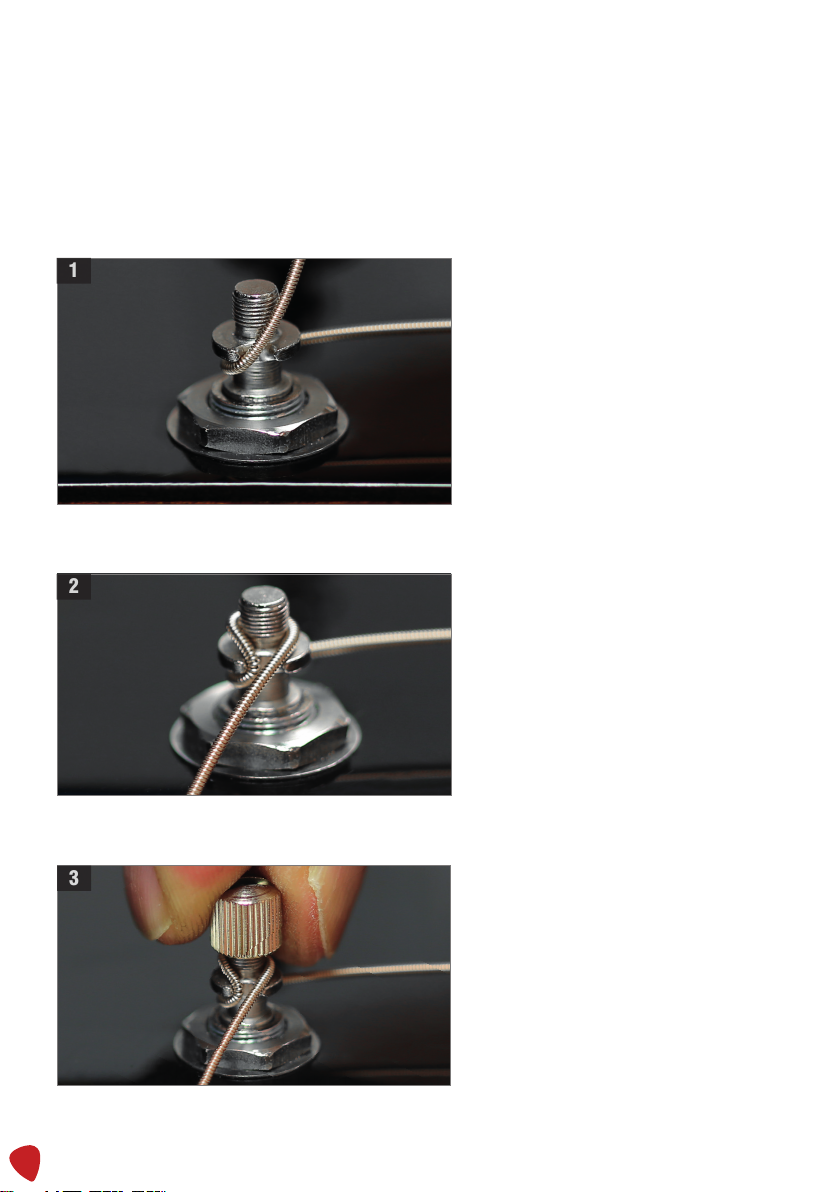
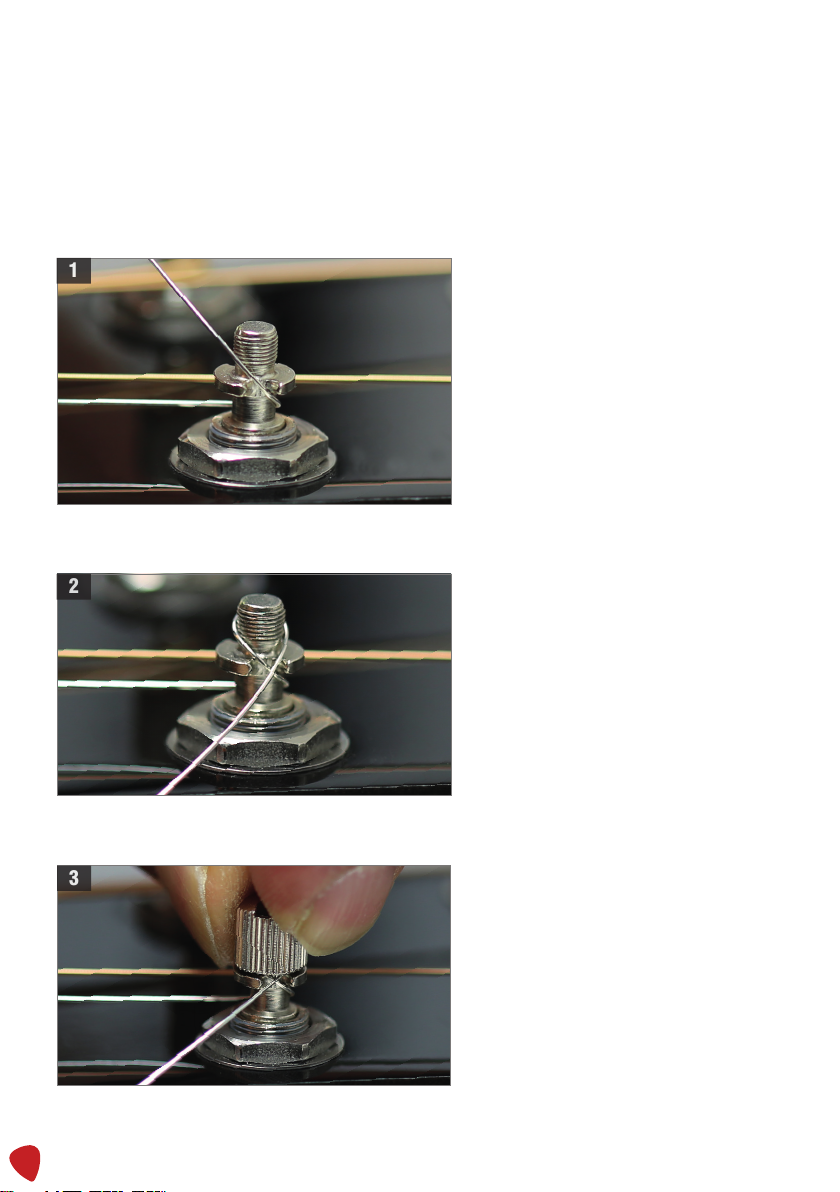
ATTACHING THE STRINGS TO THE ROBOHEADS
BASS STTINGS (E A D)
Make sure the NEWCOMER system is OFF
Wind the string around the
shaft once above the recess.
Hold the string tight and apply
the Lock Nut.
Take off the LockNut and make sure
the recess is turned horizontal to the
neck (90 degree angle). You can turn
the key manually. Wind the string
around the string shaft under the
recess and bring it up through the
recess.
11
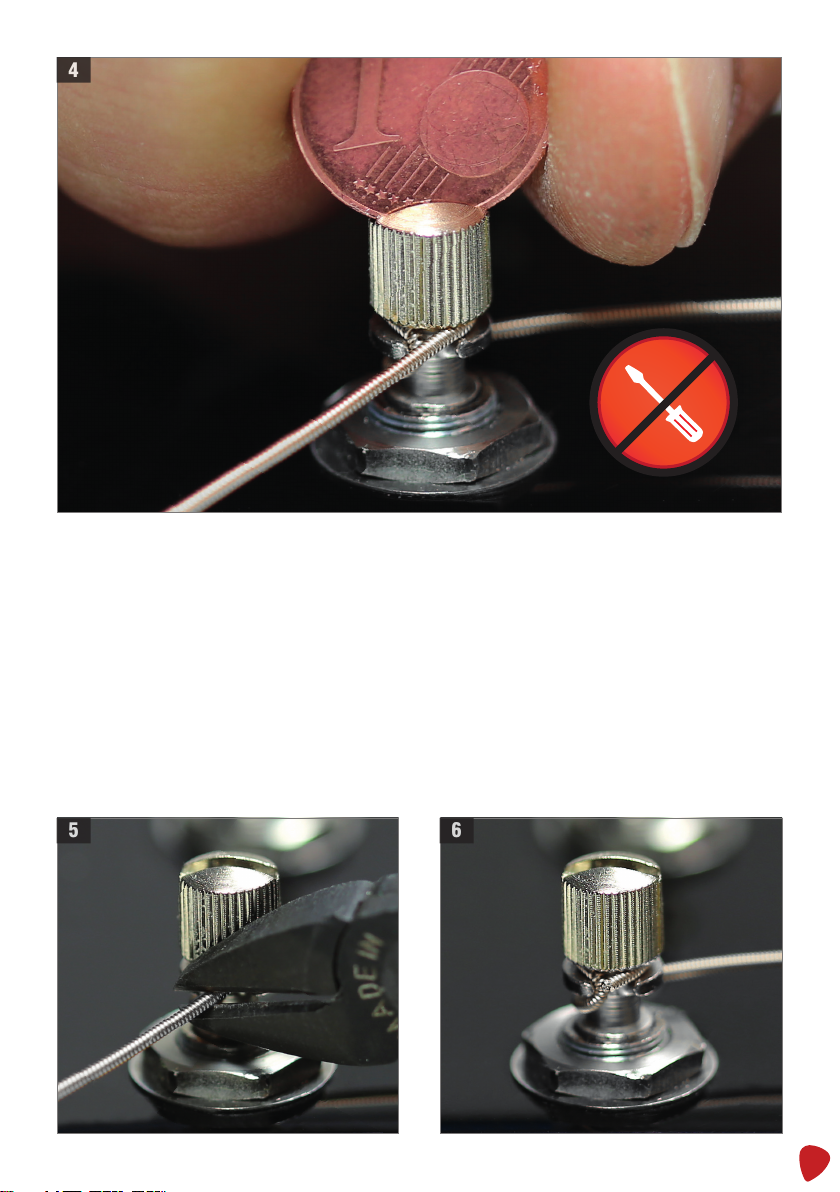
4
5
6
Tighten the Lock Nut with a small coin easily by hand.
NOTE: Do not use any tool to fix the Lock Nut and DO NOT OVER TIGHTEN! Use a
1 cent coin to tighten the Lock Nut, otherwise you may damage the RoboHead!
Recommended max. torque is 1.0 Nm (8.85 in-lbs)
12
1
2
3
ATTACHING THE STRINGS TO THE ROBOHEADS
TREBLE STTINGS (G B e)
Make sure the NEWCOMER system is OFF.
Take off the LockNut and make sure
the recess is turned horizontal to the
neck (90 degree angle). You can turn
the key manually. Wind the string
around the string shaft under the
recess and bring it up through the
recess.
Wind the string around the shaft
once above the recess.
Hold the string tight and apply the
Lock Nut.

13
4
5
6
Tighten the Lock Nut with a small coin easily by hand.
NOTE: Do not use any tool to fix the Lock Nut and DO NOT OVER TIGHTEN! Use a
1 cent coin to tighten the Lock Nut, otherwise you may damage the RoboHead!
Recommended max. torque is 1.0 Nm (8.85 in-lbs)

14
TUNING AFTER APPLYING NEW STRINGS
●Turn manually the key of the RoboHead until the string is tight enough to give a
tone when plucked.
NOTE! To ensure tuning stability, please stretch all strings. After applying the
strings you can grab a string slightly above the sound hole at the beginning of the
neck and pull it up about 1 inch in order to stretch it. You can do this several times
but make sure the device is still off.
●Now you can switch on the NEWCOMER by holding the ON-button
for 3 - 4 seconds.
●The system is now active in single string mode and the first LED (E) starts fla-
shing RED.
●Now please pluck the string indicated by the RED flashing LED and let it ring
3-5 seconds until the LED turns GREEN. The system will automatically switch
to the next string to repeat the procedure for every string step by step.
●If all LED’s are GREEN the guitar is in tune and you are ready to go.
NOTE: New strings will still stretch a little bit after the first tuning. Please just retune
to make sure that the guitar is perfectly in tune.
FACTORY RESET
●Make sure that NEWCOMER is turned OFF.
●To restore factory settings please click the ON button briefly to switch on the device.
●Now hold the on button for about 15 seconds until the device turns on the LED’s
start flashing YELLOW. NEWCOMER will turn off and the factory reset is restored.
BE AWARE!
●Please read the manual carefully.
●Never use a string winder tool.
●Never try to tune manually when the system is ON/active.
●Bring the battery to full charge before start up.
●Check the status of the battery continually while using the NEWCOMER .
GREEN = full of charge
RED = out of charge

15
SAFETY INFORMATION
Please use read this information carefully before starting to use NEWCOMER!
Product care and maintenance:
●Avoid contact with fluids. Do not oppose the device to humidity.
●Do not oppose to heat or heavy cold.
●Do not drop, throw or bend the device. Improper handling will cause serious
damage to the device.
●Do not take the system apart. Parts or components cannot be changed. Only
Tronical Components GmbH as the manufacturer is authorized to service the device.
Taking the system or single components apart will conclude into a breach of the
warranty.
●Store NEWCOMER and the guitar in a dry and clean (non-dusty) place without
humidity or heat. Take out the Battery if you do not use NEWCOMER for a longer
period of time.
SPECIFICATIONS:
●Neck contacting including CPU + 6 RoboHeads
●Universal Charger 100-140 VAC 50/60 Hz / 4.2 Volt DC 300 mA
●Li-Polymer Accumulator 3.6V – 340 mAh – 1258 mWh
DISPOSAL:
Please make sure to dispose the product environmentally compliant. Inside the EU
you cannot dispose the product with the normal domestic waste. To avoid serious
damage to the environment and nature please make sure to dispose the product
correctly according to your countries/regions legislations.
INDEX:
- Guitar equipped with NEWCOMER
- Allen key for adjusting the neck
- Charger for NEWCOMER-tunes system
- Accumulator/Battery Pack for NEWCOMER-tunes system

Tronical Components GmbH
Heselstücken 18
22453 Hamburg
Table of contents


