Truper MOTE-18 User manual

Manual
Electric
Chainsaw
MOTE-18
ModelCode
MOTE-18
Applies for:
16295
2.2 Hp
ENGLISH
ESPAÑOL
Read the user’s manual thoroughly
before operating this tool.
CAUTION

Use and care recomendations
Perform periodic MAINTENANCE to your machine (page 17).
A HEAVY DUTY EXTENSION CORD 16 AWG is recommended
Using extensions with smaller gauges can damage the product.
2
Technical Data
Power requirements
Safety warnings for electric tools
Safety warnings for using Chainsaws
Parts
Safety Devices
Oil Supply
Bar and Chain Assembly
Start Up
Cutting Operation
Felling and Bucking
Cutting Branches and Pruning
Adjustments and Maintenance
Troubleshooting
Notes
Authorized Service Centers
Warranty policy
3
3
4
5
7
8
9
10
12
13
14
16
17
19
20
21
22
ENGLISH
Contents
CAUTION
Keep this manual for future references.
The illustrations in this manual are for reference
only. They might be different from the real tool.
To gain the best performance of
the tool, prolong the duty life,
make the Warranty valid if
necessary, and to avoid hazards
of fatal injuries please read and
understand this Manual before
using the tool.

Power cord grips used in this product: Type “Y”.
Build quality: Reinforced insulation
Thermal insulation on motor winding: Class B
Power Requirements
3
Code
Description
Voltage
Frequency
Current
Power
Axis Speed
Advance Speed
Bar
Oil Tank
Chain Pitch Chain Gauge
Work Cycle
Conductors
MOTE-18
16295
127 V
Electric Chainsaw
6 000 RPM
43.6 ft/s
6.7 oz
3/8”
30 minutes’ work and 15 minutes idle. Maximum 6 hours per day.
0.05”
14 AWG x 2C with 176 °F insulating temperature.
Insulating Class II
60 Hz
13 A
2.2 Hp
18”
Technical Data
ENGLISH
WARNING
WARNING Avoid the risk of electric shock or severe injury. When the power cable gets damaged
it should only be replaced by the manufacturer or at a Authorized Service Center.
The build quality of the electric insulation is altered if spills or liquid gets into the tool while in use.
Do not expose to rain, liquids and/or dampness.
Before gaining access to the terminals all power sources should be disconnected.
from 0 A and up to 10 A
from 10 A and up to 13 A
from 13 A and up to 15 A
from 15 A and up to 20 A
18 AWG(*)
16 AWG
14 AWG
8 AWG
16 AWG
14 AWG
12 AWG
6 AWG
3 (one grounded)
from 5.9’ to 49.2’ | higher than 49.2’
Ampere
Capacity Number of
Conductors Extension gauge
*It is safe to use only if the extensions have a built-in artifact for over current protection.
AWG = American Wire Gauge. Reference: NMX-J-195-ANCE
WARNING When operating power tools outdoors, use a grounded
extension cable labeled “For Outdoors Use”. These extensions are specially designed for
operating outdoors and reduce the risk of electric shock.
Tools with double insulation and reinforced insulation are
equipped with a polarized plug (one prong is wider than the other). This plug will
only fit in the right way into a polarized outlet. If the plug cannot be introduced into
the outlet, reverse the plug. If it still doesn’t fit, call a qualified electrician to install
for you a polarized outlet. Do not alter the plug in any way. Both insulation types
eliminate the need of both a grounded third power cord with three prongs or a
grounded power connection.
When using an extension cable, verify the gauge is enough for
the power that your product needs. A lower gauge cable will cause voltage drop in the line, resulting in power loss and
overheating. The following table shows the right size to use depending on cable’s length and the ampere capability shown in
the tool’s nameplate. When in doubt use the next higher gauge.
WARNING
WARNING

4
Safety warnings for
electric tools
ENGLISH
Work area
Keep your work area clean, and well lit.
Cluttered and dark areas may cause accidents.
Never use the tool in explosive atmospheres, such as in the
presence of flammable liquids, gases or dust.
Sparks generated by power tools may ignite the flammable material.
Keep children and bystanders at a safe distance while operating
the tool.
Distractions may cause loosing control.
Electrical Safety
The tool plug must match the power outlet. Never modify
the plug in any way. Do not use any adapter plugs with
grounded power tools.
Modified plugs and different power outlets increase the risk of electric shock.
Avoid body contact with grounded surfaces, such as pipes,
radiators, electric ranges and refrigerators.
The risk of electric shock increases if your body is grounded.
Do not expose the tool to rain or wet conditions.
Water entering into the tool increases the risk of electric shock.
Do not force the cord. Never use the cord to carry, lift or unplug
the tool. Keep the cord away from heat, oil, sharp edges or
moving parts.
Damaged or entangled cords increase the risk of electric shock.
When operating a tool outdoors, use an extension cord suitable
for outdoor use.
Using an adequate outdoor extension cord reduces the risk of electric shock.
If operating the tool in a damp location cannot be avoided, use
a ground fault circuit interrupter (GFCI) protected supply.
Using a GFCI reduces the risk of electric shock.
Personal safety
Stay alert, watch what you are doing and use common sense
when operating a tool. Do not use a power tool while you are
tired or under the influence of drugs, alcohol or medication.
A moment of distraction while operating the tool may result in personal injury.
Use personal protective equipment. Always wear eye
protection.
Protective equipment such as safety glasses, anti-dust mask, non-skid shoes,
hard hats and hearing protection used in the right conditions significantly
reduce personal injury.
Prevent unintentional starting up. Ensure the switch is in the
“OFF” position before connecting into the power source and /
or battery as well as when carrying the tool.
Transporting power tools with the finger on the switch or connecting power
tools with the switch in the “ON” position may cause accidents.
Remove any wrench or vice before turning the power tool on.
Wrenches or vices left attached to rotating parts of the tool may result in personal
injury.
Do not overreach. Keep proper footing and balance at all times.
This enables a better control on the tool during unexpected situations.
Dress properly. Do not wear loose clothing or jewelry. Keep
hair, clothes and gloves away from the moving parts.
Loose clothes or long hair may get caught in moving parts.
If you have dust extraction and recollection devices connected
onto the tool, inspect their connections and use them correctly.
Using these devices reduce dust-related risks.
Power Tools Use and Care
Do not force the tool. Use the adequate tool for your
application.
The correct tool delivers a better and safer job at the rate for which it was designed.
Do not use the tool if the switch is not working properly.
Any power tool that cannot be turned ON or OFF is dangerous and should be
repaired before operating.
Disconnect the tool from the power source and / or battery
before making any adjustments, changing accessories or
storing.
These measures reduce the risk of accidentally starting the tool.
Store tools out of the reach of children. Do not allow persons
that are not familiar with the tool or its instructions to
operate the tool.
Power tools are dangerous in the hands of untrained users.
Service the tool. Check the mobile parts are not misaligned or
stuck. There should not be broken parts or other conditions that
may affect its operation. Repair any damage before using the
tool.
Most accidents are caused due to poor maintenance to the tools.
Keep the cutting accessories sharp and clean.
Cutting accessories in good working conditions are less likely to bind and are
easier to control.
Use the tool, components and accessories in accordance with
these instructions and the projected way to use it for the type of
tool when in adequate working conditions.
Using the tool for applications different from those it was designed for, could
result in a hazardous situation.
Service
Repair the tool in a Authorized Service Center
using only identical spare parts.
This will ensure that the safety of the power tool is maintained.
WARNING! Read carefully all safety warnings and instructions listed below. Failure to comply with any of
these warnings may result in electric shock, fire and / or severe damage. Save all warnings and instructions for
future references.
This tool is in compliance with
the Official Mexican Standard
(NOM - Norma Oficial Mexicana).

• Keep this in mind. Safety is a combination of common
sense, alert mind and knowledge of the tool operation.
• Please read carefully the manual before
using the chainsaw. Be aware of the safety measures, the
Alert symbols and the Danger, Warning and Attention
Symbol labels pasted on the tool. These safety measures
are alert you and to help you avoid possible injuries or
fatal accidents. However, they do not eliminate the
danger involved in mishandling the chainsaw. The tool
when used with care and for the job it is intended will
render many safe and reliable services.
• Aided with this manual get familiar with the chainsaw.
Keep it in a safe and handy place to consult frequently
and to teach other chainsaw users. Learn its uses,
limitations and also the possible specific dangers.
• Chainsaws are specifically designed to
cut wood. Do not try to cut any other materials.
• Never allow untrained people to use
the chainsaw.
• Operate the chainsaw only when visibility and light
conditions are adequate to see clearly.
Kickback is the sudden and strong movement off the cut
and towards the operator made by the running tool. It
can make the operator losing control or even severe
personal injury. Usually, kickback happens when the nose
of the cut bar touches an object or the cutting chain is
pinched into the material to be cut. To avoid this
dangerous situation the following measures must be
used:
• Keep all the guards and safety devices incorporated to
the chainsaw well-kept and in place.
• When operating a chainsaw be always alert and avoid
being used to the tool make you stop paying attention to
the cutting job.
• With the chainsaw switched on, hold it
firmly with both hands. Set the right hand in the rear handle
and the left hand in the front handle. Both handles need to
be encircled by your fingers and with your thumbs bent
under the handles (A). This way of holding has the least
chance of failing when kickback occurs. By keeping the
thumbs in the same side of the other fingers is dangerous
because it greatly diminishes your control over the tool if
kickback occurs.
• Operate the chainsaw with your left arm totally straight
and outstretched.
• DO NOT allow the nose of the cut bar
make contact with both the material you are about to cut
and obstacles such as logs, branches, fences or any other
material that could touch the cut bar while operating the
chainsaw.
• Always cut with the engine running at maximum speed.
Press the trigger switch all the way and keep a stable
cutting speed.
• Do not overreach or cut objects out of
reach or higher than your chest.
• Keep the cutting chain sharp and in optimal conditions.
• Use only spare bars and chains specified by
.
Right way to hold
the chainsaw
Wrong way to hold
the chainsaw
5
DANGER
DANGER
DANGER
Safety warnings for
Using Chainsaws
WARNING
CAUTION
WARNING
General To Prevent Kickback
A
ENGLISH

• Keep co-workers away when starting or operating the
chainsaw. A safe distance is15 feet between every worker.
Make sure passersby or animals are further away from the
work area when you start and operate the machine. A
safe area is at least double the height of the tallest trees in
the felling zone.
• After starting the motor, verify the cutting chain in not
coming into contact with any object.
• Set both feet firmly in the ground. Do
not operate the chainsaw if standing in an unstable area,
such as scaffolding, ladders, trees, etc. Only highly
qualified people and adequate safety gear can operate a
chainsaw up in a tree.
• Do not start cutting until the work area is clear, feet
perfectly stable on the ground and an escape route that
takes into account the felled tree.
• Never operate the chainsaw
single-handedly. Otherwise the operator and third parties
will get injured.
• Keep every part of your body away from the cutting
chain when the motor is running.
• Do not cut small vines or shrubs (smaller than 3”
diameter).
• Use extreme caution when cutting
small shrubs and young trees. The slim material could get
pinched in the saw chain and be thrown with great force
towards you.
• Use extreme caution when cutting
branches under pressure. When cutting, the branch
might whiplash back to its original position, therefore
hitting the operator. Take this in mind and stay away from
the branch trajectory.
• Stay alert to the chainsaw reaction when
cutting big trunks. Because of reaction forces dependent of
the direction of the chain movement and (the upper or lower)
edge of the cut bar used, the chainsaw might be pushed
towards the operator (B), or could be pulled towards the
trunk (C).
• Never use the chainsaw when tired, sick or under the effects of drugs, alcohol o medication.
• Wear clothes adequate for chainsaw operation: tight fitting clothes, thick slacks, safety non-skid
boots, heavy-duty protective gloves, safety goggles or protective lenses with side protection compliant
with the ANSI Z87.1 Standard, head and hearing protectors. Also recommended are overalls, jeans
and chaps, as well as wide vision full masks.
• Remove from your person any accessory or lose clothing that could get caught into the moving chain.
Hold long hair up above your shoulders.
• Verify the chainsaw is in perfect conditions. Do not turn it on is not well adjusted or not completely assembled so it will
work safely.
• Verify the cutting chain stops moving when releasing the trigger switch. In the event the chain is not stopping when
releasing the trigger switch, turn off the chainsaw and go to a Authorized Service Center to fix the
problem.
• Do not turn on the chainsaw if assembled with any device or accessory not specified in this Manual.
• Verify the chainsaw handles are clean, dry and free of oil or fuel.
• Make sure the work area is an open and well-ventilated area.
• Always carry the chainsaw switched off
and with the chain brake engaged, the cut bar facing back
and sheathed and the muffler away from the body.
• Turn off the chainsaw and apply the
chain brake before setting it idle. DO NOT leave it running
while unattended.
• Service and repairs on the chainsaw
have to be carried out only by highly trained staff. A bad
service job may cause an accident with fatal consequen-
ces. (For example; if when disassembling or supporting
the flywheel to remove the clutch, a structural damage
may happen and make it burst).
6
DANGER
DANGER
DANGER
Safety warnings for
Using Chainsaws
WARNING
WARNING
WARNING
WARNING
Before operating the Chainsaw
When operating the Chainsaw After Operating the Chainsaw
CAUTION
CAUTION
CAUTION
B
C
ENGLISH

Chain
Cover
Sprocket
Wheel
Oil Level
Window
Trigger
Switch
Oil Level
Window
Motor
Cover Rear Handle
Base
Chain
Tightening Knob Chain Cover
Locking Knob
Chain
Cover
Cable
Fastener
Mounting
Surface
Power cord
protector
Power
Cable
Rear
Handle Low Kickback
Chain
Oil Deposit
Cap
Front
Handle Switch
Lock
Cut Bar
Cut Bar Scabbard
Front Guard /
Chain Brake
7
Parts
ENGLISH

K
i
c
k
b
a
c
k
• The chain brake (A) function is to stop quickly the chain
movement and protects the hand in case of kickback.
(See page 5). It is designed taking in consideration the
predictable movement of kickback, which sends the cut
bar upwards and towards the operator, so when the brake
is pushed with the left hand, the chain stops immediately.
• Test the chain brake every time you
turn on the chainsaw and before you start cutting:
• With the motor running and pressing the trigger switch,
push with the back of your left hand the chain brake
towards the cut bar. When doing this
movement DO NOT let go the front handle. Just turn your
left hand forward until it touches the brake and push it.
• If for any reason the brake does not stop the chain, DO NOT
operate the chainsaw. Turn it off and have it repaired in a
Authorized Service Center..
• If the brake is working properly, the cutting chain will stop immediately. To
disengage the brake, hold the upper side of the guard and pull towards you until
you hear it snap.
• Remember the chainsaw brake does not prevent the kickback. It
is a safety device to avoid possible injury after the kickback happens.
• Keep in mind that even with the proper maintenance, in field use
conditions, the chain brake function cannot be considered totally safe. Be alert at all
times. Use adequate cutting techniques and always use the rest of the safety devices.
• This type of chain has cleaning teeth (depth gauge) placed before each cutting
tooth to prevent it enters too deeply into the wood and gets pinched causing the
kickback.
• To replace worn chains, use only Low-Kickback certified chains.
• Take into consideration that the chain wears out with regular
use or with the filing process. It loses its capability to lessen the possibility of
kickback, therefore; you need to use extra caution.
• When the working life of the cut bar (C) is finished, replace it
with an identical bar.
• The smaller the nose radius in the cut bar is, the capacity to
decrease the possibility of kickback will be less.
Changing Direction
of the Left Hand
to Activate the
Chain Brake
8
Cut Bar
Chain Brake
Low Kickback Chain (B)
Safety Devices
WARNING
WARNING
WARNING
WARNING
WARNING
WARNING
CAUTION
CAUTION
CAUTION
A
C
B
ENGLISH

9
Oil Supply
• Use oil for bars, chains and their lubrication systems,
specially designed to work in a wide range of
temperatures without any dilution. Using SAE-20 oil is
recommended.
• Oil level should be checked every 20 minutes through
the oil level window (E). The tank should be filled up
when the level is below the MIN mark.
• Do not use dirty, used or
contaminated oil. The oil pump, the bar or the chain
might get damaged.
• Clean the surface around the oil tank cap to avoid
contamination.
• Loosen slowly the oil tank cap.
• By carefully avoiding spills pour oil in the tank with the help
of an oil funnel.
• Before re-capping the oil tank, check and clean the joints.
• Place immediately the oil tank cap and tighten by hand.
• Clean any spilled oil.
CAUTION
Oil Supply for Cut Bar and Chain
E
ENGLISH

• Never start the motor before having
first assembled the cut bar, chain and chain cover.
Otherwise, the operator would be exposed to severe
personal injury.
• Set the switch in the off position.
• Pull back the chain brake to be sure it is in the operating
position (see page 8).
• To handle the chain safely and to avoid
cuts, use heavy-duty protective gloves.
• Loosen the knob to fasten the chain cover (D).
• Remove the chain cover (E).
• Set the chain flat on a flat and clean surface making an
oval shape near the cut bar and straighten any crooked
link. The cutting teeth should face the chain movement
direction, otherwise reverse the chain position.
Traction
Sprockets
Streighten
Displacement Direction
Cut
Sprockets Advance
Slot
Advance
Cut Bar
Bar and Chain Assembly
10
WARNING
CAUTION D
E
• Set the chain traction sprockets in the bar groove.
• Place the chain so that is set loose in the rear side of the
bar.

• Lift the bar with the chain and set it into the saw. Pass
the mounting knob (F) through the bar groove and the
loose space between the bar and the chain around the
sprocket wheel (G). Upon setting the bar in the knob,
double check that the tension pin enters into the
corresponding orifice in order to tighten the chain (H).
• Mount the chain cover and tighten the knob just a
little bit to secure the chain cover. This way the bar is
released and then you can proceed with the chain
tightening.
Loose Chain
Adjusted Chain
Right tightness with
dilated chain
Bar and Chain Assembly
11
F
G H
Chain Tightening
• Turn the chain tightening knob until the chain is snug
against the bar and with the traction links inserted in the
bar groove.
• Lift the nose of the cut bar to look for any looseness in
the chain. If so, turn the knob again ½ turn to give more
tension to the chain. Repeat this process until no
looseness is present between the chain and the bar.
• Tighten the knob firmly to secure the chain cover.
• To verify if the chain is not too tight, try moving it by
hand. If the chain gets stuck or is hard to move you need
to slightly loosen the knob to tighten the chain, only ¼ of
a turn. Lift the nose of the bar and tighten back the knob
to secure the chain cover before checking again the chain
tightness.
• To verify if the tightness of a chain that was dilated by the
heat produced while cutting is adequate, the distance
between the lower side of the cut bar and the chain links
must be 0.05” (3).
30.05”
When tensing a hot chain, it can tighten in
excess when it cools down. Verify the “cold tension”
before using it again.
ENGLISH
NOTICE

12
Start Up
A
• Use the cable holder (A) to prevent the chainsaw will
get unplugged accidentally from the extension cable while
in use.
• Make a loop in the extension end and pass it through
the orifice in the rear handle base.
• To secure it, pass the cable holder through the loop and
pull the extension out off the handle.
• Connect the chainsaw to a 1-outlet 16 AWG heavy duty
extension cord.
Connection
• Double check the chain is not making contact with any
object.
• Connect the extension cable plug to the power supply.
• Keep the switch lock pressed (C) to unblock it (B).
The switch block prevents accidental startups.
• Press the switch lock (B) so that the chain starts
advancingr.
Turning ON
• To stop the chain, release the trigger switch (B).
• It is normal that the chain keeps moving a couple of
seconds after releasing the trigger switch. As an additional
safety measure, activate the chain brake (see page 8).
Turning OFF
C B
ENGLISH

Cut Axis
13
Cutting Operation
Basic Cutting Procedures
If you lack of previous experience using chainsaws and to
get familiar with its use, it is recommended to practice
sawing small logs (not smaller than 8” in diameter),
supported by a sawhorse and using the following
technique:
• Adopt a right posture facing the log. The chainsaw
should be idle.
• Press the throttle trigger to get to the highest speed.
• Start cutting setting the bar onto the log.
• Keep the motor in high speed all the time.
• Allow the chain to do its job applying slight pressure
downwards with the chainsaw. Never try to force the cut.
Otherwise, the chain, bar or motor might get damaged.
• Release the trigger switch as soon as finishing the cut.
You will avoid unnecessary wear in the chain, bar o motor.
Cutting Correct Position
• Both feet should be evenly set on firm ground. Your
body weight well balanced. The left foot should be slightly
forward from your right foot.
• Hold the chainsaw as indicated in the Safety Standards
for chainsaws section (page 5).
• Keep your right arm straight; to stand the kickback
forces do not bend your elbow.
• Always keep the cut axis to your right; it keeps your
body free from the cut axis in case of kickback.
• To avoid tension in arms and back, keep the chainsaw
close to your body.
• Do not try to hold the chainsaw in a left-handed
position.
Cut Axis
Left arm straight
Cut Axis
ENGLISH
Debris Area
First Cut
Third
Cut
Notch
Wedge
Hinge
Second Cut
45°
40°
180°
45°
Felling and Bucking
14
Preparations to Fell
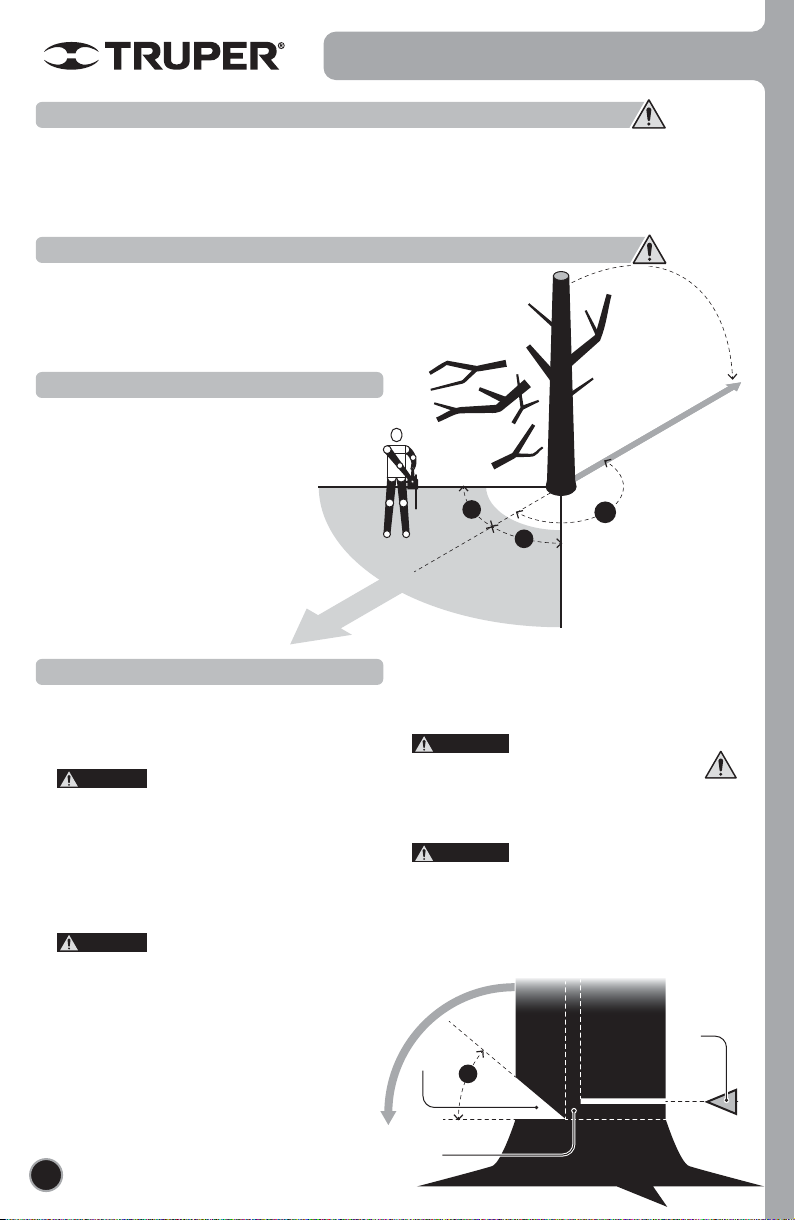
• Set ahead at least two escape paths. Clear the area from
any obstacle. The optimal escape path is 180° opposite to
the falling tree direction and with a 45° margin in both
sides.
• To estimate the how the tree will drop,
consider wind force and direction. Examine
the tree’s inclination and balance as well as
placement of the largest branches.
• Verify the tree has no dead branches,
which could fall onto you while cutting.
How to Fell Trees
• Cut a notch 1/3 of the trunk diameter on the side of the
tree in the direction of falling.
• The notch takes two cuts. The first one is horizontal and
the second one at 40°.
• It is important to make the cuts in that
order to avoid wood residues pinching and trapping the
bar and being shot with force onto any direction.
• The third cut is made opposite to the notch side. Must
be horizontal and placed at 2” above the horizontal cut in
the notch but not reaching it. Leave 1/10 diameter of trunk
between the notch and the third cut to make a “hinge”.
This guides the falling tree and avoids unexpected
trajectories or violent separation from its stump.
• To avoid the uncontrolled falling of the
tree, never reach the notch with third cut.
• When cutting trees with a large diameter, stop the rear
cut before reaching such a depth that will make the tree
to sit and trap the bar.
• Before going on with the cut, fit a plastic or wood wedge
into the cut to keep it open.
Felling Restrictions. Do not attempt this EVER!
• Do not cut down trees under heavy rain or while strong winds are blowing. Wait for suitable weather.
• Do not cut down trees when people or animals are in the area. The safe distance standards for passersby are explained
in “When Using the Chainsaw” on the Safety Standards for Chainsaws section; page 6.
• Do not cut down trees without estimating first an escape path. Avoid getting crushed by the felled tree!
• Do not cut extremely slender trees.
• Do not cut big trees with dead branches, loose bark or hollow trunks.
Professional loggers operating heavy log pushing or dragging equipment is needed.
• Do not cut trees near power lines or buildings.
Felling Route
Safest Escape Path
Limits for Felling Trees. Leave this job to professionals!
E
s
c
a
p
e
S
c
o
p
e
CAUTION
CAUTION
• Inserting the wedges may be enough to the tree.
Otherwise you need to insert the bar nose to continue to
cut without removing the wedges until the “hinge” is
made.
• Introducing the bar nose into the cut
must be performed only by professionals.
• Once the tree starts to fall, turn off the saw and
immediately set it on the ground. Move down your
optimal escape path. Be alert all the time in case of
contingency.
• While making the third cut pay
attention to the behavior of the crown to verify the tree
falls in the programmed direction. If for any reason the
tree starts falling in the wrong direction or the chainsaw is
pinched in the falling tree, drop it and run for your life!
WARNING
WARNING
F
a
l
l
i
n
g
r
o
u
t
e
1/3 of
theTrunk
1/10 of the trunk
2”
ENGLISH

• While cutting large trunks it is useful to use wedges into
the cut to prevent the bar from being pinched by the
trunk when it sits into place.
• If the trunk diameter is too large, it will be necessary to
fit the bar nose into the trunk to keep on cutting without
removing the wedges until finishing.
Introducing the bar nose into the cut
must be performed only by professionals.
• Bucking is when cutting a tree limb after being felled.
• While bucking, cut only one trunk at a time.
• To cut small branches support them on a sawhorse or
between two larger trunks.
• If the ground in the bucking area is
uneven stand in the higher side to avoid being run over
by the cut branches.
• Stay alert all the time. Oftentimes it is
difficult to predict the direction the branches will take
when cut. Also, sometimes it is not possible avoid the bar
from being pinched.
First Cut
Second Cut
Anchor Root
Sawhorse
Wedge
Load
Load
Felling and Bucking
15
Anchor Root Cutting
• Anchor roots are those roots that stick out too much
from the ground. When they are too big may make the
felling job too difficult. They must be removed before
felling.
• First, make a horizontal cut through the root, some
centimeter up the ground.
• Then make a downward vertical cut and leveled to the
trunk to separate the root and to the bar from being
pinched.
• It is important to make the cuts in that
order to avoid wood residues pinching and trapping the
bar, and being shot with force onto any direction.
WARNING
WARNING
WARNING
CAUTION
Bucking
Bucking with a Wedge
• Make the first cut at 1/3 depth of the trunk diameter. Then make a 2/3 depth cut on the opposite side. See the diagram to
determine where to make the first cut and to avoid the bar from being pinched by the trunk weight.
Bucking Trunks under Tension
First Cut
(1/3)
Final
Cut
Final Cut
First Cut
(1/3)
ENGLISH

Bucking the
Top of the Trunk Bucking Below
the Trunk
Reaction Reaction
16
Felling and Bucking
Cutting Branches and Pruning
T
e
n
s
i
o
n
R
e
l
e
a
s
e
Bucking the Top of the Trunk
• Setting the lower side of the bar against the trunk, start
cutting the upper side of the trunk.
• Apply pressure downwards.
• Stay alert to the chainsaw reaction force. It
will pull it towards the trunk.
• Felling, the same as trimming and pruning, should be
done slowly and very carefully and following the Safety
Standards (see pages 5 and 6).
• When cutting a branch keep the tree between you and
the chainsaw.
• Never cut branches standing on top of
a ladder, hanging from the tree or standing onto a
platform or trunk. It is extremely dangerous. Let the
professional people take care of the branches you cannot
reach standing on the ground and above your chest.
CAUTION
Bucking Below the Trunk
• Setting the upper side of the bar against the trunk, start
cutting the lower side of the trunk.
• Apply slight pressure upwards.
• Stay alert to the chainsaw reaction force. It
will pull it towards the trunk.
Cutting Operation
• To avoid the falling branch to pull out the bark from the
tree do not cut level with the trunk.
• Make the first cut at 1/3 depth of the branch diameter.
Then make a second cut at 2/3 depth of the branch
diameter in the opposite side.
• Finish cutting the branch with a third cut, this time level
with the trunk to allow the bark to grow back and seal the
cut.
• When the branch is too thick cut sections to avoid a
violent detachment.
Spring Poles
• Spring poles are any trunk, branch or young tree being
held down by the pressure of a second trunk or branch,
accumulating tension and releasing great force if the
pressure is released.
• Spring poles are very dangerous. They
can hit the operator causing severe injury and/or causing
to lose control of the chainsaw. Be always aware of that
possibility.
CAUTION
DANGER
DANGER
First Cut
(1/3) deep
Spring Pole
Final
Cut
Second cut
(2/3) deep
Load
ENGLISH

Chainsaw Chain Maintenance
Sharpening of the Chain
• The chain needs sharpening if the wood shavings
generated when cutting are small and dusty; when
needing to force the bar trough the wood or when the
chain is cutting sideways.
• Sharpening of the chain must be done with the chain
mounted and tight on the bar (see page 11) and with the
chainsaw shut off.
• Use a 5/32” round file.
• Be careful to file all the teeth to the
angles specified in the image being careful to give them
the same length. Only uniform teeth get a safe and right
cut.
• Sharpen all the teeth, one by one. First those on the
right side, then, those on the left side. To travel from one
tooth to the other move the chain little by little so each
time you file a tooth it should sit in the middle of the bar.
• Keep the file level with the upper top-plate in the tooth.
Keep the file from leaning or balancing. Apply slight but
firm pressure moving only to the front of the tooth.
Remove the file each time you move back.
• Give each tooth a few passes.
• Remove the steel shavings produced while filing with a
wire brush.
• Using the chainsaw with a badly
sharpened or dull chain at high speed could damage the
motor.
• Operating the chainsaw with the
wrong or blunt chain increases the risk of kickback.
• Using the chainsaw with a damaged
chain may cause severe injury.
• The chain is very sharp. Use
heavy-duty protective gloves.
• If the cutting chain is dull due to
contact with nails, stones or sand and mud present in the
wood, have it re-sharpened by a
Authorized Service Center.
• To make smooth and fast cuts, the cutting chain needs
maintenance periodically.
• Shut off the chainsaw before maintenance and service.
• Use heavy-duty protective gloves.
17
Adjustments and Maintenance
CAUTION
CAUTION
CAUTION
WARNING
WARNING
WARNING
WARNING
Top Plate Top Plate
Right Hand
Cutting Edge
Top Plate
Cutting Edge
Top Plate
Cutting Edge
Left Hand
Cutting Edge
Toe
Chain Axis Chain Axis
Chain Direction
Rivet
Depth
Gauge
Groove Groove
Basic
Tooth
Body
Basic
Tooth
Body
Heel Heel
Toe
Depth
Gauge
Right Hand
Cutter Link
Top Plate
Cutting Edge
Correct Filing Angle
Filing
Direction
Left Hand
Cutter Link
30°
30°
80°
Any angle different from the one
specified causes damage to the motor, bar and chain, and
increases the risk of violent kickback.
ENGLISH

Direction
Cutting Link
Depth Gauge Depth
Gauge
Flat
File
Depth Gauge
Jointing Tool
Adjustments and Maintenance
18
A
B
Chain Depth Gauge
Bar Maintenance
• The chain has cleaning teeth (Depth Gauge) placed in
front of each tooth. Their design avoids getting too deep
into the wood getting pinched and causing kickback.
• Depth gauges should be checked each time you file the
chain in order to get the correct height in the top plate.
• The difference in height on the depth gauge and the top
plate should always be 0.025”.
• If due to normal wear / or filing of the chain the
difference is less, use a calibrating instrument and a flat
file to even and verify the difference to 0.025”.
• File only the depth gauges. Do it towards the same
direction as of the adjacent tooth being careful not to
touch its cutting edge.
• After matching the difference on all the cleaning teeth,
file each one and restore the original rounded shape (A).
• The cutting bar has to be cleaned in the end of the work
day and checked closely to identify wear and possible
damage.
• The appearance of minute grooves or bumps in the bar
rails is due to normal wear and should be smoothed
down with a file as soon as identified.
• Clean debris from the lubrication orifice and the chain slot.
• After a week working with the chainsaw, reverse the bar to
distribute its normal wear and maximize its useful life (B).
• After a week working with the chainsaw lubricate the bar
if it has a sprocket wheel in the nose. Use a grease syringe
to apply the lubricant into the lubrication orifice.
• If the rail has such wear that is not allowing the chain to
rest in its side, if widened or broken; or the bar is bent,
replace it with a new one.
0,025”
ENGLISH

Adjustments and Maintenance
19
Troubleshooting
Chainsaw Storage
Carbon Replacement
When storing the chainsaw for a month or longer
consider the following:
• Drain the bar and chain oil tank completely into an
approved oil container.
• Clean the chainsaw thoroughly.
• Store the unit in a ventilated area, away from corrosive
agents such as garden chemical products or deicing salts.
Keep it away from children.
Lubrication
The tool bearings have high grade lubricant and when
used under regular conditions it lubricates for life. No
lubrication needed.
• Never try to start the motor if ALL the
chainsaw parts are not assembled in place. Otherwise, the
parts may fracture and be shot towards the operator. It
also damages the tool and makes the warranty void.
WARNING
• Remember to disconnect the tool before cleaning or
maintenance.
• All the tool components are an important part of the
insulating system and should only receive maintenance in
a Authorized Service Center.
• EVERY TIME you service the tool ask for original
spare parts.
• When cleaning the plastic parts, do not use solvents.
Most of the plastic materials are susceptible to damage
when using commercial solvents.
• To clean sooth, coal or dust; use a clean cloth or
pressurized air.
A DVERTENNEVER expose to brake fluid,
petroleum based products, penetrating oils, etc. They are
made of chemical substances that could damage or
destroy plastic.
When using pressurized air to clean
particles ALWAYS use safety eyeglasses with lateral
protection or a facemask. If there is too much dust, use a
dust mask as well.
• It is not advisable to use this tool for large jobs with
fiberglass, gypsum wallboard, plaster or gypsum. Their
particles are highly abrasive to components on any power
tool.
• Check periodically the carbons. If worn have them
replaced in a Authorized Service
Center. After being replaced, ask to check if the new
carbons can move freely in the carbon housing. Ask to
turn on the tool during 5 minutes’ to even the contact of
the carbons with the commuter.
• Use only original spare carbons designed specifically with
the electric roughness and resistance for each type of
motor. Carbons that are out of specification may damage
the motor.
• When replacing carbons, always replace both.
WARNING
WARNING
Bar and chain are too
hot and give off
smoke.
The motor starts and
runs but the chain is
not moving.
The motor starts and
runs; the chain moves
but is not cutting.
• The oil tank in the chain is empty.
• Too much tension in the chain.
• The chain brake is activated.
• Too much tension in the chain.
• The chain and the cutting bar are not
properly assembled.
• The chain and / or bar is damaged.
• The chain is dull.
• The chain is assembled the wrong way.
• Fill up the oil tank. Remember too fill up every
time the level is below the “MIN” mark.
• Reduce the chain tension. (See page 11).
• Release the chain brake. (See page 8).
• Reduce tension in the chain. (See page 11).
• Chain and bar need to be assembled correctly.
(See pages 10 and 11).
• Replace and assemble similar chain and / or bar.
• File the chain. (See page 17).
• Assemble the chain in the right direction.
Problem Cause Solution
ENGLISH

20
Notes
ENGLISH
This manual suits for next models
1
Table of contents
Other Truper Chainsaw manuals


