TTS EDCAM User manual
Digital Still and Video Camera
User’s Manual
PLEASE READ BEFORE OPERATING THE TUFF-CAM
AND RETAIN FOR FUTURE REFERENCE
Model: EDCAM
TM
1
2
Table of Contents
1. Important Information
2. Getting to know your Tuff-Cam™
1. Package contents
2. System Requirements and Compatibility
3. Tuff-Cam Specification and Features
4. Location of Controls and Major Parts
3. Installation
1. Preparation
2. Software installation for Windows™ 98 and 98SE
3. Battery and SD memory card installation
4. Display, Controls and Selections
1. Status Icons
2. Controls
3. Selections
5. Getting started
1. Capture
2. Playback
3. Downloading Images & Videos to a PC
6. Maintenance
1. Storage Conditions
2. Important - Special Care Instructions
7. Troubleshooting and Hints
1. Monitor resolution adjustment
2. Using the SD memory card
3. Capturing images in different conditions
4. Windows XP Driver Installation
8. Support & Warranty
9. FCC Information
Please read through this manual carefully before using the Tuff-Cam and follow these
instructions to avoid any damage being caused by improper operation and installation
3
1. Important Information
• The software CD-ROM packaged with the Tuff-Cam is designed for PCs only. Playing this
CD-ROM on a stereo or CD player may cause damage to it.
• This Tuff-Cam is a precision electronic device. Do not attempt to service the Tuff-Cam
yourself, as opening or removing covers may expose you to dangerous voltage points or
other risks.
• Do not expose the Tuff-Cam to direct sunlight to avoid causing a fire.
• Please use the lens cloth to clear the lens and do not touch the lens with fingers.
2. Getting to know your Tuff-Cam™
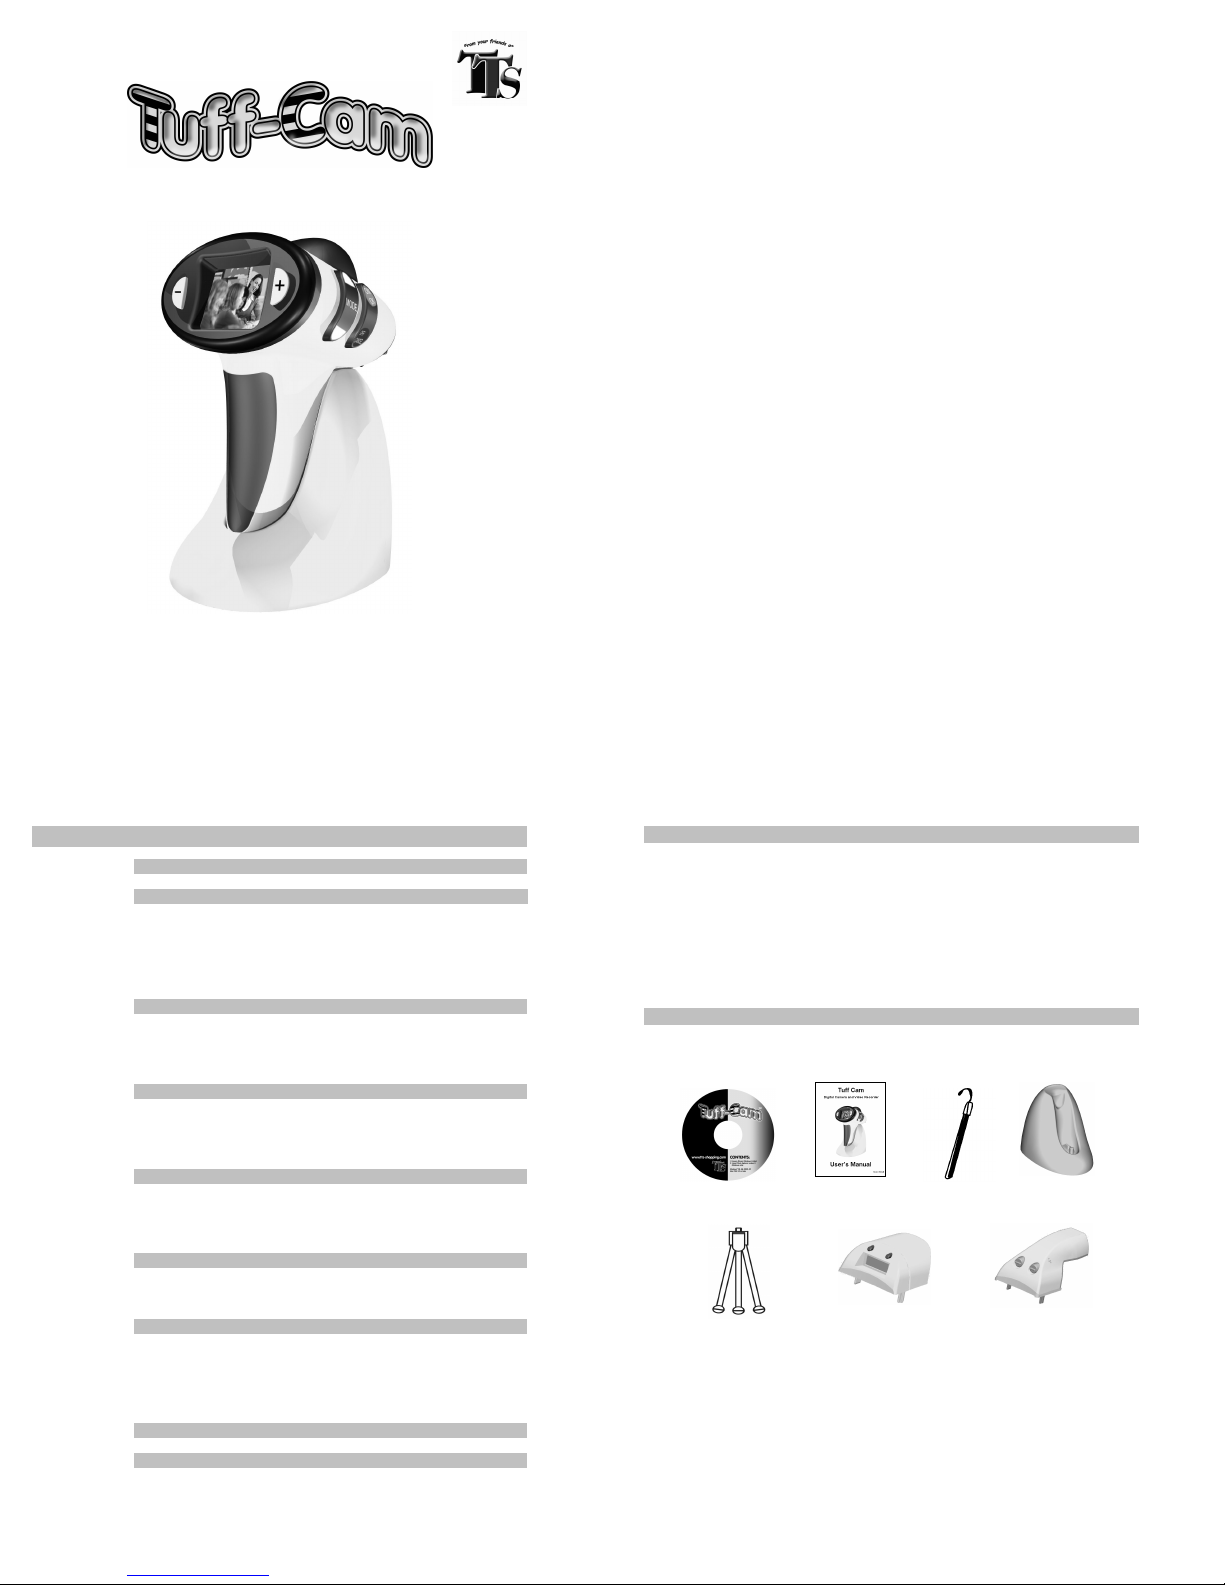
2.1. Package contents
Please check that the following items are in the package when purchasing this product.
2.1.1. Standard Parts
CDROM User’s manual Neck Strap USB Docking Station
(incl. Tuff-Cam driver)
2.1.2. Optional Parts
Tripod Time Lapse Module Motion Detector Module
2.2. System Requirements and Compatibility
2.2.1. Windows 98 / 98SE / 2000 / Me / XP
2.2.2. Pentium 450MHz or better processor
2.2.3. 128MB RAM or above
2.2.4. VGA Video Card with minimum 32MB RAM, 16-bit or higher colour
2.2.5. An available CDROM driver and an available USB Port
2.2.6. 600MB free hard disc space
2.2.7. Optional: Windows compatible sound card, microphone and speaker
Please contact your PC manufacturer for questions on your PC specification

4
2.3. Tuff-Cam Features and Specifications
2.3.1. Features
o Colour CMOS Image Sensor 2.0M
o Max Resolution: 3.0M, 2048 x 1536 pixels by hardware interpolation
o Built in 1.5” Colour LTPS display with backlight for image playback and settings
o 2 Capture options: Single image, Video & Voice recording
o 3 Resolution selections: HI (3.0M pixels), LO (1.3M pixels), VGA (300K pixels)
o Image performance for video stream: 10fps at 320 x 240 pixels
o Built in 16MB SDRAM memory for image and video buffer storage
o SD Card slot for additional storage, max memory size up to 1GB
o Photo storage of a typical 64MB SD memory card:
3.0M HI (2048 x 1536): Approx 120 images
1.3M LO (1280 x 1024): Approx 280 images
300K VGA (640 x 480): Approx 1000 images
Video (320 x 240): Approx 12 minutes
o Digital zoom: x4, x0.1 per step for still image capturing
o Enable or Disable Date & Time stamp on images
o Automatic or manual control of exposure, white balance and sharpness
o Automatic exposure selectable for 50Hz or 60Hz
o Selectable flash settings: Auto, Manual, Off
o Real time clock setting for Date, Clock and Time stamp
o Adjustable auto power off time
o High precision 4 piece glass lens with IR coating
o Focusing: 1.5m (minimum) to Infinity
o Effective viewing angle: 54 deg
o Auto battery low detection
o Power consumption:
230mA +/-20mA when display on
160mA +/- 10mA when display off
No power consumption when powered off or USB cable is connected
o Interface type: USB 1.1
o Image format: JPG, Motion JPEG
o Friendly English user interface
o Batteries: AA alkaline batteries x 2
o Product measurements: W79 x H137 x T113mm. Weight 120g not including batteries.
o Storage conditions: -20ºC to 55ºC, 20-85% R.H., non-condensing
5
2.4. Location of Controls and Major Parts
o Accessory module connector cover: Remove to connect an accessory module
o Flash light: Required for image taking in darkened conditions
o Microphone: Used for audio and voice recording
o Mode switch: Slide to change the Tuff-Cam mode to Photo, Video or Playback
o Lens: Window to capture the image
Please do not touch the lens with fingers as it could be damaged or scratched and
poor image will be recorded.
o Speaker: To playback the voice or audio recording
o Shutter button: Press this trigger button to take a photo or press and hold the button to
take a video
o USB socket: Connects Tuff-Cam to PC and docking station for image downloading
o Tripod mount: For accessory tripod mounting
6
o Display: LTPS colour display to show the captured image or preview the image
o : Press this button to zoom out during photo mode. Also used to move selection in
menus and decrease values. This button is disabled when Tuff-Cam is connected to a PC.
o : Press this button to zoom in during photo mode. Also used to move selection in menus
and increase values. This button is disabled when Tuff-Cam is connected to a PC.
o Neck strap hole: To mount the neck strap or wrist strap
o Battery door: Open this door to insert or replace batteries, or to insert SD card
7
o Press this button to enter the Menu system
o Press and hold this button to turn on the Tuff-Cam, or to confirm the menu system
settings
o Press and hold this button to turn off the Tuff-Cam, or to exit the menu system
3. Installation
3.1. Preparation
o CDROM containing Ulead Photo Explorer 8 application program and Tuff-Cam drivers for
Windows™ 98 or 98SE and Mac OS
o Docking station with USB cable (included)
o 2 x AA alkaline batteries (not included)
8
3.2. Software installation for Windows™ 98 and 98SE
3.2.1. Unplug the USB cable from PC
3.2.2. Insert the Tuff-Cam CDROM in CD drive of your PC
3.2.3. The auto-run program will execute
3.2.4. Follow the instructions shown on screen from your PC to completely install the driver and
application program
3.2.5. Restart windows
3.2.6. Successful installation will create “Ulead Photo Explorer” icon on your desktop
3.2.7. Connect your Tuff-Cam to the PC with the USB cable, the PC will recognize the new
device and set up the configuration of the PC automatically
If your computer doesn’t run automatically, please click “Start” button and
choose “Run”, and then browse the CD drive and click “Autorun”
Operation manual of Ulead Photo Explorer is contained on the provided CDROM
3.3. Battery and SD memory card installation
3.3.1. Use a small Philips screwdriver to loosen the screw and open the battery door
3.3.2. Insert 2 AA alkaline batteries into the battery compartment in the correct direction as
shown
Alkaline batteries should be used
Ensure the battery polarity is correct as shown
3.3.3. Push the SD memory card fully into the SD socket until it clicks, ensuring the correct
direction as shown. To release the SD memory card, press it in again and the card will
eject.
3.3.4. Close the battery door carefully then use the screwdriver to tighten the screw
Please ensure the protection lock of the SD card is in the unlocked position
9
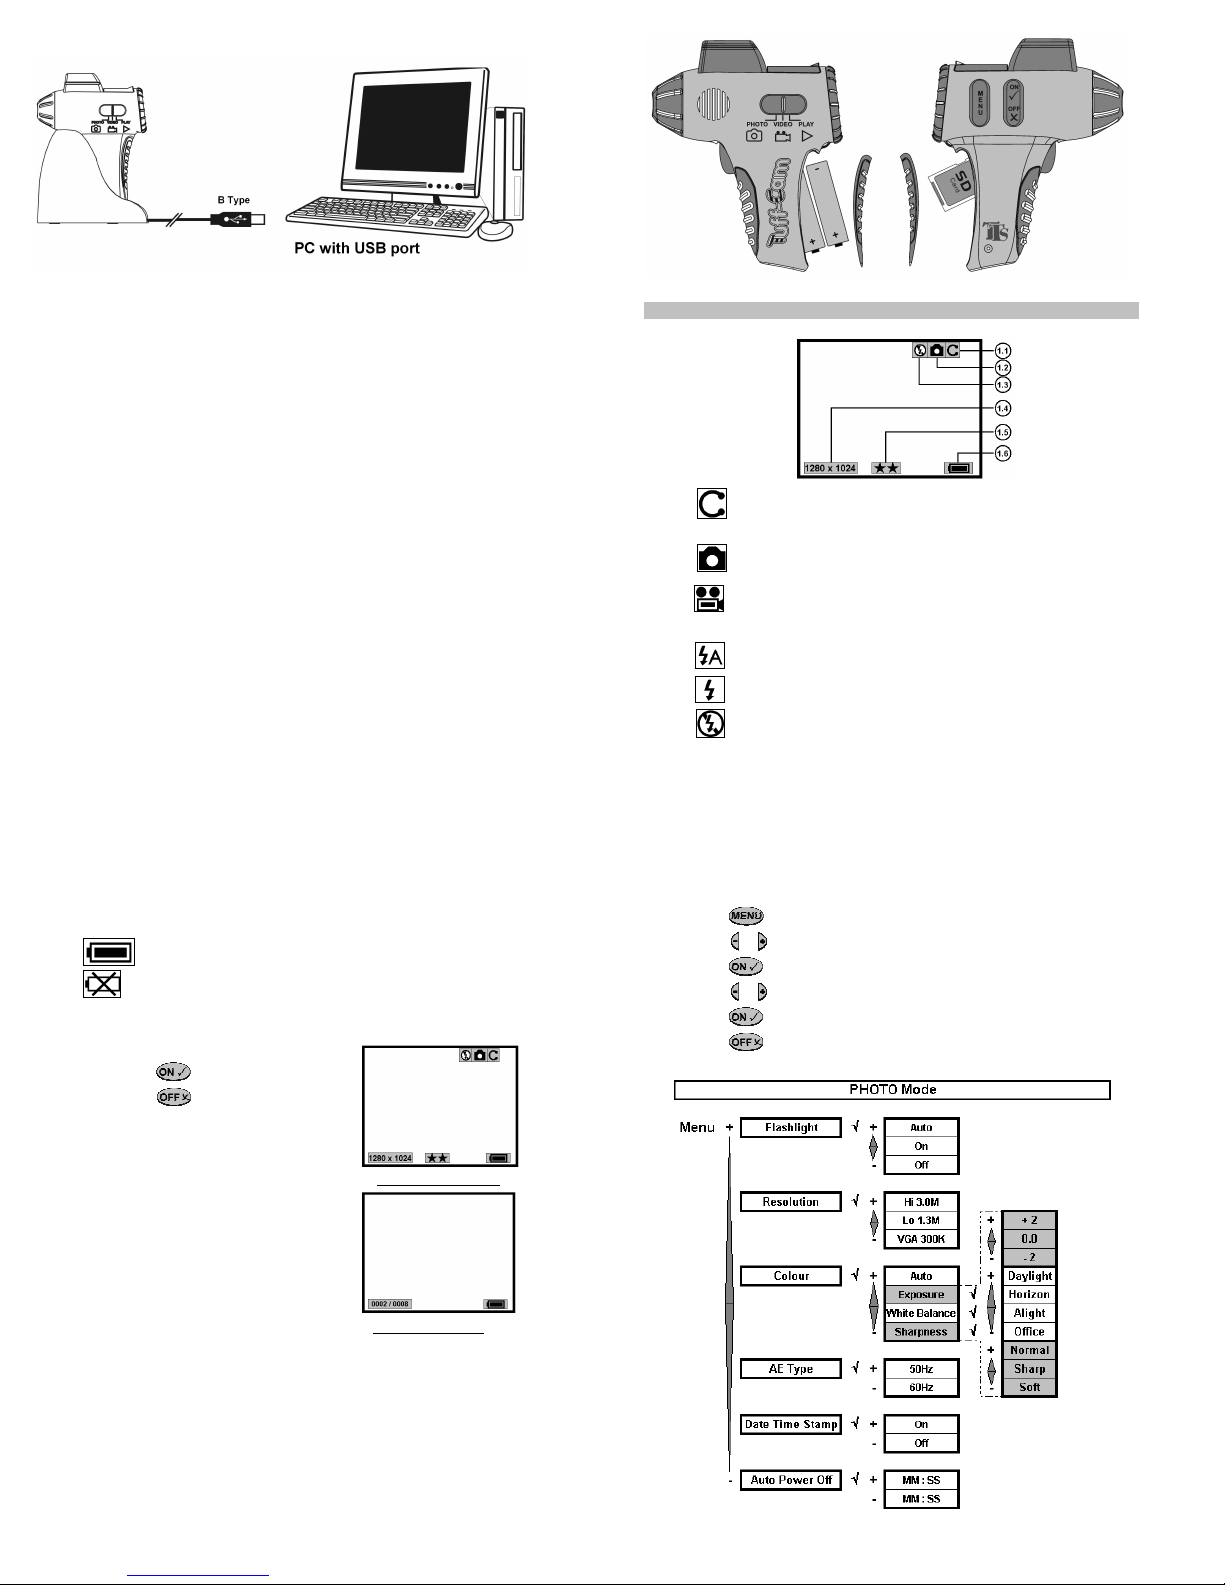
4. Display, Controls and Selections
4.1.
Status Icons
4.1.1. Card inserted: If memory card is installed, Tuff-Cam will show Con the display
4.1.2. Capture Mode: This shows the status of capture selections that you have selected
o Single Image Capture: When selected, press the shutter to capture a still image
o
o Video & Voice Capture: When selected, press the shutter button to start the
capture of video and voice recording, and release to stop recording
4.1.3. Flash Mode: This shows the status of the flash
o Auto: When selected, the Tuff-Cam will check the light conditions to control the
flash automatically
o Manual: When selected, the Tuff-Cam will turn on the flash without checking the
light conditions
o Off: When selected, the Tuff-Cam will not use the flash
10
Display in PHOTO Mode
Display in PLAY Mode
4.1.4. Resolution: This shows the resolution that has been selected
o 2048 x 1536 3.0M: Select this option to capture a 3.0M pixels high resolution image.
o 1280 x 1024 1.3M: Select this option to capture a 1.3M pixels normal resolution image.
o 640 x 480 VGA: Select this option to capture a 300K pixels low resolution image.
o 320 x 240 Video resolution: The resolution of Video capturing is 100K pixels.
4.1.5. Batteries Status:
o Full: Shows the batteries are full
o Low: Shows the batteries are low and should be replaced
4.2. Controls
4.2.1. Turn Tuff-Cam on or off
o
Press and hold to turn on Tuff-Cam
o
Press and hold to turn off Tuff-Cam
4.2.2. Change Tuff-Cam to PHOTO Mode
o Slide the mode switch to PHOTO, the display will show
the live image
o Tuff-Cam is ready for you to capture a photo
4.2.3. Change the Tuff-Cam to VIDEO Mode
o
Slide the mode switch to VIDEO, the display will show
the live image
o Tuff-Cam is ready to capture a video
4.2.4. Change the Tuff-Cam to PLAY Mode
o Slide the mode switch to PLAY, the display will show the
captured photos
o Tuff-Cam ready to playback captured photos or videos
11
4.3. Selections
4.3.1. Select the options and settings from PHOTO Mode
Slide the MODE switch to PHOTO when the Tuff-Cam is turned on, and then follow the chart
below and steps to change the selections and settings:
o Press to enter the Photo menu system
o Press or to change the selection
o Press to confirm
o Press or to change the settings
o Press to confirm the settings
o Press to go back one level in the menu system
If no buttons are pressed within 10 seconds, the unit will return to Photo mode
12
4.3.2. Setting Flash Mode and Image Quality from PHOTO mode
4.3.2.1. Setting the Flash Mode
Press and press or to select Flash, then press to confirm
Press or to select Auto, On or Off, then press to finish
4.3.2.2. Setting the Resolution
Press and press or to select Resolution, then press to confirm
Press or to select Hi 3.0M, Lo 1.3M or VGA 300K, then press to finish
4.3.2.3. Setting Exposure and Colour modes
o To set Tuff-Cam to automatically use the best settings:
Press and press or to select Colour, then press to confirm
Press or to select Auto, then press to finish
o To override automatic settings and set specific Exposure value in Colour menu:
Press or to select Exposure, then press to confirm
Press or to set the value between +2 and -2 and press to finish
o To override automatic settings and set specific White Balance value in Colour menu:
Press or to select White Balance, then press to confirm
Press or to set Daylight, Horizon, Alight or Office, then press to finish
o To override automatic settings and set specific Sharpness value in Colour menu:
Press or to select Sharpness, then press to confirm
Press or to set Normal, Sharp or Soft, then press finish
o To set Auto Exposure (AE) value for your country:
Press and press or to select AE Type, then press to confirm
Press or to select 50Hz or 60Hz, then press to finish
Using correct AE type will eliminate flicker effect on the image so please select
it according to the country that you are located in
4.3.2.4. To Set Date Time Stamp
o Press or to select Date Time Stamp, then press to confirm
o Press or to select On or Off, then press to finish
Turn on the Date Time Stamp to stamp the date and time on the captured image.
Ensure you set the date and time (from PLAY mode) first
13
4.3.2.5. To set the Auto Power Off delay time
o Press or to select Auto Power Off, then press to confirm
o Press or to set auto power off timer minutes and seconds
o Press to confirm and leave the selection
Setting the Auto power off timer to a short time will increase the battery life
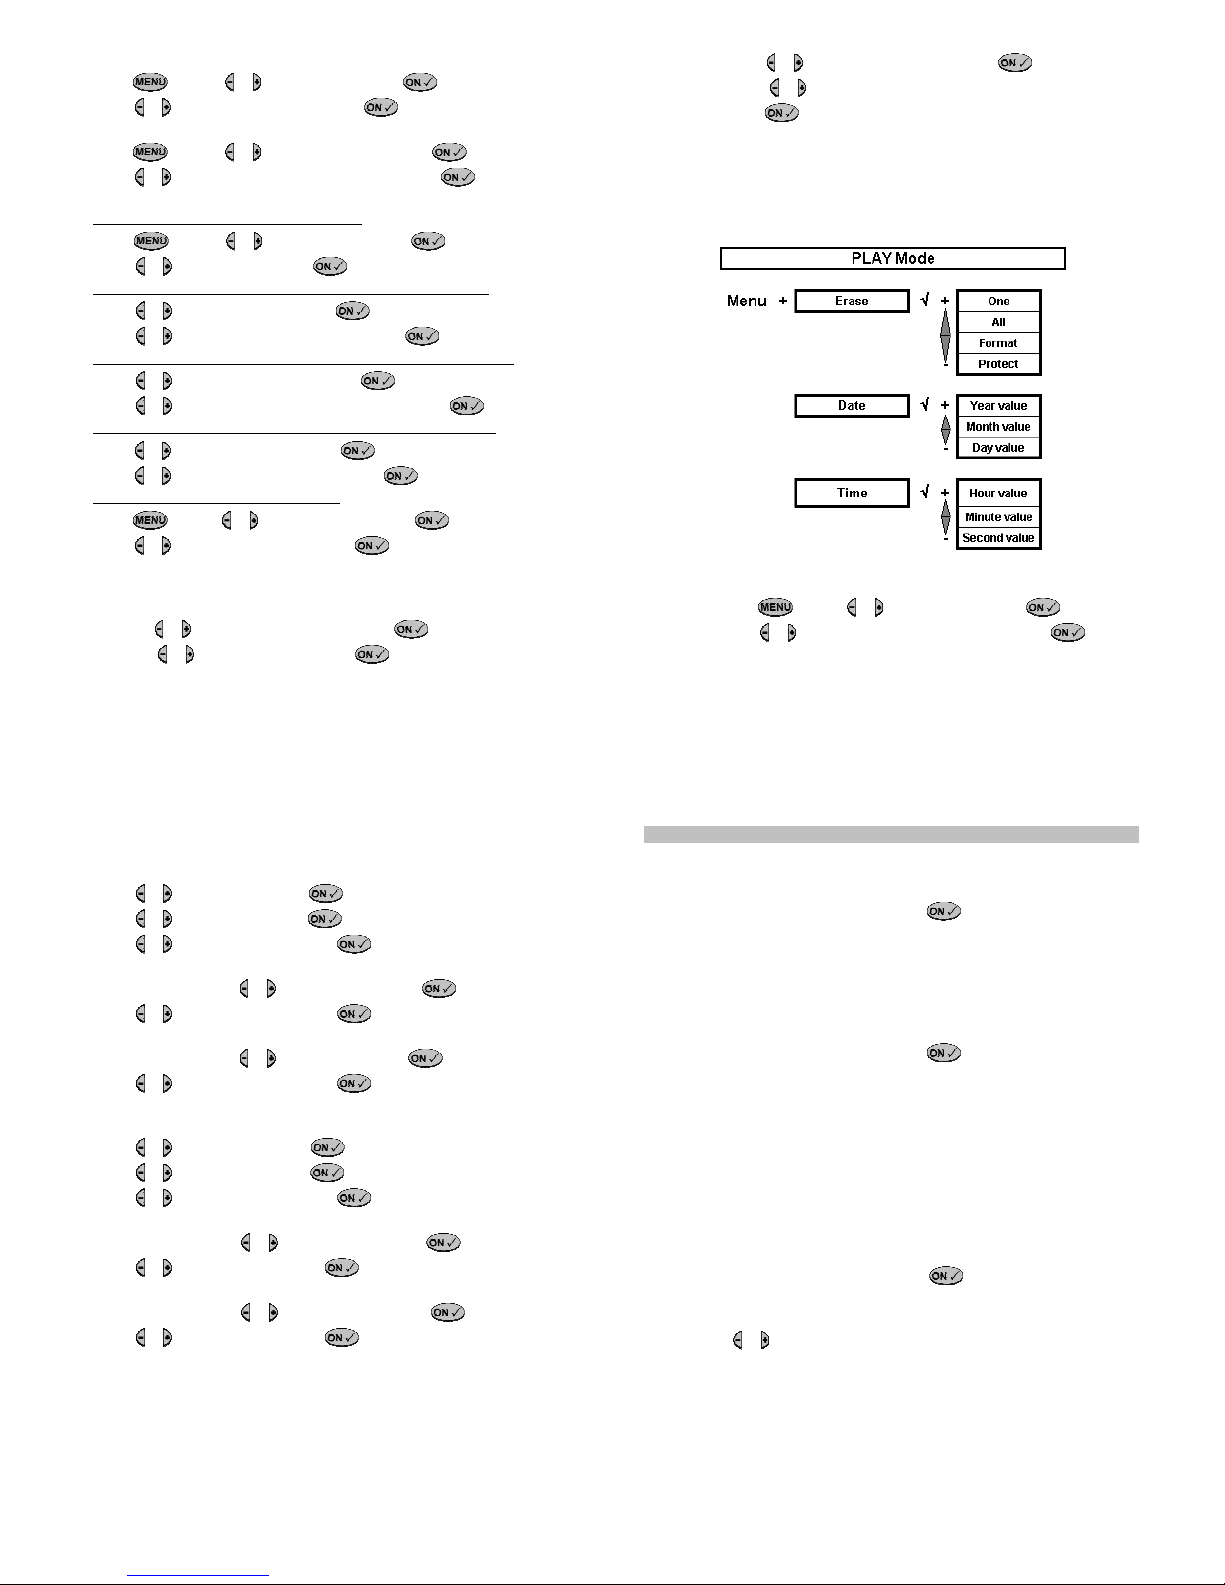
4.3.3. Set the selection and setting from playback mode
Slide the MODE switch to PLAY when the Tuff-Cam is turned on, and then follow the chart
below and steps to change the selections and settings:
4.3.3.1. Erasing Images or Videos
o Press and press or to select Erase, then press to confirm
o Press or to select One, All, Format or Protect, then press to finish
Once you have selected Erase One, Erase All or Format, the data or images will
be deleted from memory and you will not be able to restore them. If there are no
images stored in memory the Erase One and Erase All options will not be
displayed in the erase selections
14
4.3.3.2. Setting the Date
o Set Year value:
Press or to select Date, then press to confirm
Press or to select Year, then press to confirm
Press or to change the value, then press to finish setting Year
o Set Month value:
After selecting Date, press or to select Month, then press to confirm
Press or to change the value, then press to finish setting Month
o Set Day value:
After selecting Date, press or to select Day, then press to confirm
Press or to change the value, then press to finish setting Day
4.3.3.3. Setting the Time
o Set Hour value:
Press or to select Time, then press to confirm
Press or to select Hour, then press to confirm
Press or to change the value, then press to finish setting Hours
o Set Minute value:
After selecting Time, press or to select Minute, then press to confirm
Press or change the value, then press finish setting Minutes
o Set Second value:
After selecting Time, press or to select Second, then press to confirm
Press or change the value, then press finish setting Seconds
15
5. Getting started
5.1. Capture
5.1.1. Capturing a still image
o Turn the Tuff-Cam on by pressing and holding
o Set the Tuff-Cam mode to Photo by sliding the mode switch to PHOTO
o Hold the Tuff-Cam steady with your hands
o Display will show the live image that is being pointed at
o Point the Tuff-Cam at the object you wish to photograph
o Press the Shutter button once to capture an image
5.1.2. Capturing a Video with Voice
o Turn the Tuff-Cam on by pressing and holding
o Set the Tuff-Cam mode to Video by sliding the mode switch to VIDEO
o Hold the Tuff-Cam steady with your hands.
o Display will show the live image that is being pointed at
o Point the Tuff-Cam at the scene you wish to video
o Press and hold the Shutter button
o Video is recording
o To stop the recording, just release the shutter button
Note that the video resolution is fixed at 320 x 240 pixels
5.2. Playback
o Turn the Tuff-Cam on by pressing and holding
o Set the Tuff-Cam mode to Playback by sliding the mode switch to PLAY
o Display will show the captured photos and video
o Press or to scroll backward or forward through the photos

16
5.3. Downloading the images and videos to a PC
o Turn the Tuff-Cam on
o Slide the mode switch to PLAY
o Put the Tuff-Cam into the docking station
o Connect the Tuff-Cam to the PC with the USB cable of
docking station
o Display will show “MSDC”
o The PC will recognize the Tuff-Cam as a mass storage disk and will be found when you
open the My Computer icon from your desktop
o Open the mass storage disk then copy or cut the images to your PC.
6. Maintenance
6.1. Storage conditions
o Operating Environment: 5ºC to 40ºC, 20-85% relative humidity, non-condensing
6.2. Special care instructions!!
o Never immerse the Tuff-Cam into any fluid or liquid
o Remove dust or stains with a soft cloth dampened with water or neutral detergent
o Keep the Tuff-Cam in a dry and cool dust-free environment or container when it is NOT
being used
o Take the batteries out when the Tuff-Cam is NOT to be used over a long period
o Avoid dropping the Tuff-Cam on to hard ground
o Do not disassemble the Tuff-Cam
o Static discharge may cause the operation fail or damage the Tuff-Cam
17
7. Troubleshooting and Hints
7.1. Monitor resolution adjustment
You need to set the display of your PC monitor resolution to 16-bit colour or higher for optimum
image display. Please refer to the display card manual or follow the procedure below:
o Click the Windows Start button
o Click settings and then Control Panel from the pop-up menus
o Double click the Display icon
o Click the Setting tab
o Select High Colour (16 bit) or True Colour (24 bit) from the list box
o Click OK. You may need to update the monitor driver to change to the new setting
o Restart your computer
7.2. SD memory card use
You are recommended to FORMAT the SD memory card before you save an image to it when:
o You use a new SD Card
o You have used the SD card in other digital devices (as the format of the SD card might have
changed when using other devices due to non-standard formats)
7.3. Capturing Images in different conditions
If the image capture conditions are outside normal limits, please select the correct white
balance:
o Daylight, when the target object is under in direct sunlight
o Horizon, when the object is under a cloudy sky
o Alight, when the object is under Tungsten light
o Office, when the object is under Fluorescent light
To prevent the camera shaking when held in the hand, please use a tripod to hold the Tuff-Cam
when capturing a high-resolution image
7.4. Windows XP Driver Installation
Although the Tuff-Cam device driver is compatible with
Windows XP, you may find the error message shown
here.
Please click “Continue Anyway” and complete the rest of
the installation process.
18
8. Support & Warranty
This product is provided with a one-year warranty for problems found during normal usage.
Mistreating the Tuff-Cam or opening the unit will invalidate this warranty.
All out of warranty repairs will be subject to a replacement fee.
Please visit www.tuff-cam.co.uk for hints and tips and latest product information.
Email techsupport@tuff-cam.co.uk for technical support.
TTS Group Ltd
Unit 1
Park Lane Business Park
Kirkby in Ashfield
Nottinghamshire, UK
NG17 9LE
Freephone: 0800 318686
Freefax: 0800 137525
9. FCC Information
This device complies with Part 15 of the FCC Rules. Operation is subject to the following two
conditions: (1) This device may not cause harmful interference, and (2) This device must accept any
interference received, including interference that may cause undesired operation.
Warning: Changes or modification to this unit not expressly approved by the party responsible for
compliance could void the user’s authority to operate the equipment.
NOTE: This equipment has been tested and found to comply with the limited for Class B digital
device, pursuant to Part 15 of the FCC Rules. Their limits are designed to provide reasonable
protection against harmful interference in a residential installation. This equipment generates, uses
and can radiate radio frequency energy and, if not installed and used in accordance with the
instructions, may cause harmful interference to radio communications.
However, there is no guarantee that interference will not occur in a particular installation. If the
equipment does cause harmful interference to radio or television reception, which can be
determined by turning the equipment off and on, the user is encouraged to try to correct the
interference by one or more of the following measures:
o Reorient or relocate the receiving antenna.
o Increase the separation between the equipment and receiver.
o Connect the equipment into an outlet on a circuit different from that to which the receiver is
connected.
o Consult the dealer or an experienced radio/TV technician for help.
WF064 Rev 1.0. Printed in China.
TM
Table of contents
Other TTS Camcorder manuals


