TTS Easi-Walker User manual


Easi-Walker User Guide
2
•Please retain these instructions for future reference
•Easi-Walker contains a replaceable, rechargeable
battery
•Only allow adults to remove and replace the battery
•Replace with equivalent rechargeable battery only
•Warranty is void if the case is opened for any reason
•The warranty does not cover any data loss from the
unit nor any consequential loss of information
FCC compliance
NOTE: THE MANUFACTURER IS NOT RESPONSIBLE FOR ANY RADIO OR TV INTERFERENCE CAUSED BY
UNAUTHORIZED MODIFICATIONS TO THIS EQUIPMENT. SUCH MODIFICATIONS COULD VOID THE USER
AUTHORITY TO OPERATE THE EQUIPMENT.
NOTE: This equipment has been tested and found to comply with the limits for a Class B digital device, pursuant to Part
15 of the FCC Rules. These limits are designed to provide reasonable protection against harmful interference in a
residential installation. This equipment generates, uses and can radiate radio frequency energy and, if not installed and
used in accordance with the instructions, may cause harmful interference to radio communications. However, there is no
guarantee that interference will not occur in a particular installation.
If this equipment does cause harmful interference to radio or television reception, which can be determined by turning the
equipment off and on, the user is encouraged to try to correct the interference by one or more of the following measures:
•Reorient or relocate the receiving antenna.
•Increase the separation between the equipment and receiver.
•Connect the equipment into an outlet on a circuit different from that to which the receiver is connected.
•Consult the dealer or an experienced radio/TV technician for help.
Know Your Easi-Walker
Charging the Battery
•Before use, please ensure that the battery is fully charged. If the battery indicator is
showing, then the unit requires charging
•Insert the Easi-Walker into the docking station and plug the docking station into a PC. You
do not need to start the software to charge the battery
•The Battery Indicator will be on during charge and turn off when the charging is complete
•(NB. If the display is completely blank, then the battery has been completely discharged
and the Easi-Walker will need to be charged for 5 minutes or so before a display will
appear)
Step count
accuracy
+/- 10%
Battery type LIR2032, rechargeable
Lithium coin cell
Battery life
(standby)
10 weeks
Battery life
(normal use)
4 weeks
Connections 6 USB connections per
docking station
USB power
requirement
<10mA for a full docking
station
Current Activity
Number
Step Count
Lock
Indicator
Battery Charge
Indicator
USB Conne
ctor
Select Button
Lock Button
Belt Clip

Easi-Walker User Guide
3
Using your Easi-Walker
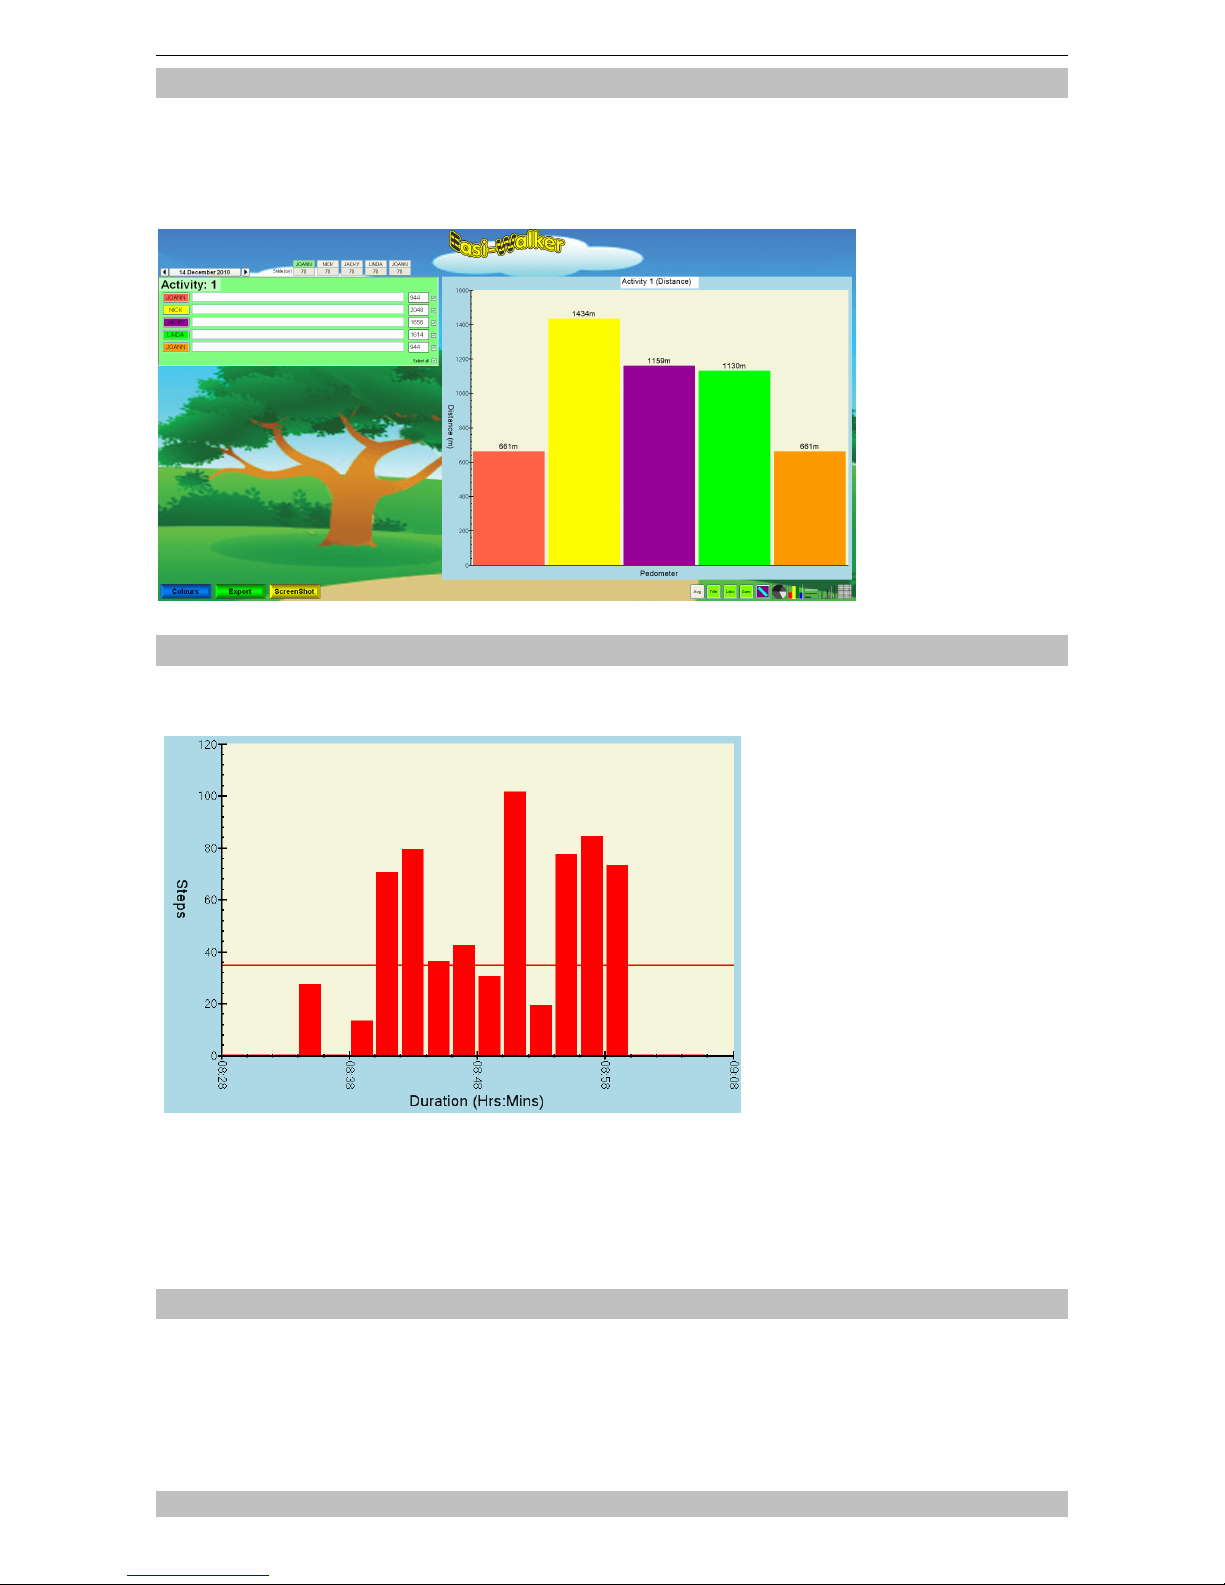
•The Easi-Walker pedometer will count all the steps you take while wearing it
•It will store the information for 14 separate days, then start overwriting the first date stored
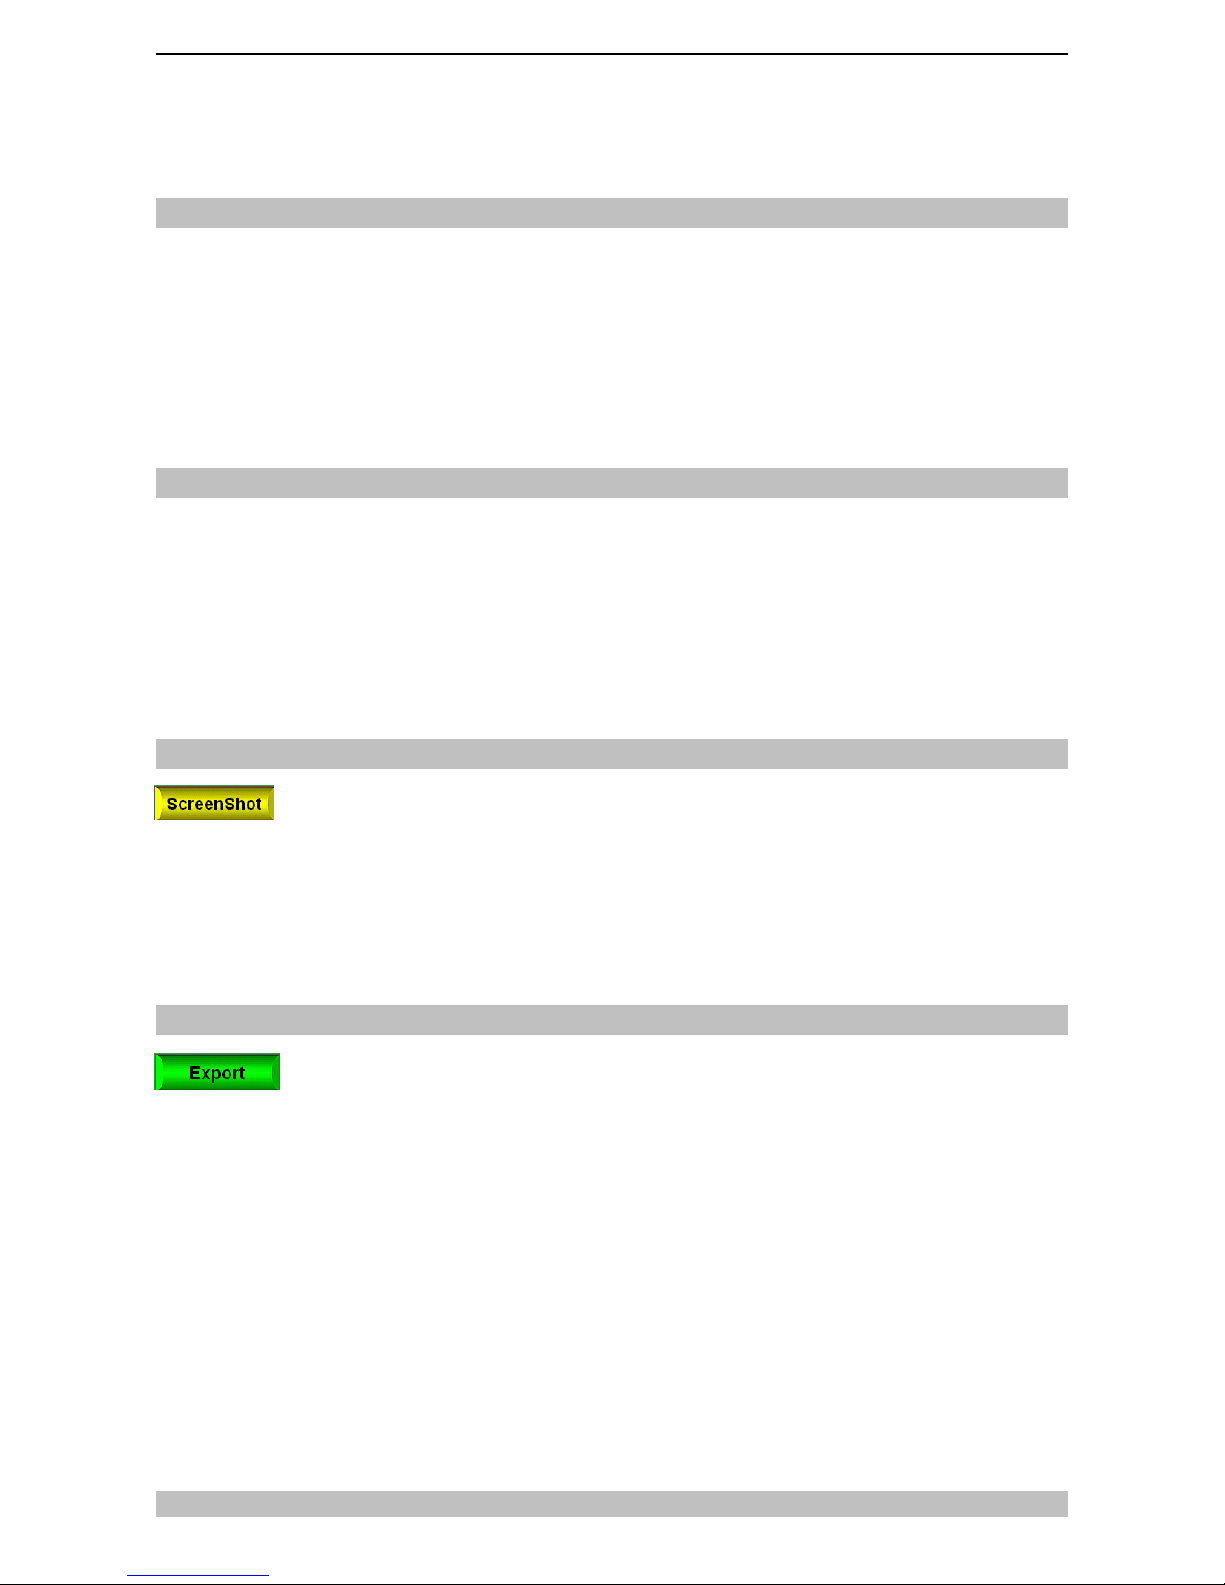
•It stores the number of steps made in each 2-minute period during each day so you can
see how the number of steps varies over the course of each day
•The Easi-Walker pedometer can store the step counts into different activities. You can split
each day into up to 9 separate activities (Activity 1, Activity 2, Activity 3, etc.)
•At the start of each day, the current Activity is reset to Activity 1
•Two sets of numbers are stored in the Easi-Walker; firstly the number of steps that are
taken during each activity. Secondly the step count during every 2 minute interval
throughout the day i.e total number of steps taken in that day
•Because the Activity can be changed during a 2-minute period, there is sometimes a
discrepancy between the total number of steps for each Activity (as counted using the 2-
minute period data) and the total stored separately for each Activity. However, the overall
total number of steps will, of course, be the same
Selecting the Activity
•At the start of each day, the Activity number is set back to Activity 1
•Press the Lock button (on the side) briefly to unlock the pedometer the Lock indicator will
now flash on the display
•Press the Select button (on the front) briefly twice to move to the next Activity number
Activity number will increase
•You are now locked out of changing the Activity number for another 5 seconds as a security
measure, but the pedometer will immediately start counting steps for the new Activity
•When you have reached the maximum Activity number (9), then it cannot be increased
further and all steps counted for the remainder of the day will be allocated to Activity 9
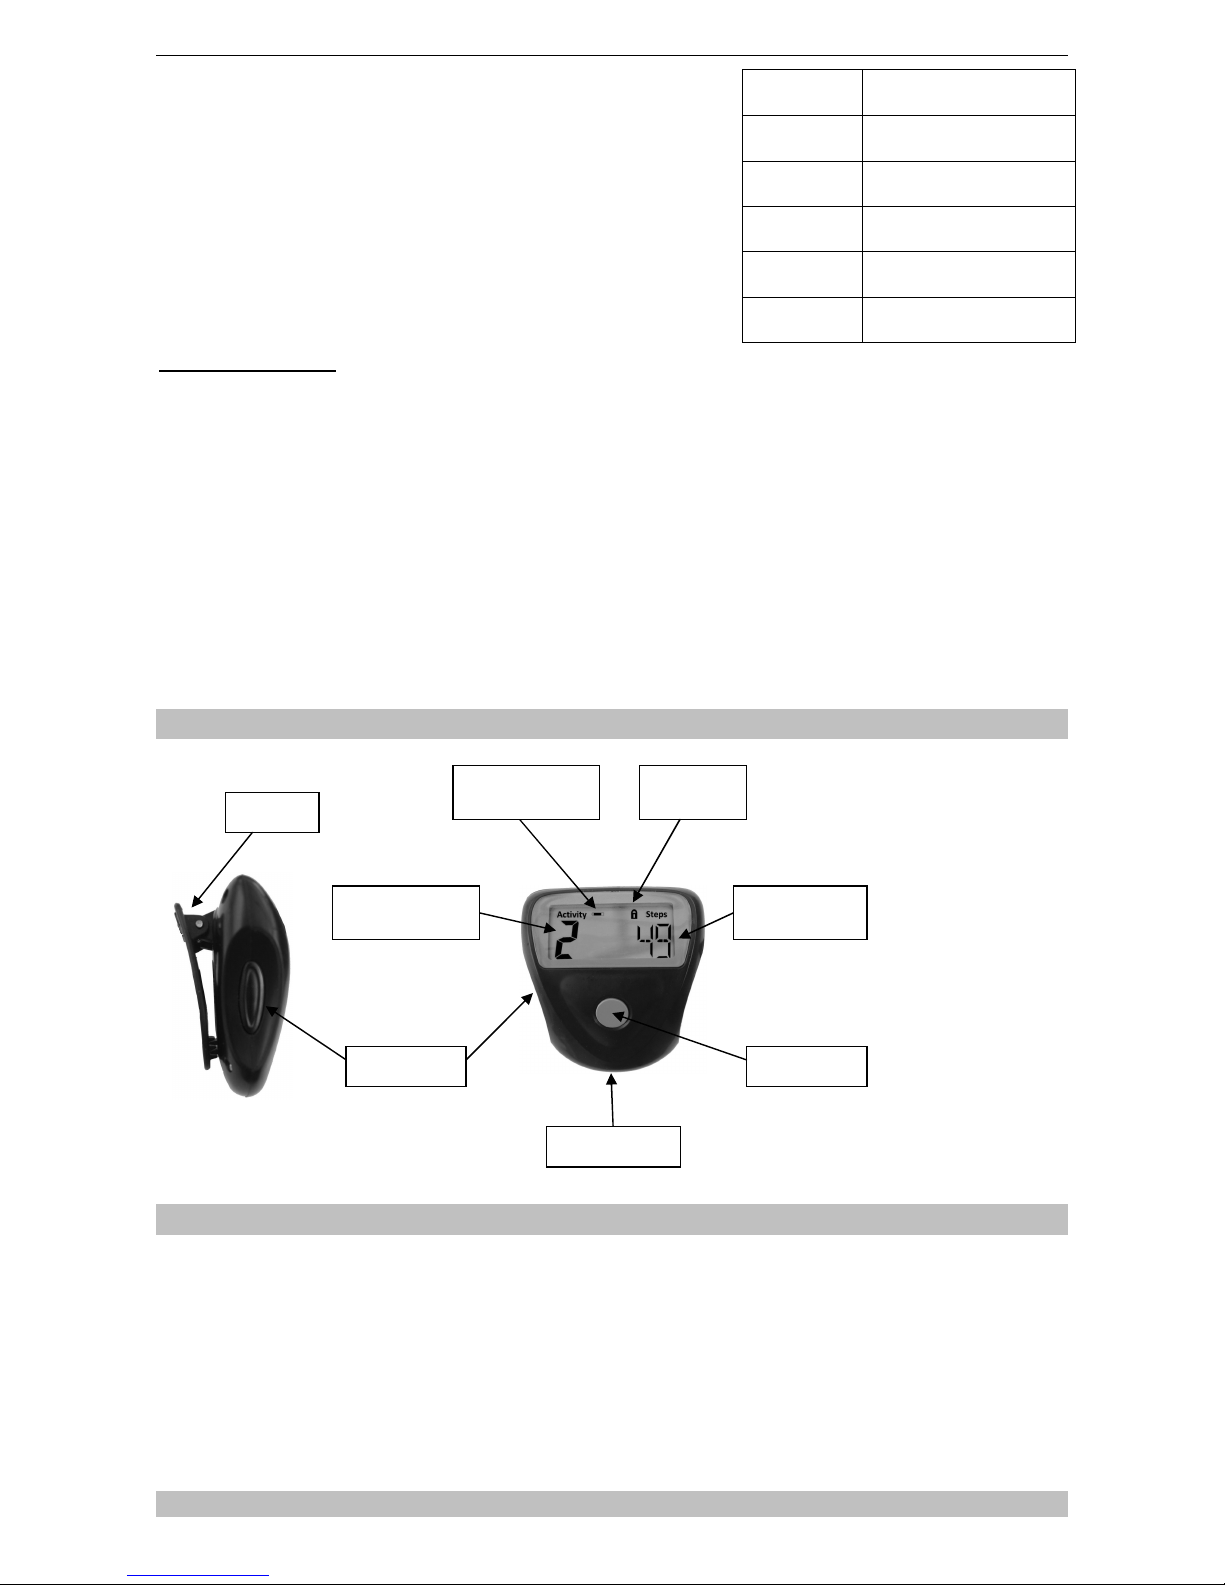
Viewing Activity and Other Information
•Press and Hold the Lock button for 5 seconds
•The Easi-Walker display will change to show the current Time
•Press the Lock button again to cycle through: Year, Date, Name, Activity 1 steps, Activity 2
steps, Activity 3 steps
•After 5 seconds, the display will return to normal display
•Note that the Time and Date, as well as the name are set using the Easi-Walker software
and cannot be set on the pedometer itself
Installing the Software
•There are no drivers to install, but you must install the Easi-Walker application in order to
read the data held on the Easi-Walker pedometers
•Insert the CD into the CD drive and the installation should start
•If the installation doesn’t start, then browse to the CD and double-click on setup.exe
•Follow the instructions to select the location to install
•When installation is complete, the Easi-Walker software will be found in the Start Menu in
the group TTS Group

Easi-Walker User Guide
4
Attaching Easi-Walker Pedometers to the docking station
•The first time that you attach an Easi-Walker pedometer to the PC, Windows must identify it
and install its own driver. This can take several minutes to complete if many pedometers
are connected at the same time.
TIP: It is generally quicker to add each pedometer one at a time to the docking station while the
data is uploading from the pedometer to the PC
•When the pedometers are connected to a PC, they will show the name allocated to that
pedometer. The name can be changed using the Easi-Walker application if required
•At all times while the Easi-Walker pedometer is connected to the PC it will be charging,
regardless of whether the application software is running
Running the Easi-Walker Application Software
•From the Start menu, go to All Programs and select the program group TTS Group. Then
select Easi-Walker
•Easi-Walker will run and initially show a blank activity table on the left and a selection of
buttons along the bottom. As pedometers are plugged in, the data from the pedometer will
be loaded and shown as a chart
•When a pedometer has been loaded, the name is shown near the top of the screen. If the
pedometer is currently attached to the PC, the pedometer name will be in red lettering, if it
is not connected the name is in black lettering
•The screenshot shows that five pedometers have
been loaded on the 14
th
December and JACKY’s
data has been selected.
•All 9 activities were completed, if there are
certain values that are 0 steps or you don’t want
to include in the days step count, these can be
unchecked. In the above table only 6 have been
selected to show in the graph.

Easi-Walker User Guide
5
The type of chart can be selected using the buttons on the lower right of the screen.
Available chart types are:
Pie chart
Horizontal bar chart (thick or thin bars)
Vertical bar chart (thick or thin bars)
Time chart (shows the 2-minute data as a cumulative line chart or vertical bar chart)
Table (shows all activity data for every pedometer)
You can select the units to use for the axes labels and the labels for each item, by pressing the
“Units” button. There are three options:
Number of steps taken
Distance travelled (you must set the stride length appropriately for this to be accurate.
Enter the number of centimetres for each stride on the box that appears below each
pedometer name near the top of the screen)
Percentage of total steps
The titles can be changed by double-clicking the title and typing in your new title.
•All data downloaded from pedometers is automatically saved in the database. The
information from up to 50 pedometers can be saved for each date. The data on each
pedometer is deleted after downloading to the database. Please ensure that you only
download the data to the correct database as you will not be able to move it afterwards.
•Double-click in the chart area and the chart will fill the whole screen area above the
buttons. Double-click again to restore the original view
Selecting Data to View
•The title can be changed by double-clicking it and typing in your new title
•Click on the date (top left) to open a month calendar. This will show in bold those days that
have valid step data. You can click on any bold date to load up the information for that day
•Alternatively you can click on the Previous and Next arrows either side of the date to move
to the previous (or next) date that has valid step data. If there is no more previous (or next)
step data, then the date will not change
•If you want to select a different pedometer to view, click on the name of the pedometer in
the list above the activities. The selected pedometer will be in green and the name will be
shown clearly on the left

Easi-Walker User Guide
6
Switching between Activity and Pedometer Views
•If you want to compare the performance of all the pedometers for the same activity, click on
the activity number on the left. If you click on “ACT 1” for instance, you would see the data
for all pedometers on Activity 1
•In Activity view the colours shown on the chart will match the pedometer colour
Using the Time Chart function
•When you are viewing the 2-minute data using the Time Chart function, it will show all the
activities for the selected pedometer, with each activity starting at 00:00. Each Activity will
be in a different colour.
•If you select any activity, it
will show ALL activities for
each pedometer attached.
Each pedometer will be in
a different colour, with the
breaks between activities
shown as diamonds.
•Because the activity
number can change
within a 2 minute period, it
is possible that there can
be small discrepancies
between the step counts
shown in the different
views.
•To zoom in to a part of the chart, hold down the left click button then drag over the area you
want to zoom in on, the area then becomes highlighted red. When you have the area
covered in red that you would like to zoom in on, let go of the left click and that area will
now be shown in the graph area.
•In this chart type, if the icon is clicked again it shows a cumulative graph of the total number
of steps for that day.
Naming the Activities
•The name for an activity e.g Football, can be typed into the white box next to the activity
number. The activity labelled football is then saved only for that specific activity for that
pedometer and on that day
•To make it quicker to add activity names, the names that have been used before are
entered into an auto-complete list and will pop-up as you start typing them. Select the name
you want and press the <Enter> key to accept

Easi-Walker User Guide
7
•When you have entered all the activity names for one pedometer, you can then set all the
other pedometers on that day to the same names, by pressing the “Copy to all” button
under the activities. The database will then be updated so that all the pedometers currently
showing on that day have the same activity names
Changing a Pedometer Name
•To change the name of a pedometer, double-click on the pedometer name at the top of the
screen
•The background will change to yellow, indicating that you are in edit mode. Up to 5 upper-
case letters or numbers can be inserted. Press the <Enter> key to accept the new
pedometer name
•If the pedometer is currently attached, the name on the pedometer will also be changed. If it
is not attached, the name will only be changed in the database
Changing a Chart Title
•To change the chart title, first ensure that the Chart title is showing, by clicking on the Title
button (bottom right)
•Double-click on the existing chart title to open up the title editing box.
•Enter the title you require and press the <Enter> key.
•The new title will be placed centrally at the top of the chart.
•Note that this title is not stored in the database.
Taking and Using a ScreenShot
When you are happy that the chart area is showing the information you want, press
the ScreenShot button at the bottom left of the screen
The Windows clipboard will now contain an exact copy of the chart area, including axis
labels and chart title
Move to any Windows application such as Publisher or Word and “Paste” the chart into
your document. The chart image will be placed into your document as a picture and can be
resized etc
Exporting Data
If you want to do additional analysis of the detailed data from pedometers, you will
need to export the data and use another product such as Easiteach, or Excel
•Press the Export button and browse to the location that you want to save the file to. Choose
the file name and press OK
•The exported data is in CSV (Comma Separated Value) format and can be directly opened
with Excel
•Each pedometer that was in the database for the day you exported from will be present in
the exported file
•There is a separate column for each activity and the 2-minute step data is shown, each
activity starting at 0:00
•Heading lines show the name and ID of each pedometer

Easi-Walker User Guide
8
Network Setup
•If you require a number of different computers to share the same pedometer data, you
should set the database location to be a folder on a shared drive for which everyone has
Read and Write access rights
•Enter the Teacher Menu by pressing <Ctrl-T> then browse to the selected folder
•Now any PC using this same database location will be updated whenever the database is
changed by any other PC
•You can also set the configuration file to be on the network. By doing this, all the PCs will
share the same configuration, so any changes will only need to be made once
•Note that the database folder itself does not directly contain the data files. Instead, it
contains a folder for each year: 2010, 2011, 2012, etc. These Year folders then contain
Month folders: 01, 02, 03, etc. Within each Month folder there are files for every day that
contains pedometer data
Troubleshooting
Easi-Walker is designed to work reliably and predictably in all normal conditions. However, it is
possible that problems may occur. Please check the following before contacting technical support:
Problem Electronic interference causes unit to malfunction
Solution Remove the battery for 5 seconds, then replace it
Problem No display on screen
Solution Recharge for 30 minutes. If still no display, remove the battery for 5 seconds then replace and
continue recharging
Problem Cannot change the Activity Number
Solution The activity number cannot be increased past 9 and cannot be changed for 5 seconds after it
has been changed
Problem Easi-Walker fails to capture some steps
Solution To prevent accidentally counting, at least 15 steps must be counted within a short period
Problem Battery indicator is permanently on
Solution This indicates that the battery may not be in good condition and may need changing. Replace
only with rechargeable Lithium cells, LIR2032
Problem The colour shown does not match the colour of the Pedometer
Solution This means that the Unique ID of the pedometer is not set correctly. The last digit of the ID
represents the colour: 0 to 5 is Red, Yellow, Blue, Green, Orange and Purple. Use the EWSet
utility to set the ID correctly
Support & Warranty
This product is provided with a one-year warranty for problems found during normal usage.
Mistreating the Easi-Walker or opening the unit will invalidate this warranty. Any data stored on the
unit and any consequential loss is not covered by this warranty.
All out of warranty repairs will be subject to a replacement fee.
Please visit www.tts-group.co.uk for latest product information.
Email feedback@tts-group.co.uk for technical support.
TTS Group Ltd Freephone: 0800 318686
Park Lane Business Park Freefax: 0800 137525
Kirkby-in-Ashfield
Nottinghamshire, UK
NG17 9GU
Table of contents