Twinhead Durabook R13S User manual

1Introduction
Congratulations on your purchase of a Durabook R13S notebook! The R13S is a
fully functional PC with built-in wireless connectivity. With the R13S notebook, you
will be able to organize and access important business and personal information. In
addition, you will be able to access the Internet and send and receive e-mail.
This manual contains all the information you need to set up and use your Durabook
R13S. It thoroughly describes all the features of the notebook in a detailed and
easy-to-read manner.
System Configurations
Processor: Intel U7500 "Merom" Processor Support
Speed at 1.06GHz
Chipset: INTEL ICH-8M + 965GM Chipset
OS Support:
Microsoft Windows XP Edition OS Support
Display Screen Interface Support:
Standard Touch Screen
Sunlight readable screen
LCD Flat Panel Support:
13.3” TFT, 1280x800 Resolution

Storage Support:
HDD Support
z2.5” SATA HDD
zCapacity Points: 80GB 5400RPM (up to 250GB)
System Memory:
Single SO-DIMM Memory Slots
DDR2-667MHz
System Memory Upgradeable to 2GB
Expansion Slot:
Connecter
USB 2.0 Support
RS-232 Support
PCMCIA & Flash Memory Slot
Optical Device:
DVD Super Multi Dual Layer 8X/6X/4X
Communication Device Support:
Wireless LAN (WLAN) Intel 802.11A/B/G/N Support:
Modem 56K
Bluetooth 2.1 + EDR
GPS
WWAN Compliant

Safety Precautions
The following safety precautions will increase the life expectancy of the Durabook R13S
notebook. Follow all precautions and instructions. Except as described in this manual,
refer all servicing to qualified personnel. Do not use damaged power cords,
accessories, and other peripherals. Do not use strong solvents such as thinners,
benzene, or other chemicals on or near the surface.
IMPORTANT! Disconnect the AC power and remove the battery pack(s) before cleaning. Wipe
the R13S notebook using a clean cellulose sponge or chamois cloth dampened with a solution
of nonabrasive detergent and a few drops of warm water and remove any extra moisture with a
dry cloth.
DO NOT place or drop objects on top of the notebook.
DO NOT insert any foreign objects into the notebook.
DO NOT place the notebook on uneven or unstable work surfaces. Seek servicing if the casing has been damaged.
DO NOT expose the notebook to strong magnetic or electric fields.
DO NOT press or touch the notebook’s LCD display.
DO NOT place the notebook together with small items that may scratch or enter the display.
DO NOT expose the notebook to dirty or dusty environments.
DO NOT operate the notebook during a gas leak.

DO NOT expose the notebook to or use near liquids, rain, or moisture.
DO NOT use the notebook’s modem during an electrical storm.
DO NOT leave the notebook on your lap or any part of the body in order to prevent discomfort or injury from heat
exposure.
BATTERY SAFETY WARNINGS:
DO NOT throw the battery into fire.
DO NOT short circuit the contacts.
DO NOT disassemble the battery.
SAFE TEMPURATURE: The notebook should only be used in environments with ambient temperatures between
5°C (41°F) and 35°C (95°F)
INPUT RATING: Refer to the rating label on the bottom of notebook and be sure that your power adapter
complies with the rating.
DO NOT throw the notebook into municipal waste. Check local regulations for the disposal of electronic products.
DO NOT carry or cover the notebook while it is ON with any materials that will reduce air circulation such as a
carrying bag.

Preparing Your Notebook
These are only quick instructions for powering on your Durabook R13S notebook. Read
the later pages for detailed information on using your notebook.
1. Connect the AC Power Adapter
2. Install the Battery Pack
3. Turn ON the Notebook
IMPORTANT! When opening, do not force the display panel down to the table or else the
hinges may break! Never carry the notebook by the display panel!

2Getting Started
Front View
1. Five Way Control Key – Up/Down, Left/Right, & Enter Button
2. WiFi/BT Power Button
3. Mouse Button
4. System Power Button
5. LCD Panel
6. Internal Microphone & Speaker
7. LED Status Indicator
8. Fingerprint Scanner
9. Volume Control
10. Brightness Control

I/O Port View
1. USB Port
2. LAN Port
3. Modem Port
4. USB Port
5. RS232 Port
6. Display Output
7. Optical Drive
8. Battery Slot
9. Kensington Lock
10.Microphone-In & Audio-Out
11.PCMCIA and Flash Memory Slot
12.Power (DC) Input
Stylus

Making Connections
Your Durabook R13S notebook is equipped with a full array of ports and connectors,
including standard input/output (I/O) ports for quickly and easily adding peripheral
devices such as printers, keyboards, and mice. Refer to the documentation included
with individual devices for details on connecting these devices to your notebook.
1. USB (Universal Serial Bus) Ports
The Universal Serial Bus (USB) is the latest standard for connecting monitors, input
devices, scanners, and other devices to a PC. USB devices can be chained together onto a
single cable.
2. LAN Port
The RJ-45 LAN port with eight pins is larger than the RJ-11 modem port and supports a
standard Ethernet cable for connection to a local network. The built-in connector allows
convenient use without additional adapters.
3. Modem Port
The RJ-11 modem port with two pins is smaller than the RJ-45 LAN port and supports a
standard telephone cable. The internal modem supports up to 56K V.90 transfers. The
built-in connector allows convenient use without additional adapters.
4. Microphone-In Jack
Connect a microphone to this jack to record audio.
5. RS232 Port
The RS232 connector is reserved for specific purposes used to connect various customer
devices.
6. Audio-Out Jack
Connect a stereo headset or external speakers to this jack to listen to multimedia.
7. Power Input Jack
Connect the DC power cable from the AC adapter to this jack.
8. Optical Drive
The R13S notebook comes in various models with different optical drives. The notebook’s
optical drive may support compact discs (CD) and/or digital video discs (DVD) and may
have recordable (R) or re-writable (RW) capabilities.

9. Kensington® Lock Port
The Kensington® lock port allows the notebook to be secured using Kensington® com-
patible Notebook PC security products. These security products usually include a metal
cable and lock that prevent the notebook from being removed from a fixed object. Some
may also include a motion detector to sound an alarm when moved.
10. PC Card Slot
One PCMCIA 2.1 compliant PC card socket is available to support on type I/II PC card. The
socket supports 32-bit cardbus. This allows accommodation of notebook expansion options
such as memory cards, ISDN, SCSI, and Smart Card adapters.
11. Flash Memory Slot
Normally an external memory card reader must be purchased separately in order to use
memory cards from devices such as digital cameras, MP3 players, mobile phones, and
PDAs. The R13S has a built-in high-speed memory card reader that can conveniently read
such cards.
12. Display Output
The 15-pin D-sub monitor port supports a standard VGA-compatible device such as a
monitor or projector to allow viewing on a larger external display.
GPS Disclaimer
Underwriters Laboratories Inc. (“UL”) has not tested the performance or reliability of the
Global Positioning System (“GPS”) hardware, operating software or other aspects of this
product. UL has only tested for fire, shock or casualties as outlined in UL’s Standard(s) for
Safety. UL60950-1 Certification does not cover the performance or reliability of the GPS
hardware and GPS operating software. UL MAKES NO REPRESENTATIONS,
WARRANTIES OR CERTIFICATIONS WHATSOEVER REGARDING THE
PERFORMANCE OR RELIABILITY OF ANY GPS RELATED FUNCTIONS OF THIS
PRODUCT.

3Power Systems
Using AC Power
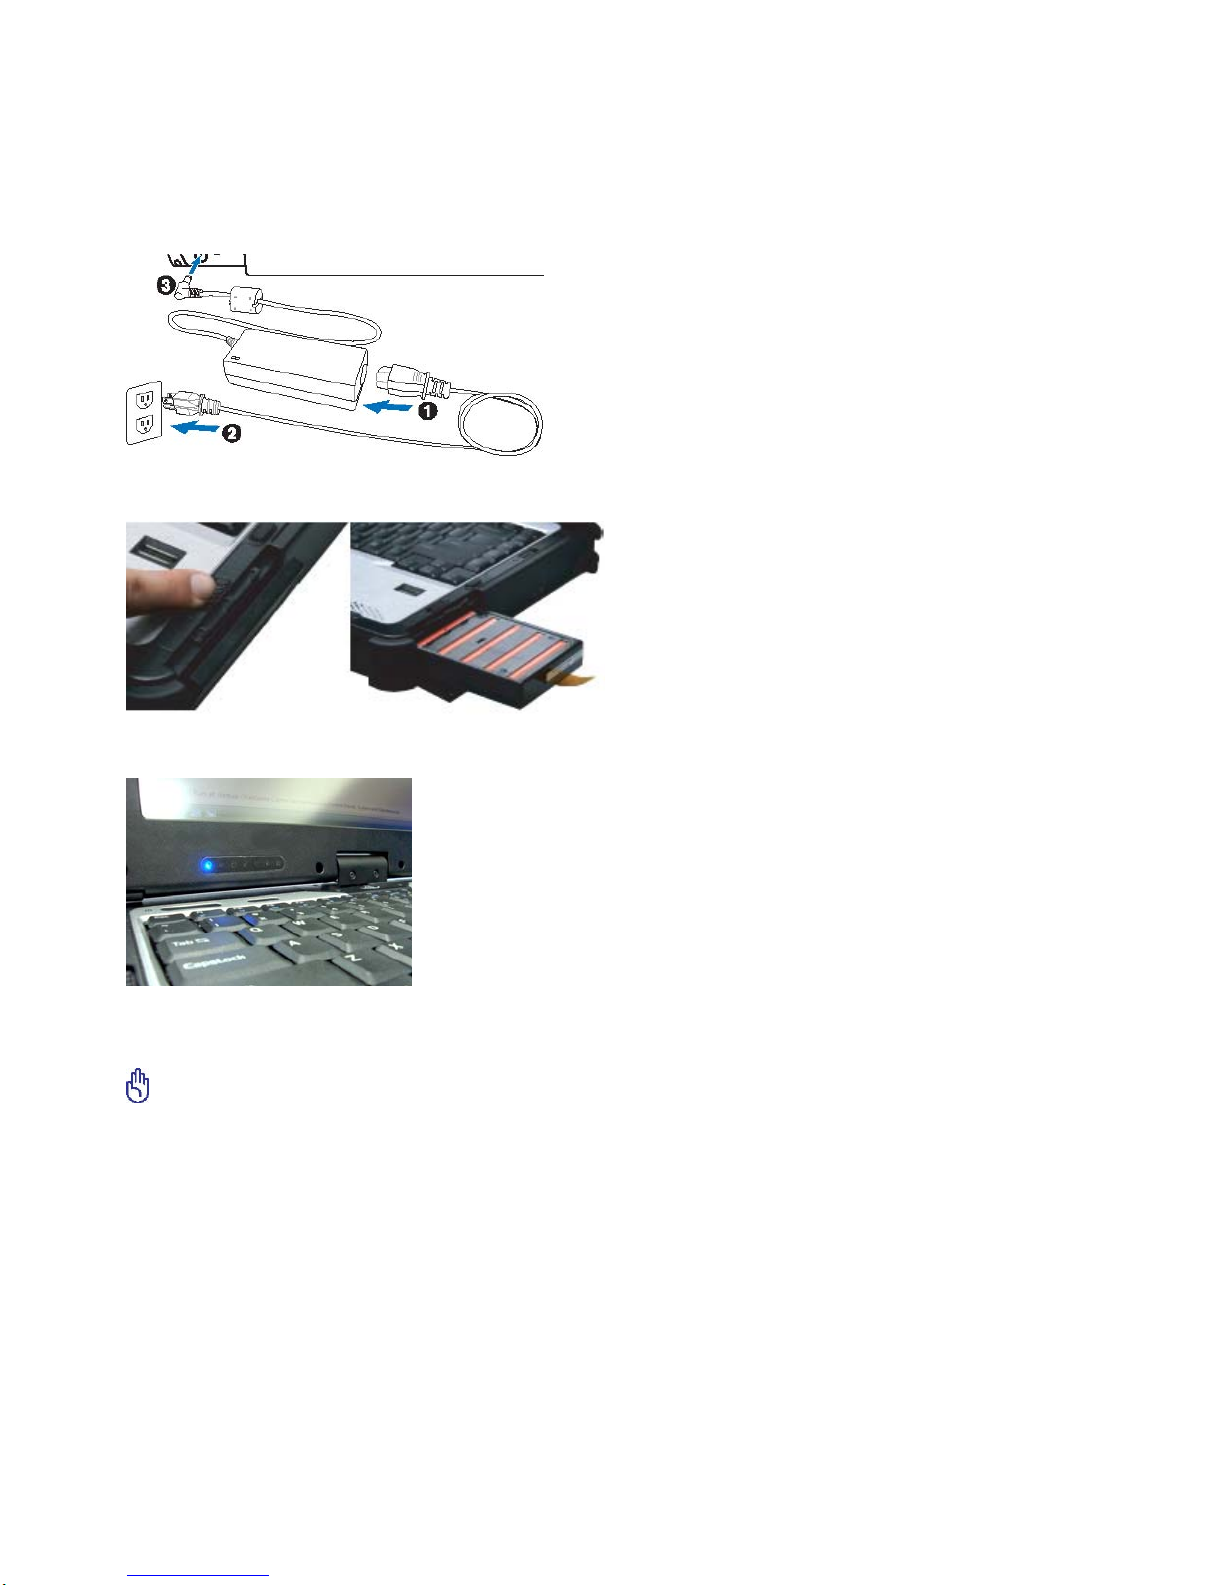
The Durabook R13S notebook power system is comprised of two parts, the power
adapter and the battery. The power adapter converts AC power from a wall outlet into
DC power required by the R13S. Your R13S notebook comes with a universal AC/DC
adapter. That means you may connect the power cord to any 100V-120V outlet as well
as any 220V-240V outlets without setting any switches or using power converters.
Different countries may require that an adapter be used to connect the provided
US-standard AC power cord to a different standard. Most hotels will provide universal
outlets to support different power cords as well as voltages. It is always best to ask an
experienced traveler about AC outlet voltages when bringing power adapters to another
country.
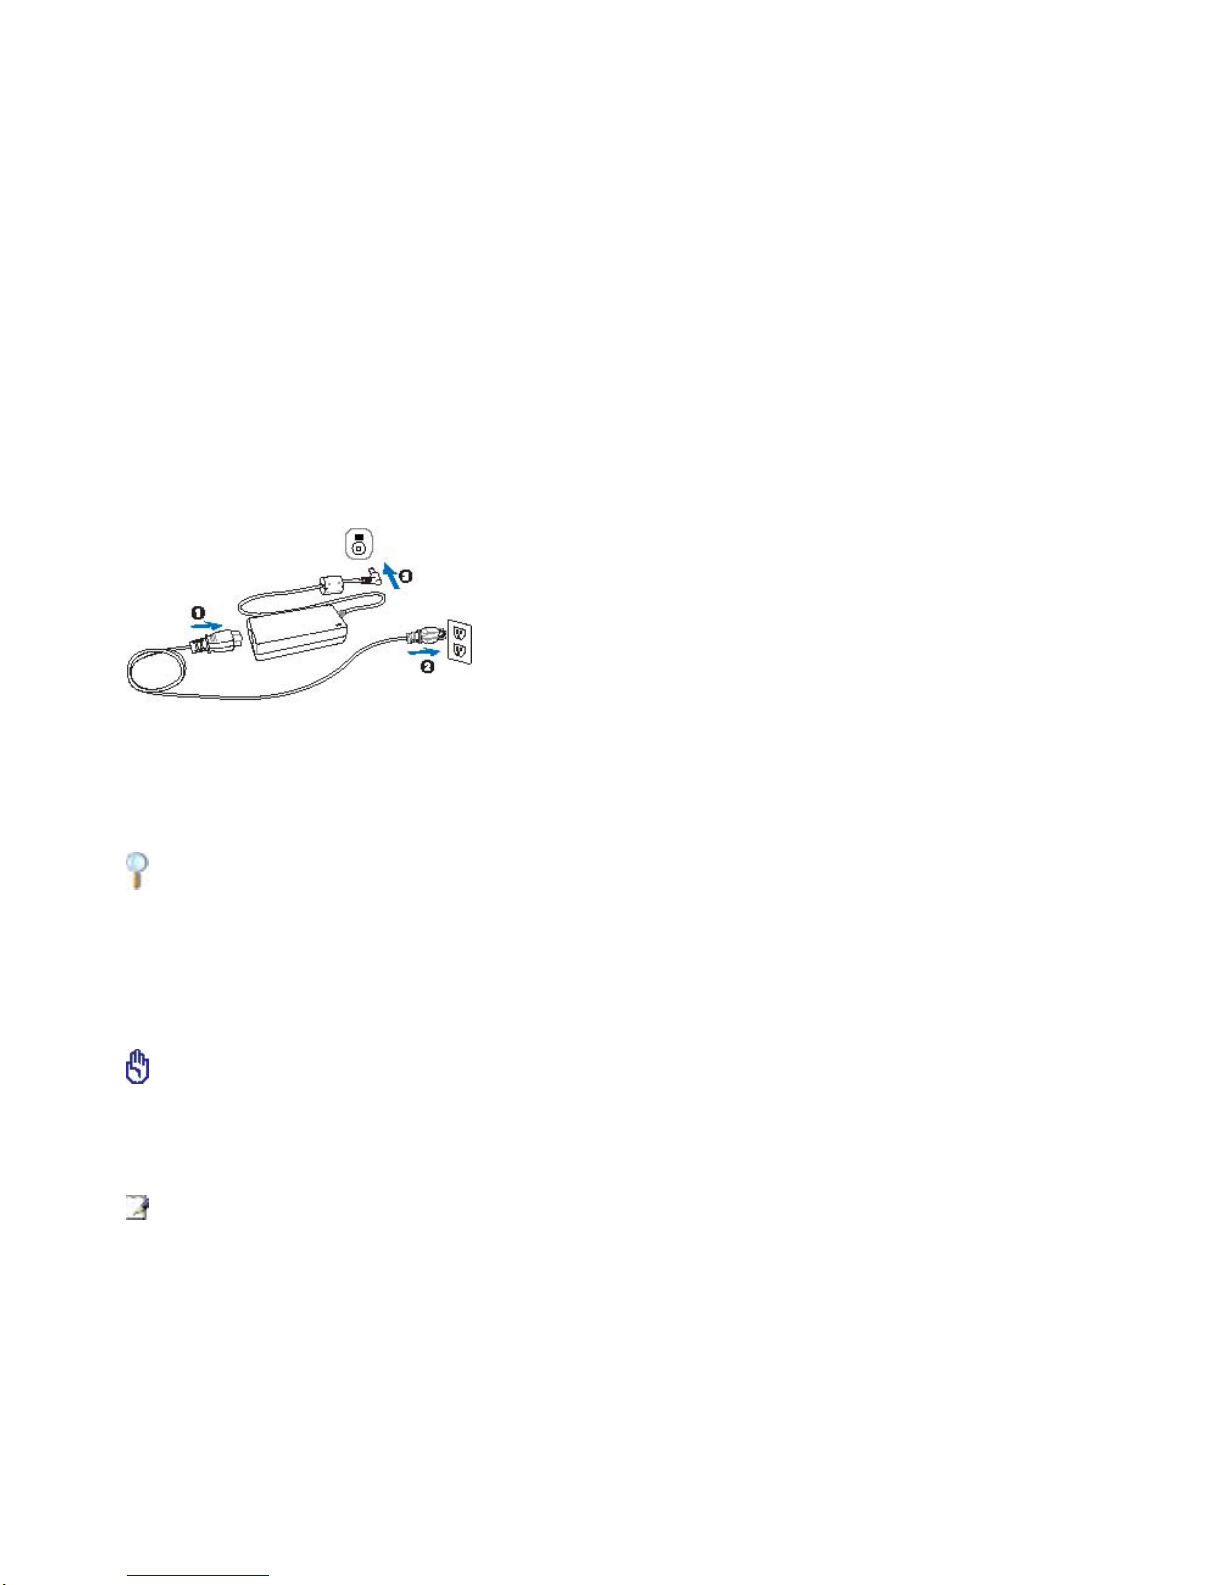
TIP: You can buy travel kits for the R13S notebook that includes power and modem adapters for
almost every country (preferably with surge-protection) and then connect the DC plug to the
notebook. Connecting the AC/DC adapter to the AC outlet first allows you to test the AC outlet’s
power and the AC/DC converter itself for compatibility problems before connecting the DC
power to the R13S notebook. The power indicator on the adapter (if available) will light if the
power is within accepted ranges.
IMPORTANT! Damage may occur if you use a different adapter to power the R13S notebook or
use the R13S’s power adapter to power other electrical devices. If there is smoke, a burning
scent, or extreme heat coming from the AC/DC adapter, seek immediate servicing. Seek
servicing if you suspect a faulty AC/DC adapter. You may damage both your battery pack(s) and
the R13S notebook with a faulty AC/DC adapter.
NOTE: This R13S notebook may come with either a two or three-prong plug depending on
territory. If a three-prong plug is provided, you must use a grounded AC outlet or use a properly
grounded adapter to ensure safe operation of the notebook.

WARNING: THE POWER ADAPTER MAY BECOME WARM TO HOT WHILE IN USE. BE SURE
NOT TO COVER THE ADAPTER AND KEEP IT AWAY FROM YOUR BODY.
Using Battery Power
The Durabook R13S notebook is designed to work with a removable battery pack. The
battery pack consists of a set of battery cells housed together. A fully charged pack will
provide several hours of battery life, which can be further extended by using power
management features through the BIOS setup. Additional battery packs are optional
and can be purchased separately through a Durabook retailer.
Installing and Removing the Battery Pack
Your R13S notebook may or may not have its battery pack already installed. If your
notebook does not have its battery pack installed, use the following procedures to install
the battery pack.
IMPORTANT! Never attempt to remove the battery pack while the R13S notebook is turned ON,
as this may result in the loss of working data.
To remove the battery pack:
IMPORTANT! Only use battery packs and power adapters supplied with this notebook or
specifically approved by the manufacturer or retailer for use with this model or else damage
may occur to the notebook.

Battery Care
The Durabook R13S notebook’s battery pack, like all rechargeable batteries, has a limit
on the number times that it can be recharged. The battery pack’s usability will depend
on your environment’s temperature, humidity, and how the R13S notebook is being
used. It is ideal that the battery be used in a temperature range between -20˚C and
60˚C. You must also take into account that the R13S notebook’s internal temperature is
higher than the outside temperature. Any temperatures above or below this range will
shorten the life of the battery. But regardless, the battery pack’s usage time will
eventually decrease and a new battery pack will need to be purchased from an
authorized dealer of this notebook. Because batteries also have a shelf life, it is not
recommended to buy extras for storing.
WARNING! For safety reasons, DO NOT throw the battery into fire, DO NOT short circuit the
contacts, and DO NOT disassemble the battery. If there is any abnormal operation or damage to
the battery pack caused by impact, turn OFF the R13S notebook and contact an authorized
service center.
Table of contents
Other Twinhead Laptop manuals