U.S. Solid SLUSH MACHINE User manual

SLUSH MACHINE
USS-SMM00001
This manual should be made available to all users of this equipment. For best results, and for
maximum durability of the equipment, carefully read and follow all instructions. Failure to do so can lead to
serious injury or catastrophic damage to the user, machine, supplies, or surrounding areas. All safety
suggestions must be followed closely, and extreme precaution must be taken to assure proper use of the
equipment by only qualified personnel who have read this guide.

Table of Contents
I. Introduction.....................................................................................................................................1
II. Safety Notes.....................................................................................................................................2
III. Parameters.......................................................................................................................................3
IV. Setting Up the Machine..............................................................................................................4
V. Operating the Machine...............................................................................................................4
VI. Making your Slush.........................................................................................................................6
VII.Troubleshooting............................................................................................................................6
VIII. Cleaning the Machine...............................................................................................................8
IX. Assembling Machine..................................................................................................................10
X. Structure Diagram......................................................................................................................13
Warranty.........................................................................................................................................14
XI.

I. Introduction
Hello, new slush machine users!
Thank you for choosing our slush machine. For smooth and safe operation, please
read and understand this manual. The operation and maintenance information listed
within has been updated as of its printing.
In light of the ever-changing nature of technology, the company reserves the right to
modify specifications or procedures for this machine without notice. The company will
not assume any responsibility for equipment damage or malfunction that is due to
improper operation, incorrect repairs, or use of parts from another company.
The slush machine has passed through rigorous testing. Like all of our products, it is
made with high quality materials at an affordable price. This slush machine is suitable
for use in your restaurant, home, bar, or any other indoor locations.
This manual includes basic safety precautions and instructions regarding installation,
operation, and maintenance. Therefore, before operating the equipment, please read
carefully and fully comply with all instructions, and fully understand the listed product
requirements.
This manual does not include instructions for all possible uses or functions of this
machine.
1

II. Safety Notes
• Be careful when using the coolant; if large blocks of ice form, immediately turn
off the freezing function and the mixer as this can lead to blockages and
damage to the machine.
• Turn off and unplug the machine when making any physical adjustments or
repairs.
• Turn off and unplug the machine when not in use.
• Keep the area around the machine clear and free of any debris.
•This machine should only be operated by adults who have read and fully
understood this manual.
• Never allow minors to operatethis machine.
• Keep fingers and other objects away from the motor and rotors when the
machine is on.
• Never have the freezing function on when the mixers are stationary, this can
lead to over freezing and malfunction of the machine.
• Only use parts from the original manufacturer to ensure safety and the highest
performance of the machine.
• Do not touch any of the electrical connections while the machine is on, as there
is risk of electrocution.
•Liquid must reach minimum liquid level but never beyond the maximum liquid
level, as this will cause overflow and can damage the machine.
call (800) 243-5428
Make sure that the space around
the machine is at least 35 cm (14 inch).
Always make sure the machine is
grounded.
2

III. Parameters
Tank: 15 Liters *2 tanks
Cooling Power: 600 W
Cold-beverage Temperature: 26.6°F to 28.4°F (-2 °C to -3 °C)
Voltage: 110 V
Frequency: 60 Hz
Product Dimension: 15.7" x 25.7" x 30.8"
Carton Package Dimension: 18" x 23" x 31"
Wooden Package Dimension: 18.5" x 24" x 33"
Net Weight: 90 lbs
Gross Weight: 122 lbs
Left Side View Front View
Bottom View Back View
3

When first opening the slush machine, be very careful removing the machine from the
box. It is a heavy piece of equipment.
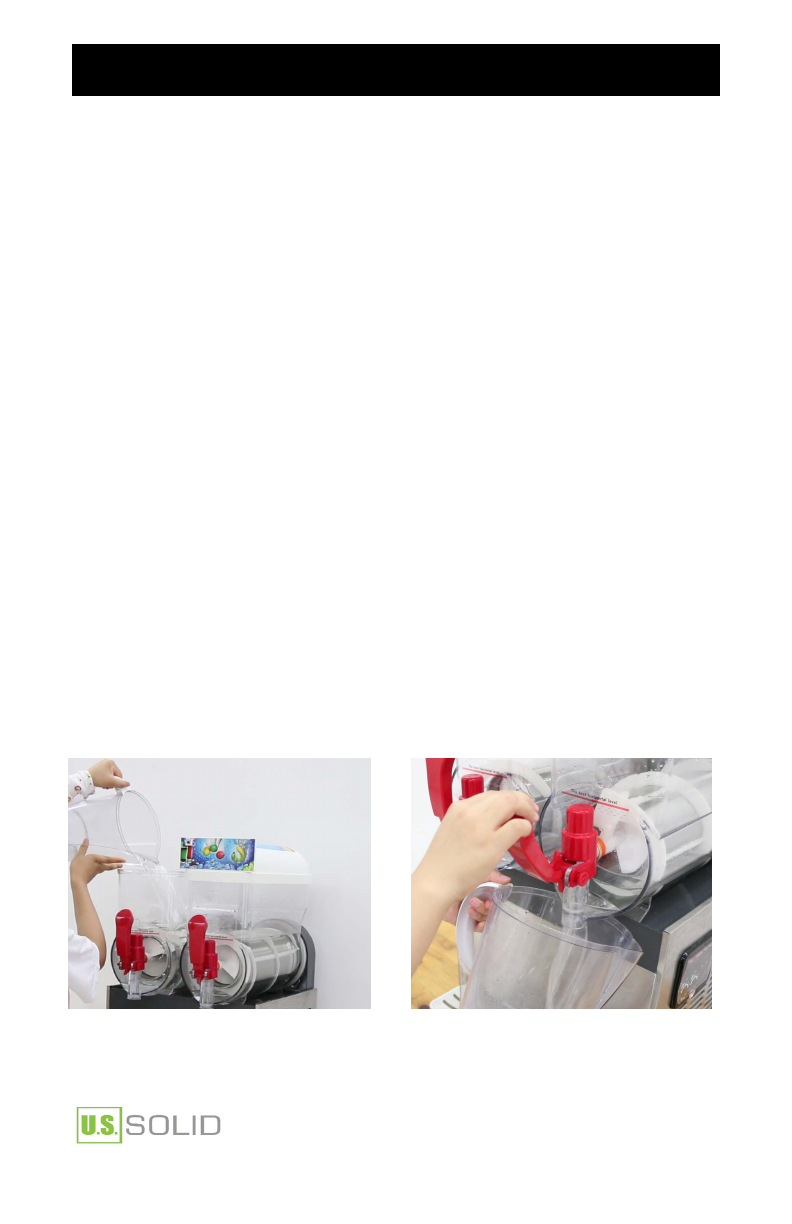
There is grease included for any of the moving parts in the machine. This grease
should be applied liberally to the spots where the mixer connects to the faucet, and
where it connects to the back of the machine. It should also be applied to the tube
inside the faucet assembly. There will already be grease on some of these parts, which
is the cause for any minor discoloration on the faucet or inside mechanisms.
Once the grease is applied, the machine is ready to use! It is a simple setup. Plug in the
machine, and you are ready to go!
It is important that the machine is set up in a place free of debris and clutter.
The floors should also be kept clear. Make sure hoses and wires for the machine
are all secured to avoid tripping hazards.
There are replacement gaskets included in the machine, as well as replacement parts
for the auger. These should not need to be replaced, but are included as a courtesy in
case of issues. The machine comes preassembled and pregreased.
IV. Setting Up the Machine
V. Operating the Machine
General Operation
The slush machine can be used with either one or both mixers in operation. The
cooling level will help determine the thickness of your slush. Be sure to monitor the
slush machine in the start-up. Always start at a lower level of freezing and work up.
If you start with the machine too cold, large blocks of ice will form and can damage
the machine.
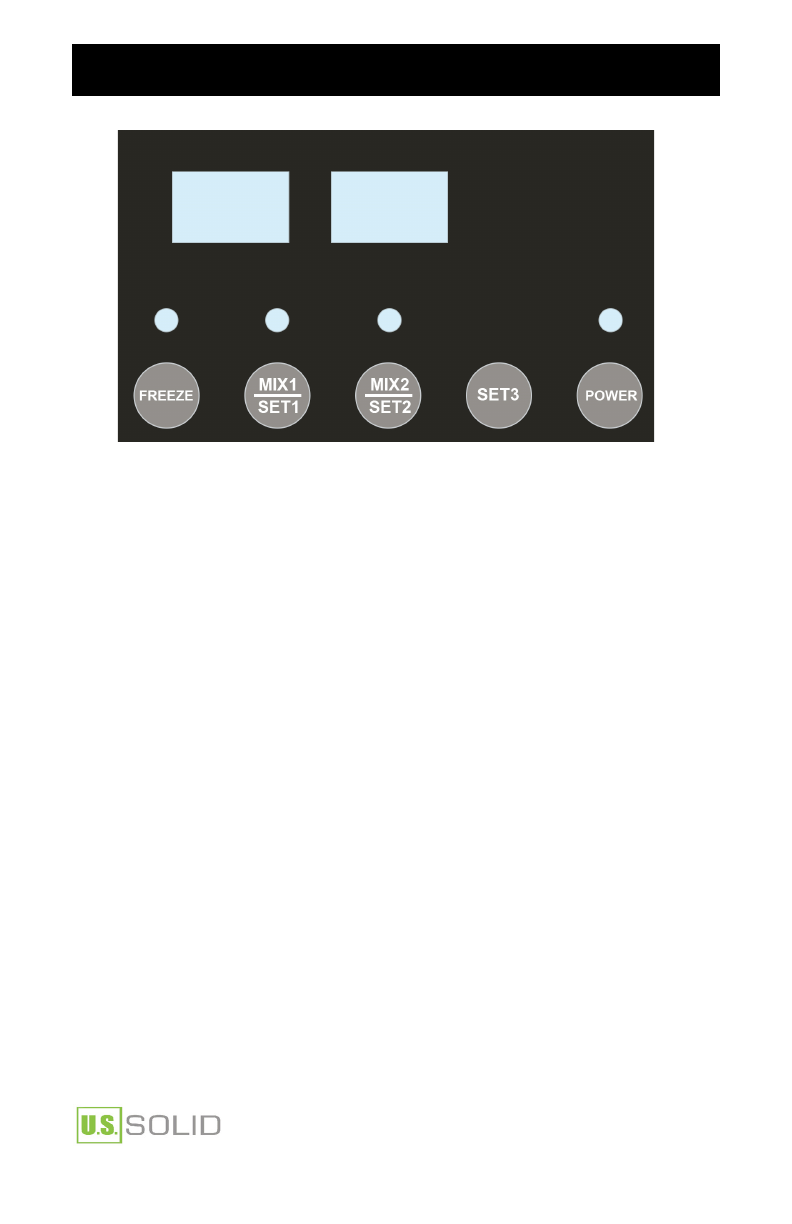
When first operating the machine, turn on the power. If you are looking to make slush
mixtures, turn on the Freeze. There are 5 levels controlling the consistency of your
slush, which are level 0 (when there is no slush at all) to level 4 (corresponding to the
hardest slush). The recommended level is level 2 and that should be suffice for most
users. Give the machine at least an hour, and check on the consistency of the
mixture. Please be patient.
call (800) 243-5428
4

V.Operating the Machine
Steps:
1.Turn on the Power. You will hear two clicking sounds.
2.Press MIX1/Set1 and MIX2/Set2 to start the mixers.
3.Press FREEZE, the Light above FREEZE will flash for 5 minutes, then the compressor
will start working.
If you want to change the consistency level, please follow the steps below:
Method 1:
a. Press Set3 for 3 seconds, release, the lights above MIX1 and MIX2 will flash.
b. Press MIX1/Set1 to change the consistency in Tank 1, and MIX2/Set2 to change
the consistency in in Tank 2.
Method 2:
a.
Press MIX1/Set1 or MIX2/Set2 for 3 seconds, release, lights above MIX1/Set1 or
MIX2/Set2 will flash.
b. Press MIX1/Set1 to change the consistency in Tank 1, and/or MIX2/Set2 to
change the consistency in Tank 2.
NOTE: If the consistency level is on level 0, compressor and mixer will continue
working, but the corresponding tank will not freeze.
It usually takes one hour for the slush to show up in the tank. Please be patient.
5

VI.Making your Slush
It is recommended that you use a prepared syrup for making slush in the machine.
Whatever you choose to use, it is important that the sugar content of any mixture be
around 20%. This sugar content makes the mixture maintain a two phase state, and
keeps your slush slushing. If making your own mixture, you mix sugar into the liquid
before adding to the bowls. Additionally, make sure that the slush machine is filled
up to red line when starting. This will allow the mixer to work properly.
Warning: Mixers might get stuck if the sugar content is less than 18%.
VII.Troubleshooting
Signs that the Mixers Are Stuck
1.Unusual sounds
2.Mixers do not rotate smoothly
In such cases, you should turn off the mixer immediately and adjust the Hard/Soft to
level 0 or turn off the freeze setting. Please do not restart the machine until the ice
melts. Usually, this process requires about 45 minutes.
Double check that the space around the machine is at least 14 inches (35 cm).
call (800) 243-5428
6

VIII. Cleaning the Machine
Cleaning the machine is very important for long term health of your slush machine.
Preparations:
1.Turn off the cooling function on the machine. Allow the mixers to continue to run
while the mixtures melts fully. This may take 30 minutes or more, depending on the
amount of liquid left, and the consistency of your slush.
2.Once there is no ice remaining, empty each bowl using the faucets.
Quick Clean:
1. Fill each bowl with warm water and continue to let the mixers run. Again, empty
from the faucet.
2. Once empty, for a quick clean, fill each bowl with food grade kitchen sanitizer,
allow the mixers to run for 15 minutes, and then empty out each bowl. Fill each
bowl again with water for a final flush.
3. When each side is empty, you can begin to disassemble the machine.
4. Each bowl has a plastic ridge on the front that slides in behind a metal lip on the
front of the machine. To remove each bowl, push on the bowl from the front,
gently, while lifting the front to get the plastic ridge over the metal lip.
7

Deep Clean
VIII. Cleaning the Machine
1. Take apart the handle and faucet assembly.
12
34
5
8
call (800) 243-5428

VIII. Cleaning the Machine
2. Remove each bowl. The bowls have a plastic ridge that holds it in place. To remove
the bowl, push gently on the bowl while lifting up to get the plastic ridge above the
metal lip. Then pull out the bowl.
3.Remove the assembly mixer, this is the white spiral plastic that wraps around the
Evaporator. It should slide off easily.
4.Remove the inner spiral from the evaporator. There will be some resistance when pulling
it out.
9

VIII. Cleaning the Machine
5. Remove the bowl gasket
6.Take all of the disassembled pieces and wash with food grade soap, rinse fully, and
sanitize.
7.Carefully wipe down the top and sides of the machine.
8.Reassemble the machine and allow it to air dry.
9.The machine should now be ready for further use.
IX.Assembling Machine
1.Put the bowl gaskets back on. Start from the bottom and work your way around.
10
call (800) 243-5428

2. Put the inner spiral into the metal tube.
IX.Assembling Machine
3. Connect the assembly spiral.
4. Put the bowl back.
11

IX.Assembling Machine
5. Assemble the handle and faucet.
Notes:
Please kindly apply grease to each parts of the faucet before reassembling them.
If parts get stuck, apply grease to the very corner of the faucet. Assembling the parts
back, then pull the faucet for several times.
12
call (800) 243-5428

X.Structure Diagram
17. Magnet for inner spiral
18. Copper bush for motor fixing
19. Plastics motor panel
20. Motor
21. Cover for motor
22. Stainless steel back panel
23. Base for control panel
24. PCB board
25. Valve
26. Base support
27. Compressor
28. Compressor starter
29. Protector
30. Motor fan
31. Fan
32. Control panel
1. Cover
2. Bowl
3. Tap pin
4. Tap O-ring
5. Handle
6. Tap spring
7. Pin for handle fixing
8. Bowl gasket
9. Inner spiral
10. Assembly spiral
11. Stainless steel side panel
12. Condenser
13. Stainless steel front panel
14. Grate for drip tray
15. Drip tray
16. Evaporator
13

call (800) 243-5428
Thank you for your purchase from U.S. Solid!
This Warranty applies to only physical goods purchased from authorized U.S. Solid
retailers.
What does this warranty cover?
This Warranty covers any defects in material or workmanship under normal use during
the Warranty Period.
What will we do to correct problems?
Within the first 30 days after the date of delivery, U.S. Solid will either work with you to
get your product working with replacement parts, replace the product after receiving
the returned defective machine, or accept a return for a full refund.
After the first 30 days but still within the first 1 year after the date of delivery, U.S. Solid
will send new or refurbished replacement parts at no charge, so you can repair the
product.
What does the warranty not cover?
This Warranty does not cover any problem that is caused by conditions, malfunctions
or damage not resulting from defects in material or workmanship.
The Warranty will only be in effect if all instructions in the manual are followed fully.
The warranty does not cover unforeseeable forces of nature, or‘acts of god‘ (fire,
earthquakes, floods, etc.).
Any product purchased from anunauthorized U.S. Solid retailer will automatically
void the warranty.
All returns more than 30 days after the date of delivery that void this warranty are
subject to a 50% restocking fee.
What do you have to do?
To obtain warranty service, you must first contact us to determine the problem and
the most appropriate solution. When doing so, please include the following
information: Purchase Date, Order Number, Consignee Name, and Delivery Address.
XI.Warranty
14
This manual suits for next models
1
Table of contents
Popular Beverage Dispenser manuals by other brands

ASM
ASM SSM52 Start-up instructions

lancer
lancer 14800 Series Installation and service manual

Flavor Burst
Flavor Burst TS 44SS manual

Perlick
Perlick 66134-2 Installation and operation instructions

lancer
lancer Flavor Select 30 Installation and service manual

Avantco Equipment
Avantco Equipment RDM-32 user manual

EBS
EBS Nitro Infuser-Dual installation instructions

FBD
FBD 37 Series Installation & operation manual

Bunn
Bunn FMD-2 Illustrated parts catalog

Bunn
Bunn ULTRA-2 PAF Use and care instructions

Cornelius
Cornelius Drop-In and Free-Standing Ice Cooled... installation instructions

Bunn
Bunn FMD-4 OPERATING & SERVICE MANUAL