UEC UECTV24 User manual

UECTV24
USER MANUAL
24” HD TV

Page is intentionally blank.

3
Table of Contents
Important Notes 4
Abbreviations & terms 4
Safety 5
Cautions 5
Features 8
Inputs and Outputs 8
Specications 8
What’s in the Box 9
Rear Panel Connectivity 10
Rear Panel Control 10
Attach stand 11
Remote Control Unit 12
RCU Navigation Buttons 13
Battery Installation 13
Connecting the TV 14
Terrestrial/DTV Antenna Feed 14
Connect Devices to TV 15
What is HDMI? 15
Connect HDMI Cable 15
Connecting with RCA Cables 16
Connect TV to Power Source 16
VDC Cigarette Charger 16
Optional Wall Plug Power Supply 17
Getting Started 18
TV Settings 20
Channel 20
Picture 22
Sound 23
Time 24
Setup 25
Lock 27
PVR Operation 27
Recording Live TV 28

4
Important Notes
The UECTV24 User Manual is the subject of intellectual property rights, including
copyright, under domestic law and international conventions.
All rights are reserved. The UECTV24 User Manual supplements the information supplied
with the packaging of the TV as well as the detailed information available on our website.
Due to software upgrades, the features and functionalities in this User Manual may differ
from those on your TV.
https://uec.com.au/downloads/product-manuals for the latest User Manual.
Abbreviations & terms
Antenna Any general reference to antenna shall be taken to describe terrestrial
antenna.
AV Audio Visual – on the TV refers to Video/L/R sockets on rear.
Boot Full start-up of the TV from power cycle or factory reset.
CEC CEC (Consumer Electronics Control) allows for HDMI devices to be
controlled with one remote control.
CPU
A central processing unit is the electronic circuitry that executes instructions
comprising a computer program. The CPU performs basic arithmetic, logic,
controlling, and input/output operations specified by the instructions in the
program.
DVBT Digital Video Broadcasting Terrestrial
ELED Edge Emitting LED fulfills the requirement of high brightness LED, which
provides high efficiency coupling to optical fibers.
EPG Electronic Program Guide (GUIDE Button on the RCU).
GPU
A graphics processing unit is a specialized electronic circuit designed to
rapidly manipulate and alter memory to accelerate the creation of images in
a frame buffer intended for output to a display device.
HDCP High-bandwidth Digital Content Protection (HDCP) is a system designed to
protect digital content.
HDMI HDMI Cable - a standard for connecting high-definition video devices.
HDMI ARC
HDMI ARC (Audio Return Channel) reduces the cables between your TV and
an external Home Theatre System or Soundbar. Improved sound quality and
latency.
NAS NAS Australia (importer, distributor and service authority).
OSD On screen display.
PVR Personal Video Recorder
RCU Remote Control Unit.
SPDIF Data transfer format used to connect various home theatre and
entertainment system components to sound systems.
STB Set Top Box
!

5
Safety
This TV complies with all relevant Australian safety standards. Please read all safety
precautions and warnings carefully and adhere to all safety and warning notes.
Our goods come with guarantees that cannot be excluded under the Australian Consumer
Law. You are entitled to a replacement or refund for a major failure and compensation for
any other reasonably foreseeable loss or damage. You are also entitled to have the goods
repaired or replaced if the goods fail to be of acceptable quality and the failure does not
amount to a major failure.
The Warranty period begins on the date of purchase. As evidence of date of purchase
present the relevant document (sales slip, invoice or delivery note). Keep these documents
in a safe place. If the TV is faulty and requires repair take the TV to your nearest authorised
dealer as failure to do so may void any guarantee / warranty.
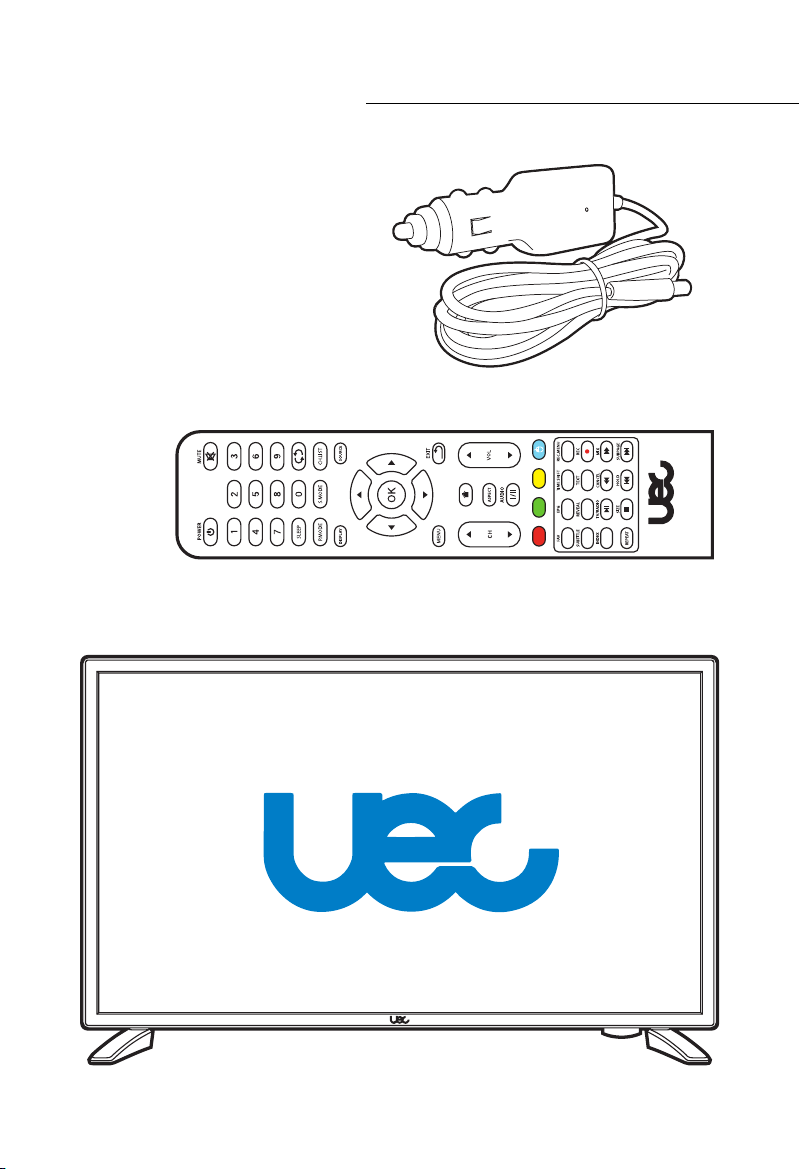
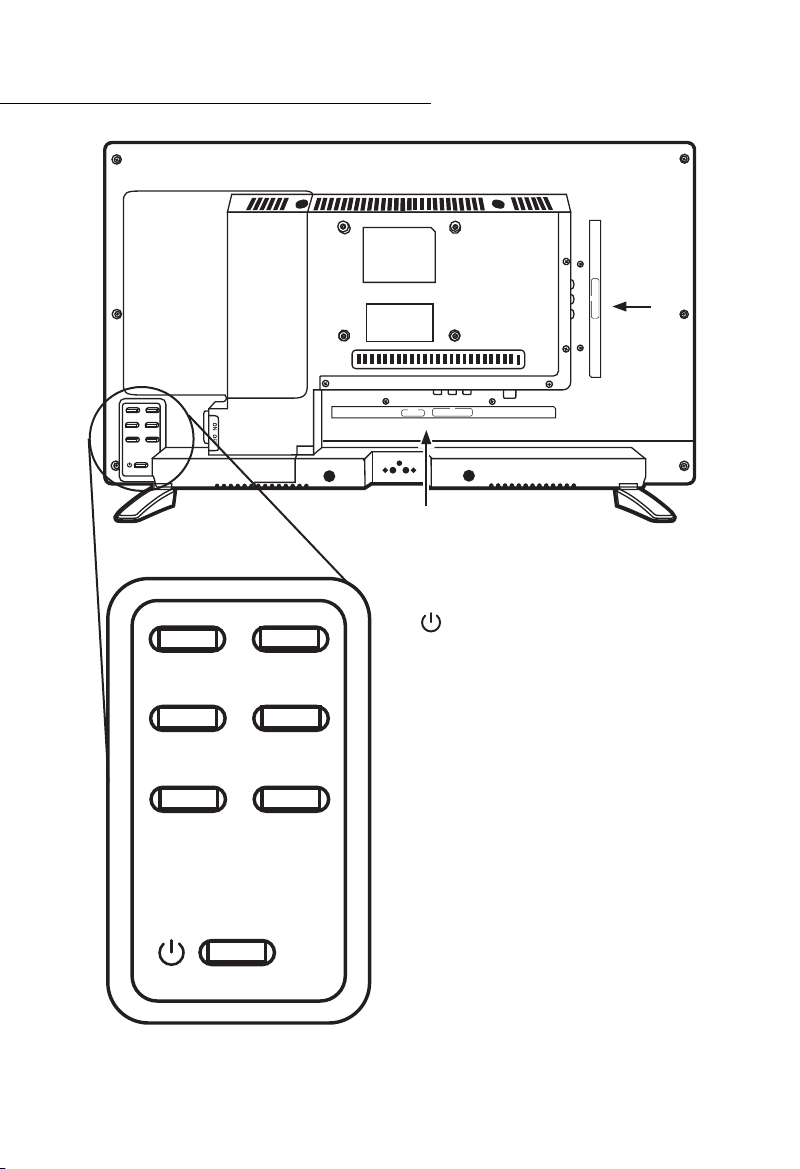
Power required to operate the TV is 12VDC at 2 amps
Power Supply: 12VDC Cigarette Lighter Adaptor
A cigarette lighter adaptor is supplied with the TV for use in vehicles or RV installations.
Optional Power Supply: 240V AC 50-60Hz to 12VDC
A power pack is an optional accessory, to allow your TV to use a 240V AC power source, such
as a standard house power outlet.
A well-regulated 12V DC supply is essential for this TV to operate efficiently; contact NAS
Service Centre for recommended replacement adaptors if required.
Unplug TV immediately if you notice an abnormal sound or smell.
Cautions
INSTALLATION: Always install this product in an environment free from dust, moisture and
contaminants. Ensure TV is placed/installed on secure and stabled surface.
OVERLOADING: Do not overload a wall outlet, extension cable or adapter as this may result
in fire or electric shock.
LIQUID: Do not expose this TV to liquid of any kind. Do not place objects filled with liquid
on the TV.
CLEANING: Disconnect the product from power before cleaning. Use a soft, dry, lint-free
cloth to dust the product. Do not use any solvents.
VENTILATION: Never cover the TV ventilation slots. This may result in overheating, damage
and malfunction. TV should be at least 10cm from wall and around the TV.
ATTACHMENTS: Do not use non-recommended attachments that may be hazardous or
damage the TV.

6
Safety
!CABLE CONNECTION: To avoid possible damage to the antenna disconnect the TV
from the adaptor before connecting or disconnecting any antenna cables.
LOCATION: TV is intended for INDOOR use ONLY.
• Never place the TV on or near a radiator or other heat source.
• On a rack or bookcase, ensure adequate ventilation space and that manufacturers
installations cautions are observed.
• Do not place on unstable surfaces where it can fall possibly causing injury or damage
to the appliance.
• When installing in a caravan or RV, ensure the unit is properly fixed to avoid damage
during travel.
• Do not place the TV where it will be in direct sunlight.
• It is NOT a toy – keep away from children.
LIGHTNING, STORM or NOT IN USE: Prevent damage from lightning and power-surges –
unplug the TV from the power and disconnect antenna during thunderstorms or when it will
be unused for long periods.
!PARTS REPLACEMENT & REPAIRS: Only manufacturer-authorised service technicians
may perform repairs and/or replace parts.
Do not remove the back cover, as it contains high voltages inside and will cause
electric shock. Only qualied professionals should conduct internal adjustments,
maintenance, and checks. Unauthorised access or repairs to internal electronics may
void warranty.
WARNING! Risk of electric shock / damage / re
Damage to the power cable and plug:
• Do not modify the TV power cable or plug.
• Do not bend or twist the power cable.
• Disconnect the power cable at the when installing / re-installing the TV or when it will
not be used for extended periods.
• Route cables well away from heat sources. Exposure to heat can make cables brittle or
melt the insulation.

7
Safety
To avoid electric shock:
• Never open the main body of the TV.
• Do not insert metal or inflammable material through vents.
• Never touch the power plug pack with wet hands.
• Disconnect the power cable during lightning storms.
To avoid damaging the product:
• Do not use the product when it is faulty. If you continue to use a defective product
serious damage may occur. Contact an authorised agent for repairs to the TV.
• Do not insert metal or foreign substance into the ventilation slot.
• Ensure that the TV is placed near a 12V DC supply.
Correct handling of batteries:
• Never subject batteries to heat, extreme sunlight, fire or similar.
• Batteries can contain toxic substances. Keep out of reach of small children who may
put batteries into their mouths and could swallow them.
• Leaking batteries can cause damage to the remote control. Remove RCU batteries
when the TV will not be used for a prolonged period.
• Toxic substances in batteries can damage the environment.
• Ensure batteries are disposed of in accordance with statutory law.
• Normal batteries can not be charged.
• Never dispose of batteries in your regular household waste.
• Never heat or throw ANY batteries into open fire (danger of explosion!).
Disposal:
• Never dispose of your TV, other electronics or batteries in the regular household waste.
Contact an E-Waste facility to arrange disposal.
(http://www.cleanup.org.au/au/)
Intended use:
The purpose of this TV is for private use only. This involves also following all information
contained in this user manual, especially the cautions and safety notes. Any other use is
considered as not intended and can lead to damage or even personal injury and may void
the guarantee / warranty.

8
Features
Inputs and Outputs:
• One AV Input,
• One YPbPr Input,
• One Earphone output,
• One Antenna Input,
• Two HDMI Inputs,
• Two USB inputs,
Specications:
• ELED Display Technology,
• Full 24” HD Widescreen Display,
• Record Live TV directly to USB,
• Two high quality, 5W Speakers,
• Low power consumption,
• 12/24V VDC cigarette power
support,
• DC surge protection,
• Two HDMI inputs,
• Ruggedised & vibration resistant,
designed for use in RV’s, Caravans and
boats,
• Backed by UEC reliability, and after sales
support
Screen Display Type Colour ELED Display
Model UECTV24
Maximum Resolution 1366 x 768
Power Supply DC 9 -32V
TV System PAL / DVB-T
Frequency Range 48.25MHz - 863.25MHz
Video Input Format PAL / NTSC
Antenna Input Antenna socket 75Ω
Average Power Consumption 30W
Dimensions (mm) (L x W x H) 549mm x 165mm x 323mm
Weight (Net Weight) 2.7 kg
Optimal Temperature (Celsius) 0°c to 35°c

9
What’s in the Box
TV
Remote Control Unit (RCU) - Batteries Included
2 x Base Feet 4 x Screws
12V/24V VDC
Cigarette Plug

10
Rear Panel Connectivity
VOL+ VOL-
CH+ CH-
SOURCE MENU
EARPHONE
HDMI 2HDMI 1 Y Pb Pr
IN
COAXIAL
OUT
DC RF
VIDEO L R
IN
USB1/2 L R
AUDIO
OUT
VOL+ VOL-
CH+ CH-
SOURCE MENU
Power
Switches the TV between ON and
STANDBY
Vol + / Vol -
Press to increase or decrease the volume.
While in on-screen menu the volume +and
-buttons act as left and right respectively.
Ch + / Ch -
Press to change the TV Channels.
While in on-screen menu the channel
+and -buttons act as up and down
respectively.
Source
Switch between TV sources.
Menu
Press to see on-screen menu of TV settings
and features.
VOL+ VOL-
CH+ CH-
SOURCE MENU
Bottom Panel
Side Panel
Rear Panel Control

11
Rear Panel Connectivity
1. Place the TV on it’s back on a flat and clean table, with the screen facing up.
2. Ensure long side of the feet are pointing up, and the wings are facing out.
3. Screw each foot in using a phillips head screw driver with the four screws provided.
Attach stand
EARPHONE
HDMI 2HDMI 1 Y Pb Pr
IN
21 3 4
1HDMI 1In HDMI Cable Input
2HDMI 2 In HDMI Cable Input
3Y Pb Pr Component mode input Y/Pb/Pr
4Earphone 3.5mm Jack Headphone or speaker output
COAXIAL
OUT
DC RF
VIDEO L R
IN
USB1/2 L R
AUDIO
OUT
21 3 4 5 6
1DC In 9-32V DC Power input
2USB Input USB in for PVR and MP3 and MP4 player
3Left / Right Audio Audio Out for Amplifier and Home Theatre
4Video In AV (RCA Composite) Cables In
5RF (Radio Frequency) Coax Input for Antenna TV Signal
6Coax Input RCA Cable Audio Out
Side Panel
Bottom Panel

12
Remote Control Unit
Power Button / Standby Mute ON / OFF
Numeric Keypad
Select Picture Mode
Return to previous program
Display Source and Info
Select Sound Mode
Navigation Buttons
Select / OK Button
Launch MENU System
Channel UP / DOWN Volume UP / DOWN
Not Available
Not Available
Media Playback Controls
Switch between TV and Radio
Set Sleep Timer
Begin Recording
Select Device Source
Exit INFO / MENU
Turn Subtitles ON / OFF
Media Player Controls
Rewind
Play or Pause
Fast Forward
Stop
Previous
Next
Electronic Program Guide
Change Aspect Ratio
Channel List
Cursor

13
Using the Remote
RCU Navigation Buttons
The terms NAVIGATE (NAV) or SELECT are used when referring to
activities controlled by these four arrows and the OK button.
The OK button is the same as SELECT / SAVE / AGREE. In some
instances it is a shortcut button - for example to quickly see the
available channels.
The arrow buttons move the cursor/highlight around the on
screen display.
When a screen/menu has been opened the cursor will be situated on a command or
program in the screen.
If that default is not what is needed use the arrow buttons until the required function is
highlighted. Press OK to select that item.
MOST functions require the user to press OK before LEAVING the program or function
because the OK button implies SAVE CHANGES. Failing to SAVE (OK) will cause all unsaved
commands to be lost.
The term SELECT is a prompt to use the arrow buttons to navigate to the required function
as described above and then SELECT (OK) it.
Battery Installation
1. Open the battery compartment on the back of the RCU
2. Insert two AAA batteries, in the correct polarity.
3. Close the battery compartment.
Warning
• One set of batteries should last for at least one year under normal use.
• Do not use old and new batteries together.
• Do not expose batteries to excessive heat, such as sunshine, fire or heater.
• If you do not intend to use the RCU for a long period of time, remove batteries to avoid
damage.
Navigation (NAV) Buttons

14
Terrestrial/DTV Antenna Feed:
Note: Antenna input impedance of this
unit is 75ohm. VHF/UHF 75ohm coaxial
cable can be connected to the antenna
jack directly, if the antenna cable is
300ohm parallel at feeder cable, you
need to use the 300ohm/75ohm
converter to connect the antenna cable
to the antenna jack. For details Please
refer to the following drawing: .
Step 1: Connect Terrestrial/DTV Feed
Connect the TV antenna cable (not provided) to the RF in connector on the rear of the TV.
Connecting the TV
75ohm Coaxial Cable
Please note: TV wall mount brackets must be tted by caravan / RV dealer to ensure
adequate structural support, TV should not be left on a wall bracket whilst in transit, TV
should be adequately protected when stowed for transit.

15
Connecting the TV
Connect Devices to TV
Connecting with HDMI Cable
You can connect any device with a HDMI output to the TV. Below are some examples of
common devices with HDMI outputs:
What is HDMI?
HDMI, or high-definition multimedia interface, is a single cable that allows both Audio and
Video to be passed through without compression.
Connect HDMI Cable
Connect the one end of the HDMI Cable into your preferred device, and the other end into
either HDMI 1 or HDMI 2 on the back of your TV.
• Set Top Boxes,
• DVD Players,
• Laptops / Computers,
• Game Consoles,

16
Connect TV to Power Source
VDC Cigarette Charger
Connecting the TV
Connecting with RCA Cables
Many older devices require an analog video connection (sometimes ‘CVBS’, ‘Composite’ or
‘AV’). If this is the case, follow the instructions below:
Use a Yellow, Red and White “RCA” cable, and match the colours into the AV input on the
side of the TV. If only one audio (‘mono’) cable is required, it is usually the white (Left/Mono)
cable.
Plug the12V/24V Power Supply jack connector into the “DC In”
port on the underside of the TV. Then plug the VDC Cigarette
Plug into a cigarette port in your Car or Van. Once all the required
devices is connected to your TV turn on the power.

17
Connecting the TV
Optional Wall Plug Power Supply
If required, you have the option to purchase an additional wall plug power supply at 240V.
Plug the Jack Connector into the “DC In” port of the TV. Then plug 240V the
power adaptor into a power socket in your RV or home. Once all the required
devices are connected to your TV turn on the wall power socket.

18
Getting Started
First Time Installation
The first time you turn on your TV you will need to complete the FIRST TIME
INSTALLATION wizard.
Step 1: Start Up Settings
Upon first boot up you will need to select your preferred LANGUAGE, the COUNTRY the
TV is in, and the ENERGY MODE. Select your preferences by using the Left and Right
Navigation buttons, and use the Up and Down buttons to choose the next setting. Press the
OK button to save preferences and continue.
Step 2: Tuning Setup
If you have connected Terrestrial/DTV Antenna input into the TV unit, you will need to
tune to search for available channels. Ensure the Tune Type is DVT, and press OK to begin
automatic scanning. This may take a couple of minutes.
Please note: When traveling and wanting to watch DTV service, you will need to
retune your TV each time your location changes so that your TV can nd the TV
channels in the new location. Read more on “Auto Tuning” on page 20.

19
General Functions
Power
The Power / Standby button switches TV ON and OFF. It functions the same as
the Standby button on the back panel of the TV. Keep in mind this function only
controls the TV. It will not affect your Set Top Box, DVD player or other devices.
Volume (VOL) Controls
The Volume buttons control the output volume of your TV. VOL UP increases
the volume, and VOL DOWN the volume. When you use the Volume buttons, the
current volume is displayed on your screen as a bar.
Keep in mind this function only affects the TV. The Volume of your other devices will
also affect the output. If the audio is too quiet, be sure to also check your Set Top
Box’s or DVD players volume.
Channel Controls
The Channel UP/DOWN button changes between channels sequentially according
to the numerical ‘logical channel numbers’ (LCN) assigned by the broadcasters to
their respective channels. CH UP moves forward to the next available channel in
the list and CH DOWN moves back to the previous available channel.
Note: Channel Controls only aect terrestrial signals if directly plugged into TV, if
separate Set Top Box is connected, the Channel Controls on the TV remote will not
change the channels. Use Set Top Box remote to change channels.
Source
Press the Source button to display the input source menu,
press left and right navigation buttons to select the
corresponding input source, and press the OK button to enter the
relevant source.
If you’re using terrestrial signal, you will find you terrestrial TV
services under DVT source.
If you’re using set top box, the TV services will be under, AV, HDMI1
or HDMI2

20
TV Settings
TV Settings
Press the Menu on your RCU to display TV’s the settings menu. Use the navigation
buttons to select the category of settings you would like to choose. Use the OK
button to enter the setting category.
Channel
Image settings allow you make changes to your channel and DTV
tuning settings.
Auto Tuning
Please Note: ATV is no longer a standard used by television
providers in Australia. Tuning type DTV is the recommended
setting.
Please note: If you’re using the terrestrial/DTV signal, every
time your TV changes location you will need to re-tune the TV
If you have changed locations, or lost TV
signal, you will need to re-scan for DTV
Tuning. Enter AUTO TUNING, by highlighting
it in the CHANNEL SETTINGS and press
right navigation button. Ensure TUNE TYPE
is DTV and check the correct preferences are
selected, then press OK on the remote. The TV
will begin automatic scanning.
This may take a couple of minutes.
Once Scanning is complete, the you will see
the number of TV/Radio channel available.
Please note: Ensure your TV antenna is correctly deployed and pointed for optimal
direction towards the broadcast antenna and that your mast head amplier (if tted)
is turned on.
Table of contents