USOUND OP 50 User manual


Congratulations on your purchase of the U-Sound OP 50 Guitar Amplier!
This development is the result of almost 50 years of research and experimentation in the creation of guitar devices
by Russian engineer and guitarist Oleg Vorokha.
This is a Plexi Style amplier with very advanced modern features.
The OP 50 is a 50 watt tube head with 2 EL34 output tubes and 4 ECC83 (12AX7) tubes.
The availability of three channels with various adjustments allows the OP 50 to be used in a wide variety of styles of
music - from blues to classic rock, hard rock, as well as for powerful metal riff attacks.
Special adjustment “Master Volume” allows using the device not only on large concert halls, but also in ordinary home,
without losing the powerful sound structure.
You will immediately notice the rich lows and excellent "readability" of chords, even at high Gain levels.
At the same time, the amplier perfectly "friends" with the volume knob of your guitar.
If you are a fan of all kinds of guitar effects pedals - from conventional overdrive and distortion, to all kinds of
modulation effects, the OP 50 allows you to further diversify the palette of your musical fantasies.
The presence of a very transparent FX "loop" is another feature of the amplier. You can practically use
any guitar processor by including it in Send-Return.
Each of the knobs and other controls on the OP50 will be described below.
-1-

Initial Installation of the amplier.
We recommend the following presets when you turn on your amplier for the rst time.
Select the load impedance with the switch according to the impedanceIMPEDANCE
your guitar cabinet.
Set the control on the rear panel to .MASTER VOLUME 5
Select channel using the channel selector (front panel).B HB-B-CL
Set the channel controls to approximately the following values:"overdrive"
PRESENCE - 5
BASS - 10
MID - 5
TREBLE - 5
MASTER - 5
GAIN - 5
Switch the toggle switches:
SAT - down
FAT - down
JTM - left
POWER Turn on the amplier - a big switch - down.
After warming tubes(5-15 minutes), turn the big switch - down.STANDBY
Adjust the control to a comfortable volume. MASTER
control on the rear panel, you can adjust the output volume up to maximum.MASTER VOLUME
Note:
When working on stage and in the studio, it is recommended to set the MASTER VOLUME to the maximum value,
and adjust the volume with the MASTER knob (for overdrive channels), and the VOLUME knob (for the CLEAN channel)
on the front of the amplier.
This completes the presetting of channel .B
You can now proceed to presetting the channel.HB
To do this, switch the toggle switch to .HB-B-CL HB
This turns on an additional tube amplication stage, and you will hear how your the stallion got spurs in his sides!
With the and controls, either chill the mustang's ardor, or give the wild creature more heat!GAIN MASTER
After such a wild trip, it's a good idea to wipe off the sweat and relax.
Switch the amplier to the CLEAN channel - toggle switch to position.HB-B-CL CL
Set the CLEAN channel controls (on the right side of the panel) to the following positions:
GAIN - 7
VOLUME - 5
BASS - 5
TREBLE - 5
Use the toggle switch and knob to add brightness and clarity to your sound.BRIGHT PRESENCE
The OP-50 works great with a variety of effects pedals. In particular, a very good result can be obtained with different
Overdrive / Distortion pedals when using the CLEAN channel. In this case, the GAIN knob of this channel is very effective.
Note:
-2-

-3-
Front panel controls.
POWER - Switch for turning on the amplier.
STANDBY The toggle switching of the anode voltage. -
Turns on 5-15 minutes after turning on the POWER toggle switch.
PRESENCE - Presence adjustment. Works on all channels.
BASS B HB- Bass control for channels and .
MID B HB- Middle control for channels and .
TREBLE B HB- Treble control for channels and .
MASTER B HB- Volume control for channels and .
GAIN B HB- Gain control for channels and .
BASS CLEAN- Bass control for channel .
FAT B HB- Toggle switch into a "fat" mode for the channels and .
SAT - Add gain, compression and saturation. This is a heavier tone.
It is normal for the volume level to drop with this switch engaged. Compensate with the amp’s
Master volumes.
JTM B HB- Gain structure switch provides three choices of overall gain of the and channels.
HB - B - CL - A toggle switch for switching amplier channels.
The indicator shows which the channel is currently on. CH
When using FootSwitch (rear panel socket) toggle switch does not function.
TREBLE CLEAN- Treble control for channel .
VOLUME CLEAN- Volume control for channel .
GAIN CLEAN- Gain control for channel .
INPUT- Guitar input.
CH - Selected channel indicator.
Green - channel CLEAN - CL
Blue - channel BROWN SOUND - B
Red - HIGH GAIN - HB

-4-
Rear Panel Control.
QU
!
FUSE
RETURN LEVEL - Adjusts the signal level from the output of the effects processor.
Works with the included toggle switch.FX LOOP
SEND - This is where you plug the INPUT of your Effect(s).
RETURN - This is where you plug the OUT of your Effect(s).
FX LOOP - Effects loop toggle switch.
Note.
The board is very useful even without connecting an effects processor (effects chane).SEND / RETURN
When the FX LOOP switch is turned on, the knob can be used as an additionalRETURN LEVEL
general volume control.
MASTER Post Phase Inverter Master Volume - . Adjusting the volume before the output tubes
of the power amp.
Allows you to reduce the overall power of the amplier, practically without changing the sound
structure. A very useful feature for home use.
IMPEDANCE - Select between 16, 8 or 4 Ohm to match your speaker set-up.
SPEAKERS - Plug speaker cabinets here. Set Impedance selector to appropriate position.
FUSE HT - Only replace with Type indicated on rear panel. If this fuse blows, it’s most
likely a bad power tube.
Note.
If the sound fails, it is possible that this particular fuse has blown. In this case replace it with the same one
(1 amp, 250 volts). In no case, not a higher denomination!
If it burns out again immediately after replacement, turn off your amplier completely and
contact me for advice and possible repair.
MAINS INPUT- Mains socket 220 volts. At the bottom of the connector is a 2 amp 250 volt
mains fuse.
Do not use fuses with a larger value, in order to avoid serious damage!

-6-
Warranty, service conditions, precautions.
U-Sound Op50 is a sophisticated device built on very high quality components,
requiring due regard and compliance with the rules for the operation of tube ampliers.
Follow the instructions to turn on and set up your amplier.
With proper operation and adherence to simple rules, this amplier will
serve you for many years and delight you.
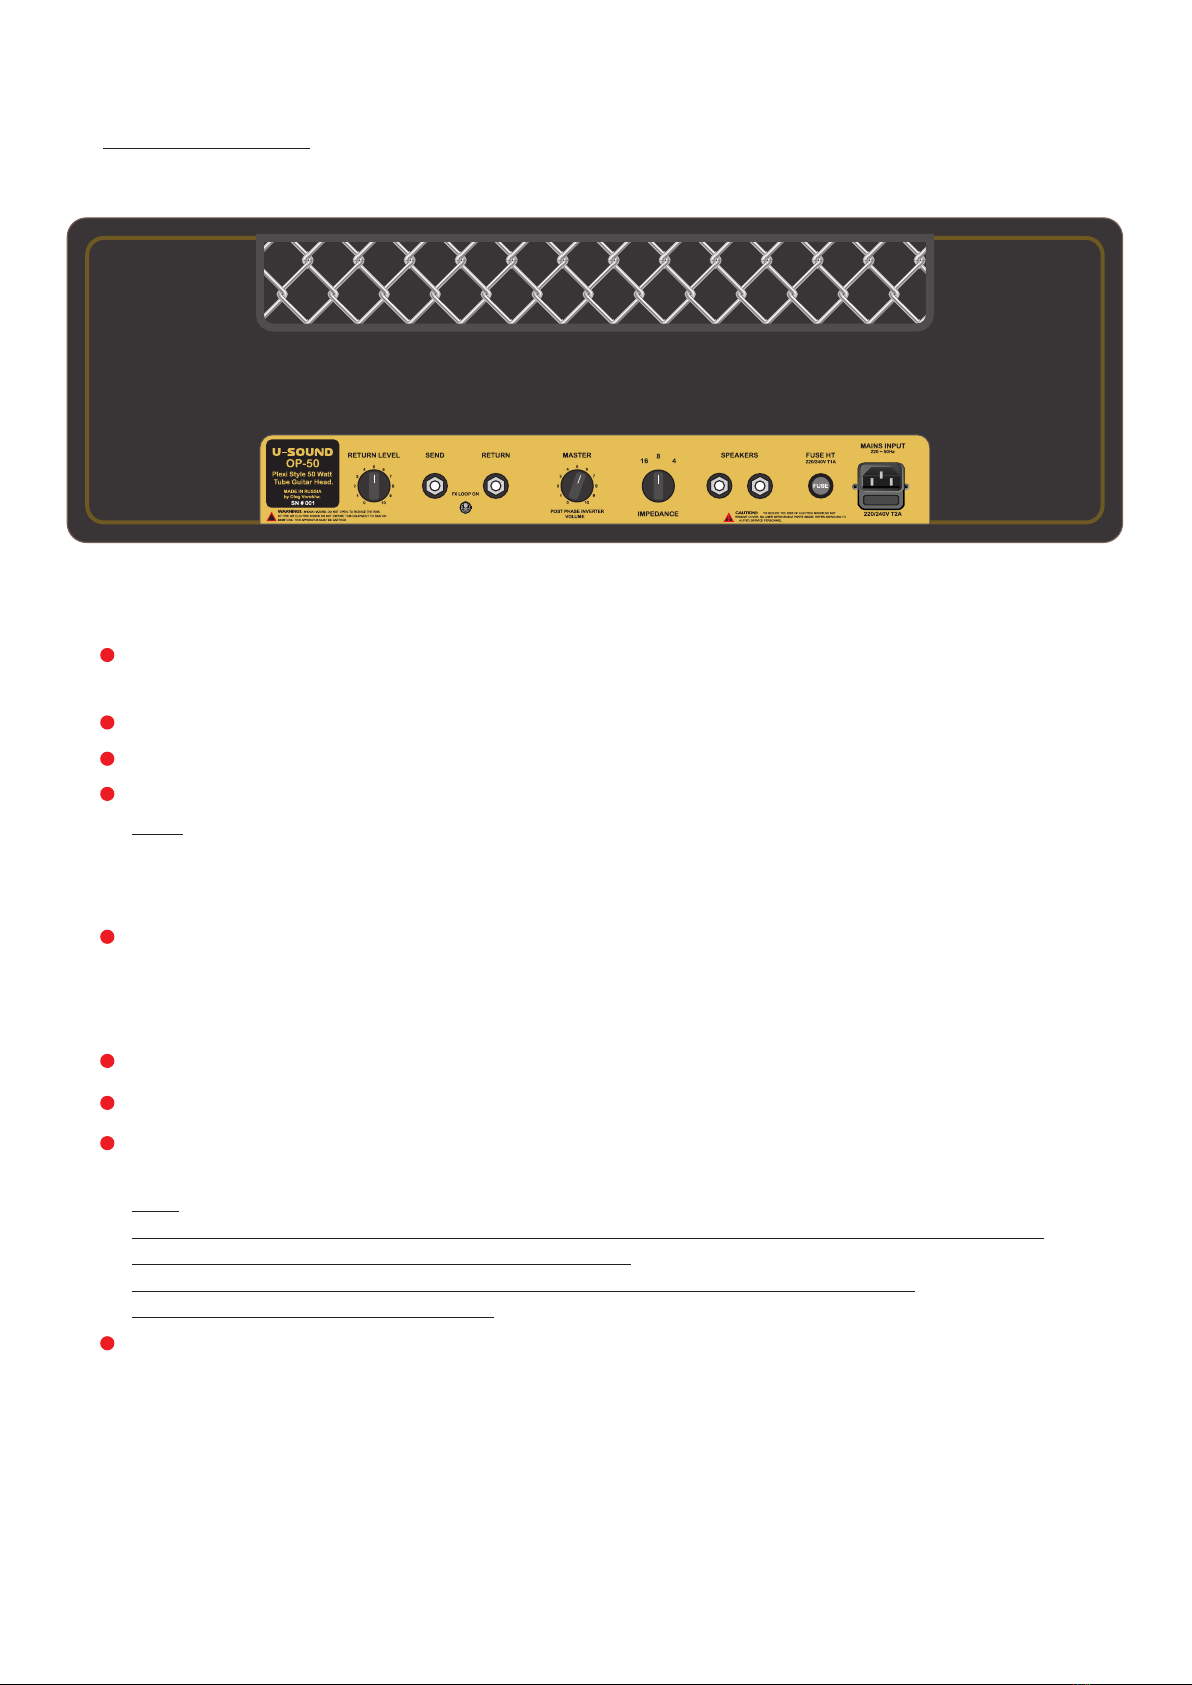
.
Switch on your amplier in the strict sequence described in the chapter "First start-up".
Let the tubes warm up for 5-15 minutes, and only then turn on STANDBY.
Considering that the best sound will be after the amplier is fully warmed up - and this,
perhaps at least 30 minutes, I recommend that you do not turn it off during performances
the whole concert. 2-3 hours of continuous operation, this is an acceptable time for such ampliers.
However, I do not recommend more intensive use, for example in summer outdoor performances
at high air temperatures. Let your amplier rest while breaks in performance.
Avoid getting wet and using the amplier in rooms with high humidity.
Be careful not to obstruct the mesh ventilation openings.
Air access allows the amplier tubes to ventilate.
Do not use the amplier on stages with voltages over 220 volts, or large power surges.
Avoid mechanical stress - careless handling, transportation.
In case it is a long trip, do not be lazy, and remove all tubes from the sockets, isolate
each separately (foam rubber, bubble wrap, etc.) and put in a cardboard box.
Tubes (especially output) are afraid of mechanical shock.
When replacing tubes, try to buy them only from reliable sources, output tubes must be matched
according to the parameters. The amplier design allows for customization the bias current of the
output tubes after replacement without removing the chassis from the case.
To adjust the bias, contact me for advice.
master@u-sound.net
https://www.facebook.com/vorokha/
Subject to all rules, the warranty is one year from the date of purchase of the amplier.
During this time, repairs are free of charge. Lamp replacement is not included
warranty obligations.
You will lose your warranty in case of unauthorized opening of the amplier, and other unqualied
interventions in the operation of the device.
What you need to know.
U-Sound Amplications
Oleg Vorokha.
Table of contents
Popular Musical Instrument Amplifier manuals by other brands

Yamaha
Yamaha VA-2 owner's manual

Marshall Amplification
Marshall Amplification 1987X quick start guide

Hughes & Kettner
Hughes & Kettner CLUB REVERB manual

Peavey
Peavey Mark III Series Standard operating guide

Atomic
Atomic Reactor 50-112 owner's manual

Ashdown
Ashdown Fallen Angel 50 DSP Combo operating instructions