Venga SWM 3000 User manual

Sewing machine
Nähmaschine
Machine à coudre
Máquina de coser
Macchina da cucire
SWM 3000
DC 12 V - 2000 mA
I/B Version
190822

ENGLISH
IMPORTANT SAFEGUARDS
Please read these instructions carefully before using the
appliance, and always follow the safety and operating
instructions.
Important : This appliance can be used by children over 8 years
old and people with reduced physical, sensory or mental
capacities or with a lack of experience or knowledge if they have
been given supervision or instructions concerning the safe use of
the appliance and the risks involved. Children shall not play with
the appliance. Cleaning and user maintenance shall not be made
by children unless they are older than 8 years and supervised.
Never leave the appliance and its cord unsupervised and within
reach of children less than 8 years old or irresponsible persons
DANGER - To reduce the risk of electric shock, or injury to
persons:
❑The machine should never be left unattended when plugged
in.
❑Always unplug the machine from the electrical outlet
immediately after using and before cleaning.
❑WARNING - To reduce the risk of burns, fire, electric shock,
or injury to persons:
❑Always unplug before replacing the removable bulb. Replace
bulb with the same type rated 0.6W and Voltage=s3.2V.
❑Do not allow to be used as a toy. Close supervision is
necessary when the machine is used by or near children.
❑Use this machine only for its intended use, as described in
this manual. Use only attachments recommended by the
manufacturer as contained in this manual.
❑Never operate this machine if it has a damaged cord or plug,
if it is not working properly, if it has been dropped or

damaged, or come into contact with water. Return the
machine to the nearest authorized retailer or service center
for examination, repair, or electrical or mechanical
adjustment.
❑Never operate the machine with any air openings blocked.
Keep ventilation openings of the sewing machine and foot
controller free from accumulation of lint, dust and loose
fabrics.
❑Keep fingers away from all moving parts. Special care is
required around the sewing machine needle.
❑Always use the correct needle plate. The wrong plate can
cause the needle to break.
❑Do not use bent needles.
❑Do not pull or push the fabric while stitching, as this may
deflect the needle, causing it to break.
❑Switch the sewing machine off when making any adjustments
in the needle area, such as threading the needle, changing
the needle, threading the bobbin, changing the presser foot,
etc.
❑Always unplug the sewing machine from the electrical outlet
when replacing accessories, removing covers, or when
making any other user servicing adjustments mentioned in
the instruction manual.
❑Never drop or insert any object into any opening.
❑Do not use outdoors.
❑Do not operate where aerosol spray products are being used
or where oxygen is being administered.
❑To disconnect, turn all controls to the Off position, then
remove the plug from the electrical outlet.
❑Do not unplug by pulling on the cord. To unplug, grasp the
plug, not the cord.
❑The sound pressure level under normal operation conditions
is 72db.
❑Turn off or unplug the machine when if you suspect the
appliance is not operating properly.

❑Never place anything other than your foot on the Foot
Controller.
❑If the power supply cord Is damaged, it must be replaced by
the manufacturer or its service agent or similarly qualified
person in order to avoid a hazard.
❑This machine Is not intended for use by persons (Including
children) with reduced physical, sensory or mental
capabilities or lack of experience and knowledge, unless they
have been given supervision or Instruction concerning the
use of the appliance by a person responsible for their safety.
Children should be supervised to ensure that they do not play
with the appliance
❑Check that your mains voltage corresponds to that stated on
the appliance.
❑Never leave the appliance unsupervised when in use.
❑From time to time check the appliance for damages. Never
use the appliance if cord or appliance shows any signs of
damage. In that case, repairs should be made by a
competent qualified electrician (*). Should the cord be
damaged, it must be replaced by a competent qualified
electrician (*) in order to avoid all danger.
❑Only use the appliance for domestic purposes and in the way
indicated in these instructions.
❑Never immerse the appliance in water or any other liquid for
any reason whatsoever. Never place it into the dishwasher.
❑Never use the appliance near hot surfaces.
❑Never leave the appliance unsupervised when in use.
❑Never use the appliance outside and always place it in a dry
environment.
❑Never use accessories that are not recommended by the
producer. They could constitute a danger to the user and risk
to damage the appliance.
❑Never move the appliance by pulling the cord. Make sure the
cord cannot get caught in any way in order to avoid the
appliance’s fall.

❑Stand the appliance on a stable surface so that it cannot fall
over.
❑Never let children use the appliance, even when they are
supervised.
❑Make sure the appliance is switched off and unplugged
before inserting or removing accessories.
❑Never touch the accessories when the appliance is in use.
Furthermore, never try to stop the movement of the
accessories in any way whatsoever.
(*) Competent qualified electrician: after-sales department of the
producer or importer or any person who is qualified, approved
and competent to perform this kind of repairs in order to avoid all
danger. In case of need you should return the appliance to this
electrician.

PRINCIPAL PARTS OF THE MACHINE
Machine Front View
1. Thread Tension Dial
2. Thread Take-up Lever
3. Thread Cutter
4. Reverse Lever
5. Presser Foot
6. Needle Plate
7. Removable Extension
Bed
8. Bobbin Winding
Stopper
9. Power On/Off &
Speed Control Switch
10. Pattern Selector Dial
11. Presser Foot Release
lever
12. Needle
13. Needle Clamp &
Screw
14. Presser Bar
15. Presser Foot Holder
16. Presser Foot Screw
17. Needle plate
18. Bobbin Cover Plate
19. Bobbin Cover Release
Button

Machine Back View
20. Spool Pin
21. Bobbin Winder
22. Carry Handle
23. Hand Wheel
24. Foot Controller Input
25. Power Cord Socket
26. Power Cord
27. Foot Controller
28. Presser Foot Lifter
29. Light Switch & Built-in
sewing light
30. Faceplate
31. Thread Spool
32. Bobbin Case
PRINCIPAL PARTS AND WHAT THEY DO
1. Thread Tension Dial lets you select just the right tension for your stitch, thread
and fabric. Tension discs, inside the machine, regulate the amount of tension on
the needle thread. The thread tension dial is numbered from 1 through 9. The
lower the number, the looser the tension is on the needle thread. The higher the
number, the tighter the tension is on the needle thread. The settings of 3, 4 and
5 are marked with a box around the number, indicating the settings at the
range at which most of your sewing will be done.
2. Thread Take-Up Lever controls the flow of the needle thread. The self-threading
eyelet simplifies the threading of the take up lever.
3. Thread Cutter is built-in at the side of the machine for convenience. Use this to
trim thread tails quickly and easily when completing a seam.
4. Reverse Lever instantly reverses the stitching direction. Simply press the lever all
the way down and hold in place. Release it to resume sewing forward.
5. Presser Foot holds the fabric against the feed dogs. Use the presser foot lifter to
lower the presser foot to begin sewing or to raise the presser foot if you wish to

remove the fabric.
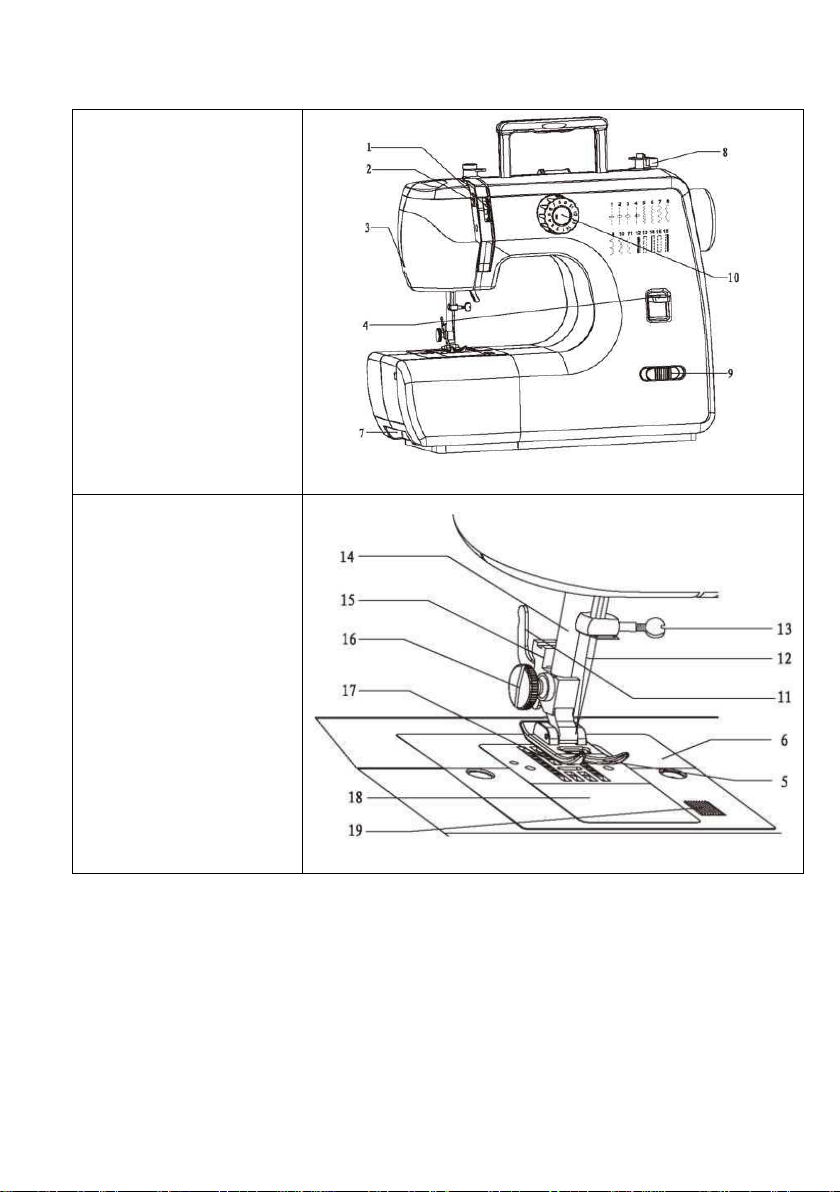
6. Needle Plate is located under the presser foot area, around the feed dogs. It
provides a flat surface for the fabric while sewing.
7. Removable Extension Bed provides a larger surface around the arm of the
machine to support fabric while sewing. This can be removed to access the free
arm, making it possible to sew smaller, harder-to-reach areas such as pant or
sleeve hems. There is a storage compartment for the machine's accessories,
keeping accessories within hands reach.
8. Bobbin Winding Stopper is used in the process of winding the bobbin.
9. Power On/Off & Speed Control Switch is used to turn the machine on and off.
There is an “L” setting for lower speed, and an “H” setting for higher speed.
10. Pattern Selector Dial is used to set the machine to the stitch you want to sew. It is
numbered from 1through 12, and the numbers correspond to the display near
the top of the machine. Just turn the dial to the stitch you want and sew.
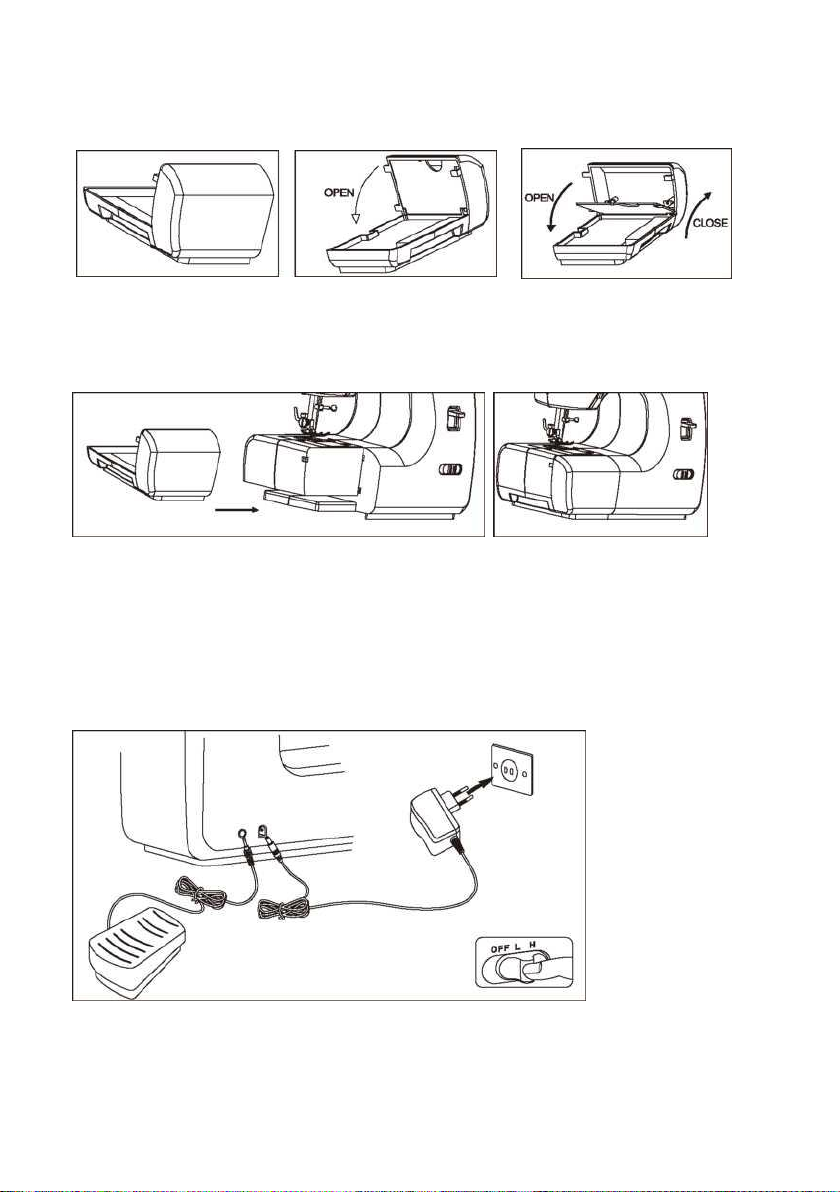
11. Presser Foot Release Lever is located at the back of the presser foot holder. Use
this lever to remove the presser foot from the presser foot holder.
12. Needle is placed into the needle bar and is required in order for the machine to
sew.
13. Needle Clamp & Screw work together to hold the needle in place for sewing.
14. Presser Bar holds the presser foot and presser foot holder. It is raised and
lowered using the presser foot lifter
15. Presser Foot Holder is attached to the presser bar. It holds the presser foot in
place for sewing.
16. Presser Foot Screw is located to the left of the presser foot holder. The screw is
used to secure the presser foot holder in position on the presser bar
17. Feed Dogs move the fabric under the presser foot.
18. Bobbin Cover Plate sits over the bobbin and bobbin case. It is transparent,
making it easier to monitor the thread supply.
19. Bobbin Cover Release Button is located to the right of the bobbin cover plate.
Press it to the right to release the cover when replacing the bobbin.
20. Spool Pin holds the thread spool. The spool pin holder fits onto the spool pin to
allow thread to unwind without tug or drag. The spool pin can be used in either
of two ways (horizontally or vertically), depending on the size of the thread
spool being used.
21. Bobbin Winder is used for smoothly and evenly winding thread onto the bobbin.
22. Carry Handle is built-in, making it easy and convenient for transporting the
machine.
23. Hand Wheel controls the movement of the take-up lever and the needle.
Always turn the hand wheel toward you.
24. Foot Controller Input is located at the back of the machine. The foot controller
cord must be plugged into this input before starting to sew.
25. Power Cord Socket at the back of the machine is where the power cord is
inserted in order to provide power to the machine.

26. Power Cord has one end that connects into the power cord socket and
another end that is connected to a mains power supply.
27. Foot Controller is used to start the machine sewing. Step on the controller to
begin sewing and remove your foot from the controller to stop sewing.
28. Presser Foot Lifter is located inside the “C” area of the machine. Use the lever to
raise and lower the presser foot. The foot is raised before threading the machine
and to remove work from the machine. Lower the presser foot lifter before
beginning to sew.
29. Light Switch & Built-in Sewing Light are used to illuminate the sewing area.
30. Faceplate houses the take-up lever, sewing light and tension mechanism.
31. Thread spool is used to hold and direct the thread into the tension discs. There is
a diagram at the top of the machine indicating where the thread slips into the
guide.
32. Bobbin case holds the bobbin thread securely, providing adequate tension on
the thread while sewing.
ACCESSORIES
REMOVING / INSTALLING EXTENSION BED
To remove the extension bed from the machine, hold It firmly and pull It toward the left.
Once removed, you will have access to the free arm. This allows you to sew pants or
sleeve hems, as well as other hard-to-reach areas.
Foot pedal
XI
IMPORTANT!
Only use metal bobbins in this sewing
machine. The tension on the bobbin
thread is operated magnetically and
therefore the metal bobbin is
required. Using transparent or plastic
bobbins, though they may seem to fit
in the machine, will not allow the
machine to function properly, and
the stitch result will be unsatisfactory.
Using metal bobbins will provide
correct stitch results.
Thread spool
X2
Bobbin
X2
Needle
threader
XI
Needle
XI

The Inside of the removable extension bed can be used to store the machine's
accessories.
To open the accessory storage compartment, flip the cover down, as shown.
To Install the removable extension bed, hold It In your left hand and push It firmly toward
the right.
It is helpful to place your right hand at the right side of the machine to stabilize It as you
push the extension bed in place.
CONNECTING MACHINE TO POWER SOURCE
Connect the machine to a power source, as illustrated.
This machine is equipped with an electric plug that must be used with the appropriate
power outlet.
Unplug the power cord when the machine is not in use

Important!
Do not modify the plug in any way.
To turn the machine on to sew, use the Power On/Off & Speed Control Switch.
Set it in the “L” position in order to sew at slower speeds or set it at the “H” position in
order to sew at higher speeds.
When the machine is threaded and ready to sew, lower the presser foot and step on the
foot controller. The machine will sew according to where you have set the Power On/Off
& Speed Control Switch
NEEDLE IFABRIC ITHREAD GUIDE
There are various styles of needles available for your machine, depending on the type of
fabric you are sewing. Be sure to use the correct style and size of needle to achieve the
best results for your sewing projects.
The most common needle styles are regular point and ball point. The most commonly
used sizes are: 11/80,14/90 and 16/100. The smaller the number is, the smaller the needle
size is. The larger the number is, the larger the needle is. Use smaller size needles for lighter
weight fabrics and larger size needle for heavier weight fabrics. For best results, the chart
below offers some suggestions for matching thread type and needle type with various
fabrics.
Fabric
Thread
Needle Style
Needle Size
Lightweight: taffeta,
organdy, batiste
All purpose thread; Silk thread
2020
11
Medium weight: linen,
challis, chintz, cotton
All purpose thread; Silkthread
2020
14
Medium heavy: tweed,
denim, corduroy
All purpose thread; Heavy duty cotton
2020
14 or 16
Knit: stretch woven,
spandex, tricot
All purpose thread; Silkthread
2045
14
TO NOTE:
•Regular point needles are designed for use with fabrics that are woven, such as
cotton, linen, silk, denim or twill. The style number for this needle is 2020.
•Ball point needles are designed for use with fabrics that are stretch knit, such as
spandex, t-shirt knit or tricot. The style number for this needle is 2045

INSERTING I CHANGING NEEDLES
Change the needle regularly, especially If it is showing signs or wear or causing problems.
To insert a new needle, first turn the Power On/Off & Speed Control Switch to the “Off’
position. Loosen the needle clamp screw.
Remove the old needle and discard it.
Insert the new needle, with the flat side toward the back, as far up as it will go.
Tighten the needle clamp screw securely.
Needles must be in perfect condition. Problems can occur with: A. Bent needles B.
Damaged points C. Blunt needles
PRESSER FOOT LIFTER
The Presser Foot Lifter is located inside the “C” area of the machine. Use this to raise and
lower the Presser Foot.
Raise the Presser Foot Lifter before beginning to thread the machine, to ensure that the
machine is properly threaded. Raise it also to remove work from the machine when
sewing is finished. Lower the Presser Foot Lifter after setting fabric under the Presser Foot,
to begin sewing.
Turn the Power On/Off & Speed Control Switch to the “off' position and make sure the
needle is in its highest position
REMOVING / ATTACHING THE PRESSER FOOT
Removing the Presser Foot

Raise the Presser Bar by lifting the Presser Foot Lifter. Press the Presser Foot Lever, located
in back of the Presser Foot Holder and the Foot will disengage.
Attaching the Presser Foot
Raise the Presser Foot using the Presser Foot Lifter. Place the Foot under the Presser Foot
Holder, then lower the Presser Foot Holder until the cut-out is directly above the pin.
The Presser Foot will engage automatically
WINDING THE BOBBIN
The Sewing machine uses metal bobbins. The Bobbin Case is magnetised. When the
metal bobbin is used, correct tension for the bobbin thread can be achieved. Therefore,
do not use transparent or plastic bobbins - using transparent or plastic bobbins will result
in poor stitch quality due to lack of tension on the Bobbin Thread. Always use metal
bobbins.
Place the spool base, thread and spool cap onto the spool pin. Pull the thread out from
the spool. Slip it into the Thread Guide, then wind it around the bobbin tension guide, as
illustrated.

THREAD GUIDE
Put the end of the thread through the hole in the bobbin, as shown. Place the bobbin
onto the bobbin winder as far as it will go.
Holding onto the end (aka ‘Tail’) of the thread, push the bobbin winder firmly to the right,
up against the bobbin winding stopper. Step on the foot controller to begin winding the
bobbin, and then stop to trim the thread tail. Step on the foot controller again to resume
winding the bobbin. When the bobbin is full, push the spindle to the left, clip the thread
and remove the bobbin from the winder.
INSERTING THE BOBBIN
To insert the bobbin, first remove the bobbin cover plate.
Place the bobbin into the bobbin case.
Pull the thread tail to check that the bobbin turns in a counter-clockwise direction. If it
turns in a clockwise direction, remove it from the bobbin case, turn it over and replace it

into the bobbin case. Pull the thread tail again to ensure that it moves in a counter-
clockwise direction.
THREADING THE UPPER THREAD
Threading the upper thread is a simple process, but it must be done correctly in order to
achieve the correct sewing results.
Turn the Power On/Off & Speed Control Switch to the “off” position before threading the
machine.
Start by raising the needle to its highest position by turning the handwheel toward you
(counter-clockwise), and continue turning until the needle just starts to descend.
Raise the presser foot lifter, which will release the tension of the machine.
Note: This step is very important. If the presser foot is not raised so that the tension is
released, the result will be a large thread jam on the underside of the fabric when you
start to sew.
Turn the handwheel toward you until the needle and take-up lever are in their highest
positions.

Place the spool base, thread and spool cap onto the spool pin.
If the thread spool Is smaller In size, the spool pin can remain In a horizontal position. Note:
If the thread spool has a slit on the end of it, put that end toward the right so that the
thread doesn't get caught on it while sewing.
If the thread spool is larger in size, and therefore does not feed properly when it is placed
onto the spool pin horizontally, move the spool pin to the vertical position. If the vertical
position is used, loosen the spool cap slightly or completely remove it, so that it doesn't
prevent the spool from turning while sewing.
Thread the machine with your left hand while firmly gripping the thread with your right
hand in the order shown:
1. Guide the thread through the
thread guide at the top of the
machine.
2. Pull the thread into the tension
discs by pulling the thread
down into the channel, as
shown.
3. Do a U-turn around the inside of
the tab.
4. Pass the thread through the
thread take-up lever from right
to left.
5. Place the thread into the
thread guide.
6. Pass the thread through the eye
of the needle from front to
back.
or

RAISING THE BOBBIN THREAD
Before you start to sew, it will be necessary to draw up the bobbin thread.
Please see the table below to check the corresponding numbers, as follows:
1. Raise the presser foot lifter
2. Remove bobbin cover plate.
3. Hold the needle thread loosely with your left hand
4. Turn the hand wheel toward you (counter-clockwise) with your right hand, first
lowering the needle and continuing until the needle comes to its highest position.
5. Lightly pull up the top thread, and pick up the bobbin thread
6. The bobbin thread will appear through the needle plate slot.
7. Pull both the top and bobbin thread together toward the back of the machine
under the presser foot, leaving about 6” clear.
8. Replace the bobbin cover plate cover.

CHOOSING A STITCH PATTERN
The Pattern Selector Dial Is used to select the stitch you want to sew. The numbers on the
dial directly correspond to the display on the front of the machine. Simply turn the dial
until the number of the stitch that you want to sew lines up with the red dot marking
above the dial.
Stitch
Number
Stitch Name
Application
Recommended
Foot
1
Straight Stitch Short
Sewing lightweight fabrics
All Purpose Foot
2
Straight Stitch Medium
Sewing medium weight fabrics
All Purpose Foot
3
Straight Stitch Long
Sewing heavier weight fabrics
All Purpose Foot
4
Straight Stitch Extra Long
Machine basting; Gathering/Shirring
All Purpose Foot
5
Left Position Straight
Stitch
Topstitching
All Purpose Foot
6
Zig-Zag Satin
Applique; Decorative stitching
Satin Stitch Foot
7
Zig-Zag Short
Seam finishing; Decorative stitching
Satin Stitch Foot
8
Zig-Zag Medium
Seam finishing; Decorative stitching
Satin Stitch Foot
9
Zig-Zag Long
Seam finishing; Decorative stitching
Satin Stitch Foot
10
Blind Hem
Hems for woven fabrics; Decorative stitching
Blind Hem Foot
11
Stretch Blind Hem
Hems for stretch knit fabrics; Decorative
stitching
Blind Hem Foot
12
Multi-Stitch Zig-Zag
Mending; Elastic insertion; Decorative stitching
Satin Stitch Foot
13
The Buttonhole Stitching
The 1st Step To Sew A Buttonhole
Presser Foot For
Buttonhole
14
The Buttonhole Stitching
The 2nd Step To Sew A Buttonhole
15
The Buttonhole Stitching
The 3rd Step To Sew A Buttonhole
16
The Buttonhole Stitching
The 4th Step To Sew A Buttonhole
STRAIGHT STITCHING
The straight stitch is the most frequently used stitch for all types of sewing.
1. To begin sewing, first raise the presser foot lifter.
2. Pull both the upper thread and the bobbin thread under the presser foot
toward the back of the machine, leaving about 6” of thread.
3. Place the fabric under the presser foot, then lower the presser foot lifter.
4. Turn the hand wheel counter-clockwise (toward you) until the needle enters the
fabric.
5. Start the machine by stepping on the foot controller. Guide the fabric with your
hands. When reaching the edge of the fabric, stop the sewing machine.
6. Turn the hand wheel counter-clockwise (toward you) until the needle is in its
highest position, then raise the presser foot lifter.
7. Draw the fabric to the rear and cut off excess thread with the thread cutter,
located on the side of the machine, as shown.

THREAD TENSION
Having selected the correct needle and thread combination for the fabric being used, it
may be necessary to adjust the tension of the sewing machine to ensure a well balanced
stitch.
A well-balanced stitch is produced when the top and under thread appear the same on
the fabric.
Your machine has an adjustable top tension dial. This control exerts tension on the top
and under thread as they pass through the machine to form a stitch.
Too much tension will produce a tight stitch which will cause puckered seams.
Too little tension will produce a loose stitch.
When an even amount of tension is exerted on both threads, a smooth even stitch,
known as a well-balanced stitch, is produced.
Notice the machine tension dial is marked from 1 through 9, and that the settings of 3, 4
and 5 are further distinguished by a small square. The settings of 3, 4 and 5 represent the
general range at which most of your sewing will be done.
HOW DOES TENSION WORK
To help understand the effect of tension on fabric and thread, try this simple test.
Take 2 pieces of a medium weight woven fabric in a solid, light color about 6” long.
Place a 2020 size 14 needle in the machine.
Thread the top of the machine with an all-purpose thread (darker color) and place the
same type of thread (lighter color) in the bobbin.
Set the machine for Stitch #3, one of the Straight Stitch selections.
Seam the two pieces of fabric together starting with the top tension control at 1. As you
continue to sew, slowly turn the tension dial from 1 through 9.
Sew another row, turning the dial back to 1. You should see a balanced stitch on each
row about midway between the start and finish.
The different colored threads will help you see the effect that tension has on the top and
bottom threads.

TENSION TEST
To verify that the machine is threaded properly in the tension discs, do this simple check:
1. With the presser foot raised and the needle unthreaded, pull the thread. You should
detect only a slight resistance and little or no deflection of the needle.
2. Now lower the presser foot and again pull the thread toward the back of the
machine. This time you should detect a considerable amount of resistance and much
more deflection of the needle. If you do not detect the resistance, this means you
have not threaded the upper machine tension correctly and need to rethread it.
REVERSE SEWING / CUTTING THE THREAD
1. Reverse sewing is usually done at the beginning and end of a seam. The
purpose Is to lock the threads at both ends of the seam so that the seam does
not unravel.
2. Set the machine for straight stitch sewing, depending on the fabric you are
sewing.
3. Place the fabric under the presser foot, just inside the top raw edges of the
fabric.
4. Lower the presser foot and sew about 3 stitches.
5. NOTE: The length of the stitch when sewing in reverse Is pre-set, regardless of the
selected stitch.
6. Stop sewing, then press and hold the Reverse Lever, located on the front of the
machine.
7. Hold it while you sew 3 stitches In reverse.
8. Release the lever and sew forward again, until you come to the opposite end of
the fabric.
9. Press and hold the Reverse Lever to sew in reverse again for about 3 stitches.
10. Release the lever to sew forward again to the end of the fabric.
11. Lift the presser foot lifter, then remove the work from the machine.
Table of contents
Languages: