Vetus ECGPS Specification sheet

2
14
26
38
50
62
Copyright © 2007 Vetus den Ouden n.v. Schiedam Holland
Bedieningshandleiding en
installatieinstructies
Operation manual and
installation instructions
Bedienungshandbuch und
Einbauanleitung
Manuel d’utilisation et
instructions d’installation
Manual de manejo y
instrucciones de instalación
Manuale per l’uso e
istruzioni per l’installazione
Electronisch kompas/GPS
Electronic compass/GPS
Elektronischer Kompass/GPS
Compas électronique/GPS
Compás electrónico/GPS
Bussola elettronica/GPS
ECGPS

2 100506.01 Electronische kompass EC
1 Inleiding ........................................... 3
1.1 Inhoud van de verpakking .........3
2 Werking ........................................... 3
2.1 Het scherm ................................ 3
2.2 Overzicht van
de bedieningsfuncties ................... 3
2.2.1 Knopgeluid ........................... 3
3 Gebruik ............................................ 4
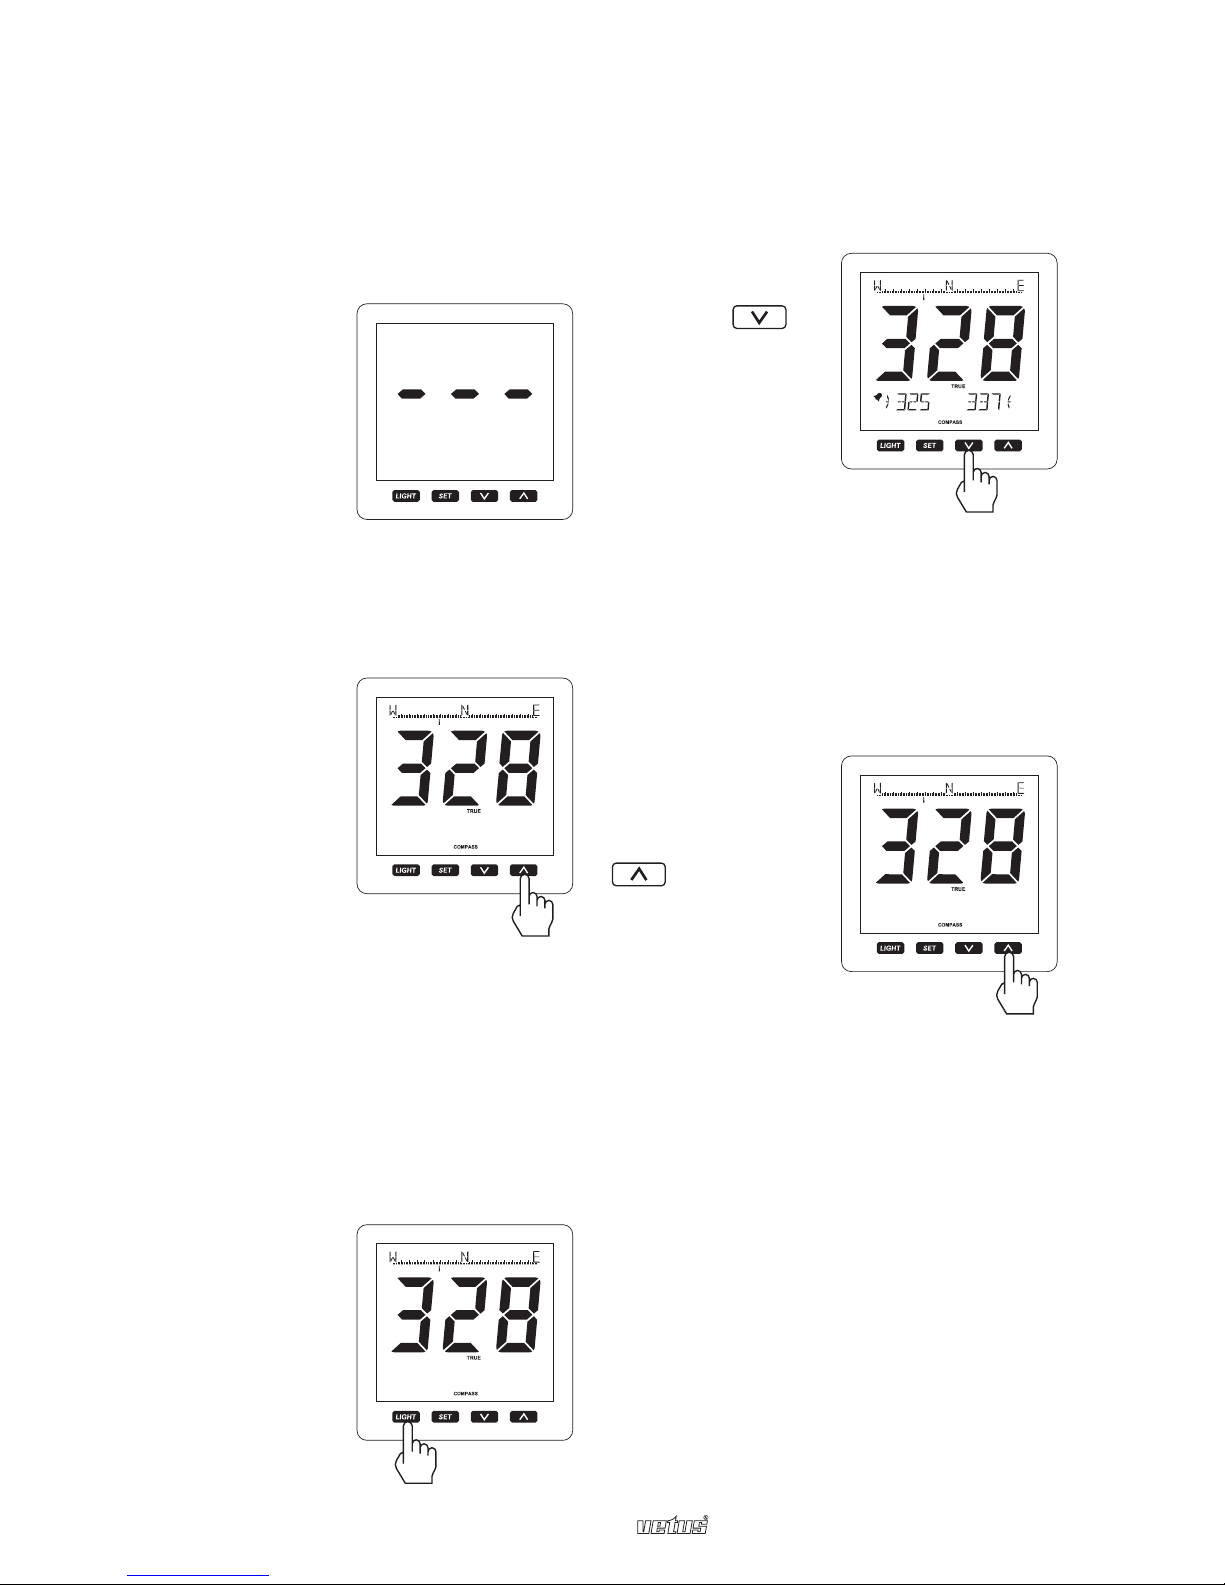
3.1 Inschakelen ............................... 4
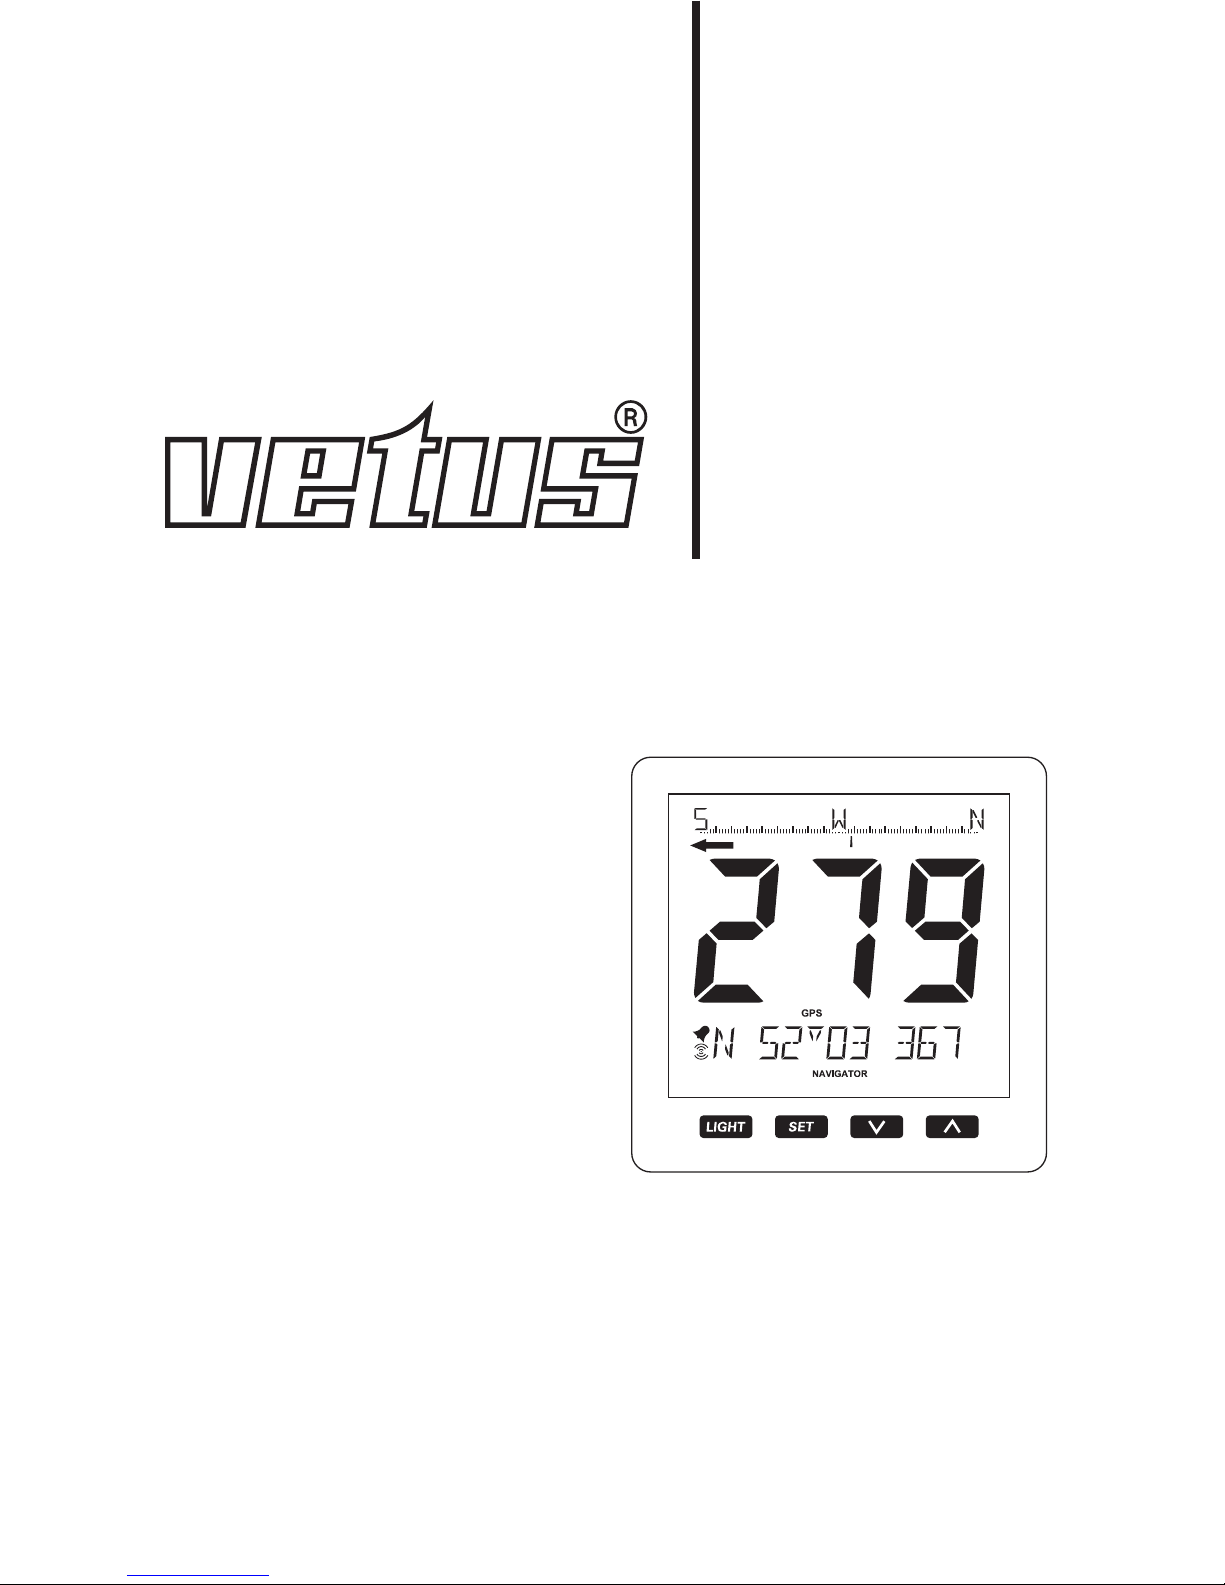
3.2 Hoofdscherm ............................. 4
3.3 Achtergrondverlichting .............. 4
3.4 Alarm bij koersafwijking ............ 4
3.5 Kies tweede berichtregel .......... 4
4 Menu ................................................. 5
4.1 Menufuncties: ............................ 5
4.1.1 Alarm bij koersafwijking (C1) 5
4.1.2 Demping (C2) ....................... 5
4.1.3 Knopgeluid (C3) ................... 6
4.1.4 Contrast (C4) ........................ 6
4.1.5 Baudrate (C5) ....................... 6
4.1.6 Kalibreren (C6) ..................... 6
4.1.7 Uitlijnen (C7) ......................... 7
4.1.8 Variatie (C8) .......................... 7
4.1.9 Tijdzone (C9) ........................ 7
4.1.10 Kies eenheden (C10) ......... 8
4.1.11 Reset vaarafstand (C11) ..... 8
4.1.12 GPS-gegevens (C12) ......... 8
4.2 Servicemenu ............................ 8
4.2.1 Schermgegevens ................. 8
4.2.2 Kompasgegevens ................. 8
4.2.3 Reset scherm ........................ 8
4.2.4 Reset kompas ....................... 8
4.2.5 Weergavecontrole ................ 8
4.2.6 Demofunctie ......................... 8
4.2.7 Menu afsluiten ...................... 8
5 Installeren ......................................... 9
5.1 Afleesinstrument ......................... 9
5.2 Kompassensor / GPS-ontvanger 9
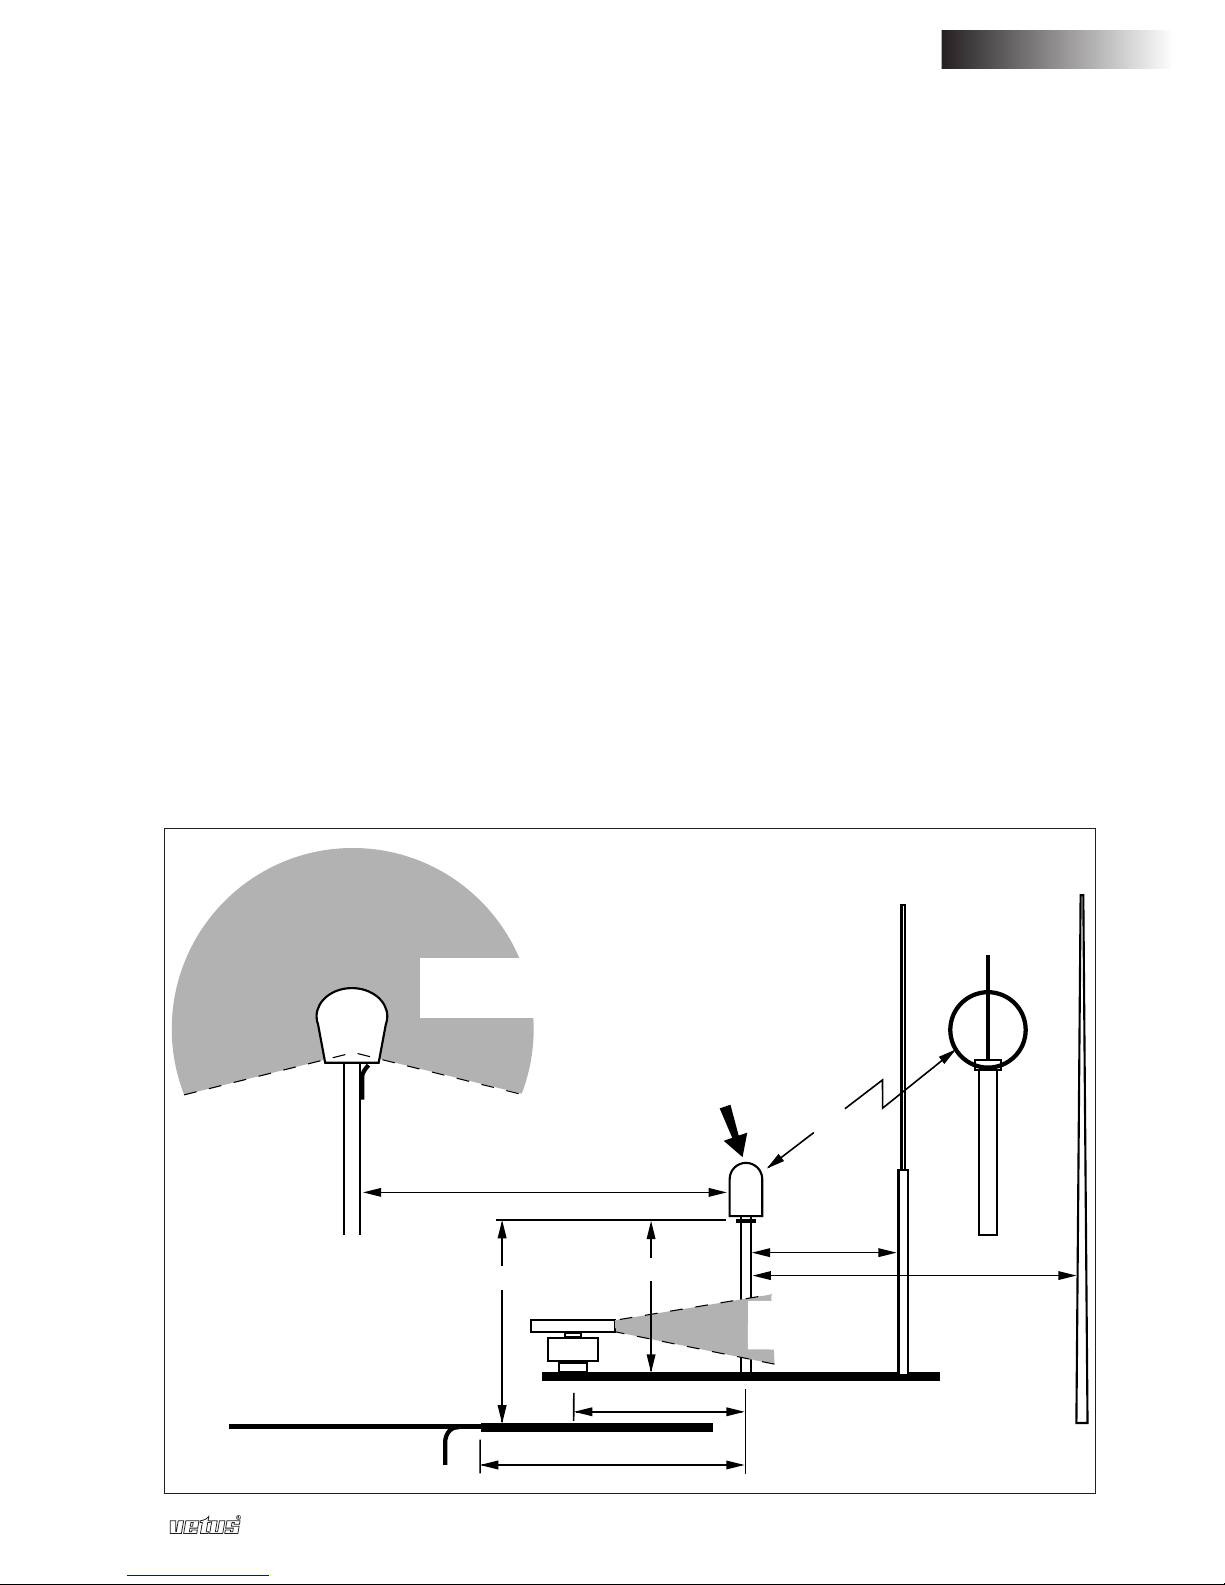
5.2.1 De bevestigingsplaats kiezen 9
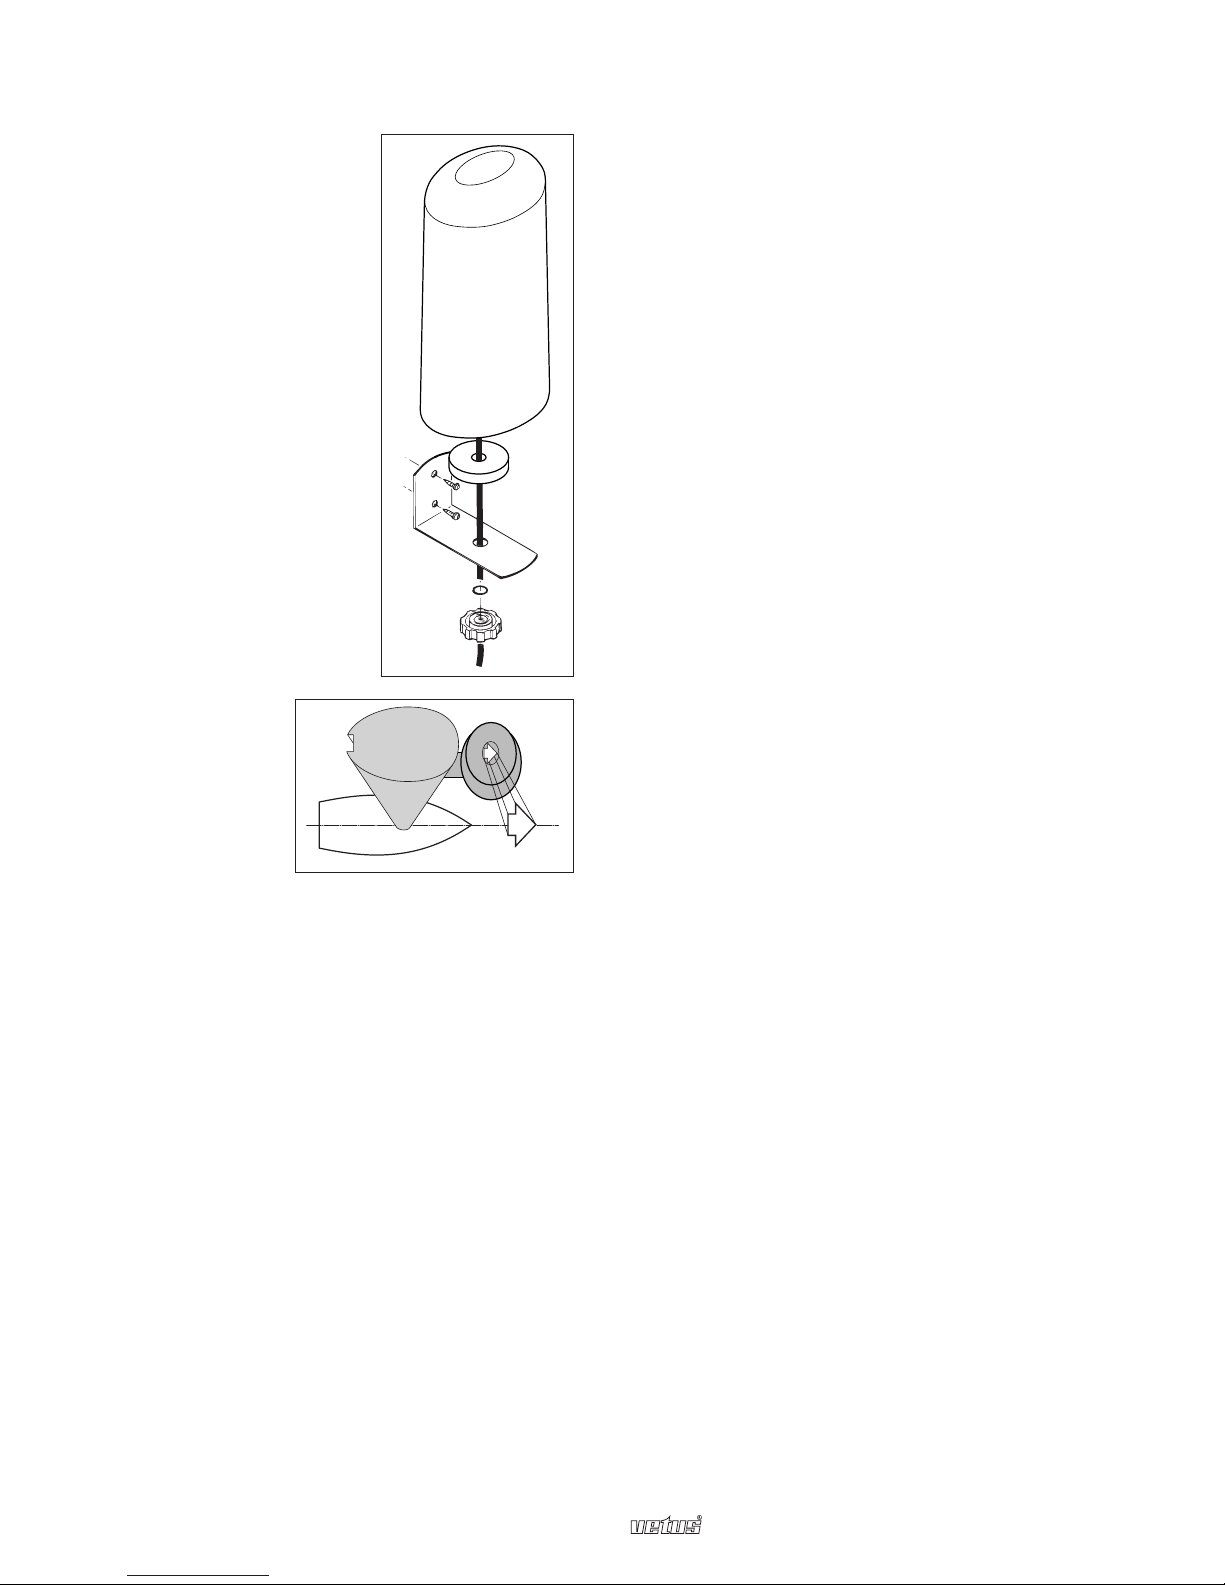
5.2.2 Monteren .............................10
5.3 Aansluiten .................................10
5.3.1 Verlichting ............................ 10
5.3.2 NMEA0183-echo .................10
5.3.3 Alarmuitgang ....................... 10
6 Technische gegevens ....................11
6.1 Algemeen ................................. 11
6.2 Kompassensor .........................11
6.3 GPS-ontvanger .........................11
6.4 Communicatie ..........................11
6.5 Certificeringen ........................ 12
6.6 NMEA 0183-berichten .............. 12
7 Aansluitschema .............................. 74
8 Opties .............................................. 76
8.1 Schakelaar voor
achtergrondverlichting ...............76
8.2 Dimmer voor achter-
grondverlichting ........................76
8.3 NMEA 0183 ECHO ................... 76
8.4 Alarmuitgang ............................ 76
8.5 Bluetooth (optioneel) ............... 77
8.6 NMEA 2000 (optioneel) ............ 77
9 Hoofdafmetingen ............................ 78
Inhoud
Electronisch kompas / GPS ECGPS

100506.01 3
NEDERLANDS
Electronische kompass EC
1 Inleiding
Deze handleiding geeft u informatie over
het gebruik, het kalibreren en het instal-
leren van het elektronisch kompas / GPS.
Het scherm toont u de volgende
gegevens:
- De koers als analoge koersschaal
- Digitale koersindicatie, naar keuze
GPS, magnetisch, ware koers of
afdrijving.
- Digitaal weergegeven berichten, naar
keuze: tijd, datum, coördinaten, enz.
1.1 Inhoud van de verpakking
- ECGPS-afleesscherm
- ECGPS kompas/GPS-sensor met beugel
- 2 zespolige contrastekkers
- 1 vierpolige contrastekker
- Montageafdichting
- 4 metalen ringen + M4-moeren
- Boormal
2 Werking
2.1 Het scherm
1 Horizontale analoge koersschaal
2 Grote, digitale koersindicatie
3 Alarmindicatie
4 Bedieningsknoppen
5 Indicatie magnetische of ware noorden
6 Digitale berichtenweergave
2.2 Overzicht van de bedieningsfunc-
ties
Dit apparaat heeft vier bedieningsknop-
pen. Deze knoppen hebben de volgende
functies:
druk één of enkele keren op de
knop om de achtergrondver-
lichting te regelen. In de menu’s
werkt deze knop ook als herstel-
knop (reset).
druk op de knop om naar de
instellingenmenu’s te gaan.
Druk op /om het
gewenste menu-item te kiezen en
druk op om het gekozen
menu te openen. Druk langer dan
2 seconden op de knop om
het menu te verlaten.
druk op om het ‘alarm bij
koersafwijking’ aan of uit te zet-
ten. In de instellingenmenu’s kunt
u met deze knop een menu of
bericht kiezen of een instelling
veranderen.
druk op om het ‘ware’ of
‘magnetische’ noorden te kiezen
of ‘GPS’ of ‘drift’. In de instellingen-
menu’s kunt u met deze knop
een menu kiezen of een instelling
veranderen.
Het effect van de knop merkt u pas bij het
loslaten van de knop, zowel de knop
als heeft een automatische herhaal-
functie. Na 1 minuut zonder knopdruk
wordt automatisch de kompasroos weer
getoond.
2.2.1 Knopgeluid
Bij het loslaten van de knoppen hoort u
een geluid. U kunt dit geluid uitschakelen in
het menu ‘knopgeluid (Key Sound)’(C3).
4
6
1
5
2
3
Electronisch kompas / GPS ECGPS

4 100506.01 Electronische kompass EC
3 Gebruik
3.1 Inschakelen
Sluit het instrument aan op een aparte
schakelaar (er zit geen aan- / uitschake-
laar op het apparaat zelf).
Bij het inschakelen
toont het scherm 2
seconden lang alle
schermelementen.
Daarna ziet u deze
vier horizontale lijn-
tjes die aangeven
dat het instrument
op de kompasgegevens aan het wachten
is.
3.2 Hoofdscherm (standaard)
Het hoofdscherm
kan naar keuze de
magnetische of
ware koers weer
geven, de GPS-
koers of de afdrijv-
ing (drift).
Druk 2 seconden
lang op de meest
rechtse (pijl)knop
om te wisselen tus
sen deze weer-
gaves.
3.3 Achtergrondverlichting
De achtergrondverlichting kent 7 standen:
- Niveau 1
- Niveau 2
- Niveau 3
- Niveau 4
- Niveau 5
- Extern (remote)
- Uit
Bij de instelling
‘extern’ (remote)
bepaalt de spanning
op de verlichting-
spen van de con-
nector het niveau
van de achtergrondverlichting.
Zie ‘5.3 Aansluitingen’ en ‘8 Opties’ voor
de pengegevens.
3.4 Alarm bij koersafwijking
Drukinhethoofdsch-
erm 2 seconden lang
op de knop om
het alarm in of uit te
schakelen.
Voordat u het alarm
inschakelt, moet u
het alarm eerst ins-
tellen.
Zie voor het instellen van het alarm ‘4.1.1
Alarm bij koersafwijking (ST1)’.
Bij ingeschakeld alarm verschijnt de alar-
mindicatie in het scherm en worden beide
limieten in de berichtenregel weerge-
geven.
3.5 Kies tweede
berichtregel
Druk in het hoofd-
scherm op de knop
om te bepalen
welke berichten er
op de berichtenregel
worden weerge-
geven.
U kunt kiezen uit:
1 Tijd
2 Datum
3 Breedtegraad
4 Lengtegraad
5 GPS-snelheid
6 Vaarafstand
7 Logboek
8 GPS-koers
2 sec.
Electronisch kompas / GPS ECGPS

100506.01 5
NEDERLANDS
Electronische kompass EC
4 Menu
4.1 Menu functies:
Druk op de knop om naar het instel-
lingenmenu te gaan. Elke keer dat u op
/drukt, verschijnt het volgende
of vorige menu-item. Druk vervolgens op
om het gekozen menu te openen.
- Alarm bij koersafwijking C1
- Demping C2
- Knopgeluid C3
- Contrast C4
- Baudrate C5
- Kalibreren C6
- Uitlijnen C7
- Variatie C8
- Tijdzone C9
- Eenheden C10
- Reset C11
- GPS-gegevens C12
- Menu afsluiten C13
4.1.1 Alarm bij koersafwijking (C1)
U kunt een alarmmelding laten geven als
de actuele koers meer dan een ingesteld
aantal graden naar bakboord of stuur-
boord afwijkt van de geplande koers.
De zoemer in het apparaat zal een gelu-
idssignaal geven als de actuele koers
buiten de ingestelde limieten valt.
• Druk in het hoofdscherm op de knop
om de menu’s te openen.
• Druk nogmaals op voor het menu
‘alarm bij koersafwijking’ (C1). Stel met
de knoppen /de geplande
koers in.
• Druk op en stel daarna met
/de afwijkingslimiet naar bak-
boord in. U kunt deze limiet instellen
op een afwijking van 2 tot 45 graden.
• Druk op en stel daarna met
/de afwijkingslimiet naar stuur-
boord in. U kunt deze limiet instellen
op een afwijking van 2 tot 45 graden.
Druk 2 seconden lang op de knop
om dit menu af te sluiten.
Voorbeeld
Als u de ‘geplande koers’ instelt op 246,
de ‘afwijkingslimiet naar bakboord’ op 3
en de ‘afwijkingslimiet naar stuurboord’ op
2, dan zal het alarm afgaan als de koers
krimpt naar minder dan 246-3 = 243° of
ruimt naar meer dan 246+2 = 248°.
Druk in het hoofdscherm langer dan 2 sec-
onden op de knop om het alarm aan
(ON) of uit (OFF) te schakelen (zie 3.4).
4.1.2 Demping (C2)
Met de dempingsinstelling kunt u het
dempingsniveau aanpassen aan de
omstandigheden. De demping bepaalt
de periode waarover de gemiddelde
koers wordt bepaald. Demping maakt
het kompas niet minder nauwkeurig, het
reageert alleen trager. U kunt de demp-
ing uitschakelen of een dempingsniveau
instellen tussen 1 en 7. Onder normale
omstandigheden wordt niveau 2 gebruikt.
• Druk in het hoofdscherm op de knop
om de menu’s te openen.
• Druk op /om het menu
demping (Damping) te selecteren
(C2).
• Druk op om het menu demping te
openen.
• Stel met de knoppen /de
gewenste waarde in.
• Druk kort op om de ingestelde
waarde te activeren en naar het
hoofdmenu te gaan, of:
• Druk langer dan twee seconden op
de knop om terug te gaan naar
het hoofdscherm.
Electronisch kompas / GPS ECGPS

6 100506.01 Electronische kompass EC
4.1.3 Knopgeluid (C3)
U kunt het knopgeluid aan- of uitzetten.
• Druk in het hoofdscherm op de knop
om de menu’s te openen.
• Druk op /om het menu
knopgeluid (Key Sound) te selecteren
(C3).
• Druk op om het menu knopgeluid
te openen.
• Kies met de knoppen /aan
(ON) of uit (OFF).
• Druk op om naar het hoofd-
menu te gaan of:
• Druk langer dan twee seconden op
de knop om terug te gaan naar
het hoofdscherm.
4.1.4 Contrast (C4)
U kunt het schermcontrast van het kom-
pas/GPS-scherm aan de kijkhoek aan-
passen. Stel een contrastniveau in tussen
0 en 9.
• Druk in het hoofdscherm op de knop
om de menu’s te openen.
• Druk op /om het menu
contrast te selecteren (C4).
• Druk op om het menu contrast te
openen
• Selecteer met de knoppen /
het gewenste contrastniveau.
• Druk op t om naar het hoofd-
menu te gaan of:
• Druk langer dan twee seconden op
de knop om terug te gaan naar
het hoofdscherm.
4.1.5 Baud rate (C5)
Deze kompas/GPS-combinatie kan de
baudrate automatisch detecteren. Via
dit menu kunt u een voorkeur voor de
baudrate instellen voor de aangesloten
kompassensor.
• Druk in het hoofdscherm op de knop
om de menu’s te openen.
• Druk op /om het menu
baudrate te selecteren (C5).
• Druk op om het menu baudrate
(C5) te openen.
• Selecteer met de knoppen /
de gewenste baudrate.
• Druk op om naar het hoofd-
menu te gaan of:
• Druk langer dan twee seconden op
de knop om terug te gaan naar
het hoofdscherm.
4.1.6 Kalibreren (C6)
Ook de magnetische invloeden van het
schip zelf kunnen kompasafwijkingen
veroorzaken. U kunt deze magnetische
afwijkingen corrigeren door het kompas te
kalibreren.
• Druk in het hoofdscherm op de knop
om de menu’s te openen.
• Druk op /om het menu
kalibreren (Calibration) te selecteren
(C6).
• Druk op om het menu kalibreren
te openen.
• Kies met de knoppen /
automatisch (Auto) of handmatig
(Manual).
4.1.6.1 Automatisch kalibreren
Dit elektronisch kompas kan zichzelf au-
tomatisch kalibreren. Standaard staat ‘Au-
tomatisch kalibreren’ op aan ‘ON’.
De kompassensor zal zichzelf ka-
libreren als u met constante snelheid
twee volledige cirkels vaart binnen 1 tot
maximaal 4 minuten per cirkel. U kunt
deze functie ook uitschakelen en in plaats
daarvan handmatig kalibreren.
4.1.6.2 Handmatig kalibreren
Kalibreer de kompassensor alleen bij kalm
weer en in een scheepvaartvrij gebied.
Laat uw schip met constante snelheid
een ruime cirkel varen. Selecteer vervol-
gens ‘kalibreren’ in het menu en druk de
knoppen en samen twee sec-
onden lang in. In het scherm verschijnt nu
Electronisch kompas / GPS ECGPS

100506.01 7
NEDERLANDS
Electronische kompass EC
de koers en de tekst ‘bezig (In process)’.
Zorg dat uw schip de cirkel (de volledige
360°) tussen de 1 en maximaal 4 minuten
voltooit. Als het kalibreren is gelukt komt
er ‘klaar (Done)’ in het scherm te staan en
klinkt er een kort piepje. U mag de cirkels
zowel linksom als rechtsom varen.
Indien de cirkel niet binnen de gestelde
tijd werd gevaren, blijven de bestaande
kalibratiegegevens bewaard en kunt u in
het display aflezen of het rondje te snel of
te langzaam is gevaren.
Voorbeeld:
• Laat uw schip een ruime cirkel varen.
• Open het menu kalibreren en selecteer
handmatig kalibreren, druk op
• Druk 2 seconden lang tegelijk op
en ‘bezig (In process)’
• Blijf de cirkel varen en wacht tot het
kompas piept.
In het scherm staat nu of het kalibreren is
gelukt of niet.
4.1.7 Uitlijnen (C7)
Corrigeer uitlijnfouten door enkele be-
kende koersen uit te zetten op een kaart
en de magnetische koersen daarvan te
vergelijken met de magnetische koers die
het kompas aangeeft. U kunt eventuele
verschillen compenseren met de uitlijn-
waarde.
• Druk in het hoofdscherm op de knop
om de menu’s te openen.
• Druk op /om het menu
uitlijnen (Align) te selecteren (C7).
• Druk op om het menu uitlijnen te
openen.
• Corrigeer de afwijking met de knop-
pen /.U kunt deze waarde
wijzigen in stappen van 0,1° tot max.
+/- 45°.
• Druk op om naar het hoofd-
menu te gaan of:
• Druk langer dan twee seconden op
de knop om terug te gaan naar
het hoofdscherm.
4.1.8 Variatie (C8)
Stel de variatie in van de magnetische
koers ten opzichte van de geografische
(ware) koers.
• Druk in het hoofdscherm op de knop
om de menu’s te openen
• Druk op /om het menu vari-
atie (Variation) te selecteren (C8).
• Druk op om het menu variatie te
openen.
• Corrigeer de afwijking met de knop-
pen /.U kunt deze waarde
wijzigen in stappen van 0,1° tot max.
+/- 45°.
• Druk op om naar het menu
terug te gaan of:
• Druk langer dan twee seconden op
de knop om terug te gaan naar
het hoofdscherm.
Druk in het hoofdscherm op ‘pijltje om-
hoog’ om te kiezen tussen weergave van
de ware of de magnetische koers (zie
3.5).
4.1.9 Tijdzone (C9)
U kunt voor uw tijdzone het tijdverschil ten
opzichte van de UTC-tijd opgeven zodat
de juiste tijd wordt weergegeven.
• Druk in het hoofdscherm op de knop
om de menu’s te openen.
• Druk op /om het tijdzone-
menu (UTC offset) te selecteren (C9).
• Druk op om het tijdzonemenu te
openen.
• Stel met de knoppen /in
hoeveel uren verschil er is tussen uw
tijdzone en de UTC-tijd. U kunt alleen
hele uren instellen.
• Druk op om naar het hoofd-
menu te gaan of:
• Druk langer dan twee seconden op
de knop om terug te gaan naar
het hoofdscherm.
Electronisch kompas / GPS ECGPS

8 100506.01 Electronische kompass ECElectronisch kompas / GPS ECGPS
4.1.10 Eenheden (C10))
U kunt afstanden en snelheden laten weer-
geven in km en km/u of in mijlen en kno-
pen.
• Druk in het hoofdscherm op de knop
om de menu’s te openen.
• Druk op /om het menu
eenheden (Unit Select) te selecteren
(C10).
• Druk op om het menu eenheden
te openen.
• Kies met de knoppen /kil-
ometers (KM) of zeemijlen (Miles).
• Druk op om naar het hoofd-
menu te gaan of:
• Druk langer dan twee seconden op
de knop om terug te gaan naar
het hoofdscherm.
4.1.11 Reset vaarafstand (C11)
Gebruik het menu vaarafstand om de ge-
varen afstand weer te geven of op nul te
zetten.
• Druk in het hoofdscherm op de knop
om de menu’s te openen.
• Druk op /om het menu
vaarafstand (Trip Reset) te selecteren
(C11).
• Druk op om het menu vaarafstand
te openen.
• Kies met de knoppen /‘wel
op nul zetten’ (Yes) of ‘niet op nul zet-
ten’ (No).
• Druk op om naar het hoofd-
menu te gaan of:
• Druk langer dan twee seconden op
de knop om terug te gaan naar
het hoofdscherm.
4.1.12 GPS-gegevens (C12)
In dit menu kunt u zien hoeveel GPS-satel-
lietsignalen er worden gebruikt.
• Druk in het hoofdscherm op de knop
om de menu’s te openen
• Druk op /om het GPS-
gegevensmenu (GPS info) te select-
eren (C12).
• Druk op om het GPS-gegevens-
menu te openen.
• Druk op om naar het hoofd-
menu te gaan of:
• Druk langer dan twee seconden op
de knop om terug te gaan naar
het hoofdscherm.
4.2 Servicemenu
Houd tijdens het inschakelen de knop
ingedrukt om het servicemenu te
openen.
4.2.1 Schermgegevens
Druk op u ziet nu: schermtype, com-
municatiefuncties, softwareversie.
4.2.2 Kompasgegevens
Druk op , u ziet nu: kompastype,
communicatiefuncties, softwareversie.
4.2.3 Reset scherm
Druk op om het scherm terug te zet-
ten naar de standaardinstellingen, met uit-
zondering van het logboek.
4.2.4 Reset kompas
Druk op om het kompas terug te zet-
ten naar de standaardinstellingen.
4.2.5 Weergavecontrole
Druk op om alle schermelementen
weer te geven zodat u kunt zien of er el-
ementen defect zijn.
4.2.6 Demofunctie
Druk op om de demofunctie in te
schakelen.
4.2.7 Menu afsluiten
Druk op om het servicemenu af te
sluiten.

100506.01 9
NEDERLANDS
Electronische kompass ECElectronisch kompas / GPS ECGPS
5 Installeren
5.1 Afleesinstrument
Zie hoofdstuk 9 voor de afmetingen.
Maak aan de hand van de meegeleverde
boormal de vereiste gaten in het instrumen-
tenpaneel of in de wandplaat. Bevestig het
afleesinstrument met behulp van de 4 mee-
geleverde draadbouten en moeren. Zorg
dat de afdichting correct tussen het instru-
ment en het paneel of schot is geplaatst.
5.2 Kompassensor / GPS-ontvanger
5.2.1 De bevestigingsplaats kiezen
Alle kompassen worden gekalibreerd ge-
leverd, dus hoe zorgvuldiger u de plaats
kiest voor de kompassensor, hoe beter het
resultaat zal zijn.
Het is uiterst belangrijk om de sensor uit
de buurt te houden van materialen die
magnetische storingen kunnen veroor-
zaken.
• Een veilige afstand voor externe mag-
netische interferentie is: 3 m afstand tot
VHF, RDF, luidsprekers, dieptemeters,
motoren en stroomvoerende kabels
met hoge stroomsterktes.
• 3 m afstand tot radarapparatuur en
SSB-radio’s.
• Monteer hem buiten de romp van sta-
len schepen.
• Bescherm de sensor tegen beschadi-
gingen.
• Optimale plaatsing: zo laag mogelijk
om zo min mogelijk last te hebben van
het rollen en stampen van het schip.
• Monteer het kompas nooit in de buurt
van magneten (bijv. van een kaart-
koerskompas)
Als u twijfelt of de sensor wel op een be-
paalde plaats kan worden gemonteerd van-
wege mogelijke magnetische interferentie,
controleer dan met een handkompas of er
op die plek magnetische afwijkingen zijn.
De GPS-antenne zit bovenin de sensor.
Zorg dat de antenne altijd rondom vrij
zicht heeft naar de lucht.
INMARSAT
-antenne
nooit binnen het
INMARSAT-bereik
Lange MF/HF
-zendantenne
nooit binnen
het radarbereik
Lusantenne
VHF-antenne of
MF/HF zend-/
ontvangst-
sprietantenne
Zend-
spriet-
antenne
(MF/HF)
Min. 1 m
Min. 4 m
Min. 5 m
Min. 4 m
Min. 4 m
Min. 1.5 m Min. 0.5 m
Radar
Min. 3 m
Kompassensor /
GPS-antenne

10 100506.01 Electronische kompass EC
5.2.2 Monteren
In de verpakking zit
een roestvrijstalen beu-
gel om het kompas op
te monteren.
Draai de wartelmoer
los en til het huis op;
de pen en de kabel
passen door het gat in
de beugel. Monteer de
beugel op de gewenste
plaats. Gebruik uitslui-
tend niet-magnetische
schroeven om de beu-
gel te bevestigen.
De pijl bove-
nop de kom-
passensor
moet evenwij-
dig lopen met
de lengteas
van het schip.
5.3 Aansluiten
Zie hoofdstuk 7 voor het aansluitschema.
Sluit de kabel van de kompassensor aan
volgens het aansluitschema. Als het nodig
is om de kabel door te knippen, herstel
de aansluitkabel dan door de aders met
dezelfde kleur weer met elkaar te verbin-
den. Dit elektronisch kompas met afleess-
cherm is zowel geschikt voor 12 volt als 24
volt gelijkspanning. Sluit de voeding aan
volgens het aansluitschema. Zie hoofd-
stuk 8 voor optionele verbindingen.
5.3.1 Achtergrondverlichting
De ingang voor de achtergrondverlichting
is een automatische meetingang die de
aangeboden spanning meet ten opzichte
van de accuspanning. Als de accuspan-
ning 12 V is, is de verlichting maximaal
als de aangeboden spanning op pen 2
ook 12 V bedraagt. Als de accuspanning
24 V is en de aangeboden spanning op
pen 2 bedraagt 12 V, wordt de verlichting
gedimd.
PEN 2:Dimingang achtergrondverlichting
(0-12V of 0-24V, automatische regeling))
Zie hoofdstuk 8: Opties.
5.3.2 NMEA 0183-echo
Op de NMEA-echopen kunt u andere ap-
paraten aansluiten die ook de NMEA-beri-
chten van de kompassensor moeten ont-
vangen..
PEN 8: NMEA0183-uitgang, samen met
massapen 7 (GND)
Zie hoofdstuk 8: Opties.
5.3.3 Alarmuitgang
Op de alarmuitgang kunt u een externe
waarschuwingsvoorziening aansluiten zo-
als een zoemer. Verbruikt deze voorzien-
ing meer dan 100 mA, schakel er dan een
klein relais tussen.
PEN 12: Alarmuitgang,samen met de plus
pool (+) van de accu
Zie hoofdstuk 8: Opties.
Electronisch kompas / GPS ECGPS

100506.01 11
NEDERLANDS
Electronische kompass EC
6 Technische gegevens
6.1 Algemeen
Voedingsspanning : 10 - 30 volt gelijkspanning
Stroomverbruik : 40 mA bij 12 V, 20 mA bij 24 V
Max. stroomverbruik achtergrondverlichting: 40 mA (extra)
Voorzien van ompoolbeveiliging
Afmetingen, instrument : 110 x 110 x (24,5 + 31,5 mm)
Afmetingen, sensor : 72 x 72 x 170 mm
Kabellengte, sensor : 10 m
Bedrijfstemp. instrument : -20 tot +70 °C
Bedrijfstemp. sensor : -20 tot +50 °C
Opslagtemp. sensor : -30 tot +70 °C
Beschermingsgraad : IP66
Regelbare schermverlichting : 5 helderheidsniveaus, uit en externe ingang
Alarmuitgang : open collector, max. 100 mA
6.2 Kompassensor
Resolutie, instrument : 1 graad
Resolutie, sensor : 0,1 graad
Herhalingsnauwkeurigheid : 1°
Kantelcompensatie : tot 35°
Uitgangsfout : max. 2°
Kantelvariatie uitgang : max. 2°
6.3 GPS-ontvanger
Chipset : NEMERIX
Frequentie : 1575,42 MHz-Li C/A Code
Protocol : NMEA 0183
GPS-kanaal : 16 kanalen
Positienauwkeurigheid : 3 m CEP (50%), 7 m DEP (90%)
Koude start : 0 45 sec.
Warme start : 38 sec.
Vanuit stand-by : 10 sec.
Reacquisitie : 100 ms
Updatefrequentie : 1 Hz
Gevoeligheid tracking : -147 dBm
6.4 Communicatie
Communicatieopties : NMEA 0183 (standaard, 4800 baud, naar keuze
max. 19200)
NMEA 2000 (optioneel), Bluetooth (Class 1)
Max. stroomverbruik Bluetooth : 100 mA (extra)
Max. stroomverbruik NMEA2000 : 100 mA (extra)
De communicatieopties zijn niet door de gebruiker achteraf te installeren.
Electronisch kompas / GPS ECGPS

12 100506.01
6.5 Certificeringen
Maritieme apparatuur voor navigatie en radiocommunicatie: conform IEC 60945
EMC: geleide/uitgestraalde emissies: conform IEC 60945-9
geleide/uitgestraalde immuniteit: conform IEC 60945-10
Veiligheid: gevaarlijke spanningen, enz.: conform IEC 60945-12
6.6 NMEA0183-berichten
Deze combinatie van elektronisch kompas en GPS gebruikt de standaardberichten vol-
gens NMEA-0183 maar ook enkele speciale kalibratieopdrachten en -berichten.
Standaardkompasberichten:
$HCHDG,X.X,Y.Y,v,Z.Z,Q*CC<13><10>
Speciale kalibratieopdrachten:
$IIELP,CAL,ECT,STRT*CC<13><10> // Start kalibreren
$IIELP,CAL,ECT,STOP*CC<13><10> // Stop kalibreren
$IIELP,CAL,ECT,DONE*CC<13><10> // Ontvangst bericht “Klaar”
$IIELP,CAL,ECT,FAST*CC<13><10> // Ontvangst bericht “Snel”
$IIELP,CAL,ECT,SLOW*CC<13><10> // Ontvangst bericht “Traag”
$IIELP,CAL,ECT,BUSY*CC<13><10> // Ontvangst bericht “Bezet”
Antwoordbericht:
$IIELP,CAL,ECS,DONE*CC<13><10> // bericht “Klaar”
$IIELP,CAL,ECS,FAST*CC<13><10> // bericht “Snel”
$IIELP,CAL,ECS,SLOW*CC<13><10> // bericht “Traag”
$IIELP,CAL,ECS,STRT*CC<13><10> // bericht “Start”
$IIELP,CAL,ECS,STOP*CC<13><10> // bericht “Stop”
$IIELP,CAL,ECS,SFWR,X.X,Y,Z*CC<13><10> // softwareversie/-type/-interface
X.X: Softwareversie
Y: 1=kompassensor
2=GPS-ontvanger
3 =
gecombineerde kompassensor
/ GPS-ontvanger
Z: 1=NMEA0183
2=NMEA2000
3 =Bluetooth
GPS-berichten:
Deze GPS gebruikt standaard NMEA 0183-berichten.
$GPGGA (niet beschikbaar bij gebruik van NMEA 0183 op 4800 baud)
$GPGSA
$GPRMC
$GPGSV
Electronisch kompas / GPS ECGPS

100506.01 13
Electronisch kompas / GPS ECGPS

14 100506.01
1
ummary of operating functions
........ 15
2.2.1 Button sound ...................... 15
3 Operating .................................... 16
3.1 Switching on .......................... 16
3.2 Main display ........................... 16
3.3 Backlight setting .................... 16
3.4 Off Course Alarm ................... 16
3.5 Select second line message .. 16
4 Menu ............................................ 17
4.1 Menu functions: ..................... 17
4.1.1 Off Course Alarm (C1) ..... 17
4.1.2 Damping (C2) .................. 17
4.1.3 Key sound (C3) ............... 18
4.1.4 Contrast (C4) ................... 18
4.1.5 Baud rate (C5) ................. 18
4.1.6 Calibration (C6) ............... 18
4.1.7 Align (C7) ......................... 19
4.1.8 Variation (C8) ................... 19
4.1.9 UTC offset (C9) ................. 19
4.1.10 Unit select (C10) ............ 20
4.1.11 Trip reset (C11) .............. 20
4.1.12 GPS info (C12) .............. 20
4.2 Service menu.......................... 20
4.2.1 Display info ..................... 20
4.2.2 Compass info .................. 20
4.2.3 Display reset ................... 20
4.2.4 Compass reset ................ 20
4.2.5 Segments check ............. 20
4.2.6 Demo mode ..................... 20
4.2.7 Close menu ..................... 20
5 Installation .................................. 21
5.1 Display instrument ................. 21
5.2 Compass sensor / GPS receiver 21
5.2.1 Choosing a location ........ 21
5.2.2 Mounting .......................... 22
5.3 Connections ............................ 22
5.3.1 Backlight ........................... 22
5.3.2 NMEA0183 echo ..............22
5.3.3 Alarm output .....................22
6 Technical data ............................ 23
6.1 General ................................. 23
6.2 Compass sensor ................... 23
6.3 GPS receiver .......................... 23
6.4 Interfaces ............................... 23
6.5 Certifications .......................... 24
6.6 NMEA0183 messages ........... 24
7 Wiring diagrams ......................... 74
8 Options ...................................... 76
8.1 Switch for backlight ............... 76
8.2 Dimmer for backlight ............. 76
8.3 NMEA 0183 ECHO ................ 76
8.4 Alarm output .......................... 76
8.5 Bluetooth (optional) ............... 77
8.6 NMEA 2000 (optional) ........... 77
9 Overall dimensions .................... 78
Contents
Electronic Compass / GPS ECGPS

100506.01 15
ENGLISH
1 Introduction
This manual contains information about
the operation, calibration and installation
of the electronic compass / GPS.
The following information can be read
from the display:
- Heading on analogue heading bar
- Heading, selectable GPS, magnetic,
true or drift, on 7-segment display.
- Messages, selectable time, date, coor-
dinates, etc., on 11 character display
1.1 Package contents
- ECGPS display instrument
- ECGPS compass/GPS sensor with
bracket
- 2 female 6-pole connectors
- 1 female 4-pole connectors
- Mounting seal
- 4 metal rings + M4 nuts
- Drill Template
2 Working
2.1 The display
1 Horizontal analogue heading bar
2 Large heading display
3 Alarm indicator
4 Buttons
5 Magnetic or True North indicator
6 11 character display
2.2 Summary of operating func-
tions
The unit has four control buttons. These
buttons have the following functions:
press the button once or
more times to change the back-
light intensity or when in a menu
this button works as a reset but-
ton.
press the button to access
the menu.
Use /keys to choose
one of the menus and press
to enter the menu.
If you press the button for
more than 2 seconds you will exit
the menu.
on/off setting for the ‘off
course alarm’ or when in a menu
it works as a button to select a
menu or messages or to change
settings.
select ‘true’ , ‘mag’ , ‘GPS’ or
‘drift’ or when in a menu it works as
a button to select a menu or mes-
sages or to change settings.
The function of a button is activated when
the button is released, both and
buttons have an automatic repeat
function. The buttons have a timeout of 1
minute.
2.2.1 Button sound
On the release of a button you will hear a
key sound.
This sound can be switched of in the menu
‘Key Sound’ (C3).
4
6
1
5
2
3
Electronic Compass / GPS ECGPS

16 100506.01
3 Operating
3.1 Switching on
The instrument must be switched on with
a separate switch (there is no ON/OFF
switch on the instrument itself).
All segments will
be show for 2 sec-
onds. Then this four
horizontal lines are
displayed while the
display is waiting for
compass data.
3.2 Main display (Default mode)
The main display
can show magnetic
heading, true head-
ing, GPS heading
or Drift.
Press the right ar-
row button 2 sec-
onds to change the
display mode.
3.3 Backlight setting
The backlight has 7 settings:
- Level 1
- Level 2
- Level 3
- Level 4
- Level 5
- Remote
- Off
If the remote set-
ting is chosen the
brightness of the
backlight will be set
by a voltage applied
to the backlight pin
on the connector.
See ‘5.3 Connections’ and '8 Options’ for
pin information.
3.4 Off Course Alarm
While in the default
mode, press the
button for 2
seconds to switch
the alarm on or off.
Before you can use
the alarm you have
to enter the alarm
setting.
To enter the alarm setting see '4.1.1 Off
course alarm (ST1)’.
If the alarm is switched on, the alarm in-
dicator is displayed and both limits are
shown at the message line.
3.5 Select second line message
While in default
mode, press the
button to
choose the mes-
sage which will be
shown on the mes-
sage line.
You can choose be-
tween:
1 Time
2 Date
3 Latitude
4 Longitude
5 GPS speed
6 Trip
7 Log
8 GPS course
2 sec.
Electronic Compass / GPS ECGPS

100506.01 17
4 Menu
4.1 Menu functions:
To access the menu you have to press
the button. Every time the /
button is pressed the next/previous
menu item is shown, press to enter
the menu.
- Course Alarm C1
- Damping C2
- Key Sound C3
- Contrast C4
- Baud rate C5
- Calibration C6
- Align C7
- Variation C8
- UTC Offset C9
- Unit select C10
- Trip reset C11
- GPS info C12
- Exit menu C13
4.1.1 Off Course Alarm (C1)
The Off Course Alarm can be set for a
number of degrees off course for both
sides of the course to be steered.
The buzzer inside the unit will sound as
the course is beyond the limits of the off
course setting.
• Press in the default mode to enter
the menu.
• Press again to enter the Course
Alarm Menu (C1).
Use the /buttons to set the
preferred course.
• Press and enter the Portside
alarm boundary with the /
buttons.
This can be set from 2 to 45 degrees
difference.
• Press and enter the Starboard
alarm boundary with the /
buttons.
This can be set from 2 to 45 degrees
difference.
To exit the menu press the button for
2 seconds.
Example:
If the ‘Set course’ is 246, the ‘Limit port-
side’ set to 3 and the ‘Limit starboard’ is
set to 2, then the alarm will sound if the
course change is less than 246-3 = 243
and if the course is more than 246+2 =
248 degrees.
Press the button more than 2 sec-
onds in the default mode to set the Alarm
ON or OFF (see 3.4).
4.1.2 Damping (C2)
Damping allows you to change the damp-
ing level as conditions change. The damp-
ing controls the averaging period over
which the heading is displayed. Damping
does not make the compass less accu-
rate, only slower. Damping levels can be
set from Off and 1 up to 7. In normal con-
ditions level 2 is used.
• Press in the default mode to enter
menu.
• Press the /buttons to select
the Damping menu (C2).
• Press to enter the Damping
menu.
• Use the /buttons to change
the value.
• Press short to enter the select-
ed value and to move back to the
main menu or
• Keep pressed for two seconds
to exit to the default mode.
Electronic Compass / GPS ECGPS
ENGLISH

18 100506.01
4.1.3 Key sound (C3)
The key sound can be switched on or off.
• Press in the default mode to enter
the menu.
• Use the /buttons to select
the Key Sound menu (C3).
• Press to enter the Key Sound
menu.
• Use the /buttons to select
ON or OFF.
• Press to return to the main
menu or
• Keep pressed for two seconds
to exit to the default mode.
4.1.4 Contrast (C4)
The display of the compass/GPS can be
adjusted for different viewing angles.
Contrast level can be set from 0 up to 9.
• Press in the default mode to enter
the menu.
• Use the /buttons to select
the Contrast menu (C4).
• Press to enter the Contrast
menu.
• Use the /buttons to select
the contrast level.
• Press to return to the main
menu or
• Keep pressed for two seconds
to exit to the default mode.
4.1.5 Baud rate (C5)
The compass/GPS has auto baud rate
detect. This menu can be used to send
a preferred baud rate to the connected
compass sensor.
• Press in the default mode to enter
the menu.
• Use the /buttons to select
the Baud rate menu (C5).
• Press to enter the Baud rate
menu (C5).
• Use the /buttons to select
the baud rate.
• Press to return to the main
menu or
• Keep pressed for two seconds
to exit to the default mode..
4.1.6 Calibration (C6)
Magnetic deviation, caused by the vessel
itself, results in incorrect compass read-
ings.
This magnetic deviation can be corrected
by means of the calibration procedure.
• Press in the default mode to enter
the menu.
• Use the /buttons to select
the Calibration menu (C6).
• Press to enter the Calibration
menu.
• Use the /buttons to select
Auto or Manual.
4.1.6.1 Automatic calibration
The electronic compass has an automatic
calibration procedure. Default ‘Auto Cali-
bration’ is ‘ON’.
The compass sensor will calibrate itself
every time two full circles at a constant
speed have been made within 1 to maxi-
mum 4 minutes per circle.
You can switch this function OFF and use
the manual calibration command.
4.1.6.2 Manual calibration
To calibrate the compass sensor you need
a calm day and a clear area. Start turning
your boat in a large circle at a constant
speed. Then select calibrate in the menu
and press and buttons togeth-
Electronic Compass / GPS ECGPS

100506.01 19
er for two seconds. Now the display shows
the heading and ‘In process’. The time to
complete the circle (full 360°) should be at
least 1 up to maximum 4 minutes. When
the calibration was successful the display
shows ‘Done’ and a short beep will be
heard. Circles may be clockwise or coun-
ter clockwise.
If the circle was not in between the time
limits, the old calibration is restored and
you can see on the display if the circle was
too fast or too slow.
Example:
• Start turning the boat in a large circle.
• Go to menu Calibration and select
manual calibration, press .
• Press and together for 2
seconds -> In process.
• Now continue the circle and wait for the
compas display to beep.
The display now shows if the calibration
was completed or not.
4.1.7 Align (C7)
Alignment error adjustment should be
done by taking a couple of known runs
from a chart and compare the magnetic
heading with the magnetic heading shown
on the display. The difference can be com-
pensated by setting the Align value.
• Press in the default mode to enter
the menu.
• Use the /buttons to select
the Align menu (C7).
• Press to enter the Align menu.
• Use the /buttons to set the
offset. This can be set in steps of 0.1°
up to +/- 45°.
• Press to return to the main
menu or
• Keep pressed for two seconds
to exit to the default mode.
4.1.8 Variation (C8)
The Variation can be set to compensate
the magnetic heading so that the display
shows the geograpical (True) heading.
• Press in the default mode to enter
the menu.
• Use the /buttons to select
the Variation menu (C8).
• Press to enter the Variation
menu.
• Use the /buttons to set the
offset. This can be set in steps of 0.1°
up to +/- 45°.
• Press to return to the menu or
• Keep pressed for two seconds
to exit to the default mode.
Use the up button in the default mode to
select True or Mag. Display (see 3.5).
4.1.9 UTC offset (C9)
To have the time displayed for the time
zone your in an offset with respect tot UTC
can be entered.
• Press in the default mode to enter
the menu.
• Use the /buttons to select
the UTC offset menu (C9).
• Press to enter the UTC offset
menu.
• Use the /buttons to set the
time offset. This can be set in hours.
• Press to return to the main
menu or
• Keep pressed for two seconds
to exit to the default mode.
Electronic Compass / GPS ECGPS
ENGLISH

20 100506.01 Electronic Compass / GPS ECGPS
4.1.10 Unit select (C10)
For distances resp. speed you can select
either km resp km/h or miles resp. knots.
• Press in the default mode to enter
the menu.
• Use the /buttons to select
the Unit select menu (C10).
• Press to enter the Unit select
menu.
• Use the /buttons to select
Km or Miles.
• Press to return to the main
menu or
• Keep pressed for two seconds
to exit to the default mode.
4.1.11 Trip reset (C11)
To read the trip distance or to reset trip dis-
tance the Trip reset menu is to be used.
• Press in the default mode to enter
the menu.
• Use the /buttons to select
the Trip reset menu (C11).
• Press to enter the Trip reset
menu.
• Use the /buttons to select
Yes or No.
• Press to return to the main
menu or
• Keep pressed for two seconds
to exit to the default mode.
4.1.12 GPS info (C12)
Select this menu to view the number of
used GPS sattelites.
• Press in the default mode to enter
the menu.
• Use the /buttons to select
the GPS info menu (C12).
• Press to enter the GPS info
menu.
• Press to return to the main
menu or
• Keep pressed for two seconds
to exit to the default mode.
4.2 Service menu
To enter the service menu you have to
press when you switch the power
on.
4.2.1 Display info
Press to view: Display type, interface,
software version.
4.2.2 Compass info
Press to view: Compass type, inter-
face, software version.
4.2.3 Display reset
Press to reset the display to factory
settings, except for the log.
4.2.4 Compass reset
Press to reset the compass to factory
settings.
4.2.5 Segments check
Press to turn on all segments to
check for faulty segments
4.2.6 Demo mode
Press to run demo mode.
4.2.7 Close menu
To exit the service menu press .
Table of contents
Languages: