vita vPad excellence User manual

VITA vPad excellence
VITA – perfect match.
Instructions for use
Date of issue: 2022-01
VITA Farbkommunikation
VITA shade control
VITA shade reproduction
VITA shade communicationVITA shade determination

Dear Customer,
Congratulations and thank you for choosing a VITA vPad excellence for operation and
control of the VITA ceramic firing furnace and the VITA high-speed sintering furnace.
The VITA vPad excellence is a state-of-the-art control unit that complies with all the
international safety standards.
In order to ensure that you can operate the VITA vPad excellence safely and effectively,
please read these instructions for use and all the relevant notices carefully.
These instructions for use must always be kept close to the device. They must be read
and used by all persons who operate, care for and maintain the system.
I wish you every success working with this VITA device.
Your product manager for VITA dental devices and accessories, VITA Zahnfabrik
System/technology info Please note
Explanation of symbols:
Modifiable parameters
Note Process Hotline and support
The control unit for high cost-effectiveness and efficiency

2. First use
2.1 Connections of the VITA VACUMAT 6000 M.................7
2.2 Connections of the VITA VACUMAT 6000 MP................7
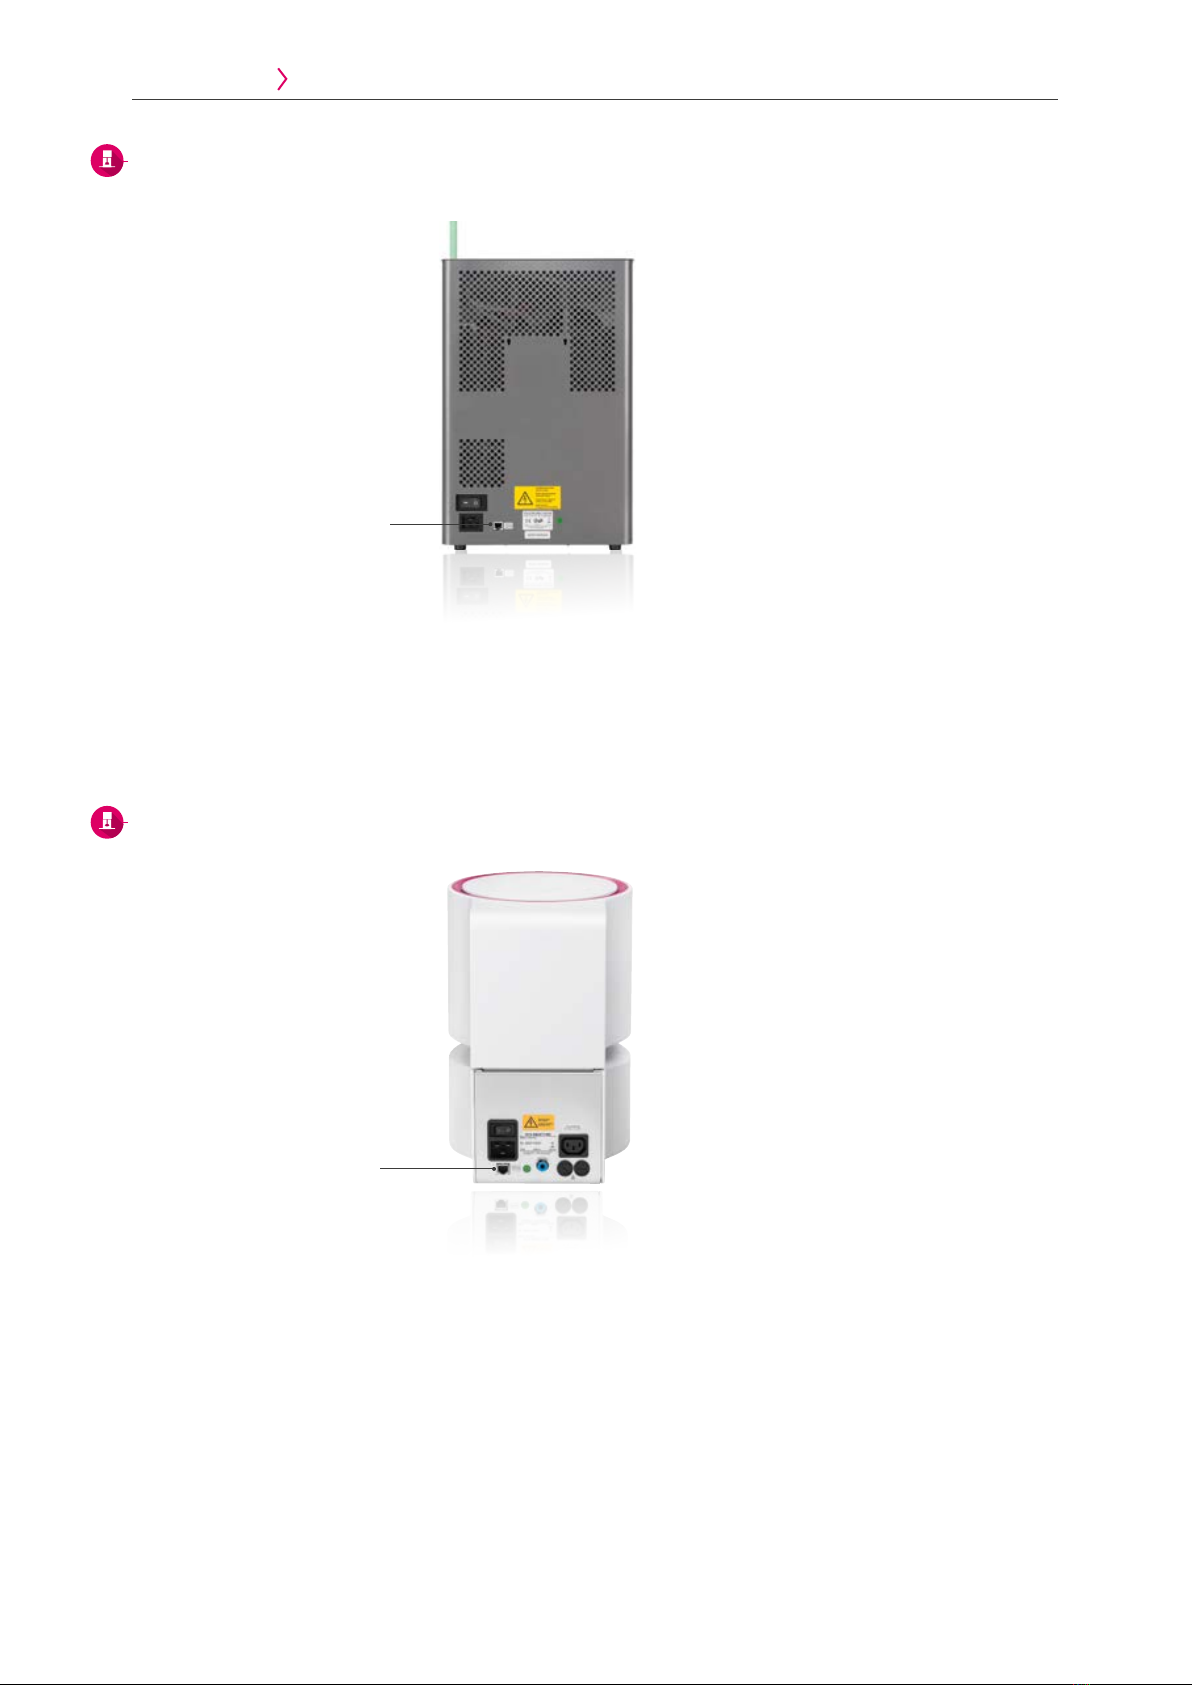
2.3 Connections of the VITA ZYRCOMAT 6100 MS...............8
2.4 Connections to VITA SMART.FIRE .........................8
2.5 Starting up the firing system of a unit......................9
2.6 Starting up the firing system with several units ..............9
2.7 Guided initial setup.....................................9
3. Operation
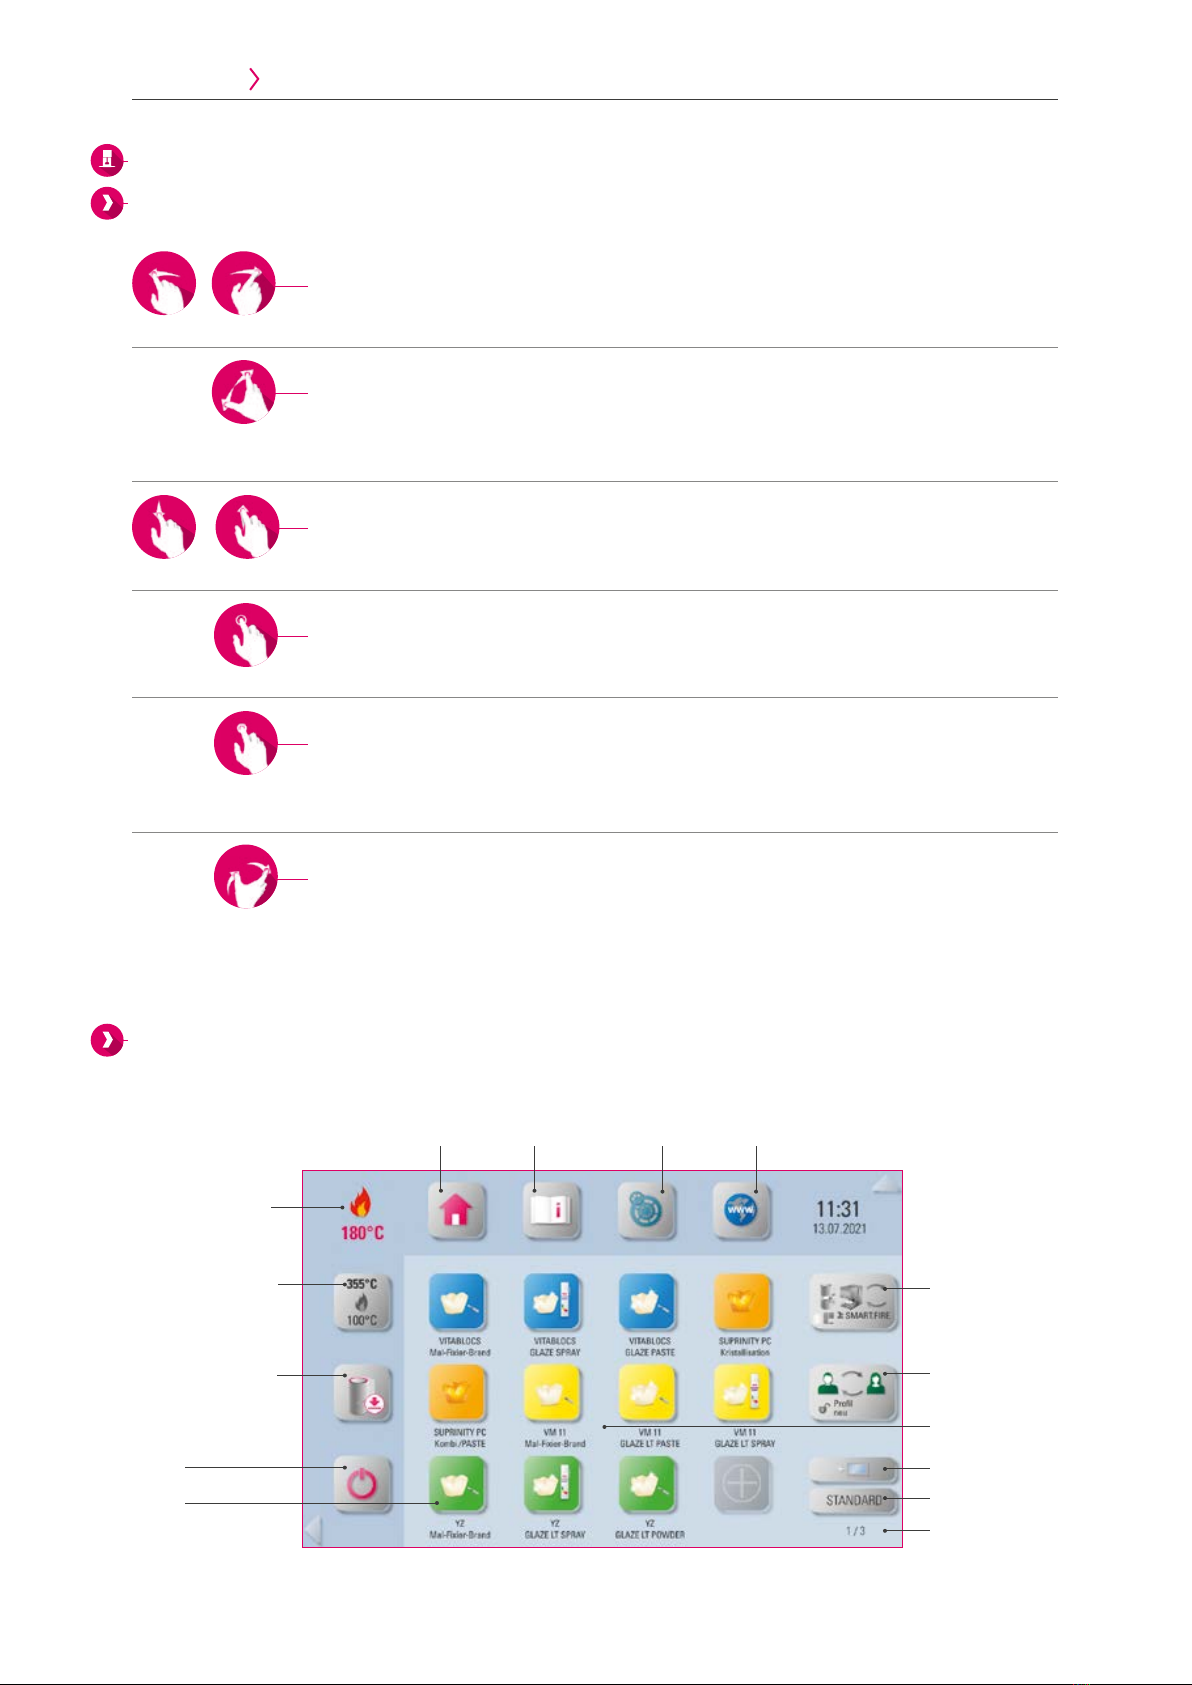
3.1 Gesture controls of the control unit .......................10
3.2 System functions .....................................10
3.3 Power ..............................................11
3.4 Moving the lift plate up and down .......................11
3.5 Stand-by temperature .................................11
3.6 Home...............................................11
3.7 Instructions for use and information ......................12
3.8 Settings.............................................12
3.9 Web browser ........................................12
3.10 Multifurnace overview ................................14
3.11 Changing profile / creating a new profile .................14
3.12 Adding a desktop ....................................15
3.13 Changing a desktop ..................................15
3.14 Adding a firing program ...............................16
4. Settings
4.1 Control unit settings ...................................17
4.2 Multifurnace overview and firing unit settings ..............18
4.3 Device information ....................................21
4.4 Firmware update. . . . . . . . . . . . . . . . . . . . . . . . . . . . . . . . . . . . . . 22
4.5 WLAN configuration setting ............................22
4.6 Abort setting.........................................23
4.7 Temperature standby setting ............................23
4.8 File manager .................................... 24
4.9 SMART.VIEW setting .............................. 29
4.10 Profile setting................................... 30
5. Desktop management
5.1 Desktop editing menu .................................35
5.2 Naming the desktop ...................................36
5.3 Changing the desktop color .............................36
5.4 Storing desktop information ............................37
5.5 Creating a new desktop ...............................37
5.6 Copying a desktop ....................................38
5.7 Cutting a desktop .....................................38
5.8 Pasting a desktop .....................................39
5.9 Deleting a desktop ....................................39
6. Button management
6.1 Button editing menu...................................41
6.2 Multi-selection .......................................41
6.3 Moving a button ......................................42
6.4 Naming a button......................................42
6.5 Configuring a button ..................................43
6.6 Storing button information..............................44
6.7 Creating a new firing program...........................45
6.8 Copying a button .....................................46
6.9 Cutting a button ......................................46
6.10 Pasting a button .....................................47
6.11 Deleting a button ....................................47
7. Firing window
7.1 Firing program: one- and two-step curve ..................49
7.2 Firing program: press curve .............................56
7.3 Firing program: sintering curve ..........................59
7.4 Changes after program start ............................63
8. Technical data / information
8.1 Specification and symbols ..............................65
8.2 Information ..........................................65
8.3 Safety functions ......................................66
8.4 Cleaning the control unit ...............................66
9. Additional information
9.1 Delivery scope of VITA vPad excellence....................67
9.2 VITA system solutions..................................67
9.3 Error messages .......................................68
9.4 VITA warranty and consumer protection...................70
9.5 Update messenger ....................................70
9.6 Spare parts ..........................................70
9.7 Competitor material ...................................70
9.8 Copyright information..................................70
9.9 Hotline and support ...................................71
1. The system
1.1 The control unit........................................6
ADDITIONAL
INFORMATION
TECHNICAL DATA /
INFORMATION FIRING WINDOW BUTTON MANAGEMENT DESKTOP MANAGEMENT SETTINGS OPERATION FIRST USE THE SYSTEM

4

VITA SWITCHBOX II VITA MultiPump
VITA vPad excellence
5
1. The system 2. First use
1. The system
Note:
• You can operate up to four firing units in combination with the vPad excellence.
The following firing unit types can be combined:
Ceramic firing furnace: VITA VACUMAT 6000 M
Combipress furnace VITA VACUMAT 6000 MP
High-speed sintering furnace VITA ZYRCOMAT 6100 MS
or:
Ceramic firing furnace VITA SMART.FIRE
High-speed sintering furnace VITA ZYRCOMAT 6100 MS
• For connecting two to four firing devices to the vPad excellence, you will need a VITA SWITCHBOX II.
• VITA MultiPump: an adaptor for operating one to four VITA vacuum firing devices with a vacuum pump for:
Ceramic firing furnace VITA VACUMAT 6000 M
Combipress furnace VITA VACUMAT 6000 MP
• The VITA vPad excellence is compatible with the VITA SWITCHBOX II and the VITA MultiPump.
VITA vPad excellence system
Multiple furnace operation
ADDITIONAL
INFORMATION
TECHNICAL DATA /
INFORMATION FIRING WINDOW BUTTON MANAGEMENT DESKTOP MANAGEMENT SETTINGS OPERATION FIRST USE THE SYSTEM

6
1. The system 2. First use
1.1 The control unit
SD card slot
10-inch TFT display
Port for connecting cable
USB ports (1+2)
Adjustable stand
Note:
• The VITA vPad excellence has two USB connections for transferring photos, firing programs or device updates.
• Images can be transferred directly from the camera to the VITA vPad via the SD card slot.

7
1. The system 2. First use
Connection for VITA vPad comfort/
VITA vPad excellence or
VITA SWITCHBOX II
Connection for VITA vPad comfort/
VITA vPad excellence or
VITA SWITCHBOX II
2.2 Connections of the VITA VACUMAT 6000 MP
(see also the VITA VACUMAT 6000 MP instructions for use)
2.1 Connection to the VITA VACUMAT 6000 M
(see also the VITA VACUMAT 6000 M instructions for use)
2. First use
1. The system 2. First use 3. Operation
ADDITIONAL
INFORMATION
TECHNICAL DATA /
INFORMATION FIRING WINDOW BUTTON MANAGEMENT DESKTOP MANAGEMENT SETTINGS OPERATION FIRST USE THE SYSTEM

8
2.3 Connection to the VITA ZYRCOMAT 6100 MS
(see also the VITA ZYRCOMAT 6100 MS instructions for use)
2.4 Connection to the VITA SMART.FIRE
(see also the VITA SMART.FIRE instructions for use)
1. The system 2. First use 3. Operation
Connection for the VITA vPad excellence
or VITA SWITCHBOX II
Connection for the VITA vPad comfort/
VITA vPad excellence or
VITA SWITCHBOX II

9
1. The system 2. First use 3. Operation 1. The system 2. First use 3. Operation
2.5 Starting up the firing system of a device
2.6 Starting up the firing system with several devices
2.7 Guided initial setup
• When you switch on the device for the first time, you will be automatically guided through all the important settings.
• Once this initial instruction has been completed, it can be repeated by resetting to the factory settings.
• The device automatically recognizes the connected furnaces.
• In VITA SMART.FIRE mode, only the VITA SMART.FIRE and VITA ZYRCOMAT can be operated together.
• If the device recognizes a VITA SMART.FIRE furnace, the operation of the VITA VACUMAT 6000 M and VITA VACUMAT 6000 MP
is not possible.
VITA SWITCHBOX II
• When starting up two or more VITA devices with one VITA vPad excellence and the VITA SWITCHBOX II, pay attention to the
numerically identified connections of the VITA SWITCHBOX II.
• Pos. 1 of the VITA SWITCHBOX II ensures the power supply of the vPad excellence and must always be connected to a firing
device that is switched on.
VITA MultiPump
• To supply up to four firing devices (VITA VACUMAT 6000 M or VITA VACUMAT 6000 MP) at the same time with one VITA vacuum
pump use the VITA MultiPump.
Note:
• Please also refer to the installation and startup instructions in the VITA VACUMAT 6000 M/
VITA VACUMAT 6000 MP/VITA ZYRCOMAT 6100 MS or VITA SMART.FIRE instructions for use.
• Connect the supplied connecting cable with the VITA vPad excellence and the VITA VACUMAT 6000 M/
VITA VACUMAT 6000 MP/VITA ZYRCOMAT 6100 MS or VITA SMART.FIRE.
ADDITIONAL
INFORMATION
TECHNICAL DATA /
INFORMATION FIRING WINDOW BUTTON MANAGEMENT DESKTOP MANAGEMENT SETTINGS OPERATION FIRST USE THE SYSTEM

10
3.2 System functions
2. First use 3. Operation 4. Settings
3. Operation
3.1 Gesture controls of the control unit
Swiping
To go to the next desktop, swipe right or left on the desktop.
Zooming
You can enlarge or reduce photos or PDFs by using two fingers to expand or contract the items.
Scrolling
Swipe downwards or upwards to move between pages in a PDF.
Brief tap
By briefly tapping a firing program, for example, you open the firing window.
Long tap
With a long tap, you will call up the additional function such as the desktop editing menu
or the button editing menu.
Rotating
Photos can be rotated by 90°.
Instructions
for use SettingsHome Web browser
Desktop change
Number of desktops
Profile change
New desktop
Desktop
Multifurnace overview
Power
Button
Moving the lift plate
up and down
Standby temperature
Current firing chamber
temperature

11
2. First use 3. Operation 4. Settings 2. First use 3. Operation 4. Settings
3.3 Power
Tip:
• Pressing the button for at least two seconds shuts down the vPad
and all connected furnaces.
• As long as a firing program is still active, the system cannot be
shut down.
• It is switched on again using the power button on the furnace.
3.4 Moving the lift plate up and down
Tip:
• By briefly tapping on the lift plate button, you move the lift plate
to 100% up or down.
With a long tap on the button, the lift plate is moved gradually
up or down.
• If you are no longer using the firing device, for example,
please close the furnace to prevent dust or moisture buildup
in the combustion chamber.
VITA AntiCon.
If the firing unit is switched off for an extended period of time, the firing chamber is heated for five minutes while slightly open
the next time the firing unit is switched on and the standby temperature is activated. This allows the condensed water on the
insulation to evaporate.
3.5 Standby temperature
---°C
---°C
Tip:
• When the temperature button is briefly tapped, the firing chamber is
closed and the firing chamber temperature rises to the individually
adjustable standby temperature. With a long tap on the button,
the firing chamber is closed and the firing chamber temperature is
preheated to the permanently set standby temperature (this cannot
be changed). Once the standby temperature has been reached,
it should be held for 20 minutes. The firing unit will then be ready for
firing processes.
3.6 Home
Tip:
• The Home button takes you to the start page.
The start page shows you the first screen of the selected user.
ADDITIONAL
INFORMATION
TECHNICAL DATA /
INFORMATION FIRING WINDOW BUTTON MANAGEMENT DESKTOP MANAGEMENT SETTINGS OPERATION FIRST USE THE SYSTEM

2
2
2
1
1
1
12
2. First use 3. Operation 4. Settings
3.7 Instructions for use and information
3.8 Settings
3.9 Web browser
Note:
• Here you can find the instructions for use for VITA devices, the instructions for use for VITA materials
and additional information.
Note:
• You have the option of making various individual settings.
• You can find detailed information on setting up your device in Chapter 4 SETTINGS.
Select the desired file.
Select the respective setting option.
This takes you directly to the
homepage of VITA Zahnfabrik.
Tap the icon.
Tap the icon.
Tap the icon.
• You can call up webpages on the internet using the web browser.
• Information from the internet can be viewed directly in the vPad excellence.

3
6
21
4
7
5
13
2. First use 3. Operation 4. Settings 2. First use 3. Operation 4. Settings
Example: Call up webpage and set bookmark
Click on address line. Delete address line.
Name bookmarks.
Call up web browser.
Enter target address and press Enter.
Generated link on the desktop.
Set bookmarks.
Address line
Update
Text field
Homepage
Cancel Bookmarks
Back
Next
ADDITIONAL
INFORMATION
TECHNICAL DATA /
INFORMATION FIRING WINDOW BUTTON MANAGEMENT DESKTOP MANAGEMENT SETTINGS OPERATION FIRST USE THE SYSTEM

21
12
14
2. First use 3. Operation 4. Settings
3.10 Multifurnace overview
Select the desired furnace.Tap the icon.
Note:
• Here you can see all firing devices that you can control using the VITA vPad excellence.
• Change firing device: To change the firing device, tap on the desired furnace. This will then be active and can be used.
The active device is displayed in the main menu in the Multifurnace overview button.
• No firing active: If you press the firing device button, you will return to the overview of the firing devices.
• Firing active: If you press the firing device button, you will go directly to the selected firing program.
Note:
• Here you will find the profiles created in Profile Management. In this overview, you can change the profile.
• The VITA profile contains all VITA firing programs. These firing programs are not individually adjustable.
• You can create an individual profile by using the "+" symbol. You can graphically customize this profile
and select the required firing programs.
• A long press on the profile takes you to the settings bar to edit the profile.
You can find more information on this in 4.10 Profile settings.
Active profile
Remaining
firing program time
Firing device
being used
Device status
Selected
firing program
3.11 Changing a profile / creating a new profile
Select "Profile change.” Select the desired profile.

2
2
1
1
15
2. First use 3. Operation 4. Settings 2. First use 3. Operation 4. Settings
3.12 Adding a desktop
3.13 Changing the desktop
New desktop.
Select the desired desktop.
Tap the icon.
Tap the icon.
Note:
• Pressing the New Desktop button gives you a new desktop view.
• You can find detailed information on setting up your desktop in Chapter 5 Desktop management.
Note:
• The button shows you the name of the current desktop.
• The Change Desktop button makes it possible to select another desktop.
• Clicking the Change Desktop button gives you an overview of available desktops.
• Select the desired desktop directly.
• You can scroll through the desktops by swiping up or down.
• You can see the total number of desktops and your current desktop in the lower right area.
• A long press allows you to change the arrangement of the desktop and rearrange the desktop.
ADDITIONAL
INFORMATION
TECHNICAL DATA /
INFORMATION FIRING WINDOW BUTTON MANAGEMENT DESKTOP MANAGEMENT SETTINGS OPERATION FIRST USE THE SYSTEM

2
5
6
3
7
1
4
16
2. First use 3. Operation 4. Settings
Note:
• You can add a firing program by pressing the "+" button.
• You can select various material groups with all available firing programs by placing a check mark
beside the respective material group.
• If you only want to select individual firing programs of the material group, then press the button
for the desired material to go to the overview of available firing programs.
• Then select the desired firing programs individually.
• You can create an individual firing program by pressing the "New Firing Program" button.
You then have an overview of firing curves that can be individually selected.
3.14 Adding a firing program
Overview of available materials.
Confirm your selection.
Create individual firing program.
Select the required material.
Select a firing curve.
Press the "+" button.
Select the desired firing program.

2
1
17
2. First use 3. Operation 4. Settings 3. Operation 4. Settings 5. Desktop management
4. Settings
Note:
• Here you find information and setting options for the firing / sintering unit and the control unit.
Note:
• Brightness: You can adjust the brightness of the display in five levels.
• Loudness: You can adjust the volume in five levels.
• Touchtone: You can turn the touchtone on and off.
• Restore settings: Here all individual profiles and desktops can be permanently deleted and the factory settings
can be restored. It is recommended that you save the profiles and desktops beforehand on a USB drive. After the reset,
the guided initial setup is performed again.
• Screen saver: Here you can configure and activate the screen saver.
• Contact information: Here you will find the data protection declaration, declaration for the transmission of VITA offers,
as well as the contact information form.
• Data settings: Date and time can be changed.
• Country settings: Temperature unit, time and date format and language can be set.
• System backup: Here you can perform a system backup on a USB drive or download an earlier backup from a USB drive.
• System protection: A password for the settings can be saved. If the "Settings" button is tapped again, a password
query appears.
• Delete web cache: Entered web passwords, cache and cookies can be deleted.
4.1 Control unit settings
Select "Control unit settings." Overview of setting possibilities
on the control element.
Multifurnace overview/
Firing unit
Program stop
Device information
Temperature standby
Firmware update
File Manager
WLAN
configuration
SMART.VIEW
Control unit
ADDITIONAL
INFORMATION
TECHNICAL DATA /
INFORMATION FIRING WINDOW BUTTON MANAGEMENT DESKTOP MANAGEMENT SETTINGS OPERATION FIRST USE THE SYSTEM

2
2
1
1
18
3. Operation 4. Settings 5. Desktop management
4.2 Multifurnace overview and firing unit settings
Firing unit settings
Note:
• Identification of the firing unit: If the button is tapped, the light signal for the associated device lights up.
The firing unit can be identified.
• Device identification: With a brief tap on the firing device button, the color identification of the firing unit can be changed.
• Device name: With a brief tap of the button, the name of the firing unit can be changed.
• Change position of the firing devices: You can change the position of the firing devices by tapping the button of the
firing device to be moved until it becomes transparent. You can then move this to the desired position.
Note:
Temperature calibration for VITA ZYRCOMAT 6100 MS
• To calibrate the temperature, please only use the VITA temperature calibration set provided by VITA
and follow the instructions in the instructions for use.
Cleaning firing in the VITA ZYRCOMAT 6100 MS
• After about 300 operating hours, the message to conduct a cleaning firing is displayed.
• Press the "Execute" button to display the program and the "Start" button to activate it. Conducting the cleaning program
is absolutely necessary if the oxide layer of the heating elements show flaking.
• Cleaning firing also acts as regeneration firing for the heating rods, as it restores the protective glass coating where
necessary (please observe the "Sintering chamber cleaning program" section of the sintering furnace instructions for
use for this process). If the oxide layer shows signs of severe flaking, or still shows signs of flaking after cleaning firing,
repeat the cleaning firing process. We recommend continual inspection of the coating on the heating elements for flaking.
If necessary, run the cleaning program before the system reaches the 300 operating hours.
• You can also start cleaning firing manually. To do this, press the "Execute" button and start the firing process.
Select "Silver Test.”
Setting options in the device display.
Firing unit identification
Colored device identification
Device name
Firing unit settings
Select "Multifurnace overview
and firing unit."
Select "Firing unit setting."

12
19
3. Operation 4. Settings 5. Desktop management 3. Operation 4. Settings 5. Desktop management
Temperature calibration using the VITA VACUMAT 6000 M / MP Silver Test:
• With the Silver Test program and the VITA Silver Test Set, you can test the temperature in the firing chamber
and readjust within the range of plus / minus 40 °C.
• During a calibration, please carefully follow all instructions on performing the test with the silver probe
(instructions in the Silver Test Set).
• A preset program is available for the calibration of the combustion chamber temperature.
To Siver Test the firing chamber temperature using the silver probe, two program sequences are necessary:
The first program sequence must be performed at 955 °C (specified in the program). The silver may then be thickened
only slightly.
The second program sequence must be performed at 965 °C (temperature value must be entered). After this program
sequence, the silver must be melted into a ball. Deviations within the range of plus / minus 40°C may be entered.
• Result of the Silver Test:
If the temperature is too low, correct the entry with the minus sign.
If the temperature is too high, enter the corrected value without a sign (automatic plus).
The correction value corresponds to about 1°C and is entered in the input field for temperature adjustment (offset).
Cleaning firing in the VITA VACUMAT 6000 M/MP
• After about 100 operating hours, the message to conduct a cleaning firing is displayed. With this program,
the firing chamber is heated up and contaminants can evaporate from the slightly opened firing chamber.
We recommend carrying this firing process out regularly.
• You can stop the cleaning firing process at any time.
• You can also start cleaning firing manually. To do this, press the "Execute" button and start the firing.
Sound settings
Note:
• Here, various sound signals can be set: program start, program end, alarm / service notice.
There are six freely selectable sound patterns available for these three sound signals.
• The tones can be tested using the "Program start" and "Program end" buttons.
Select "Firing unit setting." Select "Tone settings."
ADDITIONAL
INFORMATION
TECHNICAL DATA /
INFORMATION FIRING WINDOW BUTTON MANAGEMENT DESKTOP MANAGEMENT SETTINGS OPERATION FIRST USE THE SYSTEM

2
2
2
1
1
1
20
3. Operation 4. Settings 5. Desktop management
Standby temperature
Leak test
Lift speed
Note:
• Here, you can change the standby temperature (Standby Temperature).
Note:
• This function tests the vacuum tightness of the furnace.
Note:
• Here you can adjust the lift speed in five levels.
Select "Firing unit setting."
Set the standby temperature.
Press Leak Test
Adjust lift speed
Table of contents