VOGELS SoundMount NEXT 8365 User manual

NEXT 8365 INSTALLATION AND OPERATION MANUAL

2
EN Installation and operation manual.................................................................... 3
NL Handleiding voor installatie en bediening ........................................................11

33
EN CONTENTS
1 IDENTIFYING THE PARTS........................................................................................................................................... 4
1.1 Soundbar...............................................................................................................................................................................4
1.2 Wirele subwoofer ................................................................................................................................................................5
1.3 Remote Control.....................................................................................................................................................................5
2 PREPARATIONS ....................................................................................................................................................... 6
2.1 Preparing the Remote Control ............................................................................................................................................6
2.2 Using the Remote Control for the fir time..........................................................................................................................6
2.3 Replacing the Remote Control baery ..............................................................................................................................6
3 CONNECTIONS ....................................................................................................................................................... 7
3.1 Standard HDMI (ARC) conneion ......................................................................................................................................7
3.2 MP3 Link conneion.............................................................................................................................................................7
3.3 Power conneion .................................................................................................................................................................7
3.4 Pairing the Wirele subwoofer with the Soundbar.............................................................................................................8
Automatic pairing.................................................................................................................................................................8
Manual pairing......................................................................................................................................................................8
4 GENERAL OPERATION.............................................................................................................................................. 8
4.1 Using the remote control of the TV ......................................................................................................................................8
4.2 Using the supplied (Soundbar) remote control..................................................................................................................8
Standby / ON ........................................................................................................................................................................8
Seleing modes....................................................................................................................................................................9
Adjuing Super Ba Boo....................................................................................................................................................9
Adjuing the treble level ......................................................................................................................................................9
Adjuing the volume............................................................................................................................................................9
Seleing the equalizer .........................................................................................................................................................9
Adjuing the brightne of the display................................................................................................................................9
Seing the Sleep Timer .........................................................................................................................................................9
5 AUX / MP3 LINK / OPTICAL / HDMI OPERATION...................................................................................................... 9
6 PLAY WITH YOUR BLUETOOTH DEVICE ..................................................................................................................... 9
6.1 Pair Bluetooth enabled devices manually .........................................................................................................................9
6.2 Conne your device to the Soundbar via Bluetooth........................................................................................................9
6.3 Lien to music from your Bluetooth device ...................................................................................................................... 10
7 WARNINGS AND DISCLAIMERS...............................................................................................................................10
7.1 Precautions concerning baeries..................................................................................................................................... 10
8 SPECIFICATIONS ....................................................................................................................................................10
9 SUPPLIED ACCESSORIES.........................................................................................................................................10

4
1. IDENTIFYING THE PARTS
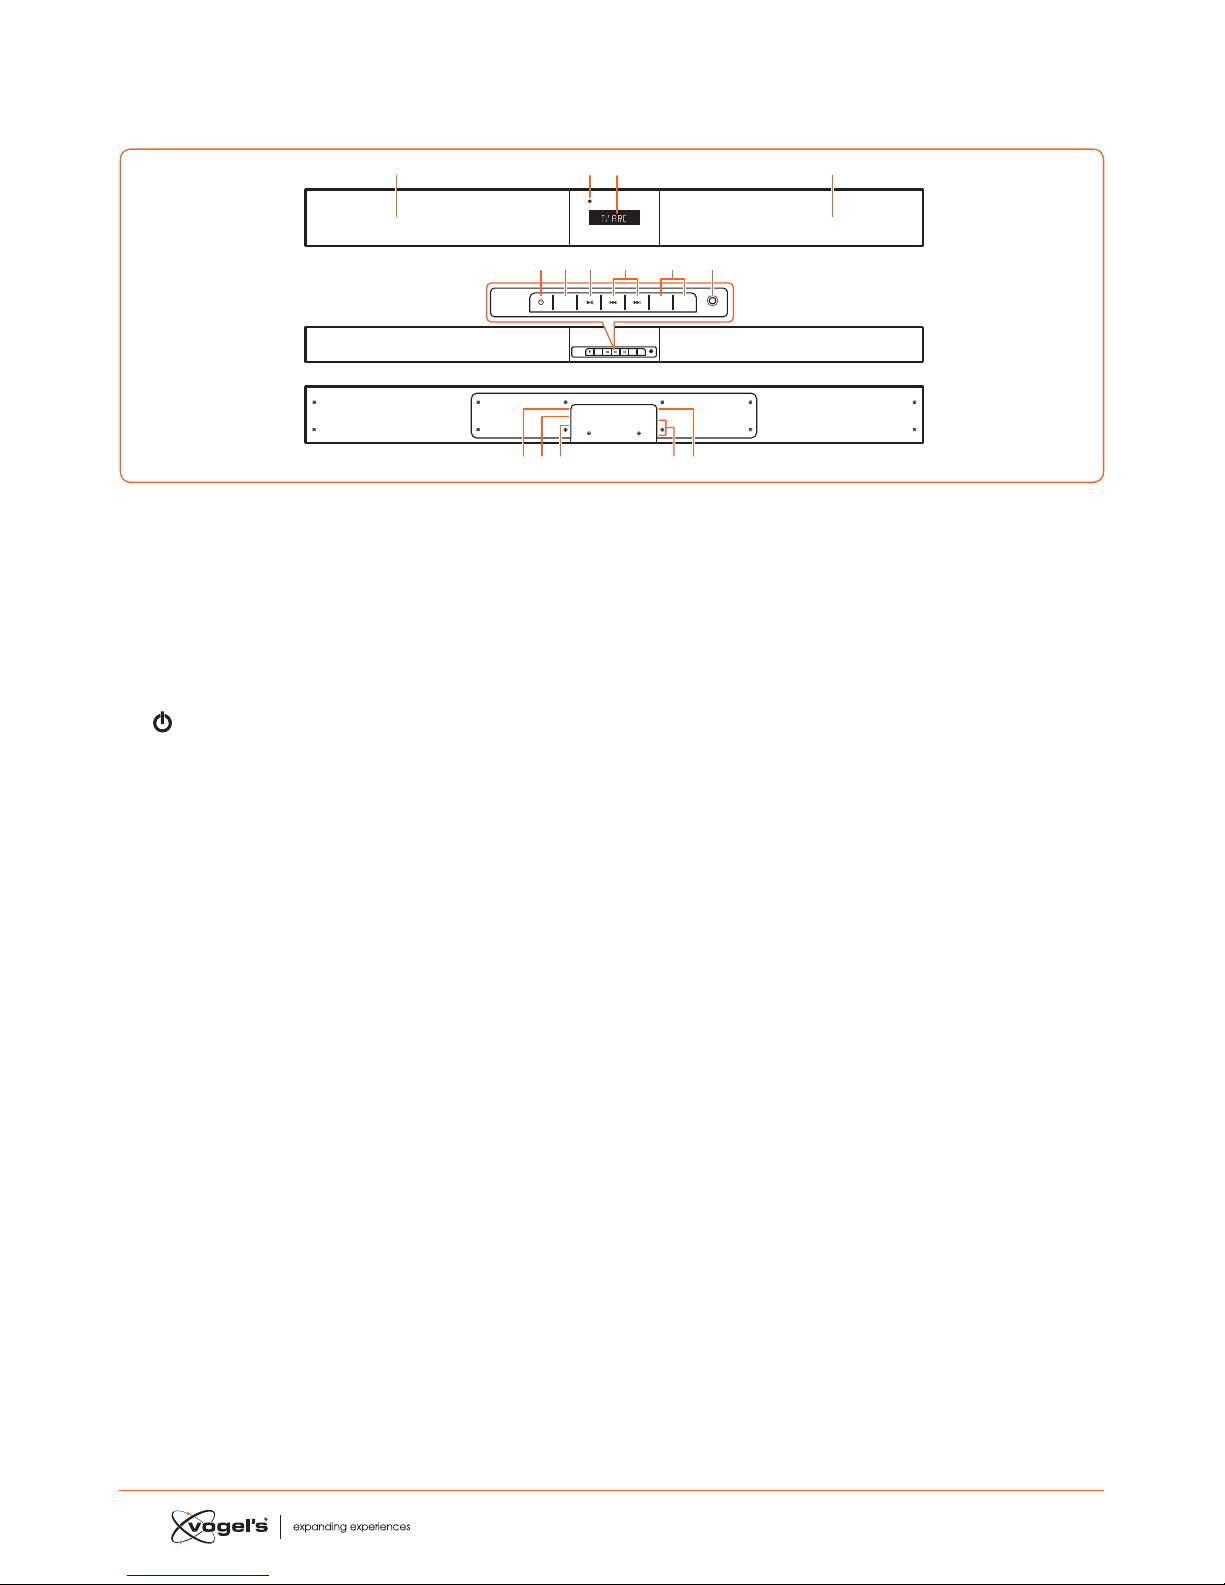
1.1 Soundbar
1 Speakers
2 Display / Remote Control Sensor
- Shows the current atus.
- Receives the signal from the remote control.
3 Standby Indicator
Lights up red when the Soundbar is in ANDBY mode.
4
Switches the Soundbar between ON and ANDBY
mode.
5 SOURCE
Switches between BT (Bluetooth), OPT (OPTICAL), AUX,
HDMI 1, HDMI 2, HDMI ARC and MP3 LINK modes.
6 B;
Play/pause/resume playback in Bluetooth mode.
7 S / T
Skip to previous track/skip to next track in Bluetooth
mode.
8 VOL+ / VOL-
Increase/decrease the volume level.
9 MP3 LINK socket
Connes to an external audio device.
10 AC ~ socket
For conneing the power cord.
11 OPTICAL socket
12 AUX socket
13 HDMI 1/HDMI 2 sockets
14 HDMI OUT TV ARC socket
HDMI output (ARC).
SOURCE
MP3LINK
VOL– VOL+
AC
OPTICAL
AUX
HDMI IN 2
HDMI IN 1
HDMI OUT
TV(ARC)
SOURCE
MP3 LINK
VOL– VOL+
123
4
10 12 13 1411
567 9
1
8
4
Front view
Top view
Rear view

5
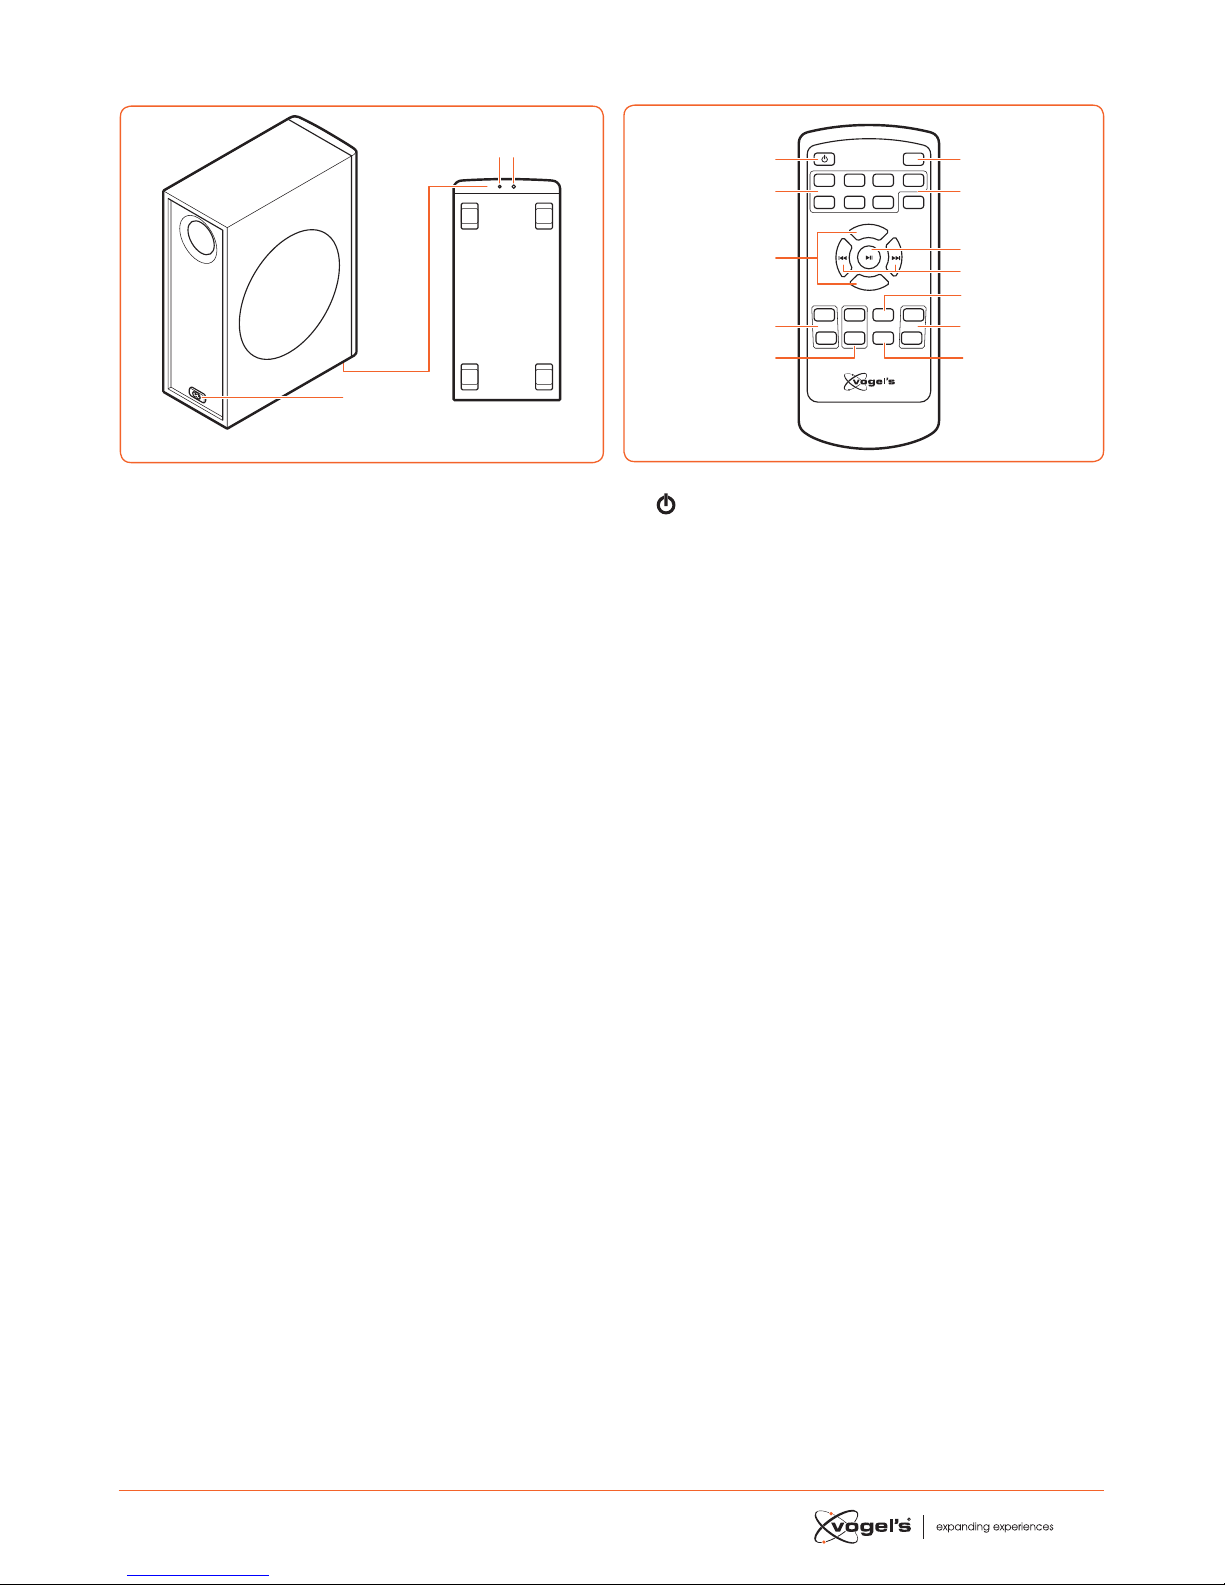
1.2 Wireless subwoofer
1
Wirelesspairing
2 3
1 AC ~ inlet
Connes to the power cord.
2 Indicator
Lights up when pairing is succeful.
3 Wireless pairing button
Connes to the Soundbar.
1.3 Remote Control
VOL+
VOL–
BASS+ TREB+ EQ DIM+
HDMI 1HDMI 2 ARC BT
OPT AUXMP3 PAIR
MUTE
BASS– TREB– SLEEP DIM–
1
2
3
4
5
6
7
8
9
11
10
12
1
Switches the Soundbar between ON and ANDBY
mode.
2 SOURCE
Sele the desired play mode.
3 VOL+ / VOL-
Increase/decrease the volume level.
4 BASS+ / BASS-
Adju the ba level.
5 TREB+ / TREB-
Adju the treble level.
6 MUTE
Mutes or resumes the sound.
7 PAIR
- Aivates the pairing funion in Bluetooth mode.
- Disconnes the exiing paired Bluetooth device.
8 B ;
Play/pause/resume playback in Bluetooth mode.
9 S / T
Skip to previous track/skip to next track in Bluetooth
mode.
10 EQ
Seles the preset equalizer.
11 DIM+ / DIM-
Adjus display brightne.
12 SLEEP
Sets the sleep timer.
6
2. PREPARATIONS
2.1 Preparing the Remote Control
The provided Remote Control allows the Soundbar to be
operated from a diance.
• Even if the Remote Control is operated within the
eeive range (6m), remote control operation may
be impoible if there are any obacles between the
Soundbar and the remote control.
• If the Remote Control is operated near other produs
which generate infrared rays, or if other remote control
devices using infra-red rays are used near the
Soundbar, it may operate incorrely. Conversely, the
other produs may operate incorrely.
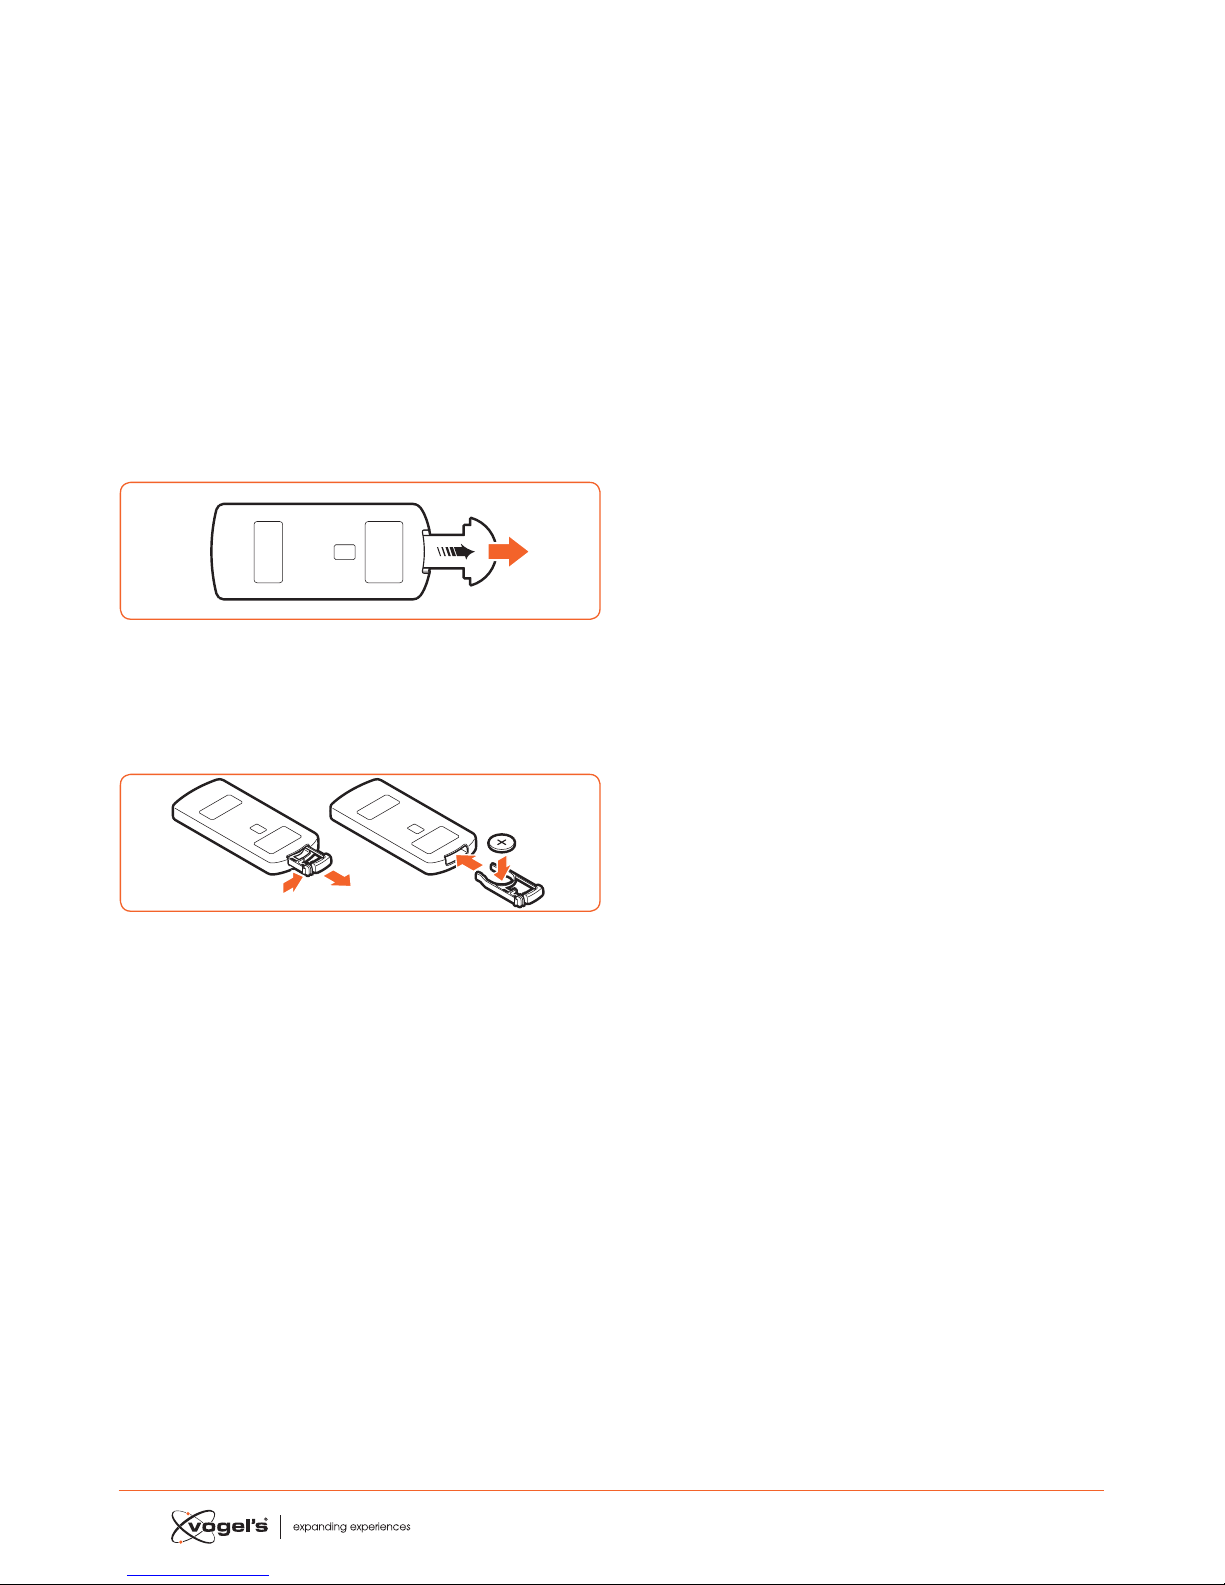
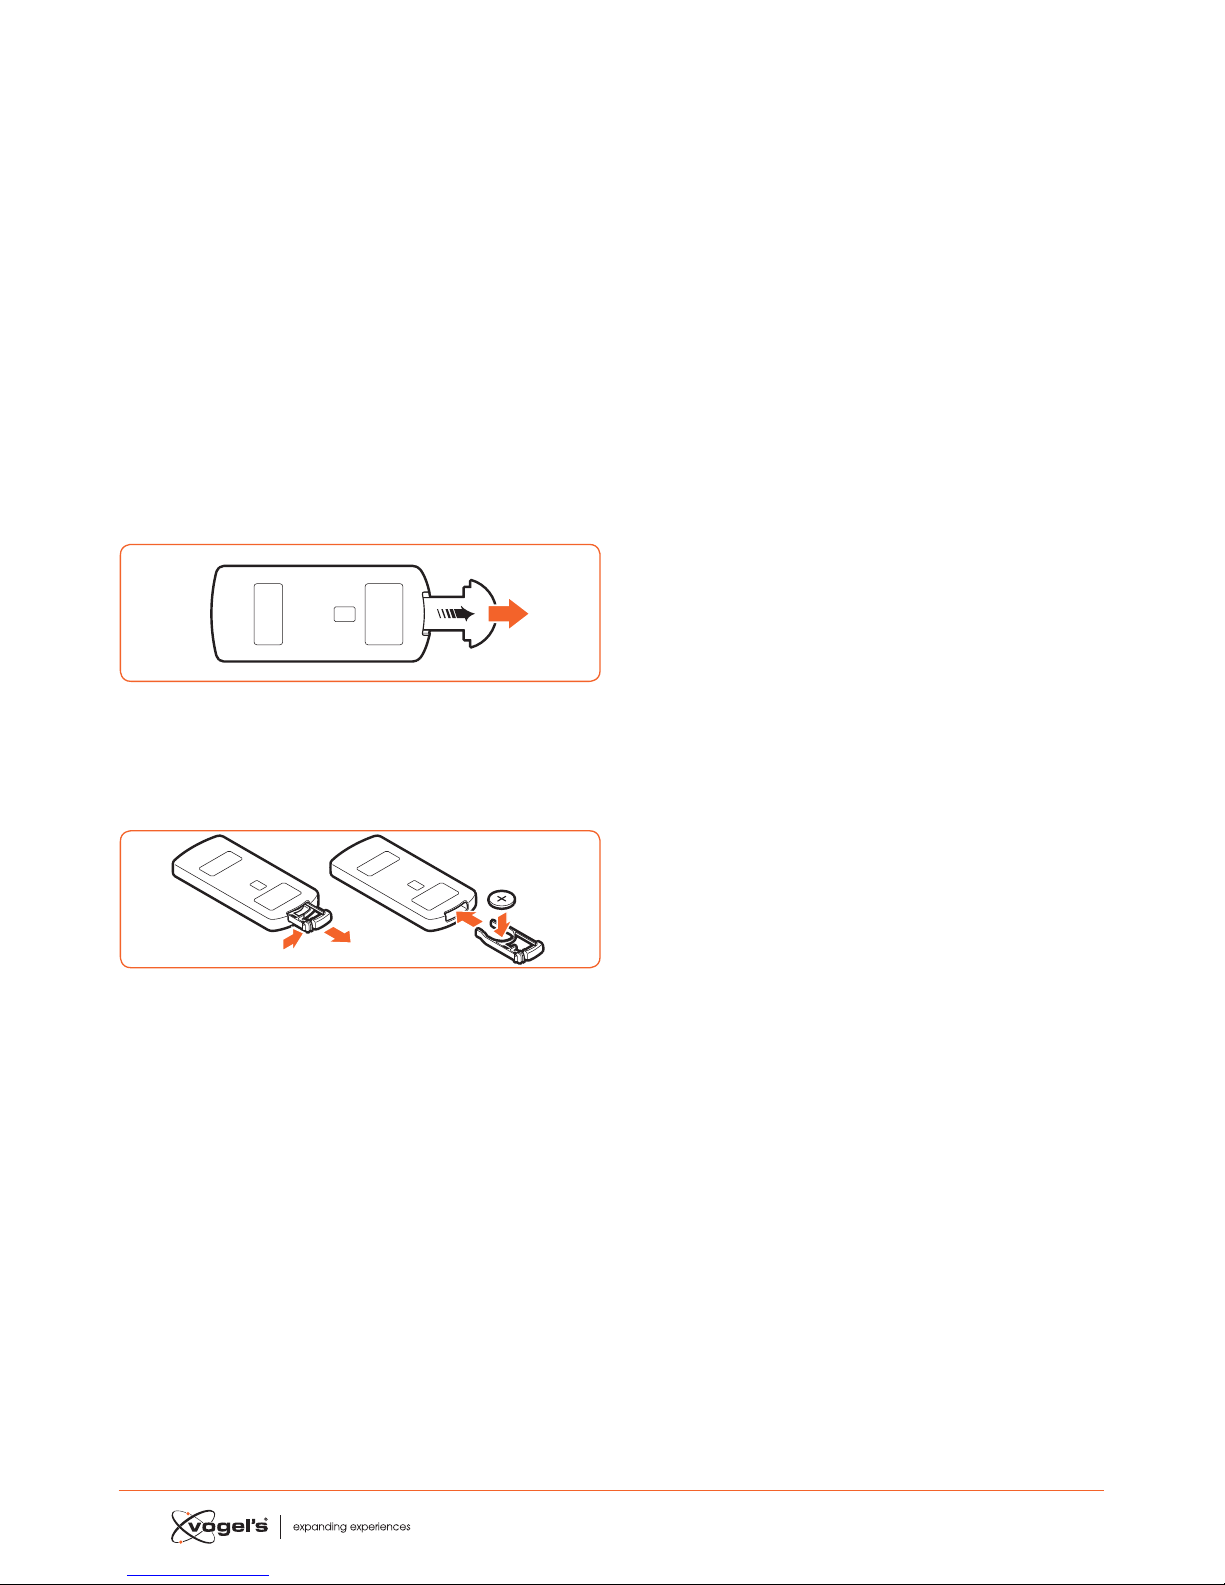
2.2 Using the Remote Control for the first time
The Soundbar has a pre-inalled lithium CR2025 baery.
• Remove the proteive tab to aivate the Remote
Control baery.
2.3 Replacing the Remote Control battery
1
2
3
1Pull out the baery tray and remove the old baery.
2Place a new CR2025 baery into the baery tray with
corre polarity (+/-) as indicated.
3Insert the baery tray back into the slot.
7
3. CONNECTIONS
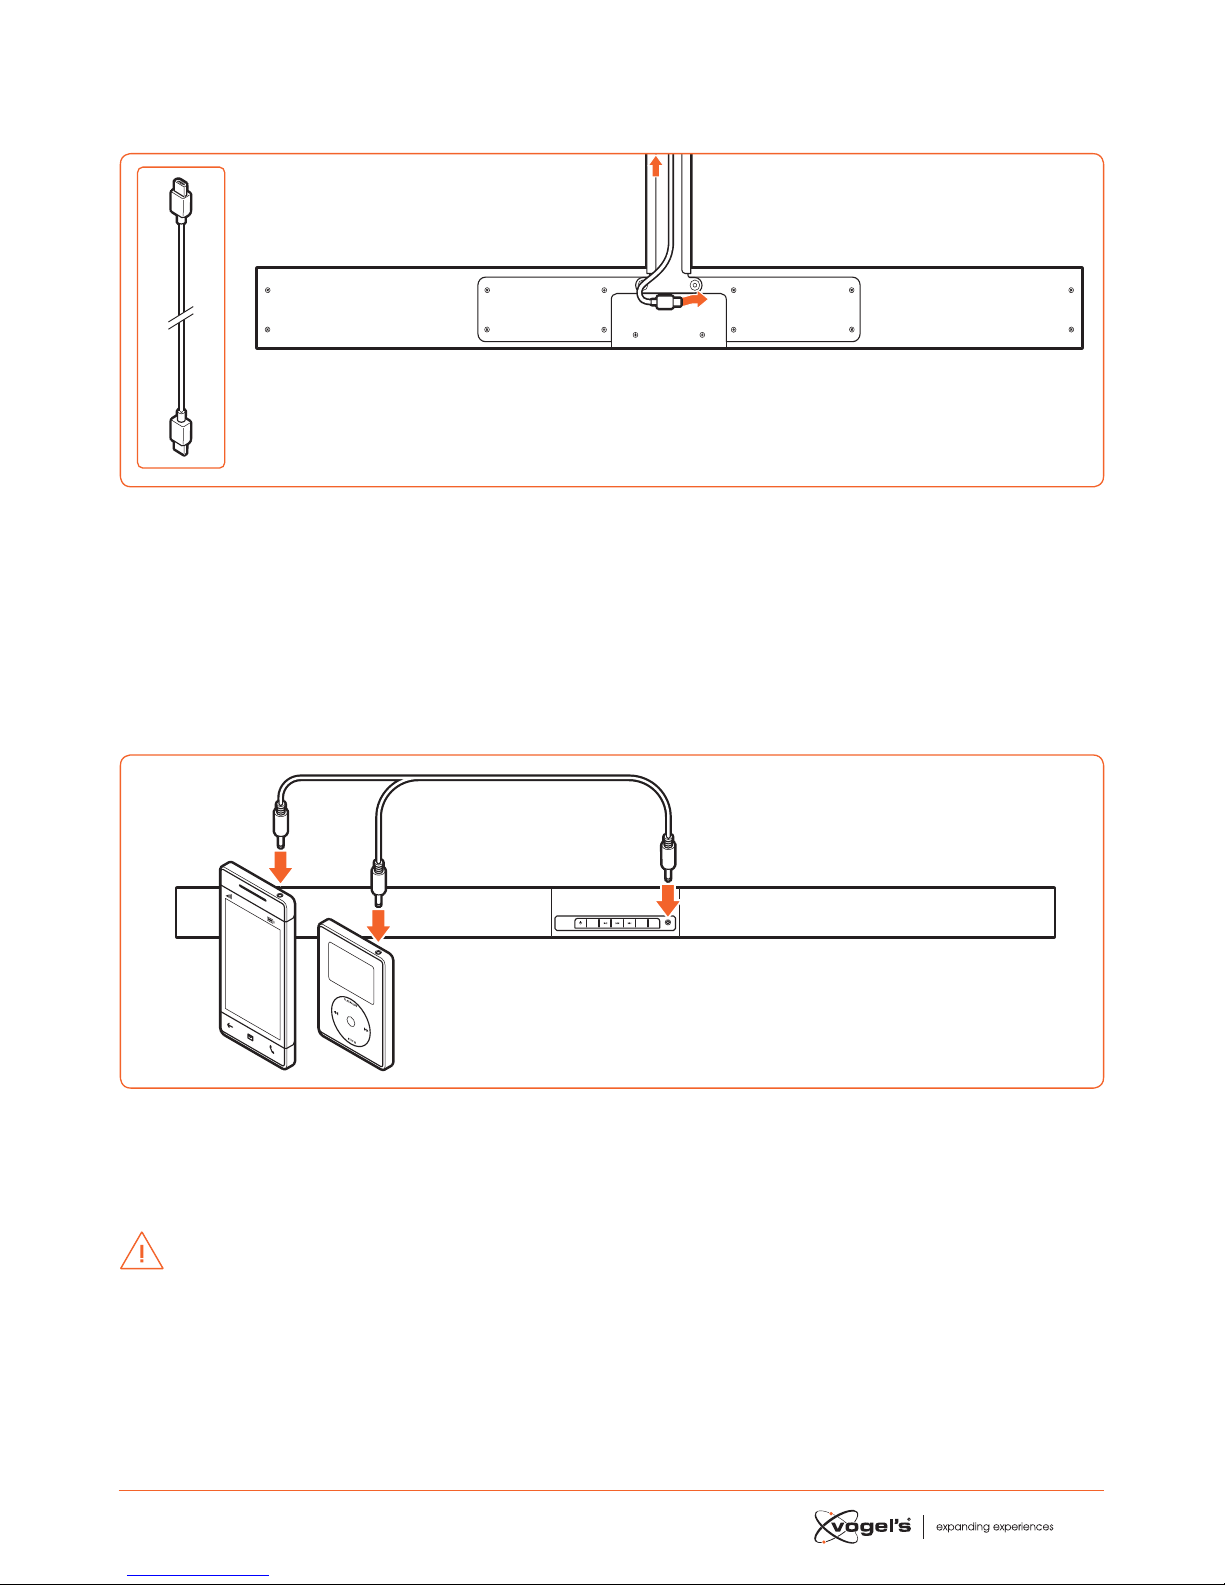
3.1 Standard HDMI (ARC) connection
AC
OPTICAL
AUX
HDMI IN 2
HDMI IN 1
HDMI OUT
TV(ARC)
TV
• The SoundMount configuration is based on a HDMI conneion between the HDMI ARC socket of the Soundbar and
the HDMI ARC socket of the TV.
Note!
ARC = Audio Return Channel.
• In case the TV is not equipped with an HDMI ARC socket, you can conne Soundbar and TV with an optical cable
(not included).
3.2 MP3 Link connection
SOURCE
MP3 LINK
VOL– VOL+
MP3
Player
•Conne a 3.5mm to 3.5mm audio cable (not included) to the MP3 LINK socket (9) on the Soundbar and the audio
output socket on an external audio device. For example an MP3 player, iPhone, etc.
3.3 Power connection
CAUTION!
•Risk of produ damage! Make sure that the power supply voltage corresponds to the voltage printed on the back of
the Soundbar and the subwoofer.
•Before conneing the AC power cord, make sure that you have completed all other conneions.

8
3.4 Pairing the Wireless subwoofer with the Soundbar
Ex faory the Wirele subwoofer and Soundbar are paired.
Automatic pairing
1Plug the dedicated SoundMount power cable into the
Soundbar.
2Plug the subwoofer into the mains sockets.
3Pre the buon on the Soundbar or on the remote
control to switch the Soundbar ON.
> The subwoofer and soundbar will automatically pair
within 30 seconds.
> When the subwoofer is pairing with the soundbar, the
Indicator will flash rapidly.
> When the subwoofer is paired with the soundbar, the
Indicator will light up conantly.
> During ANDBY mode, the subwoofer Indicator will
go o and flash slowly.
Manual pairing
1Plug the dedicated SoundMount power cable into the
Soundbar.
2Plug the subwoofer into the mains sockets.
3Make sure that the Soundbar is in ANDBY mode.
4Pre and hold the Wirele pairing buon on the
boom of the subwoofer for a few seconds.
> The subwoofer will enter the pairing mode and the
Indicator will blink quickly.
5Pre the buon on the Soundbar or on the remote
control to switch the Soundbar ON.
> Aer the wirele conneion succeeds, the Indicator
will light up conantly.
> If the Indicator ill blinks or does not blink at all, the
wirele conneion has failed.
•Unplug the cable of the subwoofer.
•Reconne the main cable aer 3 minutes.
•Repeat eps 1 - 5.
Notes!
•If the wirele conneion fails again, check if there is a
confli or rong interference (for example, interference
from an eleronic device) around your location.
Remove these conflis or rong interferences and
repeat the above procedures.
•The subwoofer mu be within 6m of the Soundbar in an
open area.
•If the Soundbar is not conneed with the subwoofer
and it is in On mode, then the meage
‘CHECK SUBWOOFER’ will show on the display and the
Indicator on the boom of the subwoofer will blink.
Repeat eps 1 - 5 above to pair the subwoofer to the
Soundbar.
4. GENERAL OPERATION
4.1 Using the remote control of the TV
When the HDMI ARC socket of the Soundbar is conneed
to the HDMI ARC socket of the TV via the HDMI cable and
the CEC funion on the TV is aivated in the setup menu of
the TV, you can use the remote control of the TV to
control the SoundMount (Soundbar and subwoofer).
• When the TV is switched ON, the SoundMount (Sound-
bar and subwoofer) will automatically switch ON.
• When the TV is switched to OFF / ANDBY, the Sound-
Mount will automatically switch OFF (to ANDBY).
• When the SoundMount is ON, the sound volume can be
controlled with the VOLUME - / VOLUME + and MUTE
buons on the remote control of the TV.
Note!
•To make it poible to control the SoundMount with the
remote control of the TV, it is important that the HDMI
CEC (Consumer Eleronics Control) funion is aivated
in the setup menu of the TV.
This funion has a dierent name for each TV brand:
Anynet (Samsung), Aquos Link (Sharp), Bravia Sync
(Sony), Regza Link (Toshiba), Simplink (LG),
Viera Link Panasonic), EZ-Sync (JVC), Easylink (Philips),
Netcommand (Mitsubishi).
The internal TV speakers will automatically be disabled
the moment the TV is switched ON and the Soundbar is
switched on automatically.
4.2 Using the supplied (Soundbar) remote control
When the HDMI ARC socket of the Soundbar is conneed
to the HDMI ARC socket of the TV via the HDMI cable and
the CEC funion on the TV is aivated in the setup menu of
the TV, you can use the remote control of the TV to
control the SoundMount (Soundbar and subwoofer).
In this case, you only need the supplid (Soundbar) remote
control for initial seings of personal preferences (TREBLE,
BASS, brightne level of Soundbar display) and for
controlling special funions like Bluetooth audio reaming.
In case the Soundbar and the TV are conneed via an
optical link, the supplied (Soundbar) remote control also
mu be used to control the SoundMount TV volume, source
seleion, etc..
It is not poible to control the sound volume with the
remote control of the TV. Internal TV speakers mu be
switched o manually. See the setup menu of the TV.
Standby / ON
When you fir conne the Soundbar to the mains socket,
the Soundbar will be in ANDBY mode and the ANDBY
Indicator lights red.
• Pre the buon on the Soundbar or on the remote
control of the TV to switch the Soundbar ON.
• Pre the buon again to switch the Soundbar back
to ANDBY mode.
> The Standby Indicator will light up red.
• Disconne the mains plug from the mains socket if you
want to switch the Soundbar o completely.
Note!
• When the Soundbar is idle for approximately 15 minutes,
it will automatically switch to ANDBY mode.

9
Selecting modes
• Pre the SOURCE buon on the Soundbar repeatedly
or pre the HDMI 1 / HDMI 2 / ARC / BT (Bluetooth) / OPT
(Optical) / AUX / MP3 buons on the remote control
to sele the desired mode. The seleed mode will be
shown on the display.
Note!
• When the HDMI ARC socket of the Soundbar is
conneed to the HDMI ARC socket of the TV via the
HDMI cable and the CEC funion on the TV is
aivated in the setup menu of the TV, SOURCE seleion
will automatically switch to ‘TV ARC’ (SoundMount).
Adjusting Super Bass Boost
• Pre the BASS + / BASS– buons on the remote control
to adju the ba boo level from –3 to +3.
> The seleed BASS level will automatically ored per
source.
Adjusting the treble level
• Pre the TREB + / TREB – buons on the remote control
to adju the treble level from –3 to +3.
> The seleed TREBLE level will automatically ored per
source.
Adjusting the volume
• Pre the VOL + / VOL – buons on the Soundbar to
adju the volume.
• Pre the MUTE buon on the remote control of the TV to
turn the sound o.
• Pre the MUTE buon on the remote control of the TV
again or pre the VOL+ buon on the Soundbar to
resume normal volume.
Selecting the equaliser
• Pre the EQ buon on the remote control to sele
equalizer seing MOVIE or SPEECH.
> Aer switching OFF and ON, the equalizer seing will
automatically return to MOVIE mode.
Adjusting the brightness of the display
• Pre the DIM+ / DIM- buon on the remote control to
sele brightne level.
> The seleed BRIGHTNESS level will automatically
ored.
Setting the Sleep Timer
Use the SLEEP TIMER to turn the syem o aer a certain
number of minutes in PLAY mode. By seing the SLEEP
TIMER, you can fall asleep to music and know that your
syem will turn o by itself rather than play all night.
1In ON mode, pre the SLEEP buon on the remote
control repeatedly to sele your desired number of
minutes. The number of minutes will be displayed in the
following sequence:
SLEEP 120 - SLEEP 90 - SLEEP 60 - SLEEP 30 - SLEEP 15 -
SLEEP 00.
2Stop preing the SLEEP buon when your desired
number of minutes is displayed.
> The Sleep Timer is now set.
3To cancel the SLEEP TIMER, pre the SLEEP buon
repeatedly until ‘SLEEP 00’ is displayed.
5. AUX/MP3 LINK/OPTICAL/
HDMI OPERATION
1Make sure that the audio device is conneed to the
Soundbar.
2Pre the SOURCE buon on the Soundbar repeatedly
or pre the HDMI 1 / HDMI 2 / ARC / OPT (OPTICAL) /
AUX / MP3 buons on the remote control of the Sound-
bar to sele the desired mode.
3Operate your audio device direly for playback
features.
4Pre the VOL + / VOL – buons on the Soundbar to
adju the volume to your desired level.
Note!
•You may need to switch to lineair PCM (Pulse Code
Modulation) output on your source device (for example
TV, DVD or Blu-ray player) while the Soundbar is swit-
ched to OPTICAL or HDMI mode.
•A/V peripherals mu be conneed to the TV.
6. PLAY WITH BLUETOOTH DEVICE
You can lien to tracks from a media device if conneed to
the Soundbar via Bluetooth.
6.1 Pair Bluetooth enabled devices manually
The fir time you conne your Bluetooth device to the
Soundbar, you need to pair your device to the Soundbar.
CAUTION!
•The operational range between the Soundbar and the
device is approximately 8 metres (without any obje
between the Bluetooth device and the Soundbar).
•Before conneing a Bluetooth device to the Soundbar,
ensure you know the device’s capabilities.
•Compatibility with all Bluetooth devices is not
guaranteed.
•Obacles between the device and the Soundbar can
reduce operational range.
•If the signal rength is weak, your Bluetooth receiver
may disconne, but it will re-enter pairing mode
automatically.
6.2 Connect your device to the Soundbar via Bluetooth
1Switch the Soundbar ON.
2Pre the SOURCE buon on the Soundbar repeatedly
or the BT buon on the remote control to sele BT
(Bluetooth) mode.
> The Display shows ‘BT’, then ‘NO BT’ (if there’s no
Bluetooth device conneed).
3Pre the PAIR buon on the remote control for a few
seconds to aivate Bluetooth pairing.
> The Display shows ‘PAIR’.
4Aivate your Bluetooth device and sele the SEARCH
mode.
> ‘Vogel’s SoundMount’ will appear on your Bluetooth
device li.
5Sele ‘Vogel’s SoundMount’ and enter ‘0000 for the
paword, if neceary.
> The display shows ‘BLUEPORT’ when the conneion is
succeful.
•To disconne the Bluetooth funion, switch to another
funion on the Soundbar or disable the funion from
your Bluetooth device.

10
6.3 Listen to music from your Bluetooth device
•If the conneed Bluetooth device supports
Advanced Audio Diribution Profile (A2DP), you can
lien to the music ored on the device through the
player.
•If the device also supports Audio Video Remote
Control Profile (AVRCP), you can use the Soundbar’s
remote control to play music ored on the device.
1Pair your device with the Soundbar.
2Play music via your device (if it supports A2DP).
3Use the remote control to control play (if it supports
AVRCP).
•Pre the B; buon to to pause/resume play.
•Pre the S / Tbuons to jump to a track.
7. WARNINGS AND DISCLAIMERS
To keep the warranty valid, never try to repair the
Soundbar and/or the Wirele subwoofer yourself.
If you encounter problems when using the SoundMount,
please conta your Vogel’s dealer.
Bluetooth and HDMI are regiered trademarks and are the
property of their respeive owners.
The Bluetooth word mark and logos are regiered
trademarks owned by Bluetooth SIG, Inc. and any use of
such marks by Vogel’s is under license. Other trademarks
and trade names are those of their respeive owners.
The term HDMI and the HDMI logo are trademarks or
regiered trademarks of HDMI Licensing LLC in the United
States and other countries.
7.1 Precautions concerning Batteries
• When the Remote Control is not going to be used for
a long time (more than a month), remove the baery
from the Remote Control to prevent it from leaking.
• If the baery leaks, wipe away the leakage inside the
baery compartment and replace the baery with a
new one.
• Do not use any baeries other than those specified.
• Do not heat or disaemble baeries.
• Never throw them in fire or water.
• Do not carry or ore baeries with other metallic objes
as this may cause the baeries to short-circuit, leak or
explode.
• Never recharge a baery unle it is confirmed to be a
rechargeable type.
WEE disposal instructions
Do not dispose of this device, the remote
control or its baery with unsorted
household wae. Improper disposal may
be harmful to the environment and human
health. Please refer to your local wae
authority for information on return and
colleion syems in your area.
CE compliance
This produ is in compliance with the eential requirements
and other relevant provisions of Direives 2006/95/EC
(Low Voltage), 2004/108/EC (EMC) and 2011/65/EU (ROHS,
Reriion of the use of certain hazardous subances in
elerical and eleronic equipment).
8. SPECIFICATIONS
Soundbar
Power requirements.............................. AC 220-240 V 50/60 Hz
Average power consumption during operation .............60 W
Standby power consumption le than ...........................0.5 W
Output power RMS ....................................................... 75 W x 2
Total harmonic diortion....................................1%(1 kHz, 1 W)
Audio input sensitivity.....................................................700 mV
Frequency response...........................................180 Hz - 20 kHz
Total Impedance .................................................................. 6 Ω
Dimension (W x H x D).................................... 950 x 86 x 52 mm
Subwoofer
Power requirements ........................... AC 220 - 240 V 50/60 Hz
Average power consumption during operation .............60 W
Standby power consumption le than ...........................0.5 W
Output power ..................................................................150 W
Frequency response ............................................40 Hz - 150 Hz
Impedance .......................................................................... 3 Ω
Dimension (W x H x D).................................. 419 X 312 x 150 mm
Remote Control
Diance.................................................................................6 m
Angle ..................................................................................... 30°
9. SUPPLIED ACCESSORIES
AC Power Cord ...................................................................... 2 x
HDMI Cable ........................................................................... 1 x
Remote Control .................................................................... 1 x

11
NL INHOUD
1 ONDERDELEN..........................................................................................................................................................12
1.1 Soundbar............................................................................................................................................................................. 12
1.2 Draadloze subwoofer ......................................................................................................................................................... 13
1.3 Afandsbediening.............................................................................................................................................................. 13
2 VOORBEREIDING....................................................................................................................................................14
2.1 De afandsbediening voorbereiden ............................................................................................................................... 14
2.2 De afandsbediening voor de eere keer gebruiken.................................................................................................... 14
2.3 De baerij van de afandsbediening vervangen .......................................................................................................... 14
3 AANSLUITINGEN.....................................................................................................................................................15
3.1 Standaard HDMI-aansluiting (ARC) .................................................................................................................................. 15
3.2 MP3 Link-aansluiting ........................................................................................................................................................... 15
3.3 Aansluiting op netvoeding ................................................................................................................................................ 15
3.4 De draadloze subwoofer koppelen met de soundbar ................................................................................................... 16
Automatisch koppelen ...................................................................................................................................................... 16
Handmatig koppelen......................................................................................................................................................... 16
4 ALGEMENE BEDIENING ...........................................................................................................................................16
4.1 De afandsbediening van de tv gebruiken .................................................................................................................... 16
4.2 De meegeleverde afandsbediening (soundbar) gebruiken....................................................................................... 16
Stand-by / AAN ................................................................................................................................................................... 17
Modi seleeren................................................................................................................................................................... 17
Super Ba Boo aanpaen .............................................................................................................................................. 17
Hogetonenniveau aanpaen........................................................................................................................................... 17
Volume regelen................................................................................................................................................................... 17
Equalizer seleeren ............................................................................................................................................................ 17
Helderheid van het display aanpaen............................................................................................................................ 17
Sleep timer inellen ............................................................................................................................................................ 17
5 AUX / MP3 LINK / OPTICAL / HDMI SELECTEREN ....................................................................................................17
6 AFSPELEN VIA BLUETOOTH-APPARAAT ...................................................................................................................18
6.1 Handmatig apparaten met Bluetooth koppelen............................................................................................................ 18
6.2 Apparaat met soundbar verbinden via Bluetooth.......................................................................................................... 18
6.3 Muziek luieren vanaf uw Bluetooth-apparaat met Bluetooth...................................................................................... 18
7 WAARSCHUWINGEN EN AFWIJZING VAN AANSPRAKELIJKHEID.............................................................................18
7.1 Voorzorgsmaatregelen betreende baerijen................................................................................................................ 18
8 SPECIFICATIES........................................................................................................................................................19
9 MEEGELEVERDE ACCESSOIRES ...............................................................................................................................19
12
1. ONDERDELEN
1.1 Soundbar
1 Luidsprekers
2 Display / Sensor van afstandsbediening
- Gee de huidige atus weer.
- Ontvangt het signaal van de afandsbediening.
3 Standby lampje
Licht rood op wanneer de unit in de AND-BY modus
aat.
4
Schakelt de soundbar tuen AAN en AND-BY.
5 SOURCE
Schakelt tuen BT (Bluetooth), OPT (OPTICAL), AUX,
HDMI 1, HDMI 2, HDMI ARC en MP3 LINK.
6 B;
Afspelen/pauzeren/afspelen hervaen in Bluetooth-
modus
7 S / T
Overslaan naar vorige nummer/overslaan naar
volgende nummer in Bluetooth-modus.
8 VOL+ / VOL-
Volume harder/zachter.
9 MP3 LINK-ingang
Ingang voor extern audioapparaat.
10 Ingang voor voeding
Voor aansluiting van het netsnoer.
11 OPTICAL-ingang
12 AUX-ingang
13 HDMI 1/HDMI 2-ingang
14 HDMI UIT TV ARC-uitgang
HDMI uitgang (ARC).
SOURCE
MP3LINK
VOL– VOL+
AC
OPTICAL
AUX
HDMI IN 2
HDMI IN 1
HDMI OUT
TV(ARC)
SOURCE
MP3 LINK
VOL– VOL+
123
4
10 12 13 1411
567 9
1
8
13
1.2 Draadloze subwoofer
1
Wirelesspairing
2 3
1 Ingang voor voeding
Voor aansluiting van het netsnoer.
2 Indicatielampje
Licht op wanneer de koppeling is geslaagd.
3 Knop voor draadloze koppeling
Maakt verbinding met de Soundbar.
1.3 Afstandsbediening
VOL+
VOL–
BASS+ TREB+ EQ DIM+
HDMI 1HDMI 2 ARC BT
OPT AUXMP3 PAIR
MUTE
BASS– TREB– SLEEP DIM–
1
2
3
4
5
6
7
8
9
11
10
12
1
Schakelt de Soundbar tuen AAN en AND-BY.
2 SOURCE
Gewene afspeelmodus seleeren.
3 VOL+ / VOL-
Volume harder/zachter.
4 BASS+ / BASS-
Basniveau aanpaen.
5 TREB+ / TREB-
Hogetonenniveau aanpaen.
6 MUTE
Geluid dempen of hervaen.
7 PAIR
- Aiveert de koppelfunie in Bluetooth-modus
- Verbreekt de beaande koppeling met Bluetooth-
apparaat.
8 B ;
Afspelen/pauze/afspelen hervaen in Bluetooth-
modus
9 S / T
Overslaan naar vorige nummer/overslaan naar
volgende nummer in Bluetooth-modus.
10 EQ
Vooraf ingeelde equalizer seleeren.
11 DIM+ / DIM-
Helderheid display aanpaen.
12 SLEEP
Sleep timer inellen.
14
2. VOORBEREIDING
2.1 De afstandsbediening voorbereiden
Met de meegeleverde afandsbediening kan de
Soundbar op afand worden bediend.
• Als de afandsbediening binnen het juie bereik (6 m)
wordt gebruikt, maar er bevinden zich obakels tuen
de Soundbar en de afandsbediening, is het mogelijk
dat deze niet naar behoren werkt.
• Ook als de afandsbediening wordt gebruikt in de
buurt van andere produen die infraroodralen
genereren, of als er andere afandsbedieningen met
infraroodralen in de buurt van de Soundbar worden
gebruikt, is het mogelijk dat de afandsbediening niet
naar behoren werkt. De werking van de andere pro-
duen kan in een dergelijk geval ook worden veroord.
2.2 De afstandsbediening voor de eerste keer
gebruiken
De soundbar bevat al een lithium CR2025-baerij.
• Verwijder het beschermlipje om de baerij van de
afandsbediening te aiveren.
2.3 De batterij van de afstandsbediening vervangen
1
2
3
1Trek het baerijcompartiment uit de afandsbediening
en verwijder de oude baerij.
2Plaats een nieuwe CR2025-baerij in het baerij-
compartiment met de polen (+/-) in de aangegeven
positie.
3Plaats het baerijcompartiment terug in de sleuf.

15
3. AANSLUITINGEN
3.1 Standaard HDMI-aansluiting
AC
OPTICAL
AUX
HDMI IN 2
HDMI IN 1
HDMI OUT
TV(ARC)
TV
• De SoundMount-configuratie is gebaseerd op een HDMI-verbinding tuen de HDMI ARC-aansluiting van de
Soundbar en de HDMI ARC-aansluiting op de tv.
Let op!
ARC = Audio Return Channel.
•Als de tv niet is voorzien van een HDMI ARC-aansluiting, dan kunt u de soundbar en de tv met een optische kabel (niet
meegeleverd) met elkaar verbinden.
3.2 MP3 Link-aansluiting
SOURCE
MP3 LINK
VOL– VOL+
MP3
Player
•Sluit een audiokabel met aan beide zijden een 3,5 mm ekker (niet meegeleverd) aan op de MP3 LINK-ingang op de
soundbar en op de audio-uitgang op een extern audioapparaat. Bijvoorbeeld een MP3-speler, iPhone, enzovoorts.
3.3 Aansluiting op de netvoeding
PAS OP!
•Gevaar voor beschadiging van het produ! Controleer of het voltage van de netvoeding overeenkomt met het
voltage dat op de achterkant van de Soundbar en de subwoofer is afgedrukt.
•Zorg ervoor dat alle andere verbindingen zijn voltooid voordat u het netsnoer aansluit.
.

16
3.4 De draadloze subwoofer koppelen met de Soundbar
De draadloze subwoofer en de Soundbar zijn af fabriek
gekoppeld.
Automatisch koppelen
1Sluit de speciale SoundMount-voedingskabel aan op
de Soundbar.
2Sluit de subwoofer aan op de netvoeding.
3Druk op de knop op de Soundbar of op de
afandsbediening om de Soundbar AAN te zeen.
> Binnen 30 seconden worden subwoofer en Soundbar
automatisch gekoppeld.
> Wanneer de subwoofer aan de Soundbar wordt
gekoppeld, knippert het indicatorlampje snel.
> Wanneer de subwoofer aan de Soundbar is
gekoppeld, brandt het indicatorlampje conant.
> In de andby modus knippert het lampje van de
subwoofer langzaam.
Handmatig koppelen
1Sluit de speciale SoundMount-voedingskabel aan op
de Soundbar.
2Sluit de subwoofer aan op de netvoeding.
3Zorg ervoor dat de Soundbar in de ANDBY modus
aat.
4Houd de knop voor draadloos koppelen op de onder-
kant van de subwoofer enkele seconden ingedrukt.
> De subwoofer gaat in de koppelingsmodus en het
indicatorlampje knippert snel.
5Druk op de knop op de Soundbar of op de afands-
bediening om de soundbar AAN te zeen.
> Nadat de draadloze verbinding tot and is gebracht,
brandt het indicatorlampje conant.
> Als het lampje blij knipperen of helemaal niet brandt,
is de koppeling mislukt.
•Haal de ekker van de subwoofer uit het opconta.
•Steek de ekker na 3 minuten opnieuw in het op-
conta.
•Herhaal ap 1 - 5.
Let op!
•Als de draadloze verbinding opnieuw mislukt,
controleer dan of er in de omgeving een ander
apparaat is dat kan conflieren of oren.
Verwijder eventuele orende apparaten en herhaal de
bovenaande procedure.
•De subwoofer moet zich binnen 6 meter van de Sound-
bar bevinden, zonder obakels ertuen.
•Als de Soundbar niet met de subwoofer is verbonden
en wel is ingeschakeld, wordt de melding
‘CHECK SUBWOOFER’ op het display weergegeven
en knippert het indicatorlampje op onderkant van de
subwoofer.
Herhaal bovenaande appen 1 - 5 om de subwoofer
aan de soundbar te koppelen.
4. ALGEMENE BEDIENING
4.1 De afstandsbediening van de tv gebruiken
Wanneer de HDMI ARC-aansluiting op de Soundbar via
de HDMI-kabel is verbonden met de HDMI ARC-aansluiting
van de tv, en de CEC-funie op de tv wordt geaiveerd in
het inallatiemenu van de tv, dan kunt u de afands-
bediening van de tv gebruiken om de SoundMount
(Soundbar en subwoofer) te bedienen.
• Wanneer de tv wordt ingeschakeld (ON), wordt de
SoundMount (Soundbar en subwoofer) automatisch
ook ingeschakeld.
• Wanneer de tv wordt uitgeschakeld (OFF / ANDBY),
wordt de SoundMount automatisch ook uitgeschakeld
(naar ANDBY).
• Wanneer de SoundMount is ingeschakeld, kan het
volume van het geluid worden aangepa met de
knoppen VOLUME - / VOLUME + en MUTE op de
afandsbediening van de tv.
Let op!
•Om de SoundMount te kunnen bedienen met de
afandsbediening van de tv, is het belangrijk dat de
HDMI CEC-funie (Consumer Eleronics Control) in het
inallatiemenu van de tv wordt geaiveerd.
Deze funie hee bij elk merk tv een andere naam:
Anynet (Samsung), Aquos Link (Sharp), Bravia Sync
(Sony), Regza Link (Toshiba), Simplink (LG), Viera Link
(Panasonic), EZ-Sync (JVC), Easylink (Philips), Netcom-
mand (Mitsubishi).
De interne tv-luidsprekers worden automatisch uitge-
schakeld op het moment dat de tv wordt ingeschakeld
en ook de Soundbar automatisch wordt ingeschakeld.
4.2 De meegeleverde afstandsbediening (Soundbar)
gebruiken
Wanneer de HDMI ARC-aansluiting op de Soundbar via
de HDMI-kabel is verbonden met de HDMI ARC-aansluiting
van de tv, en de CEC-funie op de tv wordt geaiveerd in
het inallatiemenu van de tv, dan kunt u de afands-
bediening van de tv gebruiken om de SoundMount
(Soundbar en subwoofer) te bedienen.
In dit geval hebt u de meegeleverde afandsbediening
(Soundbar) alleen nodig voor de eere inellingen of
persoonlijke voorkeuren (TREBLE, BASS, helderheid van het
Soundbar display) en voor speciale funies als audio-
reaming via Bluetooth.
Als de Soundbar en de tv via een optische koppeling zijn
verbonden, moet de meegeleverde afands-
bediening (Soundbar) ook worden gebruikt om het
volume, de bronseleie, enzovoorts, van de SoundMount
en de tv te regelen. Het is niet mogelijk om het geluidsvo-
lume met de afandsbediening van de tv te regelen. De
interne tv-luidsprekers moeten handmatig worden uitge-
schakeld. Zie het inallatiemenu van de tv.

17
Standby / AAN
Wanneer u de Soundbar voor het eer op netvoeding
aansluit, wordt de ANDBY modus geaiveerd en licht het
ANDBY lampje rood op.
• Druk op de knop op de Soundbar of op de
afandsbediening van de tv om de Soundbar AAN te
zeen.
• Druk opnieuw op de knop om de Soundbar weer in
de ANDBY modus te zeen.
> Het and-by lampje licht rood op.
• Haal de ekker uit het opconta als u de Soundbar
volledig wilt uitschakelen.
Let op!
• Wanneer de Soundbar ongeveer 15 minuten inaief
is, schakelt het apparaat automatisch over naar de
ANDBY modus
Modi selecteren
• Druk herhaaldelijk op de knop SOURCE op de Sound-
bar of druk op de knop HDMI 1 / HDMI 2 / ARC / BT
(Bluetooth) / OPT (Optical) / AUX / MP3 op de afands-
bediening om de gewene modus te seleeren. De
gekozen modus wordt op het display weergegeven.
Let op!
• Wanneer de HDMI ARC-aansluiting op de Soundbar
via de HDMI-kabel is verbonden met de HDMI ARC-
aansluiting van de tv, en de CEC-funie op de tv wordt
geaiveerd in het inallatiemenu van de tv, dan wordt
de SOURCE automatisch ingeeld op ‘TV ARC’ (Sound-
Mount).
Super Bass Boost aanpassen
• Druk op BASS + / BASS – op de afandsbediening om
het ba boo-niveau aan te paen van –3 to +3.
> Het gekozen BASS-niveau wordt automatisch per
bron opgeslagen.
Hogetonenniveau aanpassen
• Druk op TREB + / TREB – op de afandsbediening om
het hogetonenniveau aan te paen van –3 to +3.
> Het gekozen TREBLE-niveau wordt automatisch per
bron opgeslagen.
Volume regelen
• Druk op VOL + / VOL – op de Soundbar om het volume
te regelen.
• Druk op MUTE op de afandsbediening van de tv om
het geluid uit te zeen.
• Druk nogmaals op MUTE op de afandsbediening van
de tv of druk op de knop VOL+ op de Soundbar om
terug te keren naar het normale volume.
Equalizer selecteren
• Druk op EQ op de afandsbediening om de equalizer-
inelling MOVIE of SPEECH te kiezen.
> Na in- en uitschakelen wordt de equalizer
automatisch ingeeld op de MOVIE modus.
Helderheid van het display aanpassen
• Druk op DIM+ / DIM- op de afandsbediening om het
helderheidsniveau te seleeren.
> Het gekozen BRIGHTNESS-niveau wordt automatisch
opgeslagen.
Sleep timer instellen
Met de SLEEP TIMER kunt u het syeem na een bepaald
aantal minuten in de PLAY-modus uitschakelen.
Wanneer u de SLEEP TIMER inelt, kunt u met muziek in
slaap vallen zonder dat het syeem de hele nacht blij
spelen. Na het ingeelde aantal minuten schakelt het
syeem zichzelf uit.
1Druk, terwijl het syeem is ingeschakeld, herhaaldelijk
op SLEEP op de afandsbediening om het gewene
aantal minuten te seleeren. Het aantal minuten wordt
in de volgende volgorde weergegeven:
SLEEP 120 - SLEEP 90 - SLEEP 60 - SLEEP 30 - SLEEP 15 -
SLEEP 00.
2Druk niet meer op SLEEP als het gewene aantal
minuten wordt weergegeven.
> De sleep timer is nu ingeeld.
3U schakelt de SLEEP TIMER uit door herhaaldelijk op
SLEEP te drukken, totdat ‘SLEEP 00’ wordt weergegeven.
5. AUX / MP3 LINK / OPTICAL /
HDMI SELECTEREN
1Controleer of het audioapparaat is verbonden met de
soundbar.
2Druk herhaaldelijk op de knop SOURCE op de Sound-
bar of druk op de knop HDMI 1 / HDMI 2 / ARC / OPT
(OPTICAL) / AUX / MP3 op de afandsbediening van
de Soundbar om de gewene modus te seleeren.
3De afspeelfunies regelt u op het audioapparaat.
4Druk op VOL + / VOL – op de soundbar om het volume
te regelen.
Let op!
•Het is mogelijk dat u naar de lineair PCM-uitgang (Pulse
Code Modulation) moet overschakelen op het bron-
apparaat (bijvoorbeeld tv, dvd of Blu-ray-speler)
wanneer de Soundbar in de modus OPTICAL of HDMI
aat.
•A/V-randapparatuur moet op de tv worden
aangesloten.

18
6. AFSPELEN VIA APPARAAT MET
BLUETOOTH
U kunt naar muziek van een media-apparaat luieren als
dit via Bluetooth met de Soundbar is verbonden.
6.1 Handmatig apparaten met Bluetooth koppelen
De eere keer dat u een apparaat via Bluetooth met de
soundbar verbindt, moet het apparaat aan de Soundbar
worden gekoppeld.
PAS OP!
•De maximale afand tuen de Soundbar en het
apparaat is ongeveer 8 meter (zonder obakels tuen
het apparaat met Bluetooth en de Soundbar).
•Zorg ervoor dat u de mogelijkheden van het Bluetooth-
apparaat kent, voordat u dit verbindt met de Sound-
bar.
•Compatibiliteit met alle Bluetooth-apparatuur wordt
niet gegarandeerd.
•Obakels tuen het apparaat en de Soundbar kunnen
het bereik verminderen.
•Als de signaalerkte zwak is, kan uw Bluetooth-
ontvanger de verbinding verbreken, maar het
apparaat keert automatisch terug naar de koppelings-
modus.
6.2 Apparaat met soundbar verbinden via Bluetooth
1Schakel de Soundbar in.
2Druk herhaaldelijk op SOURCE op de Soundbar of op BT
op de afandsbediening om de BT-modus (Bluetooth)
te seleeren.
> Op het display wordt ‘BT’ weergegeven en
vervolgens ‘NO BT” (als er geen Bluetooth-apparaat is
verbonden).
3Druk enkele seconden op PAIR op de afands-
bediening om de Bluetooth-koppeling te aiveren.
> Op het display wordt ‘PAIR’ weergegeven.
4Aiveer uw Bluetooth-apparaat en seleeer de modus
SEARCH.
> ‘Vogel’s SoundMount’ wordt op uw lij met Bluetooth-
apparaten weergegeven.
5Seleeer ‘Vogel’s SoundMount’ en geef zo nodig
‘0000’ als wachtwoord op.
> Op het display wordt ‘BLUEPORT’ weergegeven
wanneer de verbinding tot and is gebracht.
• Om de Bluetooth-funie uit te schakelen, kie u een
andere funie op de Soundbar of schakelt u de funie
uit vanaf uw Bluetooth-apparaat.
6.3 Muziek luisteren vanaf uw apparaat met Bluetooth
•Als het verbonden Bluetooth-apparaat Advanced
Audio Diribution Profile (A2DP) ondereunt, kunt u via
de speler naar muziek luieren die op het apparaat
aat.
•Als het apparaat ook Audio Video Remote Control
Profile (AVRCP) ondereunt, kunt u de afands-
bediening van de Soundbar gebruiken om muziek te
luieren die op het apparaat is opgeslagen.
1Koppel het apparaat met de Soundbar.
2Speel muziek af via het apparaat (als het A2DP onder-
eunt).
3Gebruik de afandsbediening voor de bediening (als
het apparaat AVRCP ondereunt).
• Druk op B; om het afspelen te pauzeren en te
hervaen.
• Druk op S / Tom naar een bepaald nummer te
gaan.
7. WAARSCHUWINGEN EN
AFWIJZING VAN
AANSPRAKELIJKHEID
Probeer nooit de Soundbar en/of de subwoofer zelf te
repareren, want dan vervalt de garantie.
Neem conta op met uw Vogel’s dealer als zich
problemen voordoen bij het gebruik van de SoundMount.
Bluetooth en HDMI zijn gedeponeerde handelsmerken en
het eigendom van hun respeieve eigenaren.
Het woordmerk en de logo’s van Bluetooth zijn gedepo-
neerde handelsmerken van Bluetooth SIG, Inc. en het
gebruik van dergelijke merktekens door Vogel’s gebeurt
onder licentie. Andere handelsmerken en handelsnamen
zijn eigendom van hun respeieve eigenaars.
De term HDMI en het HDMI-logo zijn handelsmerken of ge-
regireerde handelsmerken van HDMI Licensing LLC in de
Verenigde Staten en andere landen.
7.1 Voorzorgsmaatregelen betreffende batterijen
•Verwijder de baerij wanneer u de afandsbediening
gedurende langere tijd niet gebruikt (langer dan een
maand). Dit voorkomt dat de baerij gaat lekken.
•Mocht de baerij lekken, veeg dan het baerij-
compartiment schoon en vervang de baerij door een
nieuwe.
•Gebruik geen andere baerijen dan het opgegeven
type.
•Verhit of demonteer baerijen nooit.
•Gooi baerijen nooit in open vuur of in water.
•Bewaar baerijen niet in de buurt van andere metalen
objeen; de baerijen kunnen dan kortsluiten, lekken of
exploderen.
•Laad een baerij nooit opnieuw op, tenzij u zeker weet
dat het een oplaadbare baerij betre.
Instructies voor verwijdering (WEE)
Gooi dit apparaat, de afandsbediening
of de baerij nooit bij huishoudelijke
reafval. Onjuie verwijdering kan
schadelijk zijn voor mens en milieu.
Raadpleeg de plaatselijke voorschrien
voor inzameling en verwijdering van afval
in uw regio.

19
CE-conform
Dit produ voldoet aan de eentiële vereien en overige
relevante bepalingen van de richtlijnen 2006/95/EC (laag-
spanning), 2004/108/EC (EMC) en 2011/65/EU (ROHS, beper-
king van het gebruik van bepaalde gevaarlijke
oen in elektrische en elektronische apparatuur).
8. SPECIFICATIES
Soundbar
Voedingsvereien ................................ AC 220-240 V 50/60 Hz
Gemiddeld energieverbruik tijdens werking....................60 W
Energieverbruik in and-by minder dan..........................0,5 W
Uitgangsvermogen RMS .............................................. 75 W x 2
Totale harmonische vervorming.......................1% (1 kHz, 1 W)
Audio-ingangsgevoeligheid .........................................700 mV
Frequentierespons.............................................. 180 Hz - 20 kHz
Totale impedantie ................................................................ 6 Ω
Afmetingen (B x H x D)................................... 950 x 86 x 52 mm
Subwoofer
Voedingsvereien .............................. AC 220 - 240 V 50/60 Hz
Gemiddeld energieverbruik tijdens werking....................60 W
Energieverbruik in and-by minder dan..........................0,5 W
Uitgangsvermogen ..........................................................150 W
Frequentierespons................................................40 Hz - 150 Hz
Impedantie .......................................................................... 3 Ω
Afmetingen (B x H x D)..................................419 x 312 x 150 mm
Afstandsbediening
Afand...................................................................................6 m
Hoek....................................................................................... 30°
9. MEEGELEVERDE ACCESSOIRES
Netsnoer ................................................................................. 2 x
HDMI-kabel ............................................................................ 1 x
Afandsbediening ............................................................... 1 x

www.vogels.com Vogel’s Holding BV 2015©All rights reserved
2015v01
Other manuals for SoundMount NEXT 8365
4
Table of contents
Languages:


