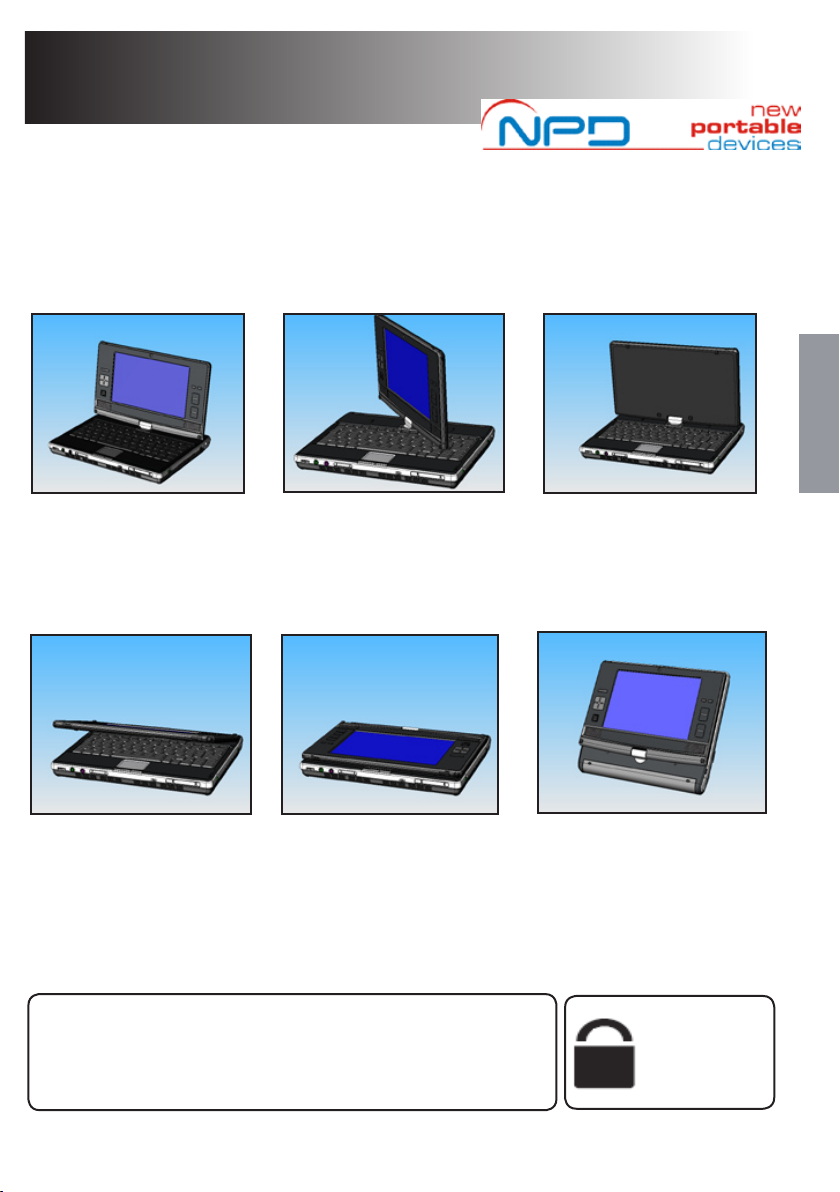
2. Touch Screen Display
4. Direction Button
5. Joystick Pointer
6. Built-in Stereo
Speakers
23. 3 in1 Media Slot
24. Microphone Input Jack
25. Headphone Jack
12. Scroll Button
13. Left & Right select
Buttons (Joystick)
21. Status LEDs
20. Touchpad (& L/R buttons)
16. Keyboard
22. Power Status LED
A Glance at your mini-v:
1. Camera
7. 10/100 Connection
8. Monitor Out
17. Power On/ O Switch
14. Status LEDs
18. CF slot
19. Wireless LAN On/O
3. Brightness Selector
11. Enter Button
10. Rotation Button
1. Camera
Take pictures and video conference with the built in camera.
2. Touch Screen Display
Use the stylus and touch screen to operate your mini-v.
3. Screen Brightness Button
This allows you to adjust the brightness of the screen
4. Direction Button
This allows you to step the cursor across the screen.
5. Joystick Pointer
This allows you to move the mouse cursor on the screen.
6. Built-in Stereo Speakers
Audio output devices that amplify the sound emitted by the
notebook.
7. 10/100 LAN Connection
Connect your mini-v to a cable network.
8. Monitor Out
This allows you to connect a Monitor to your mini-v.
9. USB 2.0
Connect your mini-v to a USB device.
10. Rotate Button
Rotate the mini-v display.
11. Enter Button
Press to action a selection.
12. Scroll Button
This allows you to scroll the content of the activated window
in a similar way to the PgUp/PgDn buttons.
10. Power Status LED
When blue your mini-v is on. When ashing your mini-v is in
standby mode.
13. Left & Right select Buttons (Joystick)
This allows you to select an icon or activate its function. These
operate the same as when you right-click/left-click the
touchpad buttons.
14. Screen Status LEDs
Displays the power, bluetooth and wireless status.
15. DVD / RW Power ON/OFF & Eject buttons
You can turn o your DVD to conserve power consumption
Open the DVD tray with the Eject button.
16. Keyboard
An input device that allows users to insert data and to control
the notebook.
17. Power On /O Switch
Turn your mini-v on and o or place the unit in standby.
18. CF Card slot
Connect your mini-v to a CF Card.
19. Wireless LAN and Bluetooth On/O
Turns the wireless receiver on or o.
20. Touchpad and Left and Right Select Buttons
This allows you to move the mouse cursor on the screen and
oers you the same functionality as a mouse.
21. Status LEDs
Status of battery charging, hard disk operation, caps lock,
number lock and scroll lock.
22. Power Status LED
Shows power status of mini-v: on / standby / hibernate
23. 3 in 1 Media Slot
This is used to insert a memory card.
24. Microphone Input Jack
This allows you to connect a microphone and make a sound
recording.
25. Headphone Jack
This is used to connect stereo headphones for audio output.
26. Volume dial button
This is used to adjust the level of the sound / audio output.
26. Volume dial button
15. DVD / RW Eject and
DVD ON/OFF Button
9. USB 2.0 (x 2)
Getting Started
2