Waxess DM1200E User manual

Dual Mode
Communication Terminal
DM1200E/DM1250E
(CDMA-EVDO)
User Guide
D mode EVDO draft 1.book Page i Friday, January 12, 2007 8:18 PM

D Mode CT User Guide ii Copyright © 2007 Waxess
Handset 10 Antenna
2 Betlclip attachment
3 Speaker for Ringer
4 Handset battery compartment
5 New Message LED
6 Handset Earpiece
7LCDDisplay
8FunctionKeys
9Up/Downkeys
10 Menu and Off keys
11 * Scroll Left
12 Flash/Delete key
13 Redial/Pause key
14 Headset Jack
15 #Scroll Right
16 Intercom
17 Handset Microphone
18 Handset Charging Contacts
D mode EVDO draft 1.book Page ii Friday, January 12, 2007 8:18 PM

D Mode CT User Guide iii Copyright © 2007 Waxess
Base
19 Base Speaker/Ringer
20 LCD Display
21 Function Keys
22 Up/Down Keys
23 Menu and Off Keys
24 Intercom Key
25 Speaker Phone Key
26 Speaker Phone ON LED
27 Redial/Pause Key
28 New Message LED
29 Flash Key
30 DC IN 9V Jack
31 TEL LINE Jack
32 Corded Handset Jack
33 Battery cover
34 Data Access Port
(for use with
DM120UB Data
Accessory Kit)
34
D mode EVDO draft 1.book Page iii Friday, January 12, 2007 8:18 PM

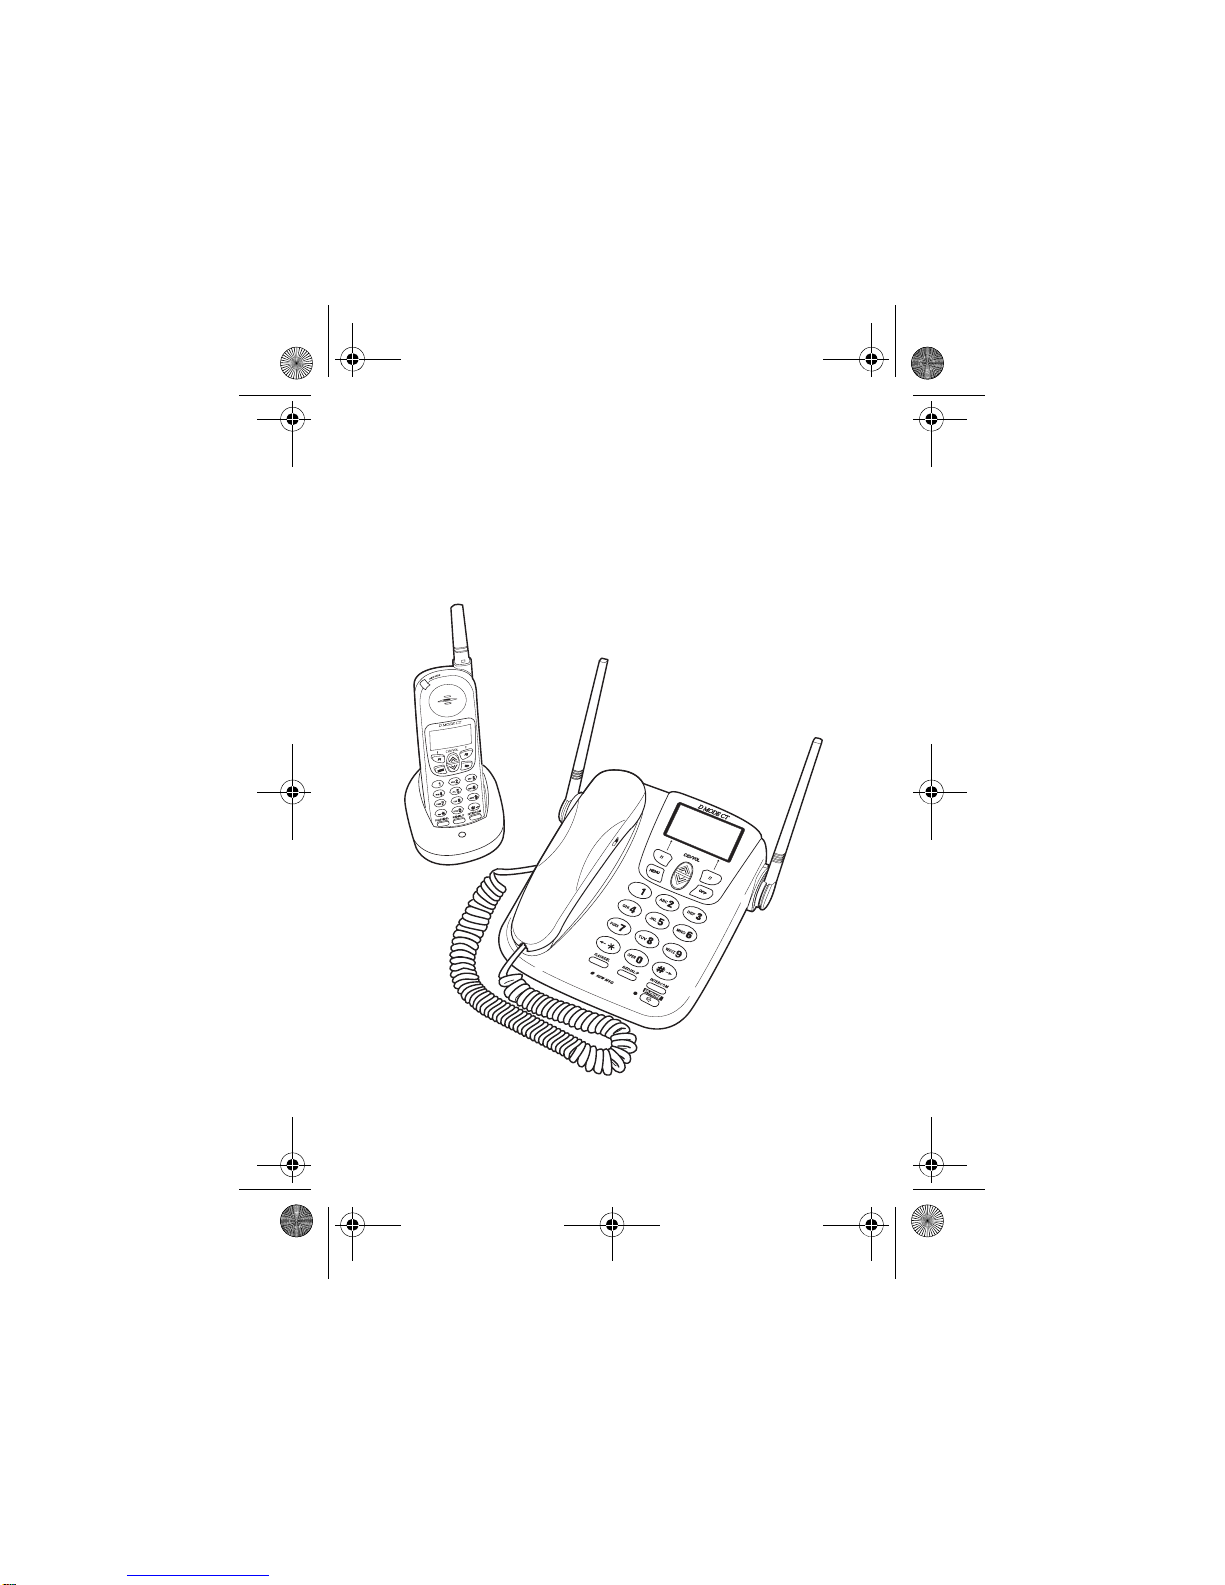
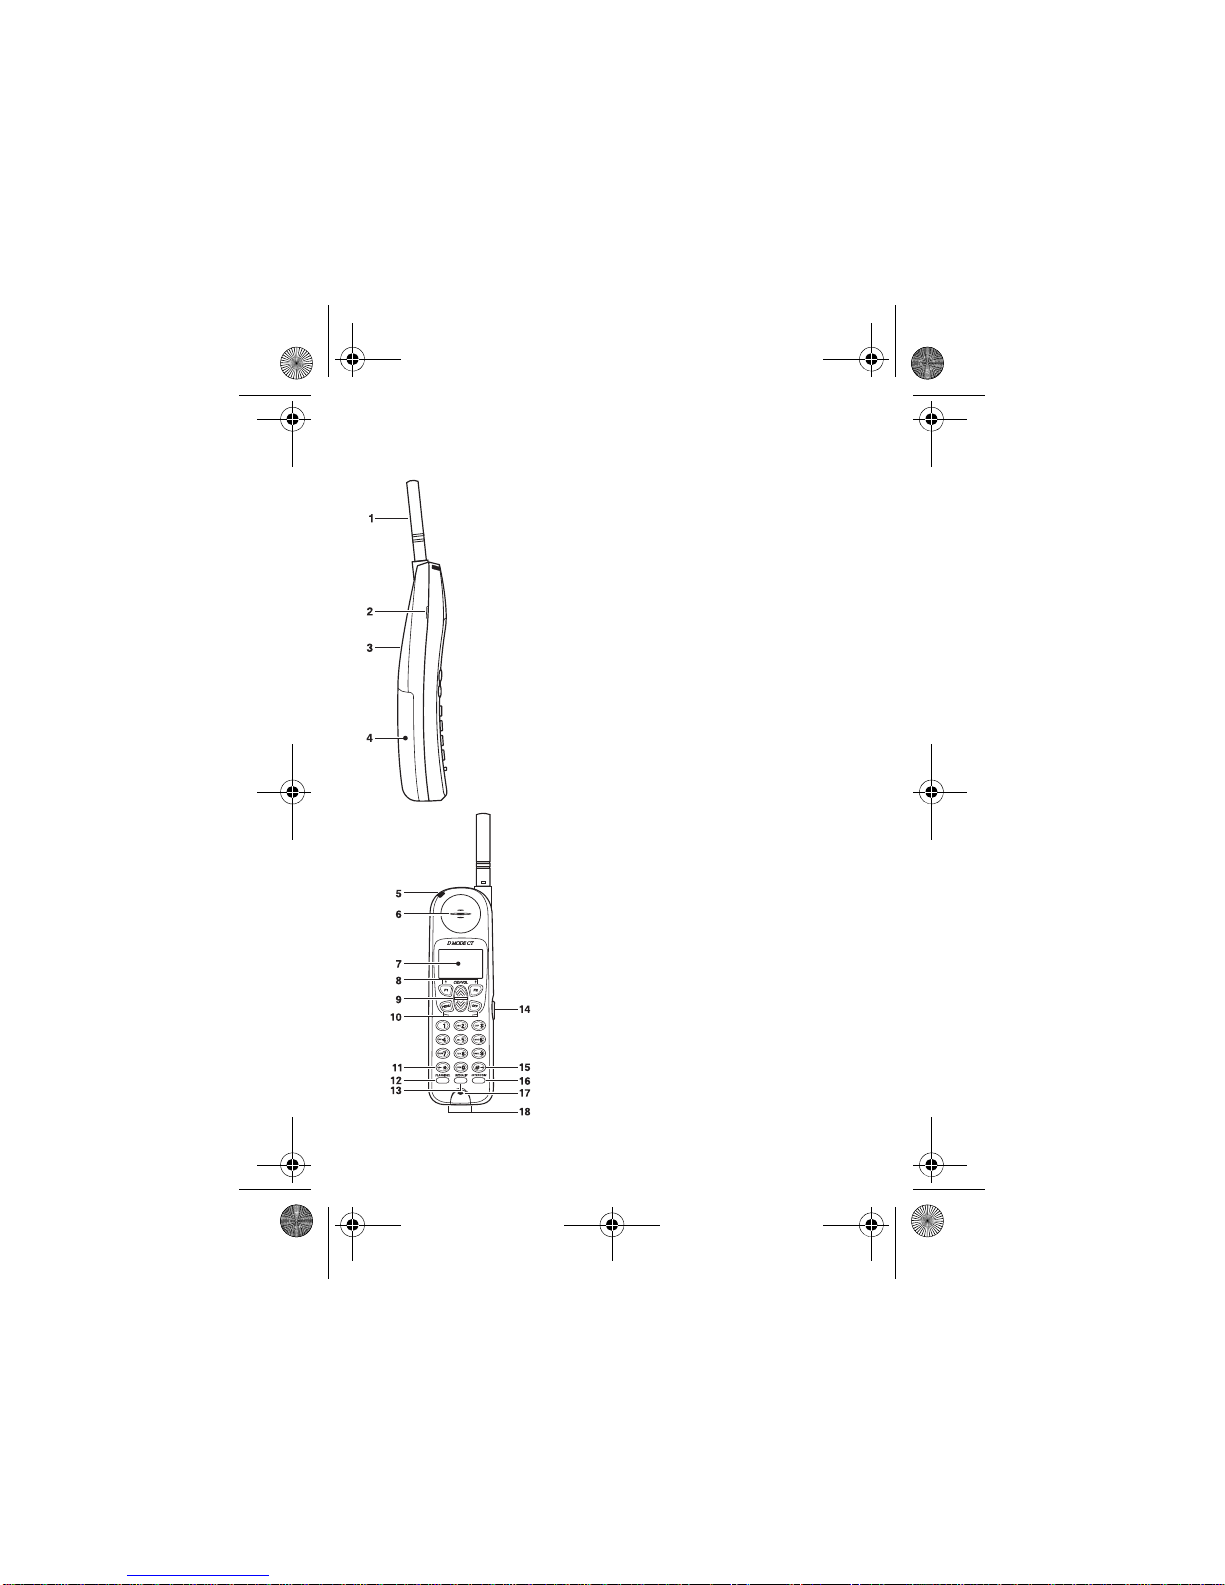
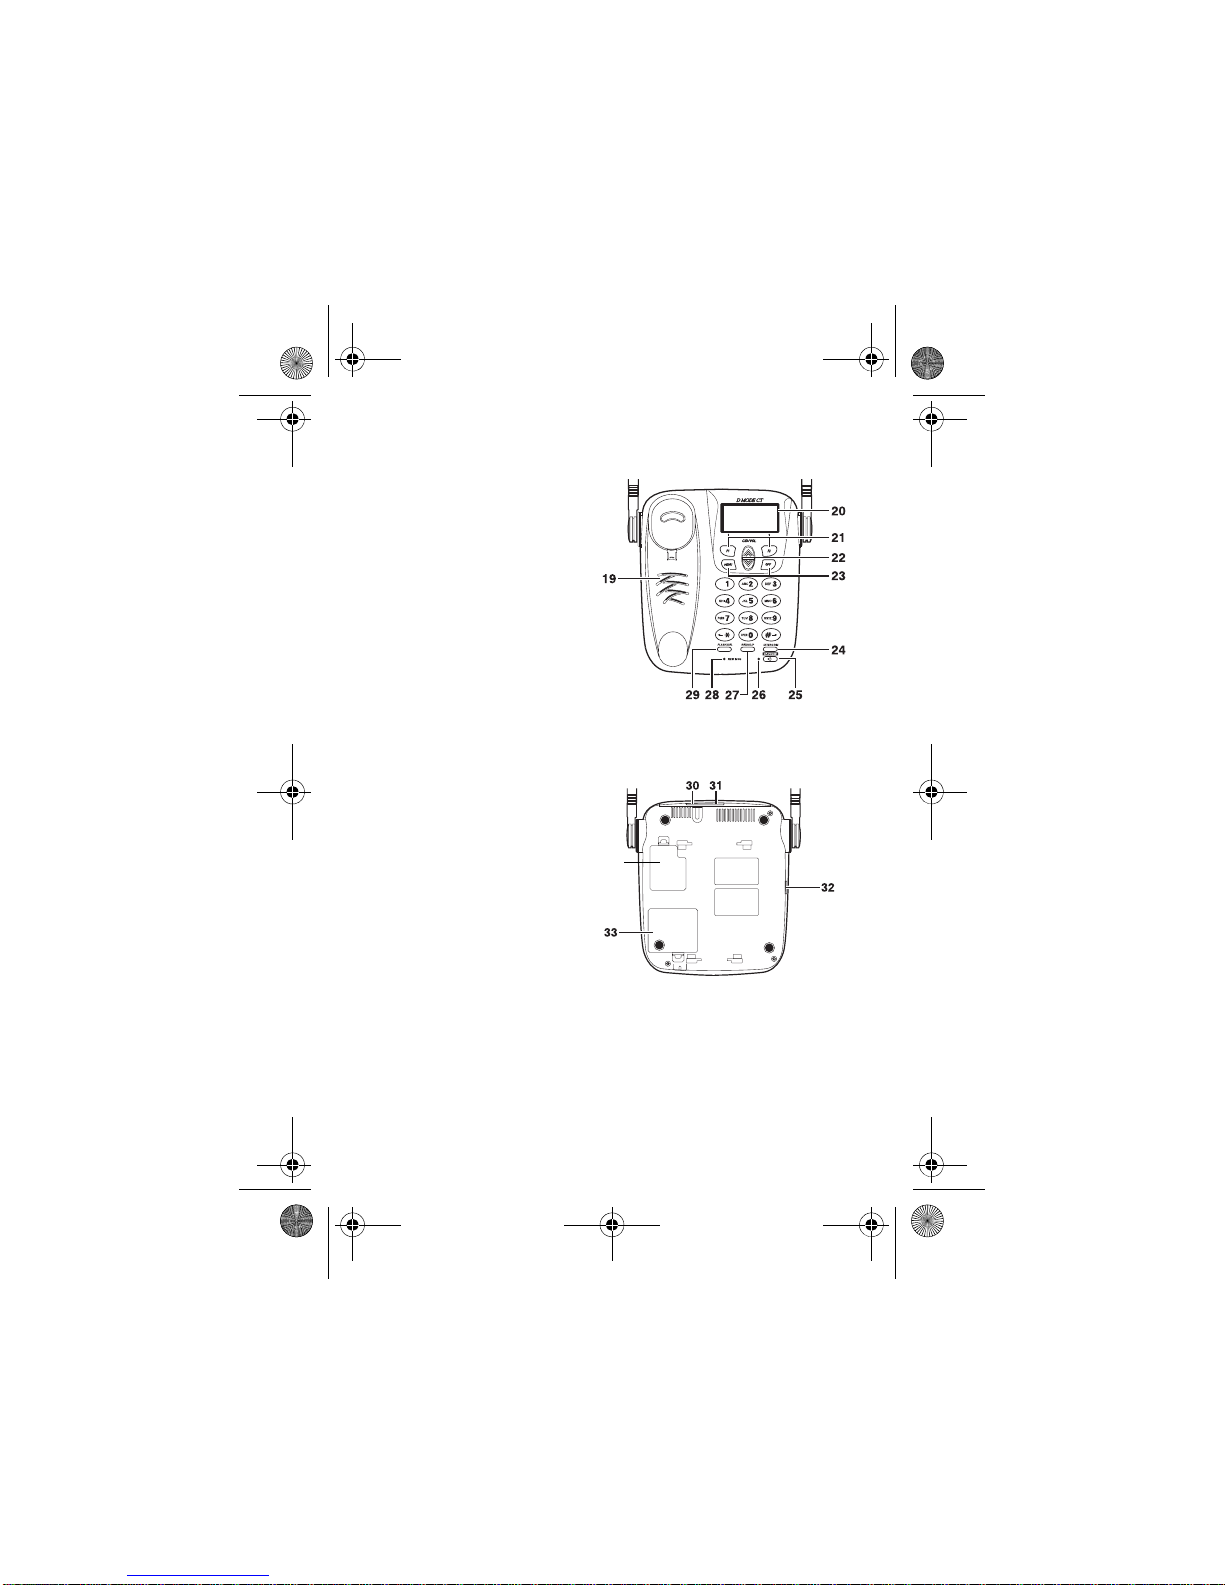
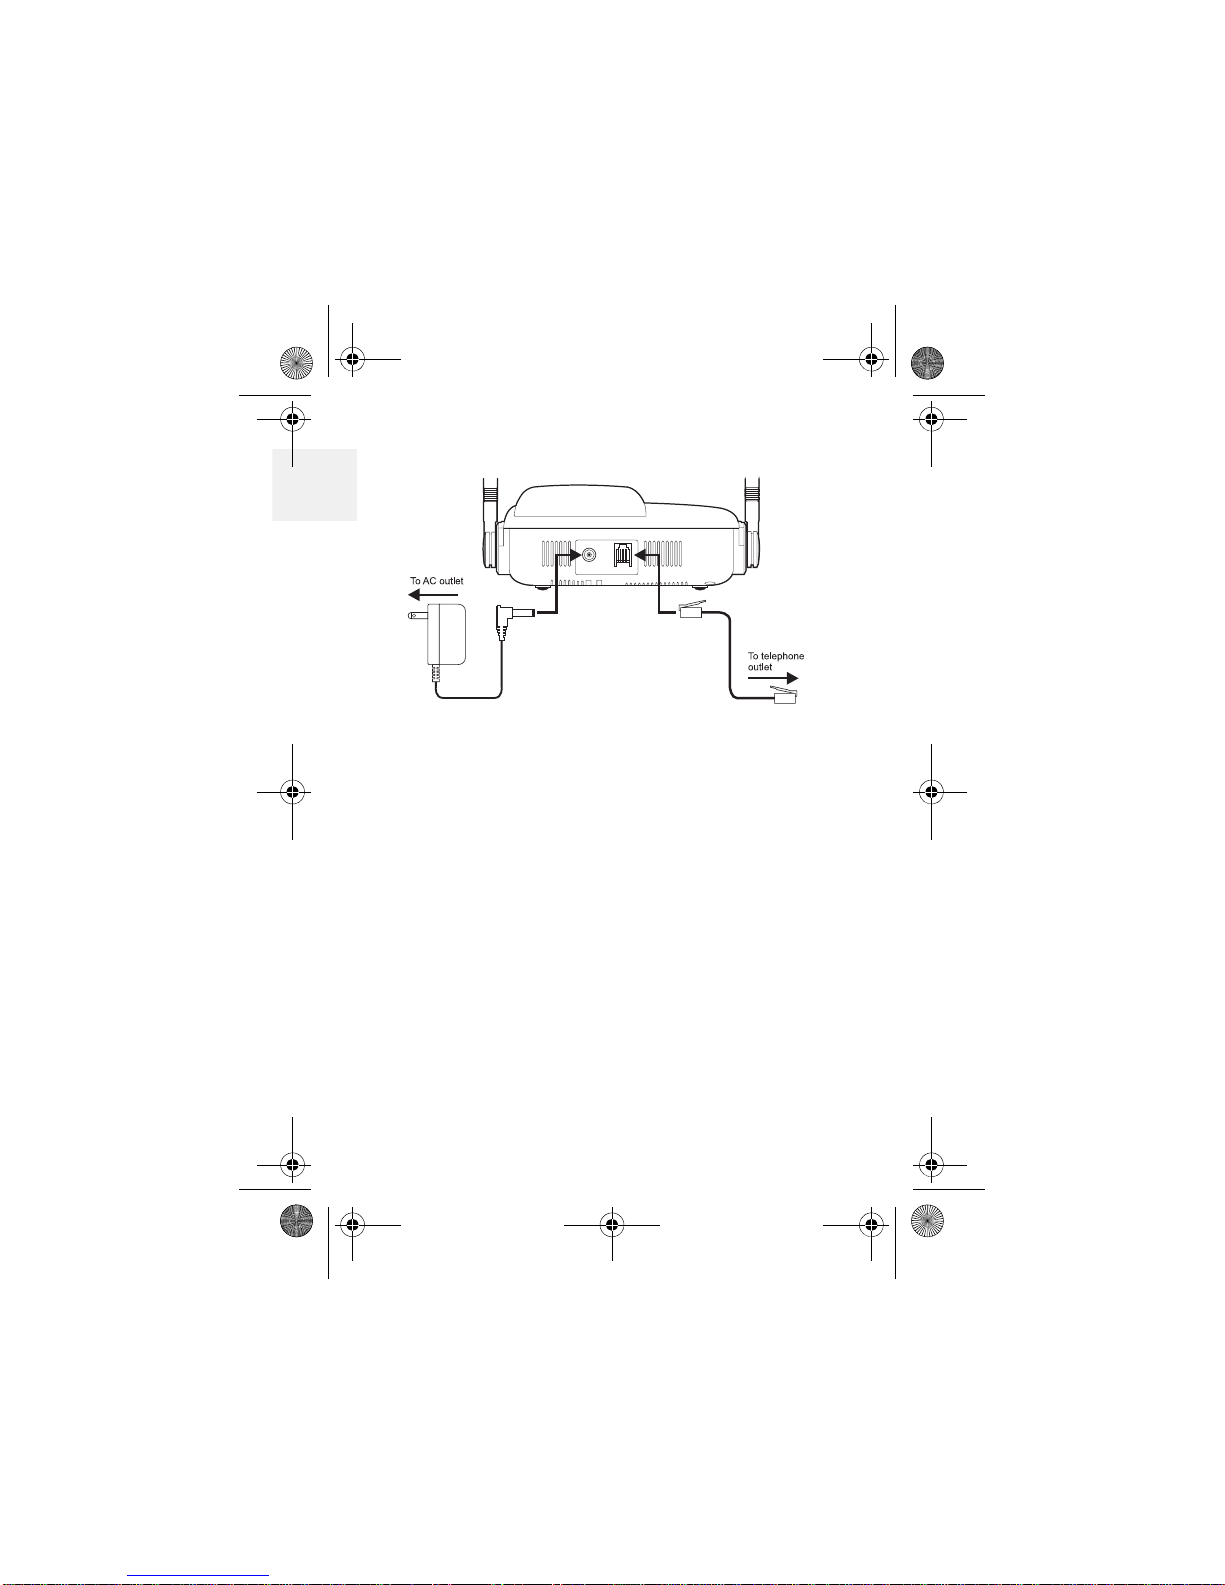
D Mode CT User Guide i Copyright © 2007 Waxess
Contents
Get ready . . . . . . . . . . . . . . . . . . . . . . 1
Choose Location . . . . . . . . . . . . . . . . . . . . . 1
Get set . . . . . . . . . . . . . . . . . . . . . . . 11
Dialing mode . . . . . . . . . . . . . . . . . . . . . . 11
Time and date . . . . . . . . . . . . . . . . . . . . . 12
Set the ringer tone . . . . . . . . . . . . . . . . . . 14
Key beep . . . . . . . . . . . . . . . . . . . . . . . . . 16
Area codes . . . . . . . . . . . . . . . . . . . . . . . . 16
Language . . . . . . . . . . . . . . . . . . . . . . . . . 18
LCD contrast . . . . . . . . . . . . . . . . . . . . . . 19
Name . . . . . . . . . . . . . . . . . . . . . . . . . . . 19
Handset registration . . . . . . . . . . . . . . . . . 19
GO! . . . . . . . . . . . . . . . . . . . . . . . . . 22
Make a wireless call . . . . . . . . . . . . . . . . . 22
Make a landline call . . . . . . . . . . . . . . . . . . 23
Calling options . . . . . . . . . . . . . . . . . . . . . 24
Answer a wireless call . . . . . . . . . . . . . . . . 25
Answer a landline call . . . . . . . . . . . . . . . . 26
In-Call operations . . . . . . . . . . . . . . . . . . . 27
Phone book . . . . . . . . . . . . . . . . . . . . . . . 30
Messages . . . . . . . . . . . . . . . . . . . . . . . . . 35
More features . . . . . . . . . . . . . . . . . . 43
Caller ID . . . . . . . . . . . . . . . . . . . . . . . . . 43
Page and Intercom . . . . . . . . . . . . . . . . . . 47
Two-line calling . . . . . . . . . . . . . . . . . . . . . 49
Barge-in . . . . . . . . . . . . . . . . . . . . . . . . . 52
Cellular only . . . . . . . . . . . . . . . . . . . . . . . 56
CEL Phone Number . . . . . . . . . . . . . . . . . . 57
Power back-up . . . . . . . . . . . . . . . . . . . . . 57
D mode EVDO draft 1.book Page i Friday, January 12, 2007 8:18 PM

D Mode CT User Guide ii Copyright © 2007 Waxess
Precautions . . . . . . . . . . . . . . . . . . . . 59
Important safety instructions . . . . . . . . . . . 60
I.C. Notice . . . . . . . . . . . . . . . . . . . . . . . . 71
General information . . . . . . . . . . . . . . 73
D Mode CT Menu map . . . . . . . . . . . . 75
Index . . . . . . . . . . . . . . . . . . . . . . . . 76
D mode EVDO draft 1.book Page ii Friday, January 12, 2007 8:18 PM

D Mode CT User Guide iii Copyright © 2007 Waxess
Notes
D mode EVDO draft 1.book Page iii Friday, January 12, 2007 8:18 PM

Get ready
D Mode CT User Guide 1 Copyright © 2007 Waxess
1
1Getready
Optional: Data Accessory Kit (DM120UB, sold
separately) available to connect with your PC for
data communication.
•Choose Location
Some important considerations:
• Charge the handset for 12–15 hours before use it.
• Locate the base near both a phone jack and a
power outlet which is not controlled by a switch.
• Keep the base and handset away from sources of
electrical noise, such as motors and fluorescent
lighting.
• Leave enough room to raise both base antennas
fully vertical.
Included items
• Base • Belt clip
• Cordless handset • Wall mount bracket
• AC adaptor for base • Telephone cord
• AC adaptor for
cordless handset •Userguide
• Rechargeable battery
for cordless handset
D mode EVDO draft 1.book Page 1 Friday, January 12, 2007 8:18 PM

D Mode CT User Guide 2 Copyright © 2007 Waxess
1Desk or Table
1Connect the telephone line cord to the TEL LINE
jack and to a telephone jack.
2Set the base on a desk or table and place the
handset on the base.
3Connect the handset cord to the jacks on the
handset and the base, then set the handset in
the cradle.
4Raise both antennas to a vertical position.
5Find the base AC adaptor (the larger adaptor,
Model number AD-48091000), and connect it to
the DC IN 9V jack and to a standard 120V AC.
D mode EVDO draft 1.book Page 2 Friday, January 12, 2007 8:18 PM

Get ready
D Mode CT User Guide 3 Copyright © 2007 Waxess
1
Wall mount
1Attach the wall mount adaptor to the base.
2Find the base AC adaptor (the larger adaptor,
Model number 48091000), plug the connector
into the DC IN 9V jack, then plug the telephone
line cord to the TEL LINE jack.
3Wrap the AC adaptor inside the molded wiring
channel, then wrap the cord around the strain
relief notch.
4Raise the antennas to a vertical position.
5Align the mounting slots on the base with the
mounting posts on the wall plate. Then push in
and down until the phone is firmly seated.
6Connect the handset cord to the jacks on the
handset and base, then set the corded handset
in the cradle.
7On the base, remove the handset retainer, flip it
over, then replace it.
D mode EVDO draft 1.book Page 3 Friday, January 12, 2007 8:18 PM

D Mode CT User Guide 4 Copyright © 2007 Waxess
1Base power on
When powered on for the first
time, the base goes through an
initialization sequence.
Note: Do not use the phone
until the initialization
sequence is complete.
Power backup
batteries (Optional)
The optional back-up batteries provide a reserve
power supply so the base can operate for up to 30
minutes (depending on battery condition) in case of
power outages or if power is cut off to the base for
any reason. Backup power activates immediately
when the normal power supply to the base is cut off.
1Verify power is disconnected from the base.
2Open the battery cover on the bottom of the
base.
D mode EVDO draft 1.book Page 4 Friday, January 12, 2007 8:18 PM

Get ready
D Mode CT User Guide 5 Copyright © 2007 Waxess
1
3Insert five AA alkaline
batteries with the
polarity (+ and -)
aligned as marked in the
compartment.
4Replace the cover.
Note:
• Batteries are not included
• Batteries are not required to operate the product
• There is no indication that shows when the base is
operating with normal power or back-up power
• If you choose to install back-up batteries, check
the power level frequently (see “Power back-up”
on page 57). Replace the batteries when the
power level is less than half of maximum
• After any power outage, check the battery power
level and replace batteries as needed
• The battery power comes on automatically when
current from the AC adaptor is interrupted;
unplugging the AC adaptor does not turn off power
to the phone
• Be sure to remove at least one battery when
disconnecting power
•The
Battery Level indicator on the base menu
screen may not show true battery condition unless
all five batteries are installed
D mode EVDO draft 1.book Page 5 Friday, January 12, 2007 8:18 PM

D Mode CT User Guide 6 Copyright © 2007 Waxess
1Caution: Use only AA alkaline batteries for power
backup. Do not use rechargeable
batteries. The battery compartment
circuitry is not designed to recharge
batteries.
Standby Screen
When the sequence is complete,
the Standby Screen appears.
This screen appears on both the
base and the handset, and is
always visible when the phone is
idle. At the bottom of the screen, the text indicates
which service lines are active. CEL is wireless
service, and TEL is landline service.
The CEL indicator may take up to two minutes to
appear, depending on cellular signal conditions in
your area.
If you have connected with your cellular service
provider, the date and time may be set
automatically. If not, see “Time and date” on page
12 to set the date and time manually.
D mode EVDO draft 1.book Page 6 Friday, January 12, 2007 8:18 PM

Get ready
D Mode CT User Guide 7 Copyright © 2007 Waxess
1
Signal level
The Signal Level feature helps
you find your strongest cellular
service signal. Move the base
around your location to find the
strongest signal level.
Be sure the CEL indicator is shown in the display
before checking the signal level.
Optional antenna removal
The base unit’s cellular antenna can be removed to
allow attachment of an external antenna.
Locate the three screws
attaching the antenna to
the base unit. Use a small
Philips head screw driver
to remove the three
screws. Store the antenna
and screws in a safe place.
D mode EVDO draft 1.book Page 7 Friday, January 12, 2007 8:18 PM

D Mode CT User Guide 8 Copyright © 2007 Waxess
1Ready the cordless handset
INSTALL THE BATTERY
1Open the cover.
2Verify that the
connector is
properly
aligned with
the jack and
connect the
battery.
Note: The
connector
is
designed to easily fit the jack in only one
direction. Do not use excessive force.
3Close the cover.
D mode EVDO draft 1.book Page 8 Friday, January 12, 2007 8:18 PM

Get ready
D Mode CT User Guide 9 Copyright © 2007 Waxess
1
CHARGE THE
BATTERY
1Find the cordless
handset AC
Adaptor (the
smaller adaptor,
Model number
RGD41090500).
Connect the AC adaptor to the DC 9V IN jack on
the charger and to a standard 120V AC wall
outlet.
2Set the charger on a desk or table, then set the
handset in the charger with the keypad facing
forward.
3Allow the battery to charge for
12–15 hours.
Note: Charge the battery
frequently. Leaving the
battery uncharged for a
prolonged period can
adversely affect battery
charging capacity. If this
happens, replace the battery.
D mode EVDO draft 1.book Page 9 Friday, January 12, 2007 8:18 PM

D Mode CT User Guide 10 Copyright © 2007 Waxess
2
A power indicator in the upper
right corner of the LCD shows
how much battery life remains.
Full charge
Low charge
Note: Use only the rechargeable battery pack
supplied with your cordless handset.
D mode EVDO draft 1.book Page 10 Friday, January 12, 2007 8:18 PM

Get set
D Mode CT User Guide 11 Copyright © 2007 Waxess
2
2Getset
•Dialing mode
1Press the MENU key on the
base.
The Menu appears.
2Press the key so the highlight bar moves to
Setup.
This action is called “scrolling” throughout this
guide.
3Press F1 to “select” this menu item.
This action is called “Press Select”
throughout this guide.
Another menu list appears.
4Press the key and scroll to Tone/Pulse.
5Press F1 to select this item
and this screen appears.
Highlight the correct setting for your phone
system, then press F1 to enter the setting in
memory.
A beep confirms the setting, and the Setup
menu appears.
D mode EVDO draft 1.book Page 11 Friday, January 12, 2007 8:18 PM

D Mode CT User Guide 12 Copyright © 2007 Waxess
2
6Press EXIT to return to the main menu screen.
OR
Press EXIT twice or OFF to return to Standby.
The following steps apply to both the base and the
handset.
•Time and date
The time and date automatically synchronizes with
the cellular network once when the base is powered
on (if supported by your service provider). The
time and date do not automatically synchronize
with the network afterward and must be set
manually.
1Press MENU.
2Use the /keys and scroll to Time and Date.
3Press Select.
A cursor blinks on the hour
number.
4Use the keypad to enter the
correct hour.
The cursor moves to the right for the minute
numbers.
5Enter the correct minutes, and press OK.
The AM/PM screen appears.
6Use the or key to set AM or PM and press
D mode EVDO draft 1.book Page 12 Friday, January 12, 2007 8:18 PM

Get set
D Mode CT User Guide 13 Copyright © 2007 Waxess
2
OK.
The time format setting appears.
7Use the or key to set the time format and
press OK.
The date screen appears with months showing.
8Use the keypad to enter the correct month.
After entering the month, the cursor moves to
the day.
9Enter the correct day then press OK.
The cursor appears on the first digit of the
current year setting.
10Use the keypad to enter the four digits for the
correct year and press OK
The date format appears.
11Press or to select a format and press OK.
You hear a confirmation tone and the Main
menu appears.
When the time and date are set on the base or on
one of the cordless handsets, the time and date for
all other components (handset or base)
automatically synchronize after a few minutes. If a
new cordless handset is added and properly
registered, the time and date for the new handset
will automatically synchronize.
D mode EVDO draft 1.book Page 13 Friday, January 12, 2007 8:18 PM

D Mode CT User Guide 14 Copyright © 2007 Waxess
2
•Set the ringer tone
You can set different ring tones for CEL (wireless)
calls and TEL (landline) calls.
1Press MENU.
2Scroll to Ringer/Key Beep, and press Select.
3Scroll to Ringer Tone, and press Select.
The ringer tone menu for CEL calls appears
first. The current ringer tone is highlighted.
The base has three ring tones available. The
handset has six rings available—three tones
and three melodies.
Note: Melodies are only available on the cordless
handset.
4Scroll through the list of tones.
Pause on a tone name to hear a short sample of
the tone. The sample plays two seconds for a
ring tone and 10 seconds for a melody.
5Press Select.
The TEL Ring Tone setting appears.
OR
Press Exit to cancel without saving changes.
6Follow steps 1–4 above to choose a tone, and
press Select.
A confirmation tone plays.
D mode EVDO draft 1.book Page 14 Friday, January 12, 2007 8:18 PM
This manual suits for next models
1
Table of contents