WEMAX L176FGN User manual

WEMAX Laser TV 4K Cinema
User Manual

2
Table of Contents
User Notice..........................................................................................3
Legal Notice........................................................................................ 3
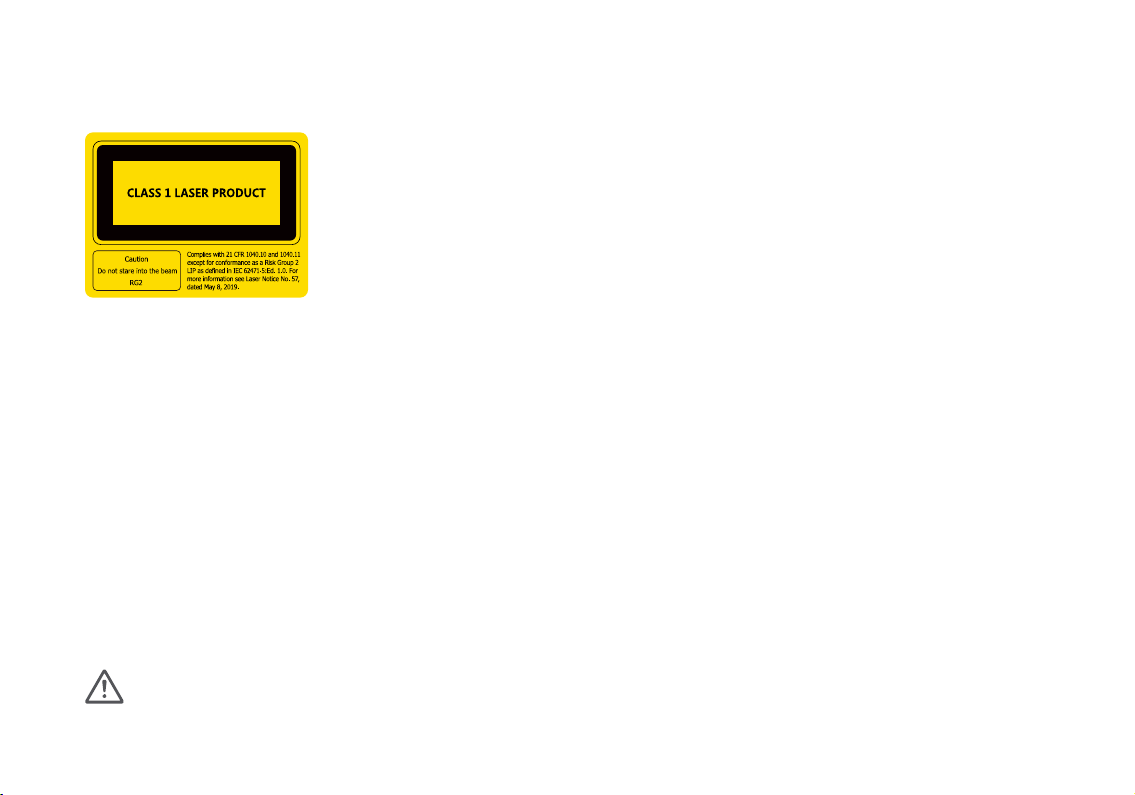
Laser Safety Information................................................................5
Safety Instructions............................................................................6
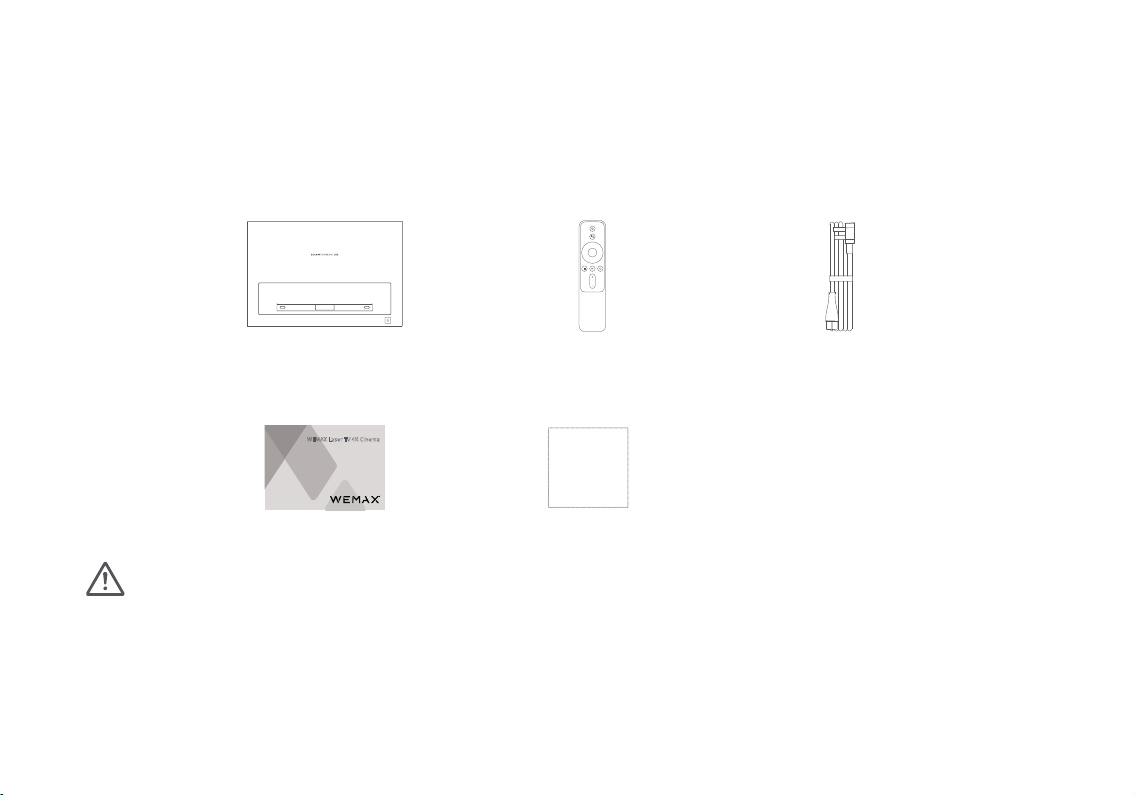
Package Contents.............................................................................8
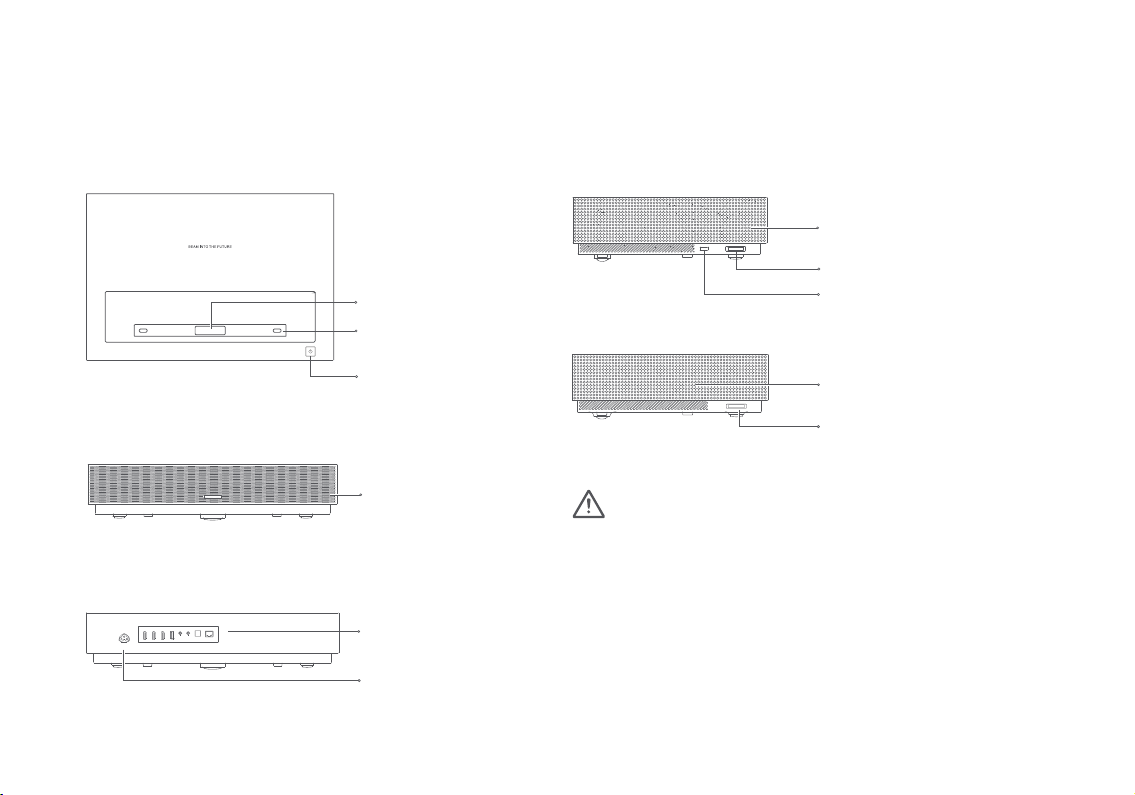
Product Overview .............................................................................9
Exterior .............................................................................................9
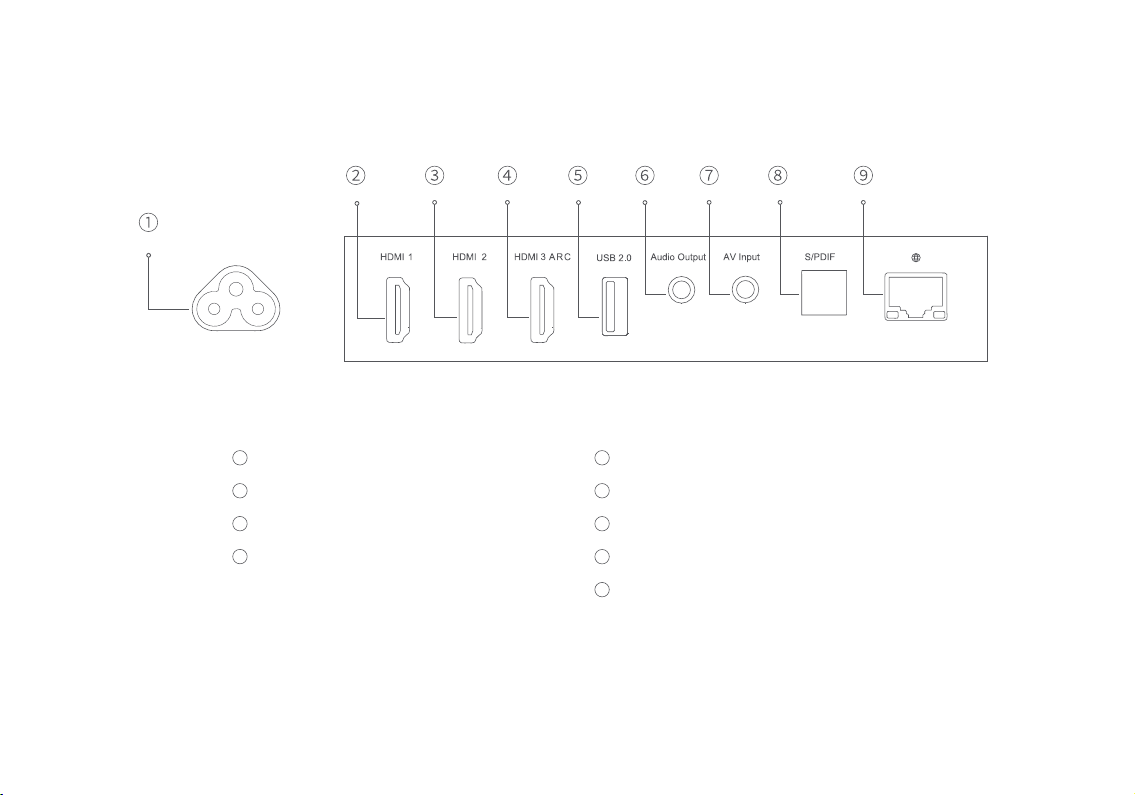
Connection Ports ......................................................................... 10
Power Indicator .............................................................................11
Remote Control ............................................................................ 12
Projection Distance & Screen Size ........................................ 13
Suspended ceiling installation................................................ 14
Getting Started ................................................................................. 15
Pairing the Remote ..................................................................... 15
Image Focus .................................................................................. 16
Keystone Correction................................................................... 16
Network & Internet...................................................................... 17
Smart Temperature Control..................................................... 17
Safety & Protection..................................................................... 18
Bluetooth Speakers..................................................................... 19
Care & Maintenance ........................................................................20
Heat Dissipation Maintenance ................................................20
Cleaning & Maintenance............................................................20
Specications .................................................................................... 21
Troubleshooting................................................................................23
Product Certications ....................................................................24
Product Warranty.............................................................................25

3
User Notice
Thank you for choosing the WEMAX Laser TV 4K Cinema.
Correct Disposal of This Product (Waste Electrical & Electronic Equipment)
(Applicable in countries with separate collection systems)
Read this manual carefully before use, and retain it for future reference. Illustrations of product, accessories, and user
interface in the user manual are for reference purposes only. Actual product and functions may vary due to product
enhancements.
Battery Disposal Information
Dispose of batteries according to your local environmental laws and guidelines.
Legal Notice
This marking on the product, accessories or literature indicates that the product and its electronic accessories should not
be disposed of with other household waste at the end of their working life. To prevent possible harm to the environment
or human health from uncontrolled waste disposal, please separate these items from other types of waste and recycle
them responsibly to promote the sustainable reuse of material resources.Household users should contact either the
retailer where they purchased this product, or their local government office, for details of where and how they can
take these items for environmentally safe recycling.Business users should contact their supplier and check the terms
and conditions of the purchase contract. This product and its electronic accessories should not be mixed with other
commercial wastes for disposal.
Hereby, [Fengmi (Beijing) Technology Co., Ltd.] declares that the radio equipment type [Formovie Laser TV 4K Cinema
/ L176FGN] is in compliance with Directive 2014/53/EU, 2009/125/EC, 2011/65/EU. The full text of the EU declaration of
conformity is available at the following internet address: http://www.formovie.com/global/service/support/declaration.
html
This device is restricted to indoor use when operating in the 5150 to 5350 MHz frequency range.
BT max transmitter power : 100mW at 2.4GHz – 2.4835GHz
Wi-Fi max transmitter power : 100mW at 2.4GHz–2.4835GHz, 200mW at 5.15GHz–5.35GHz & 5.47GHz–5.725GHz

4
WARNING: Cancer and Reproductive Harm - www.P65Warnings.ca.gov
FCC Compliance Statement
This device complies with part 15 of the FCC Rules. Operation is subject to the following two conditions:
(1) This device may not cause harmful interference, and (2) this device must accept any interference received,
including interference that may cause undesired operation.
Important: You are cautioned that changes or modifications not expressly approved by the party responsible for
compliance could void the user's authority to operate the equipment.
RF Exposure Information: The radiated output power of this device meets the limits of FCC/IC radio frequency exposure
limits.This device should be operated with a minimum separation distance of 20cm (8 inches) between the equipment
and a person's body.
Note:This equipment has been tested and found to comply with the limits for a Class B digital device, pursuant to part 15 of
the FCC rules.
These limits are designed to provide reasonable protection against harmful interference in a residential installation.
This equipment generates, uses and can radiate radio frequency energy and, if not installed and used in accordance with
the instructions,
may cause harmful interference to radio communications.However, there is no guarantee that interference will not occur
in a particular installation.If this equipment does cause harmful interference to radio or television reception, which can be
determined by turning the equipment off and on,the user is encouraged to try to correct the interference by one or more
of the following measures:
- Reorient or relocate the receiving antenna.
- Increase the separation between the equipment and receiver.
- Connect the equipment into an outlet on a circuit different from that to which the receiver is connected.
- Consult the dealer or an experienced radio/TV technician for help.

5
Laser Information Label
For U.S.A.
For Europe
The product complies with IEC 60825-1:2014 Class 1 and RG2 IEC 62471-5:2015.
Note: Under normal use of condition, this equipment should be kept a separation distance of at least 20 cm
between the antenna and the body of the user.
Complies with 21 CFR 1040.10 and 1040.11 except for conformance as a Risk Group 2 LIP as dened in IEC 62471-5:Ed. 1.0.
For more information see Laser Notice No. 57, dated May 8, 2019.
CAUTION:
- Notice is given to supervise children and to never allow them to stare into the projector beam at any distance from the
projector.
- Notice is given to use caution when using the remote control for starting the projector while in front of the
projection lens.
- Notice is given to the user to avoid the use of optical aids such as binoculars or telescopes inside the beam.
As with any bright light source, do not stare into the beam, RG2 IEC 62471-5:2015
Laser Safety Information

6
Preventing Electric Shocks and Fire Hazards:
- Using an incorrect power cord may result in decreased product performance and even electric shock or re. To ensure
the projector's performance and safety, only use its original power cord or an identical replacement.
Transportation Instructions: It is recommended to transport this projector in its original or similar packaging.
Grounding Warning: This product must be grounded when in use.
Safety Instructions
Before using the product, please carefully read the following safety instructions.
Safety Label Description
This warning symbol informs the user that this product contains non-insulated voltage sources that can cause an
electric shock. Coming into contact with any internal component may result in an electric shock.
This symbol informs the user about important handling and maintenance related information. Please read this
information carefully to ensure proper use.
This symbol informs the user to be aware of high temperatures.
This symbol informs the user to avoid touching this part.

7
• In poorly ventilated or narrow spaces.
• Near devices that produce a strong magnetic eld.
• In direct sunlight.
• Close to a re alarm.
• In extremely hot, cold or humid environments.
Safety Precautions
- Do not place this projector on an unstable platform, stand or table so as to prevent it from falling and causing serious
damage or personal injury.
- Do not look directly into the lens when the projector is turned on to avoid eye damage.
- Do not attempt to disassemble this projector as it may contain dangerous high voltage components. This projector
must only be maintained and repaired by a qualied or authorized technician.
- Do not place this projector in an upright position, as it may fall over and cause injury or damage.
- Do not expose this projector to rain or moisture (operating humidity is 20%–80%).
- Do not immerse this projector in, nor expose it to water or other liquids. Immediately unplug the projector if any liquid
or object got into its housing, and have it checked by a qualied technician before using it again.
- Do not place this projector in any of the following environments:
- If you use an extension cord, it must not have a current rating lower than the projector's original power cord. Failure to
heed this warning may result in the extension cord overheating and could pose hazards such as electric shock and re.
- To avoid damage caused by a power surge or lightning strike, unplug the projector from the power outlet during
thunderstorms or when it is not in use for a long time.
- Do not place any ammable objects near this projector so as to avoid re.
- Do not block the lens with any object when the projector is turned on. Any object placed close to the lens may get very
hot and/or deformed, and may even cause a re.
- Do not block any of the vents of the projector, as this may cause a buildup of heat within the product and result in a re.

8
When opening the packaging, check the contents of the box against the list below. If there is anything missing, please
contact the seller in time.
Package Contents
Note:
Laser Projector Remote Control Power Cord
User Manual Cleaning Cloth
- The actual contents may vary depending on the country (or region) of sale, please refer to the actual product.
- Retain the original packaging for future storage or transportation.
WEMAX Laser TV �K Cinema
User Manual

9
Projection Lens
Power Button
USB 2.0 Port
Height Adjustable Wheel
Power Port
Speaker Grille
Heat Dissipation Vents
Vents
Height Adjustable Wheel
Caution
Connection Ports
Human Body Detection
-
Do not place any ammable objects nearthe heat dissipation
vent.
- Do not place any objects near the vents, as this may cause
heat to build up inside the projector.
- Do not look directly into the lens so as to avoid eye
damage as this projector emits strong light during use.
Product Overview
Exterior

10
Connection Ports
Power Port
HDMI input port 1
HDMI input port 2
HDMI input port 3
1
3
4
5
6
7
8
9
(ARC) Audio return channel port
Supports USB 2.0 communication protocol
Audio output port
AV input port (3.5 mm composite AV port)
Optical digital audio signal output port
Ethernet port
2

11
Power Indicator
Power Indicator
The power indicator (a white light) to the corresponding projector's status is as follows:
- The indicator blinks when the projector is turning on.
- The indicator turns off after the project is turned on.
- The indicator remains on after turning off the screen.
- The indicator blinks when the projector is turning off.
- The indicator turns off after the projector is turned off.

12
Power Button:
When the projector is turned off,
press to turn on.
When the projector is on, press to
select Power off, Restart, Bluetooth
speaker mode or Screenshot.
Directional Pad (Up):
Move Up
Directional Pad (Left):
Move Left
OK: Conrm the selected option or setting
Directional Pad (Right): Move Right
Directional Pad (Down): Move Down
Google Assistant:
Press the Assistant button on your
remote to talk to Google Assistant
Battery Cover:
Slide down the battery cover, and install or
replace the batteries with two new AAA batteries.
- Pay attention to the positive and negative poles when
installing batteries in the remote control.
- When battery leaks, immediately wipe away any uid with a
dry cloth and replace the batteries with new ones.
- Dispose of used batteries according to local waste disposal
rules and regulations of the country or area you live in.
Note: With the Google Assistant, you can
quickly access entertainment, control smart
devices, get answers on screen, and more
using your voice.
Home: Return to the home screen
Return: Return to the previous menu
Volume - : Decrease the volume
Volume + :
Increase the volume
App:
Access the app interface
Note:
Remote Control

13
Projection Distance & Screen Size
Determine the distance between the projector and the wall or screen according to the desired screen size.
Screen Dimensions (SD)
The diagonal size of the projection screen (in inches).
Relative Distance (D)
The distance between the projector and the wall/screen (in inches).
Relative Height (H)
The distance from the bottom of the projector to the
bottom edge of the projected image (in inches).
Projection screen
Projection screen
SD
Screen Dimensions
(SD)
Relative Distance
(D)
Relative Height
(H)
80" 5.5" 11.8"
90" 7.1" 13.4"
100" 9.1" 14.6"
120" 13" 16.9"
150" 19.3" 19.7"
Note: The dimensions in the table above are for reference only. They are approximate and may slightly differ from the actual values.

14
Suspended Ceiling Installation
Suspended ceiling installation is one of the installation methods that you hang the projector in an overhead location, for
example, on a high ceiling, through a ceiling mount. A projector supporting suspended ceiling installation has threaded
holes on the bottom, you can install the project on the mount by attaching the screws into the holes.
1. Install the mount.
Make sure the mount used to install the projector onto can
support at least five times the weight of the projector. It
requires
a professional to carry out the installation.
2. When installing the projector onto a ceiling mount, make sure
the screws meet the following specications:
Screw Type: Non self-tapping screw M4 × 10 (diameter: 4 mm,
length: 10 mm), 4 pieces.
Assembly Dimensions: See the gure on the right.
3. Adjust the mount depending on your needs and rmly x the
screws to complete the installation.
Cautions:
- To avoid the convective heat transfer between the air inlets and air outlets, make sure there are no obstructions within
20 inches of the air inlets and heat dissipation vents.
- Keep the bottom of the projector 4 inches away from the ceiling when suspending it.
- Damage caused by incorrect installation will void the warranty.
The installation steps are as follows:
235 mm110.5 mm
135 mm
46.8 mm

15
Pairing the Remote
After installing the batteries
in the remote control, press
the OK button to start
pairing.
Note: Keep the remote control within 8 inches of the projector during the pairing process.
Place the remote control close to the
bottom right corner of the projector, then
simultaneously press and hold the Home
and the App buttons. Release the buttons
once you hear a beep, then the remote
control is paired with the projector.
Getting Started
A notification will appear on
the projected image once the
remote control has been paired
successfully.
8 in

16
Image Focus Keystone Correction
Go to Settings > Projector > Focus, press the left and
right button on the remote control to manually ne tune.
To perform keystone correction, go to Settings > Projector
> Keystone Correction. Use the Left and Right remote
buttons to select 8-Point Keystone Correction, Fine Tune,
or Reset. Press the OK button to select a mode, then use
the remote's directional pad to adjust the shape of the
projected image.
8-Point Keystone Correction Fine Tune Reset

17
Go to Settings > Network & Internet. Select a wireless
network to connect to, enter the password, and wait
for the projector to connect.
The projector automatically monitors the ambient
temperature (operating temperature range is
0°C to 40°C), projector temperature, and color
wheel temperature, and the projector's fan speed
is automatically adjusted based on the detected
temperature values.
- The projector has two brightness modes to choose
from when operating at a normal temperature. To adjust
the projector's brightness level, go to Settings > Image >
Brightness Mode.
- If the projector gets too hot, an overheating warning
will appear and the projector will automatically switch
to low brightness mode. Temperature and error
warnings will be displayed automatically whenever the
temperature exceeds its maximum range to inform you
that the projector will be automatically turned off.
Network & Internet Smart Temperature Control
Wi-Fi
Available networks
Other options
Add new network
Scanning always available
Let Google’s location service and other apps
xiaomi_2.4G
xiaomi_5G
Formovie_5G
Network & Internet

18
The projector comes with an infrared sensor which is able to intelligently detect and protect the human eye from
damage caused by strong light within the projected area.
The projector will reduce its brightness to the lowest possible value when the sensor is triggered and issue the following
notication: "Do not look directly at the light source." Press any button on the remote to exit.
Human infrared sensor &
fresnel optical lens Front sensor range: Approximately 55° Left and right side sensor
range: Approximately 70°
Safety & Protection

19
The projector has four high-quality built-in speakers with a total output of about 30 W.
The speakers can also be used as a stand-alone Bluetooth stereo.
To use speakers as the Bluetooth stereo, press the Home button, then select Settings > Remotes & Accessories >
Bluetooth speaker mode from the home screen. Enable the Bluetooth function on your phone. Search and locate the
projector name in the Bluetooth list, then pair the projector with your phone.
Note:
To connect and pair with other Bluetooth devices such as speakers and earphones, select Settings > Remotes &
Accessories > Add accessory. Make sure the device is in an awaiting connection mode with its Bluetooth function
enabled.
Bluetooth Speakers
Tweeter TweeterFull Range Speakers Full Range Speakers

20
Turn off and unplug the projector before cleaning.
Only use the cleaning cloth that comes with the projector or a
professional grade cleaning cloth to clean the projector's glass.
Do not use any abrasive cleaning products, solvents, chemicals, or other
rough objects so as to avoid scratches or corrosion.
- The projector is not water resistant. Do not allow liquids to penetrate
the projector, especially areas such as the power indicator, glass cover,
air vents, connection ports, and speaker grilles.
- Only use the cleaning cloth that comes with the projector or a
professional grade cleaning cloth to clean the projector's lens.
Care & Maintenance
Heat Dissipation Maintenance
Cleaning & Maintenance
Note: Do not place any objects within 20 inches of the projector's air vents, as this will affect its heat
dissipation effect.
Note: Do not touch the heat dissipation vent or
ventilation vents as temperatures can reach up to
65°C.
Outlet Inlet
Note:
20 in. 20 in.
Table of contents