WesAudio _TITAN User manual

WESAUDIO
3/15/17
_TITAN USER MANUAL REV3
1
www.WesAudio.com
_TITAN
User manual
EN
Copyright 2016 by WesAudio

WESAUDIO
3/15/17
_TITAN USER MANUAL REV3
2
Thank You for the purchase of _TITAN
_TITAN
Ng500 compatible frame with digital control.
With kind regards
Radoslaw Wesolowski and Michal Weglicki

WESAUDIO
3/15/17
_TITAN USER MANUAL REV3
3
_TITAN is 500 series compatible (*) rack frame which
implements ng500 connector and GCon protocol.
_TITAN is complete recall system designed to provide total integration with your
beloved analogue equipment. It extends 500 series connector with additional pins
where modules can be designed to support digital recall or any other vendor specific
functionalities. This extension is part of new open standard “ng500” –“Next Generation
500 series” which allows other manufacturers** to design and implement digitally
controlled analog devices.
We are proud to present _TITAN –Future of analog processors.
(*) Important note about 500 series extension: please check “Instalation and compatibility” chapter.
(**) Please check “GCon Open specification framework”.

WESAUDIO
3/15/17
_TITAN USER MANUAL REV3
4
Table of Contents
1. Abbreviations and terms..........................................................................................................................6
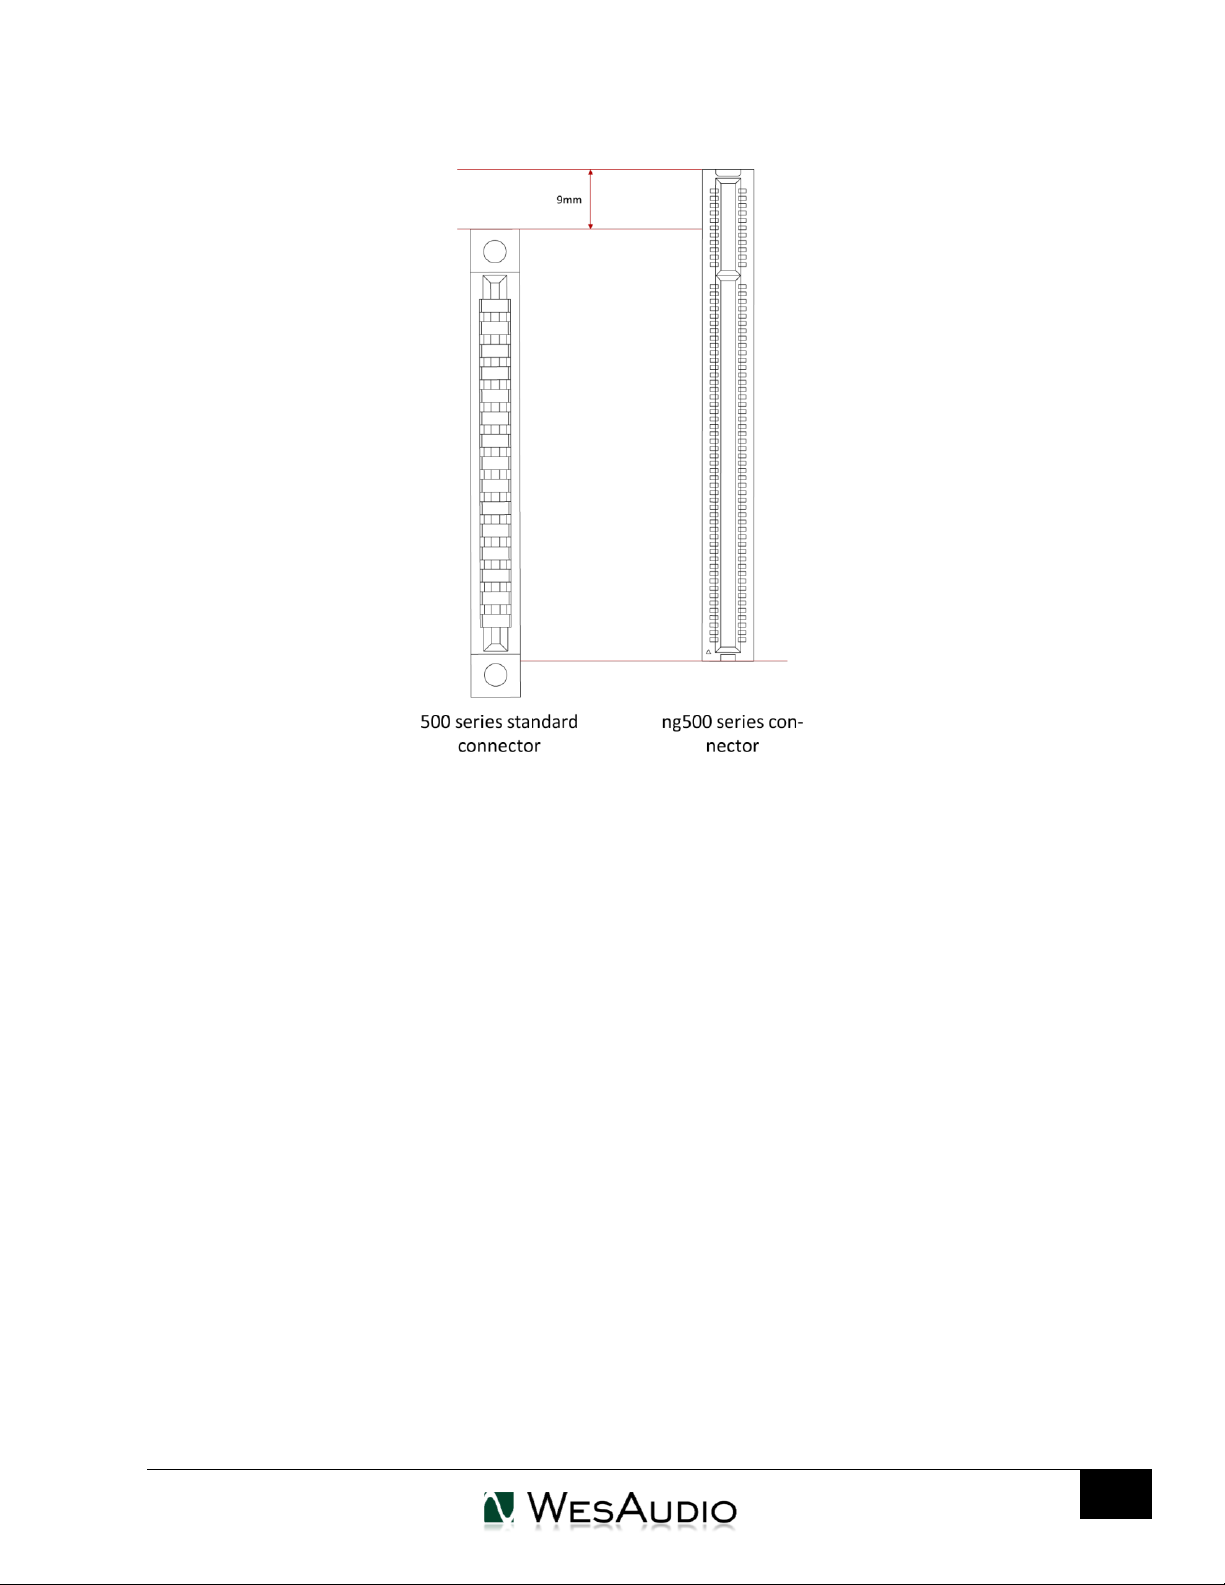
2. Installation and compatibility...................................................................................................................7
3. Front panel ...............................................................................................................................................9
4. Overview ................................................................................................................................................10
5. Software .................................................................................................................................................11
5.1. Installation..............................................................................................................................................11
5.1.1. WINDOWS .............................................................................................................................................11
5.1.2. OSX......................................................................................................................................................11
5.1.3. Troubleshooting..................................................................................................................................11
6. Set up GCon Connection. .......................................................................................................................13
6.1. USB .........................................................................................................................................................14
6.2. Ethernet..................................................................................................................................................15
6.2.1. _TITAN Configuration. ........................................................................................................................16
6.2.1.1. DHCP ..........................................................................................................................................17
6.2.2. Static IP address..................................................................................................................................18
6.2.3. Direct connection –setting IP address on PC/MAC............................................................................23
7. Set up Audio signal.................................................................................................................................24
7.1. Rear XLR Connections.............................................................................................................................24
7.2. I.A.C. - Internal Audio Connector. ..........................................................................................................25
8. Stereo links.............................................................................................................................................27
8.1. Stereo link buttons. ................................................................................................................................27
8.2. Stereo links in GConManager.................................................................................................................27
8.3. Stereo links integration with GCon compatible modules. .....................................................................28
9. GConManager ........................................................................................................................................29
9.1. Where is GConManager?....................................................................................................................29
9.2. How to start Firmware Upgrade.........................................................................................................29
9.3. How to check currently connected devices........................................................................................30
10. GCon open specification framework......................................................................................................31
11. Multi Host Support –USB note. .............................................................................................................31

WESAUDIO
3/15/17
_TITAN USER MANUAL REV3
6
1. Abbreviations and terms
GCon –high speed communication protocol which allows full management and recall of analog devices.
Please note that this is just management protocol, audio signal transfer is not in scope of its capabilities.
I.A.C. –Internal Audio Connector, special _TITAN connector which is integrated with internal audio routing,
and allows to connect audio signal directly without any additional wires (please check “I.A.C – Internal Audio
Connector” chapter).
NG500 –Next generation 500 series.
NG500 connector –special connector which extends standardized 500 series connector with additional pins.
UDP - User Datagram Protocol.

WESAUDIO
3/15/17
_TITAN USER MANUAL REV3
7
2. Installation and compatibility.
After unpacking your _TITAN frame, please check for any visible damage that may have occurred
during transit. If there is any problem, please contact your dealer immediately for advice on what to do.
!!!Ensure the rack is completely powered down before attempting modules
installation to prevent damage to the frame!!!
Modules installation walkthrough:
Choose the position in the rack to which you will install the module and slide it in so that the edge
connector of the module aligns with the matching connector in the rack. A gentle push and the module
should slide home into the rack connector. Attach the front panel to the front of the rack with screws
supplied by your rack manufacturer. This is important for mechanical rigidity. Do not over tighten these
screws to avoid stripping out the threads. Apply power, test that everything is working OK, and most
importantly, enjoy!
500 series compatibility note:
_Titan connector was designed to deliver new implementation opportunities, but also to remain
compatible with most of 500 series modules. Nevertheless ng500 series connector is higher than 500
series standard plug and some standard 500 series modules won’t fit into _TITAN. The reason for that is
module’s chassis design at the back, which can prevent the module to fit in correctly.

WESAUDIO
3/15/17
_TITAN USER MANUAL REV3
8
As you can see on above picture, ng500 series connector is higher 9mm comparing to standard 500
series socket (please note that above sockets are matched to each other based on particular pins). To
check if your modules will fit into _TITAN you can send us a query to info@wesaudio.com with description
of modules that you would like to use.

WESAUDIO
3/15/17
_TITAN USER MANUAL REV3
9
3. Front panel
H-LINK note:
If this LED is constantly blinking, that means that _TITAN is in upgrade mode, and firmware upgrade
should be triggered through GConManager application.

WESAUDIO
3/15/17
_TITAN USER MANUAL REV3
10
4. Overview
_Titan main features:
GCon compatible frame which allows to communicate with modules through single connection.
USB connection to manage up to 10 modules.
Ethernet connection (UDP based) to manage up to 10 modules (LAN single subnet).
GConManager application which allows to manage stereo links.
Internal audio signals are routed into special connector accessible on 10th slot, which allows
integration with “Summing Modules” or “Audio interfaces”.
Stereo links are fully integrated. Pressing “Link” button on 2 modules which support GCon
protocol (e.g. _Mimas) sets stereo link on the _Titan.
Open Specification –documentation and software framework including communication drivers
for any Vendor that would like to adopt to this standard.
10 slots with ng500 series connector.
Remote firmware upgrade –_Titan & all modules inside can be upgraded remotely through USB
or Ethernet connection.
XLR sockets in/out for each slot.
Internal stereo link switches which can be also managed through GConManager standalone
application.
Linear power supply capable to deliver 5A of power.
Power mode switch –115V/230V.
Warranty: 2 years.

WESAUDIO
3/15/17
_TITAN USER MANUAL REV3
11
5. Software
Software to manage HW units can be downloaded from http://www.wesaudio.com/download by
anyone who purchased related HW unit. To check currently supported plugin types and platforms, please
go to download section in our website.
5.1. Installation
To install WesAudio software package, please visit http://www.wesaudio.com/download and
download recent version of software.
5.1.1. WINDOWS
Start the installer application, if you will encounter any system warnings about this particular installer,
please ignore them*, then select any components which you would like to install**.
If this is FIRST installation, please unplug all WesAudio devices from your machine.
When USB driver will be installed, application will inform that all devices should be connected –
please do so.
If USB driver installation is triggered, user will be asked to restart its computer. We know that this
is unwanted activity, but it is necessary step for USB driver to install with success.
If computer restart is triggered, this Installer will start again during start up. If for some reason
installer won’t be started after the restart, please start same installer manually again.
5.1.2. OSX
Because OSX architecture and USB devices handling is much simpler in concept, the only thing to
note is to have all devices connected during install procedure.
Start the installer application, if you will encounter any system warnings about this particular
installer, please ignore them *(sometimes it is necessary to open context menu with right mouse button
and trigger installation once again).
5.1.3. Troubleshooting
If anything would fail during installation procedure please contact our support at
[email protected]om. We will get back to you ASAP.
Below you can find some symptoms and description which will help to investigate the issue:

WESAUDIO
3/15/17
_TITAN USER MANUAL REV3
12
“Can’t find my device on plugin drop down menu”
Unfortunately there could be dozens of root causes. On Windows machine it is very important to check if
USB device is successfully connected on system level. That can be checked in “Control Panel->System-
>Device Manager”:
** Please note that for WINDOWS it is necessary to install USB driver which is critical to communicate with
HW units. It is required step only during first installation, and this option will be automatically disabled
during any software upgrades.

WESAUDIO
3/15/17
_TITAN USER MANUAL REV3
13
6. Set up GCon Connection.
This chapter goes through possible setups and describes main configuration steps. In general
_TITAN implements two connection types:
USB 2.0+ –which allows to manage up to 10 modules inside.
Ethernet 10/100 –based on UDP protocol (LAN single subnet) which allows to manage up to 10
units from 5 GCon applications* at the same time.
(*) GCon application is any process on your workstation which implements GCon connection, like your
DAW or GConManager. It also means that such applications can be started on different hosts
(workstations) as long as those are located in same LAN subnet.
Please note that this chapter describes how to establish GCon
connection to manage your devices and recall settings, how to
setup audio signal connection is described in the next chapter.

WESAUDIO
3/15/17
_TITAN USER MANUAL REV3
14
6.1. USB
To connect your _TITAN frame directly to your workstation, just connect it to any available USB 2.0+
socket via USB cable.

WESAUDIO
3/15/17
_TITAN USER MANUAL REV3
15
6.2. Ethernet
_Titan as any network device, can be connected to your workstation in following ways:
By joining your local area network (LAN)
Or directly connected to your workstation.
In some cases it is mandatory to set IP addresses* for your workstation and _TITAN.
Below you can find possible setup in your local area network, and how different devices can access
_TITAN resources:
(*) In case you would like _TITAN to join already existing network, most probably your workstation has IP
address already set up through static configuration entry, or through DHCP (by your router).

WESAUDIO
3/15/17
_TITAN USER MANUAL REV3
16
6.2.1. _TITAN Configuration.
Each _TITAN chassis by default has DHCP enabled. So
if you would like to connect your _TITAN to your
router, just do it!
…However if you would like to change that configuration, please read description below.

WESAUDIO
3/15/17
_TITAN USER MANUAL REV3
17
6.2.1.1. DHCP
To change any network specific configuration of your _TITAN chassis:
1) Connect your _TITAN directly to your workstation through USB cable (If connection to _TITAN is
already established through Ethernet cable, this step is not necessary),
2) Start GConManager and go to _CONFIG application.
3) Then select your _TITAN unit from the elements tree on the left.
4) Then change DHCP option to “ON”. Unit will restart, and your connection to _TITAN will be
established again.
Now you can disconnect USB cable, and connect _TITAN using Ethernet cable.

WESAUDIO
3/15/17
_TITAN USER MANUAL REV3
18
6.2.2. Static IP address.
In general there are few use cases when you would like to configure _TITAN IP address manually:
1) When you router doesn’t support DHCP
2) When your LAN network is configured manually for example through hardware switch.
3) When you would like to connect your _TITAN directly to your Ethernet socket in your workstation.
As a first step please check your currently configured IP address.
6.2.2.1. Windows –how to check your IP address.
Start cmd application (hit Windows “START” button and type “cmd”):
Type “ipconfig” which will show current network configuration:

WESAUDIO
3/15/17
_TITAN USER MANUAL REV3
19
Then you have to find your currently connected network card (Ethernet card or Wi-fi card) and
check IP address. In this particular case IP address is 192.168.0.100. _TITAN IP address has to be
in the same subnet, so for above example it would mean any IP address from 192.168.0.2 to
192.168.0.254, excluding currently occupied addresses by any devices connected to your network
(like your workstation address, router address, etc.).

WESAUDIO
3/15/17
_TITAN USER MANUAL REV3
20
6.2.2.2. OSX –how to check your IP address.
Start “Terminal” (located in Applications/Utilities) application:
Type “ifconfig” which will show current network configuration:
Table of contents
Popular Enclosure manuals by other brands

Carlon
Carlon CS863 Installation Instructions and Accessory Applications

Rittal
Rittal AX 1432.000 Assembly and operating instructions

OBERON
OBERON 1020-00 installation guide

Eaton
Eaton Crouse-hinds series instruction manual

Lutron Electronics
Lutron Electronics AMX ALD-D48 quick start guide

inXtron
inXtron SK-3500 Super-S3 user manual