Whittier Wood 1127AUFg User manual

P.O. Box 2827
Eugene, OR 97402 USA
Production Code:
VN 04/19
McKenzie Dressers
Assembly Instructions
Model #
IMPORTANT NOTES:
For normal household use only. Not recommended for commercial use.
Do not climb, sit or stand on this piece of furniture.
Do not overload the drawers.
Unload items before you move this unit.
Before you begin your project, completely read the Assembly
Instructions and Finishing Hints.
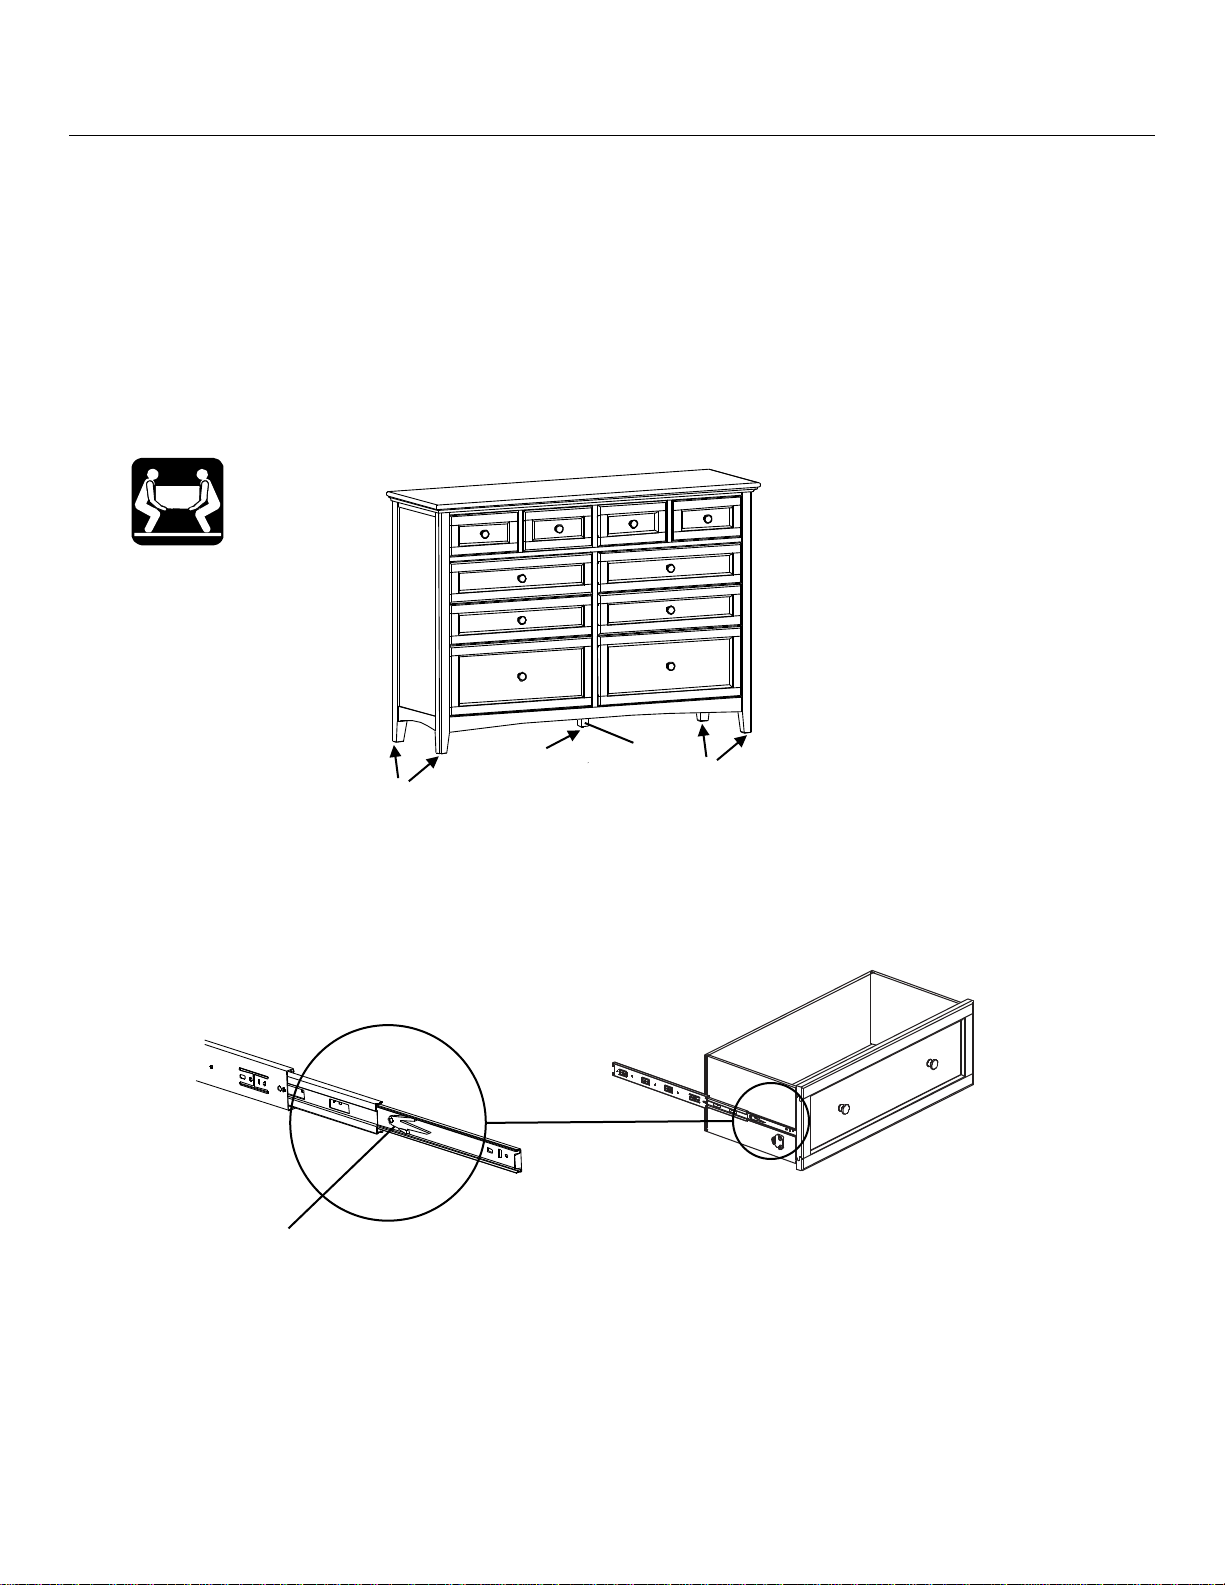
This assembly requires two people.
WARNING
Serious or fatal crushing injuries can occur from furniture tip-over. Use of
tip-over restraints may only reduce but not eliminate the risk of tip-over.
To help prevent tip-over:
Place heaviest items in the bottom drawers.
Unless specifically designed to accommodate, do not set TVs or other
heavy objects on top of this product.
Never allow children to climb or hang on drawers, doors or shelves.
Never open more than one drawer at a time.
Do not defeat or remove the drawer interlock system.
Warning: At least one tipping restraint kit was included with your piece of
Whittier Wood Furniture. When you receive your furniture, be sure to find
and properly install the tipping restraint(s). If you cannot locate the
restraint(s), please contact us immediately for replacement.
Drilling, sawing, sanding or machining wood products can expose you to
wood dust, a substance known to the state of California to cause cancer.
Avoid inhaling wood dust or use a dust mask or other safeguards for
personal protection.
For more information go to: www.p65warnings.ca.gov/wood
This product can expose you to chemicals, including formaldehyde,
which are known to the State of California to cause cancer.
For more information go to: www.p65warnings.ca.gov/furniture
DESIGN SUBJECT TO CHANGE WITHOUT NOTICE.
CUSTOMER SERVICE
If you ever have questions about your furniture, please do not hesitate to contact us. In the unlikely event you need a
replacement part; we can make those parts available through an authorized Whittier Wood Furniture dealer. If you
cannot order replacement parts through your dealer, please contact our customer service department.
Hours: Our friendly customer service staff can be reached:
Monday-Friday 8:00 a.m. to 5:00 p.m. (Pacific Time).
You may leave a message 24 hours a day, seven days a week.
Customer Service: 800-653-3336 • Outside the U.S.: 541-687-0213
Fax: 541-687-2060• Email: info@whittierwood.com
Thank you for allowing us to help you furnish your
home. We are certain you will be delighted with
your new furniture for many years to come.
1127AUFg
McKenzie
9-Drawer
Dresser
1128AUFg
McKenzie
10-Drawer
Dresser

1127AUFg McKenzie 9-Drawer Dresser
1128AUFg McKenzie 10-Drawer Dresser
Parts List
1127AUFg_1128AUFg —Page 2 —04/19
Please identify the parts and check that quantities received match those on this list.
If you need to replace a part, refer to the following letter and part name.
Part
Description
Quantity
1127AUFg
1128AUFg
A
Top Assembly (attached)
1
1
Bg
Case
1
1
F
Small Drawer Box (inserted)
3
4
G
Medium Drawer Box (inserted)
4
4
H
Large Drawer Box (inserted)
2
2
I
Small Drawer Face (attached)
3
4
J
Medium Drawer Face (attached)
4
4
K
Large Drawer Face (attached)
2
2
L
Knob (attached)
9
10
Qf
#8 x 1-1/2" Machine Screw Tuscan (installed)
9
10
Tf
#8 x 7/8" Black Lo-Profile Screw (inserted)
48
52
U
#8 x 1-1/4" Pan Head Screw (inserted)
21
26
Y
Small Adjustable Glide (installed)
4
4
YA
Adjustable Glide with Hex Nut (installed)
1
1
YB
Assembled Foot (attached)
1
1
YC
5/16" x 3/4" Insert Nut (inserted)
1
1
YD
Anti-Tip Snapper (attached)
2
2
YE
Drawer Clip (attached)
4
4
Z
16" Drawer Slides (pre-installed sets)
9
10
ZB
#6 x 1/2" Philtruss Screw (inserted)
66
72
ZC
#6 x 3/4" Philtruss Screw (inserted)
60
66
ZT
#8 x 2" Black Screw (inserted)
2
2
ZU
M4 x 10mm Insert Nut (inserted)
8
8
ZV
1/4" x 20mm Insert Nut (inserted)
4
4
ZW
#8 x 1-1/8" Lo-Profile Screw (inserted)
4
4
ZX
#8 x 1-3/8" Lo-Profile Screw (inserted)
9
10
TS
Furniture Tipping Restraint (attached)
1 set
1 set
1127AUFg McKenzie 9-Drawer Dresser
1128AUFg McKenzie 10-Drawer Dresser
Assembly Instructions
1127AUFg_1128AUFg —Page 3 —04/19
Tool Required: Phillips Screwdriver, Pencil.
1. This piece of furniture includes two drawer interlock systems, one controlling each vertical bank
of drawers; this allows only one lower drawer in each bank to be open at a time. This safety
feature reduces the risk of tip over. Do not defeat or remove the drawer interlock systems.
2. Place the unit at its final destination. Rotate the Small Adjustable Glides (Y) found at the corners
of the unit and the Adjustable Glide with Hex Nut (YA) at the bottom of the Assembled Foot (YB)
until the unit is level. See Figure 2.
3. If you need to remove your drawers, pull up on the left Drawer Release Lever while pushing
down on the right Drawer Release Lever and pull out the drawer. See Figures 3 and 3a. Note
where each drawer came from to make sure you place them back into their correct positions.
Fig. 3
Drawer Release Lever
Fig. 3a
Fig. 2
Y
YA
YB
Y

1127AUFg McKenzie 9-Drawer Dresser
1128AUFg McKenzie 10-Drawer Dresser
Assembly Instructions
1127AUFg_1128AUFg —Page 4 —04/19
4. When removing drawers from furniture featuring the Anti-Tip Drawer Interlock System it is
important that the drawer be installed back in its original location. Numbers and letters are
stamped on the back of the drawers. Stamping sequence starts at the bottom, moves to the top
and designated left or right.
Drawer back stamping example:
Continued on Page 6
3L
2L
1L
4R
2R
1R
Fig. 4
4L
4RC
3R
4LC

1127AUFg McKenzie 9-Drawer Dresser
1128AUFg McKenzie 10-Drawer Dresser
Assembly Instructions
1127AUFg_1128AUFg —Page 5 —04/19
5. Example; if you want to remove the First Drawer and Second Drawer from either side of the
dresser; remove the Second Drawer first. When you remove this drawer the upper arm on the
Anti-Tip Snapper for that side will be pulled forward. See Fig. 5d. As long as this arm is angled
toward the front of the case, you cannot remove the First Drawer. Move the upper arms of the
Anti-tip Snapper to the unlocked position as shown in Figure 5e. You can then remove the First
Drawer as shown in Step 3. To reinstall the drawers, install the First Drawer then move the
upper arm of the Anti-tip Snapper to the forward locked position. Now you can reinstall the
Second Drawer.
Fig. 5
Drawer Clip
Drawer Clip
Snapper
Close up view of
locked second
drawer.
Fig. 5a
Fig. 5b
Fig. 5d
Close up view of
locked first
drawer.
Fig. 5c
Fig. 5e
Unlocked position
1127AUFg McKenzie 9-Drawer Dresser
1128AUFg McKenzie 10-Drawer Dresser
Assembly Instructions
1127AUFg_1128AUFg —Page 6 —04/19
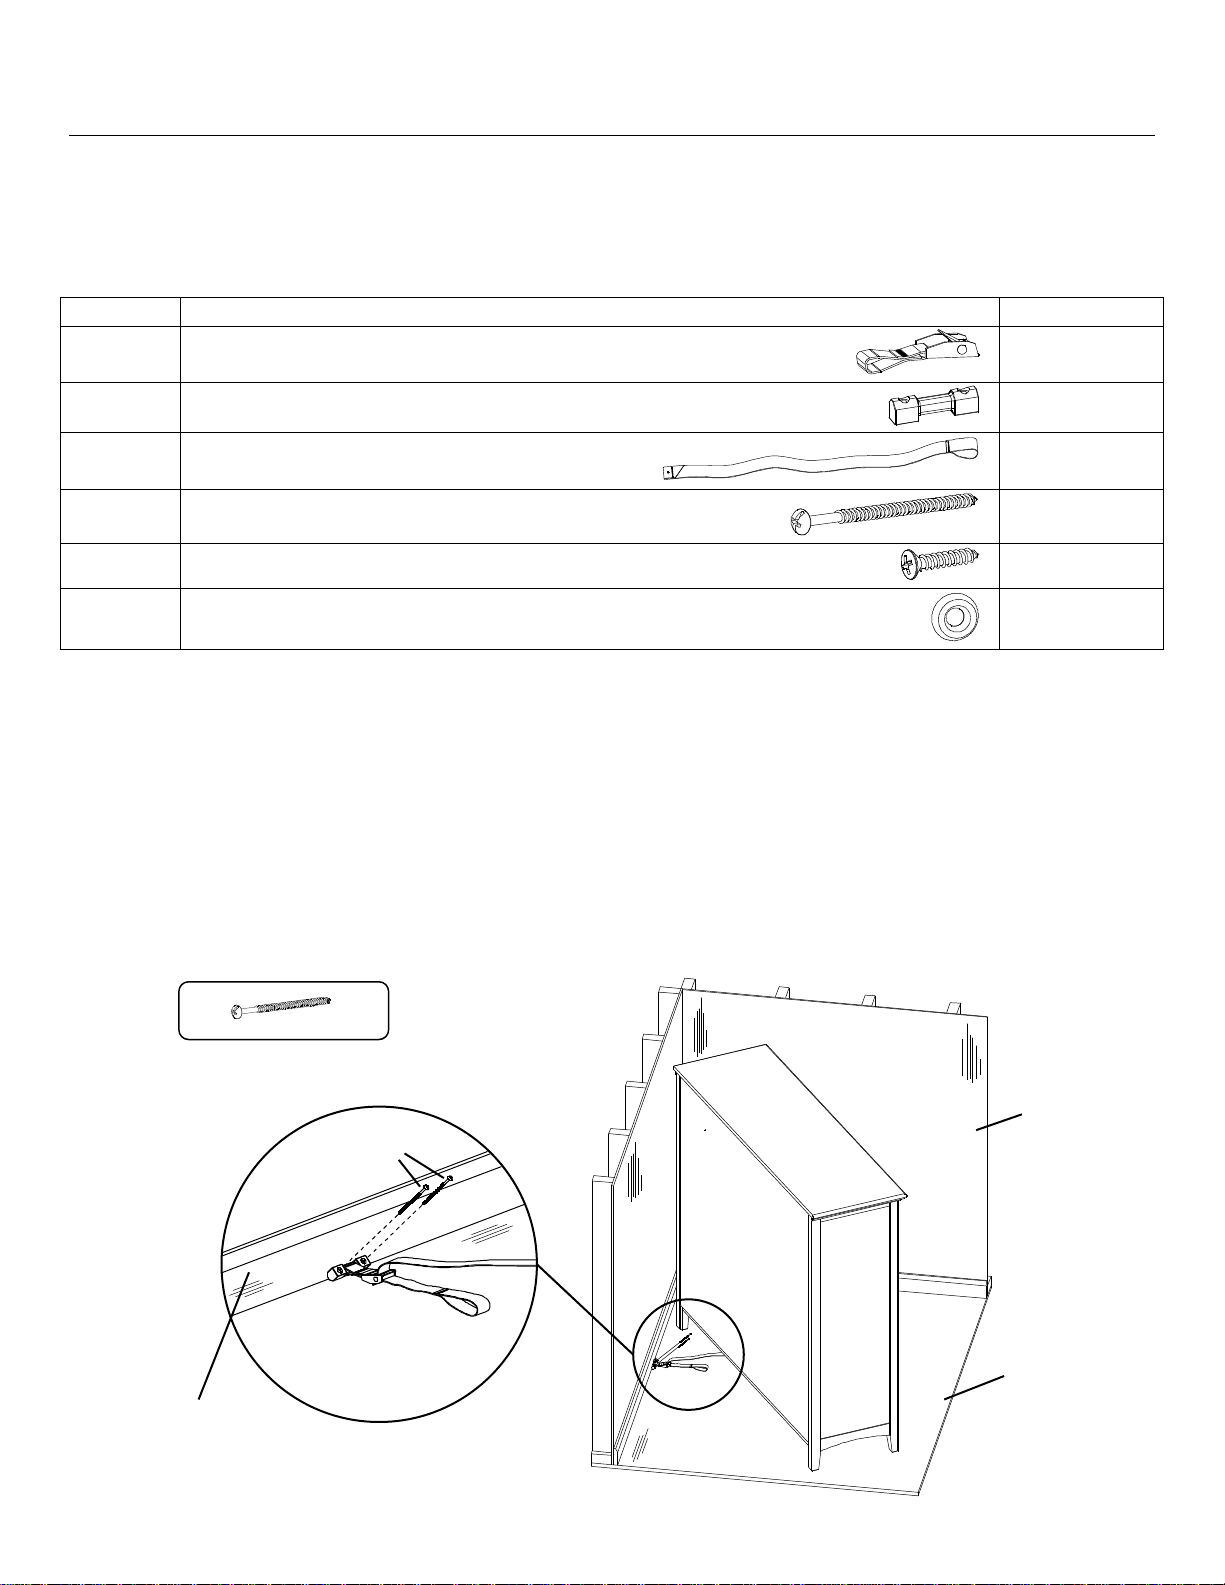
Furniture Tipping Restraint Instructions
Before you begin this assembly, identify each part and make sure the quantities received match what is on this
list. If you need to replace a part, contact Whittier Wood Furniture customer service and refer to the following
list for its name and letter code.
Part
Description
Quantity
A
Cam Buckle and Short Strap (installed)
1
B
Plastic Bracket (installed)
1
C
1" x 1000mm Long Strap (installed)
1
D
#8 x 3" Pan Head Screw
2
E
#10 x 1" Oval Head Screw (inserted)
1
F
Washer
1
If you have a stone or tile floor or do not wish to drive screws into the corner of the baseboard
and floor see the instruction included inside the tipping restraint kit for an alternate
installation.
6. Decide where you want to place the piece of furniture in your room. Mark the baseboard with a
pencil mark directly behind the location where the tipping restraint is attached to your item.
Move the item away from the wall far enough to allow you to access the spot where the
baseboard meets the floor. Position the straps and Plastic Bracket (B) as shown in Figures 6
and 6a with the angled corners of the Plastic Bracket (B) firmly placed against the seam of the
baseboard and floor. Attach by driving #8 x 3" Pan Head Screws (D) through the holes in the
Plastic Bracket (B) into the seam below the baseboard where it meets the floor. See Figures 6
and 6a.
Wall
Fig. 6
D
x 2
Fig. 6a
Floor
D
Floor
Baseboard

1127AUFg McKenzie 9-Drawer Dresser
1128AUFg McKenzie 10-Drawer Dresser
Assembly Instructions
1127AUFg_1128AUFg —Page 7 —04/19
7. Move the item back into position against the wall and reach underneath the piece of furniture to
grasp the loop in the free end of the strap. Pull the free end of the strap until portion between
the Cam Buckle (A) and the back apron of the item is tight. See Figures 7 and 7a. If you need
to move the piece of furniture reach beneath and locate the buckle which connects the two
sections of the strap and depress the release lever, then pull on the section of strap that is
between the buckle and the back apron of the furniture until there is enough slack to allow you
to pull the item away from the wall.
Fig. 7
Fig. 7a
C
Wall
Floor

Whittier Finishing Hints
P.O. Box 2827
Eugene, OR 97402 USA
Toll Free: 800-653-3336
Ph: 541-687-0213
Fax: 541-687-2060
www.whittierwood.com
Page 1 of 2
Rev. 10/13
Checklist of materials
□Rubber gloves
□Lint-free rags
□Paper towels
□Cotton swabs
□Tack cloth
□Drop cloth
□Stain brushes
(poly bristle
and foam)
□#220 & #320
sandpaper
□Painter’s tape
□Wood glue
□Dust mask
CAUTION: If you have environmental or chemical
sensitivities, please take the necessary precautions and
use personal protective equipment to aid in limiting your
exposure. Personal protective equipment may include but
are not limited to gloves, dust masks or respirators.
NOTICE TO CALIFORNIA CUSTOMERS: California Prop
65 requires consumer goods to be labeled if any one of
850+ different chemicals or substances, including wood
dust, is present, even in trace amounts. Drilling, sawing,
sanding or machining wood products generates wood
dust, a substance known to the State of California to
cause cancer. Warning: This product contains a chemical
or substance known to the State of California to cause
cancer, birth defects or other reproductive harm.
California Health and Safety Code Section 25249.6
Getting started
Assembly Instructions may contain special finishing
information or gluing requirements for that item.
Completely read both the Assembly Instructions and these
Finishing Hints before you begin your project.
Choosing the finish: Ask your retailer for advice on how
to finish bare wood. Choose a finish that meets your
expectations for the end use of the product. Will you use it
as a work surface as on a desk or kitchen island? Are you
matching a finish on existing furniture? The answers to
these questions may affect the type of finish you choose.
Where to work: Choose an area that has good light and
is well ventilated, warm and dry. If the work area is cold
and damp, the wood finishing products may require a
longer drying time than the labels indicate. Do not work in a
dirty or dusty area –dirt and/or dust can embed in the
finish.
Gluing hints
These are general hints. Refer to the Assembly
Instructions for detailed information on how to glue your
specific product. Use wood glue such as Elmer’s Wood
Glue, Titebond Wood Glue or the equivalent. Some
instructions call for a slow drying glue. Carefully read the
label and instructions of the glue manufacturer. Your unit
may not need glue.
1. We strongly recommend that you lay out all the parts
and familiarize yourself with how they fit together
before assembling with glue. Glue will set up quickly.
You can damage parts if you try to reposition any that
have been assembled incorrectly.
2. For glue to properly bond, it is very important to apply
the wood glue to bare wood. Protect your eyes and
blow into holes to clear excess dust. This will help the
glue to adhere to a clean surface.
3. If you plan on finishing the product before you
assemble it, place painter’s tape three-fourths of the
way up from the end of a dowel, spindle or tenon. This
protects the ends from the finishing product but allows
finish application where it will be visible. Finishing
products inhibit the bonding properties of wood glue.
Remove the tape prior to the final assembly.
4. Avoid getting glue on surfaces to be finished. Most
stains or finishes will not penetrate where glue has
been spilled. Wet glue can be wiped off with a damp
cloth. Follow with a light sanding of the area to ensure
a proper finish.
5. It is important to apply an even coat inside holes and
slots. Use a small dowel, pencil or cotton swab to
spread glue evenly around the inside of the holes. Do
not over glue. The tight fit of the spindles or dowels in
the holes can cause glue to be pushed to the bottom of
the hole. If too much glue is used it will fill the holes
and not allow the spindle or dowel to be fully inserted.
6. Glue usually takes several hours to cure or harden but
it will set up or grab in several seconds. Once you
begin final assembly, proceed quickly.
Finishing hints
1. Use products of the same brand to ensure
compatibility. It is not recommended to mix solvent
based and water based finishes. Always read and
follow all label directions on the can.
2. Alder is a porous hardwood and often looks best when
following the finishing instructions for softwoods.
3. Use a wood conditioner under oil base stains.

Whittier Finishing Hints
P.O. Box 2827
Eugene, OR 97402 USA
Toll Free: 800-653-3336
Ph: 541-687-0213
Fax: 541-687-2060
www.whittierwood.com
Page 2 of 2
Rev. 10/13
Preparing the surface
1. Sand each piece with #220 grit sandpaper. Sand with
the grain of the wood on flat surfaces and opposite the
grain on turnings. Some parts may be plywood. Be
careful not to sand through the veneer. End grain such
as table top ends, seat edges and grooves on turnings
accept more stain. Extra sanding in these areas with
#320 grit sandpaper reduces stain absorption and
creates a more evenly stained piece.
2. When sanding is completed, wipe the surface of your
furniture with a lint-free rag or tack cloth. Make sure the
item is free of dust before you proceed.
Staining
1. Always read and follow all label directions. Stir the
stain well before you start. Stir periodically throughout
the duration of the project to maintain uniform color
consistency.
2. Test stain on an inconspicuous spot on your project.
Put at least one coat of your top coat over the test area
as it also affects the look of the stain. Test every type
of wood that is in your kit. These are identified in the
Assembly Instructions. Different types of wood may
react differently to the stain color. You might need to
add a second coat of stain to lighter woods to match
the darker woods in your kit.
3. Apply stain with a poly brush or lint-free cloth. Apply
stain over a small area and wipe off excess. Working in
small areas will make the color easier to control.
4. Cotton swabs are ideal for hard to reach areas.
5. Allow the stain to dry thoroughly before you proceed.
Applying the top coat
1. Always read and follow all label directions. Stir your top
coat gently; do not shake. Shaking the can creates
bubbles that are hard to remove.
2. All surfaces including the underside of table tops and
inside drawers must be sealed with at least one layer
of a top coat. This will help minimize wood swelling,
shrinkage, warping and cupping due to changes in
moisture content or temperature.
3. Apply a minimum of two coats when you use
polyurethane or varnish (especially on all table top and
work surfaces). After allowing the first coat to dry,
sand lightly with #320 grit sandpaper. Remove dust
with a lint-free rag or tack cloth. For added protection,
apply additional coats. Lightly sand and wipe surface
with a lint-free rag or tack cloth between coats.
4. Some finishes tend to slightly raise the grain. This can
be easily controlled with a light sanding between coats.
Do not use steel wool when you use water-based
finishes. Strands of steel fiber caught in the wood can
cause rust spots when coated with any water-based
product.
Painting
1. Always read and follow all label directions. Since there
is a large variation between paint manufacturers and
products, ask your paint supplier for specific advice on
how to best use the paint you purchase. Ask them
specifically for advice on finishing bare wood.
2. First coat the wood with a primer. An oil based primer
works best for a smooth finish. If you do not wish to
use a solvent based primer, water based primer works
almost as well. However it may raise the wood grain
and require additional sanding.
3. Buy quality brand paint in a satin, semi-gloss, or gloss
sheen. Apply a second coat for a smooth finish. Lightly
sand between coats using with #320 grit sandpaper so
that the second coat will bond well. Be sure to use a
tack cloth after sanding to remove any residue. Repeat
as desired.
4. No top coat is required when using paint.
This manual suits for next models
3
Table of contents
Other Whittier Wood Furniture manuals


