Sport 10
Benutzerhandbuch
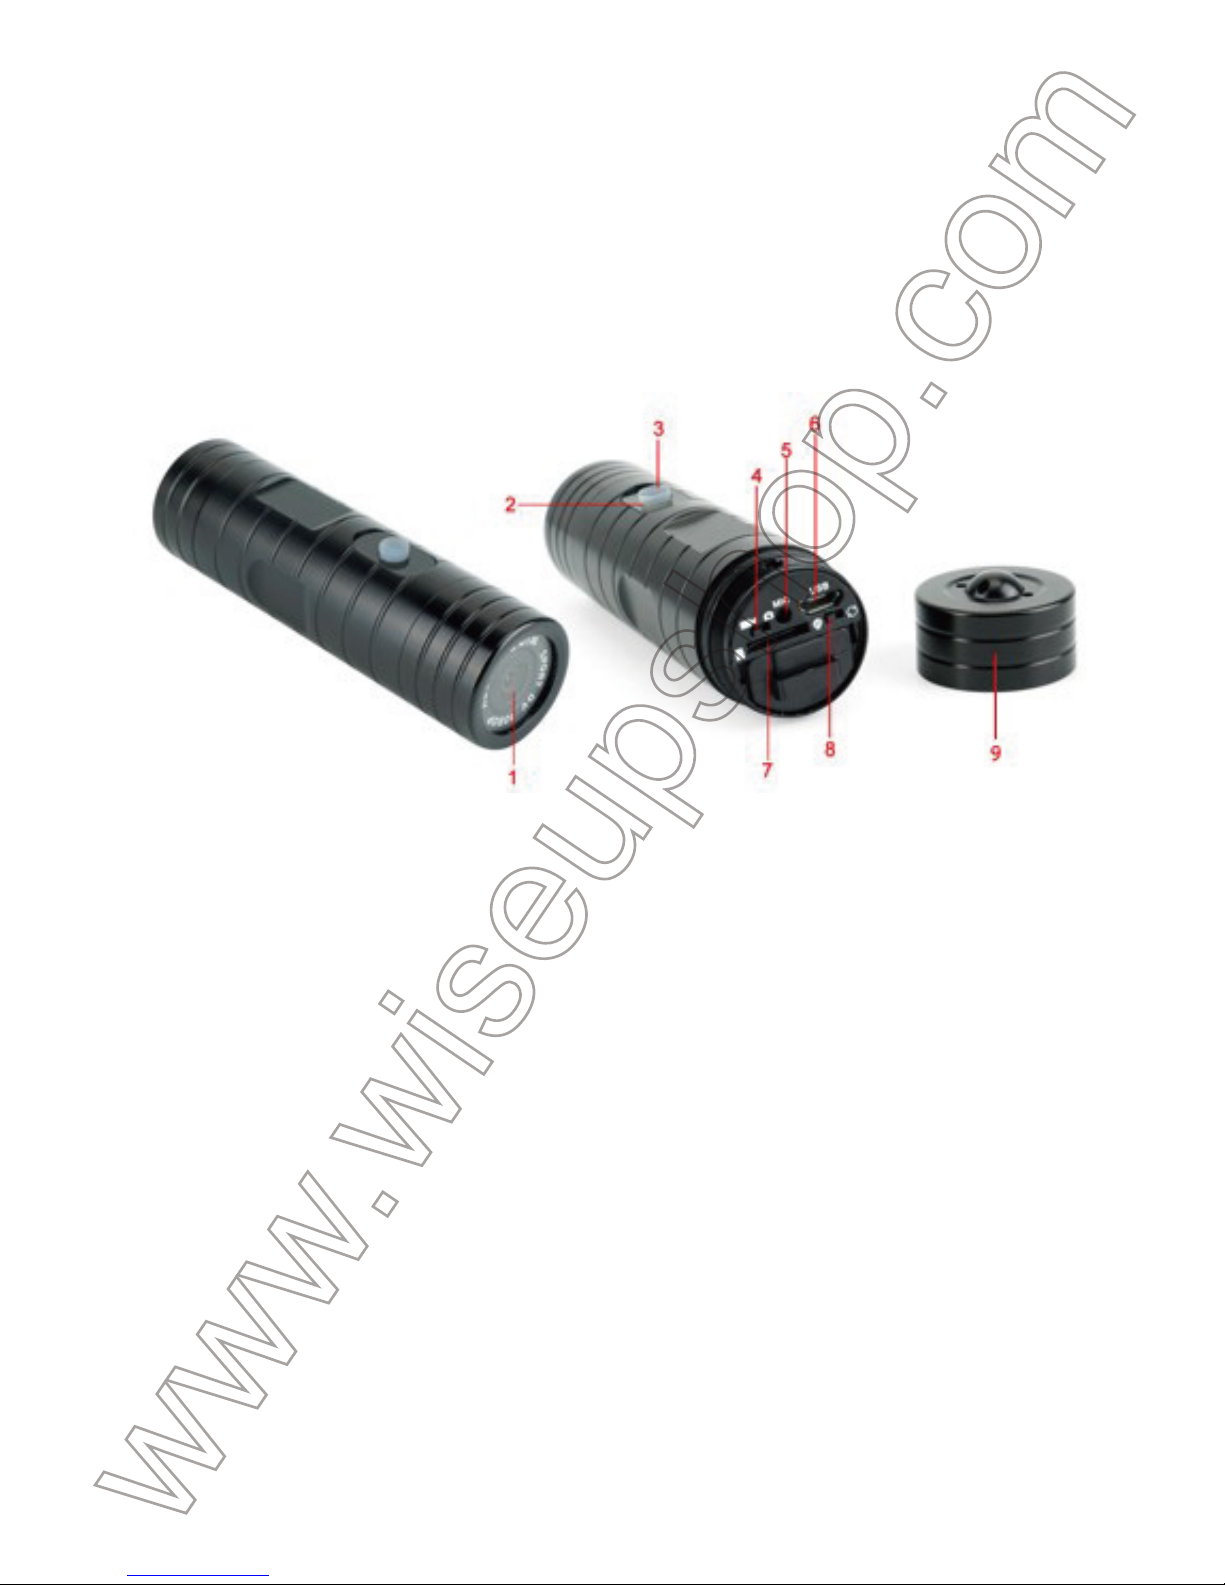
I. Produktübersicht
1. Kameraobjektiv
2. Kontrollleuchte
3. Netzschalter
4. Modusschalter
5. Mikrofon
6. USB-Anschluss
7. Mikro-Sd-Einbauschlitz
8. USB-Modus-Schalter
9. Abdeckung
II. Was ist in der Box
1. Fahrrad-Lenkerhalterung
2. Wölbungs-Klipp-Einfassung
3. Gebogene Befestigungsklebepads
4. AC110-230V zum DC 5V aufladenadapter
5. Gummidichtungen
6. Montieren Sie den Ring
7. Unterstützungs-wasserdichte Abdeckung
8. Flachstecker-Klebepads
9. Reinigungstuch
10. Wasserdichte Tätigkeit Kamera
11. Schlüsselband
12. USB-Kabel
13. Sturzhelmhalterung
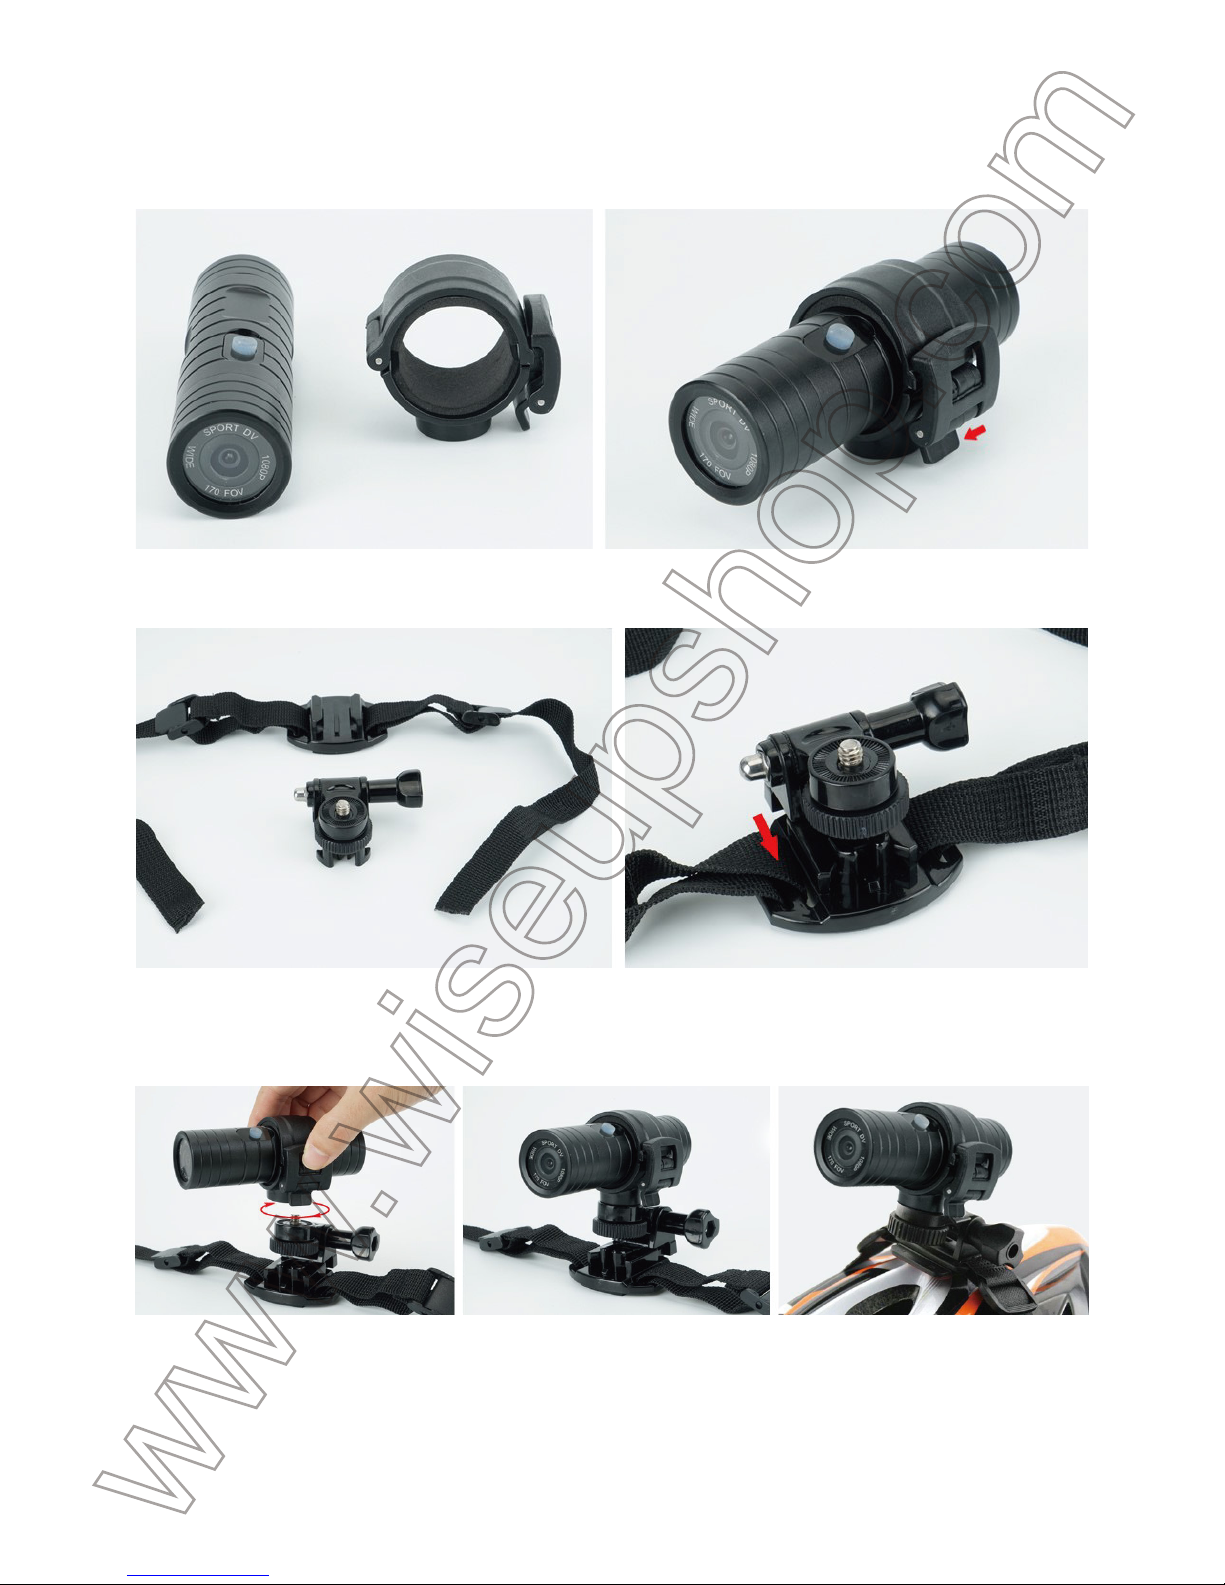
III. Montageanleitung
3.1. HELMBANDMONTIERUNG
3.1.1. Schnallen Sie den Geltungsbereich Mount Ring um die Sportkamera.
3.1.2. Drücken Sie die Schnallenhalterung in die Helmhalterung.
3.1.3. Schrauben Sie den Scope Mount Ring auf die Gürtelschnalle Clip Mount
und befestigen Sie den Gurt an Ihrem Fahrradhelm.
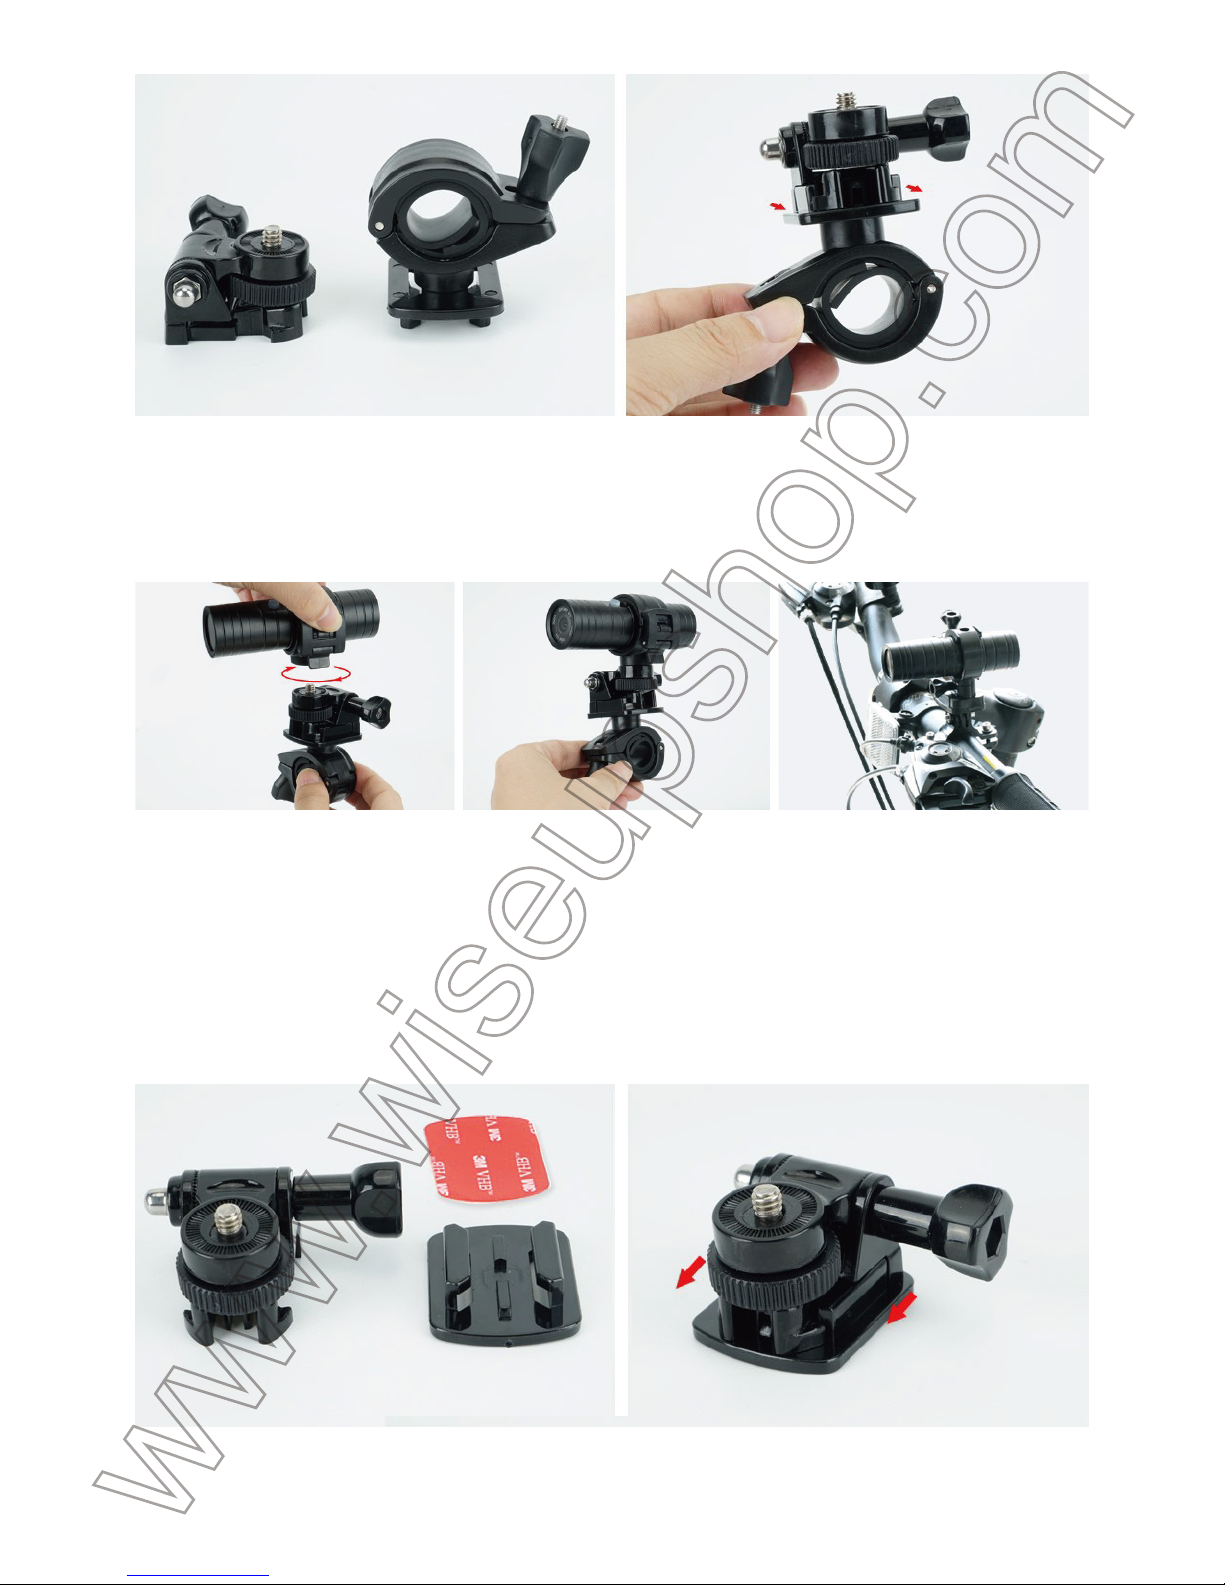
3.2. FAHRRAD-KAMERA-MONTAGE
3.2.1. Schließen Sie den Scope Mount Ring um die Sportkamera (siehe 3.1.1).
3.2.2. Schieben Sie die Schnallenhalterung in die Lenkerhalterung.
3.2.3. Schrauben Sie den Scope Mount Ring auf die Schnalle Clip Mount,
schrauben Sie die Schraube an der Bike Lenkerhalterung, dann installieren Sie
das gesamte Gerät an Ihrem Fahrrad Lenker und schrauben Sie die Schraube
zurück.
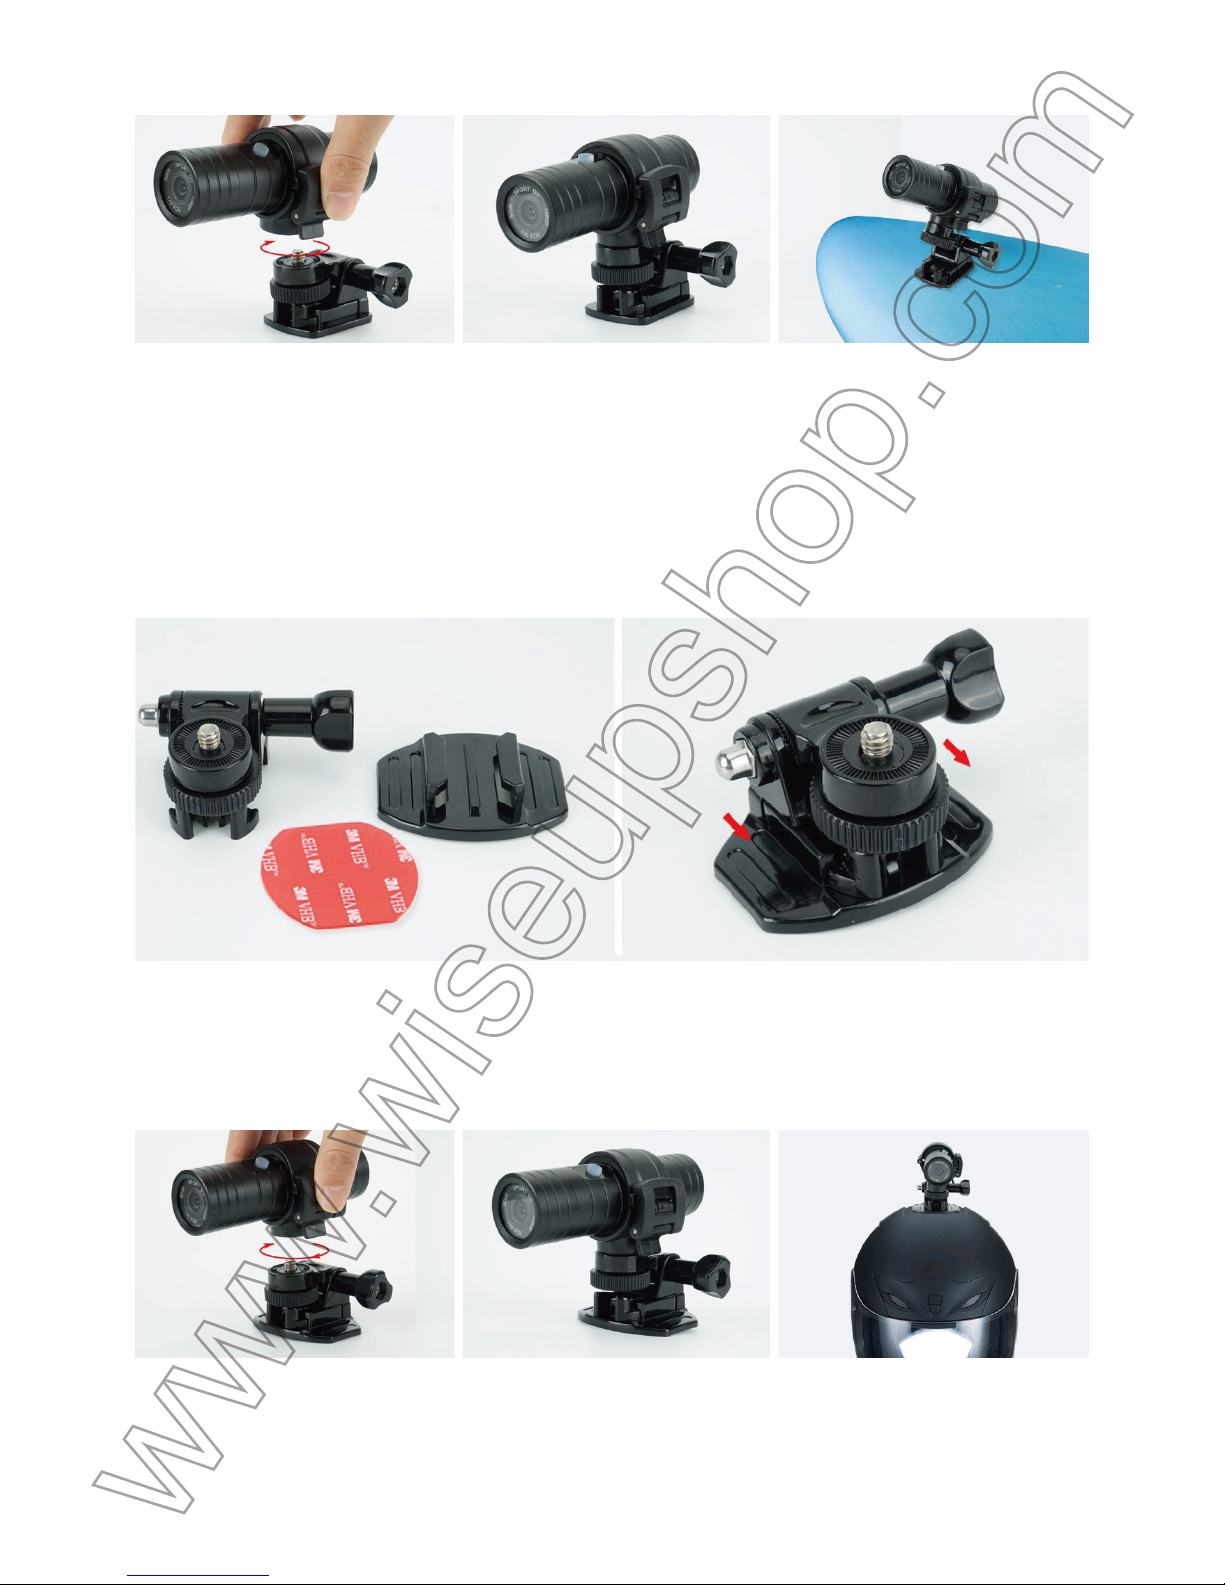
3.3. SURFBOARD KAMERA-MONTIERUNG
3.3.1. Schließen Sie den Scope Mount Ring um die Sportkamera (siehe 3.1.1).
3.3.2. Entfernen Sie eine Abdeckfolie des doppelseitigen Klebebandes und
kleben Sie das Klebeband auf das flache Montagepad. Drücken Sie die
Gürtelcliphalterung in die flache Befestigungsklammer.
3.3.3. Schrauben Sie den Scope Mount Ring auf die Gürtelschnalle Clip Mount,
entfernen Sie die andere Release-Liner des doppelseitigen Klebebandes und
halten Sie das gesamte Gerät auf einem Surfbrett.
3.4. MOTORRAD-HELM-KAMERA-MONTIERUNG
3.4.1. Schnallen Sie den Geltungsbereich Mount Ring um die Sportkamera.
(Siehe 3.1.1)
3.4.2. Entfernen Sie eine Abdeckfolie des doppelseitigen Klebebandes und
kleben Sie das Klebeband auf die gewölbte Montageunterlage. Drücken Sie die
Schnallen-Clip-Halterung in die gebogene Halterung.
3.4.3. Schrauben Sie den Scope Mount Ring auf die Gürtelschnalle Clip Mount,
entfernen Sie die andere Release-Liner des doppelseitigen Klebebandes und
stecken Sie das gesamte Gerät auf einem Motorradhelm.
IV. Betrieb der Kamera
>> Stellen Sie bitte sicher, dass Ihr Kamerabatterie vollständig aufgeladen wird,
bevor Sie verwenden.
>> Bitte stellen Sie sicher, dass die Micro SD-Karte (4GB-32GB) bereits
formatiert wurde und sicher in den SD-Kartensteckplatz der Kamera eingesetzt
ist oder die Kamera nicht funktioniert. Eine SDHC Klasse 10 Micro SD-Karte
wird empfohlen. Wenn keine Micro SD-Karte in die Kamera eingebaut ist,
leuchtet die Kontrolllampe blau und in 2 Sekunden aus, dann blinkt sie 8 mal rot
und schaltet sich wieder aus, die Kamera schaltet sich automatisch ab.
[Hinweis]: Die Kamera schaltet sich automatisch ab, wenn sie sich im Standby-Modus
befindet, ohne dass der Betrieb länger als 2 Minuten ist.
4.1. VIDEOAUFNAHME
4.1.1. Schieben Sie den Modusschalter auf die Videoaufnahmeposition .
4.1.2. Schalten Sie die Kamera ein, indem Sie den Netzschalter 2 Sekunden
lang drücken. Die Kamera wird einmal vibrieren; Blinkt die Kontrollleuchte
einmal blau und leuchtet dann blau, was bedeutet, dass die Kamera in den
Standby-Modus gegangen ist.
4.1.3. Drücken Sie einmal die Ein / Aus-Taste, um das Video aufzunehmen. Die
Anzeigeleuchte blinkt blau.
4.1.4. Drücken Sie die Ein- / Austaste erneut, um die Aufnahme zu beenden. Die
Kamera vibriert einmal und die Kontrolllampe leuchtet blau, was bedeutet, dass
die Kamera wieder in den Standby-Modus zurückkehrt.
4.1.5. Schalten Sie die Kamera aus, indem Sie den Netzschalter 2 Sekunden
lang erneut drücken. Die Kamera vibriert einmal, die Kontrollleuchte blinkt
einmal blau und schaltet sich dann aus.
[Hinweis]:
1). Eine Video-Datei wird erstellt und gespeichert alle 3-6 Minuten automatisch.
2). Die Kamera kann kontinuierlich 3,5 Stunden lang aufladen.
3). Video-Format: AVI Video Auflösung: 1920x1080P
4). Die Loop-Aufnahme wird unterstützt.
4.2. KAMERA / STILL FOTOGRAFIE
4.2.1. Schieben Sie den Modusschalter in die Kameraposition .
4.2.2. Schalten Sie die Kamera ein, indem Sie den Netzschalter 2 Sekunden
lang drücken. Die Kamera wird einmal vibrieren; Blinkt die Kontrollleuchte
einmal blau und leuchtet rot, was bedeutet, dass die Kamera in den
Standby-Modus gegangen ist.
4.2.3. Drücken Sie einmal die Ein- / Aus-Taste. Die Kamera nimmt alle 3
Sekunden automatisch ein Bild auf und die Kontrollleuchte blinkt einmal alle 3
Sekunden rot.
4.2.4. Drücken Sie die Ein- / Austaste erneut, um die Aufnahme von Fotos
fortzusetzen. Die Kamera wird einmal vibrieren und die Anzeige leuchtet rot und
zeigt an, dass die Kamera wieder in den Standby-Modus zurückkehrt.
4.2.5. Schalten Sie die Kamera aus, indem Sie den Netzschalter 2 Sekunden
lang erneut drücken. Die Kamera wird einmal vibrieren, die Anzeige leuchtet
blau und schaltet sich dann aus.
[Anmerkung]:Abbildungs-Format: JPG Abbildungs-Entschließung:3264x2448
4.3. AUFNAHME UND AUFLADUNG SIMULTAN
4.3.1. Schieben Sie den Modus-Schalter auf die Videoaufnahmeposition und
schieben Sie den USB-Modus-Schalter auf die Lade- und Aufzeichnungsposition .
4.3.2. Schließen Sie die Kamera über das mitgelieferte USB-Kabel und den
mitgelieferten Ladeadapter an eine Stromversorgungseinheit oder eine Steckdose
an.
4.3.3. Die Kamera wird eingeschaltet und dann automatisch gestartet. Die
Kamera vibriert einmal, die blaue Leuchtanzeige blinkt einmal und blinkt dann
weiter.
4.3.4. Drücken Sie einmal die Ein- / Austaste, um die Aufnahme zu beenden. Die
Kamera vibriert einmal und die Kontrolllampe leuchtet blau, was bedeutet, dass
die Kamera wieder in den Standby-Modus zurückkehrt.
V. Video- / Bilddateien Uploads
5.1. Option 1: Verwenden eines Kartenlesers
5.1.1. Schalten Sie die Kamera aus, entfernen Sie die Micro SD-Karte und
stecken Sie sie in einen Kartenleser ein.
5.1.2. Stecken Sie den Kartenleser in einen geeigneten USB-Anschluss des
PC-Computers.
5.1.3. Der Kartenleser wird als Wechseldatenträger erkannt.
5.1.4. Auf alle Dateien kann im Laufwerk zugegriffen werden.
5.2. Option 2: Verwenden des USB-Kabels
5.2.1. Schalten Sie die Kamera aus und schieben Sie den USB-Modus-Schalter
auf die Datenübertragungsposition .
5.2.2. Schließen Sie die Kamera mithilfe des mitgelieferten USB-Kabels an
einen geeigneten PC-Computer an. Die Kontrollleuchte blinkt einmal blau und
blinkt dann rot.
5.2.3. Die Kamera wird als Wechseldatenträger erkannt.
5.2.4. Auf alle Dateien kann im Laufwerk zugegriffen werden.
VI. Einstellung Zeit / Datum Stempel und Video Länge
6.1. Schalten Sie die Kamera aus, entfernen Sie die Micro SD-Karte und
stecken Sie sie in einen Kartenleser ein.
6.2. Stecken Sie den Kartenleser in einen geeigneten USB-Anschluss des
PC-Computers.
6.3. Wechseldatenträgerordner wird angezeigt.
6.4.Klicken Sie auf das Laufwerk im Stammverzeichnis und im Stammverzeichnis,
erstellen Sie eine Datei mit dem Namen "time.txt".
6.5. Schreiben Sie das aktuelle Datum, die Uhrzeit und die gewünschte Video
Länge in der Datei "time.txt" mit dem richtigen Format: zB: 2016.04.12 14:24:32
Y 3.
"Y" bedeutet, dass der Zeitstempel auf dem Video aktiviert ist; "3" bedeutet,
dass jede Videolänge 3 Minuten beträgt.
Wenn Sie den Zeitstempel nicht benötigen, ändern Sie "Y" in "N" in der Datei
"time.txt" (zB: 2016.04.12 14:24:32 N 3).
Wenn Sie die Dauer des Videoclips verlängern möchten, ändern Sie 3 in 4, 5
oder 6 in der Datei "time.txt". (Beispiel: 2016.04.12 14:24:32 N 6).
6.6. Speichern Sie diese Datei und starten Sie die Kamera neu. Das System
aktualisiert das Programm automatisch.
VII. Nur aufladen
7.1. Entfernen Sie die Micro SD-Karte von der Kamera.
7.2. Schließen Sie die Kamera über ein USB-Kabel und den mitgelieferten
DC5V-Ladeadapter an eine Netzsteckdose an.
7.3. Die Anzeigelampe blinkt während des Ladevorgangs rot.
7.4. Es dauert 2,5 Stunden, um eine volle Ladung zu erhalten.
7.5. Die Kontrolllampe leuchtet rot, wenn die Kamera vollständig aufgeladen ist.