GETTING STARTED
UNPACKING
1 Remove packing materials from unit.
Note: Save all packing materials.
2 Remote control is located in the outside of the styrofoam packaging.
3 Remove plastic bag covering radio and remote control.
4 Remove plastic safety cover from A/C plug (24).
5 Remove tie from A/C cord (24) and untie antenna wire on back of radio.
6 Open lid and remove styrofoam shipping material from turntable.
7 Remove black tie-wrap from under the TONE ARM (21).
8 Remove white protective needle cover by gently pulling towards the front of the unit.
SET UP
1 Install 2 AAA batteries (not included) in remote control.
2 Plug A/C cord (24) into appropriate outlet.
3 Untie the FM antenna and allow it to hang down in a straight
line for optimum FM reception. If you have trouble tuning in an
FM station, move the external FM antenna for best reception.
Do not connect FM antenna to outside antenna.
POWER UP YOUR 2522
Your new 2522 is equipped with a POWER/STANDBY button(12/41). Press the POWER/STANDBY
button(12/41) on either the front of the unit or on your remote control. The STAND BY INDICATOR (4) will
turn from red to green. When turned off, the STAND BY INDICATOR (4) will turn red. During standby mode,
all presets will remain programmed in your unit. Make sure the MAIN POWER SWITCH (28) at the rear
of the unit is at ON position.
BASIC OPERATION
FUNCTIONS
Electronic Volume Control
1 Press the VOLUME UP button (39) to increase the volume. The volume level will be shown
in the LCD display (3).
2 Press the VOLUME DOWN button (40) to decrease the volume.
3 Press and hold either the VOLUME UP button (39) or the VOLUME DOWN button (40) to
continuously increase or decrease the volume. The volume will continue to increase or decrease
until the button is released.
4 Press the MUTE button (42) to set the volume to 0.
Press the MUTE button (42)again to return to the previous volume level.
FUNCTIONS (CONT.)
Function Select
1 Press the TUNER button (44) on remote to enable the AM/
FM tuning function.
When in tuner mode, the LCD will display the band (AM/FM), and the
station frequency.
2 Press the CD button (43) on remote to set to CD
mode. When first set to CD mode, the display
will search for CD and track information.
3 Press the PHONO button (32) on remote to set to phono mode. When in
phono mode, the display will read PHONO.
Equalizer
1 Your radio has a built in equalizer. The equalizer fine tunes the sound according to the type of
music you like. Pressing the EQ button (34) results in the following changes:
RADIO
AM/FM TUNING
Note:The type of reception bands, the frequency step, and the upper and lower limits of the receiving
frequency are dependent on the specifications of the different areas.
1 Press the TUNER button (44) on the remote control to enable the tuner.
2 Once in tuner mode, press the TUNER button (44) again to select the
desired band (FM/AM).
3 To change stations, push the FORWARD SKIP button (9/35) to scan up, or the BACKWARD
SKIP button (8/36) to scan down. This radio is also equipped with an auto search function, which will
automatically tune in to available stations. To use this function, simply press and hold the
FORWARD SKIP(9/35) or BACKWARD SKIP button (8/36) (about 1 second) until the display
starts searching for stations. Now the radio will stop on the next station that it can tune in.
5 In FM mode, there will be a stereo displayed on the LCD when a station
broadcasting in stereo is received.
PRESETTING STATIONS
1 You can store up to 20 FM stations and 12 AM stations into the preset memory.
2 To program a preset, begin by tuning the radio to a desired station by using
either auto or manual search.
3 Once a desired channel is located, press the MEMORY button (10/37)
one time. You will see (--) flashing on the right side of the display.
4 Press the REPEAT button (38) to select the desired preset number.
The preset number will increase by one each time it is pressed.
Example: The first time the REPEAT button (38) is pressed, you
will see a 1. Press the button twice and a 2 will display.The number
you select will be the number of the preset for the selected station.
5 Press MEMORY button (10/37) one last time and the selected station is
stored.
6 Repeat steps 2 - 5 until all desired stations have been programmed.
7 Once all of the desired stations have been programmed, press the
REPEAT button (38) to select presets.
8 Unplugging the set will erase all presets.
USB OPERATION
1Insert the MP3 device (via its connecting cable) or Flash Drive with MP3 files into the USB PORT (13).
(To operate the MP3 device/Flash Drive, please refer to its manufacturers operating manual).
2 Press the USB button (31) to enable the USB function. When in USB mode, the LCD will display USB.
3Press the PLAY/PAUSE button (USB) (15) to play the music tracks stored on the external device.
4 The green ACC LED (16) will flash whilst the music is playing.
5 To pause the music, press the PLAY/PAUSE button (USB) (15) again.
6 Press the FAST FORWARD button (USB) (14) to go to the next file during Play Mode.
7 To stop playing the music files stored on the device/Flash Drive, press the PLAY/PAUSE button
(USB) (15). AT THIS STAGE, DO NOT DISCONNECT THE USB DEVICE/FLASH DRIVE!*
8Either turn the main unit off or press another Mode button (32), (43) or (44). It is now safe to disconnect
the USB device/Flash Drive.
*IMPORTANT:
Do not disconnect the USB device during USB mode, as this may damage the external device or its files. Power
off first or press another Mode button (32), (43) or (44), before safely disconnecting the USB device or cable.
NOTE:
If there is no USB device/Flash Drive connected or MP3 file detected, the red ERR LED light (17) will be
on.The green ACC LED light (16) will flash whilst MP3 data is transferring during PLAY Mode.
Powering Off or switching to another mode will reset the USB if this is not functioning.
USB Specification
Interface
* USB2.0 Full speed, HOST (USB HUB is not supported)
Corresponding Flash memory
* USB1.1 Flash memory
* USB2.0 High speed Flash memory
* Minimum memory size : 64MByte
* Maximum memory size : 2GByte (Only FAT16 corresponds.)
MP3 Decoder
* Compatible with MPEG Audio 1, 2, 2.5
* Compatible with Layer 1, 2, 3
* Compatible with Sampling rate : 8k, 16k, 32k, 11.025k, 22.05k, 44.1k, 12k, 24k,48kHz
* Compatible with Bit rate : 8k ~ 384kbps
* Subfolder nest : 8
* Number of maximum files for playback : unlimited
* File format for playback : *.mp3. *.mp2 , *.mp1 ( It is possible to select it.)
CD PLAYER
PLAYING A CD
1 Press CD button (43) on remote control. To load a CD,
press the OPEN/CLOSE button (5) one time. This will
open the CD DOOR (11).
2 Load the desired CD with the label facing up. Press the
OPEN/CLOSE button (5) once more to close the
CD DOOR (11). Once closed, the CD player will begin
to read the track information. When finished reading,
the display will read dISC. Track information will
include the total playing time of CD and the number of tracks on the CD.
3 Press the PLAY/PAUSE button (6/45) to begin playback. Playback will start at
the beginning of track 1.
GETTING STARTED
UNPACKING
1 Remove packing materials from unit.
Note: Save all packing materials.
2 Remote control is located in the outside of the styrofoam packaging.
3 Remove plastic bag covering radio and remote control.
4 Remove plastic safety cover from A/C plug (24).
5 Remove tie from A/C cord (24) and untie antenna wire on back of radio.
6 Open lid and remove styrofoam shipping material from turntable.
7 Remove black tie-wrap from under the TONE ARM (21).
8 Remove white protective needle cover by gently pulling towards the front of the unit.
SET UP
1 Install 2 AAA batteries (not included) in remote control.
2 Plug A/C cord (24) into appropriate outlet.
3 Untie the FM antenna and allow it to hang down in a straight
line for optimum FM reception. If you have trouble tuning in an
FM station, move the external FM antenna for best reception.
Do not connect FM antenna to outside antenna.
POWER UP YOUR 2522
Your new 2522 is equipped with a POWER/STANDBY button(12/41). Press the POWER/STANDBY
button(12/41) on either the front of the unit or on your remote control. The STAND BY INDICATOR (4)
will turn from red to green. When turned off, the STAND BY INDICATOR (4) will turn red. During standby
mode, all presets will remain programmed in your unit. Make sure the MAIN POWER SWITCH (28) at
the rear of the unit is at ON position.
BASIC OPERATION
FUNCTIONS
Electronic Volume Control
1 Press the VOLUME UP button (39) to increase the volume.
The volume level will be shown in the LCD display (3).
2 Press the VOLUME DOWN button (40) to decrease the volume.
3Press and hold either the VOLUME UP button (39) or the VOLUME DOWN button (40) to continuously
increase or decrease the volume. The volume will continue to increase or decrease until the button
is released.
4 Press the MUTE button (42) to set the volume to 0.
Press the MUTE button (42)again to return to the previous volume level.
FUNCTIONS (CONT.)
Function Select
1 Press the TUNER button (44) on remote to enable the
AM/ FM tuning function. When in tuner mode, the LCD
will display the band (AM/FM), and the station
frequency.
2 Press the CD button (43) on remote to set to CD
mode. When first set to CD mode, the display
will search for CD and track information.
3 Press the PHONO button (32) on remote to set to phono mode. When in
phono mode, the display will read PHONO.
Equalizer
1 Your radio has a built in equalizer. The equalizer fine tunes the sound according to the type of music
you like. Pressing the EQ button (34) results in the following changes:
RADIO
AM/FM TUNING
Note:The type of reception bands, the frequency step, and the upper and lower limits of the receiving
frequency are dependent on the specifications of the different areas.
1 Press the TUNER button (44) on the remote control to enable the tuner.
2 Once in tuner mode, press the TUNER button (44) again to select the
desired band (FM/AM).
3 To change stations, push the FORWARD SKIP button (9/35) to scan up, or the BACKWARD SKIP
button (8/36) to scan down. This radio is also equipped with an auto search function, which will
automatically tune in to available stations. To use this function, simply press and hold the FORWARD
SKIP(9/35) or BACKWARD SKIP button (8/36) (about 1 second) until the display starts searching for
stations. Now the radio will stop on the next station that it can tune in.
Note:If the FORWARD (9/35) or BACKWARD SKIP button (8/36) are pushed during auto search, the
searching will stop at that point.
4 To manually search for a station, push the FORWARD (9/35) or BACKWARD SKIP button (8/36) one
press at a time until the desired station is found.
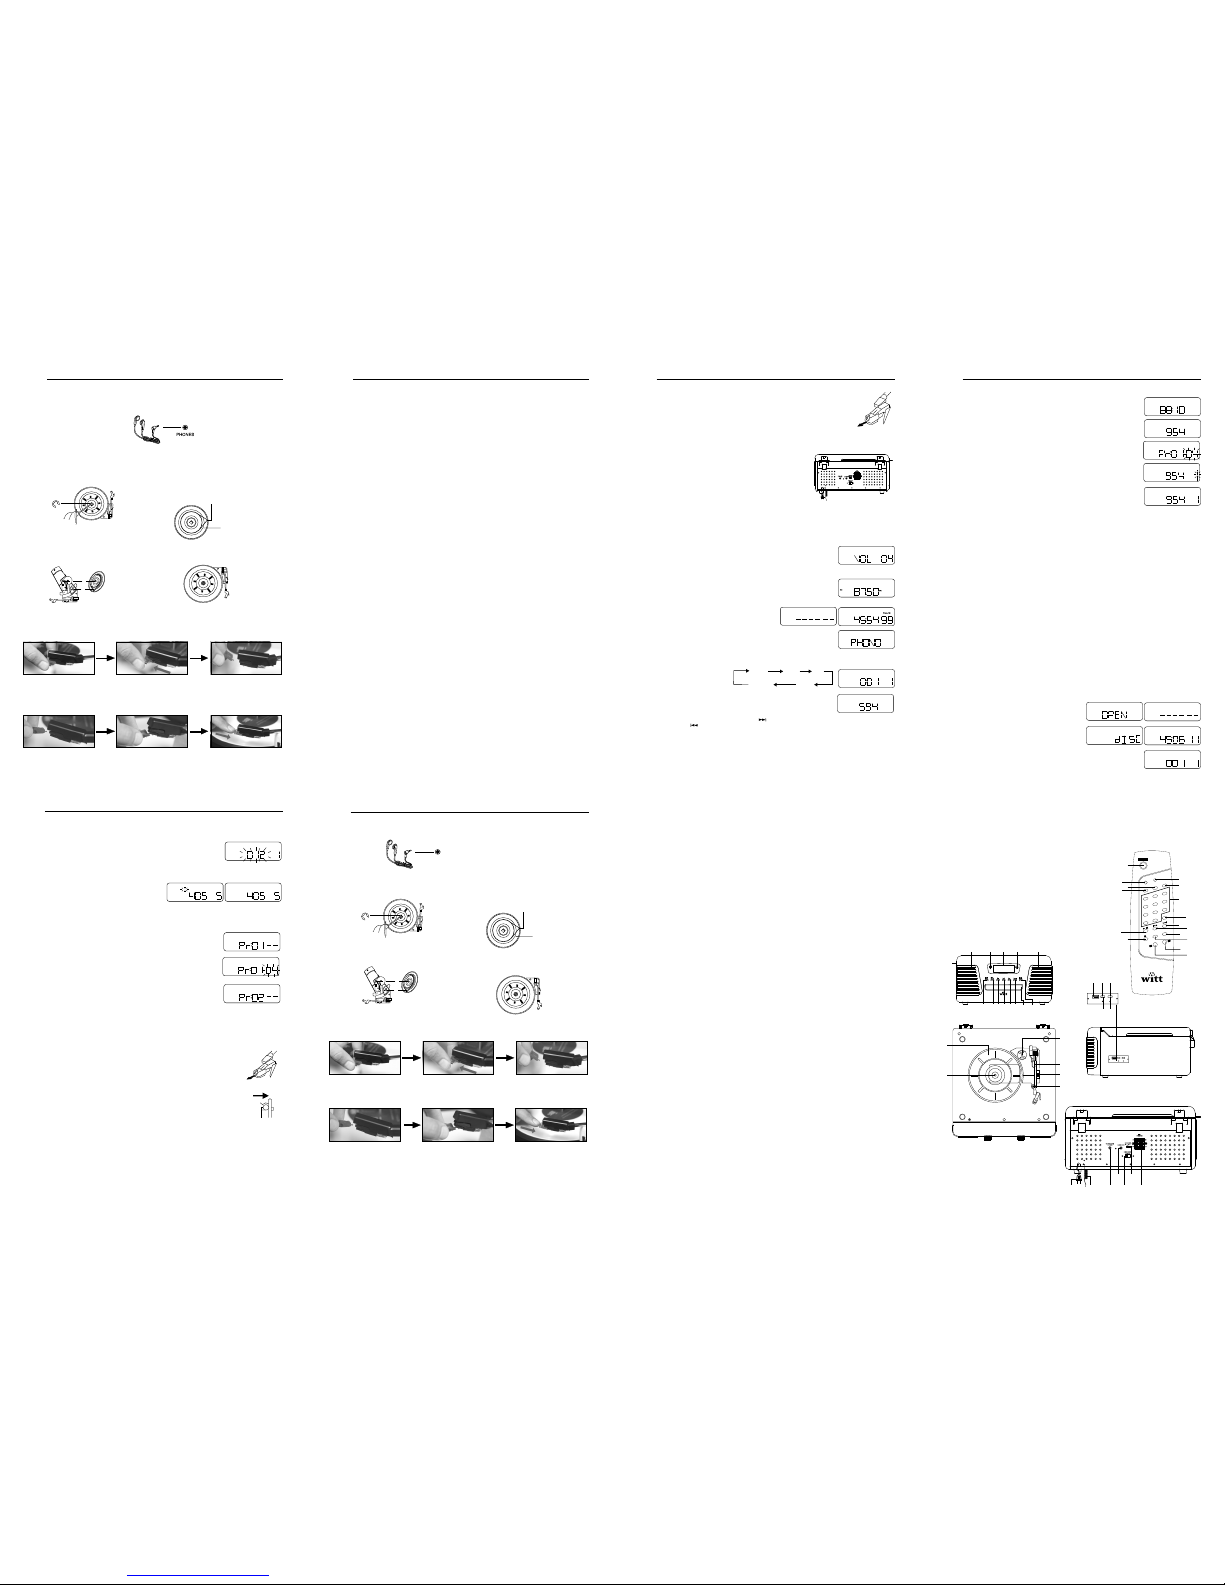
Electronic volume control display
After reading display
CD TOC reading display
FLAT ROCK Jazz
CLASSIC POP
TACK
ROCK
Equalizer ROCK
4 To skip to a different track, press the FORWARD SKIP (9/35) or BACKWARD SKIP button (8/36) until
you reach the desired track number. Each press will change the track number by one. Pressing
FORWARD SKIP (9/35) will advance forward from track to track. Pressing the BACKWARD SKIP
button (8/36) will skip backwards from track to track.
5 To fast forward during playback, press and hold the FORWARD SKIP button (9/35). Fast forwarding
stops when the button is released. To rewind (reverse) playback, press and hold the BACKWARD
SKIP button (8/36).
6 To pause playback, press the PLAY/PAUSE button (6/45).
To continue playback, press the PLAY/PAUSE button (6/45) once more.
7 To repeat playback of a single track or the whole disk, press the
REPEAT button (38). Pressing this button once will repeat only the
selected track and a flashing "repeat" will appear on the display. Pressing the REPEAT button (38)
twice will repeat the whole CD when it reaches the end and repeat will appear but will not flash. Pressing
repeat a third time will turn off the repeat function.
8 To stop playback, press the STOP button (7/46).
CD PLAYER & CONNECTING OPTIONAL EQUIPMENT
PROGRAMMING YOUR CD PLAYER
1
In CD mode with a CD inserted and play stopped, press the
MEMORY button (10/37) one time.
2 Select a track you would like to program by using the FORWARD (9/35) or
BACKWARD SKIP button (8/36).
3 Once you have selected a track, press the MEMORY button (10/37)
once more. That track is now stored in the memory.
4 You can program up to 16 tracks in the memory. Repeat steps 1 - 3 to program selected tracks.
5When all desired tracks are programmed, press the PLAY/PAUSE button (6/45) to start playback. The
programmed tracks will play in the order in which they were programmed.
6 To clear the programming, press the MEMORY button (10/37) one time and then press the STOP
button (7/46) one time. This will clear the programming. The programming will also be cleared if the
CD DOOR (11) is opened, the power is turned off, or if the radio is unplugged.
OPTIONAL EXTERNAL SPEAKERS
1 With your new radio, you have the option of adding external speakers.
2 The speaker jacks for external speakers are located on the back of the radio. Along with the speaker
jacks is a switch labelled int./ ext. When using external speakers, this switch must be switched to the
ext. position. Doing this turns off the internal speakers in the radio and redirects the power to the
external speakers.
3 If you decide not to use the external speakers, be sure the switch is on int. or the internal speakers
will not work.
TURNTABLE
PREPARING TO USE THE TURNTABLE
1. Lift up lid and remove black tie-wrap by untwisting and gently sliding out from under TONE ARM (21).
2. Remove cardboard shipper.
3. Remove white protective needle cover by gently pulling towards front of unit.
4. Release TONE ARM (21) and hold-down clip by gently pushing to the right. This will
unlock tone arm from its ARM REST (23). Re-lock the hold-down clip when moving the
unit to another location.
TURNTABLE OPERATION
1. Press the PHONO button (32) on the Remote Control.
2. Set the SPEED CONTROL SWITCH (33) to the desired speed (33 1/3, 45 or 78 rpm).
3. Place the record on the TURNTABLE (18).
4. Adjust the VOLUME on the Remote Control (39) & (40).
5. Pull the TONE ARM (21) slightly to the right until a clicksound is heard. This will activate the turntable, which
will start spinning round.
6. Move the TONE ARM (21) by hand over the record and slowly lower it onto the edge of the record. Readjust
the VOLUME to the desired level on the Remote Control (39) & (40).
7. When the record has finished playing, the TONE ARM (21) will stop at the centre of the record and must be
returned to the ARM REST (23) manually.
ACCESSORY SUPPLIED: Adaptor for 45 rpm records.
To play a 45 rpm record, remove the adaptor (20) by placing thumb & forefinger in recesses and pulling it upwards,
then placing it on the SPINDLE (19). The record can then be placed on the turntable.
Model : 2522
INSTRUCTION MANUAL
910-252200-0040-100
SPECIFICATION
Frequency Range : AM 525 - 1640 KHz
: FM 87.5 - 108 MHz
USB Port 2.0 : Max 2 GB
(Flash Drive only, not Micro Drive)
Power Consumption : 18 W
Antennas : External FM antenna
:Built-in ferrite AM bar
Power Source : AC 230V ~ 50 Hz
Speaker : 4 Dynamic type X 2
Speaker Wattage : 5 W
Speaker Ohm : 4 Ohm
Output Ohm : 4 Ohm
Output Wattage : 2 W per channel
* DESIGN AND SPECIFICATIONS SUBJECT TO CHANGE WITHOUT NOTICE.
WARNING:
TO PREVENT FIRE OR SHOCK HAZARD, DO NOT EXPOSE THIS
APPLIANCE TO RAIN OR MOISTURE. DO NOT REMOVE COVER.
PILOT LAMPS SOLDERED IN PLACE. NO USER SERVICEABLE
PARTS INSIDE. REFER SERVICING TO QUALIFIED SERVICE
PERSONNEL.
FM
MHz
STEREO
Stereo reception
AM
KHz
Search a desired station
TRACK
MEMORY
Choose track 4
AM
KHz
CH
Choose Channel 1
AM
KHz
CH
Channel 1 presetting finish
TRACK
Playing track 1
Reading TOC
Tray open
Receiving tuning frequency display
Broadcasting station in AM
AM
KHz
TRACKREPEAT
All track repeat
TRACKREPEAT
One track repeat (flashing)
TRACK
MEMORY
Choose track 4
TRACK
MEMORY
Program input complete
TRACK
Program input mode
MEMORY
While paused
TRACK
Sikkerhedsforanstaltninger
1. Læs venligst brugsanvisningen inden radioen tages i brug. På den måde beskytter du dig selv
og undgår skade på radioen.
2. Gem denne brugsanvisning, så du kan drage nytte af den ved evt. senere spørgsmål. Hvis radioen
overdrages/sælges skal brugsanvisningen følge radioen og gives til den nye ejer.
3.Radioen tåler ikke vand og fugt. Anbring derfor ikke radioen i nærheden af badekar, håndvaske,
vaskemaskiner, swimmingpools eller i en fugtig kælder.
4. Vær forsigtig når du flytter radioen.
5. Radioen må kun vægmonteres efter producentens forskrifter.
6. Sørg for at der er tilstrækkelig med ventilation rundt om radioen. Undgå placering på: senge,
sofaer og tæpper. Undgå indbygning i fx bogreol.
7. Radioen bør ikke placeres i nærheden af varmeafgivende apparater, som radiatorer, komfurer,
ovne etc.
8. Sørg for at tilslutningsforholdene på tilslutningsstedet stemmer overens med angivelserne her i
brugsanvisningen.
9. Undgå at træde på ledningen, og sørg for at den ikke bliver klemt.
10.Produktet er designet til brug med den medfølgende antenne. Forsøg ikke at tilslutte en ekstern
antenne.
11.Afbryd for strømmen hvis radioen ikke skal bruges i en længere periode. Tag stikket ud af
stikkontakten.
12.Kontakt service i følgende situationer:
o Hvis ledning eller stik er beskadiget.
o Hvis tunge genstande falder ned på produktet.
o Hvis der er kommet vand i pladespilleren eller CD-afspilleren.
o Hvis radioen ikke fungerer, eller hvis den ikke virker normalt.
13.Reparation af radioen skal foretages af en autoriseret elektriker. Reparationer, der er foretaget
af usagkyndige, kan medføre betydelig risiko for brugeren. Dette gælder også for udskiftning af
ledningen.
Tekniske data
Frekvensområde : AM 525 1640 KHz
: FM 87.5 108 MHz
USB-port : Max 2GB (Kun Flash-drive, ikke Micro-drive)
Strømforbrug : 18 W
Antenne : Ekstern FM antenne
: Indbygget ferrite AM bar
Elstilslutning : 230V ~ 50 Hz
Højttaler : 4 Dynamic type X 2
Højttaler : 5 W
Impedans (højttaler) : 4 Ohm
Impedans (udgang) : 4 Ohm
Udgang : 2 W pr. kanal
Producenten arbejder løbende på at videreudvikle produktet. Du bedes derfor have forståelse for,
at vi forbeholder os retten til at indføre ændringer med hensyn til form, udstyr og teknik.
Garanti
Der ydes 2 års reklamationsret på fabrikations- og materialefejl på din nye radio, gældende fra den
dokumenterede købsdato. Garantien omfatter materialer, arbejdsløn og kørsel. Ved henvendelse om
service bør du oplyse radioens navn og serienummer. Disse oplysninger findes på typeskiltet. Skriv evt.
oplysningerne ned her i brugsanvisningen, så du har dem ved hånden. Det gør det lettere for
servicemontøren at finde de rigtige reservedele
Garantien dækker ikke
Fejl og skader, som ikke skyldes fabrikations- og materialefejl.
Hvis der er brugt uoriginale reservedele.
Hvis anvisningerne i brugsanvisningen ikke er fulgt.
Hvis ikke installationen er sket som anvist.
Transportskader
En transportskade, der konstateres ved forhandlerens levering hos kunden, er primært en sag mellem
kunden og forhandleren. I tilfælde, hvor kunden selv har stået for transporten af produktet, påtager
leverandøren sig ingen forpligtelse i forbindelse med evt. transportskade. Evt. transport-skader skal
anmeldes omgående og senest 24 timer efter, at varen er leveret. I modsat fald vil kundens krav kunne
afvises.
Ubegrundede servicebesøg
Hvis du tilkalder en servicemontør, og det viser sig, at du selv kunne have rettet fejlen, ved fx at følge
anvisningerne her i brugsanvisningen eller ved at skifte en sikring i sikringsskabet, påhviler det dig selv at
betale for servicebesøget.
Erhvervskøb
Erhvervskøb er ethvert køb af apparater, der ikke skal bruges i en privat husholdning, men anvendes til
erhverv eller erhvervslignende formål (restaurant, kantine etc.) eller bruges til udlejning eller anden
anvendelse, der omfatter flere brugere. I forbindelse med erhvervskøb ydes ingen garanti, da dette
produkt udelukkende er beregnet til almindelig husholdning.
Brugsanvisning
Witt Retro Radio
Model: 2522
ENGLISH DANISH
ADVARSEL
Advarsel: L
åg eller bagbeklæd-
ning må ikke afmonteres,
Forsøg ikke selv at reparere
produktet.
Symbolet
informerer om
vigtigheden af
korrekt betjening
og reparation af
radioen. Følg
instruktionerne her
i brugsanvisningen.
Fare for elektrisk st
ø
d
M
å
ikke
å
bnes
Symbolet
informerer
brugeren om
uisoleret farlig
spænding i
produktet, som
kan give elektrisk
stød.
CAUTION: TO REDUCE
THE RISK OF ELECTRIC
SHOCK, DO NOT REMOVE
COVER (OR BACK). NO
USER - SERVICEABLE
PARTS INSIDE. REFER
SERVICING TO QUALIFIED
SERVICE PERSONNEL.
The exclamation point
within an equilateral
triangle is intended to
alert user to the
presence of important
operating and
maintenance (servicing)
instruction in the
literature accompanying
the appliance.
RISK OF ELECTRIC SHOCK
DO NOT OPEN
CAUTION
The lighting flash with
arrowhead symbol, within
an equilateral triangle, is
intended to alert user to
the presence of uninsulated
"dangerous voltage" within
the product's enclosure
that may be of sufficient
magnitude to constitute
risk of electric shock
to persons.
Autoriserede servicecentre
Nordjysk Hvidevare Service, tlf. 98 18 22 54
Dækker følgende postnumre:
7700-7790 9400-9493 9800-9881
7900-7990 9690 9900-9990
9300-9382 9700-9760
Dansk Køle- og Vaskeservice, tlf. 98 31 90 28
Dækker følgende postnumre:
8900-8990 9500-9575
9000-9293 9600-9681
CJ Hvidevareservice ApS, tlf. 86 47 77 77
Dækker følgende postnumre:
8000-8100 8500-8592 8700
8200-8270 8641-8643 8732-8752
8300-8382 8654-8680 8850-8883
8400-8472
AP Hvidevare Service, tlf. 96 94 60 70
Dækker følgende postnumre:
6900-6990 7800-7884 8765-8766
7260-7280 8600-8632 8800
7323-7362 8653 8830-8840
7400-7680
Kvik Hvidevareservice, tlf. 75 56 99 99
Dækker følgende postnumre:
6000-6064 6640 8721-8723
6091-6094 7000-7184 8762-8763
6560-6622 7300-7321 8781-8783
Service-Centralen Brændekilde ApS, tlf.
65 96 13 40
Dækker følgende postnumre:
5000-5985
Vestjysk Servicecenter, tlf. 75 26 91 90
Dækker følgende postnumre:
6240 6623-6630 6800-6893
6261 6650-6690 7190-7250
6510-6520 6700-6792
Storms Hvidevareservice, tlf. 74 41 50 05
Dækker følgende postnumre:
6100-6230 6300-6392 6400-6470
6270-6280 6500 6534-6541
Hornshøj Hvidevareservice, tlf. 57 61 06 06
Dækker følgende postnumre:
4000 syd for city 4600-4690
4060 4300-4390 4700
4100-4190 4400-4490 4731-4733
4200-4295 4500-4593 4736
Scandia Serviceteknik A/S, tlf. 43 20 27 00
Dækker følgende postnumre:
1000-1473 2000-2990 4040-4050
1501-1799 3000-3670 4070
1800-1974 4000 city 4300 Orø
LF Servicecenter ApS, tlf. 54 85 70 66
Dækker følgende postnumre:
4720 4750-4793 4900-4990
4734-4735 4800-4895
BMMF Hvidevare Service, tlf. 56 95 26 63
Dækker følgende postnumre:
3700-3790
PHONO
Phono display
ENGLISH
ENGLISH ENGLISH
TRACK
After reading TOC
When there is no disc
IMPORTANT SAFEGUARDS FOR AUDIO PRODUCTS
PLEASE READ CAREFULLY THE FOLLOWING IMPORTANT SAFEGUARDS THAT ARE
APPLICABLE TO YOUR EQUIPMENT.
1. Read Instructions - All the safety and operating instructions should be read before the
appliance is operated.
2. Retain Instructions - The safety and operating instructions should be retained for future
reference.
3. Heed Warnings - All warnings on the appliance and in the operating instructions should
be adhered to.
4. Follow Instructions - All operating and use instructions should be
followed.
5. Water and Moisture - The appliance should not be used
near water-for example, near a bathtub,washbowl,kitcken
sink,laundry tub, in a wet basement, or near a swimming
pool and the like.
6. Carts and Stands - The appliance should be used only with a
cart or stand that is recommended by the manufacturer.
6A. An appliance and cart combination should be moved with care. Quick stops,
excessive force, and uneven surfaces may cause the appliance and cart combination
to overturn.
7. Wall or Ceiling Mounting - The appliance should be mounted to a wall or ceiling
only as recommended by the manufacturer.
8. Ventilation - The appliance should be situated so that its location or position
does not interfere with-its proper ventilation.For example, the appliance should
not be situated on a bed, sofa, rug,or similar surface that may block the ventilation
openings; or, placed in a built-in installation, such as a bookcase or cabinet that
may impede the flow of air through the ventilation openings.
9. Heat - The appliance should be situated away from heat sources such as radiators,heat
registers, stoves,or other appliances (including amplifiers) that produce heat.
10. Power Sources - The appliance should be connected to a power supply only of the
type described in the operating instructions or as marked on the appliance.
11. Grounding or Polarization - Precautions should be taken so that the grounding or
polarization means of an appliance is not impeded.
12. Power - Cord Protection - Power-supply cords should be routed so that they are not
likely to be walked on or pinched by items placed upon or against them, paying particular
attention to cords at plugs, and the point where they exit from the appliance.
13. Cleaning - The appliance should be cleaned only as recommended by the manufacturer.
14. This product is designed for use with the antenna attached and should not be connected
to any other external antennas.
15. Nonuse Periods - The power cord of the appliance should be unplugged from the
outlet when left unused for a long period of time.
16. Object and Liquid Entry - Care should be taken so objects do not fall and liquids
are not spilled into the enclosure through openings
17. Damage Requiring Service - The appliance should be serviced by qualified service
personnel when:
A. The power-supply cord of the plug has been damaged;or
B. Objects have fallen, or liquid has been spilled into the appliance;or
C. The appliance has been exposed to rain;or
D. The appliance does not appear to operate normally or exhibits a marked change
inperformance; or
E.The appliance has been dropped, or the enclosure damaged.
18. Servicing - The user should not attempt to service the appliance beyond that described
in the operating instructions. All other servicing should be referred to qualified service
personnel.
12-10-07
ADVARSEL!
Fare for elektrisk stød, hvis radioen kommer i kontakt med vand eller fugt.
Afmonter ikke låget til pladespilleren.
Forsøg ikke selv at reparere radioen.