2 / 2
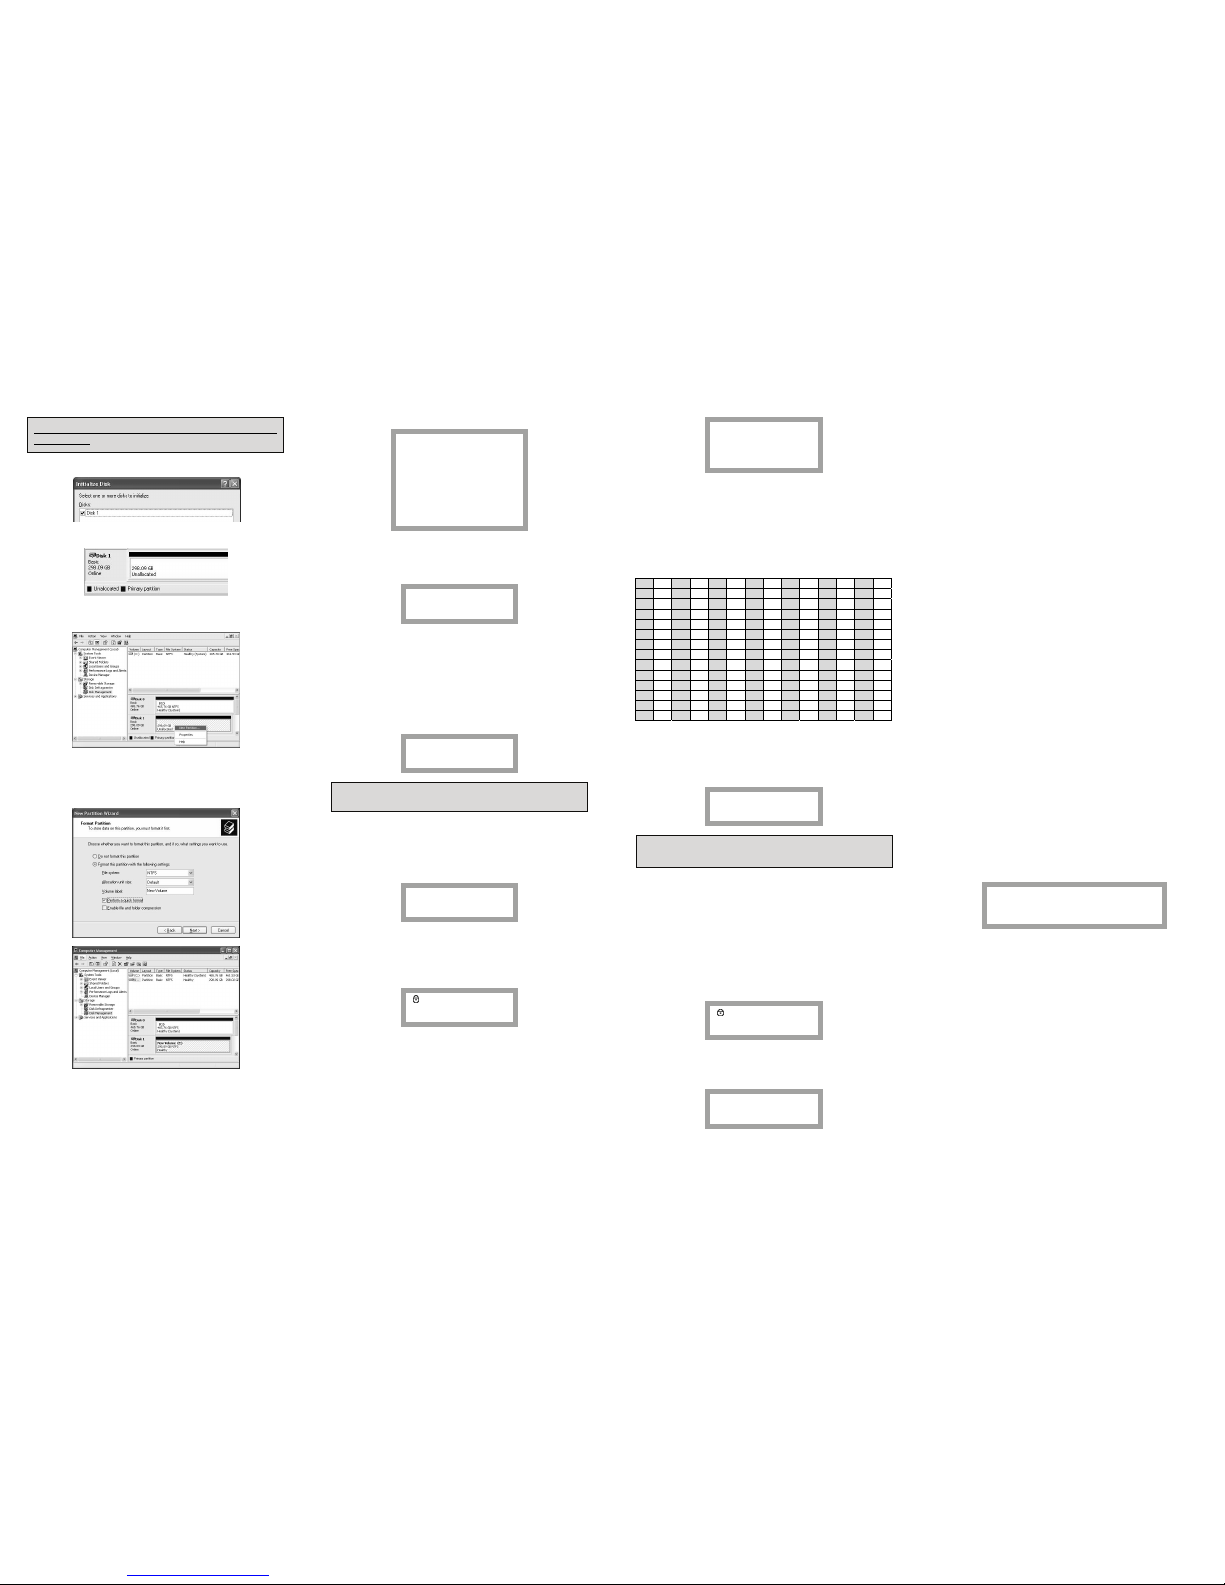
3) Right-click on the external hard drive and select [Initialize Disk] to begin the partitioning
and formatting process.
4) Select “MBR” in the menu of [Initialize Disk] and press “OK”.
.
5) [Initialize Disk] is completed, then the Hard Disk displays “Online”.
6) Now, you can begin the partitioning and formatting process on the Hard Disk. Right-click
on the driver’s space details (below picture) and select “New Partition...”.
7) “New Partition Wizard” comes up giving you some selections about the new partition. In
the first tab select the partition type. The usual is primary. Click ‘Next’ and set the partition
size. Set the max size if you want all the space to be allocated to a single partition or
smaller size if you want to create more partitions.
MENU of XS1
XS1 supports additional functions via “MENU’ on it.
Press (Touch) ‘MENU’ button on the front touch panel, then OLED shows 5 main features one
by one like the picture. You can move up and down in the menu by using 2 and 8 button. Press
(Touch) “ENTER” button to go into the selected menu. Press “MENU’ button to return to the
previous menu.
HDD Temperature
Show the temperature of HDD which is installed in XS1. (In case of SSD and some HDD
models, it may not show the temperature info)
HDD Usage Time
It shows the usage time of HDD installed in XS1. XS1 manages each usage time per HDD
separately. If users initialize HDD, HDD usage time is also initialized.
‘A’ means the total usage time which users make real data reading and writing process on the
installed HDD. ‘T’ means the total cumulative time which the installed HDD is connected to
USB port regardless of data reading or writing process.
(‘H’: Hour / ‘M’: Minute / ‘S’: Second).
USB Connection Speed
It shows the current USB port speed between XS1 and the connected PC or Laptop. It shows
total 3 different USB connection types (USB 3.0, USB 2.0, USB1.0).
Password Change
User can change the password which is being used under security mode. Go to [Password
Change] in the menu and press [ENTER] button to run it. After inputting current password,
new password input window come up.
Write Protection
Users can set up ‘write protection’ feature on the installed HDD. To use this feature, users have
to select and check on the square box in menu by pressing “Enter” button. Under the write
protection, nobody write or delete the data on the HDD, only read available.
User Info
Users can show and display “User Name or Nick name” instead of Xtrfy logo. Also, in case of
input wrong password, phone number can be displayed via front OLED display. It’s useful
function when users lost XS1 (security mode). To display Name and Phone number, users have
to select and check on the square box in menu (3.User Info Display) by pressing “Enter” button.
Refer to below combination table for letter input method of Name. In case Phone Number, use
front numeric tough panel to input the number. To input ‘-‘, use ‘Enter ’ button.
How to input letters for Name
Check the below combination table of letter creation. Then, input each related numbers and
press “Enter”, then the numbers is changed into the letter. After inputting all letters, just press
‘Menu’ button to apply.
0 SP 14 . 28 < 42 J 56 X 70 f 84 t
1 ! 15 / 29 = 43 K 57 Y 71 g 85 u
2 " 16 0 30 > 44 L 58 Z 72 h 86 v
3 # 17 1 31 ? 45 M 59 [ 73 i 87 w
4 $ 18 2 32 @ 46 N 60 \ 74 j 88 x
5 % 19 3 33 A 47 O 61 ] 75 k 89 y
6 & 20 4 34 B 48 P 62 ^ 76 l 90 z
7 ' 21 5 35 C 49 Q 63 _ 77 m 91 {
8 ( 22 6 36 D 50 R 64 ` 78 n 92 |
9 ) 23 7 37 E 51 S 65 a 79 o 93 }
10 * 24 8 38 F 52 T 66 b 80 p 94 ~
11 + 25 9 39 G 53 U 67 c 81 q 95 ٛ
12 , 26 : 40 H 54 V 68 d 82 r
13 - 27 ; 41 I 55 W 69 e 83 s
Initialization of HDD usage mode
Users can initialize the HDD installed in XS1. Press (Touch) <1> button to initialize HDD. To
make it clearly, press <1> button once again.
HDD Connection / Disconnection (Smart Mount/Un-mount Function)
Abruptly removing storage devices or external hardware from your PC can damage to the
device and result in loss of data. So, it’s recommended to get in the habit of safely removing
your external hardware via “Safely Remove Hardware”. But, it’s rather annoying job.
XS1 supports smart MOUNT and UN-MOUNT feature to make simple, convenient and safe
hardware removal. Press “MENU” button over 2 seconds, then HDD is automatically
disconnected. It works like [Safely Remove Hardware]. * To run this function, there should be
no data transfer between PC and XS1 at that time.
Again, press “MENU” button over 2 seconds, then HDD is automatically connected. (If XS1 is
Security Mode, Password input window pops up. In case of normal mode, directly HDD is
connected).
It’s very convenient feature when you step out for a moment leaving the connected XS1 on the
desk.
Q & A
1) XS1 supports 2.5” SATA I, II, III?
☞Yes, it supports all.
2) Is there a limit on 2.5” HDD Capacity which XS1 can use?
☞There’s no limit on 2.5” HDD capacity, but there’s a limit on the depth of 2.5” HDD.
XS1 can install standard 9.5mm depth (thick) 2.5” HDD only. In case of 12.5mm thick
HDD, it can’t be installed and used.
3) How’s the data transfer speed under Security Mode? Is there any slow down or delay in
data transfer due to using Security Mode?
☞Regardless of Security Mode, XS1 supports the same USB3.0 Super Speed.
4) What’s AES 256 Encryption?
☞AES (Advanced Encryption Standard) is s symmetric-key encryption standard adopted
by the U.S. government. The AES ciphers have been analyzed extensively and are now
used as a world top level security standard. AES 256 is the most advanced algorithm
among AES standards (AES 128, 192, 256).
5) I forgot my Password. Can I recover the data on HDD?
☞Without the correct password, nobody can connect and read the data on HDD of XS1.
To recover the DATA on HDD, We consider a user who has both XS1 unit and Master key
as the real owner of the XS1 unit, for the emergency rescue. Users that needs emergency
rescue have to contact Xtrfy: rescue@xtrfy.com and have both the XS1 Unit with the hard
drive inside and the Master key ready. This is a precaution to prevent unauthorized access
when it’s stolen There is also a cost to unlock the unit; this cost will be informed to you
when you email rescue@xtrfy.com and the technician knows why the unit needs
emergency rescue.
6) In case the XS1 device gets damaged while in Security Mode and I can’t read any data on
the HDD, even though there is no problem with the installed HDD. How can I recover the
data HDD?
☞It is impossible. To recover the data, you have to contact Xtrfy: rescue@xtrfy.com and
have both the XS1 Unit with the hard drive inside and the Master key ready. After
checking Master key, Xtrfy will try to do support data recover & back-up for you.
7) If I take off HDD from XS1 and connect it to PC, PC can read any data on HDD?
☞No! PC can’t read anything because it’s fully encrypted. It just recognizes it as an
unformatted HDD.
8) I change HDD and set the same password, but why a new Master-key is created?
☞XS1 create a unique Master key per HDD. XS1 can remember and save max 50
different Master-key info on it.
If the number of HDD exceed 50 (Max available quantity), the above message appears. If
users select <1, Yes>, the first HDD info (among 50) is deleted and the HDD is totally
initialized. If users select <0, No>, the connected HDD is just connected as a Normal mode
(Not encrypted).
9) My TV supports Media Play (Audio and Video). Can I connect XS1 to my TV and play the
media files even under Safety Mode?
☞Yes, it’s the greatest advantage of XS1. You can connect XS1 to any device which
supports USB Host. After entering Password, it works just like USB 3.0 super speed
storage. (Blu-ray Player, Mobile phone, Media Player, TV, PC, MAC ..)
Exceed in HDD number limit. The first HDD
information will be deleted. Do you want to continue?
0=No, 1=Yes
Password Input
****
LOCKDOWN
HDD Disconnection
After HDD initialization, it’s impossible to rescue or recover any data on it. So, please be careful not
to lose your valuable data and double check before HDD initialization.
Do you want to initialize HDD?
0=NO, 1=YES
↘1. Name ( )
↘2. Phone Number ( )
□3. User Info display
Re-enter your password
Password Change Success
USB Connection Speed
USB 3.0
HDD has a limited life (life-cycle). It is always advisable to back up important data. ‘HDD Usage
Time’ info can be useful for you to check and guess the life-cycle of your HDD.
A: 40M 34S
T: 3H 2 7 M
HDD Temperature
Te m p : 3 3 ℃
↘ HDD Temperature
↘HDD Usage Time
↘USB Connection Speed
↘Password Change
□Write Protection
↘User Info
Caution: Please be careful not to initialize the used or existing HDD which includes any
valuable DATA on it.


 user manual")


