XXL MCL16Pro Service manual

MCL16Pro
Compact Live Sound Mixer
with 24-bit DSP
Quick reference Manual
XXL MCL16Pro
8 MONO Channels and 4 STEREO Channels
12 low-noise / high dynamic Mic inputs (with +48V on channels 1-8)
8 inserts on TRS Jack (MONO channels)
3-band EQ with semiparametric mids and 75Hz Lo Cut Filters (MONO channels)
4-band EQ (STEREO channels)
1 pre fader, 1 pre/post fader, 1 post-fader AUX Send
Peak LED
2-Track IN/OUT
2 Stereo AUX Return
Control Room / Phones Stereo Out
2 sub-groups
Standby function
MIX/AUX assignable 7-band graphic EQ
12-segment LED meter bar
Built-in DSP board with 256 studio-grade effects
Footswitchable Effect MUTE
USB In/Out interface for audio transfer to/from a PC
BNC connector for 12V DC lamp


Important Safety Instructions
1) Read these instructions.
2) Keep these instructions.
3) Heed all warnings.
4) Follow all instructions.
5) Do not use this equipment near water.
6) Clean only with dry cloth.
7) Do not block any ventilation openings. Install in accordance with the manufacturer’s instructions.
8) Do not install near any heat sources such as radiators, heat registers, stoves, or other equipment
(including amplifiers) that produce heat.
9) Do not defeat the safety purpose of the polarized or grounding-type plug. A polarized plug has two blades
with one wider than the other. A grounding type plug has two blades and a third grounding prong. The wide
blade or the third prong are provided for your safety. If the provided plug does not fit into your outlet,
consult an electrician for replacement of the obsolete outlet.
10) Protect power cords from being walked on or pinched particularly at plugs, convenience receptacles, and
the point where they exit from the equipment.
11) Only use attachments/accessories specified by the manufacturer.
12) For products that are not rack-mountable: Use only with a cart, stand, tripod, bracket, or table specified
by the manufacturer, or sold with the equipment.
When a cart is used, use caution when moving the cart/equipment combination to avoid injury from tip-over.
13) Unplug this equipment during lightning storms or when unused for long periods of time.
14) Refer all servicing to qualified service personnel. Servicing is required when the equipment has been
damaged in any way, such as power-supply cord or plug is damaged, liquid has been spilled or objects have
fallen into the equipment, the equipment has been exposed to rain or moisture, does not operate normally,
or has been dropped.
15) For products that are a Mains powered device:
The equipment shall not be exposed to dripping or splashing and no objects filled with liquids (such as
vases) shall be placed on the equipment.
Warning! To reduce the risk of fire or electric shock, do not expose this equipment to rain or moisture.
16) For products containing a lithium battery:
CAUTION! Danger of explosion if battery is incorrectly replaced. Replace only with the same or equivalent
type.
17) The main power switch is located on the back of XXL MCL mixers. It should remain accessible after
installation.
18) The equipment shall be used at a maximum ambient temperature of 40° C.
19) Exposure to extremely high noise levels may cause permanent hearing loss. Individuals vary considerably
in susceptibility to noise-induced hearing loss, but nearly everyone will lose some hearing if exposed to
sufficiently intense noise for a period of time. To ensure against potentially dangerous exposure to high
sound pressure levels, it is recommended that all persons exposed to equipment capable of producing high
sound pressure levels use hearing protectors while the equipment is in operation. Ear plugs or protectors in
the ear canals or over the ears must be worn when operating the equipment in order to prevent permanent
hearing loss.
Environmental Compliance
Disposal of Waste Equipment by Users in the European Union
This symbol on the product or its packaging indicates that this product must not be disposed of with other
waste. Instead, it is your responsibility to dispose of your waste equipment by handing it over to a designated
collection point for the recycling of waste electrical and electronic equipment. The separate collection and
recycling of your waste equipment at the time of disposal will help conserve natural resources and ensure
that it is recycled in a manner that protects human health and the environment. For more information about
where you can drop off your waste equipment for recycling, please contact your local city recycling office or
the dealer from whom you purchased the product.
CE/EMC
Carisch SpA declares that this product complies with the following standards regulating emissions and
immunity:
- 89/336/EEC (EMC) and subsequent amendments 92/31/EEC e 93/68/EEC (EN 55103-1 e EN 55103-2)
- 73/23/EEC (LVD) and subsequent amendments 93/68/EEC (EN 60065)

Importanti istruzioni per la sicurezza
1) Leggere le istruzioni.
2) Conservare le istruzioni.
3) Leggere attentamente tutti gli avvisi.
4) Seguire tutte le istruzioni.
5) Non utilizzare l'apparecchiatura vicino a fonti di acqua.
6) Per la pulizia utilizzare solo un panno asciutto.
7) Non ostruire le feritoie di ventilazione. Eseguire l'installazione in conformità con le istruzioni del
produttore.
8) Non installare l'unità in prossimità di fonti di calore quali termosifoni, valvole di regolazione del calore,
stufe o altri apparecchi (inclusi amplificatori) che producono calore.
9) Non tentare di rimuovere il sistema di protezione della spina polarizzata o con messa a terra. Una spina
polarizzata ha due poli, uno più grande dell'altro. Una spina con messa a terra ha due poli, più un terzo per la
messa a terra. Il polo più grande o il terzo polo sono forniti a scopo di sicurezza. Se la spina fornita non entra
nella presa elettrica, consultare un elettricista per sostituire la presa obsoleta.
10) Adottare misure adeguate per impedire che i cavi di alimentazione vengano calpestati o schiacciati,
specialmente in prossimità di prese singole, prese multiple e punti di uscita dall'apparecchiatura.
11) Utilizzare esclusivamente i dispositivi e gli accessori specificati dal produttore.
12) Per i prodotti che non possono essere montati su rack utilizzare l'apparecchiatura esclusivamente con il
carrello, la base, il treppiede, il supporto o il tavolo specificati dal produttore o inclusi con l'apparecchiatura
stessa. Se si utilizza un carrello, prestare attenzione nello spostamento dell'apparecchiatura sul carrello, per
evitare danni dovuti al ribaltamento.
13) Scollegare l'apparecchiatura dalla presa elettrica durante i temporali o durante lunghi periodi di inattività.
14) Per la manutenzione e le riparazioni rivolgersi a personale qualificato. La riparazione è necessaria quando
l'apparecchiatura è stata danneggiata, ad esempio per danneggiamento del cavo o della spina di
alimentazione, per la caduta di liquidi oppure oggetti dentro l'apparecchiatura, per l'esposizione a
pioggia o umidità, per la caduta dell'apparecchiatura o comunque in caso di problemi nel funzionamento.
15) Per i prodotti che sono alimentati
Evitare di esporre l'apparecchiatura a schizzi o gocce e di collocare oggetti contenenti liquidi (ad esempio
vasi) su di essa.
Attenzione: non esporre l'apparecchiatura a pioggia o umidità onde evitare rischi di incendio o scosse
elettriche.
16) Per i prodotti che sono dotati di una batteria al litio
ATTENZIONE: se le batterie non vengono sostituite correttamente, potrebbero verificarsi esplosioni. Utilizzare
batterie dello stesso tipo o di tipo equivalente.
17) L'interruttore di accensione principale è situato sul retro dei mixers XXL MCL. Assicurarsi che, dopo
l'installazione, esso sia sempre accessibile.
18) Non utilizzare l'apparecchiatura a temperature ambiente superiori a 40° C.
19) Si raccomanda di evitare l’esposizione ad alti livelli sonori o livelli non confortevoli per periodi prolungati.
Se si notano perdite d’udito o acufeni (fischi) consultare un audiologo. Si raccomanda di indossare cuffie di
protezione o tappi nel canale auricolare, in caso di esposizione prolungata a livelli elevati di pressione
sonora.
Conformità ambientale
Smaltimento dei dispositivi inutilizzati da parte degli utenti nell'Unione Europea.
Questo simbolo sul prodotto o sulla confezione indica che il prodotto non va smaltito insieme ai rifiuti
comuni. È responsabilità dell'utente smaltire i componenti inutilizzati presso un punto di raccolta autorizzato
al riciclaggio di materiale elettrico ed elettronico. La raccolta separata e il riciclaggio dei dispositivi inutilizzati
aiuteranno a risparmiare risorse naturali garantendo un'adeguata protezione della salute umana e
dell'ambiente. Per ulteriori informazioni sui punti di raccolta e sul riciclaggio dei componenti elettrici ed
elettronici, rivolgersi all'ente locale specializzato o al rivenditore presso il quale è stato acquistato il prodotto.
CE/EMC
Carisch SpA dichiara che questo prodotto è conforme ai seguenti standard che regolano le emissioni e
l'immunità:
- 89/336/EEC (EMC) e successive modifiche 92/31/EEC e 93/68/EEC (EN 55103-1 e EN 55103-2)
- 73/23/EEC (LVD) e successive modifiche 93/68/EEC (EN 60065)

MCL16Pro Mono Input Channel
1 - XLR mic input
1 – Ingresso microfonico XLR
2 -1/4” line input Jack
2 – Ingresso linea Jack
3 – Insert TRS Jack
3 – Presa Insert – Jack TRS
4 - Input GAIN control
4 - Controllo di guadagno
5 – Lo Cut @ 75Hz
5 – Filtro Lo Cut @ 75Hz
6 – HI +/-15dB @ 12kHz
6 - Equalizzatore HI +/-15dB @ 12kHz
7 – MID +/-15dB @ +/-15dB @ 100Hz/8kHz
7 - Equalizzatore MID +/-15dB @ 100Hz/8kHz
8 – LOW +/-15dB @ 80Hz
8 - Equalizzatore LOW +/-15dB @ 80Hz
9 – AUX 1 pre-fader send
9 - Mandata AUX 1 pre-fader
10 – AUX 2 pre/post fader send
10 - Mandata AUX 2 pre/postfader
11 – Switch AUX 2 pre/post fader
11 – Selettore AUX 2 pre/post fader
12 – AUX 3 post-fader send
12 - Mandata AUX 3 post-fader
13 – PAN (stereo front position)
13 - Controllo PAN
14 – MUTE Button with green LED
14 – Tasto MUTE con LED verde
15 – MIX / 1-2 Assign Buttons
15 – Tasti di assegnazione del canale MIX / 1-2
16 – SOLO button & PEAK LED
16 – Tasto SOLO e PEAK LED (saturazione)
17 – Channel fader
17 - Fader del volume di canale
1
2
3
4
5
6
7
8
9
10
11
12
13
14
15
16
17

MCL16Pro Stereo Input Channel
1 - XLR mic input (Left / MONO)
1 – Ingresso microfonico XLR (Left / MONO)
2 -1/4” line input Jack (Left / MONO)
2 – Ingresso linea Jack (Left / MONO)
3 – 1/4” line input Jack (Right)
3 – Ingresso linea Jack (Right)
4 - Input GAIN control
4 - Controllo di guadagno
5 – HI +/-15dB @ 12kHz
5 – Equalizzatore HI +/-15dB @ 12kHz
6 – HI-MID +/-15dB @ 3kHz
6 - Equalizzatore HI-MID +/-15dB @ 3kHz
7 – LO-MID +/-15dB @ 500Hz
7 - Equalizzatore LO-MID +/-15dB @ 500Hz
8 – LOW +/-15dB @ 80Hz
8 - Equalizzatore LOW +/-15dB @ 80Hz
9 – AUX 1 pre-fader send
9 - Mandata AUX 1 pre-fader
10 – AUX 2 pre/post fader send
10 - Mandata AUX 1 pre/postfader
11 – Switch AUX 2 pre/post fader
11 – Selettore AUX 2 pre/post fader
12 – AUX 3 post-fader send
12 - Mandata AUX 3 post-fader
13 – BALANCE (stereo front position)
13 - Controllo BALANCE
14 – MUTE Button with green LED
14 – Tasto MUTE con LED verde
15 – MIX / 1-2 Assign Buttons
15 – Tasti di assegnazione del canale MIX / 1-2
16 – SOLO button & PEAK LED
16 – Tasto SOLO e PEAK LED (saturazione)
17 – Channel fader
17 - Fader del volume di canale
1
2
3
4
5
6
7
8
9
10
11
12
13
14
15
16
17

APPLICATION NOTES NOTE DI APPLICAZIONE
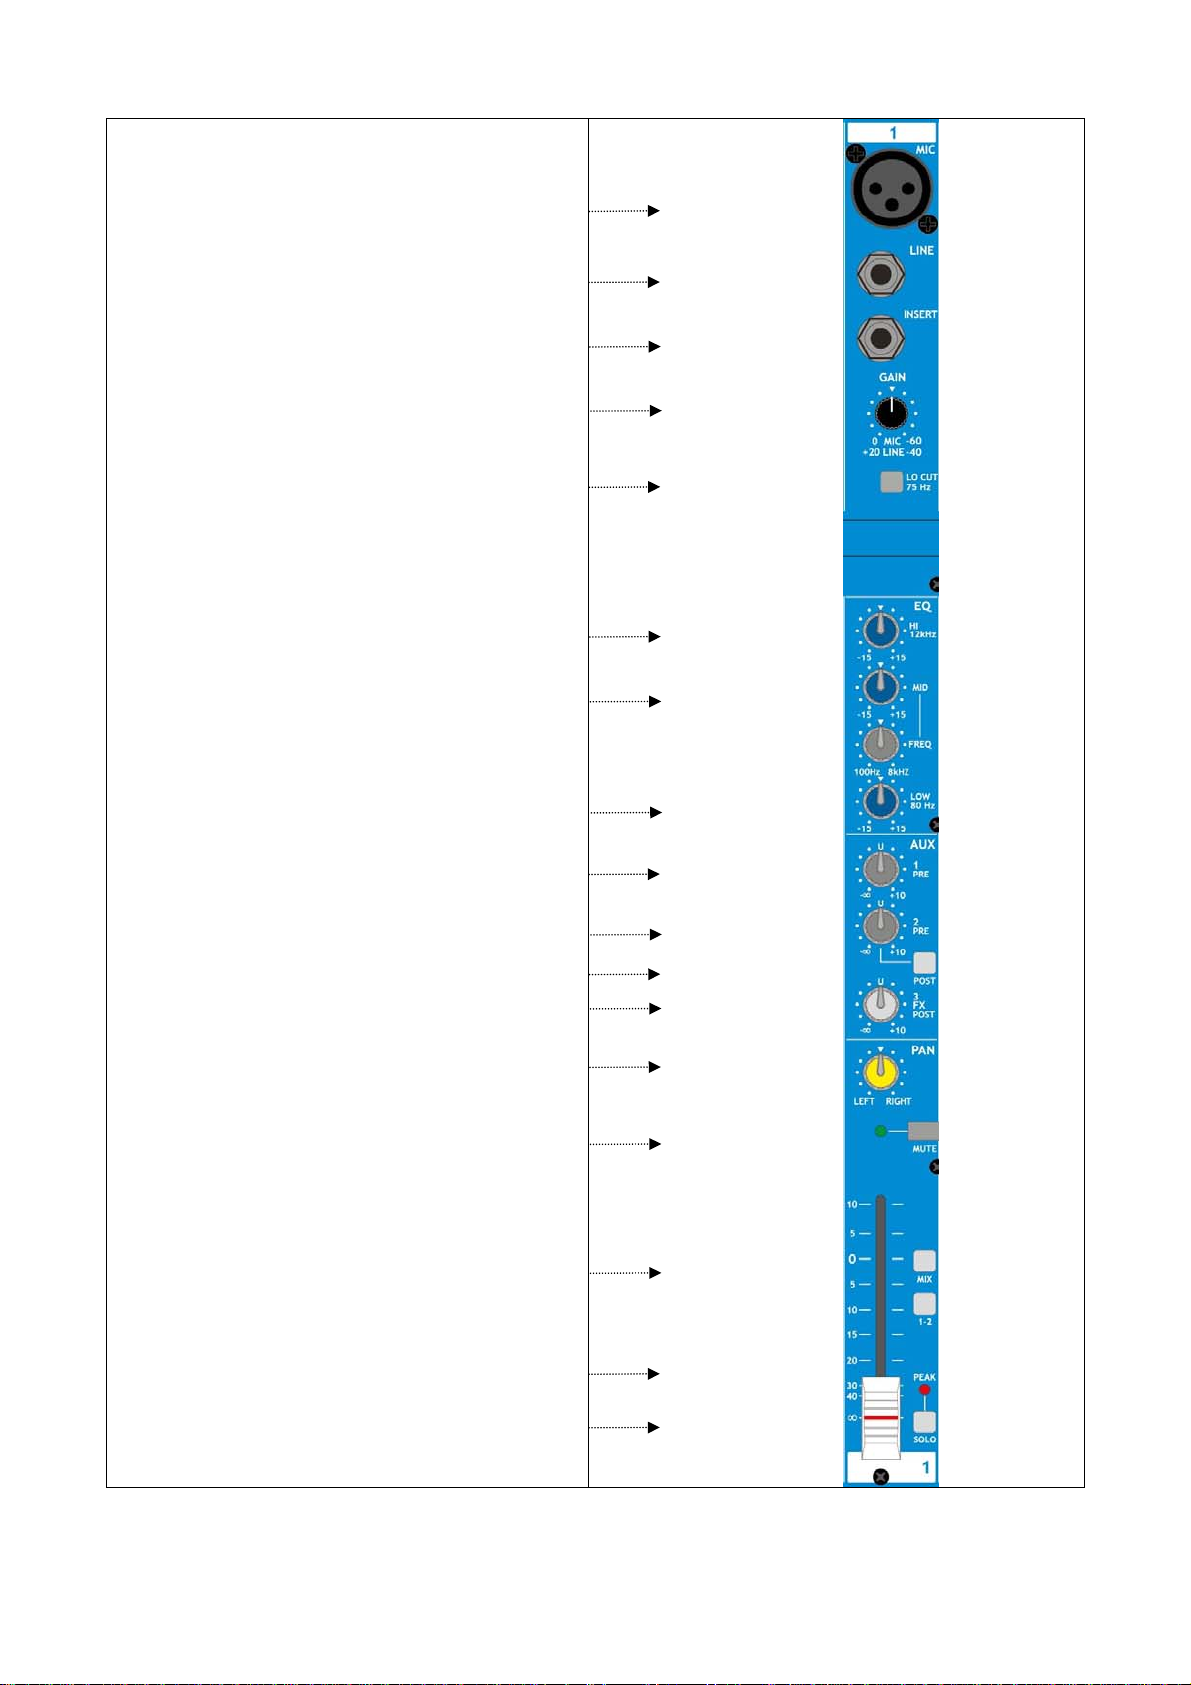
XLR microphone input
The PHANTOM switch activates 48V Phantom Power, on the
backpanel, for mic inputs 1-8.
Ingresso microfono XLR
L’alimentazione Phantom 48V è attivata dal tasto PHANTOM,
sul pannello posteriore, per gli ingressi microfonici 1-8.
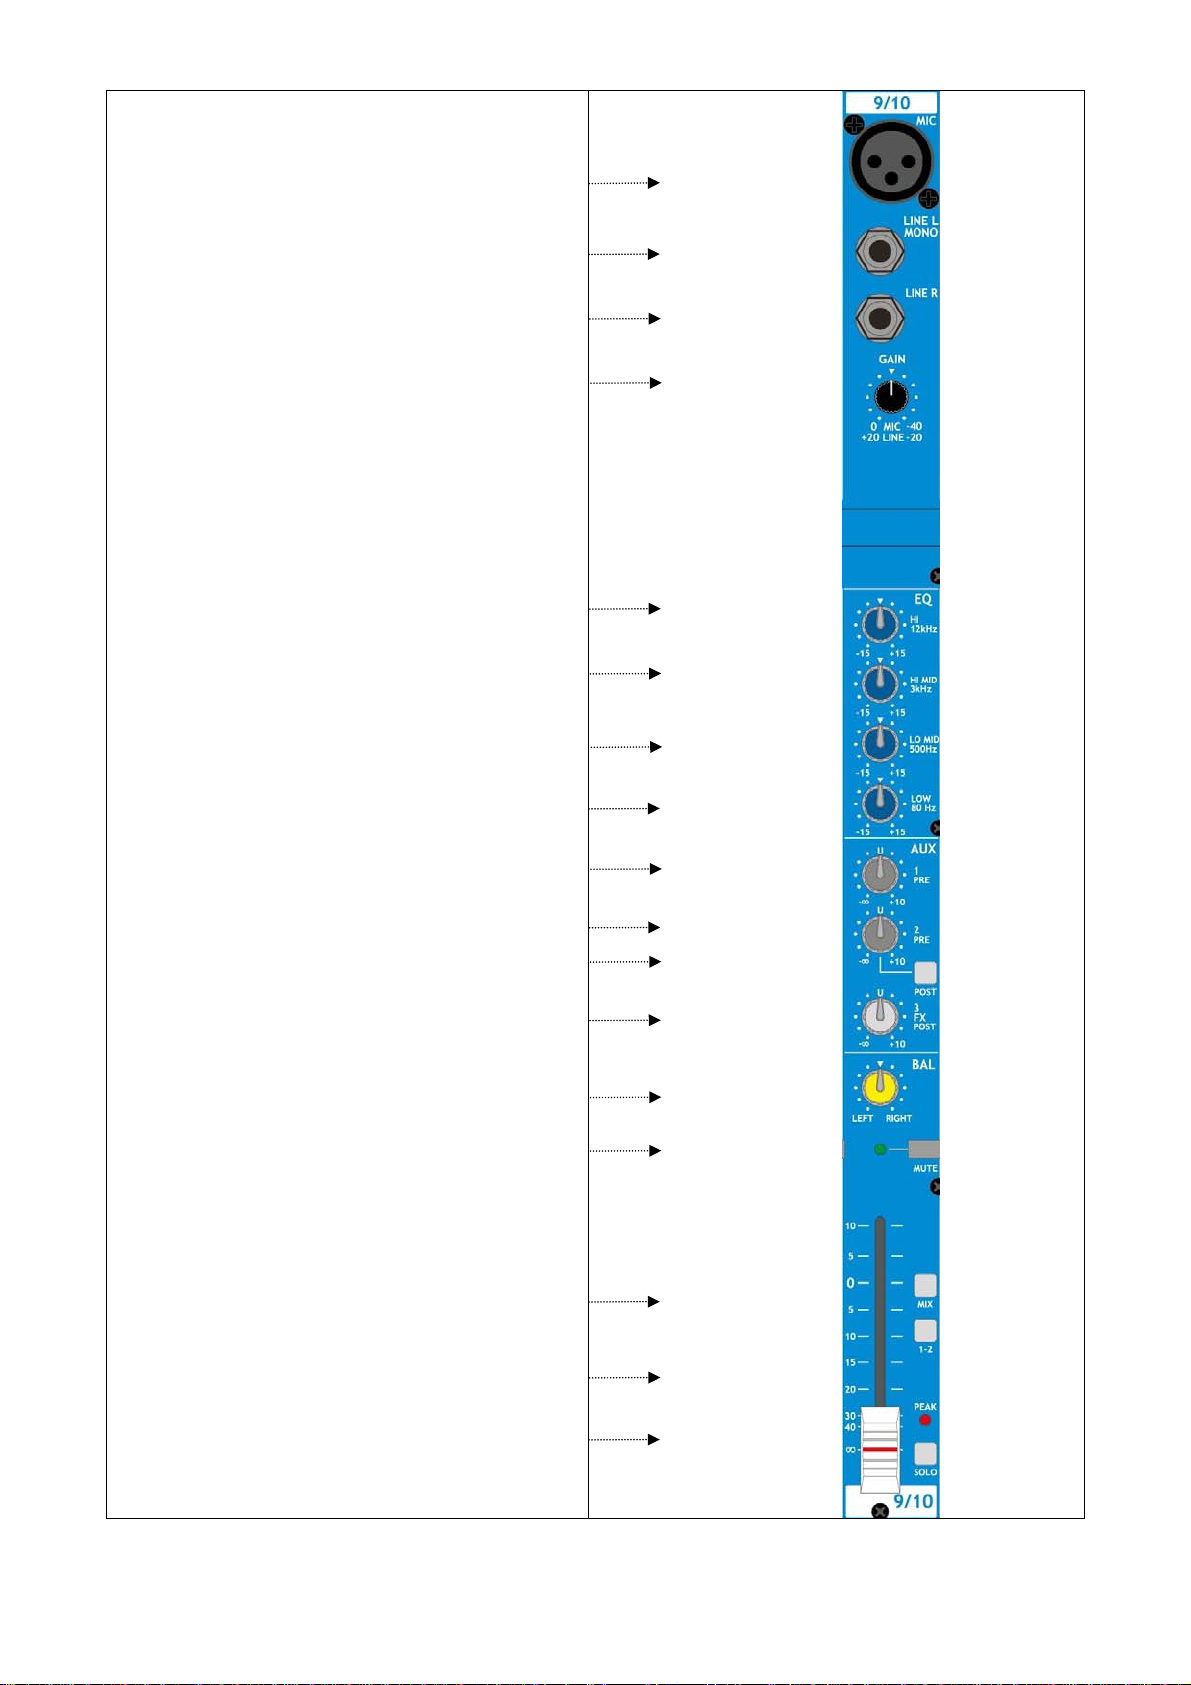
Left (Mono) XLR & 1/4” line input Jack “L”
Right 1/4” line input Jack “R”
Connecting XLR or Left ¼” Jack only, the signal will be
present in both outputs (L/R).
Ingresso Left (Mono) XLR & Jack “L”
Ingresso Right Jack “R”
Collegando la sola presa Left, XLR o Jack, il segnale sarà
presente in entrambe le uscite (L/R)
AUX 1 SEND
This control sends the signal to the AUX 1 output. This
signal is pre-fader.
AUX 1 SEND
Questo controllo invia il segnale all'uscita ausiliaria AUX1.
Questo segnale è pre-fader.
AUX 2 SEND
This control sends the signal to the AUX 1 output, this
signal is pre-fader, but could be set post-fader pressing the
POST switch. In such case the level will be ruled by the
position of the FADER LEVEL control.
AUX 2 SEND
Questo controllo invia il segnale all'uscita ausiliaria AUX1.
Questo segnale è pre-fader, ma può essere impostato post-
fader premendo il tasto POST. In questo caso il livello del
segnali inviato all’uscita AUX2 dipenderà dalla posizione del
controllo FADER LEVEL.
PRE/POST Selector
The Pre-fader setting is preferable if you intend to use the
AUX 1 send as stage monitor, to have your stage mix
independent from MAIN MIX. The Post-fader is preferable to
be used as an effect send either to the internal or to an
external signal processor.
Selettore PRE/POST
L’impostazione Pre-fader è preferibile se si intende usare la
mandata AUX 1 come monitor di palco, per avere il missaggio
di palco indipendente dal mix principale. L’impostazione
Post-fader è invece da utilizzarsi come mandata effetti, sia al
processore interno che ad uno esterno.
AUX 3 SEND
This control sends the signal to the AUX 2 output and to
the internal DIGITAL EFFECT PROCESSOR. This signal is
post-fader.
AUX 3 SEND
Questo controllo invia il segnale all'uscita ausiliaria AUX 2 e
all'effetto interno (DIGITAL EFFECT PROCESSOR). Questo
segnale è post-fader.
PAN - BAL (stereo signal balance)
It adjusts the amount of channel signal sent to the left and
the right outputs if the channel is MONO. BAL knob in the
stereo channelsdetermines the balance between Left and
Right stereo source signal. So it acts more like your hi-fi set
balance control for stereo sources, than like a PAN control.
PAN - BAL (bilanciamento stereo)
Il controllo PAN imposta la posizione di un segnale mono nel
“panorama stereo”. La manopola BAL stabilisce il
bilanciamento della sorgente di segnale Left e Right. Quindi
funziona in modo simile al controllo BAL del vostro hi-fi per
controllare le sorgenti stereo.
PEAK LED
This LED has two function:
If the PEAK LED lights permanently this means that you
have activated the SOLO switch of this channel.
If the PEAK LED flashes, it means that the input signal is
near to the CLIPPING point.
IMPORTANT: if the LED PEAK flashes, reduce the level of the
input signal using the GAIN control.
LED PEAK
Questo LED ha due funzioni:
Se il led PEAK è acceso sempre significa che è stato attivato il
tasto SOLO di questo canale.
Se il led PEAK lampeggia significa che il segnale di ingresso è
prossimo alla distorsione.
IMPORTANTE: se il led PEAK lampeggia ridurre il livello del
segnale di ingresso usando il controllo del guadagno (GAIN).
SOLO
This switch allows you to pre-listen the channel signal by
your headphones or control room outputs and to show the
channel’s signal level on the led meters. SOLO can be either
Pre Fader in MONO (PFL) or After Fader in Stereo (AFL).
SOLO
Questo tasto rende possibile il preascolto dei segnali dei
canali tramite l’uscita cuffie e l'uscita C.ROOM, e la
visualizzazione del suo livello sui led meters. Il solo può
essere commutato Pre-Fader MONO (PFL) o Post-Fader in
Stereo (AFL).
MIX / 1-2
These two buttons assign the channel signal either to the
MASTER Mix, or to the mix groups 1 and 2. T choose the
group1, turn the PAN/BAL control fully counterclockwise.
To choose group2, turn it fully clockwise.
MIX / 1-2
Questi due selettori indirizzano il segnale del canale al
Master mix, oppure ai sottogruppi 1 e 2. Per scegliere il
gruppo1, ruotare completamente il controllo PAN/BAL in
senso antiorario. Per scegliere il gruppo2, ruotarlo
completamente in senso orario.

Master Section
INPUTS & OUTPUTS – INGRESSI E USCITE
2TRK IN (play) – RCA pair
2TRK IN (play) – coppia di RCA
2TRK OUT (rec) - RCA pair
2TRK OUT (rec) – coppia di RCA
FX MUTE FOOTSWITCH – ¼“ Jack
INTERRUTTORE FX MUTE– Jack 6,35mm
BNC CONNECTOR FOR 12V/0,5 A LAMP
CONNETTORE BNC PER LAMPADA DA 12V/0,5 A
CONTROL ROOM L-R - 2 x ¼” Jack
USCITE PER STUDIO MONITOR L-R, 2 x Jack 6,35mm
GROUPS 1-2 - 2 x ¼” Jack
USCITE GRUPPI 1-2, 2 x Jack 6,35mm
MASTER INSERTS L-R - 2 x ¼” Jack TRS
PRESE MASTER INSERT L-R, 2 x Jack TRS 6,35mm
AUX RETURN 1 L-R - 2 x ¼” Jack
INGRESSI RITORNO EFFETTI 1: 2 x Jack 6,35mm
AUX RETURN 2 L-R - 2 x ¼” Jack
INGRESSI RITORNO EFFETTI 2: 2 x Jack 6,35mm
AUX 1 OUT (send) – ¼” Jack
MANDATA AUX 1 OUT – Jack 6,35mm
AUX 2 OUT (send) – ¼” Jack
MANDATA AUX 2 OUT – Jack 6,35mm
AUX 3 OUT (send) – ¼” Jack
MANDATA AUX 3 OUT – Jack 6,35mm
PHONES – ¼” Stereo Jack
USCITA CUFFIE – Jack stereo 6,35mm
MASTER OUT L-R - 2 x ¼” Jack
USCITE MASTER OUT L-R – 2 x Jack 6,35mm
24BIT DIGITAL EFFECT PROCESSOR
16-PRESET ROTARY SELECTOR
SELETTORE ROTATIVO A 16 PRESETS
ROTARY SELECTOR FOR 16 PRESET VARIATIONS
SELETTORE ROTATIVO A 16 VARIAZIONI PER OGNI
PRESET.
EFX MUTE SWITCH WITH MUTE/PEAK LED
INTERRUTTORE DI MUTE PER L’EFFETTO CON LED
PEAK/MUTE
CONTROLS & FUNCTIONS
CONTROLLI E FUNZIONI
7-BAND STEREO EQ, ASSIGNABLE TO THE MASTER
MIX OR TO THE AUX 1 AND 2
EQUALIZZATORE STEREO A 7 BANDE, ASSEGNABILE
AL MASTER MIX O ALLE MANDATE AUX 1 E 2
POWER ON LED (GREEN)
Indicatore POWER ON LED (VERDE)
+48V PHANTOM POWER ON LED (RED)
Indicatore PHANTOM POWER +48V ON LED (ROSSO)
12-SEGMENT STEREO BARGRAPH
INDICATORE STEREO A 12 LED

CONTROLS & FUNCTIONS
CONTROLLI E FUNZIONI
CONTROL ROOM / PHONES LEVEL KNOB
MANOPOLA VOLUME CONTROL ROOM E CUFFIE
MIX/GRP1-2/2TRK SELECTOR SWITCHES TO C.ROOM
TASTI DI ASSEGNAZIONE MIX/GRP1-2(2TRK AL
C.ROOM
GROUP 1-2 TO MIX ASSIGN SWITCH
TASTO DI ASSEGNAZIONE DEI GRUPPI 1-2 AL
MASTER MIX
SOLO MODE SELECTOR
AFL (RED LED) / PFL (YELLOW LED)
SELETTORE DI MODALITA’ SOLO
AFL(LED ROSSO) / PFL(LED GIALLO)
AUX1 RETURN KNOB
MANOPOLA AUX1 RETURN
AUX2 RETURN KNOB
MANOPOLA AUX2 RETURN
FX TO AUX1 KNOB
MANOPOLA FX TO AUX1
FX TO AUX2 KNOB
MANOPOLA FX TO AUX2
AUX SENDS 1-2-3
MANDATE AUX 1-2-3
2TRK IN KNOB
MANOPOLA VOLUME 2TRK IN
2TRK TO MIX SWITCH
TASTO DI ASSEGNAZIONE DELL’INGRESSO 2TRK AL
MASTER MIX
FX RETURN FADER
FADER MASTER RITORNO EFFETTI
FX RETURN TO MIX / GRP1-2
TASTO DI ASSEGNAZIONE DEL RITORNO EFFETTI AL
MASTER MIX O AI GRUPPI 1-2
STANDBY SWITCH
TASTO STANDBY (MUTE GENERALE DEL MIXER)
MASTER GROUP FADERS 1-2
FADERS MASTER DEI GRUPPI 1-2
MASTER FADERS
FADERS MASTER

Rear Panel - Pannello Posteriore
AC MAINS IEC Power Plug
Power On/Off Switch
Phantom Power On/Off Switch
Master Outputs 2 x XLR L-R
USB Port – Audio In/Out
Presa di rete per l’alimentazione del mixer
Interruttore On/Off
Interruttore Alimentazione Phantom Power On/Off
Uscite 2 x XLR Master Out
Porta USB – Audio In/Out
APPLICATION NOTES NOTE DI UTILIZZO
2TRK IN (play) - 2TRK OUT (rec)
These RCA Jack pairs are provided for
recording (rec) and listening (play) signals
using a stereo recorder analog connections.
2TRK IN (play) should also be used to listen
CD player, MP3 player, etc.
2TRK IN (play) - 2TRK OUT (rec)
Queste prese RCA sono fornite per la
registrazione (rec) e l’ascolto (play) di segnali
usando le connessioni analogiche di un
registratore stereo.
2TRK IN (play) può essere usato anche per
ascoltare lettori CD, lettori MP3 ecc.
PHONES
Connect stereo headphones here CUFFIE
Collegare a questa uscita una cuffia stereo
C. ROOM L-R OUTPUTS
These stereo line level outputs can feed a pair
of active studio monitor speakers, as well as
any other line level compatible device, as
recorders etc. The outputted signal is selected
by the MIX/ALT3-4/2TRK switches, and
controlled by the C.ROOM level knob.
USCITE C.ROOM L-R
QUeste uscite possono pilotare una coppia di
studio monitors o un registratore etc. dotato di
ingressi a livello linea. Il segnale è assegnato
tramite i tasti MIX/ALT3-4/2TRK, ed il volume è
controllato dalla manopola C.ROOM
GROUP 1-2 OUTPUTS
These JACK connectors provide a balanced line-
level signal from the GROUP 1-2 stereo bus
signal.
USCITE GROUP 1-2
Questi connettori JACK forniscono un segnale di
livello linea bilanciato proveniente dal bus stereo
GROUP 1-2.
FX PRESETS & VARIATIONS
These selectors allows you to choose the
desired effect among the 16 available presets,
each with 16 carefully selected sound
variations.
FX PRESETS & VARIATIONS
Questi selettori vi consentono di scegliere
l’effetto desiderato tra i 16 programmi
disponibili, ciascuno con 16 diverse
programmazioni.
AUX and FX RETURNS section
This section controls allows you to carefully
calibrate the global amount of effect you desire
to add to every channel. The AUX Return inputs
can either feed back to the mixer the output of
an external signal processor, or act as standard
Line inputs. The AUX Return knobs control the
amount of effect returning from an external
signal processor fed by the AUX Sends. The FX
Return fader controls the amount of effect
returning from the signal processor integrated
in the mixer.
The FX TO AUX1/2 knobs adjust the level of
the internal effect signal sent to the AUX1/2
outputs, allowing the monitor mix to be “wet”.
Sezione AUX e FX RETURNS
I controlli di questa sezione vi consentono di
regolare la quantità totale di effetto che
desiderate applicare ai singoli canali. Gli ingressi
AUX Return possono sia ricevere il segnale da un
processore esterno o fungere da normali ingressi
Linea.
Le manopole AUX Return controllano il ritorno
effetti di processori esterni collegato alla
mandate AUX. Il fader FX Return controlla il
ritorno effetti del processore integrato nel mixer.
Le manopole FX TO AUX1 e 2 regola il livello del
segnale dell’effetto interno verso le uscite AUX1 e
2, consentendo di assegnare quindi l’effetto
anche sul mix dei monitors da palco.
CONTROL ROOM Knob
The CONTROL ROOM outputs and the PHONE
output carry the same signal, selected by the
MIX/GRP1-2/2TRK switches. The CONTROL
ROOM / PHONES knob controls the volume of
both CONTROL ROOM and PHONES outputs
Manopola CONTROL ROOM
La coppia di uscite CONTROL ROOM L-R
riproduce il segnale selezionato dai tasti
MIX/GRP1-2/2TRK. L manopola CONTROL ROOM
/ HEADPHONES regola il volume di entrambe le
uscite CONTROL ROOM e PHONES.

2TRACK IN Knob
The 2TRK IN knob controls the loudness of the
playback of a source connected to the 2TRK IN
(play) RCA pair. This signal is routed to the
MASTER output.
Manopola 2TRACK IN
La manopola 2TRK IN regola il volume del
segnale in ingresso alle prese RCA 2TRK IN (play).
Il segnale è indirizzato direttamente all’uscita
MASTER.
GRP1-2 TO MIX SWITCH
Assigns the GRP1-2 mix buss to the master
buss, acting lke a mix group.
INTERRUTTORE GRP1-2 TO MIX
Assegnal il mix GRP1-2 al Master mix,
comportandosi come un sottogruppo.
12 LED Output Level meter
Take care to adjust the Channel Volume and
the Master Volume to keep the output signal in
the -12/+6dB range. A too weak signal may not
have the optimal Signal to Noise (S/N) rate,
while a too hot signal may overload the circuit,
resulting in a distorted sound. If you notice the
red CLIP LED being lit more than sporadically,
reduce the MASTER Fader level and/or the
individual Channel volume controls, to avoid
undesired clipping in the audio.
Indicatore del livello di uscita a 12 LED
Ponete attenzione nel regolare i volumi dei canali
e il Master Fader, affinchè il livello del segnale in
uscita si attesti tra i -12/+6dB. Un segnale troppo
debole potrebbe avere un rapporto Segnale
Rumore (S/N) non ottimale, mentre un segnale
troppo forte potrebbe saturate il circuito,
generando un suono distorto. Se notate che i LED
rossi CLIP lampeggiano frequentemente, riducete
il livello del MASTER fader e/o dei controlli di
Volume dei singoli canali, per evitare fenomeni di
clipping (saturazione) nell’audio.
SOLO MODE AFL/PFL SELECTOR SWITCH
PFL (Pre Fader Listen, mono) is commonly used
to check the input level of a given signal, to
optimize gain and avoid input cliping. AFL
(After Fader Listen, Stereo) is used to check the
mix of a group of channels (full drumset, or a
string section, or a choir), after EQ, PAN and
channel volume.
COMMUTATORE SOLO AFL/PFL
La modalità SOLO PFL (PRE FADER, MONO) è utile
per verificare il livello in ingresso di un segnale,
per evitare il clipping. La modalità AFL (POST
FADER, STEREO) è utile per ascoltare il segnale a
valle di equalizzazione, pan e volume di canale.
Ad esempio per verificare l’immagine stereo della
ripresa di una batteria, di una sezione archi o di
un coro, effettuata con più microfoni.
FX FOOTSWITCH
This ¼” Jack is provided for Effect unit’s remote
control. By connecting a latched footswitch
with TS connector you can turn on/off the the
FX section.
FX MUTE PRESA JACK
Questa presa da 6,35mm è fornita per il controllo
a distanza dell’unità effetti. Collegando un pedale
con Jack TS, potete attivare o disattivare la
sezione FX.
MASTER OUTPUT (L R) (back panel)
The output of the Master mix is sent to the XLR
outputs on the back panel, and to the Jack
outputs on the front panel. Both feeds can be
used independently, and both offer the same
quality.
USCITE MASTER (L R) (pannello posteriore)
Il segnale MASTER viene inviato alle uscite XLR sul
pannello posteriore, ed alle uscite Jack sul
pannello frontale. Entrambe possono essere
usate in modo indipendente, e forniscono
esattamente la stessa qualità.

USB INTERFACE (back panel)
USB connection allows you to exchange CD-
quality (stereo, 16-bit, 44.1 kHz) audio
between the computer and your mixer. Use the
computer’s built in audio recorder or use a
dedicated software (DAW) to record and play
back audio within your computer.
The USB port sends the MAIN MIX left and right
signals to the computer.
The USB port receives a stereo audio stream
from the computer and assigns it to the 2TRK
INPUT.
Connection instructions for Windows
(7, XP, 2000, ME, and 98 SE)
Upon first sensing the MCL8Pro input, Windows
XP and Windows 2000 automatically recognize
the MCL8Pro and proceed to install
“USB audio codec” drivers. Windows ME and
Windows 98 Second Edition may require you to
insert your Windows disc.
After the MCL8Pro has been recognized and its
drivers have been installed, open the Windows
Control Panel and configure the MCL8Pro as
the Audio hardware of choice for your software
Connection instructions for Macintosh
(OS X only)
After plugging in the MCL8Pro, select “USB
Audio CODEC” in the Sound area of System
Preferences.
No other action is required.
IMPORTANT: The MCL8Pro is not designed
for use with Mac OS9 and below.
INTERFACCIA USB (pannello posteriore)
La connessione USB consente di usare il mixer
MCL8Pro come una scheda audio in grado di
scambiare un segnale stereo 16-bit a 44.1kHz
con un computer. Si può utilizzare il registratore
di suoni del PC, o un programma dedicato per
registrare e/o riprodurre il suono.
La porta USB invia il segnale in uscita dal Main
Mix al computer e riceve un segnale stereo dal
computer per riprodurlo, assegnandolo
all’ingresso 2TRK INPUT.
Istruzioni di Collegamento per Windows (7, XP,
2000, ME, 98SE)
Collegare il mixer al computer. Il computer
avvierà automaticamente la procedura di
riconoscimento di un nuovo hardware, e
installerà un nuovo USB Audio Codec. Qualora il
computer sia dotato di WinME o Win98SE,
potrebbe richiedere l’inserimento del disco
originale di Windows.
Quando il mixer MCL8Pro sarà installato, tramite
il Pannello di Controllo di Windows sarà possibile
configurarlo come periferica per il software di
registrazione e/o riproduzione che si intende
utilizzare.
Istruzioni di connessione per Macintosh (solo
OS-X)
Dopo aver collegato il mixer MCL8Pro,
selezionare USB Audio Codec nell’area SUONI
delle Preferenze di Sistema. Non sarà necessaria
alcuna altra operazione.
IMPORTANTE: Il mixer MCL8Pro non è
progettato per funzionare con sistemo
operativi OS9 o precedenti.

Technical Specifications
Section Technical Specifications Connections
MONO INPUT CHANNEL
Mic Input sensitivity -0 to -60 dB XLR-F, balanced
impedance 2 Kohm
Line Input sensitivity +20 a -40 dB TRS Jack, Bal/Unbalanced
impedance 10 Kohm
EQ HI ±15 dB @ 12KHz shelving
MID ±15 dB @ 100Hz to 8kHz, peaking, Q=1,8
LOW ±15 dB @ 80Hz shelving
STEREO INPUT CHANNEL
Mic Input sensitivity from 0 to -40dB XLR-F, balanced
impedance 2 Kohm
Line Input sensitivity from +20 to -20dB TRS Jack, Bal/Unbalanced
impedance 10 Kohm
EQ HI ±15 dB @ 12KHz shelving
MID ±15 dB @ 500Hz and 3KHz peaking
LOW ±15 dB @ 80Hz shelving
MASTER SECTION
MASTER, GRP1-2 Nominal output level +4 dBu TRS Jack, Balanced
C. ROOM output Nominal output level +4 dBu TS Jack, Unbalanced
AUX 1 OUT Nominal output level +4 dBu TS Jack, Unbalanced
AUX 2 OUT Nominal output level +4 dBu TS Jack, Unbalanced
AUX 3 OUT Nominal output level +4 dBu TS Jack, Unbalanced
2-TRK OUT Nominal output level 0 dBu Rca Unbalanced
2 TRK IN Nominal input level. -10 dBv Rca Unbalanced
PHONES Minimum load impedance 32 ohm Jack Stereo
Maximum output level (2x) 193 mW
DIGITAL EFFECT PROCESSOR
Preset HALL, ROOM, VOCAL e PLATE reverbs
STEREO, MONO & TAP DELAYS
CHORUS & FLANGER MODULATIONS
REV + STEREO DELAY, MONO DELAY, CHORUS, FLANGER combinations
16 VARIATIONS FOR EACH PRESET
GENERAL SPECIFICATIONS
Maximum Output Level – All Outputs +22 dBu
Crosstalk @1 KHz > 82 dBu
Signal/Noise ratio - unweighted < -93 dBu
THD + noise at +4dB, 1kHz < 0,008 %
Weight 6.5 Kg
Dimensions (LxAxP) 48.5 x 43.5 x 9 cm
POWER REQUIREMENTS
Mains Supply Europe 230 V AC (±10 %) 50 / 60 Hz
Consumption 75 VA
Carisch S.p.A. reserves the right to modify products aspect and specifications at any time, without notice.
Please refer www.xxlinside.com for any further detail
Please refer to your XXL Dealer for your country rules about servicing.
©XXL 2013– All rights reserved. Any not-approved copy and use, even partial, of this instruction manual and its texts, it’s
forbidden.

Caratteristiche Tecniche
Sezione Caratteristiche Tecniche Connettori
CANALE INGRESSO MONO
Ingresso Mic sensibilità da -0 a -60 dB XLR-F Bilanciato
impedenza 2 Kohm
Ingresso Line sensibilità da +20 a -40 dB Jack Bilanciato
impedenza 10 Kohm
EQ HI ±15 dB @ 12KHz shelving
MID ±15 dB @ da 100Hz a 8kHz peaking
LOW ±15 dB @ 80Hz shelving
CANALE INGRESSO STEREO
Ingresso Mic sensibilità da 0 a -40dB XLR-F Bilanciato
impedenza 2 Kohm
Ingresso Line sensibilità da +20 a -20dB Jack Bilanciato
impedenza 10 Kohm
EQ HI ±15 dB @ 12KHz shelving
MID ±15 dB @ 500Hz e 3KHz peaking
LOW ±15 dB @ 80Hz shelving
SEZIONE MASTER
MASTER e GROUP1-2 liv. nom. uscita +4 dBu Jack Bilanciato
C. ROOM OUT liv. nom. uscita +4 dBu Jack Sbilanciato
AUX 1 OUT liv. nom. uscita +4 dBu Jack Sbilanciato
AUX 2 OUT liv. nom. uscita +4 dBu Jack Sbilanciato
AUX 3 OUT liv. nom. uscita +4 dBu Jack Sbilanciato
2-TRK OUT liv. nom. uscita 0 dBu Rca Sbilanciato
2 TRK IN liv. nom. ingr. -10 dBv Rca Sbilanciato
PHONES impedenza min. 32 ohm Jack Stereo
uscita massima (2x) 193 Mw
DIGITAL EFFECT PROCESSOR
Preset HALL, ROOM, VOCAL e PLATE reverberi
DELAY STEREO, MONO e TAP
CHORUS e FLANGER
REV +STEREO DLY / MONO DLY/ CHORUS / FLANGER
16 VARIAZIONI PER OGNI PRESET
INTERFACCIA USB
Risoluzione 16-bit, Delta/Sigma ADC e DAC, compatibile USB1.1
Campionamento DAC: 32, 44.1, 48 kHz – ADC: 8, 11.025, 16, 22.05, 32, 44.1, 48 kHz
SPECIFICHE GENERALI
Livello Massimo tutte le uscite +22 dBu
Diafonia mis. a 1 KHz > 82 dBu
Ronzio e Rumore non pesato < -93 dBu
THD + Rumore a +4dB, 1kHz < 0,008 %
Peso 6.5 Kg
Dimensioni (LxAxP) 48.5 x 9 x 43.5 cm
ALIMENTAZIONE
Tensione di rete Europa 230 V AC (±10 %) 50 / 60 Hz
Consumo 69 VA
Carisch S.p.A. si riserva il diritto di modificare aspetto e caratteristiche dei prodotti in qualsiasi momento, senza preavviso.
Per ulteriori informazioni, visitare il sito www.xxlinside.com.
Per ogni necessità di assistenza sui prodotti XXL, riferirsi al rivenditore presso il quale sia stato effettuato l’acquisto.
©XXL 2013– Tutti I diritti riservati. E’ proibita qualsiasi copia o utilizzo non autorizzato di questo manuale e dei suoi
contenuti.


Carisch SpA
via Antonio Canova, 55
I-20020 Lainate Milano – Italy
www.xxlinside.com
Table of contents
Other XXL Music Mixer manuals