Z-CAM E2 User manual

Z CAM E2
User Manual v0.6
Draft
(Firmware 0.89)

1. Introduction
1.1. Camera Introduction

1.2. LCD Screen
The content displayed on the LCD Screen will be different when the camera is in different
mode.
Standby & Recording
Preview
Press FN + OK button when the camera is in Standby mode, it will switch to
Preview mode. Press FN + OK again to come back to Standby mode.

Playback
Short press Power button when the camera is in Standby / Preview mode, it will
switch to Playback mode. Short press Power button again to come back to Standby
/Preview mode.

1.3. LED Indicator Status
Green
: Standby
Red
: Recording.
Flashing Red (every 1s)
: No memory card.
Flashing Red (every 0.5s)
: Memory card is full.
Flashing Red (every 0.2s)
: Camera overheat.
Flashing Red (very fast)
: Critical error.
Flashing Red (fast & slow alternant)
: Low battery
1.4. Buttons
MENU: Camera setting.

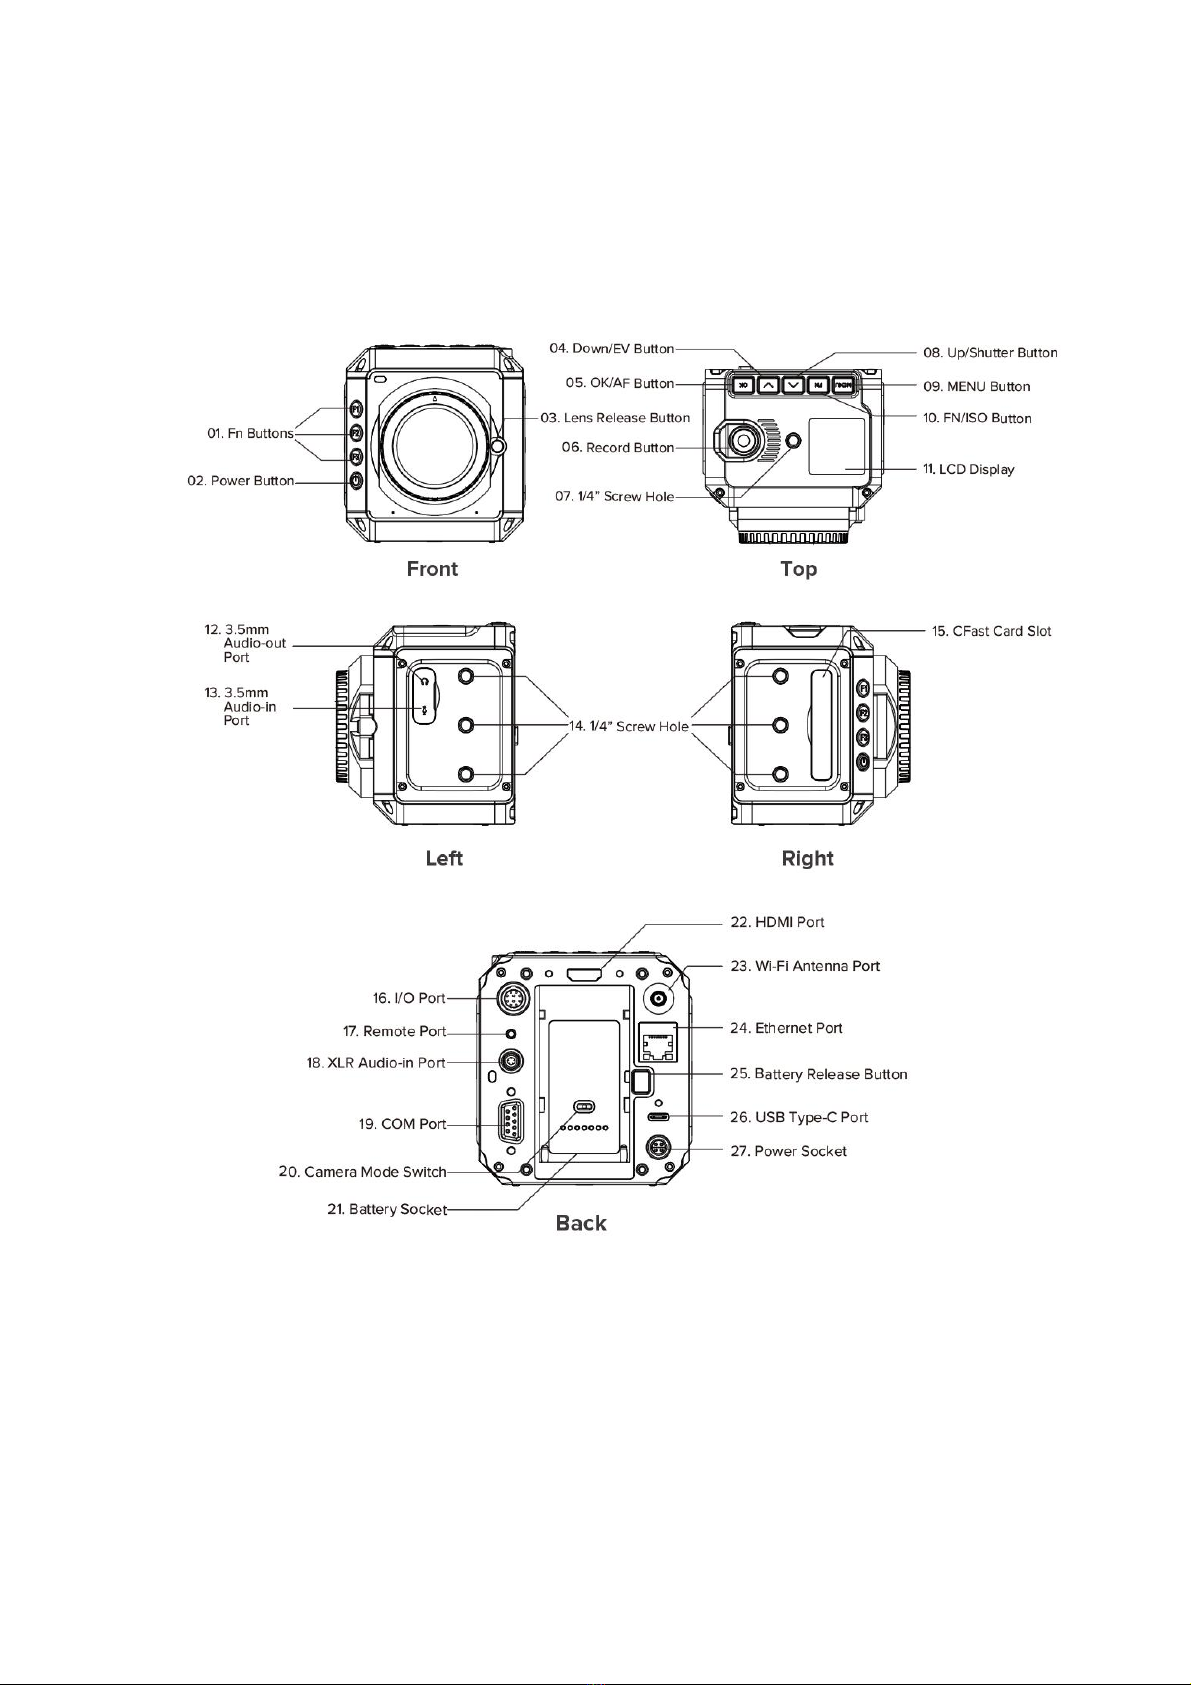
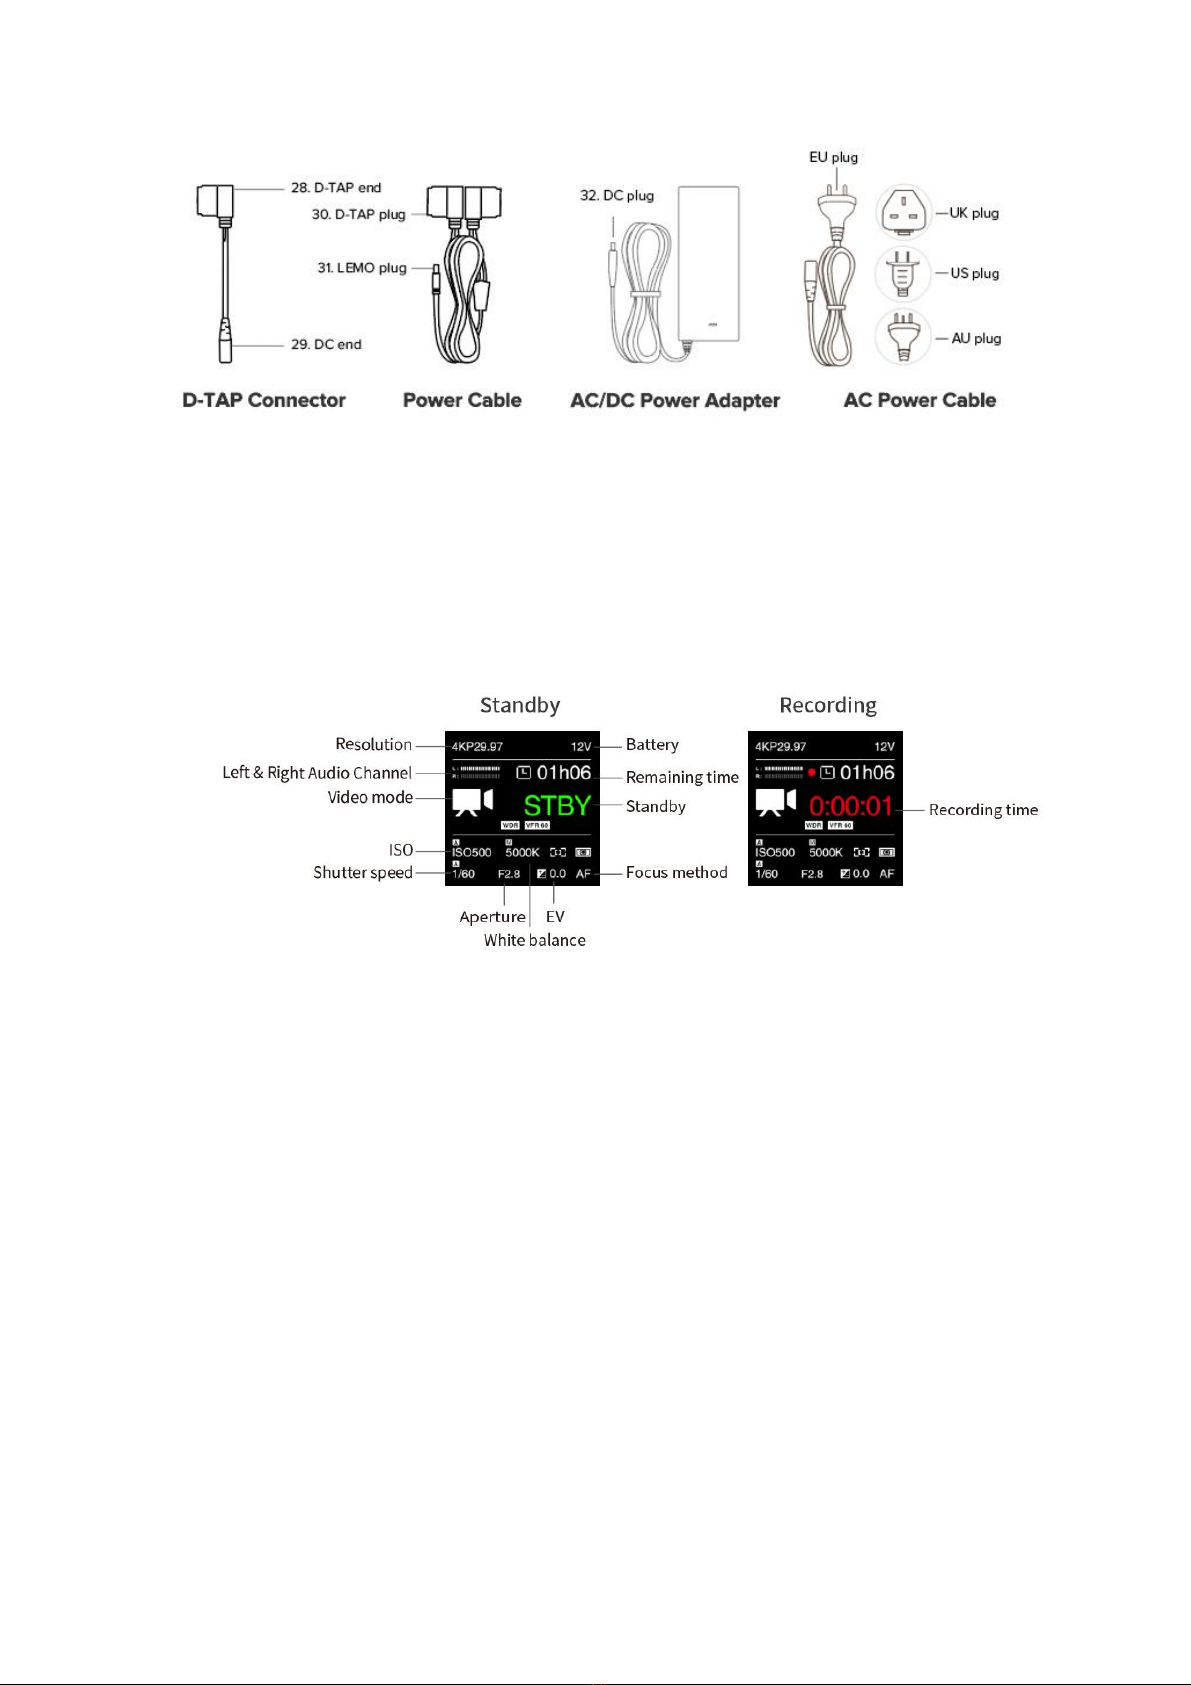
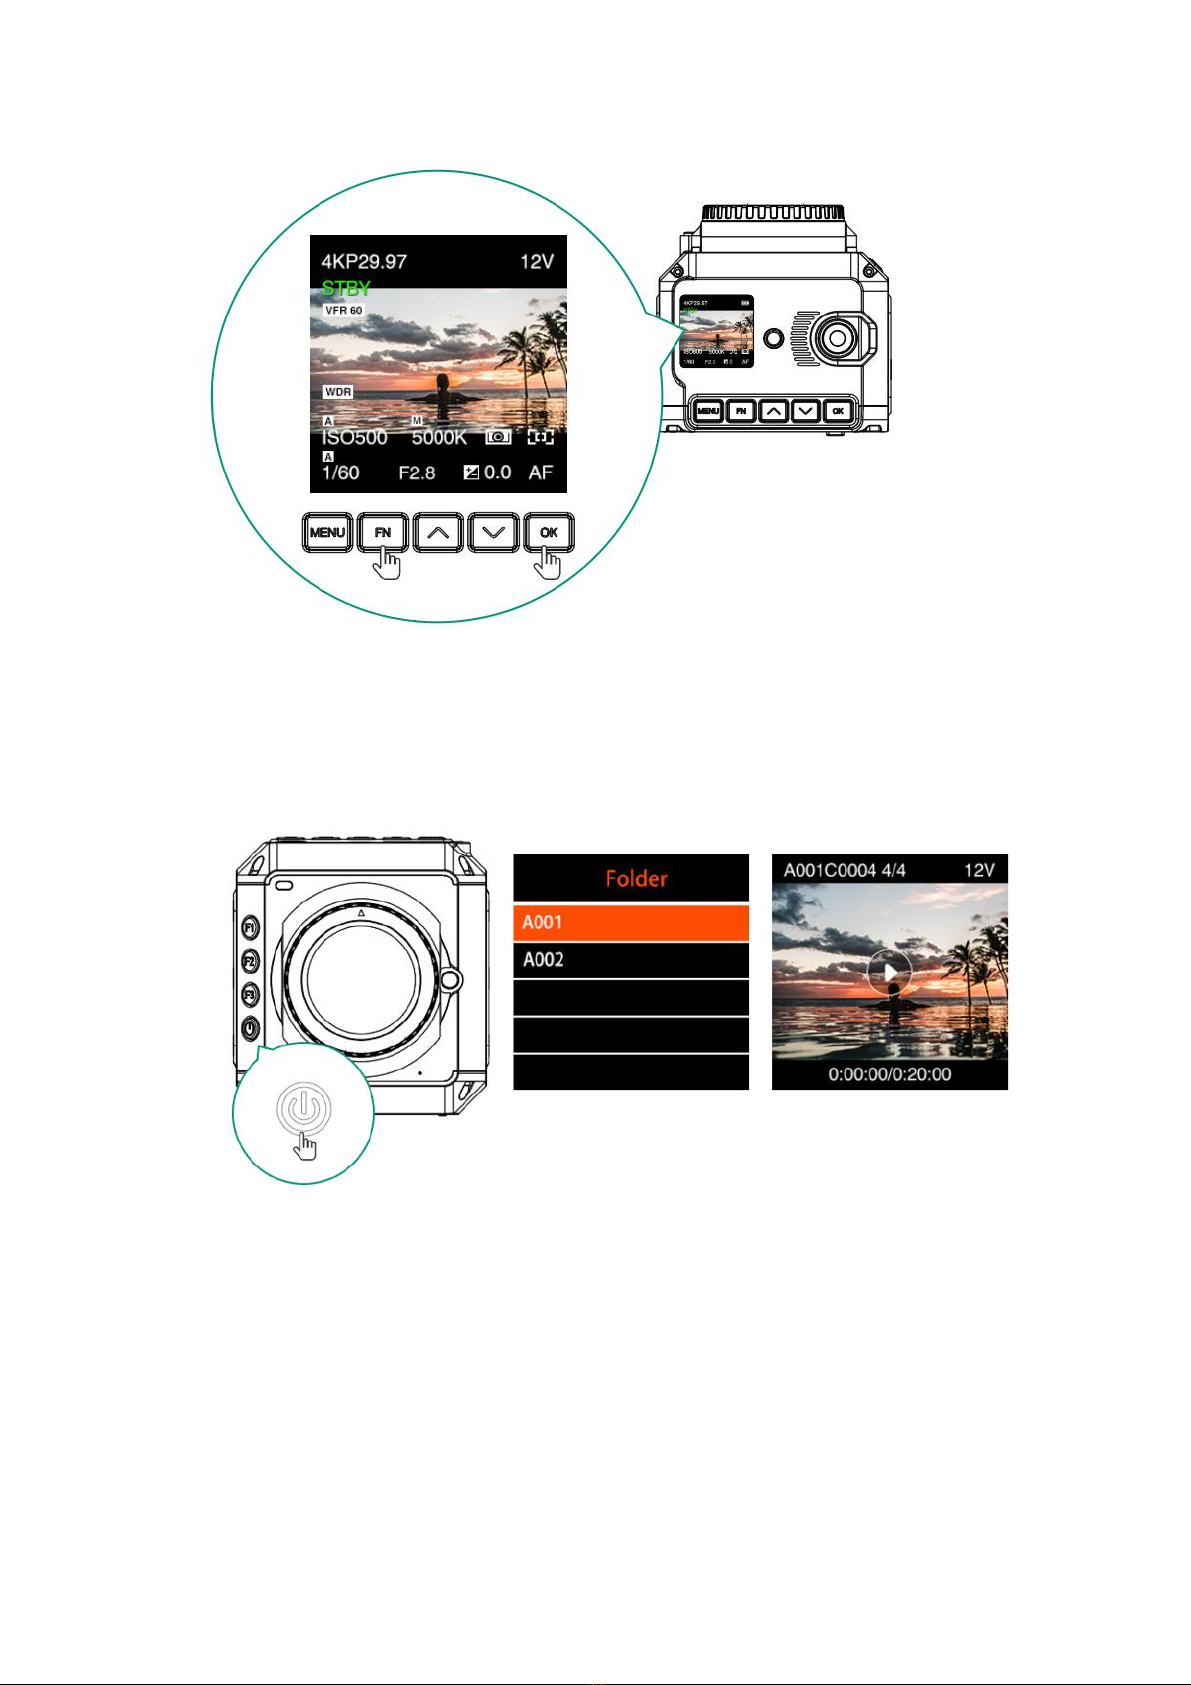
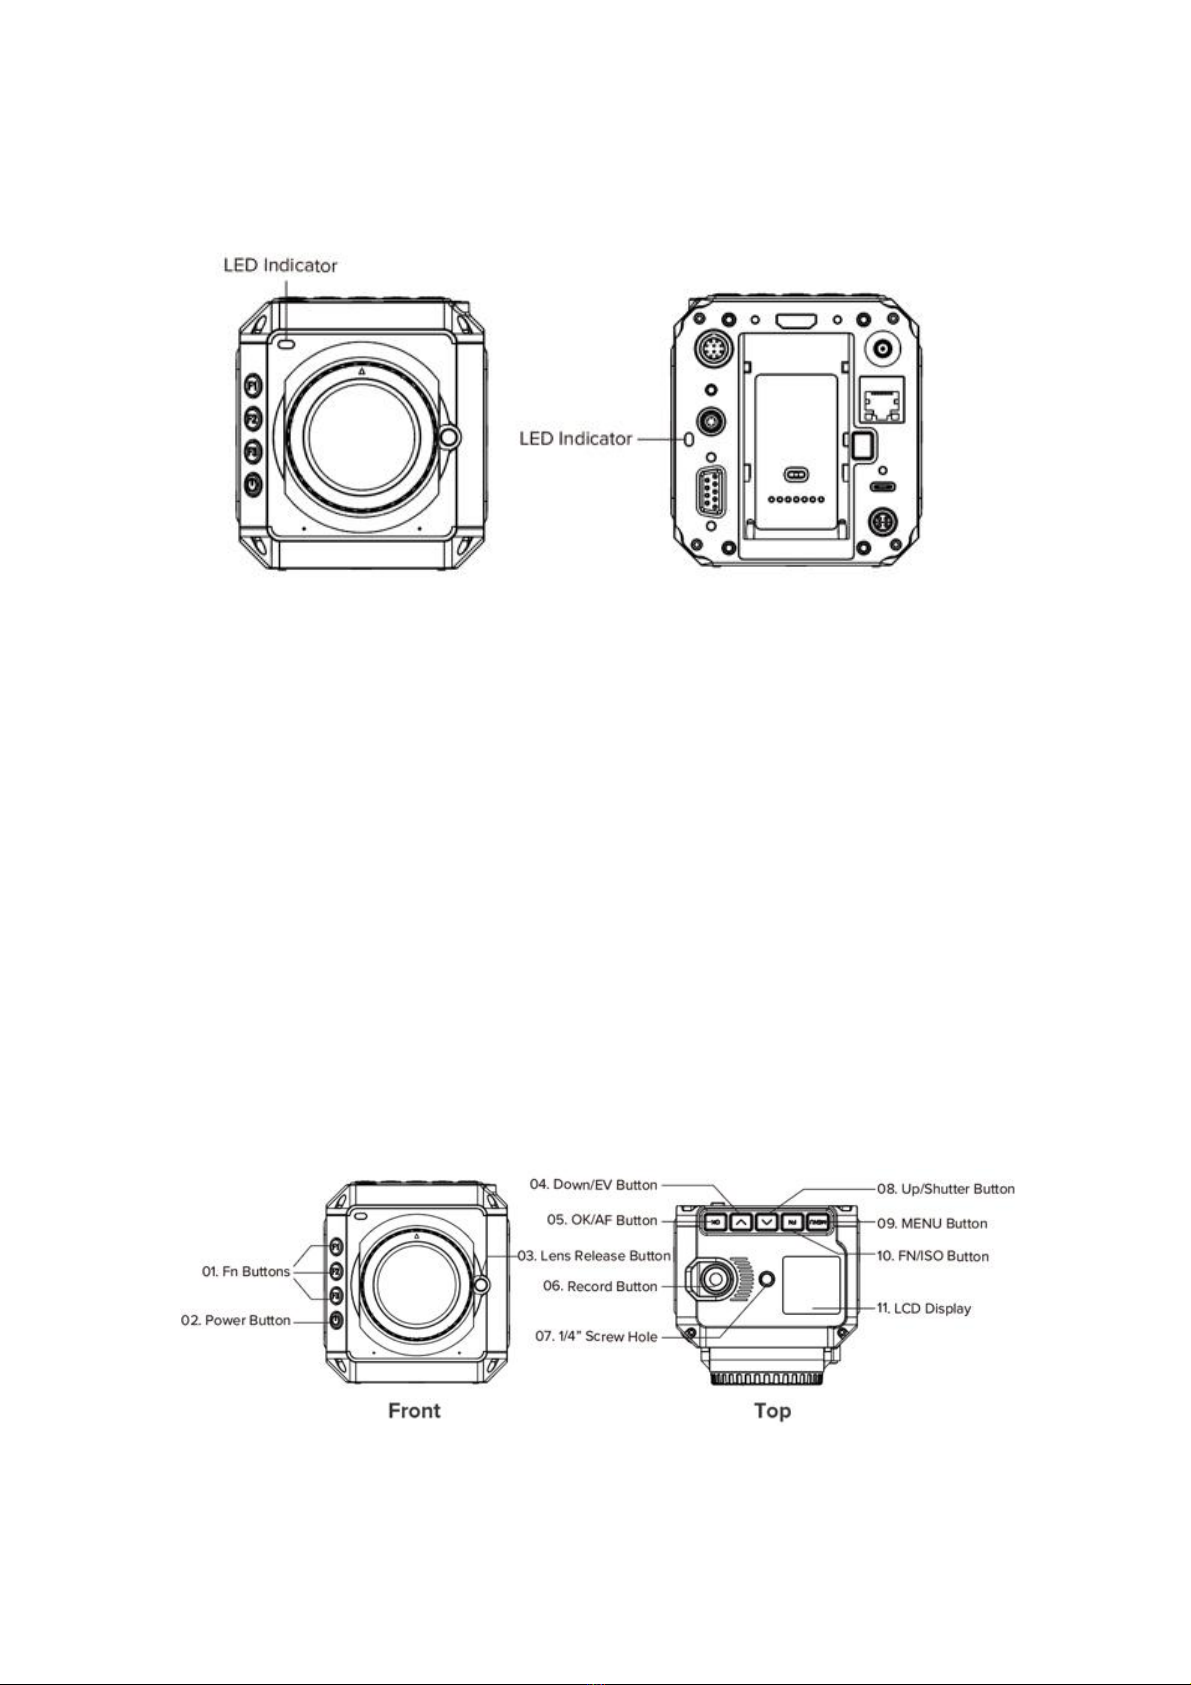
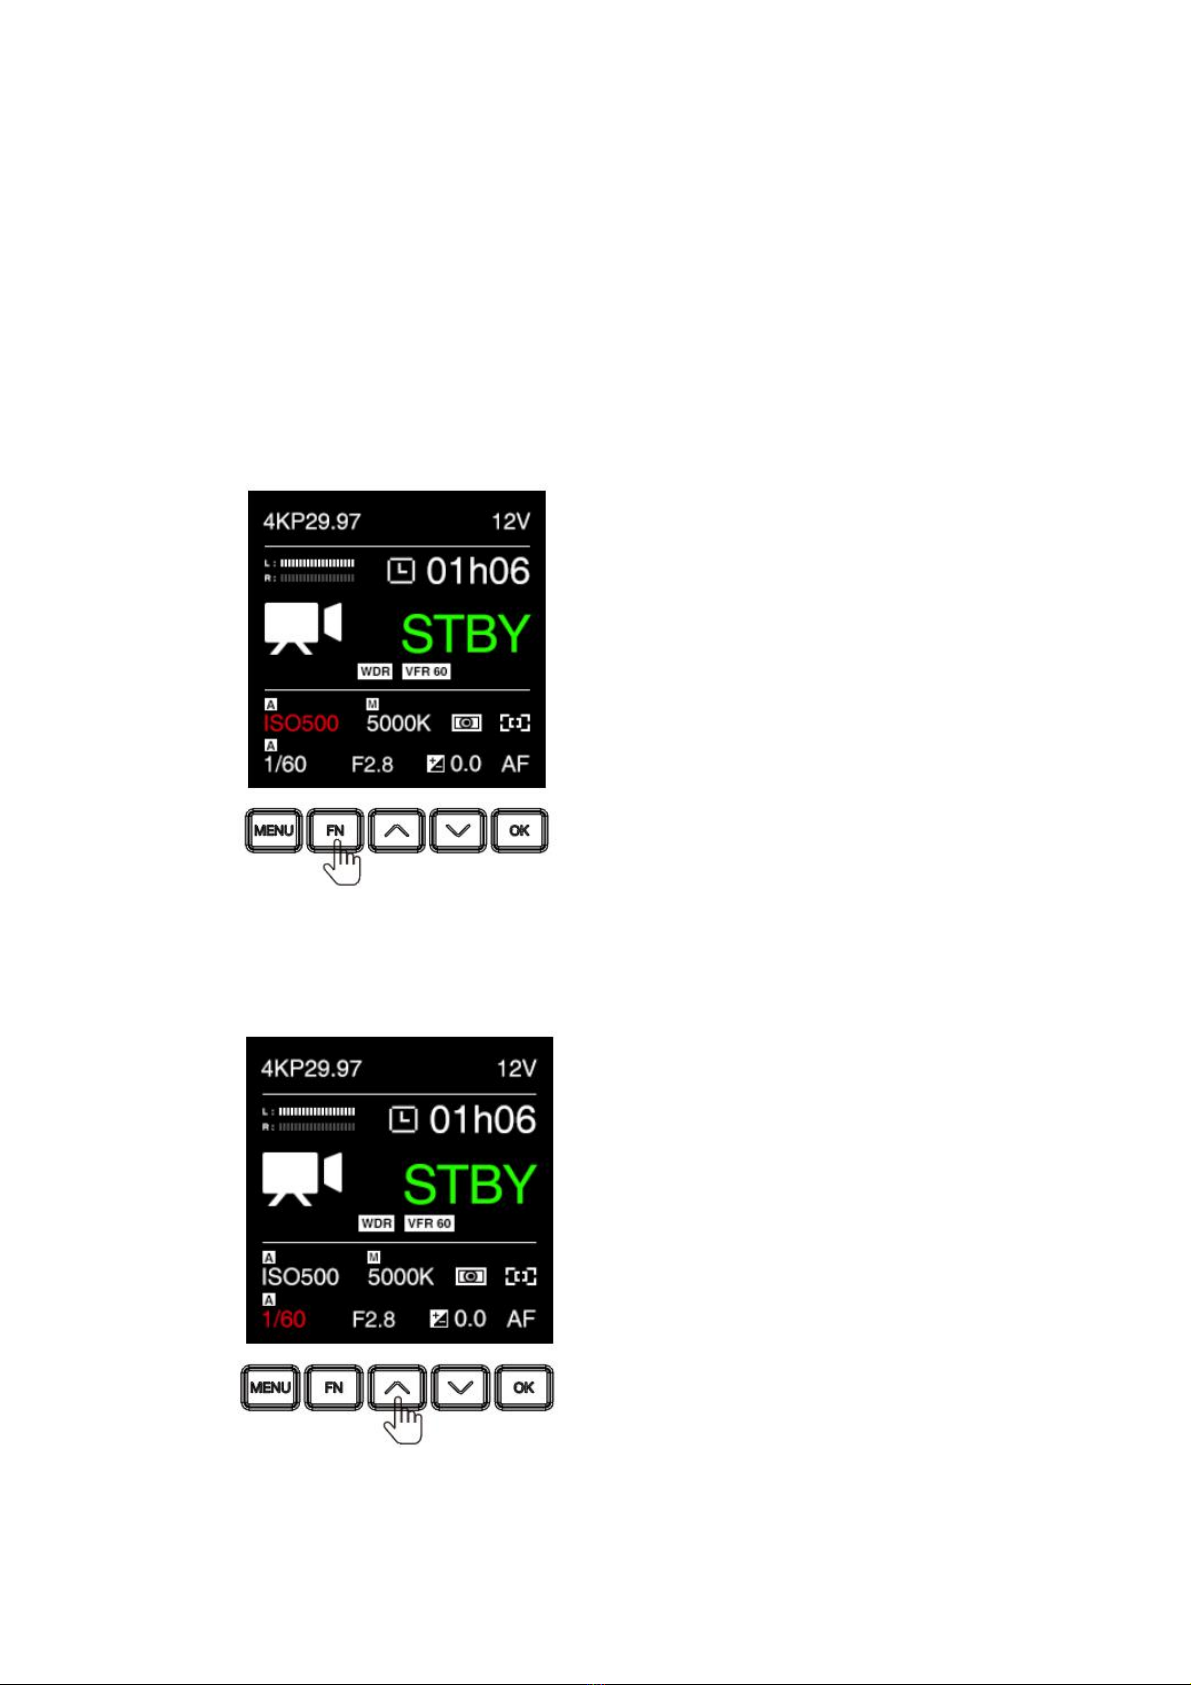
FN / ISO: FN or ISO quick setting (2.1 Quick Settings).
Up / SHT: Up selection (or add value) or Shutter Speed / Shutter Angle quick setting
(2.1 Quick Settings).
Down / EV: Down selection (or reduce value) or EV quick setting (2.1 Quick
Settings).
OK: Confirmation or to trigger the AF function (2.1 Quick Settings).
F1: AEL (Auto Exposure Lock) by default, can be changed to other quick settings
(2.10 System - Fn).
F2: Load profile by default, can be changed to other quick settings (2.10 System -
Fn).
F3: Aperture quick setting by default, can be changed to other quick settings (2.10
System - Fn).
Power button: Long press for 3 seconds to power on / off the camera, short press to
switch to / back from Playback mode.
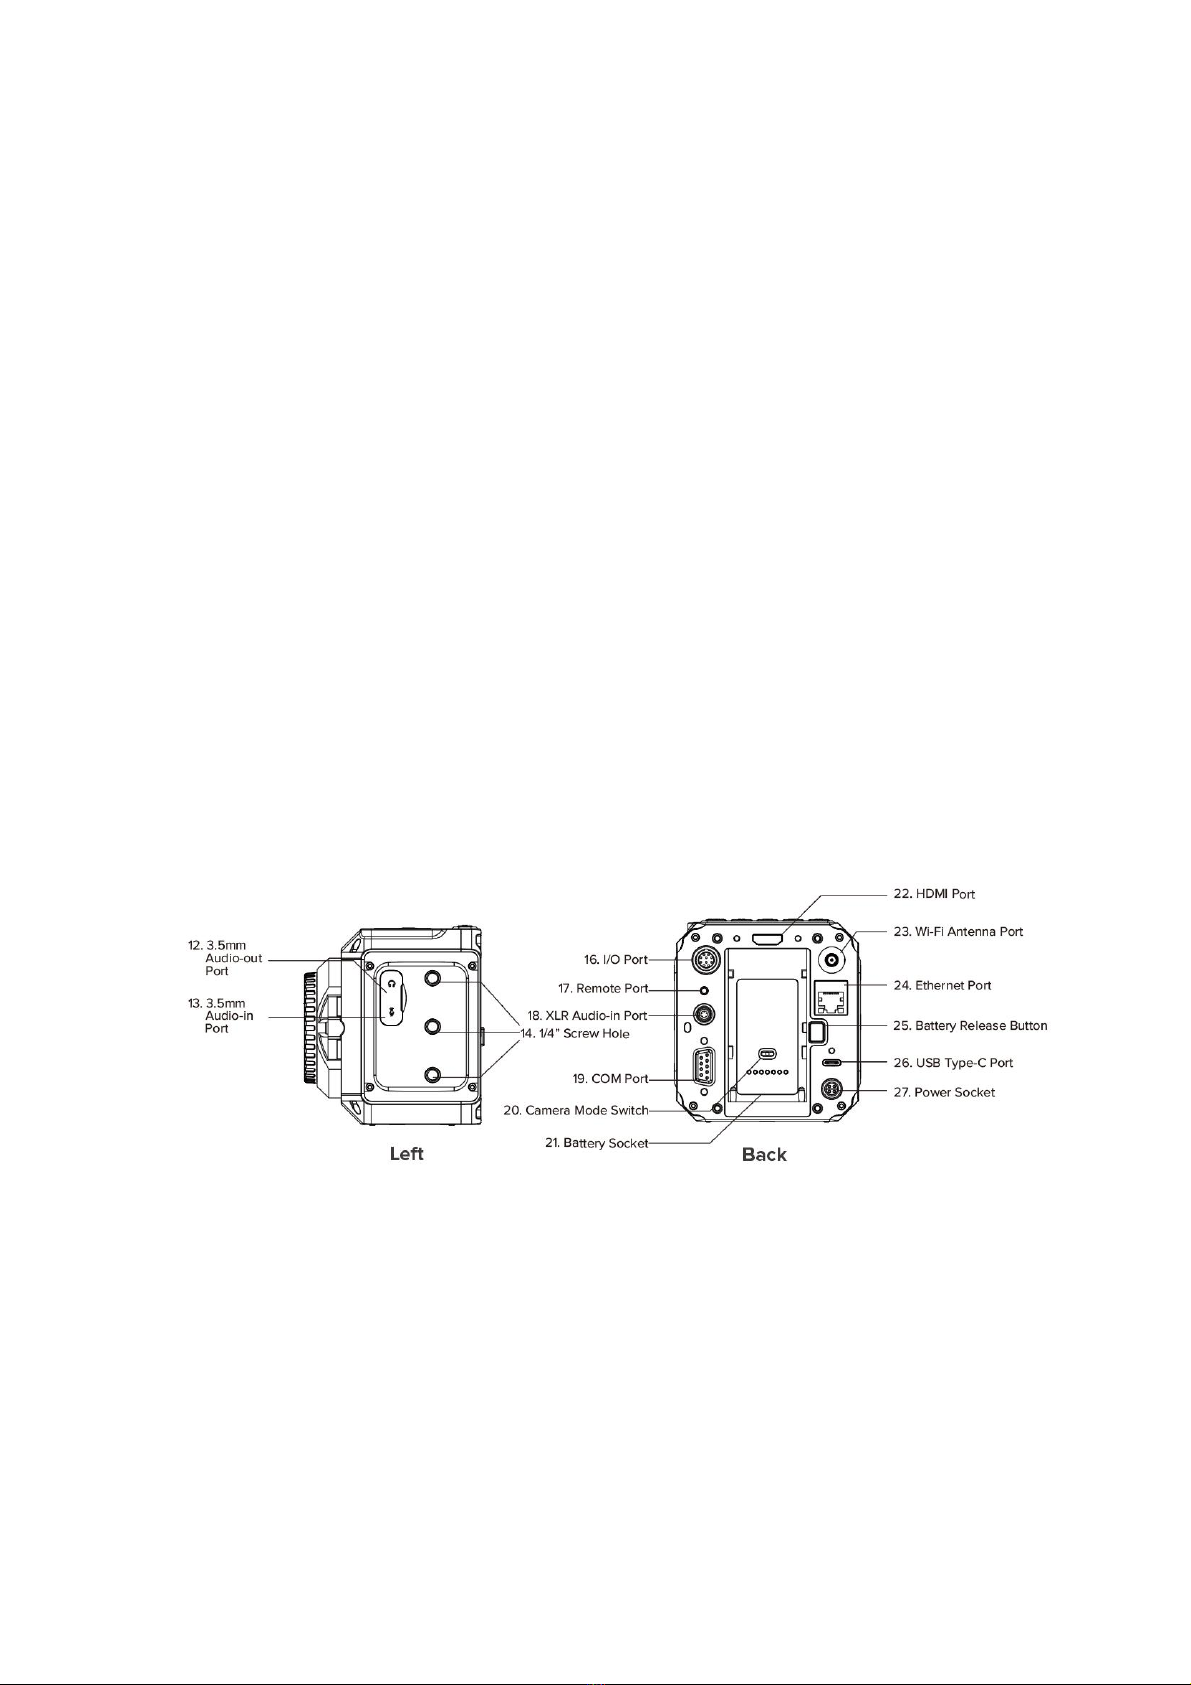
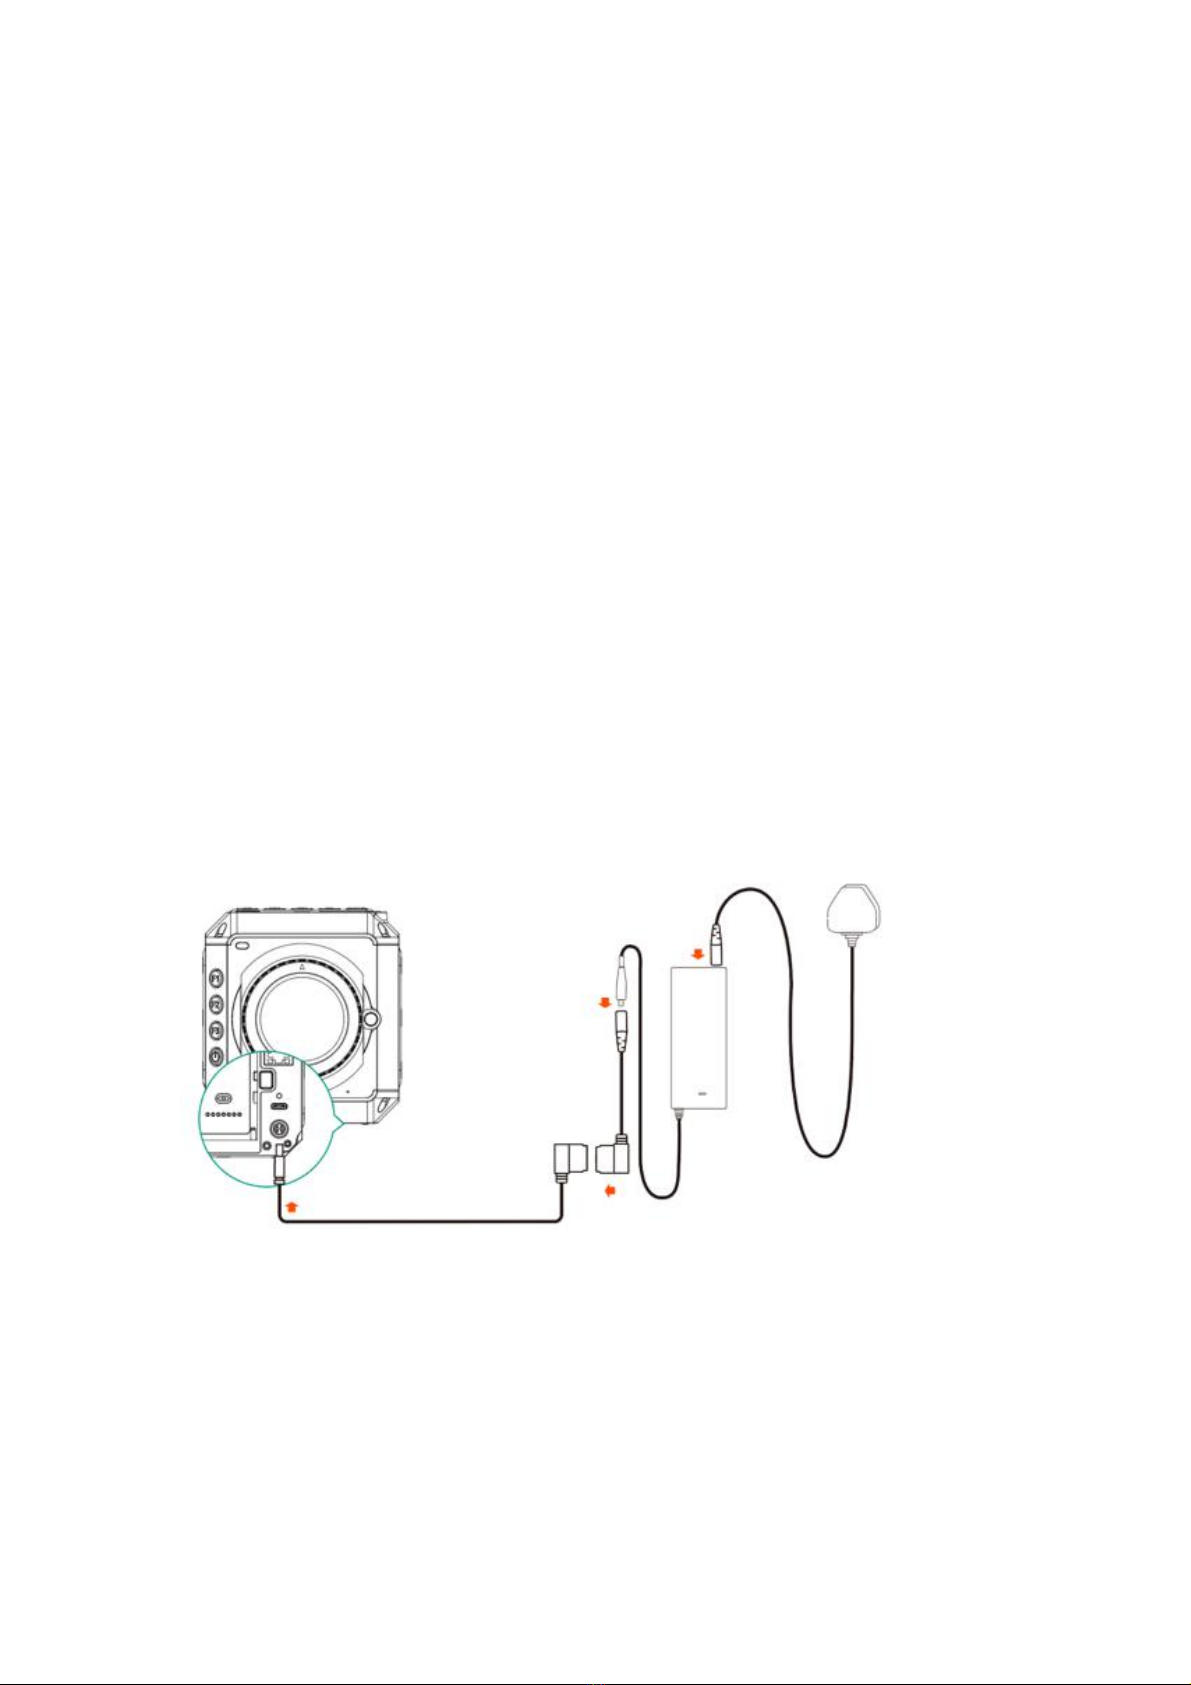
1.5. Interfaces
3.5mm Audio-out: 3.5mm (TRS) jack socket, stereo audio-out, can connect
headphone for audio monitoring
3.5mm Audio-in: 3.5mm (TRS) jack socket, support stereo microphone input (do not
support line-in), can connect external microphone
HDMI: HDMI 2.0 Type A port, video output up to C4K @60fps(10-bit 4:2:2).
Wi-Fi: 2.4GHz Wi-Fi antenna port, 802.11n supported.
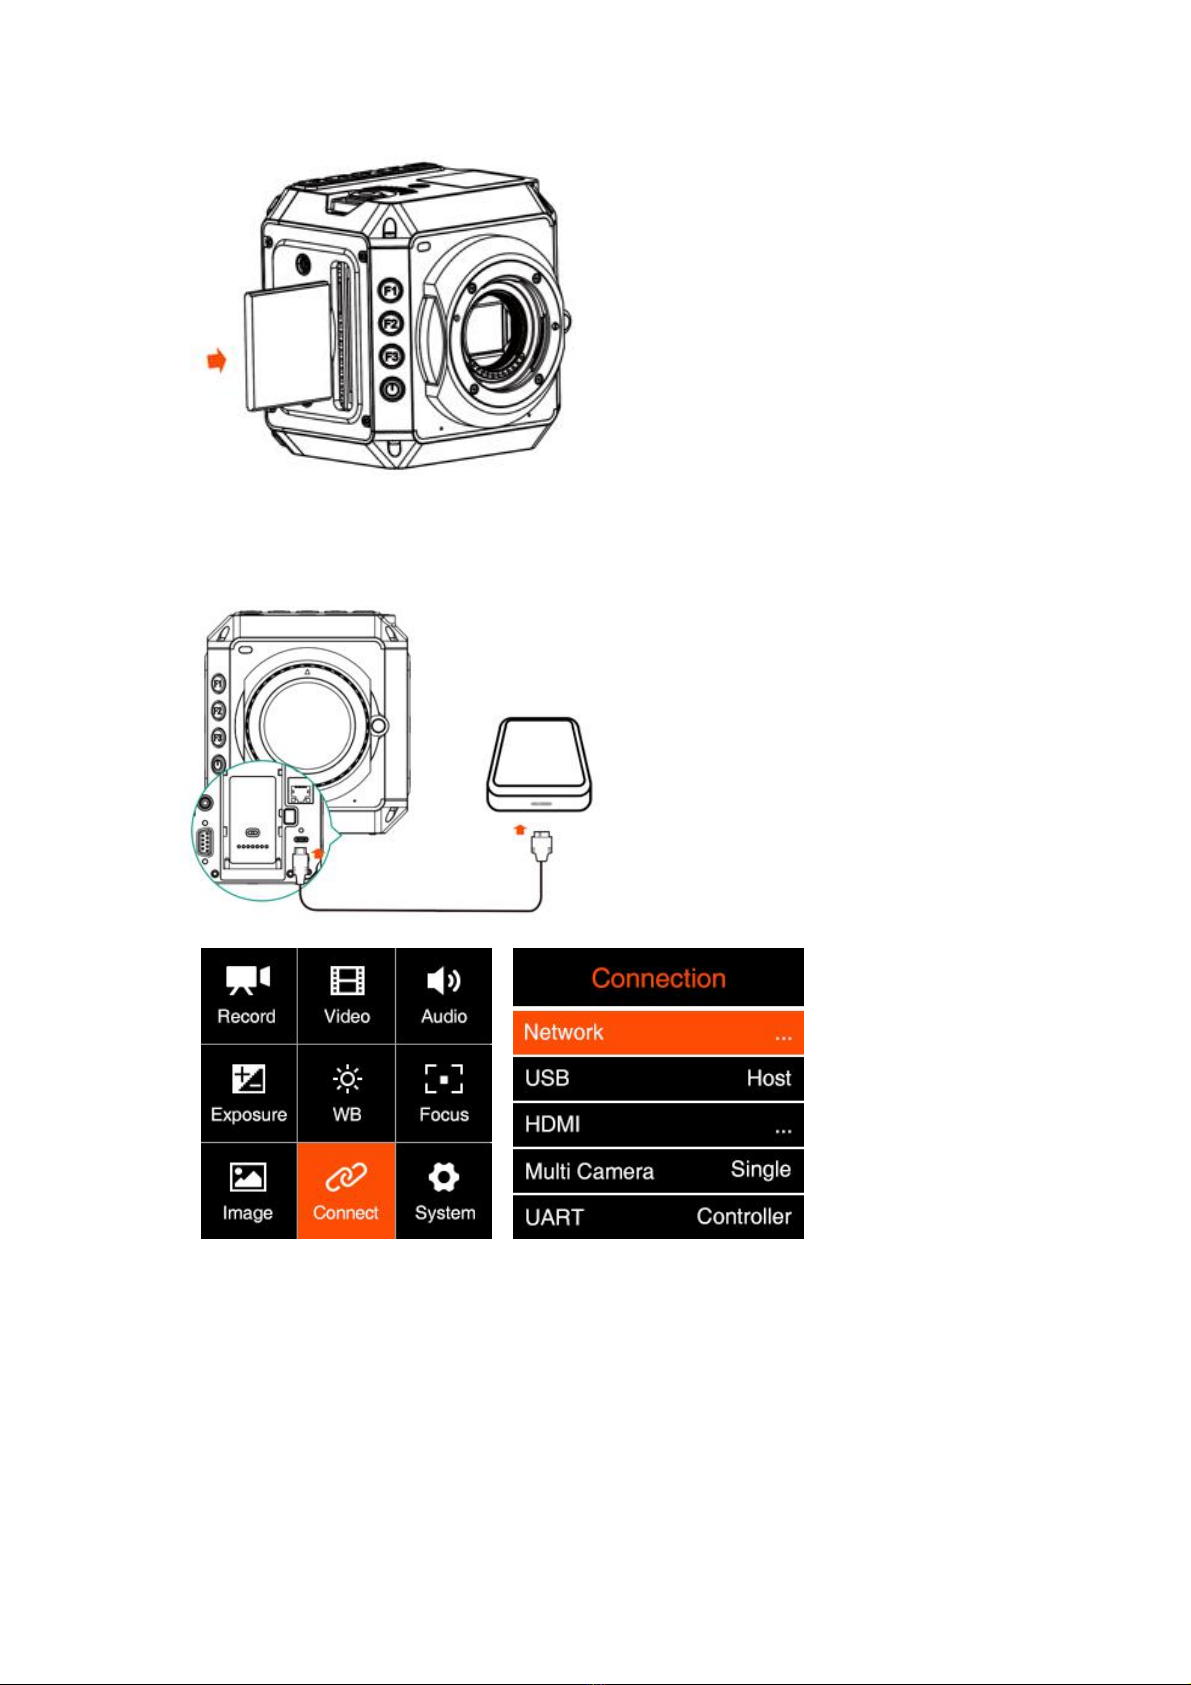
Ethernet: Gigabit Ethernet port for camera control, setting & live streaming (with Z
CAM software installed on PC).

USB: USB 3.0 Type C port for camera control and data transformation only.
Remote: 2.5mm jack socket, compatible with Sony LANC protocol.
XLR audio-in: 5-pin LEMO port for dual-channel XLR microphone, require additional
XLR audio connector (compatible with ARRI Mini XLR connector).
COM: DB-9 connector with RS232 protocol supported.
I/O: 10-pin LEMO port for multi-camera synchronization (with exclusive Z CAM E2
Sync Cable, not included).
Camera Mode Switch: The switch to set working mode of camera, of which M
(Master) and S(Slave) is for multi-camera synchronization (with exclusive Z CAM E2
Sync Cable, not included), and Ifor individual mode (default).
1.6. Power Options
External Power Source: The camera comes with a LEMO power cable (D-TAP plug
end), D-TAP/DC connector and AC/DC power adapter, which can use AC 100~240V
power source.
Camera Battery: The battery socket is compatible with SONY NP-F series batteries,
including NP-F970/770/550 etc. (Note 2)

External Battery: Connect the camera to a V mount battery (with D-TAP port) with the
LEMO power cable (D-TAP plug).
1.7. Storage
The camera uses CFast 2.0 card or SSD as storage.
CFast card: The camera has 1 x internal CFast card slot, which supports CFast 2.0
standard. Insert the CFast card with correct direction, push it to the end until it’s locked.
To take out the CFast card, push in the card and it will be unlocked, then take it out
from the slot.

SSD: Connect the SSD through USB-C port on back of camera as storage. (Note:
USB-C port must be in “Host” mode, see 2.9 Connect - USB)
Please not that the SSD will NOT be recognized if there is CFast card in the camera.
Attention: When using a CFast or SSD on Z CAM E2 for the first time, please format it
(2.10 System – Format Card).

2. Camera Settings
2.1. Quick Setting
When the camera is in Standby or Recording mode, some key settings can be quickly
accessed by pressing the buttons on the camera.
ISO: Press FN to set ISO, then press Up /Down to adjust the value, and OK to
confirm.
Shutter: Press UP to set shutter speed / angle (refer to 2.5 Exposure – Shutter
Operation about shutter speed / shutter angle), then press Up /Down to adjust
the value, and OK to confirm.
Aperture:Press F3 to set the aperture, then press Up / Down to adjust the value,
and OK to confirm.

EV: Press DOWN to set EV, then press Up /Down to adjust the value, and OK to
confirm.
AF: When focus is in AF mode (require to connect the autofocus lens), press OK
to do auto focus.

AEL (F1): Press F1 to lock the exposure, then press again to unlock
Load profile (F2): Load the configuration saved in the camera. (2.10 System User
Profile).

2.2. Record
Resolution
Resolution
Details
4K (Low Noise)
3840 x 2160 (16:9), with lower noise in shadow area in
this mode, but the jelly effect will be more obvious. So
it is suitable for static scenes shooting or less moving
scene. This option is only available when the frame
rate <=30fps and the Wide Dynamic Range is
disabled.
C4K (Low Noise)
4096 x 2160 (17:9), see above.
4K
3840 x 2160 (16:9), compare with low noise mode,
this option has the lower jelly effect. But the shadow
area noise will be more obvious in low light scene.
This resolution is suitable for all frame rates.
C4K
4096 x 2160 (17:9), see above.
C4K 2.4:1
4096 x 1728 (2.4:1), the VFR can be up to 150fps in
this resolution.
4K 2.4:1
3840 x 1620 (2.4:1),the VFR can be up to 160fps in
this resolution.
3696 x 2772(LN)
4:3 aspect ratio,with lower noise in shadow area in
this mode, but the jelly effect will be more obvious. So
it is suitable for static scenes shooting or less moving

scene. This option is only available when the frame
rate <=30fps and the Wide Dynamic Range is
disabled.
3696 x 2772
4:3 aspect ratio,can be used with anamorphic wide
screen lens.
3312 x 2760
6:5 aspect ratio,
Super 16
2704 x 1600, S16 mode,suitable for S16 cinema
camera lens,the VFR can be up to 160fps in this
resolution.
1920 x 1080
16:9,the VFR can be up to 240fps in this resolution.
Project FPS: Frame rate of the video project. It will be different when the resolution is
set to different values.
Resolution
Project FPS
C4K / 4K / C4K 2.4:1 / 4K 2.4:1
3696x2772 / 3312 x 2760 / Super 16 /
1920x1080
23.98 / 24 / 25 / 29.97 / 50 / 59.94
C4K(Low Noise)/ 4K (Low Noise)/
3696 x 2772(LN)
23.98 / 24 / 25 / 29.97
File format: MOV / MP4
Split duration: 1 / 5 / 10 / 15 / 20 / 30 / 60 min. The camera will split the video with
the length set here automatically.
Note:After the first section via camera automatically splitting, the out of sync problem
between audio and video will happen. You need to use “Z CAM™ Video
Concatenator” to merge the video section before the post editing and processing. The
download link as below:
http://www.z-cam.com/cn/software-update/
Time Code: Set the time code, there are sub-items as below:

Time Code Source: Internal / External
Time Code Value: Reset / Manual / Current
-Reset: Reset the time code value to 0.
-Manual Input: Set the time code value manually 00:00:00:00
(hour:minute:second:frame).
- Current Time: Set time according to the camera system setting time.
Count Up: Rec Run / Free Run.
-Rec Run: Counts the time code only when recording video.
-Free Run: Counts the time code even when not recording video (including
when the camera is power off)
Time Code Mode: DF / NDF.
-DF: The camera modifies the difference between recorded time and time
code. Seconds and frames are separated by “.”. (Example: 00:00:00.00)
-NDF: Records the time code without drop frame. Seconds and frames
are separated by “:”. (Example: 00:00:00:00)
HDMI Display: On / Off. To enable / disable the display of time code through
HDMI output.
Playback FR: Default / VFR. When it’s set to Default, the frame rate of playback will
be the same as set in Project FPS, when it’s set VFR, the frame rate of playback will
be the same as set in Variable Frame Rate (2.3 Video – Variable Frame Rate)
For example: Set “Record”-“Project FPS” to 29.97, and “Video”-“Variable Frame
Rate” to 120. If the "playback FR" is set to “Default”, the playback frame rate of the
video is 29.97fps (4-fold slow motion). If the "playback frame rate" is set to ‘’Variable
Frame Rate’’, the playback frame rate of the video is 120fps (normal speed).
Meta Setup: Set the camera metadata, include “Camera ID” and “Reel Name”.
Camera ID:A ~ Z
Reel Name:001 ~ 999
Pre Roll: On / Off. After seting “Pre Roll” to “ON”, there will show a red flashing circle
on the standby interface (as below), and when the Record button is pressed, the
camera will save the footage 5 seconds before the recording automatically.

2.3. Video
Variable Frame Rate (VFR): With VFR you can set a different frame rate for
capturing based on the Project FPS for recording, in this way you can get a
slow-motion or fast-motion footage.
VFR options are related to the Resolution and Project FPS in Record setting,and
whether to enable Wide Dynamic Range (WDR).
Here list the maximum VFR under each setting combination as below:
WDR Off
Project FPS
Resolution
23.98
24
25
29.97
50
59.97
C4K (Low Noise)
30
30
30
30
N/A
N/A
4K (Low Noise)
30
30
30
30
N/A
N/A

WDR On
Resolution /
Project PFS
23.98
24
25
29.97
50
59.97
C4K (Low Noise)
N/A
N/A
N/A
N/A
N/A
N/A
4K (Low Noise)
N/A
N/A
N/A
N/A
N/A
N/A
C4K
60
60
60
60
60
60
4K
60
60
60
60
60
60
C4K 2.4:1
N/A
N/A
N/A
N/A
N/A
N/A
4K 2.4:1
N/A
N/A
N/A
N/A
N/A
N/A
3696 x 2772 (Low
Noise)
N/A
N/A
N/A
N/A
N/A
N/A
3696 x 2772
48
48
48
48
N/A
N/A
C4K
120
120
120
120
120
120
4K
120
120
120
120
120
120
C4K 2.4:1
150
150
150
150
150
150
4K 2.4:1
160
160
160
160
160
160
3696 x 2772 (Low
Noise)
N/A
N/A
N/A
N/A
N/A
N/A
3696 x 2772
60
60
50
60
50
60
3312 x 2760
60
60
50
60
50
60
Super 16
160
160
160
160
160
160
1920 x 1080
240
240
240
240
240
240

3312 x 2760
48
48
48
48
N/A
N/A
Super 16
N/A
N/A
N/A
N/A
N/A
N/A
1920 x 1080
60
60
60
60
60
60
Note: When WDR is enabled,the resolutions as below will be disabled
C4K (Low Noise) / 4K (Low Noise) / C4K 2.4:1 / 4K 2.4:1 / 3696 x 2772 (Low Noise) /
Super 16 resolution
For more detail, please check 9. Appendix 1: Variable Frame Rate Detail
Encoder: H.264 / H.265 / ProRes 422 Proxy / ProRes 422 LT / ProRes 422 / ProRes
422 HQ / ZRAW
The corresponding color bit depth and color sampling of each encoding format are as
follows:
Encoder
H.264
H.265
ProRes
ZRAW
Color Bit Depth
8bit
10bit
10bit
12bit & 14bit
Color Sampling
4:2:0
4:2:0
4:2:2
N/A
Options of video encoder depends on the setting of resolution and frame rates (take
VFR if it’s different from the Project FPS). The resolutions and max frame rates
(including VFR) combinations supported by each encoding format are as follows:
Encoder
Resolution
& Max Frame
Rate
H.264
H.265
ProRes
422
Proxy
ProRes
422 LT
ProRes
422
ProRes
422 HQ
ZRAW
C4K
(Low Noise)
30
30
30
30
30
30
30
4K
(Low Noise)
30
30
30
30
30
30
30
C4K
60
120
75
60
60
30
30
4K
60
120
75
75
60
50
30
C4K 2.4:1
60
150
75
60
60
50
30

4K 2.4:1
60
160
75
75
60
60
30
3696 x 2772
(Low Noise)
30
30
30
30
30
30
30
3696 x 2772
60
60
60
60
50
30
24
3312 x 2760
60
60
60
60
60
30
25
Super 16
60
160
75
75
75
75
50
1920 x 1080
120
240
120
120
120
120
N/A
Bitrate: High / Middle / Low. Value of the bitrate varies in different resolution and
frame rate.
Resolution
Frame Rate (FR)
Range (fps)*
Bitrate (Mbps)
High
Medium
Low
C4K (Low Noise) /
4K (Low Noise) /
C4K / 4K /
C4K 2.4:1 /
4K 2.4:1 /
3696 x 2772 (Low Noise) /
3696 x 2772 /
3312 x 2760 /
Super 16
FR <= 30
200
130
60
30 < FR <= 60
230
150
100
60 < FR
300
200
160
1920 x 1080
FR <= 30
30
20
10
30 < FR <= 60
60
30
15
60 < FR
200
130
60
* If VFR is activated, the frame rate here refers to the frame rate in VFR, otherwise it
refers to the frame rate in Project FR.

** This setting is disabled when the encoding format is set to ProRes or ZRAW.
- For ProRes, the recorded video bit rate refers to the standard defined in the Apple
ProRes white paper.
-For ZRAW, the bit rate is fixed to 1.2Gbps.
Proxy File: On / Off. To enable or disable proxy file recording during video recording,
please note that it will not be available when the Bit Rate in Video is set to “High”
(2.3 Video)
Note: the proxy file can not be recorded when the following encoding format,
resolution, and code rate are set:
- H.265,Bitrate set as “High”
- ProRes 422 HQ, 4K (3840 x 2160) resolution,FR >= 48fps
- ProRes 422, C4K (4096 x 2160) resolution,FR >= 60fps
- No proxy recording is allowed when ZRAW is selected. Use iOS device or HDMI
to record proxy file instead.
Rotation: Normal / Upside Down. Rotate the image by 180 degrees.
Note: This setting is available only when the frame rate of recording is under 30fps
(include 30fps). The display on the LCD and the video output from HDMI will not be
rotated during preview and recording in current firmware, and only the video recorded
in the storage will be rotated when it’s set to “Upside Down”.
WDR (Wide Dynamic Rage):Off / on (only available when camera is in Z-Log2 mode
and not use ZRAW encoder). When WDR is enabled, the dynamic range will be
extended from13 stops of Z-Log2 to 16 stops, with 1.5 stops increased for highlight
and shadow part each.
Turn on or off the wide dynamic range mode and the camera will restart automatically.
Turning on the "wide dynamic range" mode limits the optional resolution and
maximum variable frame rate for video recording, see details in the above "variable
frame rate" section.
Timelapse: Off / Manual, when it’s Off, the camera is in normal record mode. When it
is set to a specific value, the camera is in time lapse video mode.
Other manuals for E2
4
Table of contents