Zipp ZZMX8 User manual

MANUALE D’USO USER MANUAL
MIXER AUDIO AUDIO MIXER
ZZMX8L
ZZMX10L
ZZMX8L
BOTTOM VIEWTOP VIEW
REAR VIEW FRONT VIEW
ZZMX8L

2
Grazie per avere acquistato un pro-
dotto ZZIPP.
Leggere attentamente quanto ripor-
tato in questo manuale
per comprendere il funzionamento
dell’apparecchio e utilizzarlo nel
migliore dei modi.
Conservare in luogo sicuro queste
istruzioni in modo da poterle riutiliz-
zare all’occorrenza.
Thanks for purchasing this ZZIPP
product, please read this instruction
carefully to understand how to ope-
rate the product correctly. Please
store this instruction in a safe place
after reading as a reference in the
future.
Per ridurre il rischio di shock elettri-
ci non rimuovere coperchio e laterali.
Per le riparazioni rivolgersi sempre a
personale qualificato.
Per ridurre il rischio di incendio e
shock elettrici non esporre l’appa-
recchio a umidità e a contatto diretto
con liquidi.
To reduce the risk of electric shock,
do not remove the cover or the side.
Always contact qualified personnel
for repairs.
To reduce the risk of fire and electric
shock, do not expose the appliance
to moisture and direct contact with
liquids.
ISTRUZIONI SULLA SICUREZZA SAFETY INSTRUCTIONS

3
CARATTERISTICHE DEL SISTEMA
•DSP integrato a 16 bit.
•Connettività Bluetooth.
•Lettore mp3 integrato con USB.
•Possibilità di registrare e riprodurre
file audio da PC/MAC tramite con-
nessione USB.
•8 ingressi per ZZMX8L
•10 ingressi per ZZMX10L
•1 ingresso stereo line.
•Equalizzatore a 3 bande su ogni
canale.
•Indicatore di livello master.
•Alimentazione phantom +48V.
•AUX su ogni canale
•Robusto case in metallo.
•Alimentatore multivoltaggio
FEATURES
•Integrated 16-bit DSP.
•Bluetooth connectivity.
•integrated MP3 player with USB.
•Possibility to record and play audio
files from PC / MAC via
USB connection.
•ZZMX8L 8 inputs
•ZZMX10L 10 inputs
•1 stereo line input.
•3-band equalizer on each channel.
•Master level indicator.
•+ 48V phantom power supply.
•AUX on each channel.
•Sturdy metal case.
•Multivoltage power supply
ZZMX8L ZZMX10L
ZZMX8L
BOTTOM VIEWTOP VIEW
REAR VIEW
FRONT VIEW
ZZMX8L
ZZMX8L
BOTTOM VIEW
TOP VIEW
REAR VIEW FRONT VIEW
ZZMX8L
ZZMX10L
BOTTOM VIEW
TOP VIEW
REAR VIEW
FRONT VIEW
ZZMX10L

4
DIAGRAMMA CONNESSIONI CONNECTION DIAGRAM

5
INGRESSI INPUTS
1. [MIC] Ingresso microfonico, connettere
microfoni con cavo bilanciato XLR.
2. [LINE] Ingresso LINE, connettere strumenti
musicali o sorgenti di linea con connettore Jack
Sbilanciato 6.3mm.
3. [STEREO] Ingresso LINE Stereo, connettere
sorgenti line stereo (ad esempio tastiere) con
connettore Jack sbilanciato. Se si connette
solamente LINE L (MONO) il mixer invierà
all’uscita del canale destro e del canale sinistro
lo stesso segnale.
4. [STEREO] Ingresso stereo RCA, permette
di connettere sorgenti di playback ad esempio
lettori CD o multimediali.
5. [REC] Uscita di registrazione, uscita stereo
RCA per la connessione di un registratore audio.
6. [STEREO IN] Ingresso stereo minijack,
ingresso ausiliario su connettore Jack 3.5mm,
permette la connessione di sorgenti LINE per
esempio smartphone o tablet dotati di uscita
cuffia.
1. [MIC] Input, use this socket to connect a
microphone’s BALANCED XLR PLUG.
2. [LINE] Input, connect a musical instrument
or audio device (i.e. CD player) to the device. The
socket supports UNBALANCED 1/4” PLUG.
3. [STEREO] Input, connect a LINE level device
(i.e. electric keyboard) via 1/4” plugs, if only L
(MONO) jack is connected, the mixer will send
out the same mono signal to L and R outputs.
4. [STEREO] Input, these stereo RCA input jacks,
allow the connection of play-back devices such
as CD players, Etc.
5. [REC] Output, use this stereo RCA output
jack to connect, for example, a tape deck for
recording applications.
6. [STEREO IN] 1/8” jack, this auxiliary stereo
input, provides flexible connectivity for a variety
of external audio devices.
1
2
3
5
4
6

6
USCITE OUTPUTS
7. [AUX] Uscita ausiliaria, è la somma dei
singoli segnali inviati da ogni ingresso e regolati
dal controllo AUX. Se il controllo AUX è a zero
(potenziometro completamente girato a sinistra)
all’uscita non verrà prelevato nessun segnale.
8. [RETURN] Ritorno, tipicamente questo
ingresso è utilizzato per ricevere il segnale di
ritorno di effetti esterni (Outboard).
9. [CONTROL ROOM] Uscita di control room,
utilizzata per connettere dei monitor per
controllare l’audio.
10. [GROUP OUT 1/2] Uscita gruppo, replica
l’uscita master con un proprio volume
indipendente. Può essere utilizzata per
connettere un secondo sistema di amplificazione
PA o per gestire una diffusione multiroom con
volumi diversi.
11. [MAIN] Uscita Master, uscita principale del
mixer a cui collegare il sistema di amplificazione
PA primario.
7. [AUX] Output, it is the sum of signals sent
from each channel. If a particular channel’s
control knob is full turned down, that channel
will not feed the AUX output signal.
8. [RETURN] Jack, typically used to receive the
signal returned from an external effect device.
9. [CONTROL ROOM] Output, connect audio
devices in the monitoring room to monitor the
sound.
10. [GROUP OUT 1/2] Group output, replicates
the master output with its own independent
volume. It can be used to connect a second PA
system or manage a multi-room broadcast with
different volumes.
11. [MAIN] Output, connect the active speaker
or amplifier.
8
7
9 1110

7
CANALE DI
INGRESSO
CHANNEL
STRIP
12.[GAIN] Guadagno, determina il volume
del segnale di ingresso. Quando il segnale in
ingresso è troppo alto il led PEAK lampeggia.
13.[HIGH] Regolazione toni alti, enfatizza o
attenua di 15dB le frequenze alte (12KHz).
14.[MID] Regolazione toni medi, enfatizza o
attenua di 15dB le frequenze medie (2.5KHz).
15.[LOW] Regolazione toni bassi, enfatizza o
attenua di 15dB le frequenze basse (80Hz).
16.[AUX] Regola il livello dell’uscita AUX.
17.[FX] Regola il volume del multieffetto
integrato sul singolo canale.
18.[PAN] Regola la posizione del segnale
all’interno del panorama stereo.
19.[CHANNEL] Fader, regola il livello del
segnale presente sul singolo canale.
20.[LEVEL] Controller, regola il livello del
segnale presente sul singolo canale.
21.[PEAK] Quando il livello di un segnale in
ingresso è troppo alto il led lampeggia, ruotare
il controllo di GAIN in senso antiorario per
abbassare il guadagno.
22.[LOW CUT] Attiva il taglio delle frequenze
sotto ai 100Hz sul singolo ingresso.
23.[PFL] Attiva il bus PFL (pre fader level),
permette di sentire il segnale di un canale senza
interessare l’uscita principale.
12.[GAIN] Controller, determines the basic
volume of each channel, adjust them for the
maximum volume performance, when the
volume gets too loud, the [PEAK] LED indicator
light will keep flashing.
13.[HIGH] Treble tone, adjust the controller to
enhance or attenuate for 15dB at 12KHz.
14.[MID] Mid tone, adjust the controller to
enhance or attenuate for 15dB at 2.5KHz.
15.[LOW] Bass tone, adjust the controller to
enhance or attenuate for 15dB at 80Hz.
16.[AUX] Adjust the output to AUX signal level.
17.[FX] Adjust the effects volume for the
corresponding channel.
18.[PAN] Panorama control, determines the
position of channel signal within the stereo image.
19.[CHANNEL] Fader, adjusts the level of the
channel signal.
20.[LEVEL] Controller, adjust the level of the
channel signal.
21.[PEAK] When the volume of input signal
is too high, the LED indicator light will keep
flashing, please rotate the [GAIN] controller
counterclockwise to turn down the volume.
22.[LOW CUT] Button, press it down to cut down
the frequency under 100Hz.
23.[PFL] Button, use to route the channel signal
to the PFL bus (Pre-fader Listen). This enables
you to listen to a channel signal without affecting
the main output signal.
21
12
23
19
20
22
13
14
15
16
17
18

8
26
29 30 31 32 35 36
37
33
34
27 25 28
24
38
39
24.[CH 7/8 - USB] Selector switch, when it is up,
the input signal is from “stereo channel”, press
down, the input signal is from USB.
25.[+48V PHANTOM POWER] When the button
is turned on, the LED light is on, provide DC
+48V phantom power to XLR plug on MIC mono
input. Please turn on this button when using the
condenser microphone which is powered by a
phantom power.
26.[PARAMETER] Used to adjust the depth of
the selected effect, speed, ect.
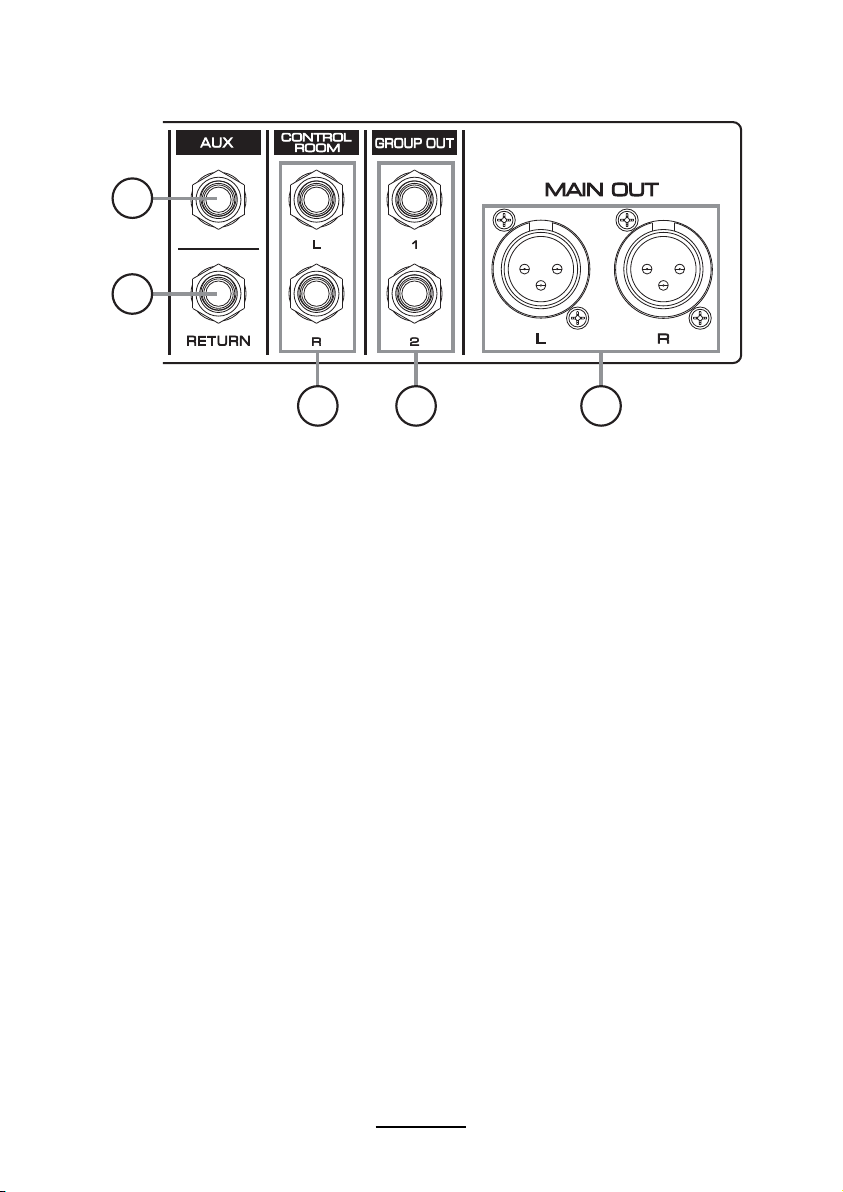
27.[AUX] Adjust the output to AUX out signal level.
28.[RETURN] Adjust the return level.
29.[FX] Control the effect input signal level.
30.[GROUP 1-2] Fader, control the signal output
volume of GROUP OUT.
31.[MAIN] Fader, adjust the overall volume from
[MAIN OUT] output signal.
32.[LEVEL] Indicators, show the signal level
from [MAIN] out. Adjust to lower the level if
[PEAK] indicator light up in RED.
33.[POWER] Indicates that the mixer is on.
34.[PFL] Indicates that the PF is active.
35.[PHONES/CTRL ROOM] Adjust the volume of
earphones or CONTROL ROOM output.
36.[PHONES] headphone jack.
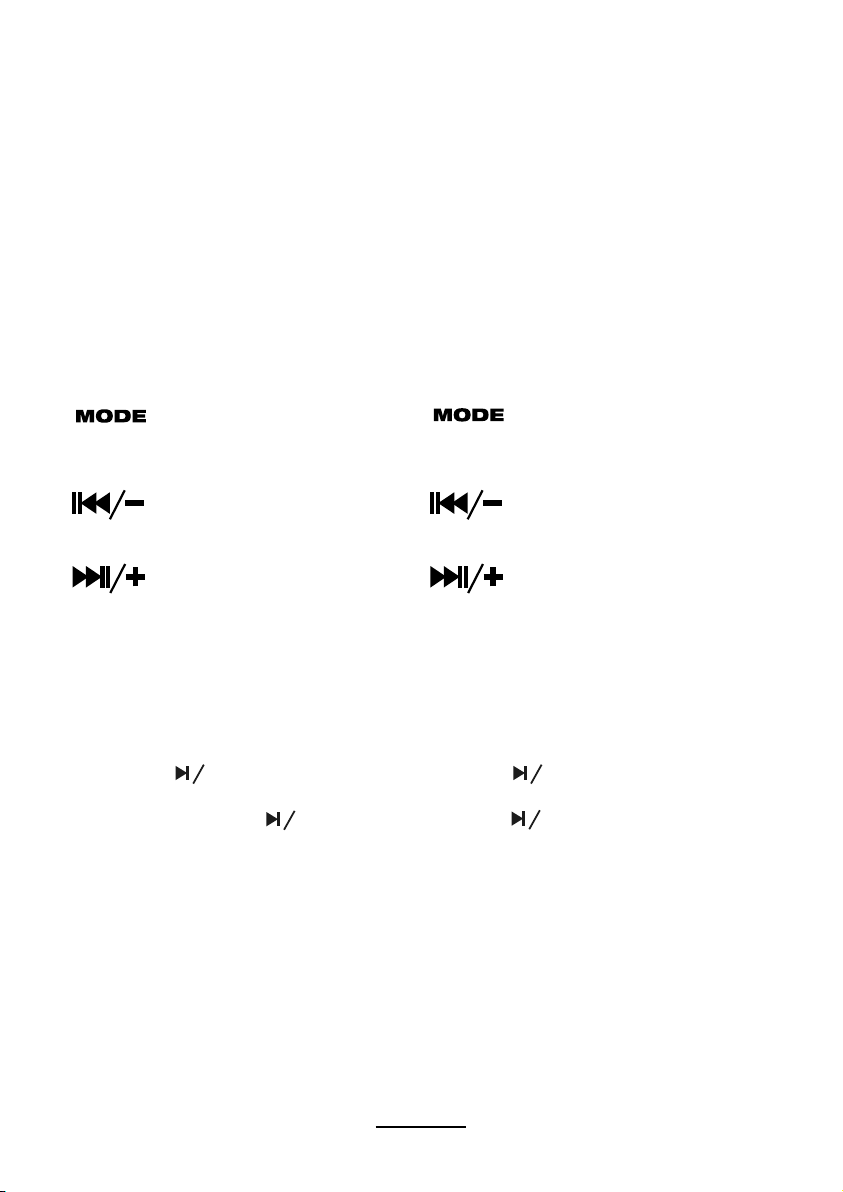
37.[DSP SELECT] Buttons, press UP or DOWN
button to select from 16 DSP (Hall, Room,
Reverb. ect, see the effect list below).
38.[USB] Port, use for MP3 input or computer
connection (can be used for U-Disk or computer
software play and record).
24.[CH 7/8 - USB] Selettore di sorgente:
Rilasciato attiva il canale stereo, premuto attiva il
segnale della sorgente USB.
25.[+48V PHANTOM POWER] Alimentazione
phantom per microfoni a condensatore,
quando è premuto fornisce i +48V necessari al
funzionamento di alcuni microfoni.
26.[PARAMETER] Modifica i paramentri degli
effetti, ad esempio velocità, durata, ecc...
27.[AUX] Regola il livello dell’uscita AUX.
28.[RETURN] Regola il livello del ritorno effetto.
29.[FX] Regola il livello dell’effetto DSP.
30.[GROUP 1-2] Regola il livello dell’uscita
stereo GROUP.
31.[MAIN] Regola il livello dell’uscita stereo
MASTER.
32.[LEVEL] Indicatore di livello permette
di visualizzare il livello di uscita. (quando si
accendono i led rossi il segnale è troppo alto,
abbassare il volume)
33.[POWER] Indica che il mixer è acceso.
34.[PFL] Indica che il PFL è attivo.
35.[PHONES/CTRL ROOM] Regola il volume
delle cuffie e dell’uscita CONTROL ROOM)
36.[PHONES] Connettore per le cuffie.
37.[DSP SELECT] Pulsanti di selezione effetti,
permettono di selezionare uno tra i 16 effetti del
DSP interno (Di seguito la lista degli effetti).
38.[USB] Porta USB per la connessione sorgente
USB o per il collegamento di un computer
esterno.

9
FUNZIONAMENTO LETTORE MP3
COLLEGAMENTO BLUETOOTH
1. Premere il tasto MODE per selezionare la
funzionalità bluetooth. Il display mostra
“BT”, e l’icona bluetooth del display lam-
peggia.
2. Sul dispositivo destinato alla trasmissio-
ne cercare tra i dispositivi bluetooth da
accoppiare DM-08 o DM-10 e selezionarlo.
Quando l’accoppiamento dei dispositivi
è avvenuto sul display “BT” smette di
lampeggiare.
FUNZIONI DEI TASTI
Permette di selezionare la modalità
di funzionamento tra USB, REC
(registrazione) e BT (Bluetooth).
Con la pressione rapida, passa al
brano precedente. Con una pressio-
ne prolungata, riduce il volume.
Con la pressione rapida, passa al
brano successivo. Con una pressio-
ne prolungata aumenta il volume.
MODALITA’ REGISTRAZIONE
• Inserire un USB pendrive
• Premere MODE fino a visualizzare RECsul
display del lettore multimediale
• Premere per qualche secondo
per avviare la registrazione
• Premere nuovamente
per mettere in pausa la registrazione.
• Premere MODE per uscire dal menù
registratore.
MP3 PLAYER OPERATION
BLUETOOTH CONNECTION
1. Press the MODE button to select the
Bluetooth function. The display shows
“BT”, and the bluetooth icon on the display
flashes.
2. On the device intended for transmission,
search for the DM-08 or DM-10 bluetooth
devices to be paired and select it. When
the pairing of the devices has occurred a
sound signal will be heard.
KEY FUNCTIONS
Select the operating mode between
USB, REC (recording) and BT (Blue-
tooth).
With quick pressure, go to the
previous song. With a long press, it
reduces the volume.
With quick pressure, go to the next
song. With a long press the volume
increases.
RECORDER MODE
• Insert a USB pendrive
• Press MODE until REC appears on the
media player display
• Press for a few seconds to
start recording
• Press again to pause recording
• Press MODE to exit the recorder menu.
REC REC
REC
REC

10
COLLEGAMENTO AL PC
Connettere il mixer al computer tramite un cavo
USB (TIPO A-> TIPO A)
Il mixer entrerà automaticamente in modalità
scheda audio.
Alla prima connessione con il compute, il PC
installerà automaticamente i driver. Attendere
che il computer termini l’installazione prima di
utilizzare il mixer.
• Collegare il mixer tramite cavo
USB tipo A - USB tipo A al computer
• Sul display appare la scritta PC
• Premendo l’apposito tasto attivare USB
nell’ultimo canale stereo.
In questo modo si può riprodurre attraverso il
mixer un file audio presente nel computer.
Per registrare l’uscita master del mixer sul
computer selezionare il mixer nelle impostazio-
ni di registrazione del software per registrare.
CONNECTION TO THE PC
Connect the mixer to the computer via a USB
cable (TYPE A-> TYPE A)
The mixer will automatically enter sound card
mode.
At the first connection with the computer, the
PC will automatically install the drivers. Wait for
the computer to complete the installation before
using the mixer.
• Connect the mixer via
USB type A - USB type A cable to computer
• The display shows PC
• Press the USB switch to activate USB in
the last stereo channel.
This allows you to play back an audio file on
your computer through the mixer.
To record the master output of the mixer to the
computer, select the mixer in the recording
settings of the recording software.
TABELLA EFFETTI LIST OF EFFECTS
.
.
.
.
.
.
.
.
.
.
.
.
.
.
.
.

11
SPECIFICHE GENERAL SPECIFICATIONS
ZZMX8L ZZMX10L
RISPOSTA IN FREQ
FREQ. RESPONCE 20Hz - 20KHz +/- 1dB
DISTORSIONE ARMONICA TOTALE
TOTAL HARMONIC DISTORTION <0.5% @ +4dBu (22Hz - 22KHz)
INGRESSI
INPUTS
Mic 4 (XLR) 6 (XLR)
Line 2 (JACK 6.3mm) 4 (JACK 6.3mm)
Stereo 3 (JACK 6.3mm; RCA) 3 (JACK 6.3mm; RCA)
Mp3 1 1
USB Sound Card 2.0 Type A 2.0 Type A
Bluetooth 1 1
USCITE
OUTPUT
REC/RCA 1 (L-R) 1 (L-R)
CONTROL ROOM L-R (JACK 6.3mm) L-R (JACK 6.3mm)
GROUP 1-2 (JACK 6.3mm) 1-2 (JACK 6.3mm)
PHONES 1 (JACK 6.3mm) 1 (JACK 6.3mm)
MAIN OUT L-R (XLR) L-R (XLR)
AUSILIARIE
AUXILIARY
STEREO IN 1 (JACK 3.5mm) 1 (JACK 3.5mm)
AUX OUT 1 (JACK 6.3mm) 1 (JACK 6.3mm)
RETURN 1 (JACK 6.3mm) 1 (JACK 6.3mm)
FUNZIONI CANALI
INPUT CH. FUNCTION
PFL/LOW CUT PFL, LOW CUT
EQ 3 BAND
HI +/-15 dB @ 12KHz
MID +/-15 dB @ 2.5KHz
BASS +/-15 dB @ 80Hz
PEAK LED
LEVEL METER 2 x 5 LED
EFFETTI
EFFECTS 16 (Reverb + Delay)
PHANTOM POWER +48V DC
CONSUMO
POWER COMSUMPTION 23W 25W
DIMENSIONI
DIMENSIONS 355 x 210 x 40mm 435 x 210 x 40mm
PESO
WEIGHT 2.6Kg 3.2Kg

The declaration of conformity in the form
complete can be found at the company:
Zzipp Group S.p.a.
or available online at the site:
zzippgroup.com
Consult the competent authorities for informa-
tion on authorizations or possible restrictions
before using the device.
Zzipp Group S.p.a.
Via Caldevigo 23/d, 35042 Este (PD)
Tel. +39 0429 617888
zzippgroup.com
La dichiarazione di conformità in forma com-
pleta è reperibile presso la società:
Zzipp Group S.p.a.
o disponibile on line al sito:
zzippgroup.com
Consultare le autorità competenti per infor-
mazioni su autorizzazioni o possibili restrizioni
prima di usare il dispositivo.
This manual suits for next models
1
Table of contents